|
|
|
Porsche, and the Porsche crest are registered trademarks of Dr. Ing. h.c. F. Porsche AG.
This site is not affiliated with Porsche in any way. Its only purpose is to provide an online forum for car enthusiasts. All other trademarks are property of their respective owners. |
|
|

  |

| bkrantz |
 Dec 11 2021, 09:15 PM Dec 11 2021, 09:15 PM
Post
#4281
|
|
914 Guru  Group: Members Posts: 8,347 Joined: 3-August 19 From: SW Colorado Member No.: 23,343 Region Association: Rocky Mountains |
Mounted on the left throttle body.
Attached thumbnail(s) 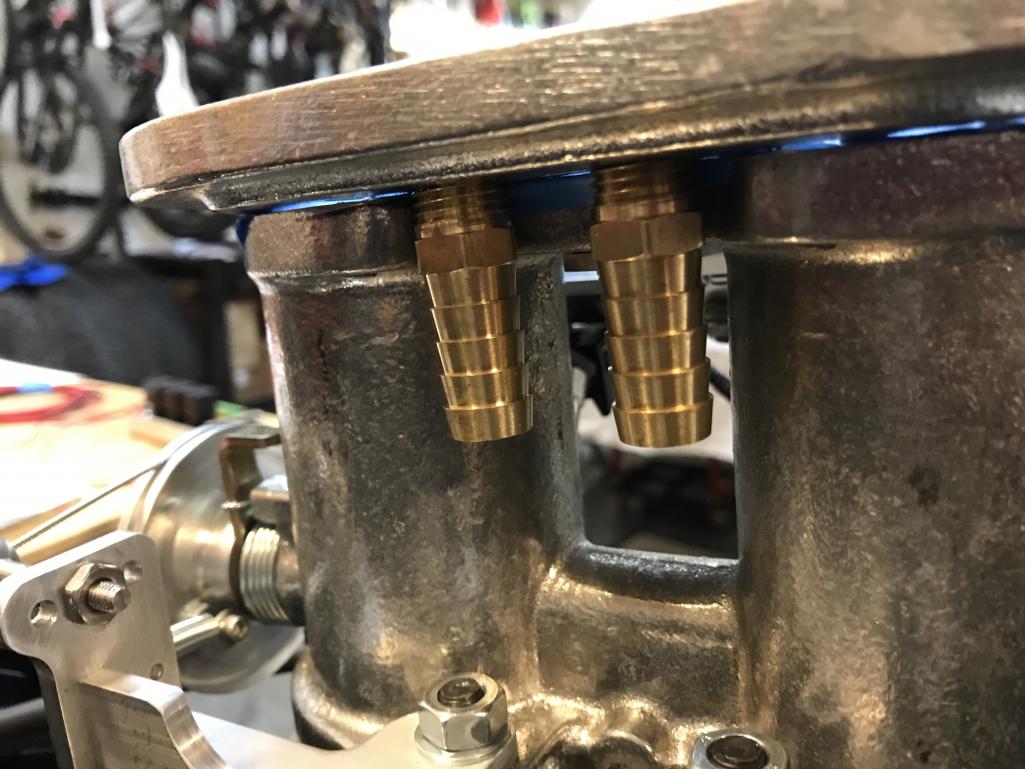
|
   |

 
|
| bkrantz |
Dec 11 2021, 09:16 PM
Post
#4282
|
|
914 Guru Group: Members Posts: 8,347 Joined: 3-August 19 From: SW Colorado Member No.: 23,343 Region Association: Rocky Mountains |
Vacuum/vent line from the cylinder heads via the anti-flashback valve.
Attached thumbnail(s) 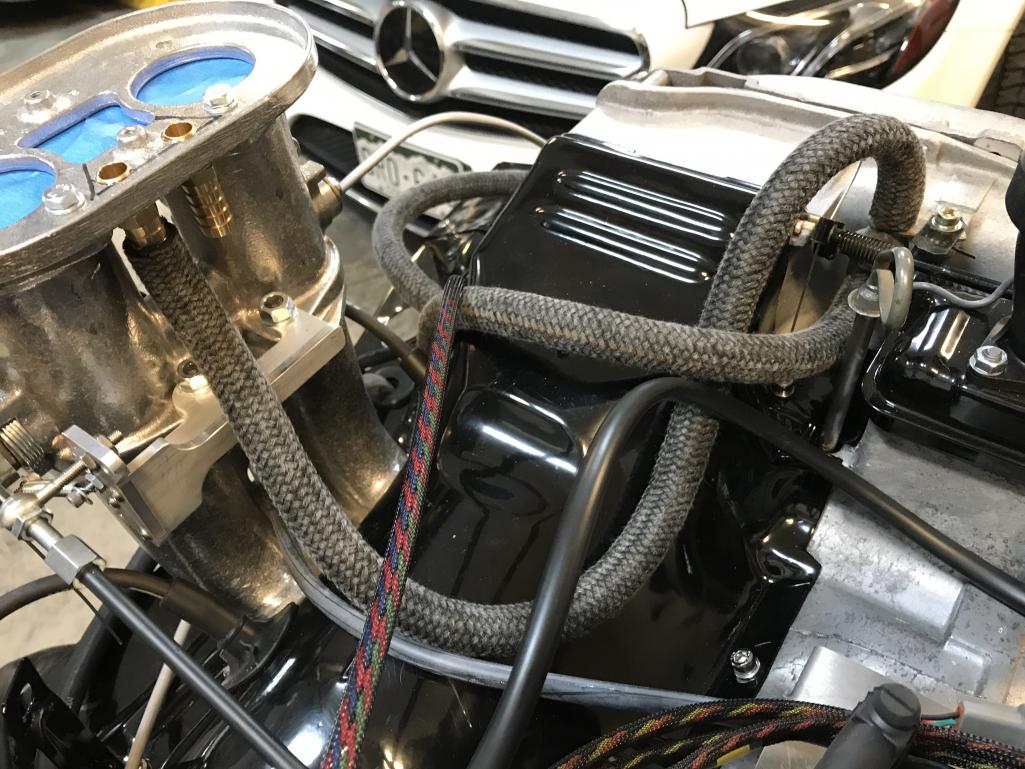
|
|
|
|
| bkrantz |
Dec 11 2021, 09:18 PM
Post
#4283
|
|
914 Guru Group: Members Posts: 8,347 Joined: 3-August 19 From: SW Colorado Member No.: 23,343 Region Association: Rocky Mountains |
I found that the notches in the plug wire brackets were too small, and pinching the wires. So I pulled off the plastic dip coating, and then filed the holes larger. I was able to slid the coating back on.
Attached thumbnail(s) 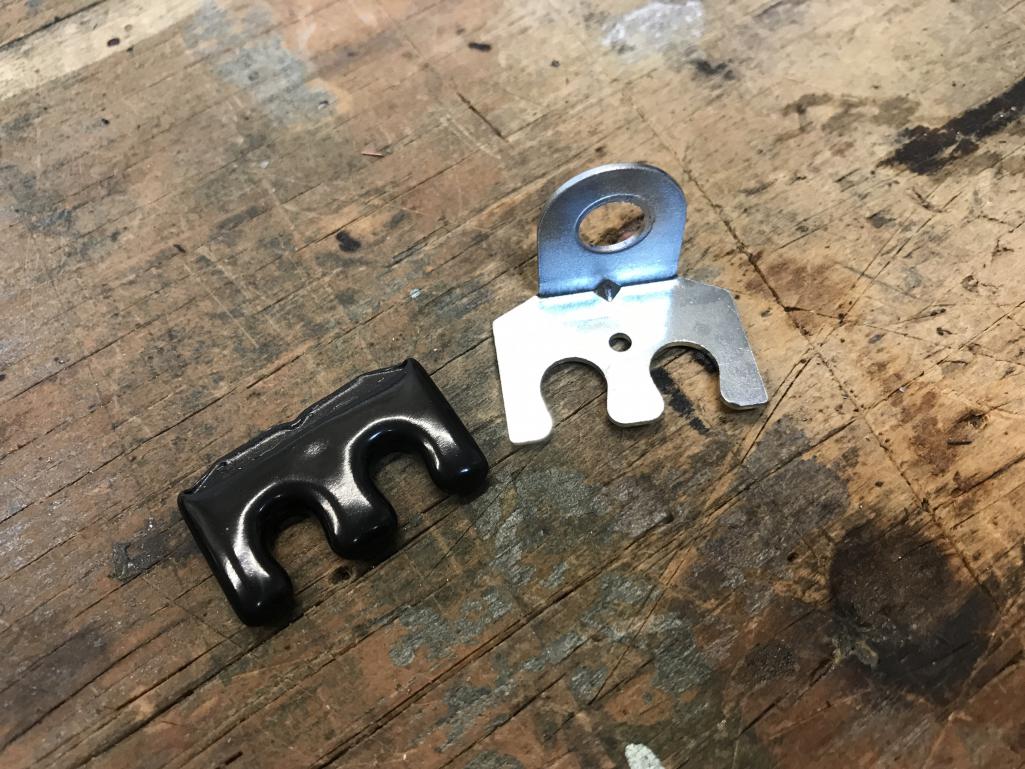
|
|
|
|
| bkrantz |
Dec 11 2021, 09:19 PM
Post
#4284
|
|
914 Guru Group: Members Posts: 8,347 Joined: 3-August 19 From: SW Colorado Member No.: 23,343 Region Association: Rocky Mountains |
I stacked the plug wire brackets with a pair of hose clamps for the fuel lines on both sides .
Attached thumbnail(s) 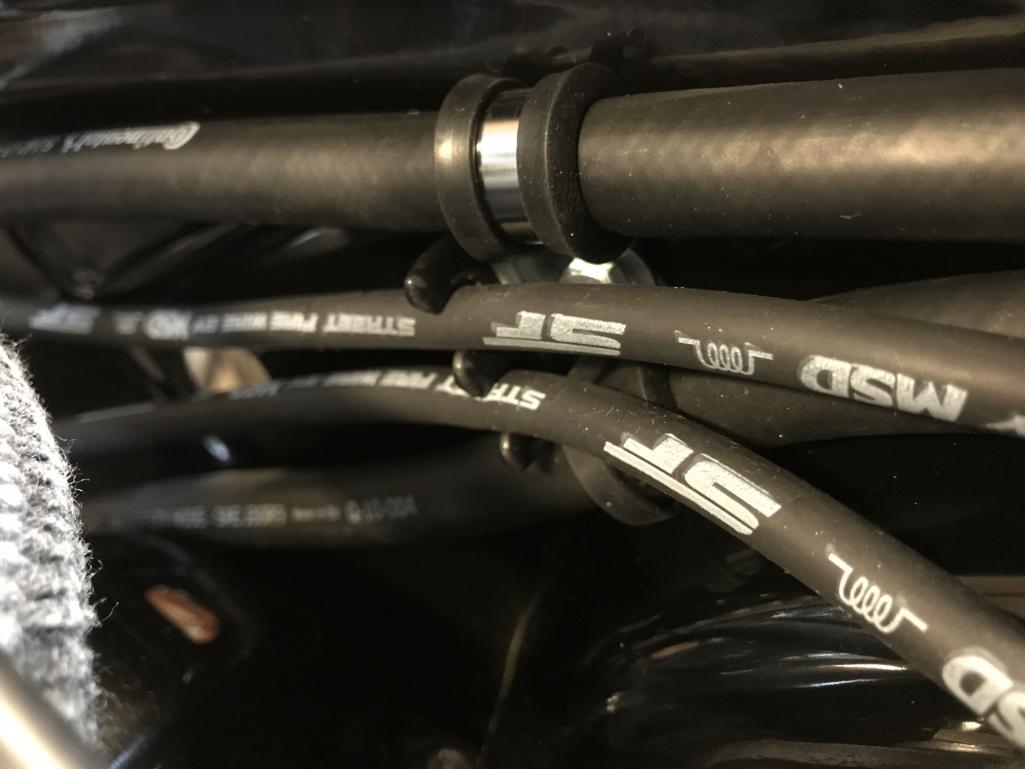
|
|
|
|
| bkrantz |
Dec 11 2021, 09:20 PM
Post
#4285
|
|
914 Guru Group: Members Posts: 8,347 Joined: 3-August 19 From: SW Colorado Member No.: 23,343 Region Association: Rocky Mountains |
For now, the fuel lines and plug wires are done.
Attached thumbnail(s) 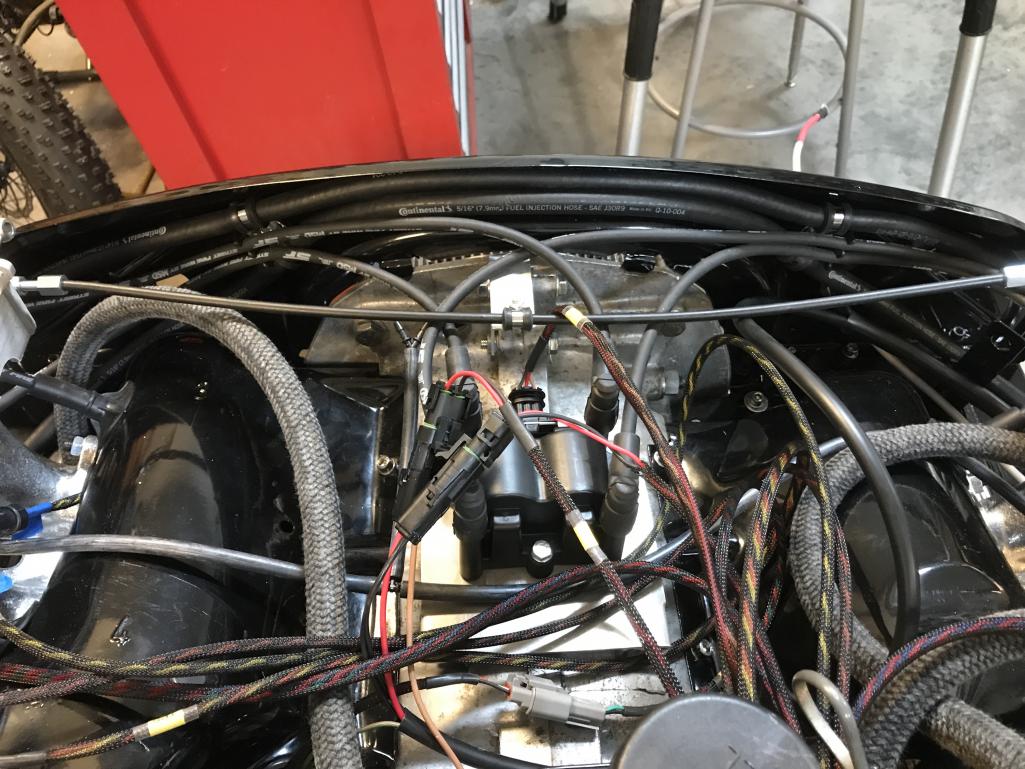
|
|
|
|
| bkrantz |
Dec 12 2021, 07:42 PM
Post
#4286
|
|
914 Guru Group: Members Posts: 8,347 Joined: 3-August 19 From: SW Colorado Member No.: 23,343 Region Association: Rocky Mountains |
Here's my SS muffler from Ben Macfarland. I need to install a SS bung for the O2 sensor. The muffler might not be ideal, since it is a bit downstream from the combustion chambers, but it is the first location where the exhaust from all 4 cylinders will mix.
Attached thumbnail(s) 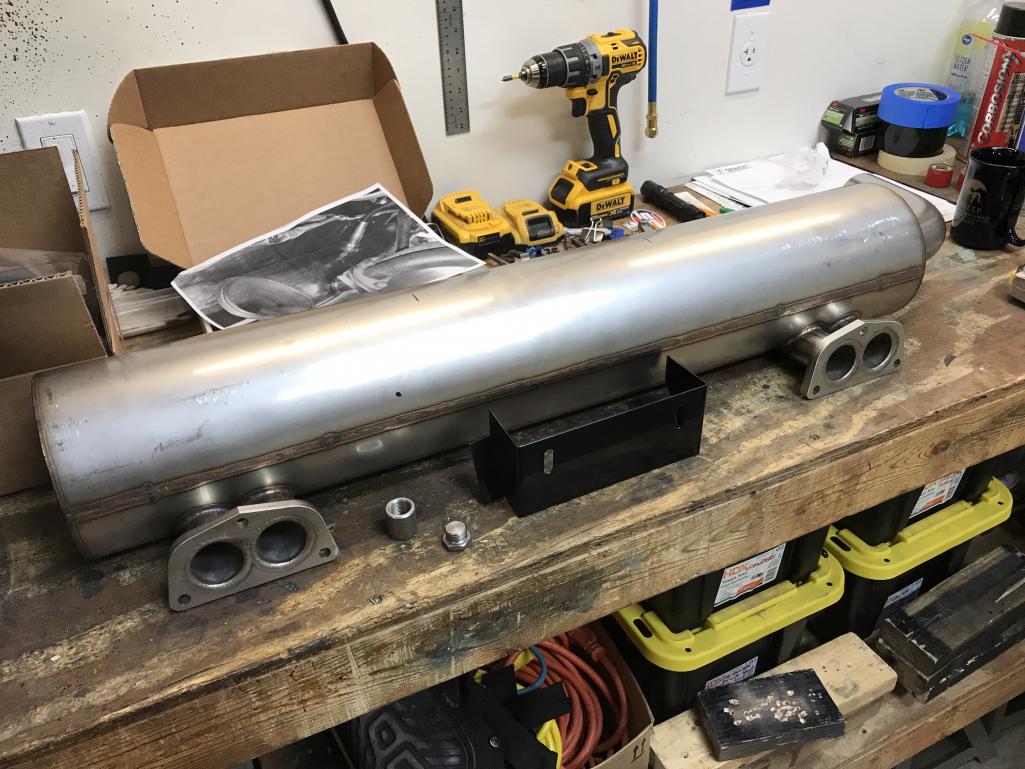
|
|
|
|
| bkrantz |
Dec 12 2021, 07:43 PM
Post
#4287
|
|
914 Guru Group: Members Posts: 8,347 Joined: 3-August 19 From: SW Colorado Member No.: 23,343 Region Association: Rocky Mountains |
I chose a location as far towards the center as possible, but not in the way of the muffler bracket.
Then I got out a 1 inch hole saw, and mounted the muffler on the press. Attached thumbnail(s) 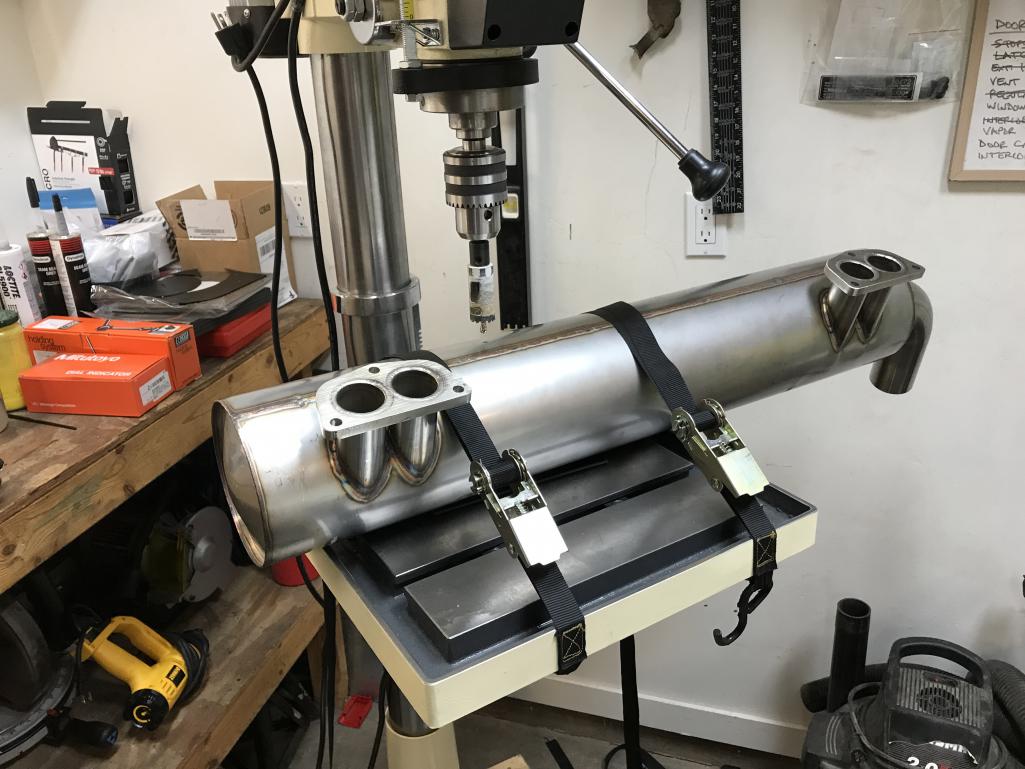
|
|
|
|
| bkrantz |
Dec 12 2021, 07:45 PM
Post
#4288
|
|
914 Guru Group: Members Posts: 8,347 Joined: 3-August 19 From: SW Colorado Member No.: 23,343 Region Association: Rocky Mountains |
Ready for welding.
Attached thumbnail(s) 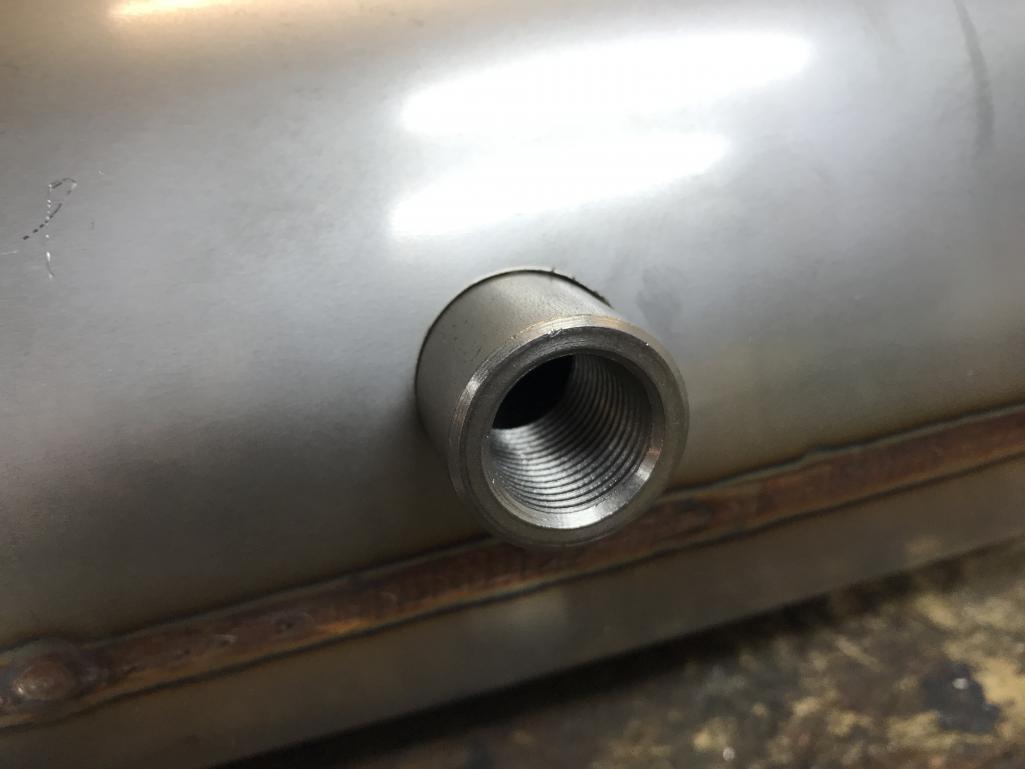
|
|
|
|
| bkrantz |
Dec 12 2021, 07:48 PM
Post
#4289
|
|
914 Guru Group: Members Posts: 8,347 Joined: 3-August 19 From: SW Colorado Member No.: 23,343 Region Association: Rocky Mountains |
I then started the transfer of the engine from the stand onto jack stands. This turned out to be a logic puzzle as well as mechanical process.
First, I got out the engine support bar, from the almost depleted stock of powder-coated parts. Attached thumbnail(s) 
|
|
|
|
| bkrantz |
Dec 12 2021, 07:49 PM
Post
#4290
|
|
914 Guru Group: Members Posts: 8,347 Joined: 3-August 19 From: SW Colorado Member No.: 23,343 Region Association: Rocky Mountains |
Bolted onto engine rubber mounts.
Attached thumbnail(s) 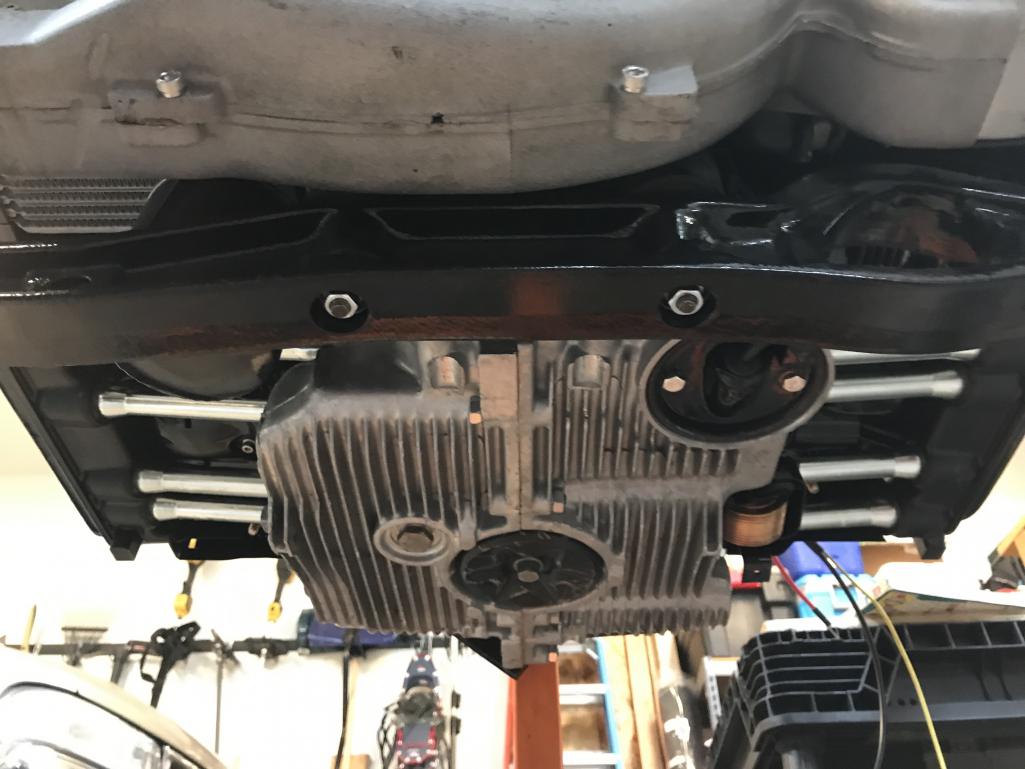
|
|
|
|
| bkrantz |
Dec 12 2021, 07:51 PM
Post
#4291
|
|
914 Guru Group: Members Posts: 8,347 Joined: 3-August 19 From: SW Colorado Member No.: 23,343 Region Association: Rocky Mountains |
Here's part one of my two step process. Given the jacks and other stuff I have, I had to first take the weight off the stand, and then lower the engine as much as possible, i.e. about half-way. I made some scaffolding, and put my Fuchs wheels to work (purists look away).
Attached thumbnail(s) 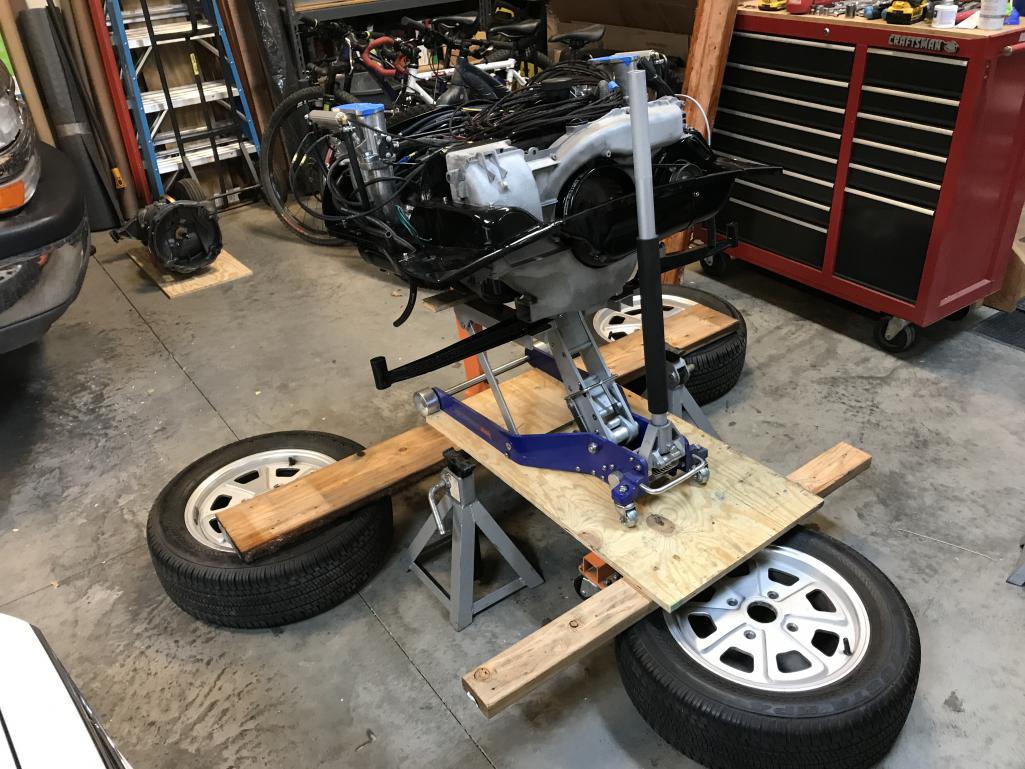
|
|
|
|
| bkrantz |
Dec 12 2021, 07:55 PM
Post
#4292
|
|
914 Guru Group: Members Posts: 8,347 Joined: 3-August 19 From: SW Colorado Member No.: 23,343 Region Association: Rocky Mountains |
After removing the stand, I lowered the engine so the support bar and the stand pivot rested on jack stands. I then pulled out my "scaffolding" and repositioned the jack now on the floor.
Attached thumbnail(s) 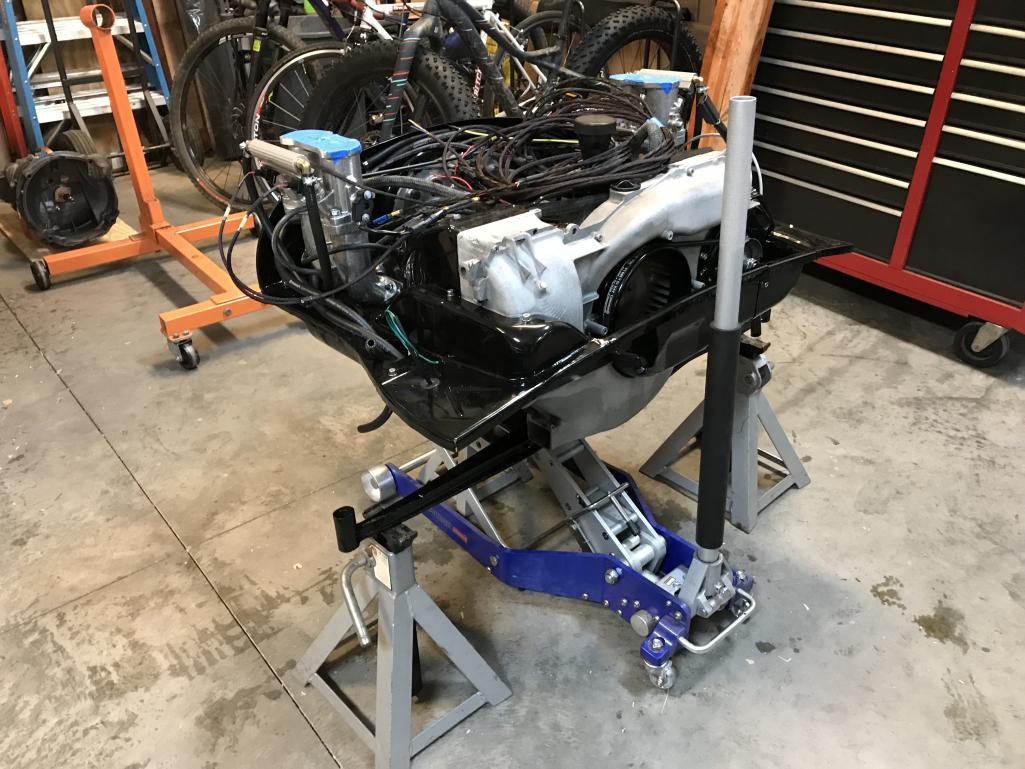
|
|
|
|
| bkrantz |
Dec 12 2021, 07:58 PM
Post
#4293
|
|
914 Guru Group: Members Posts: 8,347 Joined: 3-August 19 From: SW Colorado Member No.: 23,343 Region Association: Rocky Mountains |
With the weight on the jack again, I added an angle iron piece to support the back of the engine.
Attached thumbnail(s) 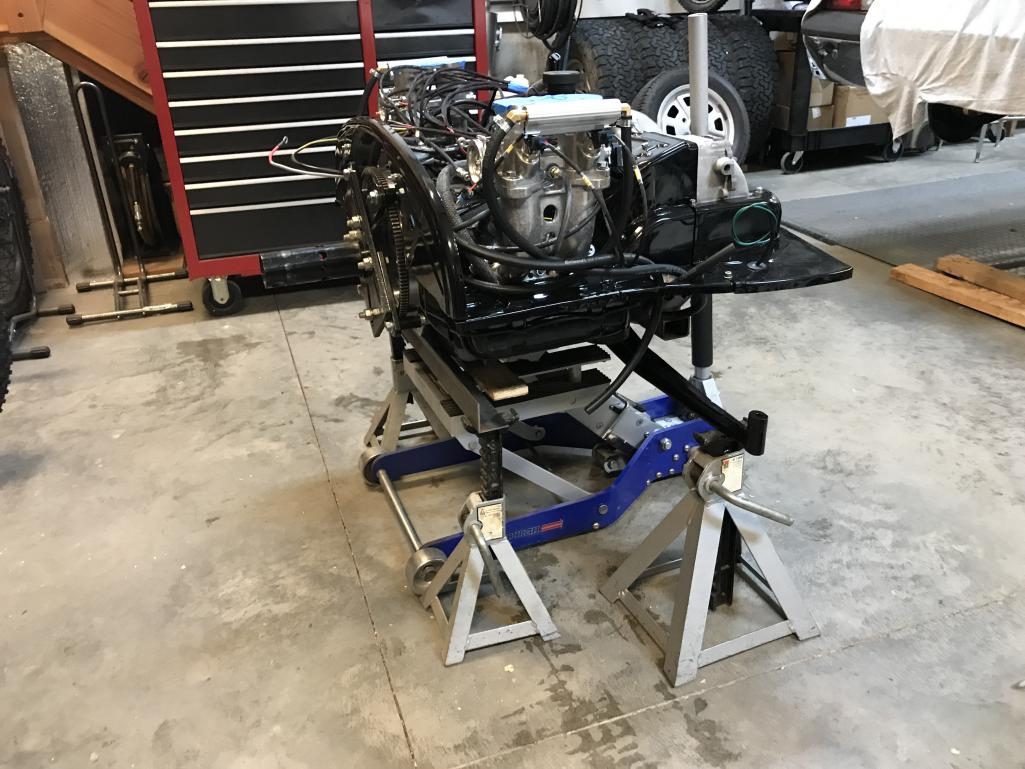
|
|
|
|
| bkrantz |
Dec 12 2021, 08:00 PM
Post
#4294
|
|
914 Guru Group: Members Posts: 8,347 Joined: 3-August 19 From: SW Colorado Member No.: 23,343 Region Association: Rocky Mountains |
I will leave the jack in place as backup, until the trans is attached and supported.
Attached thumbnail(s) 
|
|
|
|
| bkrantz |
Dec 12 2021, 08:01 PM
Post
#4295
|
|
914 Guru Group: Members Posts: 8,347 Joined: 3-August 19 From: SW Colorado Member No.: 23,343 Region Association: Rocky Mountains |
Last task today: unbolt the engine stand mount from the case. Ready for a clutch!
Attached thumbnail(s) 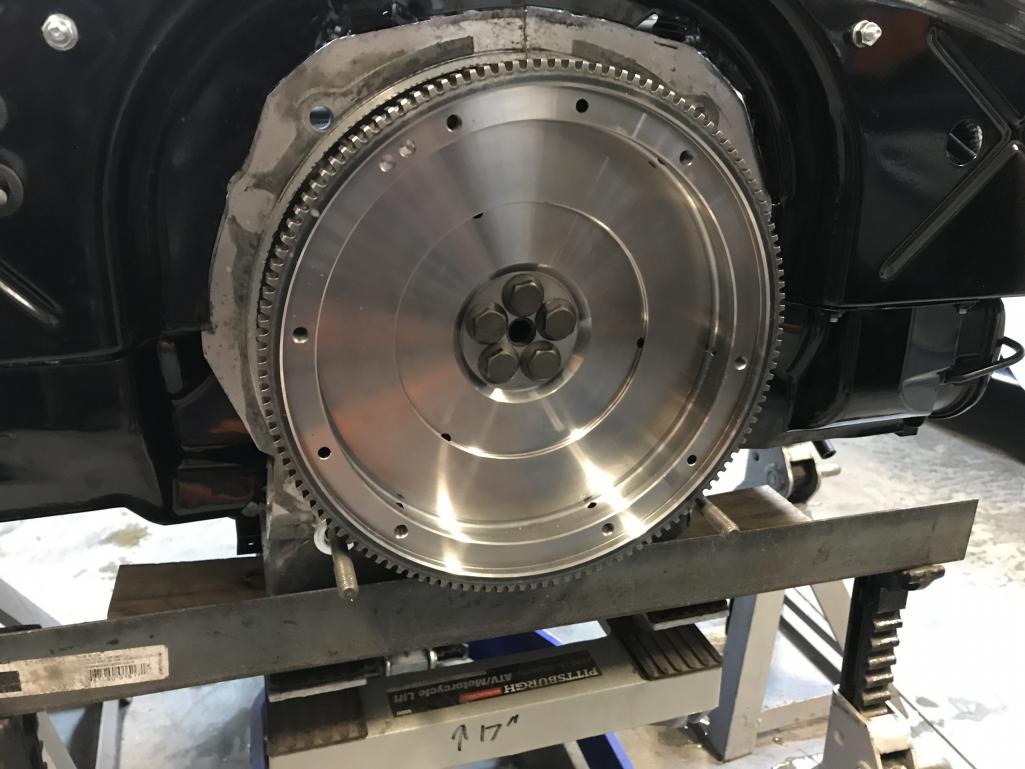
|
|
|
|
| nivekdodge |
Dec 12 2021, 08:29 PM
Post
#4296
|
|
Member Group: Members Posts: 299 Joined: 28-August 21 From: Pittsburgh Pa Member No.: 25,860 Region Association: MidAtlantic Region |
QUOTE(bkrantz @ Dec 12 2021, 09:01 PM)  Last task today: unbolt the engine stand mount from the case. Ready for a clutch! If you have an engine hoist is there a safe place to bolt a chain? |
|
|
|
| Puebloswatcop |
Dec 13 2021, 05:54 PM
Post
#4297
|
|
Senior Member Group: Members Posts: 1,444 Joined: 27-December 14 From: Mineola, Texas Member No.: 18,258 Region Association: Southwest Region |
QUOTE(bkrantz @ Dec 10 2021, 08:44 PM) Now starting to think about where to put the control box and the relay box. The trunk is the obvious place, away from wet conditions. Looking at the possibility of having to remove any connections i think the first picture makes more sense in mounting the control box...... But after looking at the pictures again I see that the ports are blocked either way....Maybe mount both on the upper part of the wall so they arent blocked by the jack or the inner fender..... |
|
|
|
| bkrantz |
Dec 13 2021, 08:10 PM
Post
#4298
|
|
914 Guru Group: Members Posts: 8,347 Joined: 3-August 19 From: SW Colorado Member No.: 23,343 Region Association: Rocky Mountains |
QUOTE(nivekdodge @ Dec 12 2021, 07:29 PM) QUOTE(bkrantz @ Dec 12 2021, 09:01 PM) Last task today: unbolt the engine stand mount from the case. Ready for a clutch! If you have an engine hoist is there a safe place to bolt a chain? I have one (in pieces, stashed under my big work bench). But I thought by the time I could rig up a safe attachment method and assemble the hoist, I could get the job done with my motorcycle lift. |
|
|
|
| bkrantz |
Dec 13 2021, 08:22 PM
Post
#4299
|
|
914 Guru Group: Members Posts: 8,347 Joined: 3-August 19 From: SW Colorado Member No.: 23,343 Region Association: Rocky Mountains |
QUOTE(Puebloswatcop @ Dec 13 2021, 04:54 PM) QUOTE(bkrantz @ Dec 10 2021, 08:44 PM) Now starting to think about where to put the control box and the relay box. The trunk is the obvious place, away from wet conditions. Looking at the possibility of having to remove any connections i think the first picture makes more sense in mounting the control box...... But after looking at the pictures again I see that the ports are blocked either way....Maybe mount both on the upper part of the wall so they arent blocked by the jack or the inner fender..... I am still pondering the best location. I should need to connect to the serial port during set up and tuning, so the jack would not be in the way most of the time. |
|
|
|
| bkrantz |
Dec 13 2021, 08:26 PM
Post
#4300
|
|
914 Guru Group: Members Posts: 8,347 Joined: 3-August 19 From: SW Colorado Member No.: 23,343 Region Association: Rocky Mountains |
Everything (almost) I need to get the trans ready and mounted to the engine.
Attached thumbnail(s) 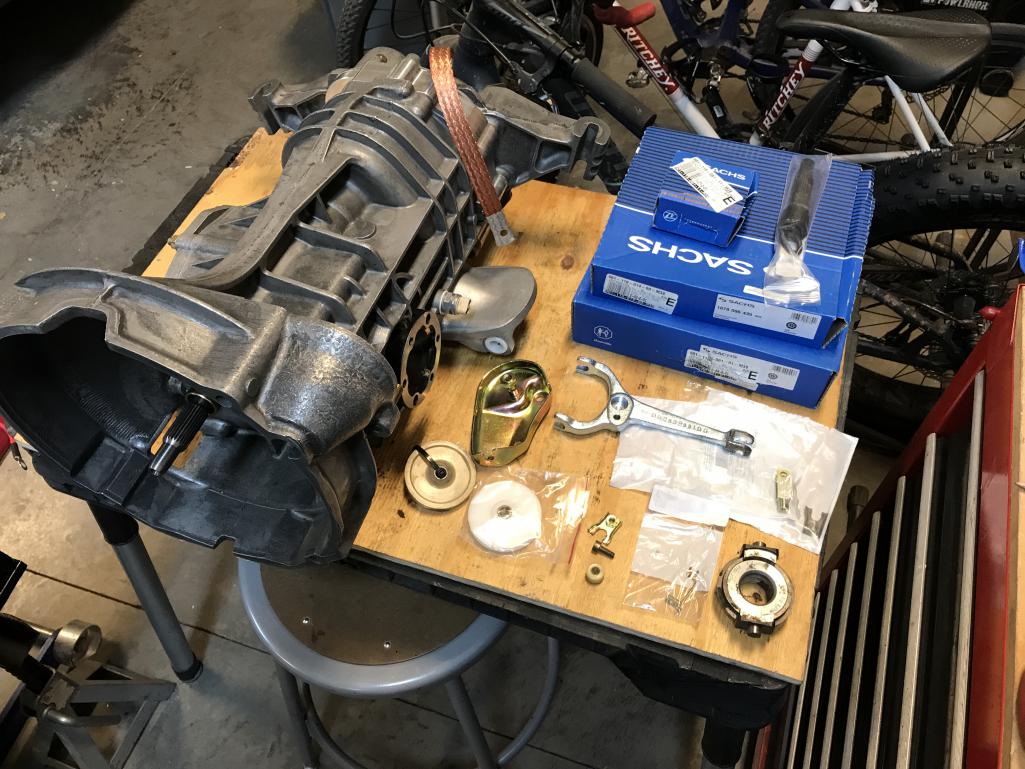
|
|
|
|
|
1 User(s) are reading this topic (1 Guests and 0 Anonymous Users)
0 Members:

|
Lo-Fi Version | Time is now: 29th April 2025 - 06:56 PM |
Invision Power Board
v9.1.4 © 2025 IPS, Inc.