|
|

|
Porsche, and the Porsche crest are registered trademarks of Dr. Ing. h.c. F. Porsche AG.
This site is not affiliated with Porsche in any way. Its only purpose is to provide an online forum for car enthusiasts. All other trademarks are property of their respective owners. |
|
|
  |
| bkrantz |
 Dec 26 2019, 09:11 PM Dec 26 2019, 09:11 PM
Post
#81
|
|
914 Guru      Group: Members Posts: 8,322 Joined: 3-August 19 From: SW Colorado Member No.: 23,343 Region Association: Rocky Mountains 
|
Left side needed a 3/4 inch wide filler for the gap in the raised ridge below the tail light. Looks a bit crude, but will be better after grinding.
Attached thumbnail(s) 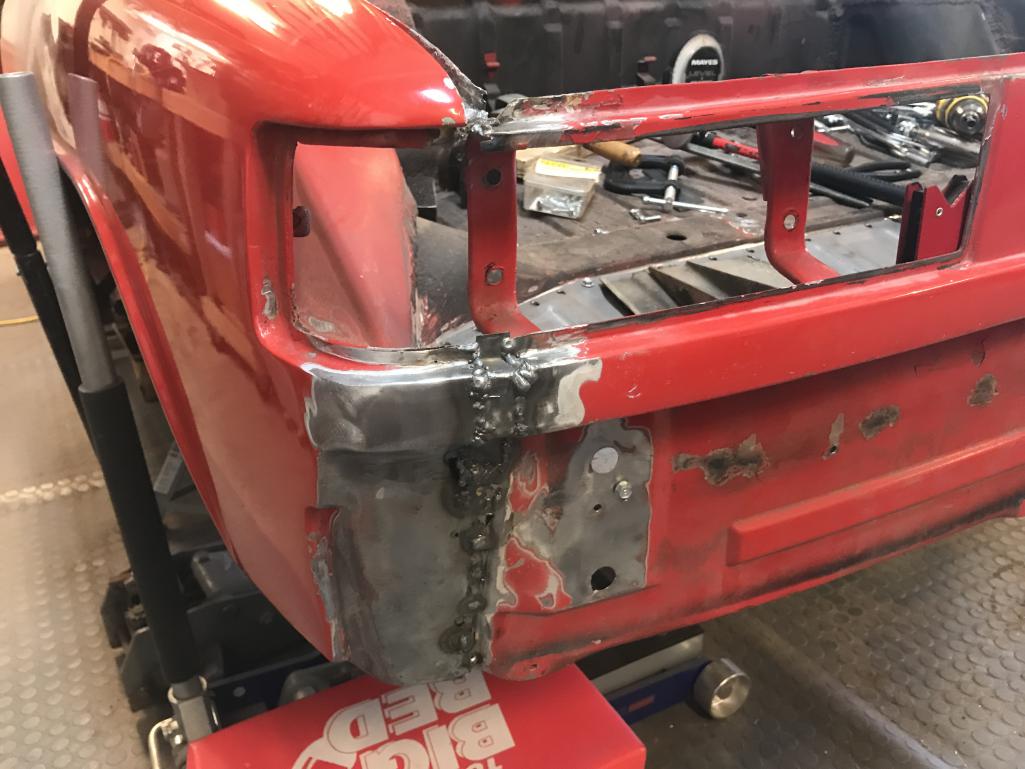
|
| bkrantz |
 Dec 26 2019, 09:12 PM Dec 26 2019, 09:12 PM
Post
#82
|
|
914 Guru      Group: Members Posts: 8,322 Joined: 3-August 19 From: SW Colorado Member No.: 23,343 Region Association: Rocky Mountains 
|
Same on the right side, but the gap was only 3/16 inch.
Attached thumbnail(s) 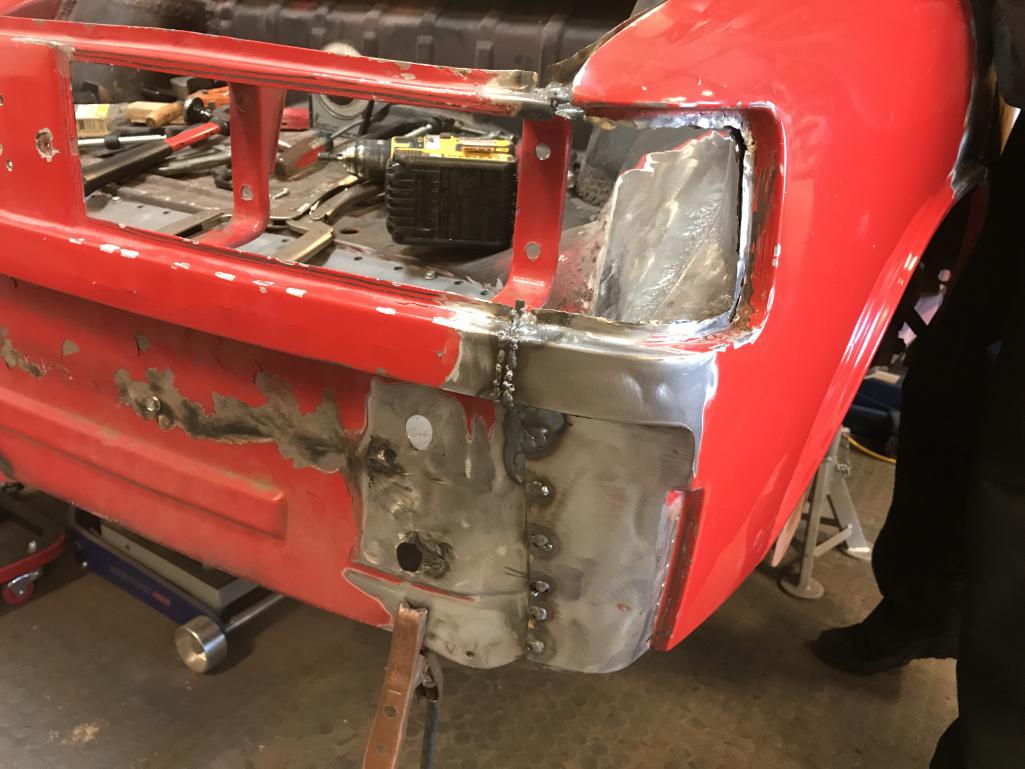
|
| bkrantz |
 Dec 26 2019, 09:14 PM Dec 26 2019, 09:14 PM
Post
#83
|
|
914 Guru      Group: Members Posts: 8,322 Joined: 3-August 19 From: SW Colorado Member No.: 23,343 Region Association: Rocky Mountains 
|
And what was the lap joint in the front panel, now ready for a tidy butt joint weld.
Attached thumbnail(s) 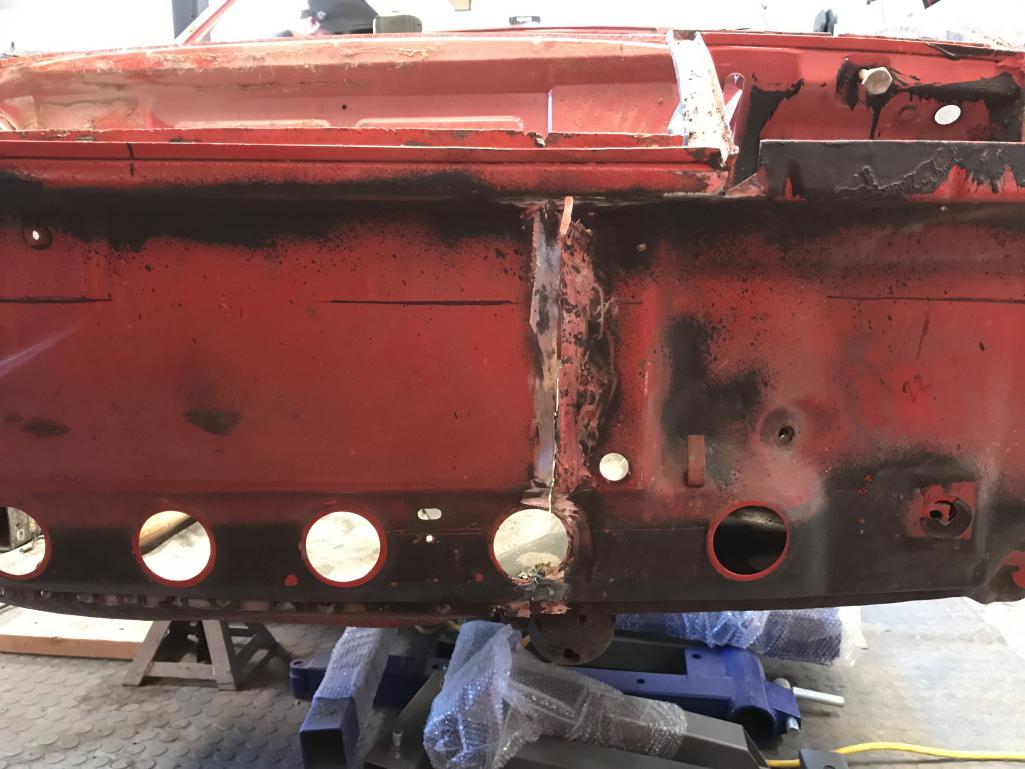
|
| FourBlades |
 Dec 27 2019, 09:47 AM Dec 27 2019, 09:47 AM
Post
#84
|
|
From Wreck to Rockin     Group: Members Posts: 2,056 Joined: 3-December 07 From: Brevard, FL Member No.: 8,414 Region Association: South East States 
|
Nice work! (IMG:style_emoticons/default/first.gif) Great to fix things the correct way. You are making rapid progress. These cars are worth much more now then they were when new, kind of ironic. John |
| bkrantz |
 Dec 27 2019, 09:48 PM Dec 27 2019, 09:48 PM
Post
#85
|
|
914 Guru      Group: Members Posts: 8,322 Joined: 3-August 19 From: SW Colorado Member No.: 23,343 Region Association: Rocky Mountains 
|
Nice work! (IMG:style_emoticons/default/first.gif) Great to fix things the correct way. You are making rapid progress. These cars are worth much more now then they were when new, kind of ironic. John Thanks. It is fun indulging my sense of "doing it right", even if my skills are not pro level. And while I do not expect to make money, at least the hole will not be too deep. |
| bkrantz |
 Dec 27 2019, 09:52 PM Dec 27 2019, 09:52 PM
Post
#86
|
|
914 Guru      Group: Members Posts: 8,322 Joined: 3-August 19 From: SW Colorado Member No.: 23,343 Region Association: Rocky Mountains 
|
Getting the front seam stitched up, along with the horizontal brace (it needs a patch to fill the gap in the center).
Attached thumbnail(s) 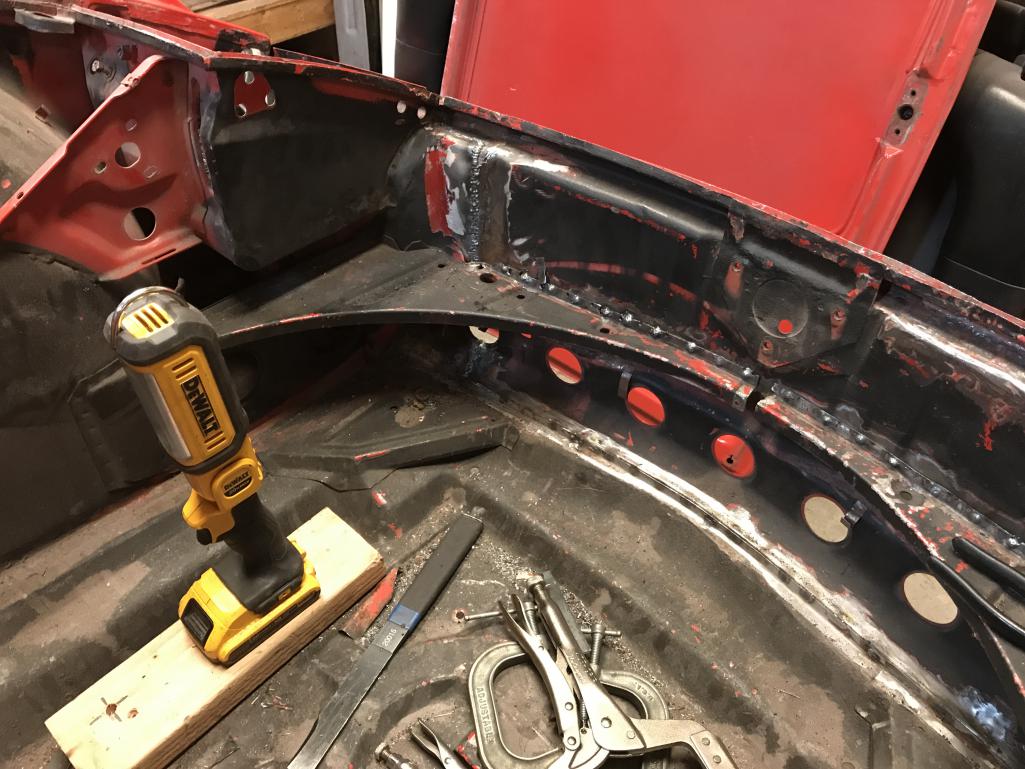
|
| bkrantz |
 Dec 27 2019, 09:57 PM Dec 27 2019, 09:57 PM
Post
#87
|
|
914 Guru      Group: Members Posts: 8,322 Joined: 3-August 19 From: SW Colorado Member No.: 23,343 Region Association: Rocky Mountains 
|
Here are the accessory pieces I made for the rear: heavy gauge L-brackets for the bumper mounting holes below the floor, light gauge reinforcements for the holes above the floor, and reinforcing patches for the floor above the rear sway bar brackets.
Attached thumbnail(s) 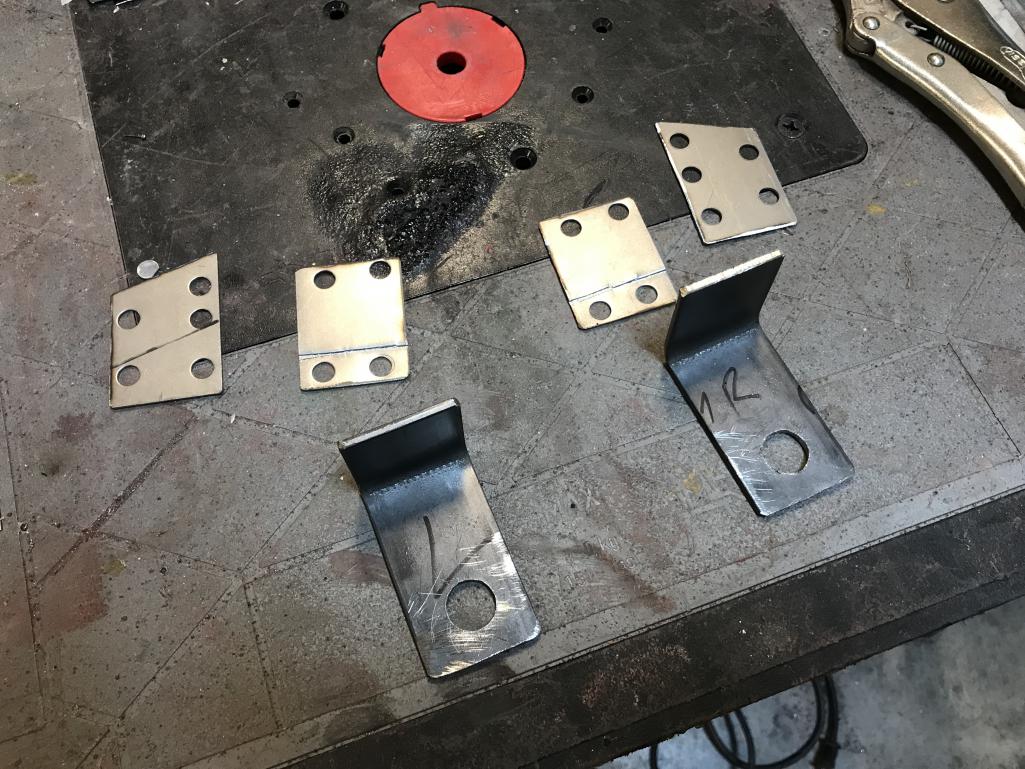
|
| Kansas 914 |
 Dec 28 2019, 06:29 AM Dec 28 2019, 06:29 AM
Post
#88
|
|
Advanced Member     Group: Members Posts: 2,999 Joined: 1-March 03 From: Durango, Colorado Member No.: 373 Region Association: Rocky Mountains 
|
Bob - you are doing everything right.
It was nice to see the progress in person Friday. Keep up the great work and let me know if you need another set of hands after your son leaves. |
| FourBlades |
 Dec 28 2019, 08:28 AM Dec 28 2019, 08:28 AM
Post
#89
|
|
From Wreck to Rockin     Group: Members Posts: 2,056 Joined: 3-December 07 From: Brevard, FL Member No.: 8,414 Region Association: South East States 
|
What are the reinforcement pieces for? John |
| bkrantz |
 Dec 28 2019, 09:45 PM Dec 28 2019, 09:45 PM
Post
#90
|
|
914 Guru      Group: Members Posts: 8,322 Joined: 3-August 19 From: SW Colorado Member No.: 23,343 Region Association: Rocky Mountains 
|
John, the 1/8 inch thick L-braces are for the bumper mount holes under the trunk floor. They replace original factory braces that were pressed in a design too hard for me to duplicate. I created my own 18 gauge rectangular reinforcement for the upper holes. These have no big hole in the center yet. And the trapezoidal pieces double up the floor above the sway bar brackets that mount on the underside of the trunk floor.
|
| bkrantz |
 Dec 28 2019, 09:48 PM Dec 28 2019, 09:48 PM
Post
#91
|
|
914 Guru      Group: Members Posts: 8,322 Joined: 3-August 19 From: SW Colorado Member No.: 23,343 Region Association: Rocky Mountains 
|
Got the trunk floor welded in, with plug welds all around, and some creative thick beads in the rear corners (these will get ground down).
Attached thumbnail(s) 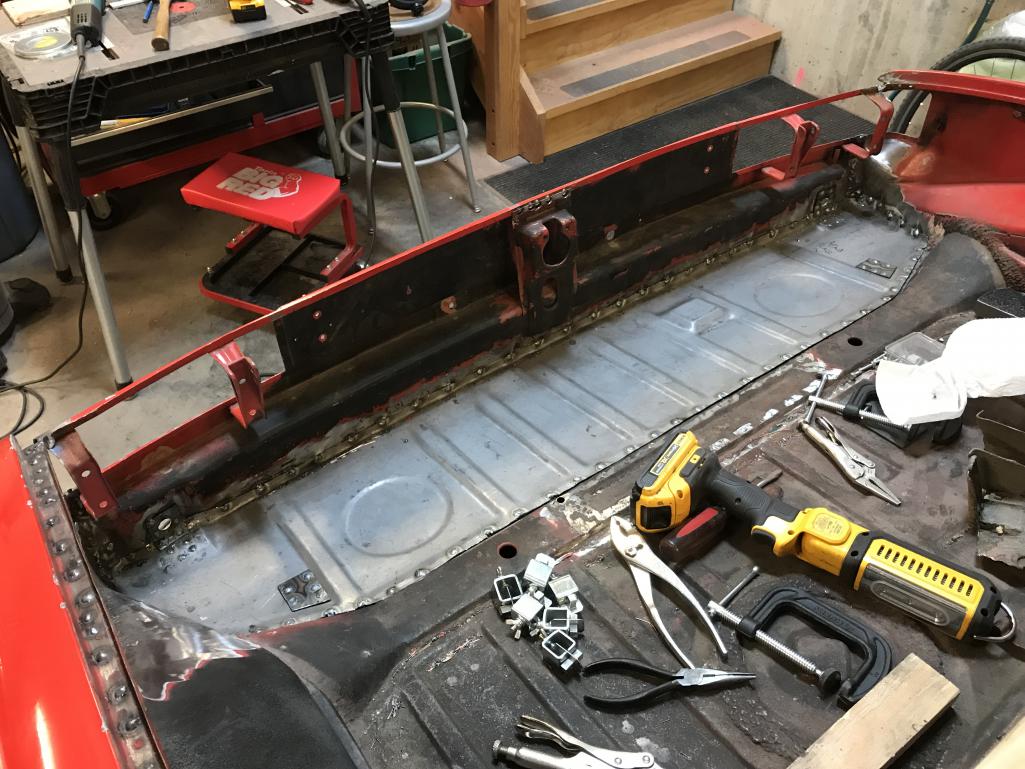
|
| bkrantz |
 Dec 28 2019, 09:50 PM Dec 28 2019, 09:50 PM
Post
#92
|
|
914 Guru      Group: Members Posts: 8,322 Joined: 3-August 19 From: SW Colorado Member No.: 23,343 Region Association: Rocky Mountains 
|
Lower bumper mount hole reinforcement, using 1/8 inch flat bar to replace the factory L-brace.
Attached thumbnail(s) 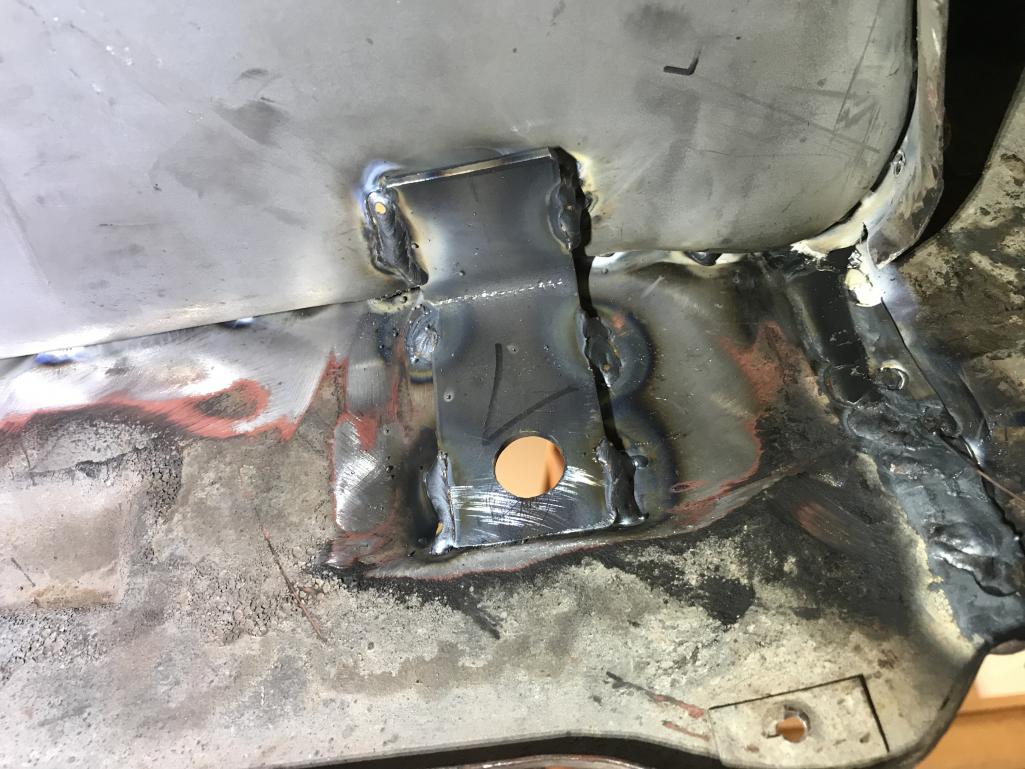
|
| bkrantz |
 Dec 28 2019, 09:51 PM Dec 28 2019, 09:51 PM
Post
#93
|
|
914 Guru      Group: Members Posts: 8,322 Joined: 3-August 19 From: SW Colorado Member No.: 23,343 Region Association: Rocky Mountains 
|
And my own additional brace for the upper bumper mount hole, to double the metal and add strength.
Attached thumbnail(s) 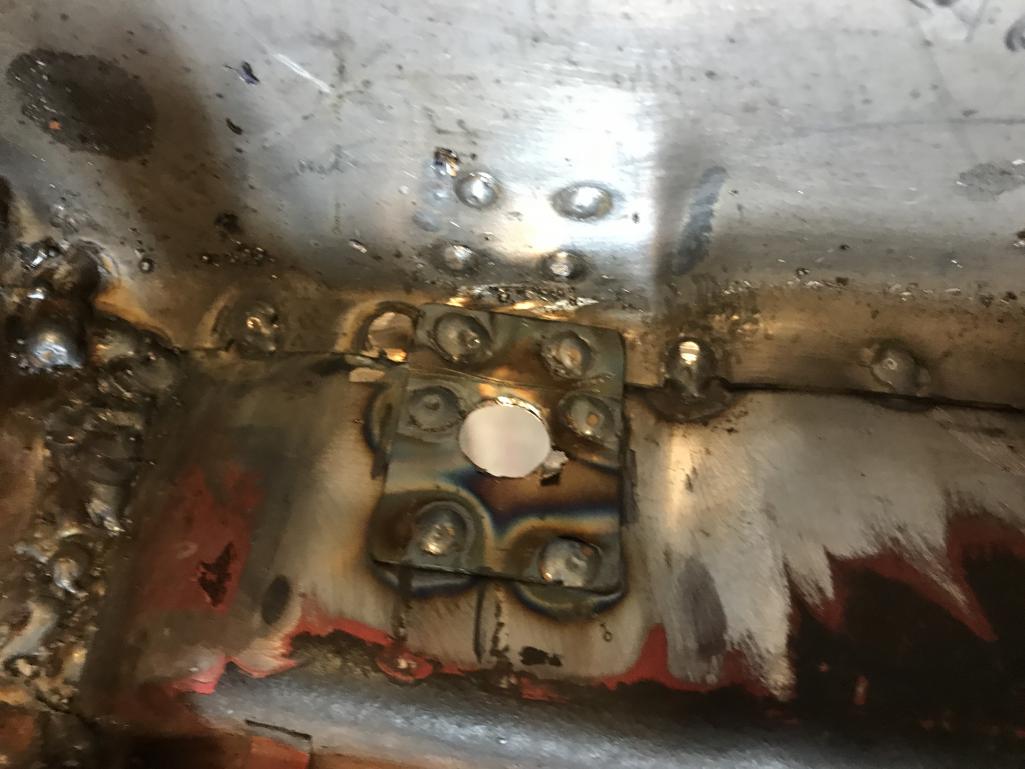
|
| bkrantz |
 Dec 28 2019, 09:54 PM Dec 28 2019, 09:54 PM
Post
#94
|
|
914 Guru      Group: Members Posts: 8,322 Joined: 3-August 19 From: SW Colorado Member No.: 23,343 Region Association: Rocky Mountains 
|
And a simple bent strip to bridge the gap between the left and right horizontal braces in the front trunk.
Attached thumbnail(s) 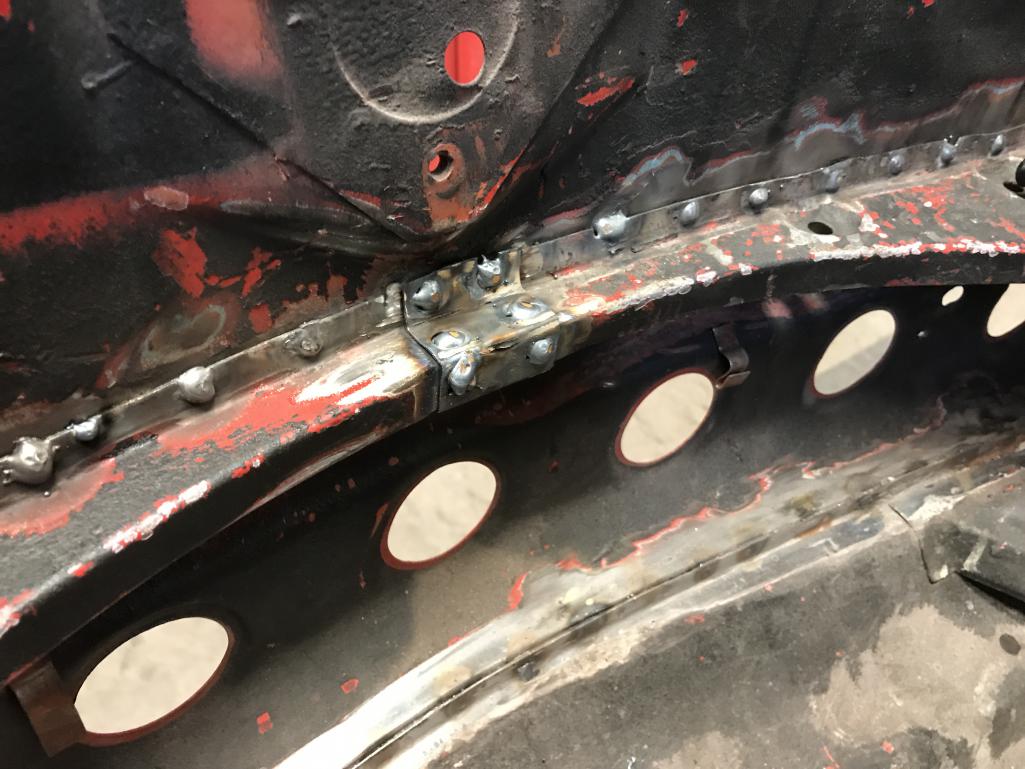
|
| bkrantz |
 Dec 28 2019, 09:57 PM Dec 28 2019, 09:57 PM
Post
#95
|
|
914 Guru      Group: Members Posts: 8,322 Joined: 3-August 19 From: SW Colorado Member No.: 23,343 Region Association: Rocky Mountains 
|
Now the fun part: fabricating brackets from 2 inch square tubing to attache the car to the rotisserie lift using the bumper mount holes. This is the back.
Attached thumbnail(s) 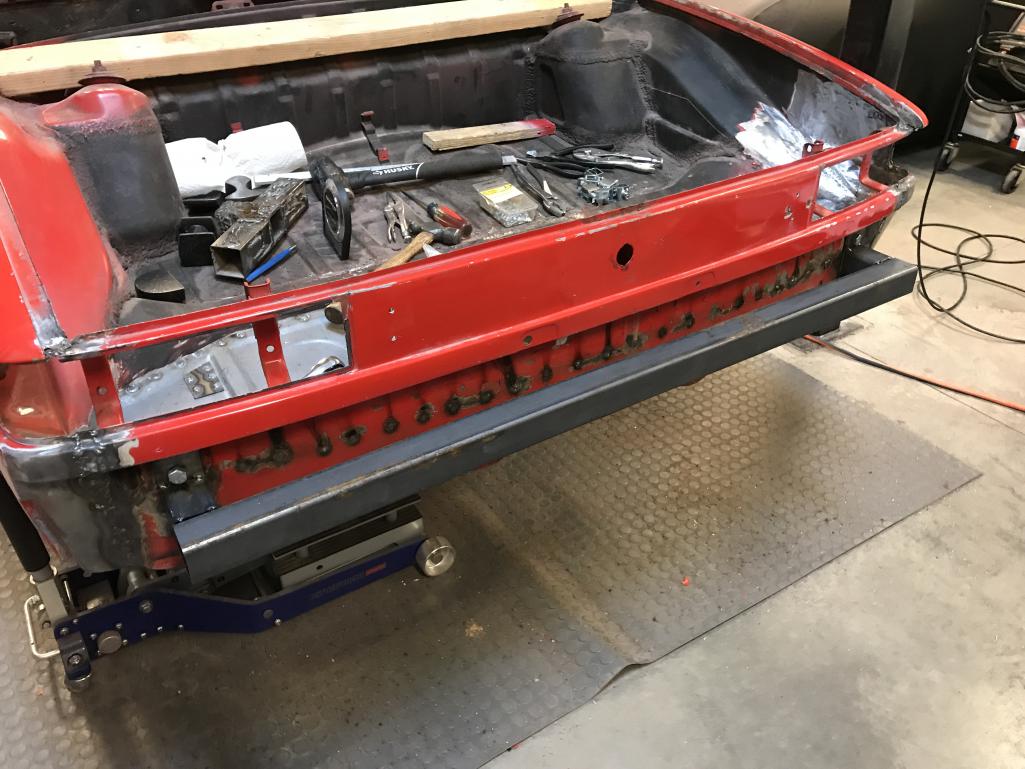
|
| bkrantz |
 Dec 28 2019, 09:58 PM Dec 28 2019, 09:58 PM
Post
#96
|
|
914 Guru      Group: Members Posts: 8,322 Joined: 3-August 19 From: SW Colorado Member No.: 23,343 Region Association: Rocky Mountains 
|
And the front, where greater curvature requires longer stand-off.
Attached thumbnail(s) 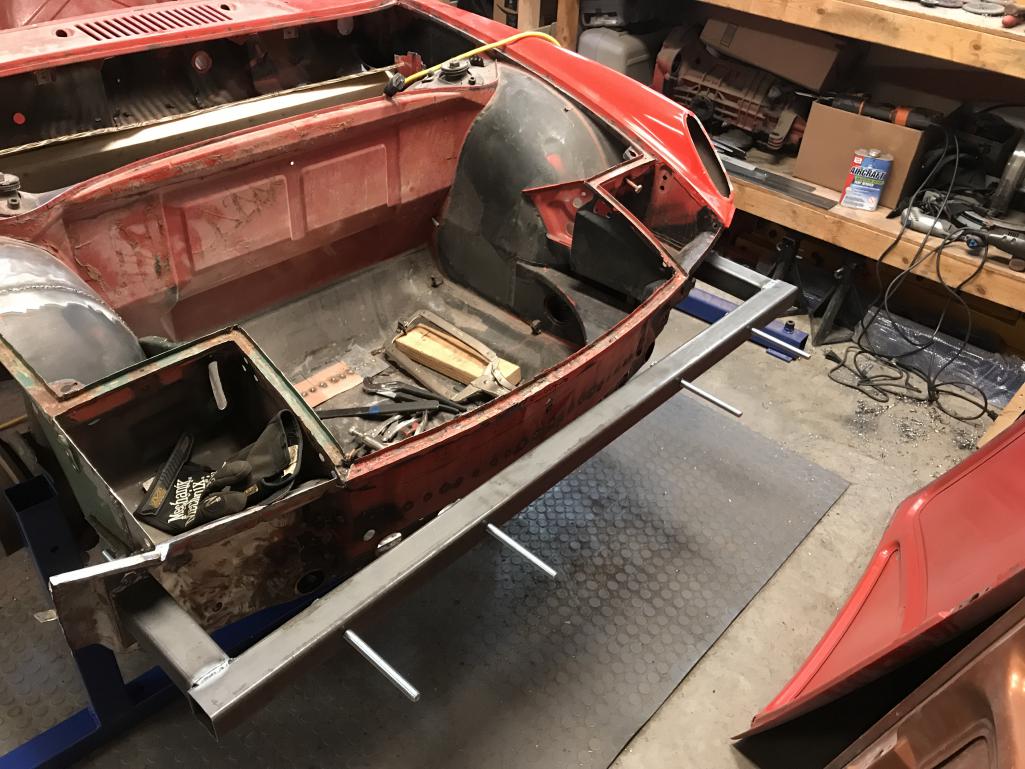
|
| bkrantz |
 Dec 28 2019, 09:59 PM Dec 28 2019, 09:59 PM
Post
#97
|
|
914 Guru      Group: Members Posts: 8,322 Joined: 3-August 19 From: SW Colorado Member No.: 23,343 Region Association: Rocky Mountains 
|
Here's the rear, with the horizontal mount from the lift bolted on.
Attached thumbnail(s) 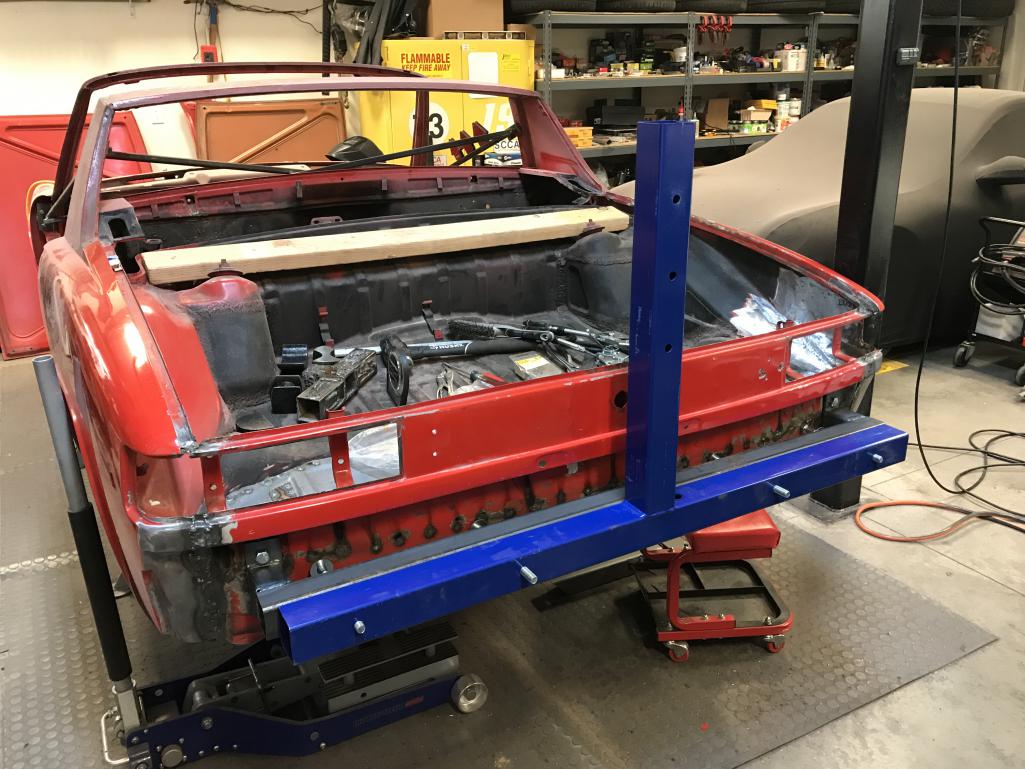
|
| bkrantz |
 Dec 28 2019, 10:02 PM Dec 28 2019, 10:02 PM
Post
#98
|
|
914 Guru      Group: Members Posts: 8,322 Joined: 3-August 19 From: SW Colorado Member No.: 23,343 Region Association: Rocky Mountains 
|
Finally! The car is on the rotisserie lift. This was the big milestone I hoped for, with my son visiting for 2 weeks. His willingness to help, and welding skills, made it possible.
Attached thumbnail(s) 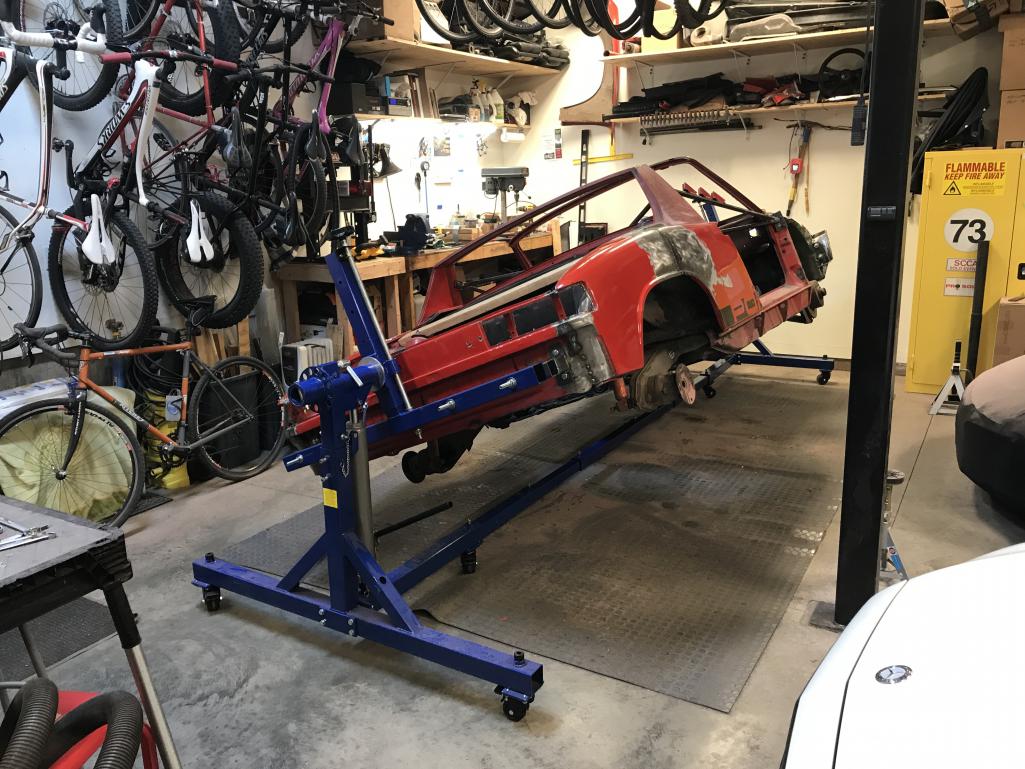
|
| ndfrigi |
 Dec 28 2019, 10:10 PM Dec 28 2019, 10:10 PM
Post
#99
|
|
Advanced Member     Group: Members Posts: 2,965 Joined: 21-August 11 From: Orange County Member No.: 13,474 Region Association: Southern California 
|
wow @bkrantz you and your son are doing a lot of accomplishment each day! keep up the pace and for sure next summer the car will be on the road. thanks for sharing all the details!
|
| bkrantz |
 Dec 29 2019, 10:03 PM Dec 29 2019, 10:03 PM
Post
#100
|
|
914 Guru      Group: Members Posts: 8,322 Joined: 3-August 19 From: SW Colorado Member No.: 23,343 Region Association: Rocky Mountains 
|
Final steps. First, we detached the suspension--took the front out as one assembly, including the steering rack. Then some final adjustment of the lift, and the car spins nicely onto its side.
Attached thumbnail(s) 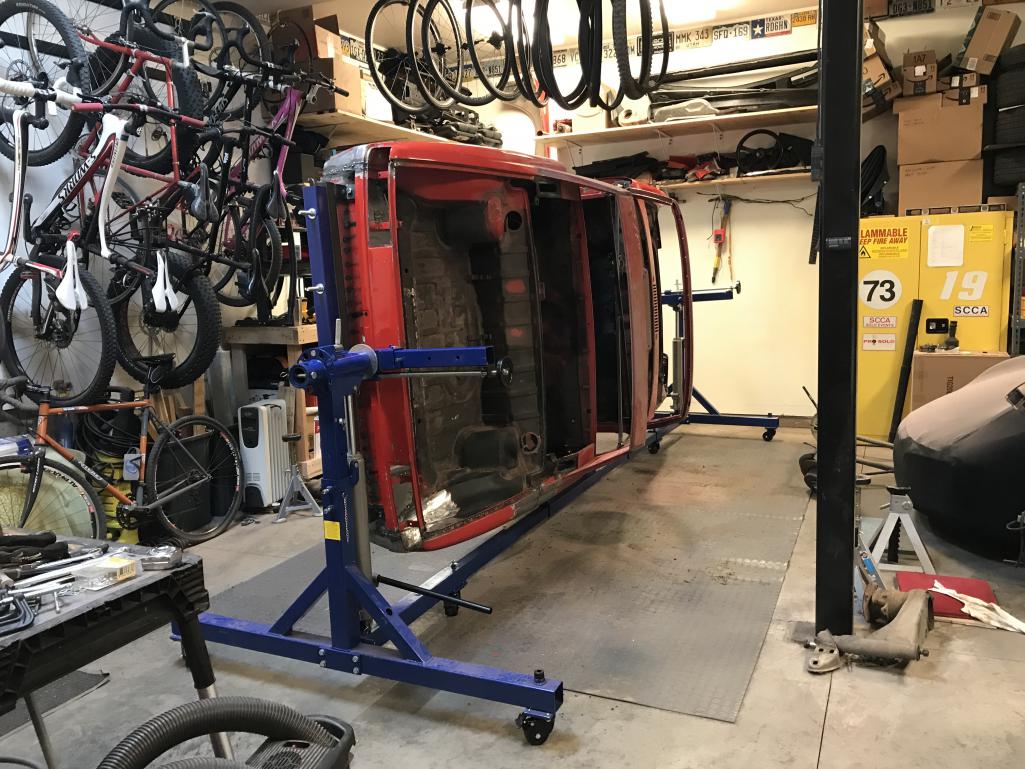
|
  |
2 User(s) are reading this topic (2 Guests and 0 Anonymous Users)
0 Members:

|
Lo-Fi Version | Time is now: 4th April 2025 - 01:41 AM |
Invision Power Board
v9.1.4 © 2025 IPS, Inc.


