|
|
|
Porsche, and the Porsche crest are registered trademarks of Dr. Ing. h.c. F. Porsche AG.
This site is not affiliated with Porsche in any way. Its only purpose is to provide an online forum for car enthusiasts. All other trademarks are property of their respective owners. |
|
|

  |

| 914forme |
 Sep 6 2020, 05:57 PM Sep 6 2020, 05:57 PM
Post
#61
|
|
Times a wastin', get wrenchin'!  Group: Members Posts: 3,896 Joined: 24-July 04 From: Dayton, Ohio Member No.: 2,388 Region Association: None |
You will always get a bit of shrinkage when you weld, the key is controlling it.
Once you get the passenger side set, then it would be fine to jack up the back and put it close to where you want it. I would also investigate and look at your door opening and door lengths. And check the pins for wear would also be a good idea. You can use a rod end at the upper seatbelt, to the lower front. Please please please if you goto the store and pickup a turn buckle make sure it is big, the bigger the better, and it is forged. Cheap ones will blow up, and if it doesn't your very lucky. If it Dows, metal bits go flying about your garage, getting stuck in various items hopefully not you. But if you want to try closing up the gap, just lower it down on its rear wheels, you gap will close right up, then pick it up in the middle right at the jamb. and fine tune your gap. Hopefully it is you pins are worn, easy enough fix, and you can get on with it. Have fun playing with molten metal, I know I always do. |
   |

 
|
| FL000 |
Sep 16 2020, 07:37 PM
Post
#62
|
|
Member Group: Members Posts: 442 Joined: 31-January 12 From: Lancaster, CA Member No.: 14,076 Region Association: Southern California |
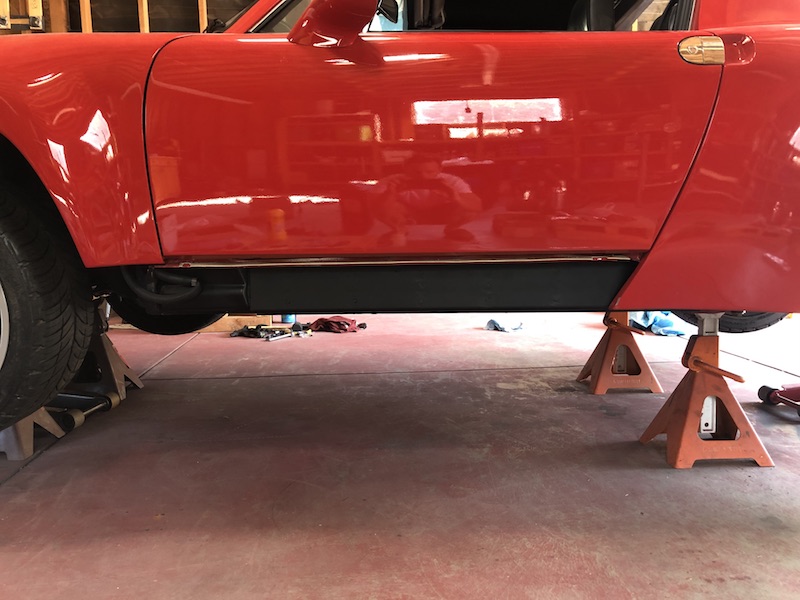
Well that sucks. Got passenger long reinforcement welded in with gap set as desired and this was the result with weight on wheels. Not sure how evident it is from picture, but gap closed up quite a bit. No more rubbing so I guess that is good.
Door is functional so going to put problem to back burner again. Short of a frame bench I think a roll cage may be my only at home solution at this point. Don’t really want a roll cage so need to ponder on it for awhile. The longs do the majority of the work keeping the door gap set, so I wonder if my flex is happening in the metal above it, with the shock being the lever to bend it all forward. (IMG:style_emoticons/default/idea.gif) Attached image(s) 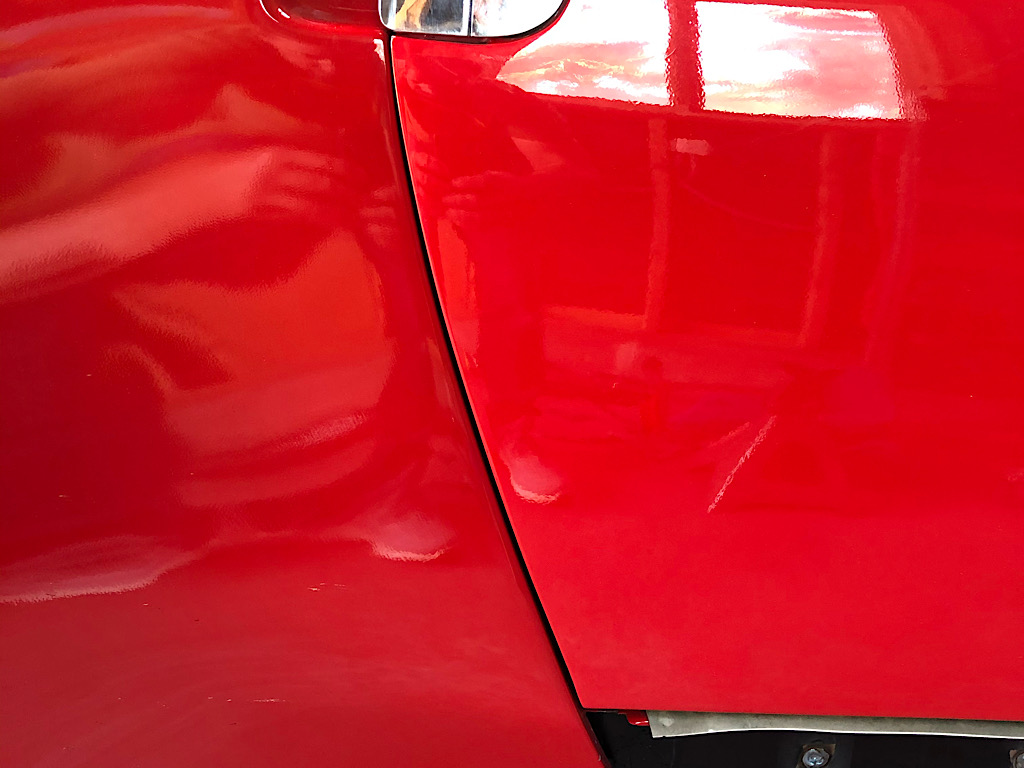 
|
|
|
|
| 914forme |
Sep 17 2020, 08:39 PM
Post
#63
|
|
Times a wastin', get wrenchin'! Group: Members Posts: 3,896 Joined: 24-July 04 From: Dayton, Ohio Member No.: 2,388 Region Association: None |
One other way is open it up, and add a metal roof and make it a coupe.
Theater solution is the 914LTD kit. But I am thinking you might want to take a closer look at your logs. |
|
|
|
| FL000 |
Oct 11 2020, 09:05 AM
Post
#64
|
|
Member Group: Members Posts: 442 Joined: 31-January 12 From: Lancaster, CA Member No.: 14,076 Region Association: Southern California |
I see a couple threads on brake related items so this is fitting. I have been busy the last few weeks (more to come on progress) but need to fast forward to last night.
Bleeding my brakes with my Motive pressure bleeder as I have done numerous times before. I am at the right rear wheel and hear what sounds like a sprinkler...in my garage. Stand up and go to front of car and there is a heavy stream of brake fluid, more like a gusher, shooting up at underside of the hood and coming down all over the front of the car (IMG:style_emoticons/default/blink.gif) We all know brake fluid and paint don’t match right? Long story short I cleaned up what I could, rinsed with a bunch of water, followed by dish soap and then another rinse. I didn’t see any paint residue while cleaning so may have gotten lucky. Oh yeah the culprit was the hose that connects to the bleeder tank ruptured. I know things can fail but not sure if I will be using it again any time soon. 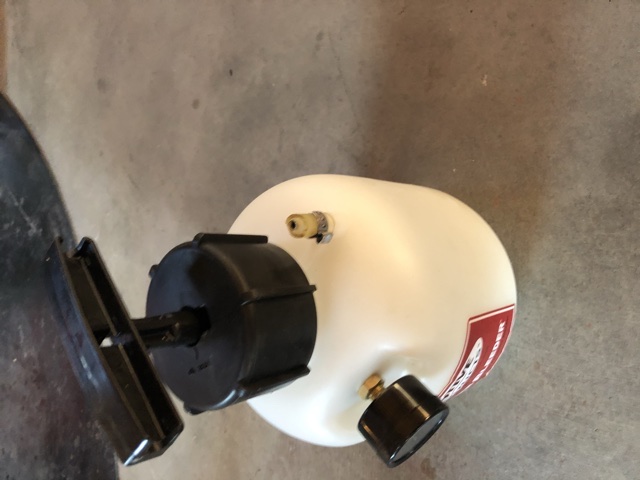 |
|
|
|
| 76-914 |
Oct 11 2020, 09:20 AM
Post
#65
|
|
Repeat Offender & Resident Subaru Antagonist Group: Members Posts: 13,694 Joined: 23-January 09 From: Temecula, CA Member No.: 9,964 Region Association: Southern California |
|
|
|
|
| FL000 |
Oct 11 2020, 11:42 AM
Post
#66
|
|
Member Group: Members Posts: 442 Joined: 31-January 12 From: Lancaster, CA Member No.: 14,076 Region Association: Southern California |
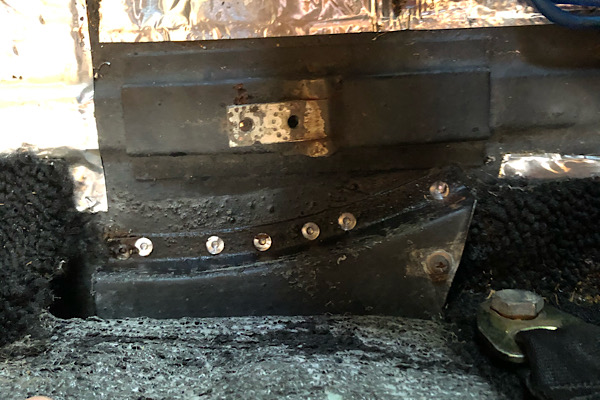
So going back a few weeks I finished up my 914LTD install. The driver side went on pretty smooth with my lessons learned from the passenger side. Also I wasn't fighting a bent long and a bunch of preload (best I can assume) so it was really just getting it set in place.
Here are some pics fro the passenger side and notes about the install. 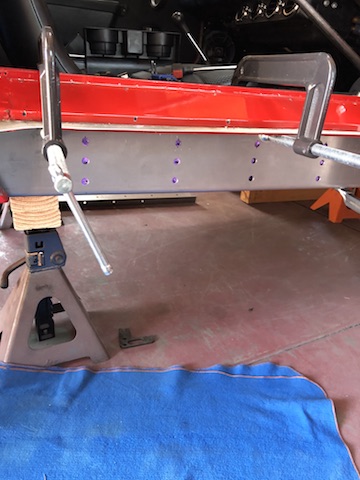 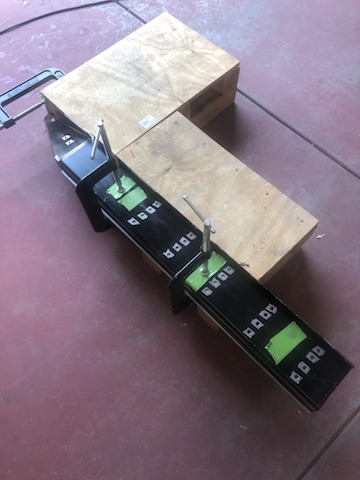 I added a few extra holes for each rib, and in hindsight, the lower ones shown were too low and didn't make good contact with the long. After tacking the two pieces together I removed it through the rear wheel well to finish welding them together on the ground; with the Sheridan kit I couldn't do it on the car. |
|
|
|
| FL000 |
Oct 11 2020, 11:51 AM
Post
#67
|
|
Member Group: Members Posts: 442 Joined: 31-January 12 From: Lancaster, CA Member No.: 14,076 Region Association: Southern California |
Some finish work on the welds, liberal use of seam sealer, and paint to call it good.
 |
|
|
|
| FL000 |
Oct 11 2020, 12:01 PM
Post
#68
|
|
Member Group: Members Posts: 442 Joined: 31-January 12 From: Lancaster, CA Member No.: 14,076 Region Association: Southern California |
I noticed my rear trailing arm bushings were not in good shape and preventing the arm from moving freely. Figured it was a good time to install an Elephant Racing polybronze set. Fairly straight forward install and amazing how easy yet precise the arm moves now. Forgot to take pics of this one.
Years ago when I installed my coil overs I cheaped out on the helper springs and used some wire to keep the spring attached to the top hat. Every time you lift the car the lower part of the springs rise out of their seat and need to find their way back in when lowered. As you can see from the picture it can give your threaded sleeve a beating. I know others have done this successfully so to each their own. I added the helpers since I was already in there. 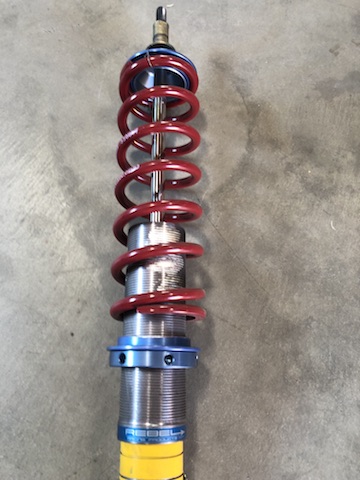 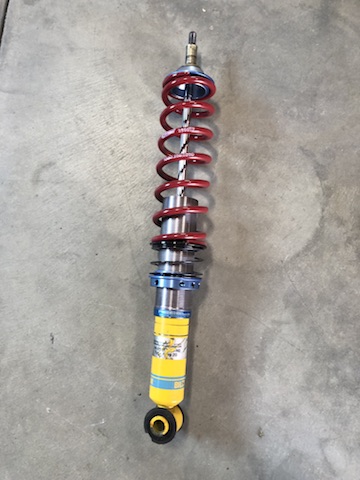 |
|
|
|
| FL000 |
Oct 11 2020, 12:13 PM
Post
#69
|
|
Member Group: Members Posts: 442 Joined: 31-January 12 From: Lancaster, CA Member No.: 14,076 Region Association: Southern California |
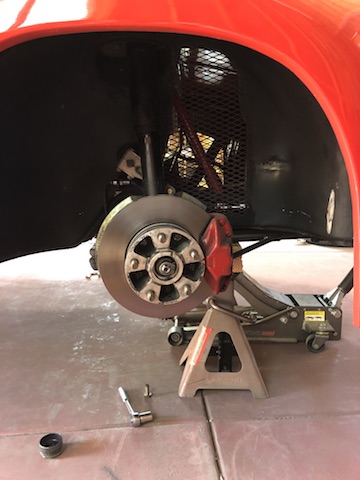
Next I moved onto the fun stuff I have been looking forward to for a while. I acquired a set of Boxster S calipers, rotors, and adapters recently (hat tip to Stephen @914forme ) and figured with the trailing arms off I was already halfway there.
If you are this far into my thread you clearly know I don't mind deviating from the beaten path and open to trying a different approach. I really want to have a parking brake when this is done, but wasn't having great luck finding the 911 parts. I decided to go with the Wilwood MC-4 style parking brake. I knew it would require some fabrication and a different cable to make it work. 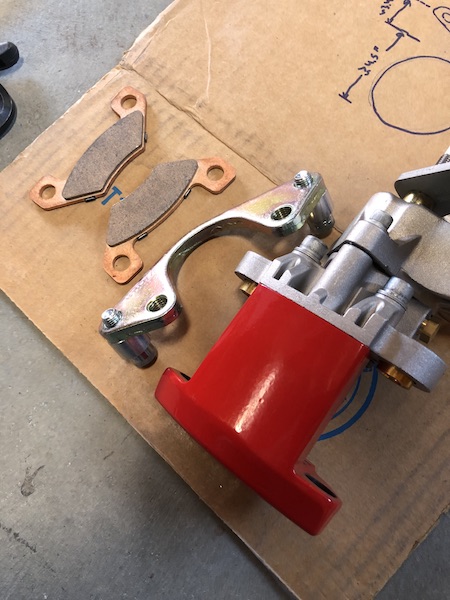 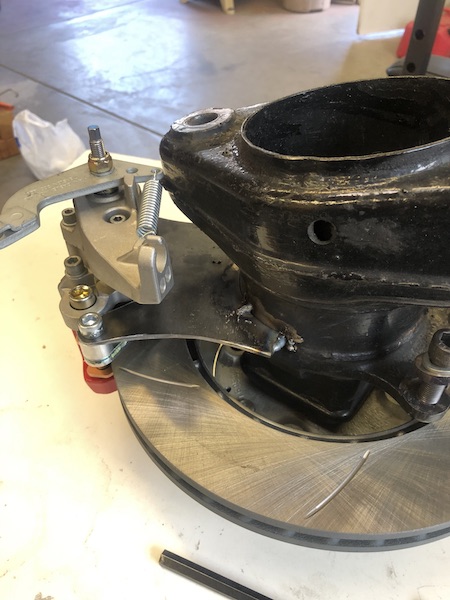 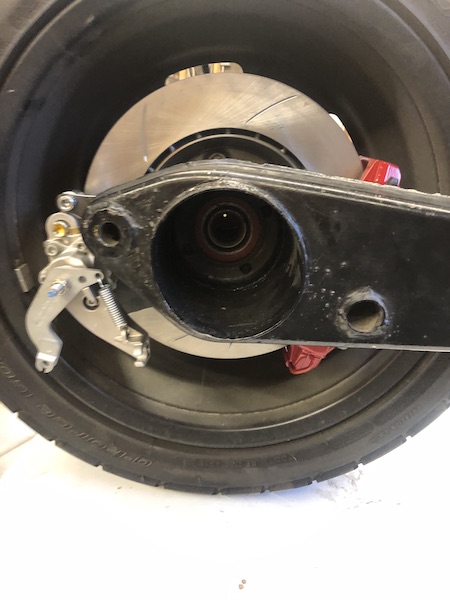 These pics were during the mockup but you can see where I am trying to go with it. |
|
|
|
| FL000 |
Oct 11 2020, 12:28 PM
Post
#70
|
|
Member Group: Members Posts: 442 Joined: 31-January 12 From: Lancaster, CA Member No.: 14,076 Region Association: Southern California |
Got to love these comparison pics. I know there are more variables than just the physical size of the calipers/rotors, but looks cool.
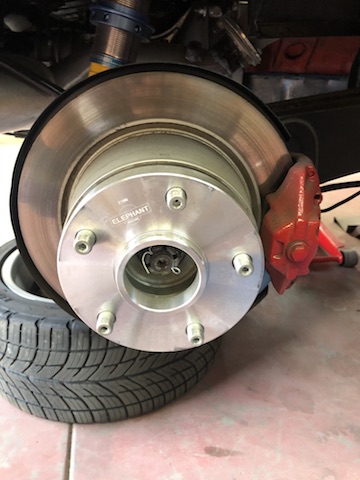 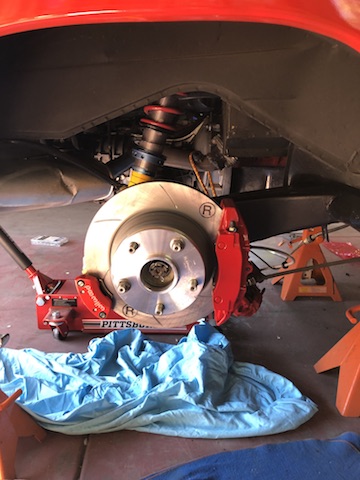  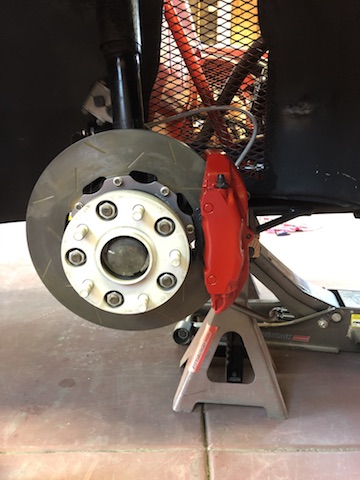 My wife helped me bleed them the old school way and after 2 trips around the car I think I have good enough pedal feel for a road test. Need to do a couple other minor things first so maybe tomorrow or later in the week. I'll consider realigning the rear trailing arms after that. I also need to figure out the parking brake actuation piece. I thought I could have some custom cables made but running into some challenges there. Maybe a good opportunity to install some linear actuators but that may take more time than I have right now (WCR right around the corner). |
|
|
|
| FL000 |
Oct 18 2020, 07:17 PM
Post
#71
|
|
Member Group: Members Posts: 442 Joined: 31-January 12 From: Lancaster, CA Member No.: 14,076 Region Association: Southern California |
Wow, loving the big brakes. Haven’t done a full on panic stop yet but all indications say way more braking capacity available than my previous setup. I did the PMB recommended bedding-in procedure and putting some miles on it to build confidence.
Also changed my little plastic do-dad in the passenger door exterior handle and that door opens fairly easily now. May still address the door gap down the road but satisfied with functionality for now. Went full circle on the parking brake cables and turns out Wilwood makes a universal kit for their caliper - go figure (IMG:style_emoticons/default/chair.gif) I now have functional parking brakes again and here is the setup under the car: 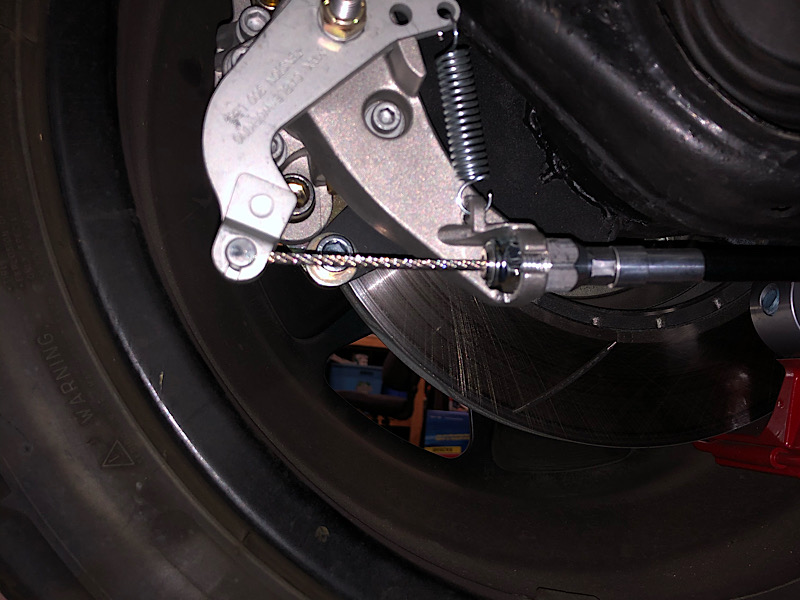 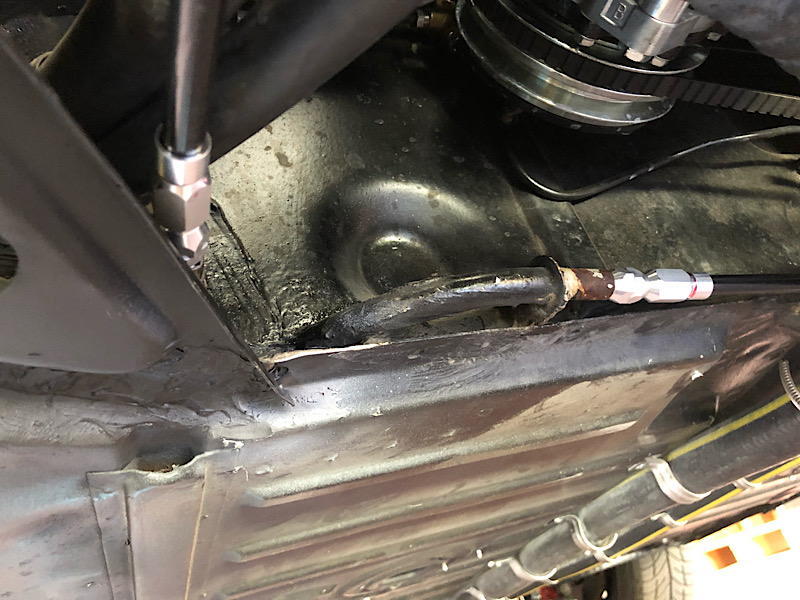 |
|
|
|
| FL000 |
Oct 18 2020, 07:29 PM
Post
#72
|
|
Member Group: Members Posts: 442 Joined: 31-January 12 From: Lancaster, CA Member No.: 14,076 Region Association: Southern California |
Inside the cabin I started by removing the metal guide plate. Still a mystery to me in identifying where all the spot welds are (IMG:style_emoticons/default/smile.gif)
 I didn’t want to prep and spray paint in this area, so I put down some Ospho to at least coat it and hopefully ward off any future rust. 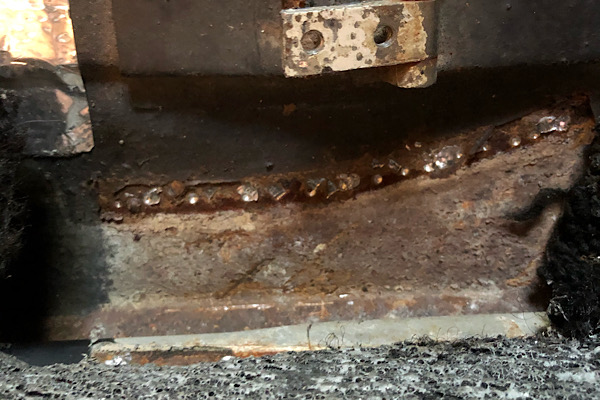 Ran the steel cables through the factory pipes and this is the (almost) final setup. You’ll note the angle of the wires to the handle is a bit extreme. I think I will go back in and use part of the guide plate I removed to help correct the angle and put less stress on the handle. Another day (IMG:style_emoticons/default/beer3.gif) 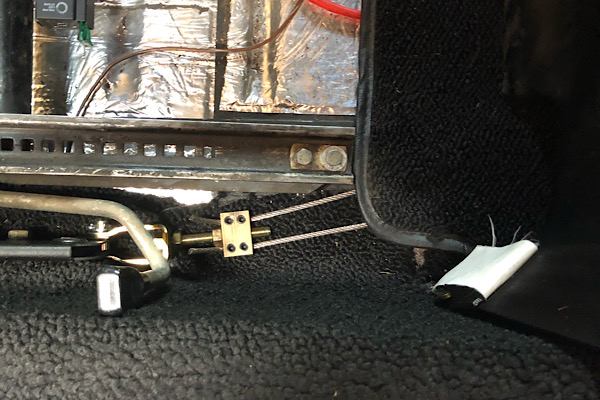 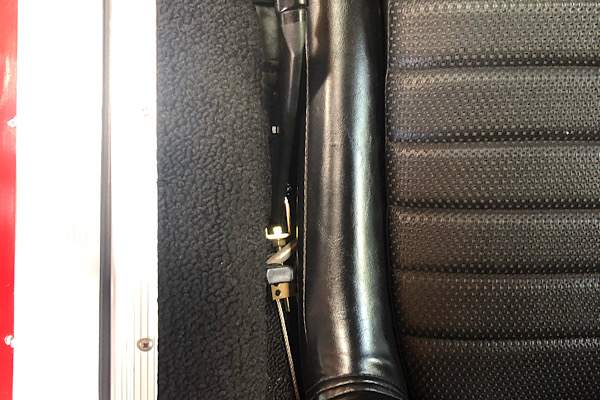 |
|
|
|
| 76-914 |
Oct 19 2020, 10:01 AM
Post
#73
|
|
Repeat Offender & Resident Subaru Antagonist Group: Members Posts: 13,694 Joined: 23-January 09 From: Temecula, CA Member No.: 9,964 Region Association: Southern California |
Looks good. With the weight of the V8 you needed some larger brakes. (IMG:style_emoticons/default/beerchug.gif)
|
|
|
|
| FL000 |
Nov 8 2020, 03:24 PM
Post
#74
|
|
Member Group: Members Posts: 442 Joined: 31-January 12 From: Lancaster, CA Member No.: 14,076 Region Association: Southern California |
I felt like my car was dialed in before heading out for WCR on Thursday morning. Even went so far as to jinx myself on that thread (IMG:style_emoticons/default/chair.gif)
Met the So Cal crew in Gorman and headed out. On the way to our first stop at Harris Ranch I started to notice valve chatter. Checked my oil while there and was barely registering on the dipstick. Threw a quart in (thanks @coondog , I still owe you so pm me a shipping address or let me know next time you are in my area) and hit the road.  Next stop 120 miles or so up the road and a couple quarts lower, smell of oil while driving, and visible oil coming from right front top side of engine. Still running ok so decided to press ahead. Rolled into Petaluma with engine running poorly and minor backfires. Enjoyed the evening with the group and made the decision right before the 0900 meetup on Friday that we could probably nurse it home if we left then. Took it easy and made the 400 miles back somehow. 800 miles round trip in 2 days and added about 8 quarts of oil along the way to make it happen. |
|
|
|
| FL000 |
Nov 8 2020, 03:40 PM
Post
#75
|
|
Member Group: Members Posts: 442 Joined: 31-January 12 From: Lancaster, CA Member No.: 14,076 Region Association: Southern California |
Decided I was going to do the Audi 01E install after WCR so now I need to throw some engine work in too. Probably won’t completely change gears at this point (so to speak) but it is a good opportunity to do some more with the motor at the same time.
Guesses on what happened before I tear into her? Symptoms that I know of: -Oil leaking about a quart per 100 miles as described in previous post -Engine running rough, underpowered, and backfire on right exhaust side -when hard on or off accelerator oil spraying out and making it out engine lid and then to rear trunk (IMG:style_emoticons/default/blink.gif) -does not appear to be coming out of passenger side breather although in the same vicinity. -Radiator fluid no longer pure antifreeze color, looks dirty, but not leaking and not overheating 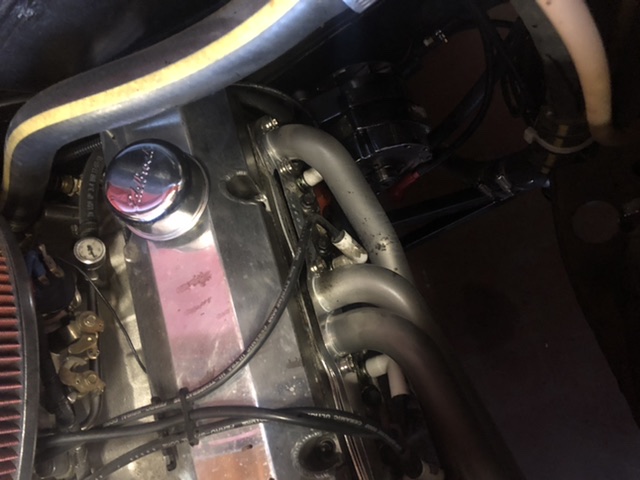 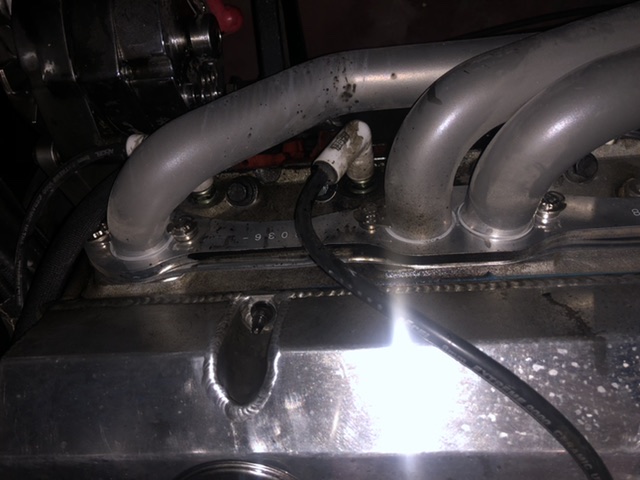 |
|
|
|
| Mueller |
Nov 8 2020, 03:44 PM
Post
#76
|
|
914 Freak! Group: Members Posts: 17,150 Joined: 4-January 03 From: Antioch, CA Member No.: 87 Region Association: None |
I parked next to you at the hotel (beat up light ivory 914) and was looking forward to checking out your car. Glad you made it back home.
I have the same parking brakes, however they are still in the box so I am without functioning parking brakes right now....hopefully for not too long. Nice 914 build for sure. |
|
|
|
| FL000 |
Nov 8 2020, 03:56 PM
Post
#77
|
|
Member Group: Members Posts: 442 Joined: 31-January 12 From: Lancaster, CA Member No.: 14,076 Region Association: Southern California |
QUOTE(Mueller @ Nov 8 2020, 02:44 PM)  I parked next to you at the hotel (beat up light ivory 914) and was looking forward to checking out your car. Glad you made it back home. I have the same parking brakes, however they are still in the box so I am without functioning parking brakes right now....hopefully for not too long. Nice 914 build for sure. Too bad we didn’t get a chance to meet up. If you want more info on what I did for my parking brake setup just let me know. |
|
|
|
| 76-914 |
Nov 8 2020, 06:26 PM
Post
#78
|
|
Repeat Offender & Resident Subaru Antagonist Group: Members Posts: 13,694 Joined: 23-January 09 From: Temecula, CA Member No.: 9,964 Region Association: Southern California |
QUOTE(FL 000 @ Nov 8 2020, 01:24 PM) I felt like my car was dialed in before heading out for WCR on Thursday morning. Even went so far as to jinx myself on that thread (IMG:style_emoticons/default/chair.gif) Met the So Cal crew in Gorman and headed out. On the way to our first stop at Harris Ranch I started to notice valve chatter. Checked my oil while there and was barely registering on the dipstick. Threw a quart in (thanks @coondog , I still owe you so pm me a shipping address or let me know next time you are in my area) and hit the road. Next stop 120 miles or so up the road and a couple quarts lower, smell of oil while driving, and visible oil coming from right front top side of engine. Still running ok so decided to press ahead. Rolled into Petaluma with engine running poorly and minor backfires. Enjoyed the evening with the group and made the decision right before the 0900 meetup on Friday that we could probably nurse it home if we left then. Took it easy and made the 400 miles back somehow. 800 miles round trip in 2 days and added about 8 quarts of oil along the way to make it happen. Never fails. (IMG:style_emoticons/default/slap.gif) |
|
|
|
| FL000 |
Nov 14 2020, 02:37 PM
Post
#79
|
|
Member Group: Members Posts: 442 Joined: 31-January 12 From: Lancaster, CA Member No.: 14,076 Region Association: Southern California |
Alright here’s the next clue from the first peak inside the engine. These are “new” and have about 1000 miles on them. (IMG:style_emoticons/default/blink.gif)
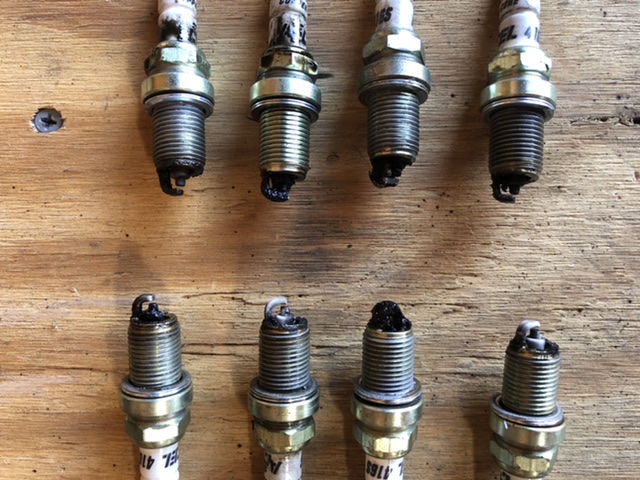 Bottom left on pic is front driver side for reference. The rest are in order. |
|
|
|
| bkrantz |
Nov 14 2020, 08:32 PM
Post
#80
|
|
914 Guru Group: Members Posts: 8,311 Joined: 3-August 19 From: SW Colorado Member No.: 23,343 Region Association: Rocky Mountains |
QUOTE(FL 000 @ Sep 16 2020, 06:37 PM) Well that sucks. Got passenger long reinforcement welded in with gap set as desired and this was the result with weight on wheels. Not sure how evident it is from picture, but gap closed up quite a bit. No more rubbing so I guess that is good. Door is functional so going to put problem to back burner again. Short of a frame bench I think a roll cage may be my only at home solution at this point. Don’t really want a roll cage so need to ponder on it for awhile. The longs do the majority of the work keeping the door gap set, so I wonder if my flex is happening in the metal above it, with the shock being the lever to bend it all forward. (IMG:style_emoticons/default/idea.gif) How is the front gap? It is possible to shift the door forward slightly, with a bit of persuasion of the B-pillar hinge mount spots (with a block and hammer and feeling brave). |
|
|
|
|
1 User(s) are reading this topic (1 Guests and 0 Anonymous Users)
0 Members:

|
Lo-Fi Version | Time is now: 1st April 2025 - 05:19 PM |
Invision Power Board
v9.1.4 © 2025 IPS, Inc.