|
|

|
Porsche, and the Porsche crest are registered trademarks of Dr. Ing. h.c. F. Porsche AG.
This site is not affiliated with Porsche in any way. Its only purpose is to provide an online forum for car enthusiasts. All other trademarks are property of their respective owners. |
|
|
  |
| Literati914 |
 Mar 21 2024, 01:42 PM Mar 21 2024, 01:42 PM
Post
#261
|
|
Senior Member    Group: Members Posts: 1,777 Joined: 16-November 06 From: Dallas, TX Member No.: 7,222 Region Association: Southwest Region |
I’ve also installed some sound deadener to the firewall and floor. I got more to do to the floors and doors but you get the idea. For the stuff on the floor I doubled it up back to back or (sticky side to sticky side) so that it’s not actually stuck to the floor at all and can easily be lifted out to monitor moisture and rust in the future
Attached image(s) 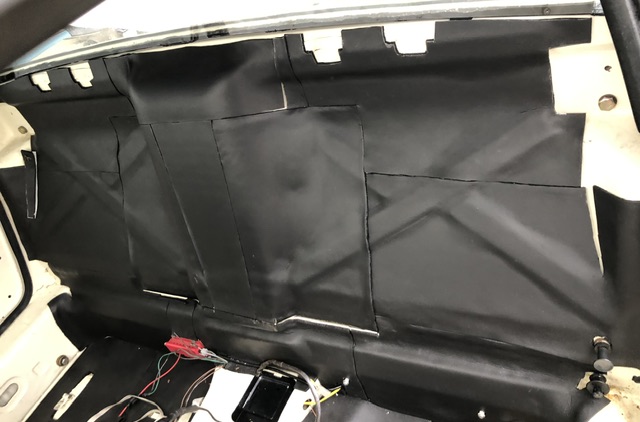 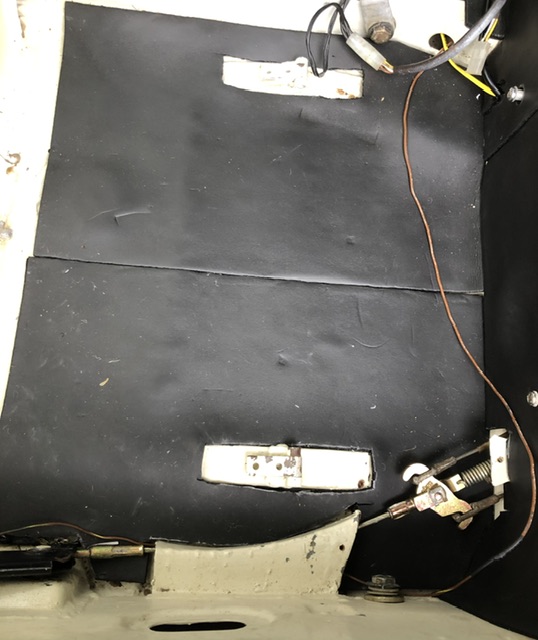
|
| Literati914 |
 Mar 21 2024, 01:45 PM Mar 21 2024, 01:45 PM
Post
#262
|
|
Senior Member    Group: Members Posts: 1,777 Joined: 16-November 06 From: Dallas, TX Member No.: 7,222 Region Association: Southwest Region |
I got the head light buckets etc completely installed as well as the front hood
Attached image(s) 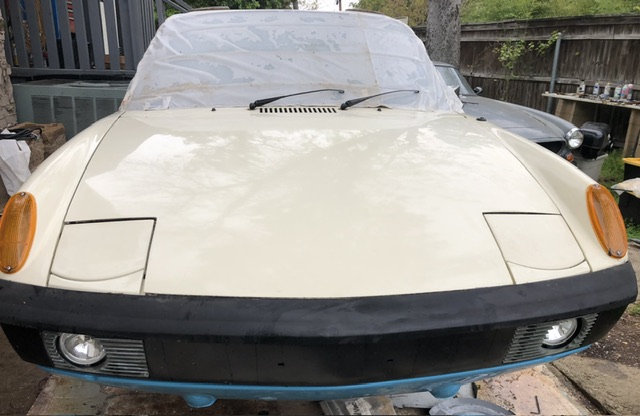
|
| Literati914 |
 Mar 21 2024, 01:48 PM Mar 21 2024, 01:48 PM
Post
#263
|
|
Senior Member    Group: Members Posts: 1,777 Joined: 16-November 06 From: Dallas, TX Member No.: 7,222 Region Association: Southwest Region |
I installed an old stock set of positive side stripes that had dried out in a few spots (didn’t realize it before I started the install).. needless to say they’ll need to be replaced
Attached image(s) 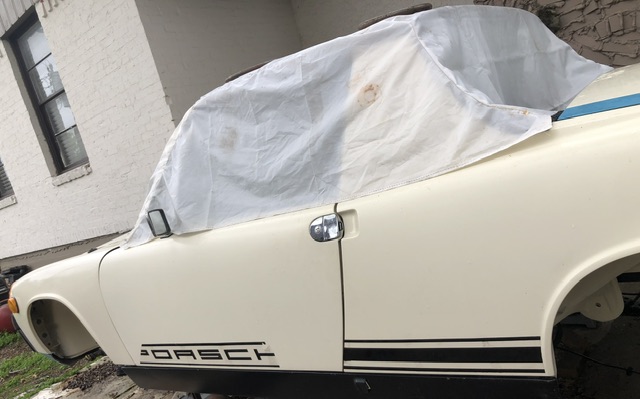
|
| Literati914 |
 Apr 4 2024, 09:47 AM Apr 4 2024, 09:47 AM
Post
#264
|
|
Senior Member    Group: Members Posts: 1,777 Joined: 16-November 06 From: Dallas, TX Member No.: 7,222 Region Association: Southwest Region |
I rebuilt my axle shaft / CV units a few month back and finally got around to getting them installed on the trailing arms.
Before: Attached image(s) 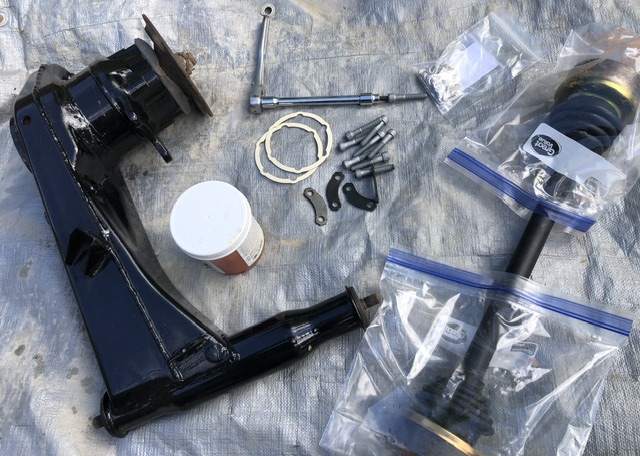
|
| Literati914 |
 Apr 4 2024, 09:47 AM Apr 4 2024, 09:47 AM
Post
#265
|
|
Senior Member    Group: Members Posts: 1,777 Joined: 16-November 06 From: Dallas, TX Member No.: 7,222 Region Association: Southwest Region |
After:
Attached image(s) 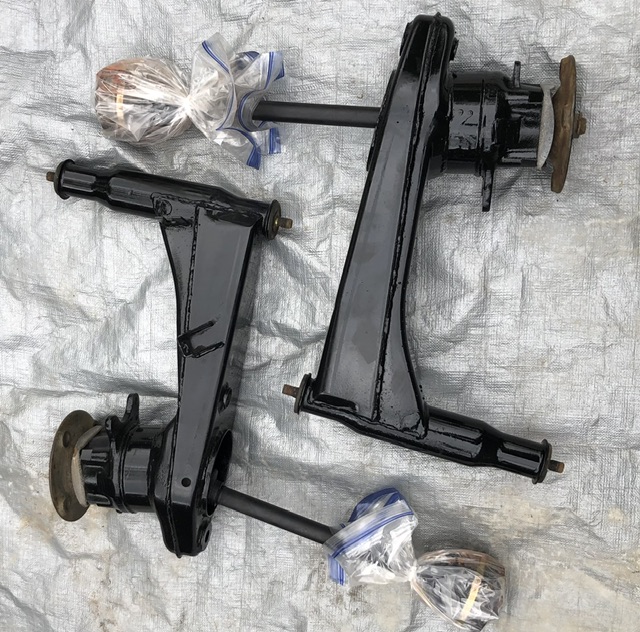
|
| Literati914 |
 Apr 4 2024, 09:48 AM Apr 4 2024, 09:48 AM
Post
#266
|
|
Senior Member    Group: Members Posts: 1,777 Joined: 16-November 06 From: Dallas, TX Member No.: 7,222 Region Association: Southwest Region |
And installed (IMG:style_emoticons/default/piratenanner.gif)
Attached image(s) 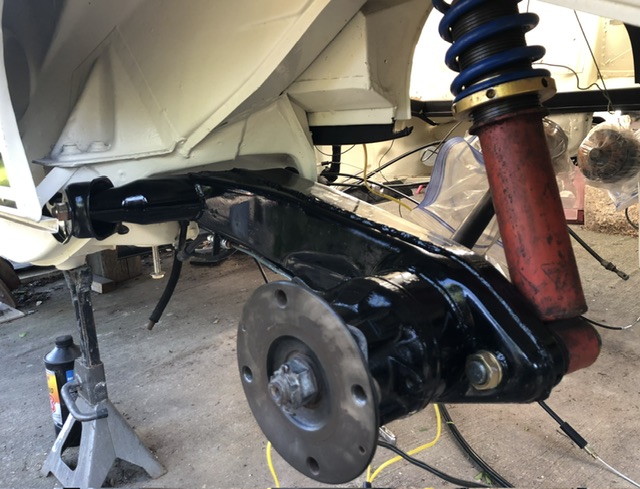
|
| Literati914 |
 Apr 4 2024, 03:45 PM Apr 4 2024, 03:45 PM
Post
#267
|
|
Senior Member    Group: Members Posts: 1,777 Joined: 16-November 06 From: Dallas, TX Member No.: 7,222 Region Association: Southwest Region |
Not sure why I never posted that the front suspension had been installed, I did it a couple months ago. These are the later wedge bolt style but I’m contemplating switching over to early struts so I can use my aluminum brembo calipers. I went with the later set cause I had a usable set of late rotors on hand. Turbo Tie rods are present and accounted for too:
Attached image(s) 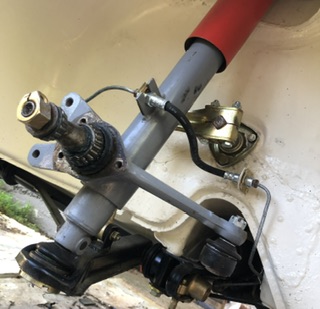 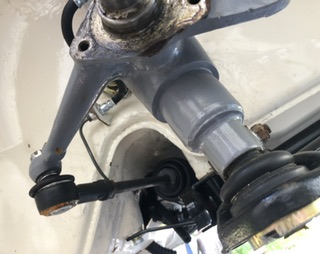
|
| Literati914 |
 Apr 4 2024, 04:11 PM Apr 4 2024, 04:11 PM
Post
#268
|
|
Senior Member    Group: Members Posts: 1,777 Joined: 16-November 06 From: Dallas, TX Member No.: 7,222 Region Association: Southwest Region |
I also got around to cutting and edging up my blue wool square weave carpets. This pics is before I finished off the edging but gives a good in process shot
Attached image(s) 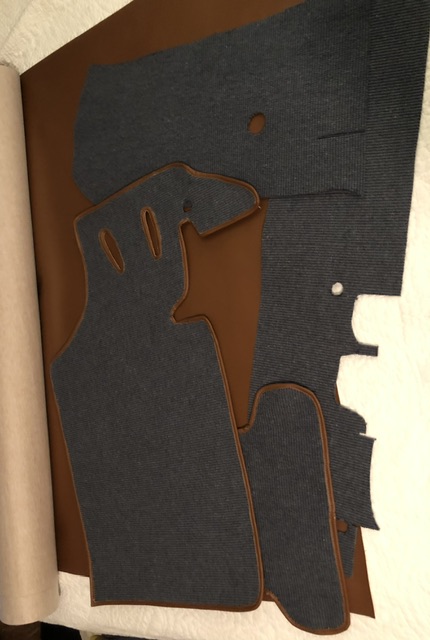
|
| Literati914 |
 Apr 4 2024, 04:14 PM Apr 4 2024, 04:14 PM
Post
#269
|
|
Senior Member    Group: Members Posts: 1,777 Joined: 16-November 06 From: Dallas, TX Member No.: 7,222 Region Association: Southwest Region |
Here’s a shot of the set installed. Notice I did a little something different at the passengers firewall area.. that area actually has a linear vertical curve, I like it highlighted by the trim and that’s how I did these.
Attached image(s) 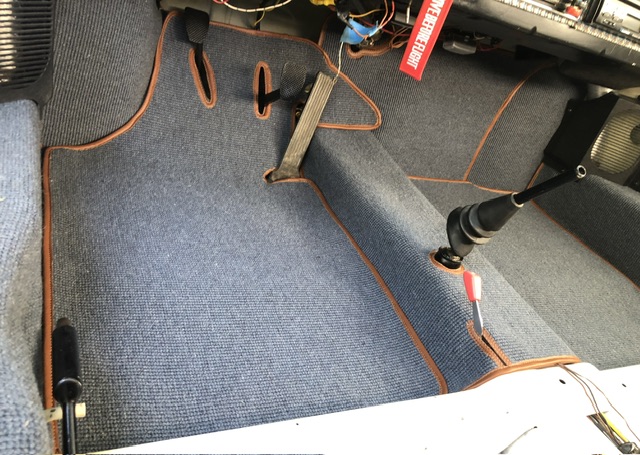
|
| Literati914 |
 Apr 4 2024, 04:18 PM Apr 4 2024, 04:18 PM
Post
#270
|
|
Senior Member    Group: Members Posts: 1,777 Joined: 16-November 06 From: Dallas, TX Member No.: 7,222 Region Association: Southwest Region |
I still have some automotive jute style underpayment to cut up and install, haven’t gotten around to it just yet.
The rear and long sections: Attached image(s) 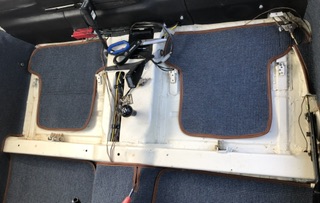 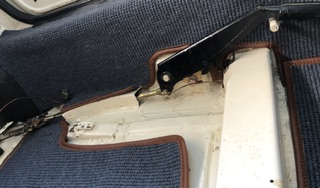
|
| gereed75 |
 Apr 4 2024, 07:24 PM Apr 4 2024, 07:24 PM
Post
#271
|
|
Senior Member    Group: Members Posts: 1,313 Joined: 19-March 13 From: Pittsburgh PA Member No.: 15,674 Region Association: North East States 
|
Beautiful carpet set. Nice work there!
|
| slowrodent |
 Apr 5 2024, 09:00 AM Apr 5 2024, 09:00 AM
Post
#272
|
|
Member   Group: Members Posts: 156 Joined: 29-February 20 From: Tucson/Oro Valley Member No.: 23,981 Region Association: Southwest Region 
|
Very impressive restoration thus far. Some personalization which seems to fit your car quite well. Thanks.
|
| ClayPerrine |
 Apr 5 2024, 12:41 PM Apr 5 2024, 12:41 PM
Post
#273
|
|
Life's been good to me so far.....                Group: Admin Posts: 15,948 Joined: 11-September 03 From: Hurst, TX. Member No.: 1,143 Region Association: NineFourteenerVille 
|
Not sure why I never posted that the front suspension had been installed, I did it a couple months ago. These are the later wedge bolt style but I’m contemplating switching over to early struts so I can use my aluminum brembo calipers. I went with the later set cause I had a usable set of late rotors on hand. Turbo Tie rods are present and accounted for too: Zims offers a service where they replace the bottom of the early pinch bolt struts and put in the wedge bolt style connectors. The wedge bolt struts are a safer, better design. Oh, and why do you need to put in the early strust for the Brembo calipers? |
| 2mAn |
 Apr 5 2024, 03:01 PM Apr 5 2024, 03:01 PM
Post
#274
|
|
trying to see how long I can go without a 914   Group: Members Posts: 487 Joined: 14-November 13 From: Westchester (Los Angeles) Member No.: 16,644 Region Association: Southern California |
Went through this whole thread and WOW... from where it started to where it is today, amazing. Nice work!
|
| Literati914 |
 Apr 8 2024, 06:31 PM Apr 8 2024, 06:31 PM
Post
#275
|
|
Senior Member    Group: Members Posts: 1,777 Joined: 16-November 06 From: Dallas, TX Member No.: 7,222 Region Association: Southwest Region |
Zims offers a service where they replace the bottom of the early pinch bolt struts and put in the wedge bolt style connectors. The wedge bolt struts are a safer, better design. Oh, and why do you need to put in the early strust for the Brembo calipers? I had no idea that Zims did that alteration .. but I’ve seriously considered making the changes myself. Shouldn’t be too hard, plus I could raise the spindles at the same time (IMG:style_emoticons/default/idea.gif) Btw - Eric at PMB did a caliper weight brake down sometime back and mentioned that the aluminum Brembos (Alfa GTV6) were only compatible with early struts on the 4 lug cars. I think there’s an offset difference at the caliper mounting point (IMG:style_emoticons/default/confused24.gif) . |
| Literati914 |
 Apr 8 2024, 06:32 PM Apr 8 2024, 06:32 PM
Post
#276
|
|
Senior Member    Group: Members Posts: 1,777 Joined: 16-November 06 From: Dallas, TX Member No.: 7,222 Region Association: Southwest Region |
|
| Literati914 |
 Apr 8 2024, 06:38 PM Apr 8 2024, 06:38 PM
Post
#277
|
|
Senior Member    Group: Members Posts: 1,777 Joined: 16-November 06 From: Dallas, TX Member No.: 7,222 Region Association: Southwest Region |
I messed around and reupholster my seats over the last couple days
Attached image(s) 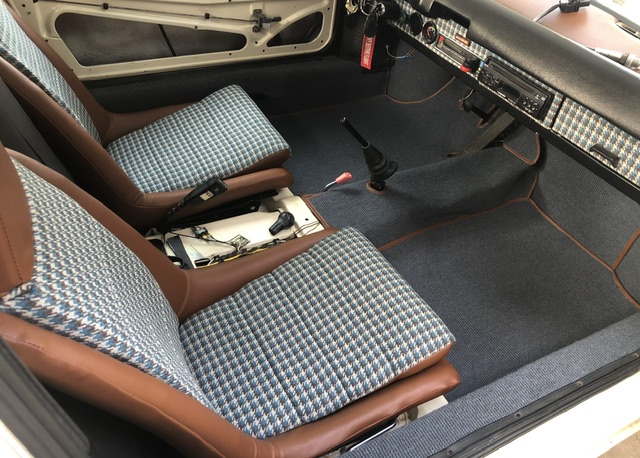
|
| Literati914 |
 Apr 8 2024, 06:40 PM Apr 8 2024, 06:40 PM
Post
#278
|
|
Senior Member    Group: Members Posts: 1,777 Joined: 16-November 06 From: Dallas, TX Member No.: 7,222 Region Association: Southwest Region |
They’re not bolted to the sliders yet, but I couldn’t resist setting them in the car for a look see (IMG:style_emoticons/default/biggrin.gif)
Attached image(s) 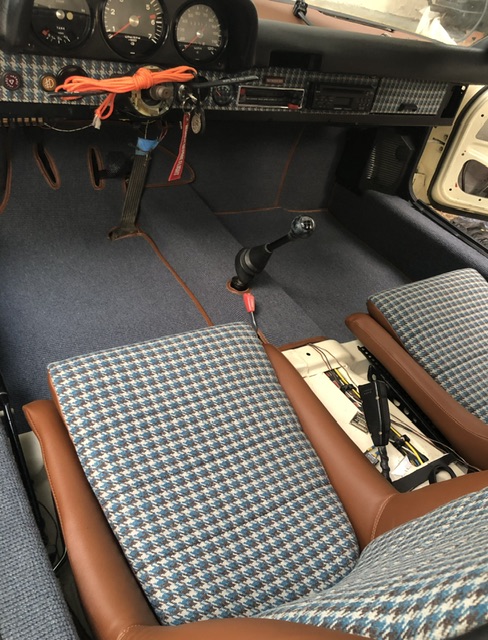
|
| Literati914 |
 Apr 11 2024, 08:18 PM Apr 11 2024, 08:18 PM
Post
#279
|
|
Senior Member    Group: Members Posts: 1,777 Joined: 16-November 06 From: Dallas, TX Member No.: 7,222 Region Association: Southwest Region |
I somehow acquired a partial Tangerine Racing SS fuel line replacement kit .. it only had the tunnel lines and I’d installed them several months ago. I knew eventually I’d have to do something about the shorter pieces that go up thru the engine shelf and to and from the fuel rails. So I happened to have some 3/8” tubing and custom bent up the feed line. For the return side (get this) I used the metal part that was fused to the front of the original return fuel line (CSOB (IMG:style_emoticons/default/lol-2.gif) ). I just had to put a few bends in it, and good to go!
Attached image(s) 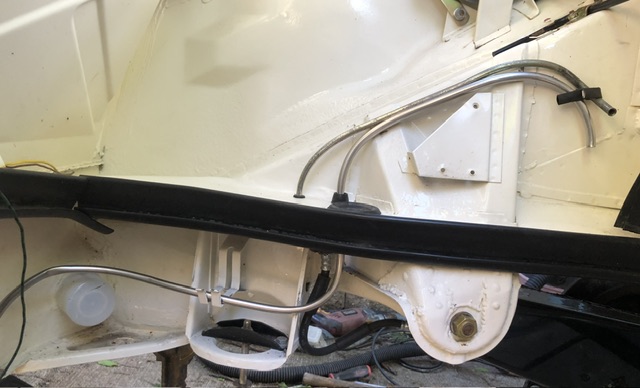
|
| Literati914 |
 Apr 14 2024, 08:59 PM Apr 14 2024, 08:59 PM
Post
#280
|
|
Senior Member    Group: Members Posts: 1,777 Joined: 16-November 06 From: Dallas, TX Member No.: 7,222 Region Association: Southwest Region |
Small job completed today - replaced the bushings for my shift rod coupler… well replace is not exactly accurate since there was no sign of any bushing at all to begin with.. didn’t take a bunch of pics, but this one shows the new bushings as I’m about to press the pin back into the assembly. Little steps, but it’s something.
Attached image(s) 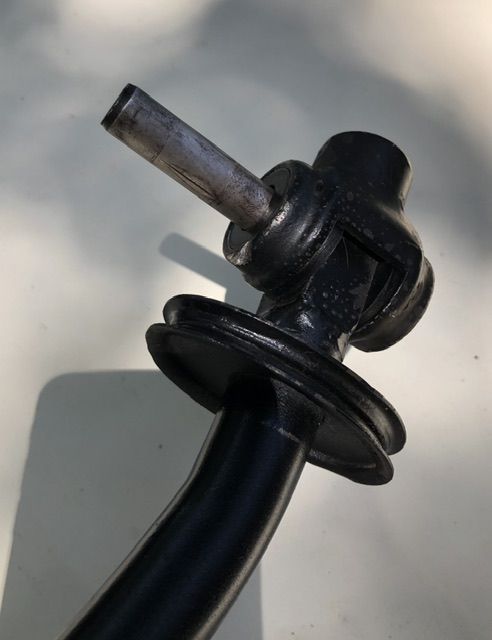
|
  |
2 User(s) are reading this topic (1 Guests and 0 Anonymous Users)
1 Members: HugoNL914

|
Lo-Fi Version | Time is now: 22nd December 2024 - 07:22 AM |
Invision Power Board
v9.1.4 © 2024 IPS, Inc.


