|
|
|
Porsche, and the Porsche crest are registered trademarks of Dr. Ing. h.c. F. Porsche AG.
This site is not affiliated with Porsche in any way. Its only purpose is to provide an online forum for car enthusiasts. All other trademarks are property of their respective owners. |
|
|

  |

| kroelofsen |
 Dec 23 2019, 12:59 PM Dec 23 2019, 12:59 PM
Post
#1
|
|
Member  Group: Members Posts: 101 Joined: 27-June 19 From: The Netherlands Member No.: 23,255 Region Association: Europe |
Hi everyone,
Started today to remove some undercoating in the rear wheel arches, see picture... 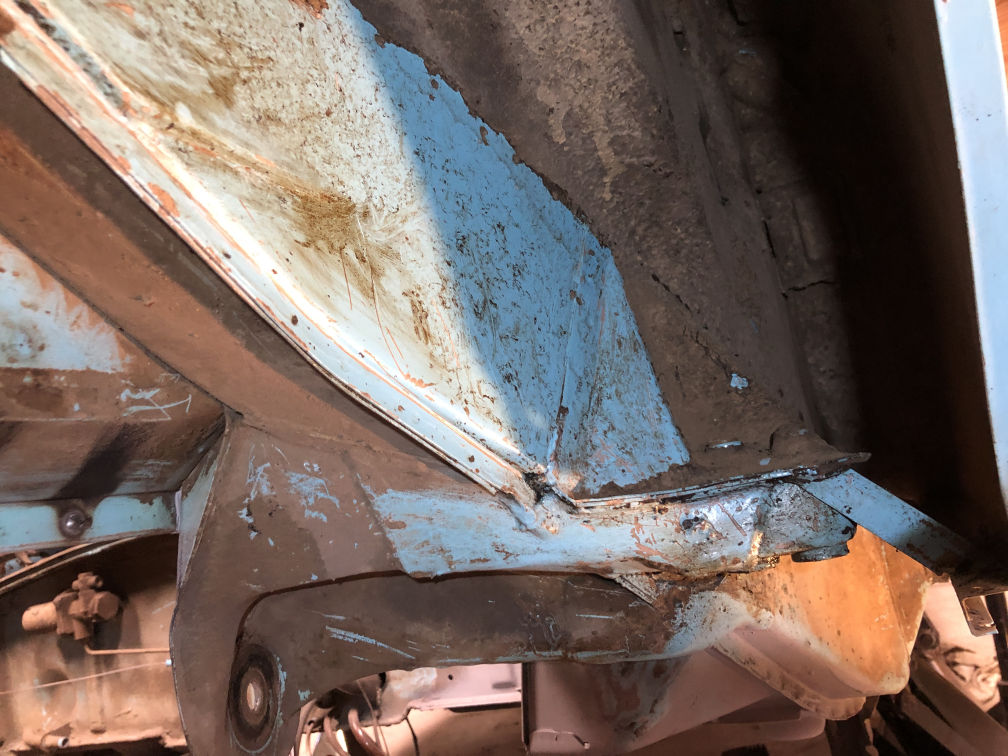 When using a (blunt) chisel is comes of rather easily. Any advise on removing it in the corners of the arches…? Especially in the rear it is almost impossible to reach the far corners... I also found the foam in the rear of the panels near the rear lights (yellow circle). With a hook I'm picking it out. Any tips on doing this more easily…? 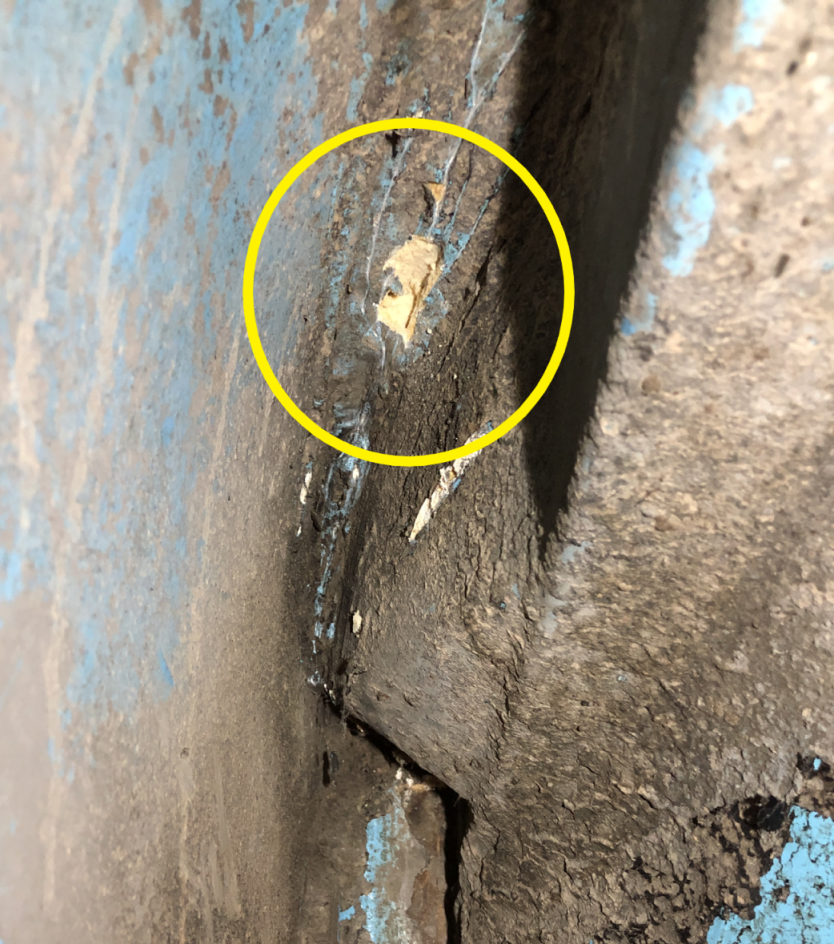 Till now I did not find any rust. The car is from 12/73 and 1.8 L-jet in olympic blue. |
   |

 
|
| ClayPerrine |
Dec 23 2019, 01:20 PM
Post
#2
|
|
Life's been good to me so far..... Group: Admin Posts: 15,950 Joined: 11-September 03 From: Hurst, TX. Member No.: 1,143 Region Association: NineFourteenerVille |
That foam was ironically installed to prevent rust. It ended retaining water and causing rust.
I was able to remove it by cleaning off the top layer of sealant, then spraying it with carb cleaner. The carb cleaner dissolves it and it runs out the bottom. You will have to repaint in the fender if you do it that way. Clay |
|
|
|
| rudedude |
Dec 23 2019, 02:27 PM
Post
#3
|
|
Senior Member Group: Members Posts: 517 Joined: 1-January 05 From: minneapolis, mn Member No.: 3,387 Region Association: Upper MidWest |
I took a long big welding rod, sharpened a tip on it and scraped little by little until it was all out. Could bend it to the shape I needed at the time. Took a while and hopefully was worth it
|
 |
|
| Eric_Shea |
Dec 23 2019, 02:41 PM
Post
#4
|
|
PMB Performance Group: Admin Posts: 19,289 Joined: 3-September 03 From: Salt Lake City, UT Member No.: 1,110 Region Association: Rocky Mountains |
Torch.
|
|
|
|
| Superhawk996 |
Dec 23 2019, 03:35 PM
Post
#5
|
|
914 Guru Group: Members Posts: 6,598 Joined: 25-August 18 From: Woods of N. Idaho Member No.: 22,428 Region Association: Galt's Gulch |
QUOTE(kroelofsen @ Dec 23 2019, 01:59 PM)  Any tips on doing this more easily…? Per Jeff Hail recommendation Wurth DBS 3600 with the wire flail wheel simply tears though the factory seam sealer and makes easy work of it. It is pricey but worth it. There are 1/2 price alternatives though Eastwood and one other place (forget the name). https://www.wurthusa.com/Tools/Air-Tool-Par...Case/p/07033601 All depends on what your time is Wurth (pun (IMG:style_emoticons/default/laugh.gif) ). It tears simply tears though undercoating even easier without damaging the metal below it. Other methods work but this tool as designed for professional use for exactly this task where time = money. |
|
|
|
| djway |
Dec 23 2019, 11:14 PM
Post
#6
|
|
Senior Member Group: Members Posts: 787 Joined: 16-October 15 From: Riverside Member No.: 19,266 Region Association: Southern California |
Heat the metal on the other side then scrape off.
Huge mess, time and wear a resperator as I hear this stuff gives off toxins. |
|
|
|
| kroelofsen |
Dec 24 2019, 01:51 AM
Post
#7
|
|
Member Group: Members Posts: 101 Joined: 27-June 19 From: The Netherlands Member No.: 23,255 Region Association: Europe |
Many thanks for good suggestions, will give it a try…
Happy holidays…! (IMG:style_emoticons/default/santa_smiley.gif) |
|
|
|
| mlindner |
Dec 24 2019, 08:36 AM
Post
#8
|
|
Senior Member Group: Members Posts: 1,591 Joined: 11-November 11 From: Merrimac, WI Member No.: 13,770 Region Association: Upper MidWest |
Purchase this from HF, extended angle grinder and a wire brush wheel, cut the 1/4 stud off the wheel and drill hole to fit grinder. I did my entire exterior floor and inner fenders in four hours. Best, Mark
 |
|
|
|
| Superhawk996 |
Dec 24 2019, 10:12 AM
Post
#9
|
|
914 Guru Group: Members Posts: 6,598 Joined: 25-August 18 From: Woods of N. Idaho Member No.: 22,428 Region Association: Galt's Gulch |
QUOTE(mlindner @ Dec 24 2019, 09:36 AM) Purchase this from HF, extended angle grinder and a wire brush wheel, cut the 1/4 stud off the wheel and drill hole to fit grinder. I did my entire exterior floor and inner fenders in four hours. Best, Mark I like it. The low profile head will have advantages over the Wurth tool in tight quarters. I don't know that I've ever seen that tool in a HF store but I'll be looking next time! Just be sure to wear a face shield. Spinning a wire wheel at air tool speeds can shed those wires as very dangerous little projectiles. |
|
|
|
| mlindner |
Dec 24 2019, 10:24 AM
Post
#10
|
|
Senior Member Group: Members Posts: 1,591 Joined: 11-November 11 From: Merrimac, WI Member No.: 13,770 Region Association: Upper MidWest |
Superhawk996, and I think it was only $25.00. really worked great up in the tight 914 inner fenders.
|
|
|
|
| kroelofsen |
Dec 24 2019, 02:15 PM
Post
#11
|
|
Member Group: Members Posts: 101 Joined: 27-June 19 From: The Netherlands Member No.: 23,255 Region Association: Europe |
The extended angle grinder is really clever, will get one asap... Many thanks for sharing!
|
|
|
|
| kroelofsen |
Jan 2 2020, 12:14 PM
Post
#12
|
|
Member Group: Members Posts: 101 Joined: 27-June 19 From: The Netherlands Member No.: 23,255 Region Association: Europe |
Today I continued working in de rear fenders... I remove from one side the seal sealer and foam. See the big piece I got out...
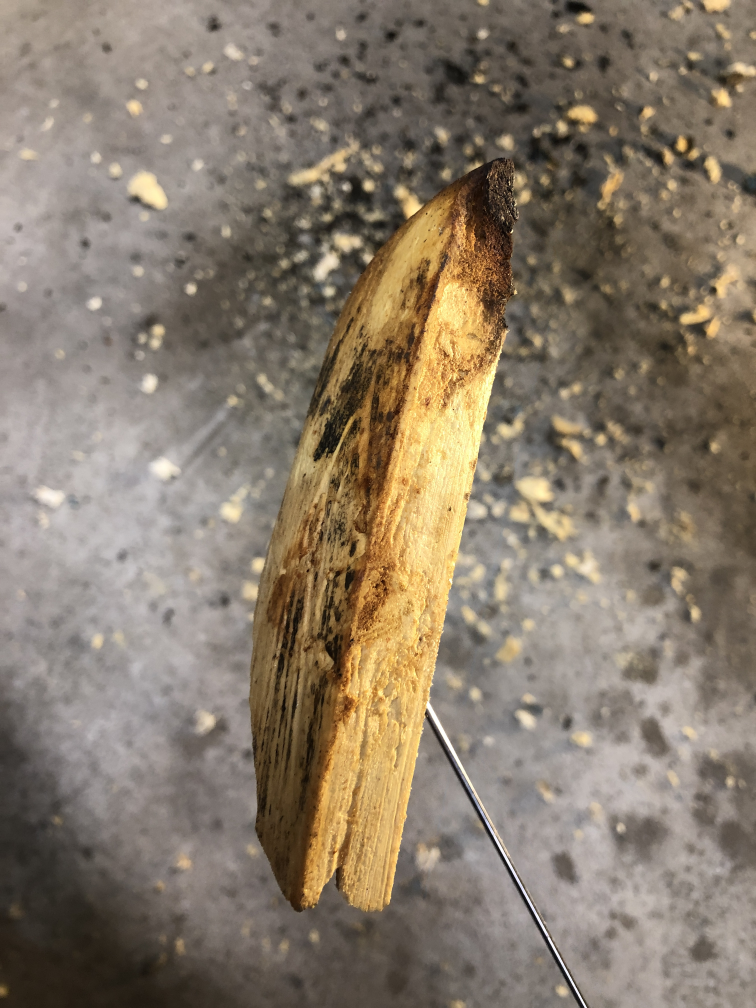 It wasn't very much sticking to the bare metal... There is no rust to be found luckily! (IMG:style_emoticons/default/piratenanner.gif) |
|
|
|
| Cairo94507 |
Jan 2 2020, 02:13 PM
Post
#13
|
|
Michael Group: Members Posts: 10,130 Joined: 1-November 08 From: Auburn, CA Member No.: 9,712 Region Association: Northern California |
Nice. Get that foam out and leave it out. (IMG:style_emoticons/default/beerchug.gif)
|
|
|
|
| mbseto |
Jan 3 2020, 01:20 PM
Post
#14
|
|
Senior Member Group: Members Posts: 1,257 Joined: 6-August 14 From: Cincy Member No.: 17,743 Region Association: North East States |
QUOTE(Superhawk996 @ Dec 24 2019, 11:12 AM) Just be sure to wear a face shield. Spinning a wire wheel at air tool speeds can shed those wires as very dangerous little projectiles. I think I'd even want a full face respirator for that... |
|
|
|
| mepstein |
Jan 3 2020, 01:31 PM
Post
#15
|
|
914-6 GT in waiting Group: Members Posts: 19,648 Joined: 19-September 09 From: Landenberg, PA/Wilmington, DE Member No.: 10,825 Region Association: MidAtlantic Region |
QUOTE(mbseto @ Jan 3 2020, 02:20 PM) QUOTE(Superhawk996 @ Dec 24 2019, 11:12 AM) Just be sure to wear a face shield. Spinning a wire wheel at air tool speeds can shed those wires as very dangerous little projectiles. I think I'd even want a full face respirator for that... I've been wearing a respirator (besides a face shield) for cutting, grinding, blasting etc. Trying to keep the nasty stuff out of my lungs. |
|
|
|
| Rand |
Jan 3 2020, 01:45 PM
Post
#16
|
|
Cross Member Group: Members Posts: 7,409 Joined: 8-February 05 From: OR Member No.: 3,573 Region Association: None |
QUOTE(Eric_Shea @ Dec 23 2019, 12:41 PM) Torch. Definitely the most satisfying. Burn that garbage out. I ain't wasting wear on abrasive tools and time for that worthless poo. |
|
|
|
|
1 User(s) are reading this topic (1 Guests and 0 Anonymous Users)
0 Members:

|
Lo-Fi Version | Time is now: 26th December 2024 - 02:24 PM |
Invision Power Board
v9.1.4 © 2024 IPS, Inc.