|
|

|
Porsche, and the Porsche crest are registered trademarks of Dr. Ing. h.c. F. Porsche AG.
This site is not affiliated with Porsche in any way. Its only purpose is to provide an online forum for car enthusiasts. All other trademarks are property of their respective owners. |
|
|
  |
| BillC |
 Feb 27 2021, 11:32 AM Feb 27 2021, 11:32 AM
Post
#121
|
|
Senior Member    Group: Members Posts: 559 Joined: 24-April 15 From: Silver Spring, MD Member No.: 18,667 Region Association: MidAtlantic Region 
|
Welded in the patch last night, and ground it down this morning. With any luck, this is the last large patch I'll need to weld into the 914 (at least for a while).
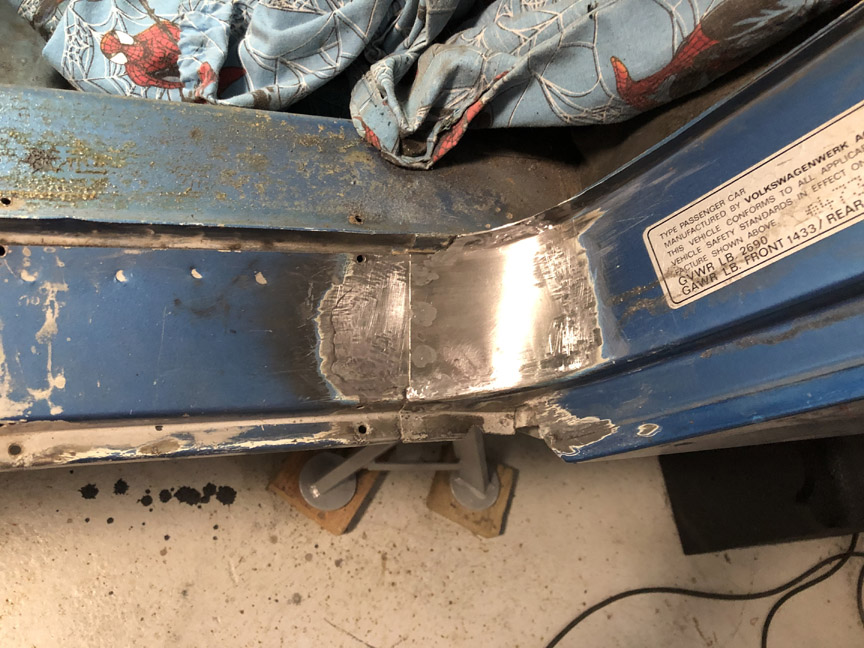 Now I need to prep and paint the door opening. Unfortunately, this is my least favorite part of working on a car. Also one of the slowest parts, since it requires waiting for everything to dry and/or harden -- not good for those of us who are patience-impaired. |
| BillC |
 Mar 12 2021, 06:56 PM Mar 12 2021, 06:56 PM
Post
#122
|
|
Senior Member    Group: Members Posts: 559 Joined: 24-April 15 From: Silver Spring, MD Member No.: 18,667 Region Association: MidAtlantic Region 
|
And . . . another milestone achieved -- driver's door is back on! (IMG:style_emoticons/default/piratenanner.gif)
Since it's just bodywork -- a little filler, a lot of sanding, then primer and paint -- I'm just going to show the final product. Here's what the door opening now looks like: 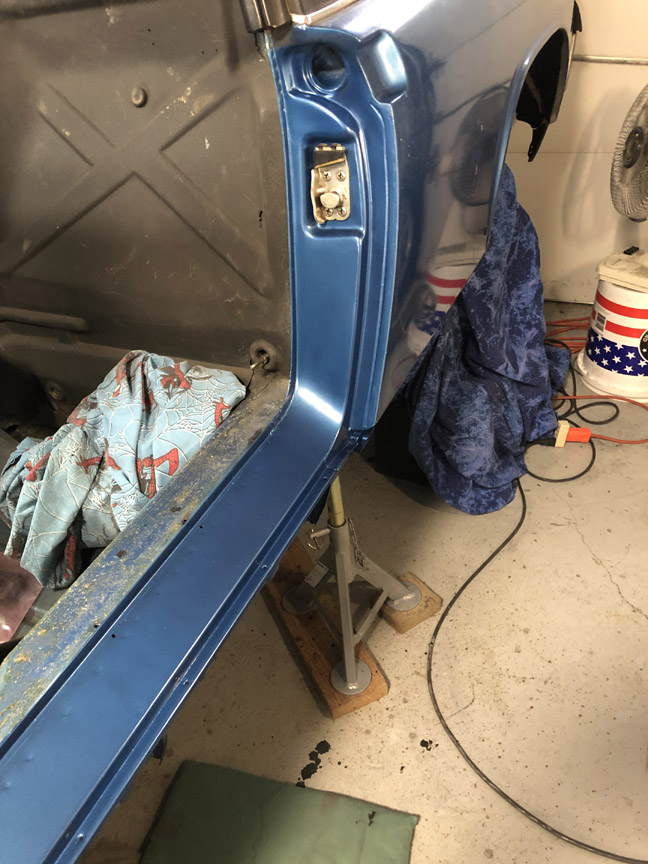 And with the door re-mounted and adjusted: 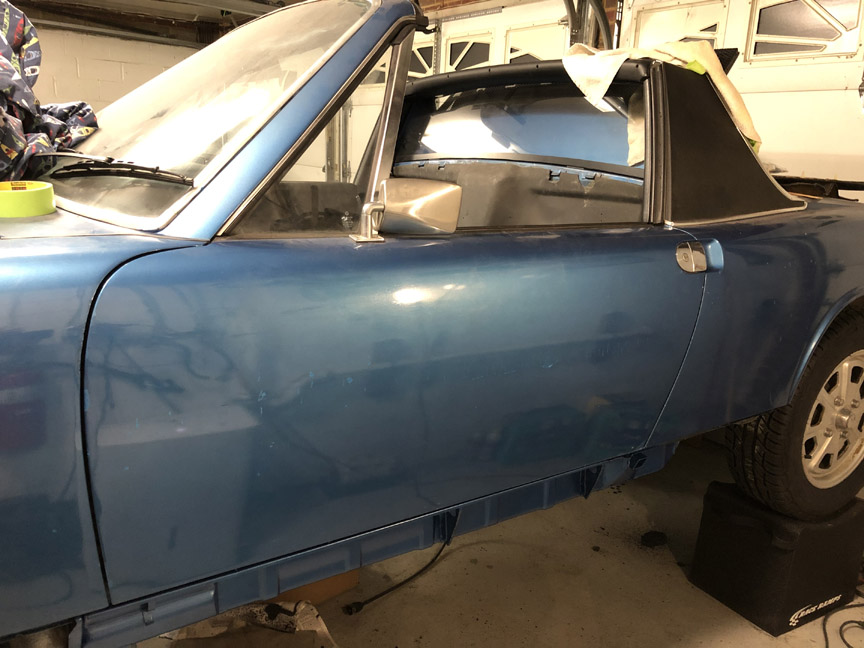 I still need to reinstall the vent lines and the door card, but those shouldn't take too long. There's a little more work in the engine compartment to wrap up, then on to the engine! |
| seanpaulmc |
 Mar 12 2021, 07:00 PM Mar 12 2021, 07:00 PM
Post
#123
|
|
Member   Group: Members Posts: 373 Joined: 6-December 16 From: Orlando, FL Member No.: 20,649 Region Association: South East States 
|
Your skills are fantastic. Looks great!
What are you using for paint and for spraying? Thanks, And . . . another milestone achieved -- driver's door is back on! (IMG:style_emoticons/default/piratenanner.gif) Since it's just bodywork -- a little filler, a lot of sanding, then primer and paint -- I'm just going to show the final product. Here's what the door opening now looks like:  And with the door re-mounted and adjusted:  I still need to reinstall the vent lines and the door card, but those shouldn't take too long. There's a little more work in the engine compartment to wrap up, then on to the engine! |
| BillC |
 Mar 12 2021, 07:06 PM Mar 12 2021, 07:06 PM
Post
#124
|
|
Senior Member    Group: Members Posts: 559 Joined: 24-April 15 From: Silver Spring, MD Member No.: 18,667 Region Association: MidAtlantic Region 
|
Your skills are fantastic. Looks great! Thanks! What are you using for paint and for spraying? Just rattlecans, paint and primer from paintscratch.com. If/when I ever do a full restoration on the car, I'll either pay someone to paint it properly or at least buy a new spray gun setup. |
| BillC |
 Dec 29 2023, 05:25 PM Dec 29 2023, 05:25 PM
Post
#125
|
|
Senior Member    Group: Members Posts: 559 Joined: 24-April 15 From: Silver Spring, MD Member No.: 18,667 Region Association: MidAtlantic Region 
|
Hard to believe it's been almost three years since I've worked on this car. All the usual excuses apply -- life, kids, wife, work, etc. Plus, I built a Spec Boxster and started PCA Club Racing.
Anyway, it's time to get back on the car. I'd really like to get it drivable by summertime (gotta have a goal, even if it's fantasy....). I decided to re-start with the guide tubes for the heater control cables. Not sure why, but someone went crazy with a cutoff wheel and removed the tubes, leaving short stubs. 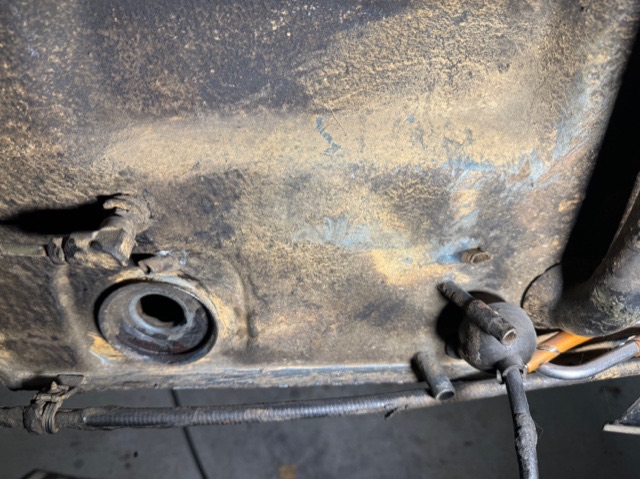 I know the proper, concours-correct fix would be to remove the old guide tubes and braze in new ones. However, the goal is to get the car drivable and enjoyable again, not compete at Pebble Beach, so I'm going to take a simpler approach. First, I cleaned up the stumps and ground back some of the factory brazing, to expose as must stub as possible. Then, I cut pieces of 3/8" steel brake line and shaped them to fit over the stubs, and then cut pieces of 5/16" steel brake line to replace the missing sections of tube. The brake line is nice because the two sizes are slip fits over each other and the stubs. Plus, I can keep the flared ends of the line to replace the factory flares. 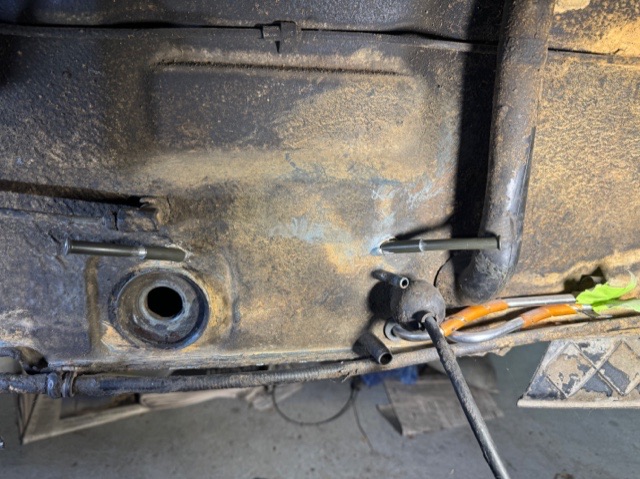 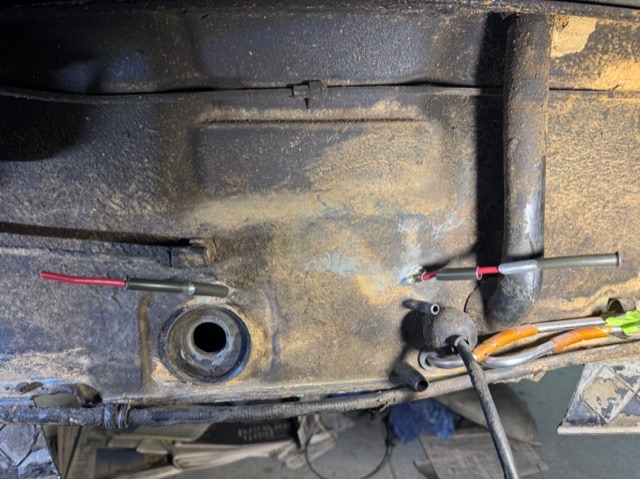 The red things are 10-ga wire. I stripped back about 1/4", flared the copper strands and stuffed them inside the tubes. Finally, I glued everything in place with JB Weld. After I glued all the pieces, I pulled the wires out, cleaning any extra glue out of the tubes, to make sure the tubes were not blocked by the glue. 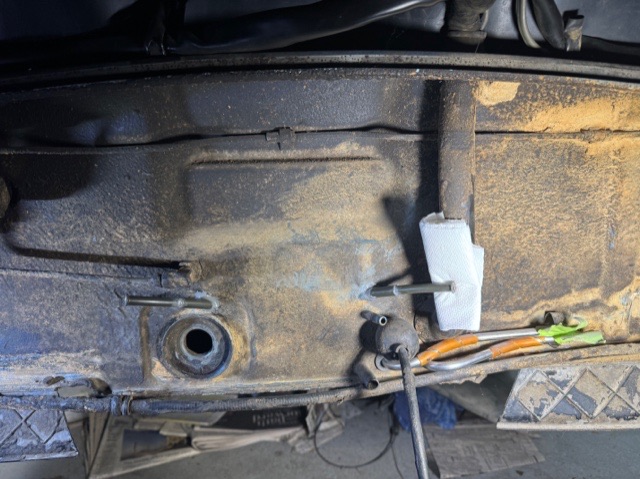 The folded-up paper towel is just to hold the tube in place until the glue dries. Don't worry, it won't stay there. I thought about welding the lines on, but there's no easy way to get the welding torch around the back sides of the stubs, plus it is very tight in there. I also thought about brazing the pieces in, but with my luck I'd set all the stuff left in there on fire. As things are, I can always remove the pieces later on when it's finally time for the full restoration. |
| Geezer914 |
 Dec 29 2023, 06:06 PM Dec 29 2023, 06:06 PM
Post
#126
|
|
Geezer914    Group: Members Posts: 1,776 Joined: 18-March 09 From: Salem, NJ Member No.: 10,179 Region Association: North East States 
|
Nice work and love the color. Suggestion, mount the fuel pump and filter under the steering rack. When you need to change the fuel filter you just have to drop the pan instead of pulling the tank. Also replace the plastic fuel lines with Tangerine Racing stainless fuel lines with the engine and tank out of the car.
|
| BillC |
 Dec 29 2023, 06:35 PM Dec 29 2023, 06:35 PM
Post
#127
|
|
Senior Member    Group: Members Posts: 559 Joined: 24-April 15 From: Silver Spring, MD Member No.: 18,667 Region Association: MidAtlantic Region 
|
Nice work and love the color. Thanks! Suggestion, mount the fuel pump and filter under the steering rack. When you need to change the fuel filter you just have to drop the pan instead of pulling the tank. I've been thinking about doing just that. We'll see how things are going when it gets closer to actually starting the engine. Also replace the plastic fuel lines with Tangerine Racing stainless fuel lines with the engine and tank out of the car. Already done. If you look at the pics, you can see the stainless fuel lines at the bottom of the firewall. The orange "wrap" on the stainless lines is actually the original vinyl fuel lines repurposed -- I cut them in a spiral and wrapped them around the stainless lines, they make good "bumpers" to prevent rattles and wear. |
| 930cabman |
 Dec 31 2023, 11:14 AM Dec 31 2023, 11:14 AM
Post
#128
|
|
Advanced Member     Group: Members Posts: 3,725 Joined: 12-November 20 From: Buffalo Member No.: 24,877 Region Association: North East States 
|
Just happened on your thread, great workmanship.
Please keep this going, it will put a smile on your face quickly and keep it there |
| BillC |
 Jan 1 2024, 08:27 PM Jan 1 2024, 08:27 PM
Post
#129
|
|
Senior Member    Group: Members Posts: 559 Joined: 24-April 15 From: Silver Spring, MD Member No.: 18,667 Region Association: MidAtlantic Region 
|
Given the history of everything else I've found with the car, I decided to go through the engine before reinstalling it. I got as far as taking the accessories and shrouds off of it, and found plenty of issues.
So, here's what I started with: 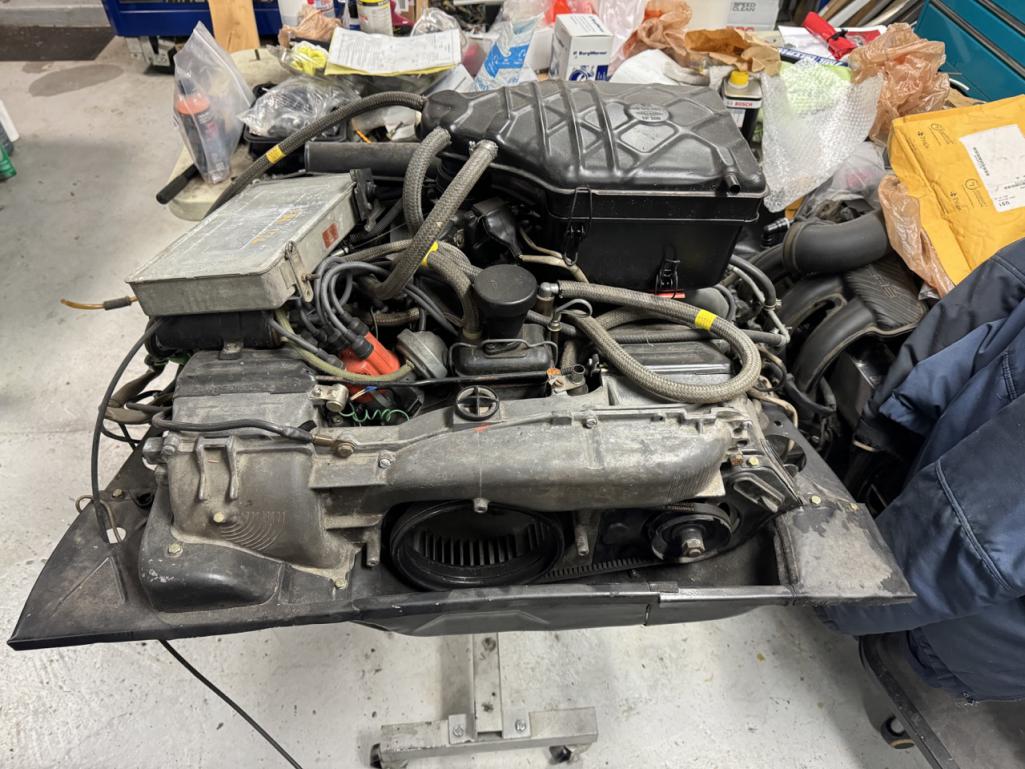 As previously mentioned, someone put a fuel pressure regulator where the decel valve was supposed to go (and also left the small vacuum line open to atmosphere). 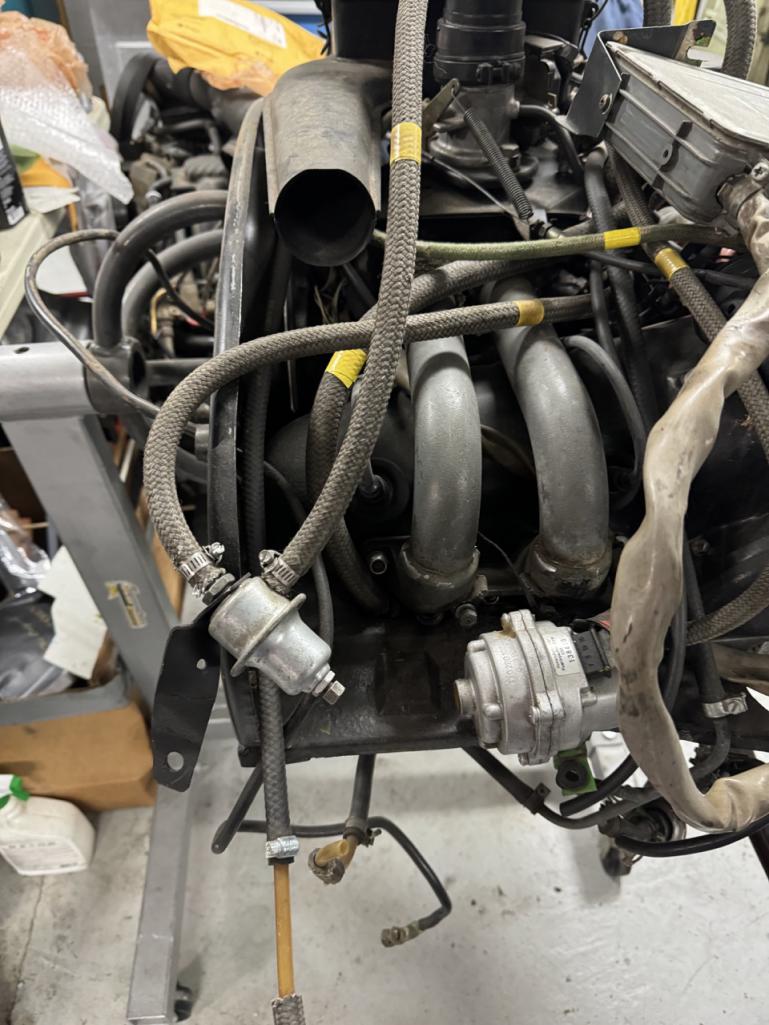 I found more kinked fuel lines: 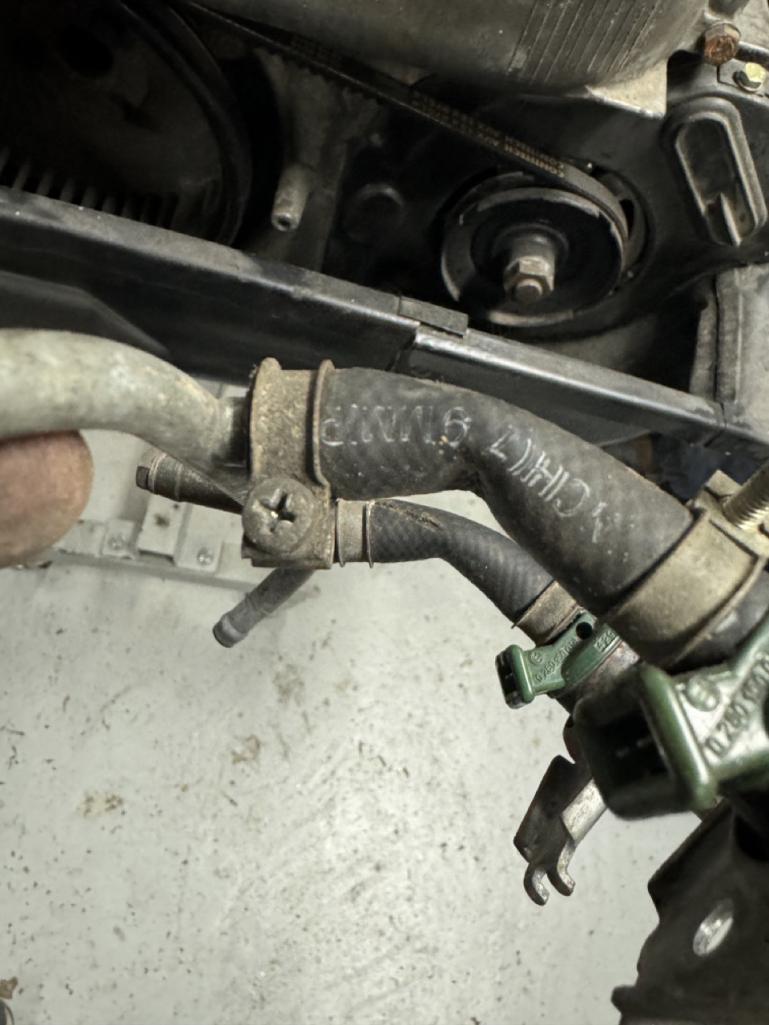 All four of the injector fuel lines were like that. And, once I got the shrouds off, I found this: 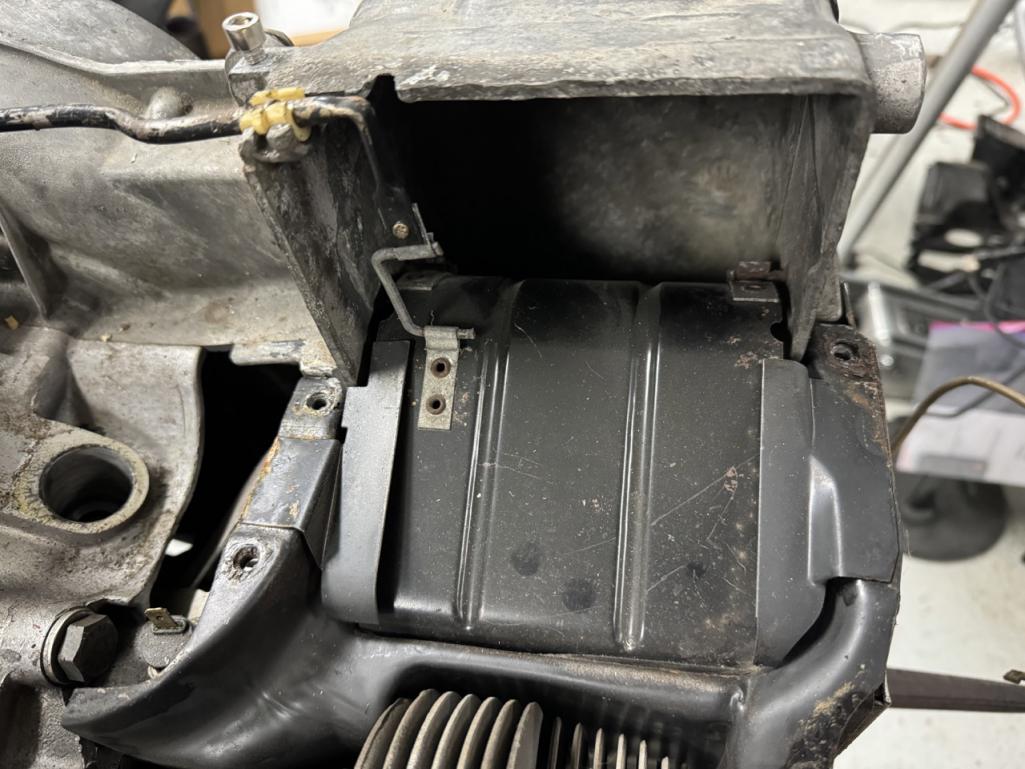 Can anyone tell what's wrong with this pic? I'll give you a hint -- there's no thermostat. |
| ClayPerrine |
 Jan 2 2024, 04:30 PM Jan 2 2024, 04:30 PM
Post
#130
|
|
Life's been good to me so far.....                Group: Admin Posts: 15,922 Joined: 11-September 03 From: Hurst, TX. Member No.: 1,143 Region Association: NineFourteenerVille 
|
Given the history of everything else I've found with the car, I decided to go through the engine before reinstalling it. I got as far as taking the accessories and shrouds off of it, and found plenty of issues. So, here's what I started with:  As previously mentioned, someone put a fuel pressure regulator where the decel valve was supposed to go (and also left the small vacuum line open to atmosphere).  I found more kinked fuel lines:  All four of the injector fuel lines were like that. And, once I got the shrouds off, I found this:  Can anyone tell what's wrong with this pic? I'll give you a hint -- there's no thermostat. That "flap" is on the wrong side of the tabs. The way it is installed, it can never move. Probably done to make sure it didn't move because of the missing thermostat. |
| 930cabman |
 Jan 2 2024, 04:58 PM Jan 2 2024, 04:58 PM
Post
#131
|
|
Advanced Member     Group: Members Posts: 3,725 Joined: 12-November 20 From: Buffalo Member No.: 24,877 Region Association: North East States 
|
Not necessarily a DAPO, unless you know the guy, probably one of the mechanic's who had touched this example.
Great looking work, ETA? |
| BillC |
 Jan 2 2024, 07:09 PM Jan 2 2024, 07:09 PM
Post
#132
|
|
Senior Member    Group: Members Posts: 559 Joined: 24-April 15 From: Silver Spring, MD Member No.: 18,667 Region Association: MidAtlantic Region 
|
That "flap" is on the wrong side of the tabs. The way it is installed, it can never move. Probably done to make sure it didn't move because of the missing thermostat. Exactly. Probably done as you said, but seems to be more of a guess than a plan (see comment below). Not necessarily a DAPO, unless you know the guy, probably one of the mechanic's who had touched this example. I don't know. Locking the flaps open makes sense, but the spring on the flap rod also does that. However, they left the threaded hole in the block where the pulley attaches open and unplugged. It seems to me like someone who knew what they were doing would know to plug the hole, since it's open to the inside of the block. At least the open bolt hole explains all the oil under the engine. ETA? Not sure, but I'm hoping to have it drivable by summertime. |
| BillC |
 Jan 20 2024, 06:35 PM Jan 20 2024, 06:35 PM
Post
#133
|
|
Senior Member    Group: Members Posts: 559 Joined: 24-April 15 From: Silver Spring, MD Member No.: 18,667 Region Association: MidAtlantic Region 
|
We're back from our vacation trip, and time to get back to work on the car.
First, I took a look at the cylinder head temp sensor, to see what was installed. I couldn't see any numbers, so I thought I'd take it out for a closer look. But, it was very loose. Upon removal, I discovered the hole is stripped. <sigh> The DAPO gifts keep on giving.... 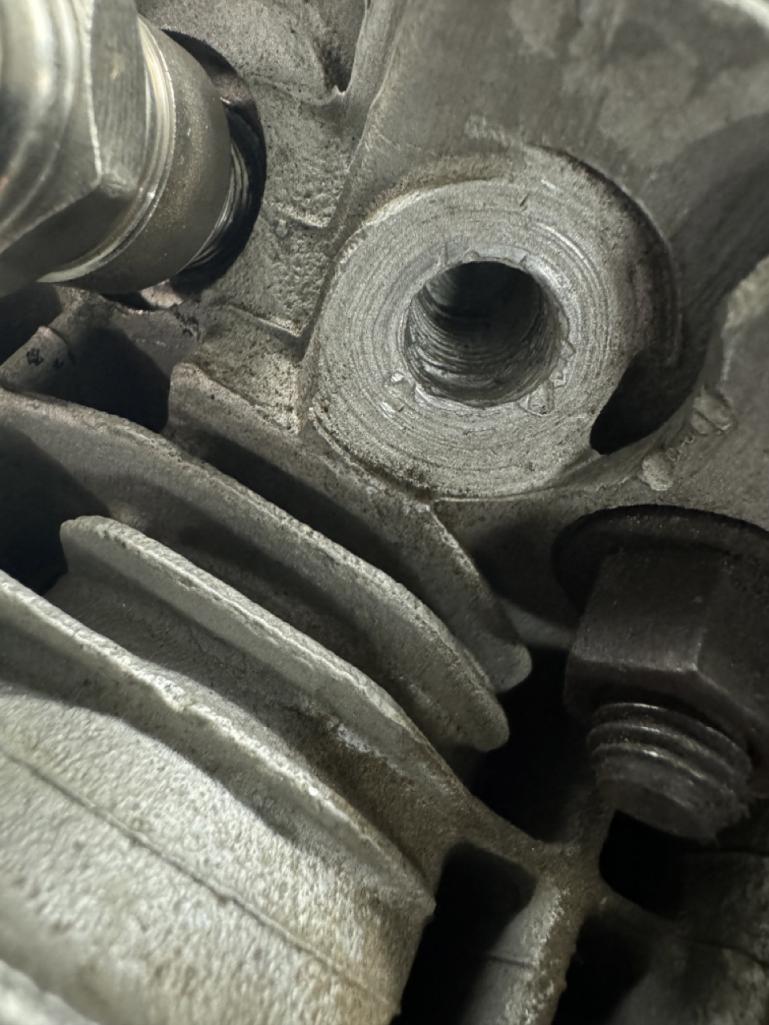 So, I have ordered a helicoil kit (10mmx1.0), which should arrive Monday. But, it turns out the CHT has no numbers on it at all, so I have no idea what it is supposed to be. Does anyone have a good 017 CHT available? (I already have a wanted ad posted in the classifieds forum) Then, I decided to move on and adjust the valves. They were all on the snug side, so I'm guessing the previous owner never adjusted them after the rebuild. They are set properly now. 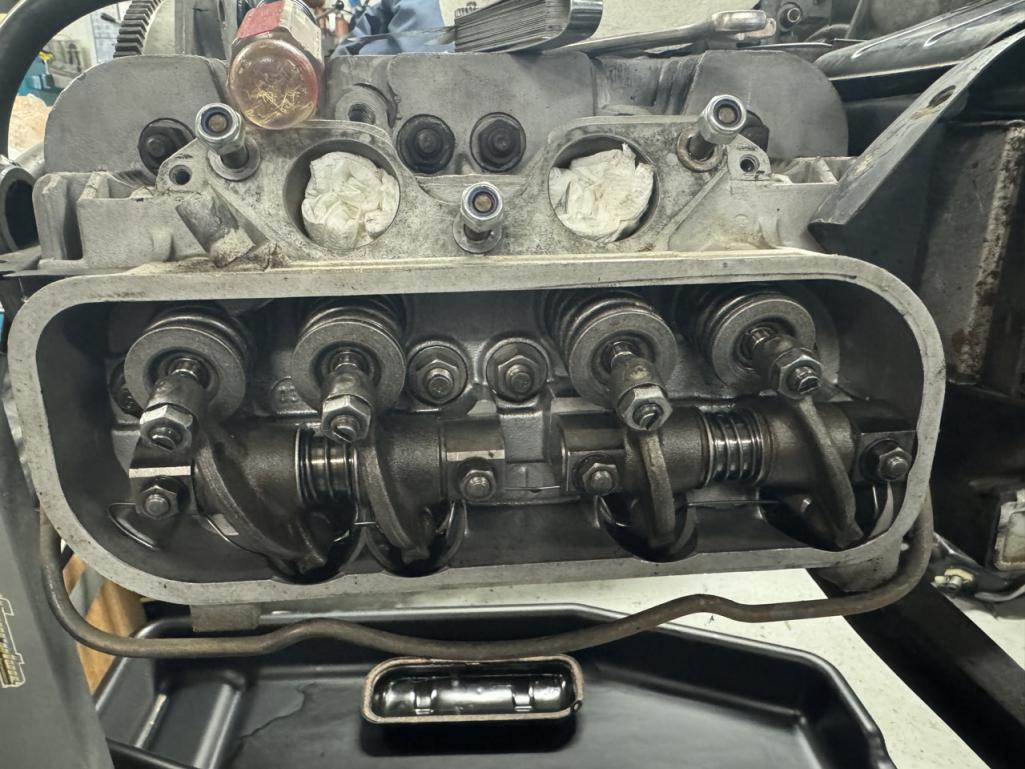 Next step was to add in some wiry goodness thanks to @JeffBowlsby -- new harnesses for the engine. 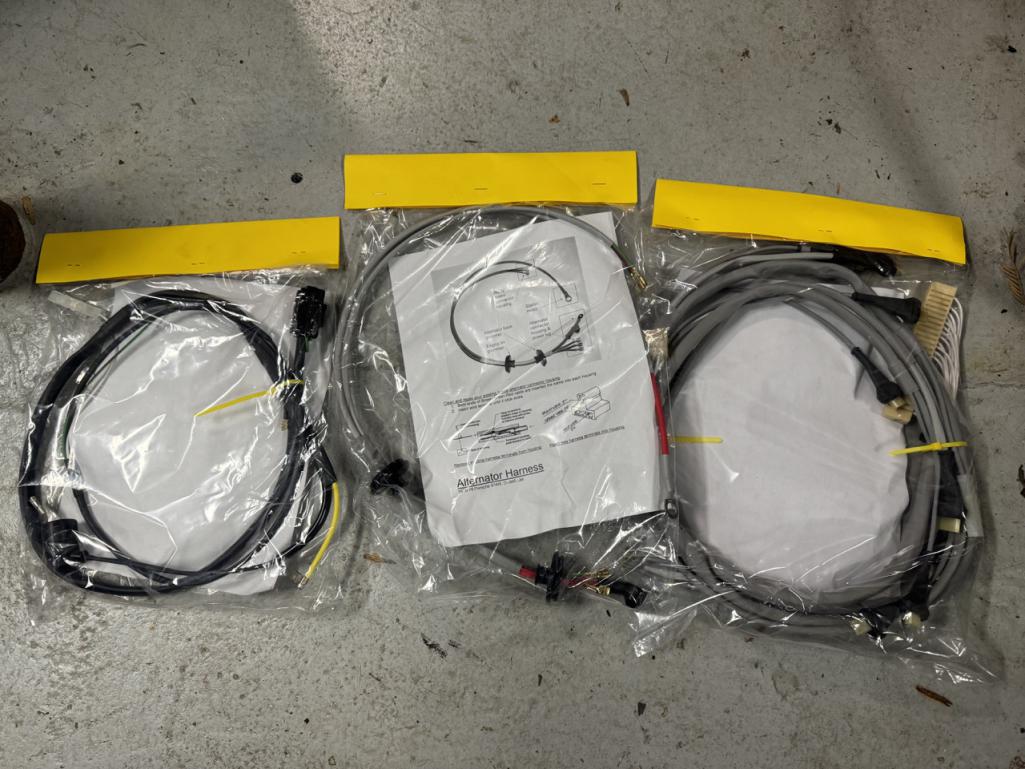 I installed the generator harness, and will put the others on as the engine progresses. Once I get all harnesses installed, I'll (finally) return the old ones for the core refund, if it isn't too late. I then moved on to installing a new taco plate and deep sump (tuna can) from 914Werke. First step was to get the old ones off: 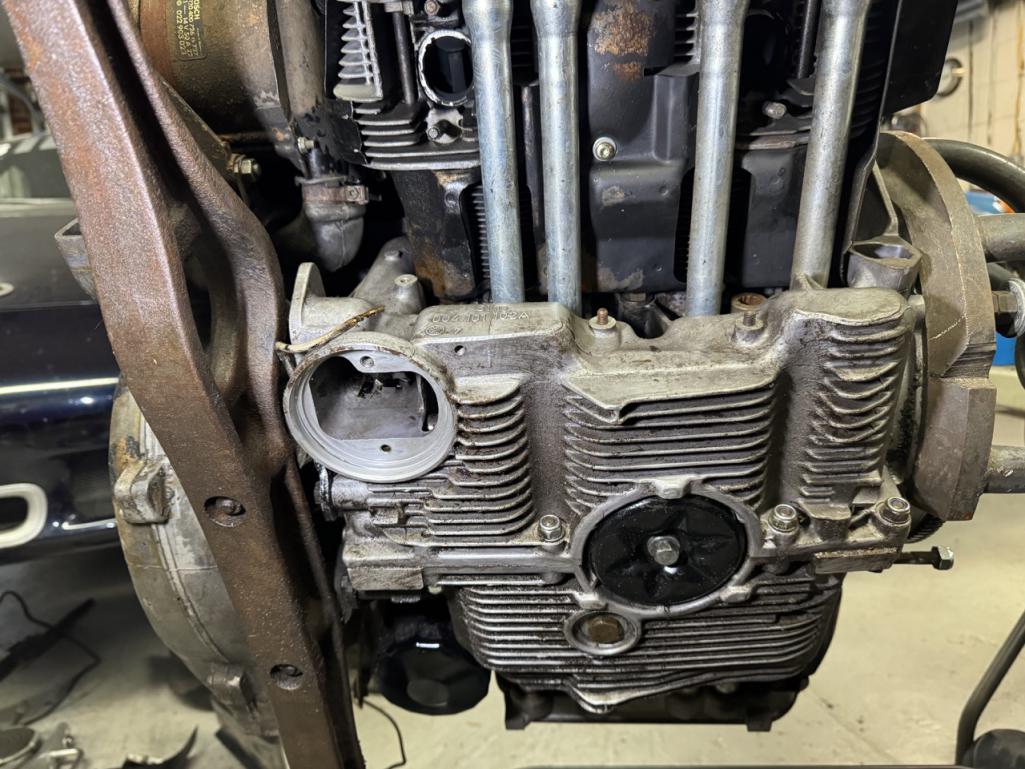 I made one change to the bottom plate for the tuna can. I checked the stock bottom plate, and the bolt flange is actually higher than the mounting rim (when installed). So I decided to take about 1/8" off the aluminum bottom plate, to raise it a little bit. 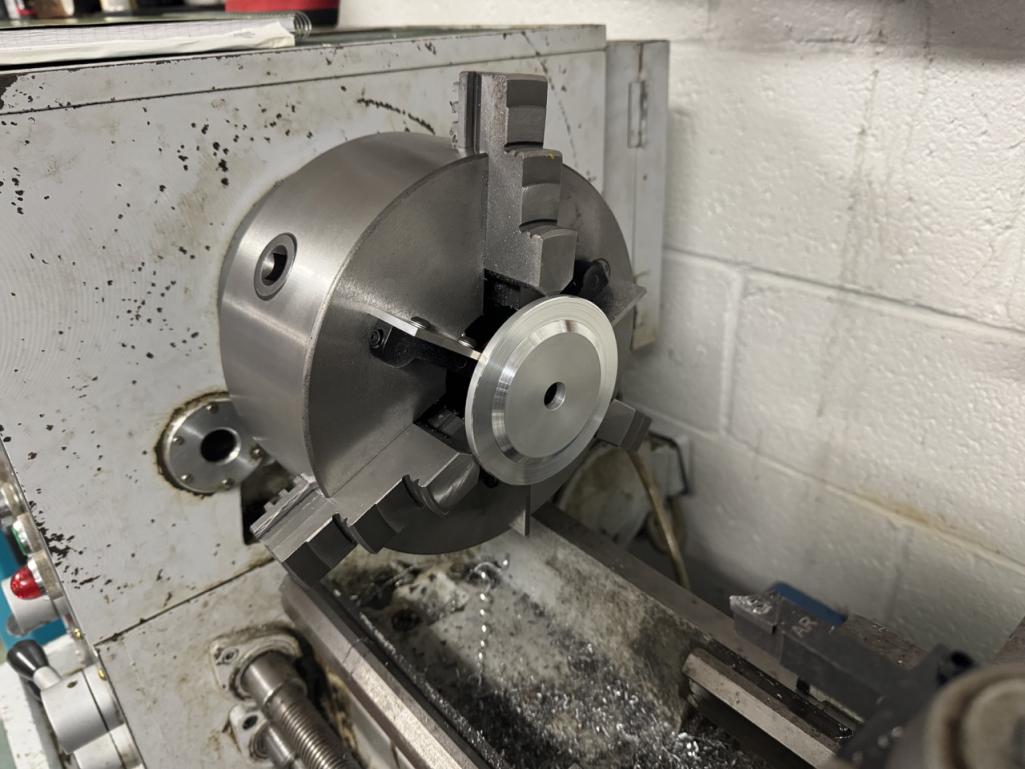 Then, I finished installing everything, including the oil strainer. Because there were now three layers of gaskets, and 9 ft-lb just doesn't seem like much, I used Yamabond on all the gaskets and under the bolt head. 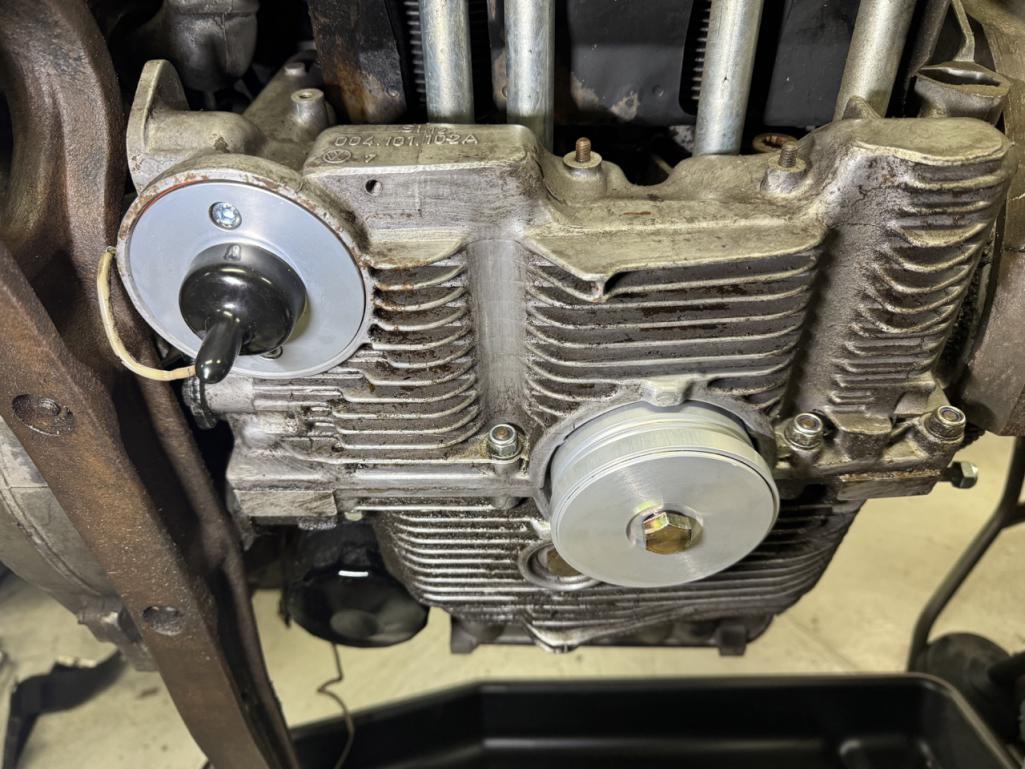 Hopefully no leaks. |
| BillC |
 Jan 25 2024, 05:16 PM Jan 25 2024, 05:16 PM
Post
#134
|
|
Senior Member    Group: Members Posts: 559 Joined: 24-April 15 From: Silver Spring, MD Member No.: 18,667 Region Association: MidAtlantic Region 
|
Had sporadic chances to work on the engine over the last few days. In that time, I painted the timing marks on the fan (and the fins near the marks), cleaned & inspected the throttle body & intake manifold, reset the distributor drive to the correct angle (12 degrees), helicoiled the CHT hole and installed the CHT, and reinstalled the cooling shrouds.
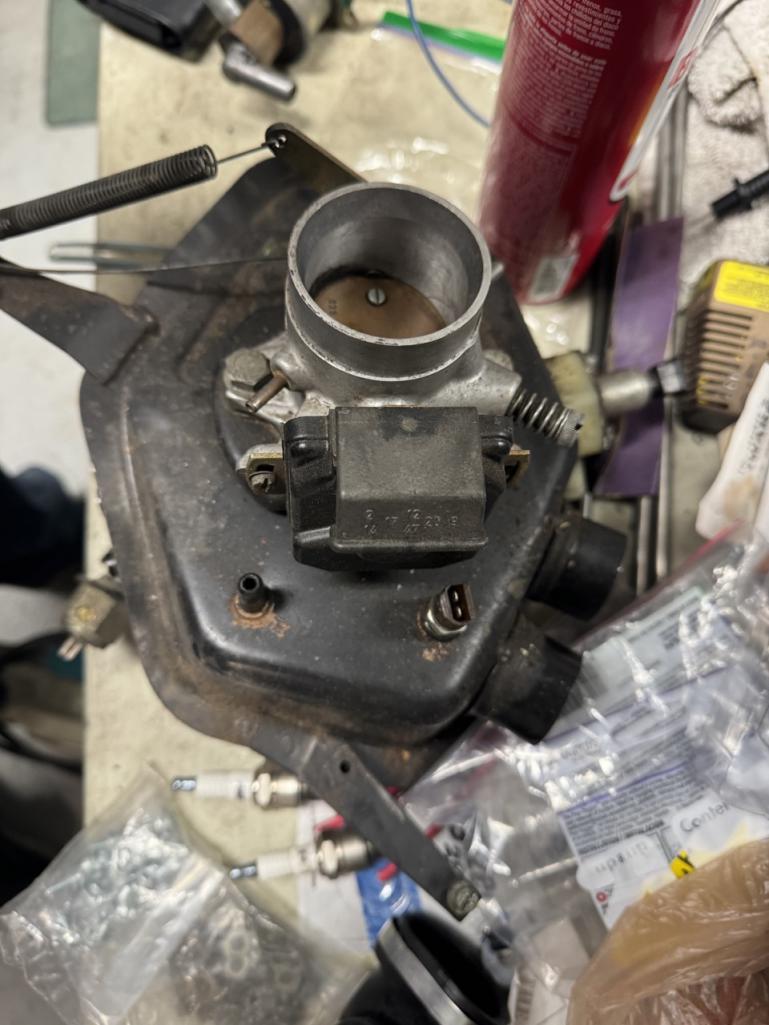 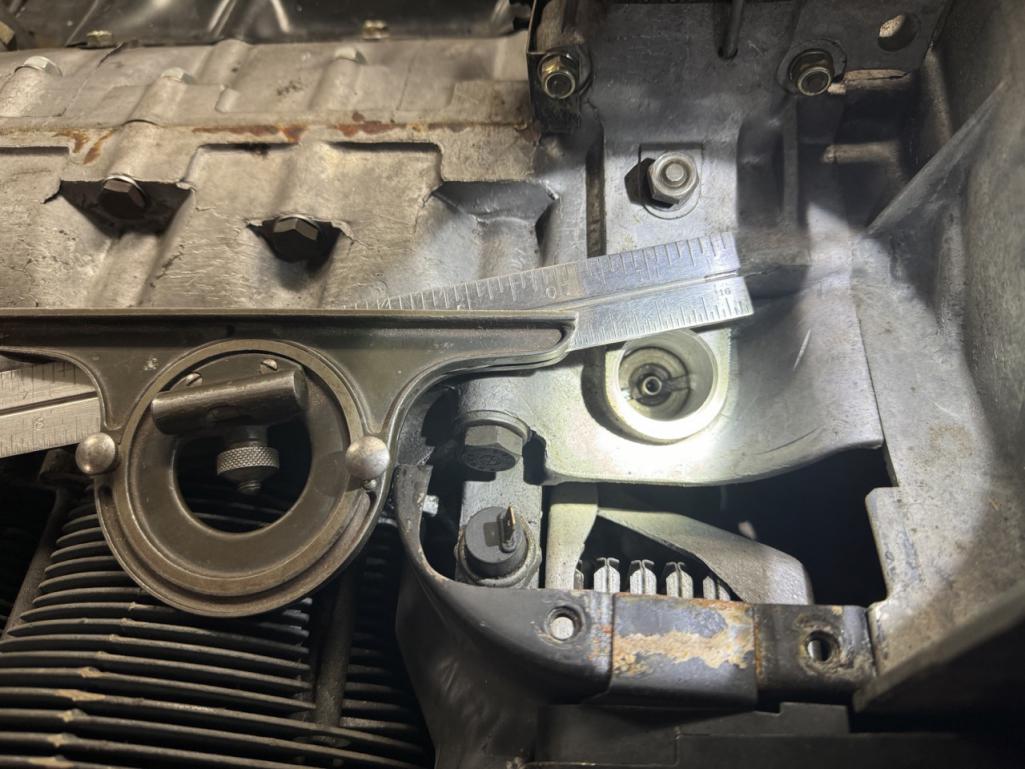 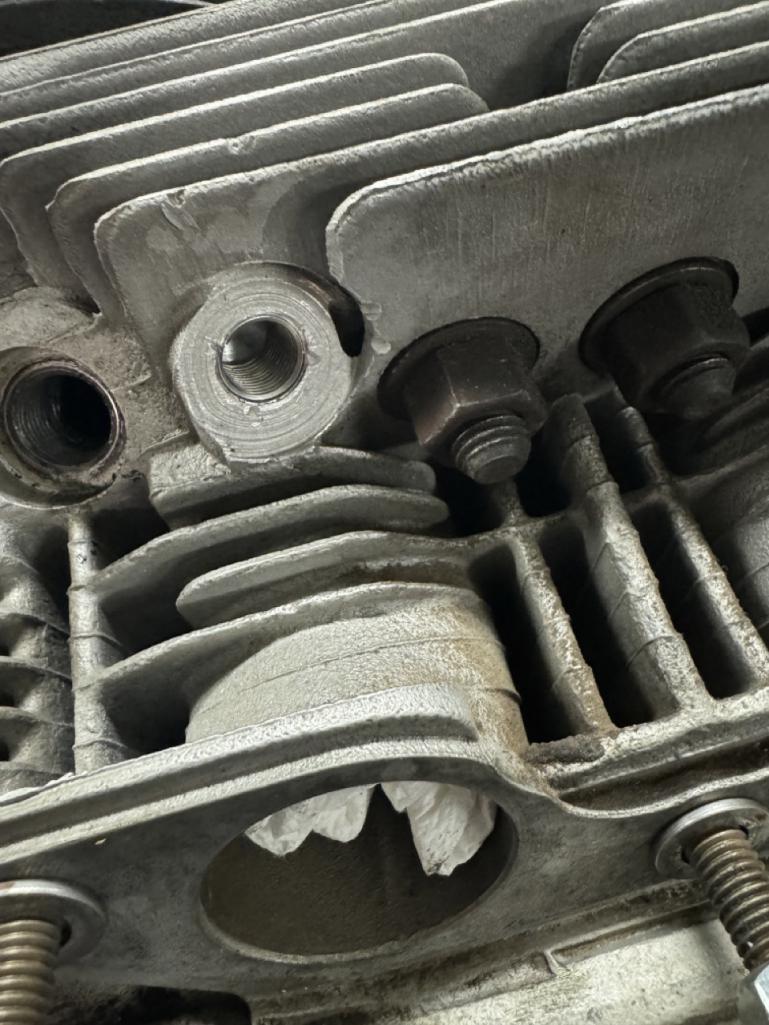 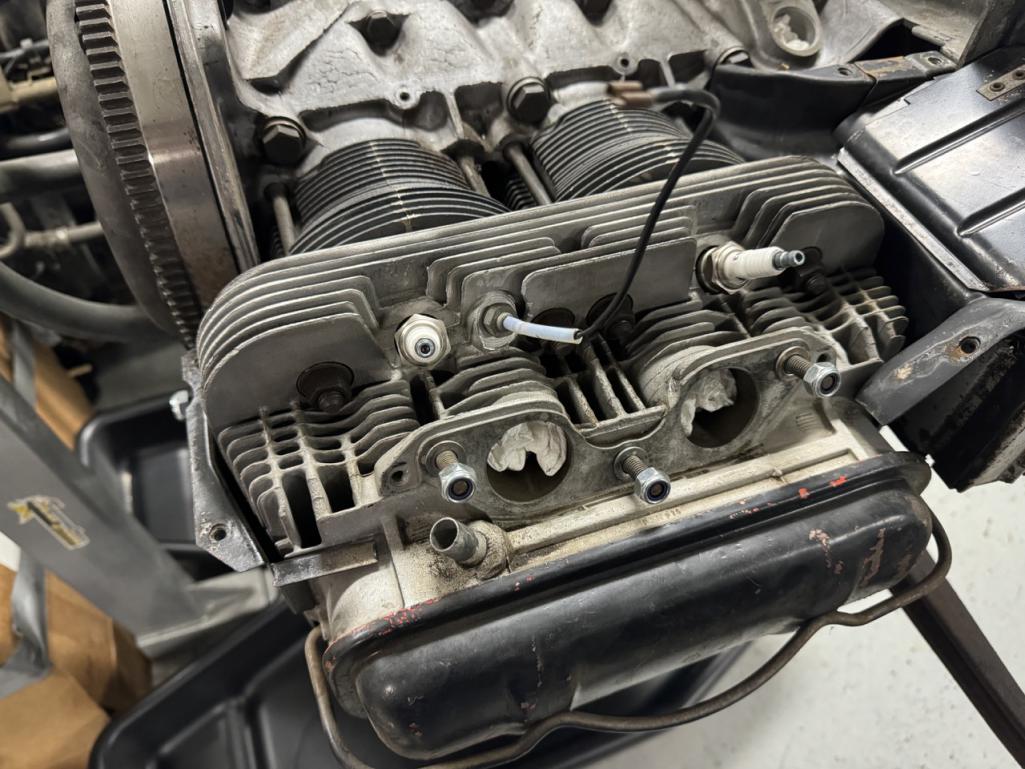 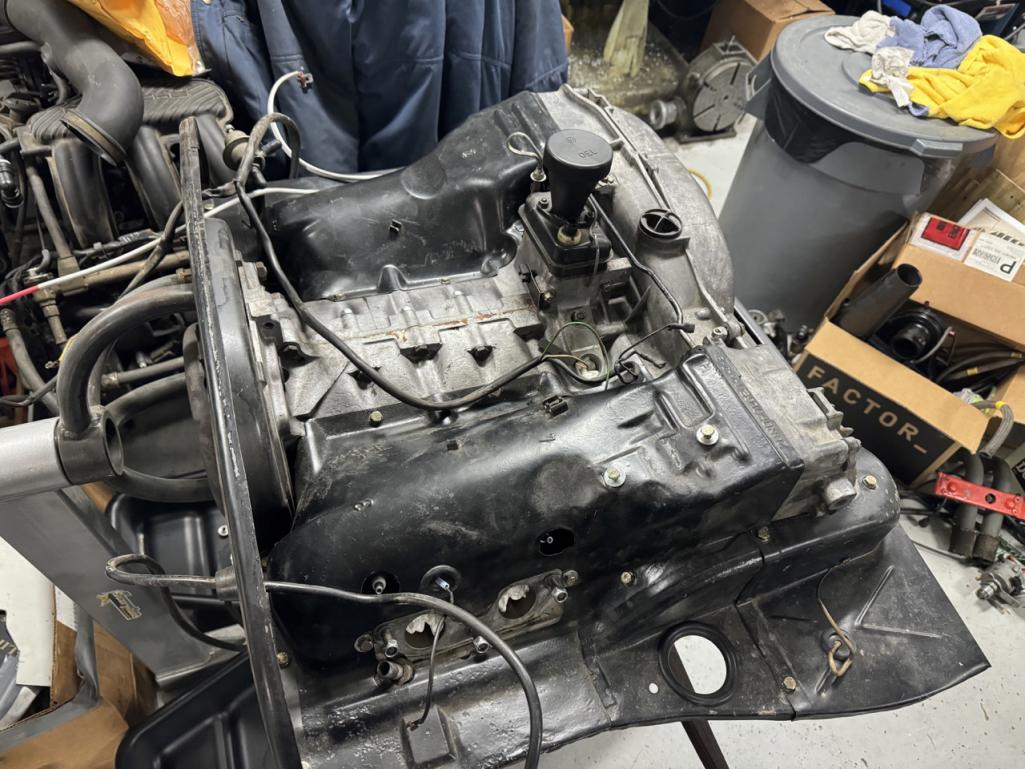 It turns out that a long, slender pair of c-clip pliers work great for pulling the distributor drive. Also, I rotated the engine on the stand so the distributor drive was exactly vertical, so the thrust washer under the drive wouldn't move around and fall into the case. Also, I just installed an old 012 CHT. I'm still trying to find a good, used 017 CHT at a reasonable price, and the car came with a generic 012, so I'll try this for now. I also discovered there's an oil leak somewhere on the front of the engine, so I'll be pulling the front shroud pieces back off and probably the engine mount bar too. At this point, it looks like the leak might be from the bolts that hold the mount brackets to the engine case. |
| BillC |
 Jan 30 2024, 08:04 PM Jan 30 2024, 08:04 PM
Post
#135
|
|
Senior Member    Group: Members Posts: 559 Joined: 24-April 15 From: Silver Spring, MD Member No.: 18,667 Region Association: MidAtlantic Region 
|
While the engine was just sitting on the stand, waiting for more parts to arrive, it dripped a few drops of oil into the pan underneath. This seemed a bit odd, since I had already drained all the oil out of it. To try to find the source, and make sure it wasn't one of my new additions, I grabbed a pointer and hung it from various points under the engine to track the drip back up to the source. The drip turned out to be coming off the left engine mount bracket, which continued the seeming oddity, since the bracket bolt holes are not through holes.
So, I removed the engine mount brackets and found the source of my leak: 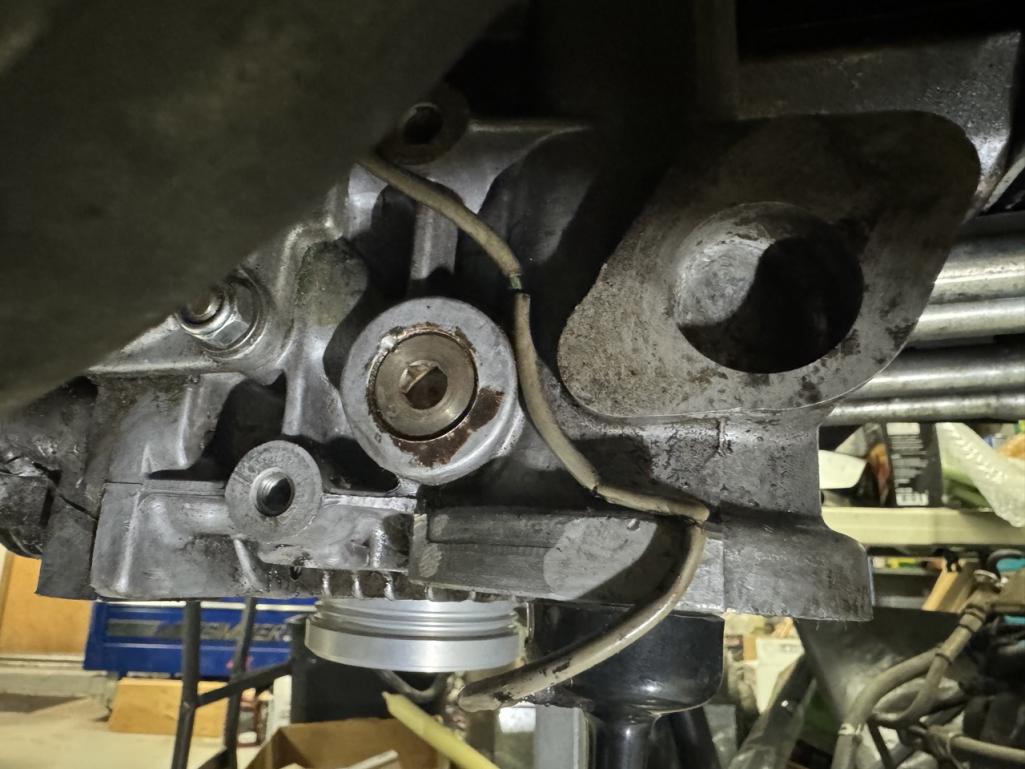 That is a straight-thread steel plug in an aluminum hole. From what I've been told, that's a factory part (smh). Anyway, the plug was a little loose, with only the factory stake holding it in -- it turned right out with almost no effort. FYI, the plug is 22mm with 1.5mm thread, straight thread (no taper), and is about 9mm thick. I asked for advice on the forum, and the general consensus was that a straight-threaded steel plug was not really the right part for the application. But, no one makes a direct-replacement aluminum plug. The options came down to either a brass plug or make my own. @bkrantz linked to his thread where he faced the same issue. He ended up going with a brass plug, but @Shivers had added a link to a place selling aluminum flange plugs with the right thread. That seemed like a promising path, so I ordered a few (one to use and spares, just in case). Here's what arrived, next to the original plug: 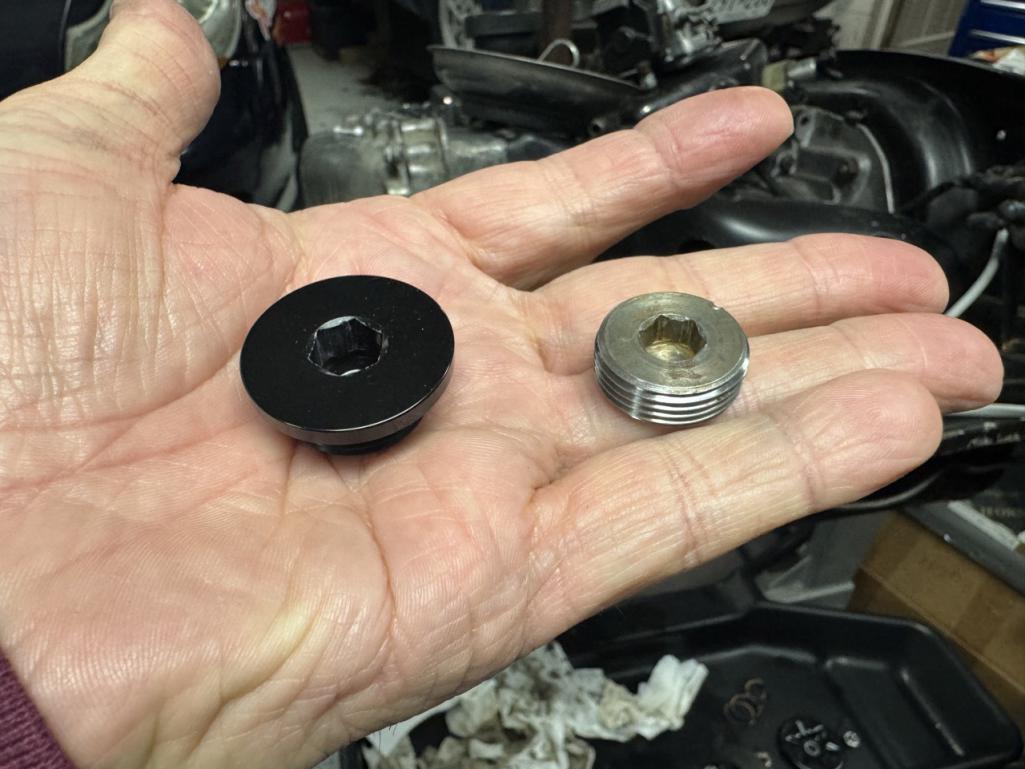 I cut the head off and the finished result is the same thickness as the original: 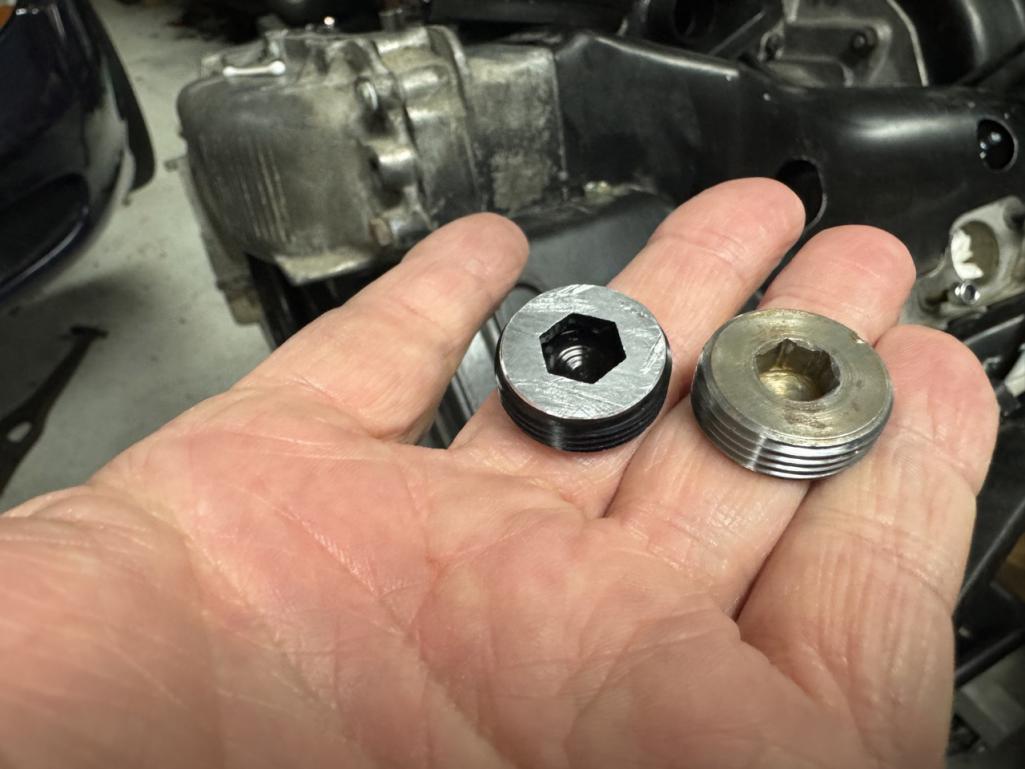 I wasn't sure what sealant to use, but someone had suggested Loctite 574, so I ordered a tube. Of course, I only found it in 50ml tubes and larger, so I now have plenty of extra.... I also ordered a cheap tap, which I cut down to clean the old sealant out of the threads the hole. 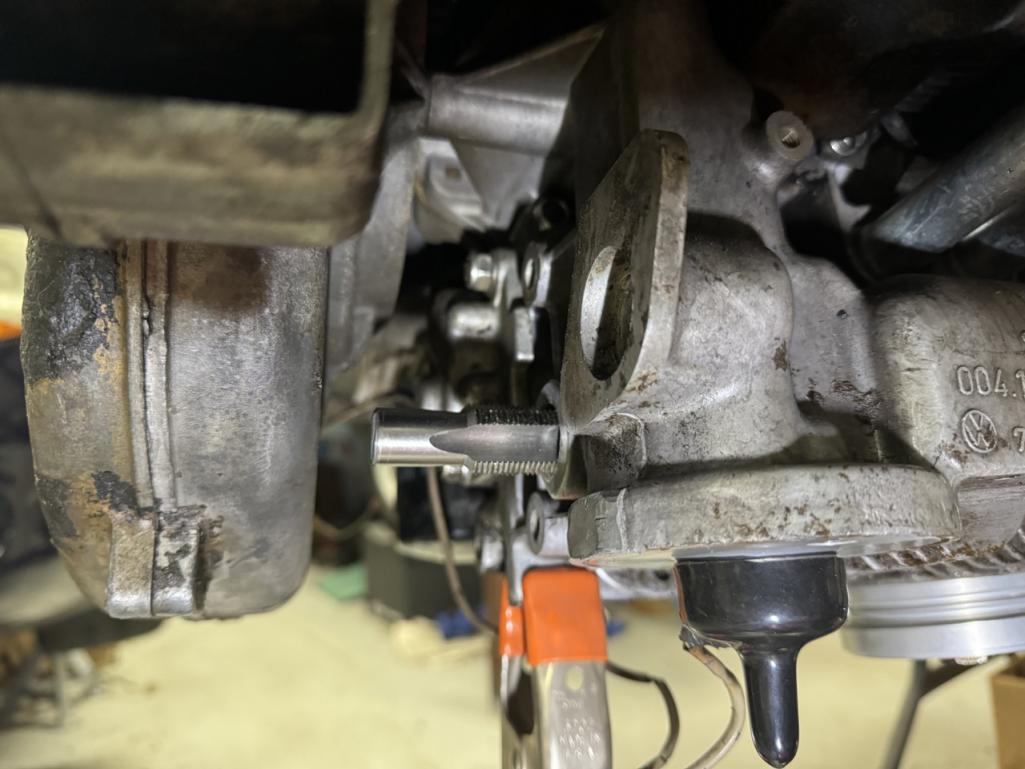 I tried a few different solvents and cleaners, but the tap was the only thing that worked to actually clean the threads. Yes, I know I could have removed the fan and ductwork off the front of the engine, but I was trying to minimize the amount of stuff to be removed and reinstalled later. And, just to help my odds of sealing, I put the new plug in the refrigerator and put a heater on the engine. 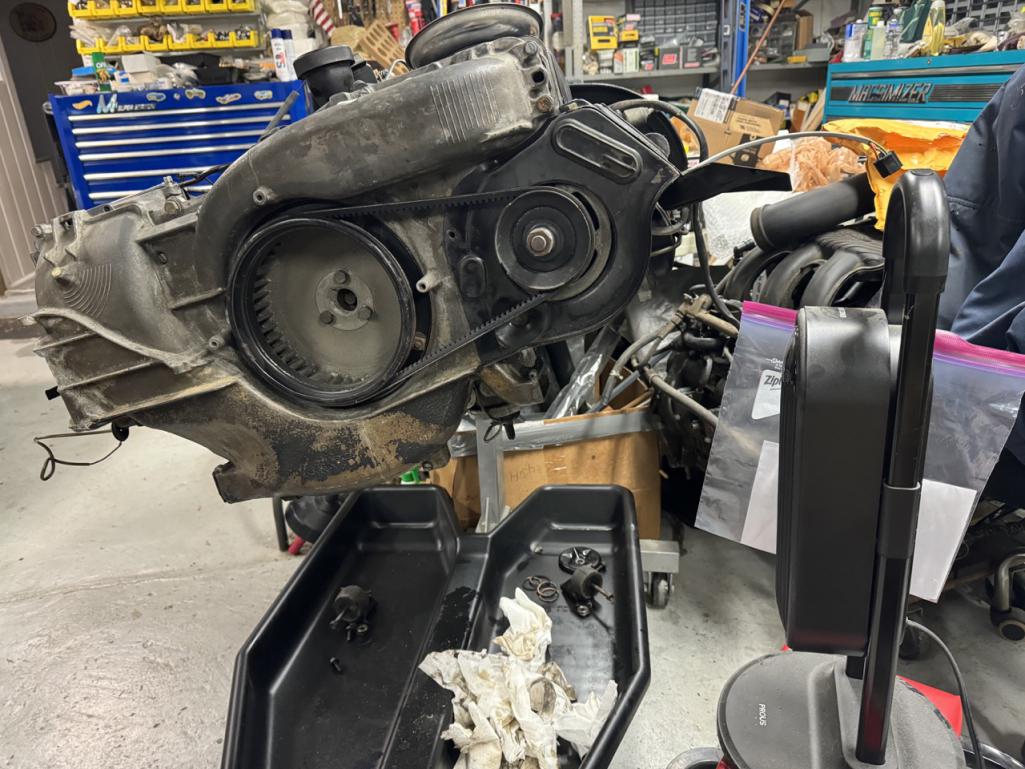 Note that the engine is tilted over. I also put a 2x6 under the front of the engine stand. This positioning helped keep that last little bit of remaining oil that never completely stops dripping from running forward into the threads. After about 1/2 hour of heating/cooling, I used a q-tip to apply sealant to the hole threads and also applied some to the threads of the plug. I then screwed the plug in as tight as a I could without risking the remaining hex in the plug, so maybe 10-15 ft-lbs or so -- this is tighter than the original plug was, and the sealant should keep it stuck. But, just in case, I also staked the plug, like factory. 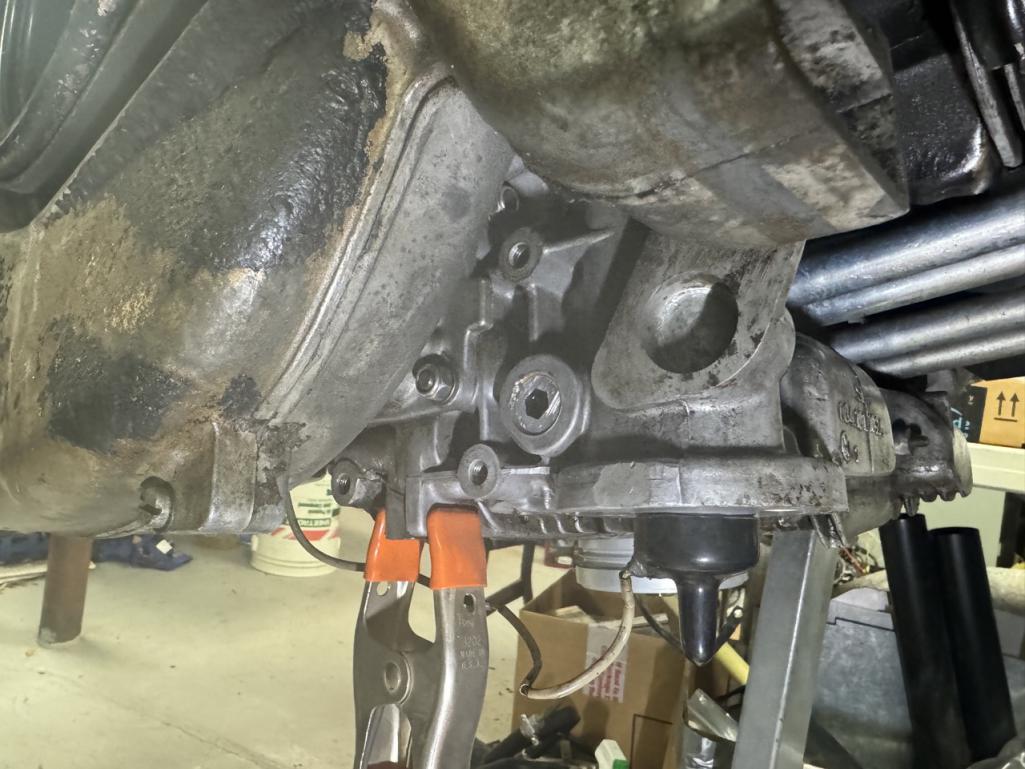 Hopefully, that's the end of that leak. |
| bkrantz |
 Jan 30 2024, 09:25 PM Jan 30 2024, 09:25 PM
Post
#136
|
|
914 Guru      Group: Members Posts: 8,156 Joined: 3-August 19 From: SW Colorado Member No.: 23,343 Region Association: Rocky Mountains 
|
Fingers coursed for you!
|
| BillC |
 Feb 5 2024, 06:51 PM Feb 5 2024, 06:51 PM
Post
#137
|
|
Senior Member    Group: Members Posts: 559 Joined: 24-April 15 From: Silver Spring, MD Member No.: 18,667 Region Association: MidAtlantic Region 
|
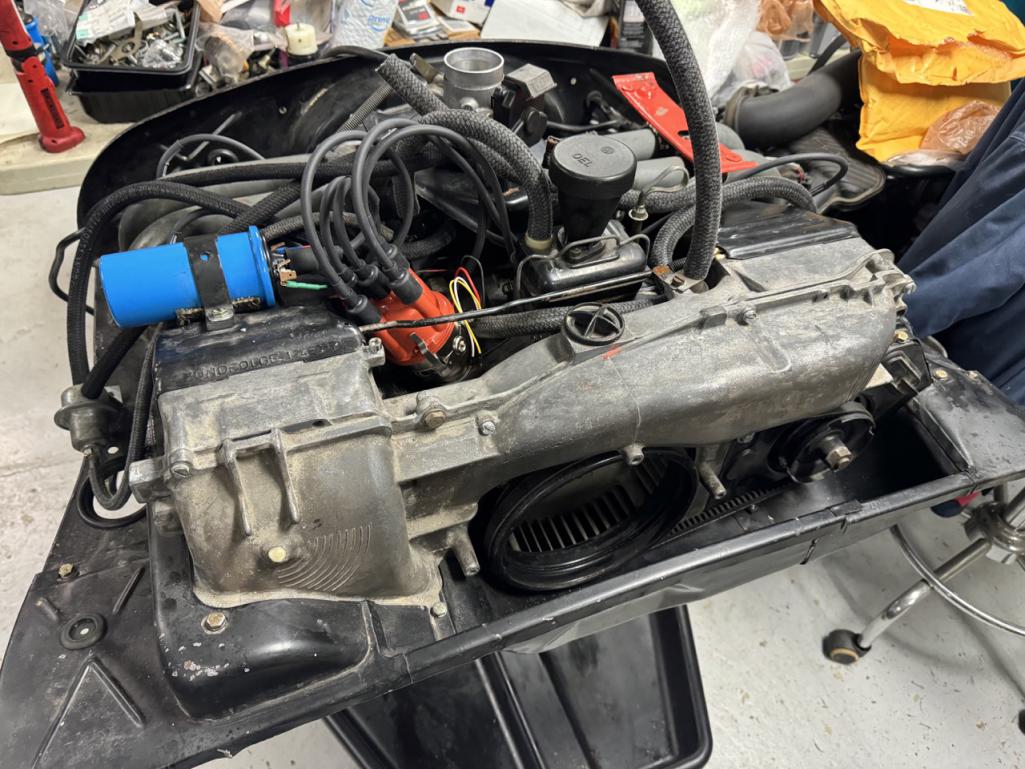
And I'm just slowly chugging away on the engine. Still waiting for a few more parts to be delivered before I can wrap it all up.
Since the last update, I have:
 Out of curiosity, and because I wanted to try out this oil filter cutter I bought from a friend, I cut open the old filter. 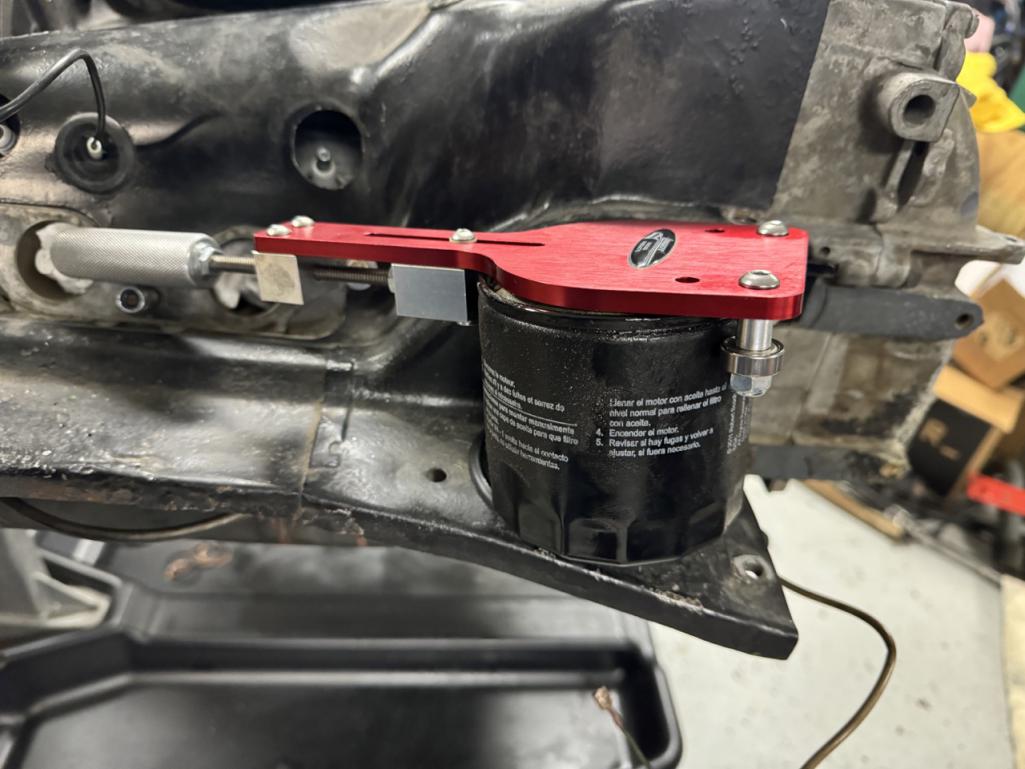 I was pleased to find no large chunks or shiny bits inside the filter. However, I did find plenty of black sludge at the bottom of the filter canister. I'm hoping it's just assembly lube and the previous owner simply didn't change the oil soon enough. 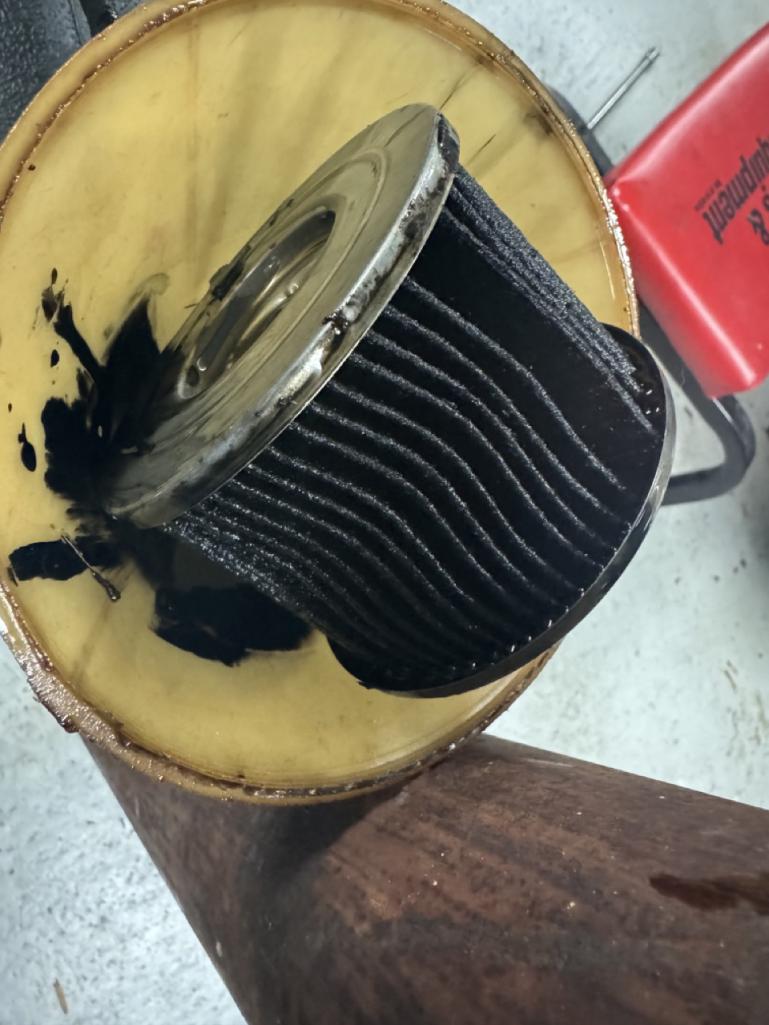 Once I (finally) get the car back on the road, I will change the oil early, just to help clear any remaining gunk out of the engine. The oil did look okay when I drained the engine three years ago. |
| 930cabman |
 Feb 6 2024, 02:43 PM Feb 6 2024, 02:43 PM
Post
#138
|
|
Advanced Member     Group: Members Posts: 3,725 Joined: 12-November 20 From: Buffalo Member No.: 24,877 Region Association: North East States 
|
Keep your momentum going, soon you will be rolling down the highways
|
| BillC |
 Feb 12 2024, 04:15 PM Feb 12 2024, 04:15 PM
Post
#139
|
|
Senior Member    Group: Members Posts: 559 Joined: 24-April 15 From: Silver Spring, MD Member No.: 18,667 Region Association: MidAtlantic Region 
|
Was able to get a little more work done on the engine this weekend. Here's what I did:
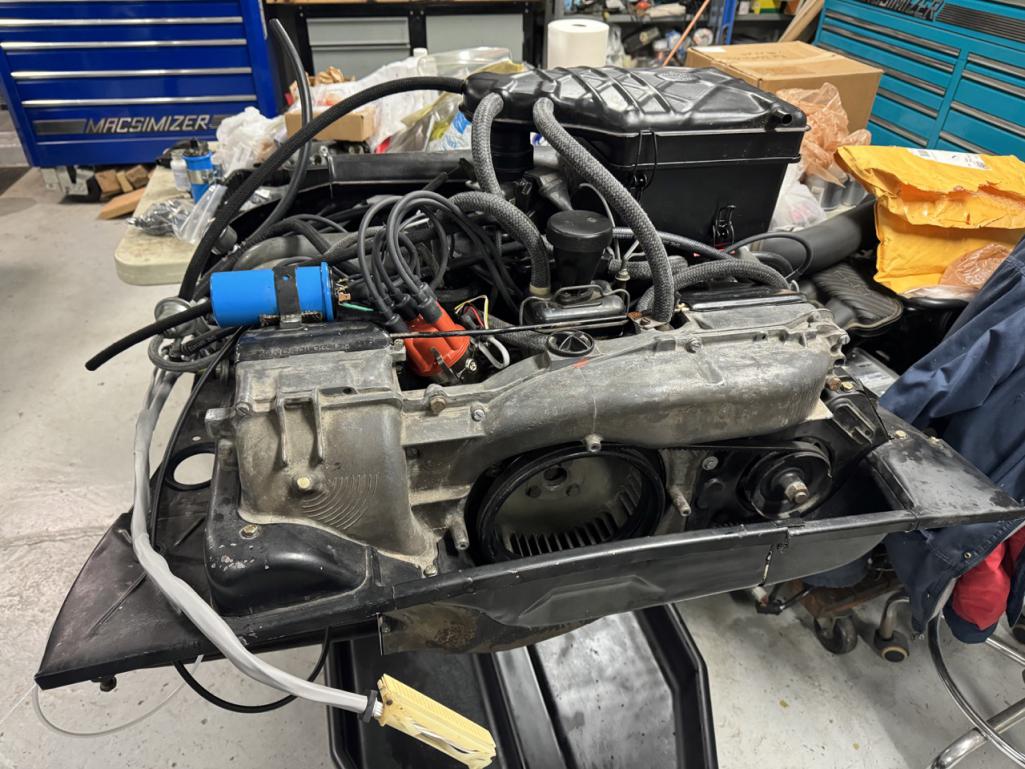 One hose from the AA vacuum hose kit was too short, but fortunately I had extra hose from a previous project. Still waiting on thermostat and oil pressure relief valve, but they should arrive any moment. Once those are installed, then I need to get the engine compartment ready and I should be able to reinstall the engine. |
| bkrantz |
 Feb 12 2024, 08:47 PM Feb 12 2024, 08:47 PM
Post
#140
|
|
914 Guru      Group: Members Posts: 8,156 Joined: 3-August 19 From: SW Colorado Member No.: 23,343 Region Association: Rocky Mountains 
|
Did you seal the bolt for the thermostat pulley?
|
  |
32 User(s) are reading this topic (32 Guests and 0 Anonymous Users)
0 Members:

|
Lo-Fi Version | Time is now: 4th December 2024 - 08:24 PM |
Invision Power Board
v9.1.4 © 2024 IPS, Inc.


