|
|

|
Porsche, and the Porsche crest are registered trademarks of Dr. Ing. h.c. F. Porsche AG.
This site is not affiliated with Porsche in any way. Its only purpose is to provide an online forum for car enthusiasts. All other trademarks are property of their respective owners. |
|
|
  |
| michel richard |
 Aug 18 2005, 09:35 AM Aug 18 2005, 09:35 AM
Post
#41
|
|
Senior Member    Group: Members Posts: 1,291 Joined: 22-July 03 From: Longueuil, Québec Member No.: 936 |
And the actual blasting. The blue-gray cloud to the right of the area being blasted is the CO2 ice turning to a gas. In the picture, the operator is blasting an area that was cleaned previously, and there is absolutely nothing being thrown off the car, i.e. no residue from the blasting itself.
One concern, though, is that the blasting "gun" is pretty big and cumbersome, and I'm not sure how it's going to work out in some of the more out-of-the-way spots on the tub. BTW the process is noisy as hell. No way I could have gotten close if they had'nt given me a pair of ear plugs. Michel Richard Attached image(s) 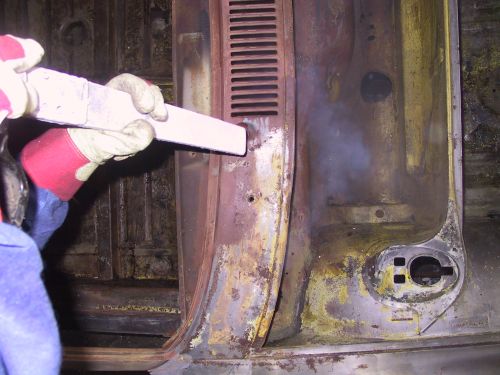
|
| michel richard |
 Aug 29 2005, 06:01 PM Aug 29 2005, 06:01 PM
Post
#42
|
|
Senior Member    Group: Members Posts: 1,291 Joined: 22-July 03 From: Longueuil, Québec Member No.: 936 |
CO2 blasting is done. Here are pics of the tub on August 29, 2005:
Attached image(s) 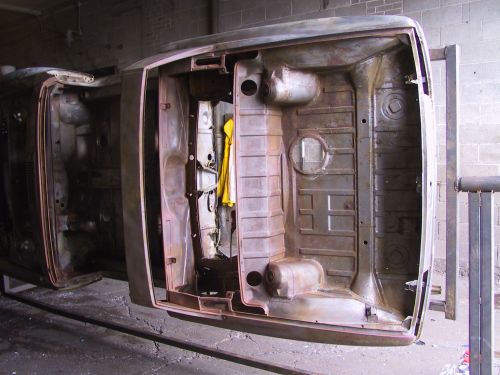
|
| michel richard |
 Aug 29 2005, 06:02 PM Aug 29 2005, 06:02 PM
Post
#43
|
|
Senior Member    Group: Members Posts: 1,291 Joined: 22-July 03 From: Longueuil, Québec Member No.: 936 |
That was the top, from the rear, obviously. Now the rear half, from the bottom:
Attached image(s) 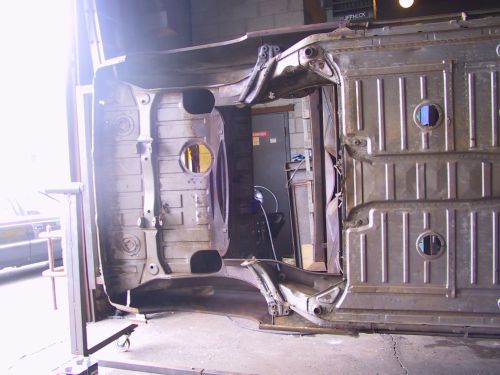
|
| michel richard |
 Aug 29 2005, 06:03 PM Aug 29 2005, 06:03 PM
Post
#44
|
|
Senior Member    Group: Members Posts: 1,291 Joined: 22-July 03 From: Longueuil, Québec Member No.: 936 |
And the front half, from the bottom:
Attached image(s) 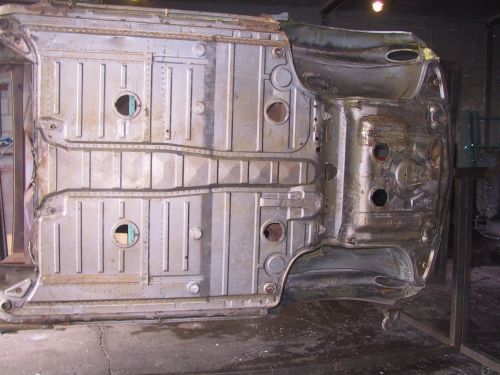
|
| michel richard |
 Aug 29 2005, 06:14 PM Aug 29 2005, 06:14 PM
Post
#45
|
|
Senior Member    Group: Members Posts: 1,291 Joined: 22-July 03 From: Longueuil, Québec Member No.: 936 |
The good news is that the floor pans under the passenger compartment, the longitudinals, inside and outside, the center tunnel and the bulkheads are all in very good shape.
Once again, I'm North of the US Northeast (in Montreal) which means I've never ever come close to seeing a stripped 914 that looks as good as this one. Any '70 914 that was used in the winter, here, must've been rustier than this in 1973 ! The bad news is that there is a little more rust than I expected: I should really be replacing both the front and rear trunk floors . . . although I might be able to repair the rear. If I can find a front trunk floor, new or used, I'll be well on my way. As for the dry ice blasting, I'm a little disapointed right now. It looks like the process is'nt quite strong enough to really clean everything. It did get rid of most of the rust but the body man who came and looked at the frame this afternoon said a lot more work would be needed before the tub could be ready for primer and paint, even disregarding the need to fix the trunks. So it looks like I'll have the tub primered, so it doe'nt rust anymore while I chase trunk floors and fix them. I'll then need to remove the primer, really prep the steel and primer again. Sure sounds like a lot of work, but I'm not sure I have a lot of choice. |
| LongARM |
 Aug 29 2005, 06:42 PM Aug 29 2005, 06:42 PM
Post
#46
|
|
it's better to burn-out , then it is to rust   Group: Members Posts: 222 Joined: 6-March 05 From: Kingston Ontario Canada Member No.: 3,720 |
nice progress .....good find
we need to bring more 6,s across the border... lol |
| michel richard |
 Aug 30 2005, 06:11 PM Aug 30 2005, 06:11 PM
Post
#47
|
|
Senior Member    Group: Members Posts: 1,291 Joined: 22-July 03 From: Longueuil, Québec Member No.: 936 |
The tub is back home. This is the rig that I threw together to make it possible to have the car towed. It turns out that the bodyman had not gotten around to shooting the car with primer when I showed up today, to take the car back.
So the plan is now to fix the front trunk as well as I can and then to use POR 15 to prepare the tub. That will mean super-thorough cleaning, etching, then the paint. At least it's something I've done in the past, so I should be OK. Attached image(s) 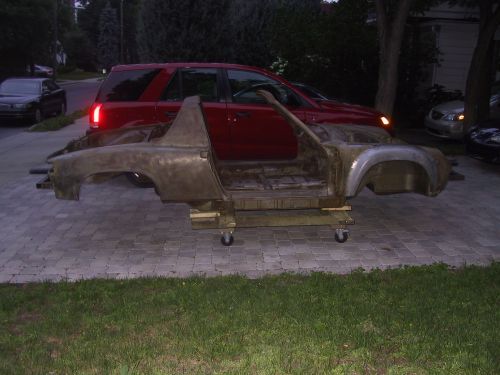
|
| michel richard |
 Aug 30 2005, 06:13 PM Aug 30 2005, 06:13 PM
Post
#48
|
|
Senior Member    Group: Members Posts: 1,291 Joined: 22-July 03 From: Longueuil, Québec Member No.: 936 |
Only one flare in the previous shot ! OH well, more to come. And here are the hoods, the doors and the dash. Under those are the trailing arms, the A-arms, teh front struts and other misc parts. I should mostly be working with clean parts, which will hopefully help things along.
Attached image(s) 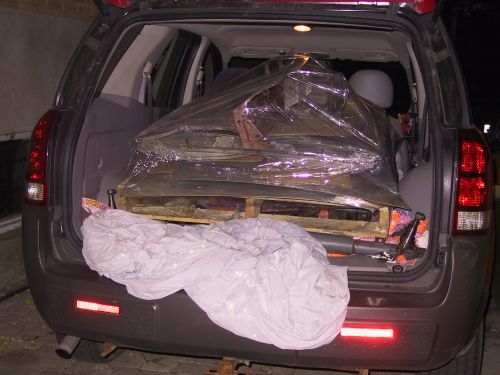
|
| michel richard |
 Sep 3 2005, 10:20 AM Sep 3 2005, 10:20 AM
Post
#49
|
|
Senior Member    Group: Members Posts: 1,291 Joined: 22-July 03 From: Longueuil, Québec Member No.: 936 |
Before I put the tub back up on the rotisserie, I shortened the latter, a little bit. The center of the swing axis is now 35.5 inches above the top of the longitudinal bar.
Unfortunately that's a little bit short. The corner of the windshield frame fouls the bar: Attached image(s) 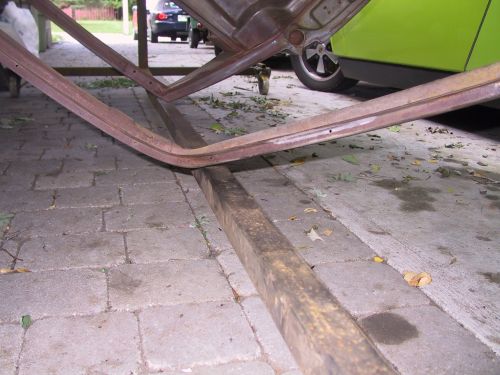
|
| michel richard |
 Sep 3 2005, 10:21 AM Sep 3 2005, 10:21 AM
Post
#50
|
|
Senior Member    Group: Members Posts: 1,291 Joined: 22-July 03 From: Longueuil, Québec Member No.: 936 |
. . . Even if the flared fender clears.
Attached image(s) 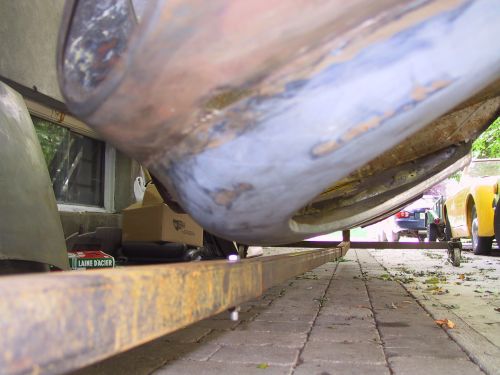
|
| michel richard |
 Sep 3 2005, 10:27 AM Sep 3 2005, 10:27 AM
Post
#51
|
|
Senior Member    Group: Members Posts: 1,291 Joined: 22-July 03 From: Longueuil, Québec Member No.: 936 |
I remember reading elsewhere that the rollbar corner was the problem. Obviously, it depends on exactly how everything is mounted. My rollbar clears by about an inch.
So, I am now able to report that the minimum height, when building a rotisserie, is somewhere around 37 inches. I'm not too concerned, in my case. It just means that I have to be careful which way I turn the car. Even then, when it fouls, there's enough flex in everything that a slight push gets the windshield frame across. And I can already tell that having the car lower will make a big difference. Cheers |
| michel richard |
 Oct 2 2005, 06:49 PM Oct 2 2005, 06:49 PM
Post
#52
|
|
Senior Member    Group: Members Posts: 1,291 Joined: 22-July 03 From: Longueuil, Québec Member No.: 936 |
Quite a bit of progress made since th last update. I spent a couple of weekends stripping the rest of the car. The guys who dry-ice blasted it took most of the junk off the car, but there was still a lot left. I went through two gallons of stripper.
Then a thorough wash, etching, and POR - 15. I sprayed the first coat on, but the stuff is pretty nasty and I got some pretty strong complaints about the smell, so I painted the second coat on. I did the "interior" portions of the car only i.e. the cabin, the engine compartment, the trunks, the fuel tank compartment, plus the underside. The hoods and the exterior I will leave to my bodyman and the products he is familiar with and he likes. Here is how the lower engine compartment loolked like when I got he car: Attached image(s) 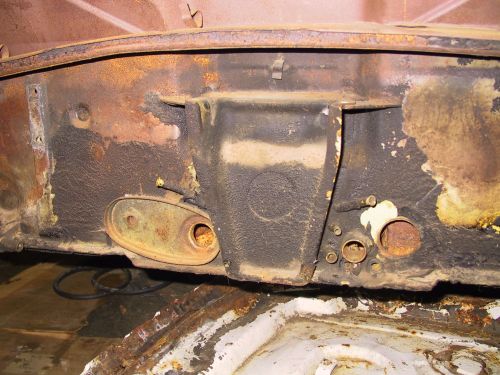
|
| michel richard |
 Oct 2 2005, 06:50 PM Oct 2 2005, 06:50 PM
Post
#53
|
|
Senior Member    Group: Members Posts: 1,291 Joined: 22-July 03 From: Longueuil, Québec Member No.: 936 |
The same area just before paint (POR - 15, actually)
Attached image(s) 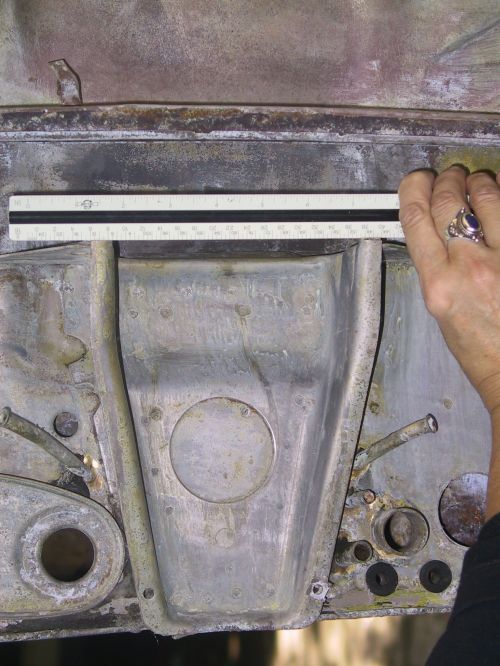
|
| michel richard |
 Oct 2 2005, 06:51 PM Oct 2 2005, 06:51 PM
Post
#54
|
|
Senior Member    Group: Members Posts: 1,291 Joined: 22-July 03 From: Longueuil, Québec Member No.: 936 |
And after the POR -15
Attached image(s) 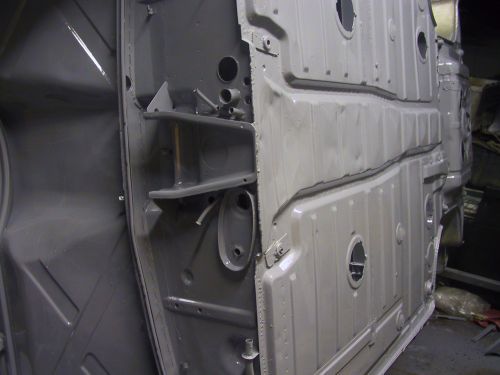
|
| michel richard |
 Oct 2 2005, 06:53 PM Oct 2 2005, 06:53 PM
Post
#55
|
|
Senior Member    Group: Members Posts: 1,291 Joined: 22-July 03 From: Longueuil, Québec Member No.: 936 |
I added a sub-thread with a bunch of pictures of the original engine mount, in case it helps anyone.
http://www.914world.com/bbs2/index.php?act=...=ST&f=2&t=39205 |
| Gint |
 Oct 2 2005, 08:25 PM Oct 2 2005, 08:25 PM
Post
#56
|
|
Mike Ginter                Group: Admin Posts: 16,095 Joined: 26-December 02 From: Denver CO. Member No.: 20 Region Association: Rocky Mountains  |
It's a decent tub though. Looks good Michel.
|
| db9146 |
 Oct 2 2005, 08:53 PM Oct 2 2005, 08:53 PM
Post
#57
|
|
Senior Member    Group: Members Posts: 953 Joined: 21-December 04 From: Atlanta, GA Member No.: 3,315 Region Association: None 
|
Dry ice blastinng is a new approach I have not heard of here in the southeast. When I have inquired locally, the shops have been talking about soda blasting (baking soda). My brother-in-law had the engine compartment of a Mustang he is working on blasted and was very pleased with the results. The clean up was easy, it left no residue, and it really took care of the junk that covered the metal.
Just thought I'd mention another alternative. Looks like you are ready to go with your tub. Congrats...looks good. |
| michel richard |
 Oct 15 2005, 12:45 PM Oct 15 2005, 12:45 PM
Post
#58
|
|
Senior Member    Group: Members Posts: 1,291 Joined: 22-July 03 From: Longueuil, Québec Member No.: 936 |
had the tub towed to a bodyshop not far from my house. The plan is to have the interior and the underside painted, so that I can start assembling. Final paint of the exterior body will be done when the bodyman has more time, over the winter.
The tub was towed on the rotisserie, on a flatbed. Glad we did'nt go too far. I'll make sure I get a picture when the truck returns on Monday. The painter is very friendly and he called me over to his shop around noon today (Saturday) to make sure the color is right, It's Conda green. I can now say it will be visible from quite a distance ! It's a very bright color. Here's the car in the paintbooth, on October 15, 2005. Cheers. Michel Attached image(s) 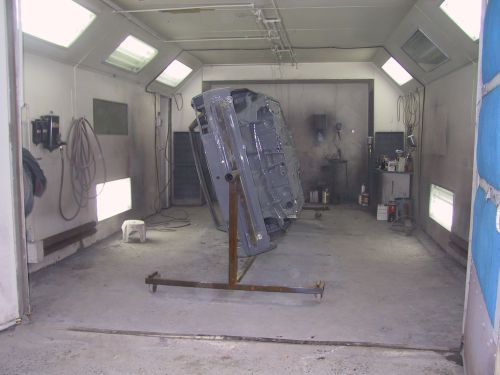
|
| michel richard |
 Oct 15 2005, 12:48 PM Oct 15 2005, 12:48 PM
Post
#59
|
|
Senior Member    Group: Members Posts: 1,291 Joined: 22-July 03 From: Longueuil, Québec Member No.: 936 |
I also dug up a couple of pictures of the car that were shot before I bought the car, in Jon Lowe's garage.
Here's one: Attached image(s) 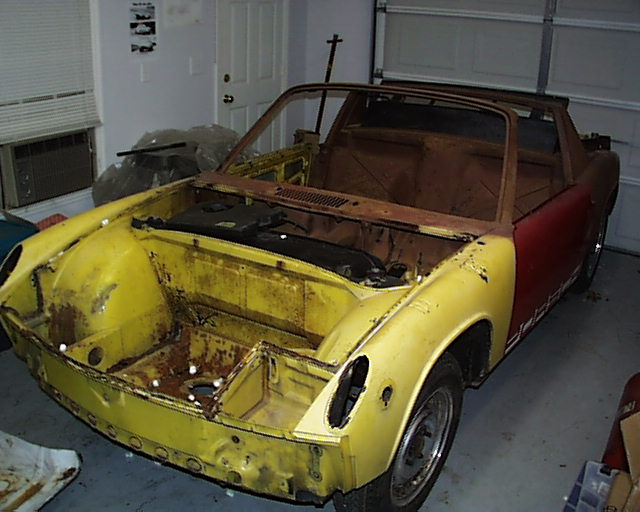
|
| michel richard |
 Oct 17 2005, 05:27 PM Oct 17 2005, 05:27 PM
Post
#60
|
|
Senior Member    Group: Members Posts: 1,291 Joined: 22-July 03 From: Longueuil, Québec Member No.: 936 |
The first stage of the paint is done: the interior, the trunks, the engine compartment and the underside are painted !
Here is the car being picked up at the body shop, on the rotisserie ! Attached image(s) 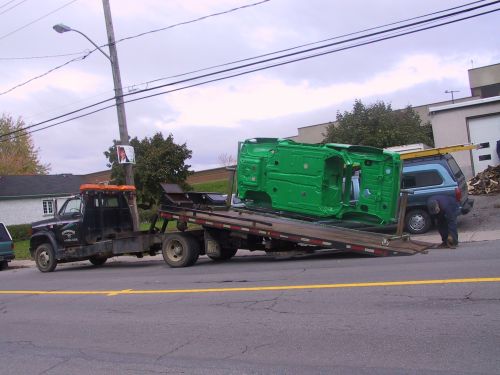
|
  |
7 User(s) are reading this topic (7 Guests and 0 Anonymous Users)
0 Members:

|
Lo-Fi Version | Time is now: 4th January 2025 - 06:24 PM |
Invision Power Board
v9.1.4 © 2025 IPS, Inc.


