|
|

|
Porsche, and the Porsche crest are registered trademarks of Dr. Ing. h.c. F. Porsche AG.
This site is not affiliated with Porsche in any way. Its only purpose is to provide an online forum for car enthusiasts. All other trademarks are property of their respective owners. |
|
|
  |
| Luke M |
 Dec 15 2021, 06:12 PM Dec 15 2021, 06:12 PM
Post
#61
|
|
Senior Member    Group: Members Posts: 1,394 Joined: 8-February 05 From: WNY Member No.: 3,574 Region Association: North East States 
|
Thank you for the advice and pictures Luke. (IMG:style_emoticons/default/smile.gif) My door handle and sail area is in decent shape. My fear of replacing the whole quarter is dealing with the tubular vent in the door jamb and all of door edge alignment. I am sure I can get a good condition quarter that would be cut beyond the mating surfaces. I can clean it up to the mating surface making it a "new" part to install. So, from the three options initially mentioned, the current recommendation is: 1- Replace whole quarter 2- Replace partial quarter 3- Straighten whole panel - not commented The vent tube is not that hard to deal with. If you can get a full q-panel have it cut with that vent in place. When you get it trim the metal off it. On the chassis you cut that vent out there's only 2 welds holding it in place. Clean up the area and the new/used section will fit right in. It was pretty easy to do. I used a spot welder to install most of the q-panel then mig welded the areas that I couldn't reach with the spot welder. Replacing the whole panel also gives you access to the backside of the targa. You can clean up and spray epoxy to help future rust in there. On my brothers car I used eastwood internal frame coating in all of the hard to get areas. If you never used that stuff it comes with a long hose and a nozzle tip that sprays in a pattern. It coats pretty well. |
| Montreal914 |
 Dec 15 2021, 08:14 PM Dec 15 2021, 08:14 PM
Post
#62
|
|
Senior Member    Group: Members Posts: 1,700 Joined: 8-August 10 From: Claremont, CA Member No.: 12,023 Region Association: Southern California 
|
So am I understanding that you keep the tube on the donner fender and join it to the body inside the cabin here? I have seen in another thread that you simply grind off the edge weld to free up the original tube.
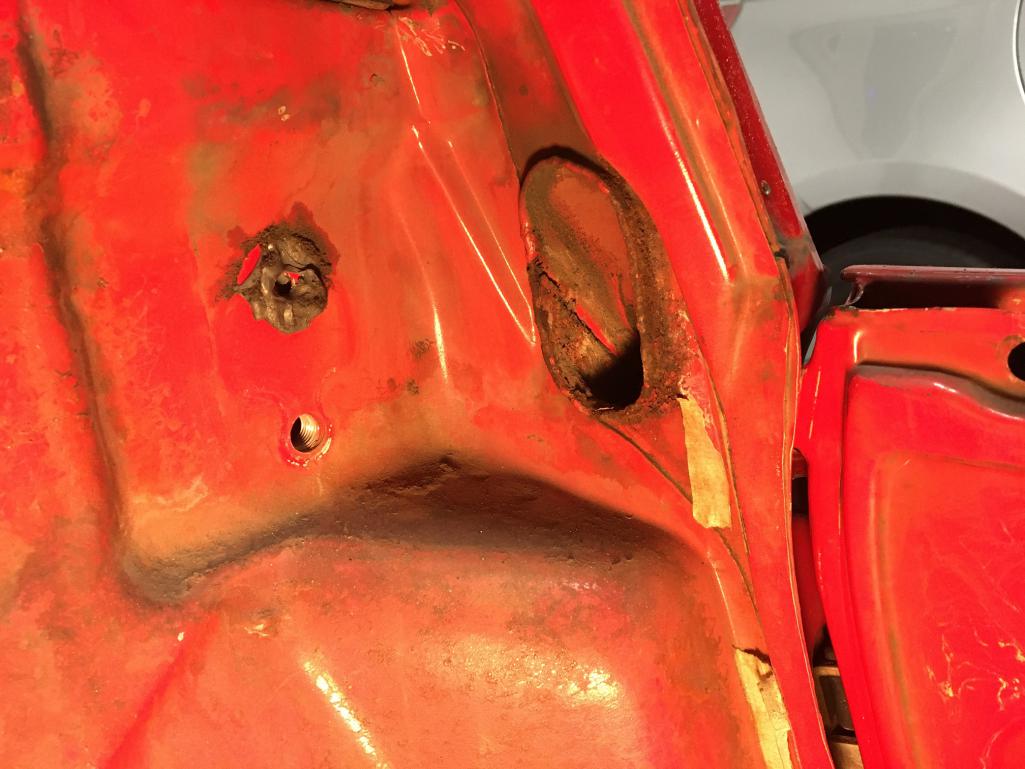 Unfortunately, I don't have a spot weld, this will be a MIG plug weld operation. Yes, having all of that section open will definitely allow me to inspect and protect. I do have a can of Eastwood with the tube, thanks! (IMG:style_emoticons/default/smile.gif) |
| Luke M |
 Dec 16 2021, 11:07 AM Dec 16 2021, 11:07 AM
Post
#63
|
|
Senior Member    Group: Members Posts: 1,394 Joined: 8-February 05 From: WNY Member No.: 3,574 Region Association: North East States 
|
Correct. Keep the tube on the donor q-panel. Remove your old one and clean up the mating areas. The new tube should slide right into place then you can see where everything lines up on the chassis. I'll snap a few pics later on my 6 as it's still apart.
|
| Montreal914 |
 Dec 17 2021, 06:30 PM Dec 17 2021, 06:30 PM
Post
#64
|
|
Senior Member    Group: Members Posts: 1,700 Joined: 8-August 10 From: Claremont, CA Member No.: 12,023 Region Association: Southern California 
|
After removing the blower box and the wiper assembly, I have noticed this "custom" enlargement of an original hole about 5/8" dia. I notice there is one too at the same spot on the driver side.
Anyone knows the use of these hole? (IMG:style_emoticons/default/confused24.gif) My car 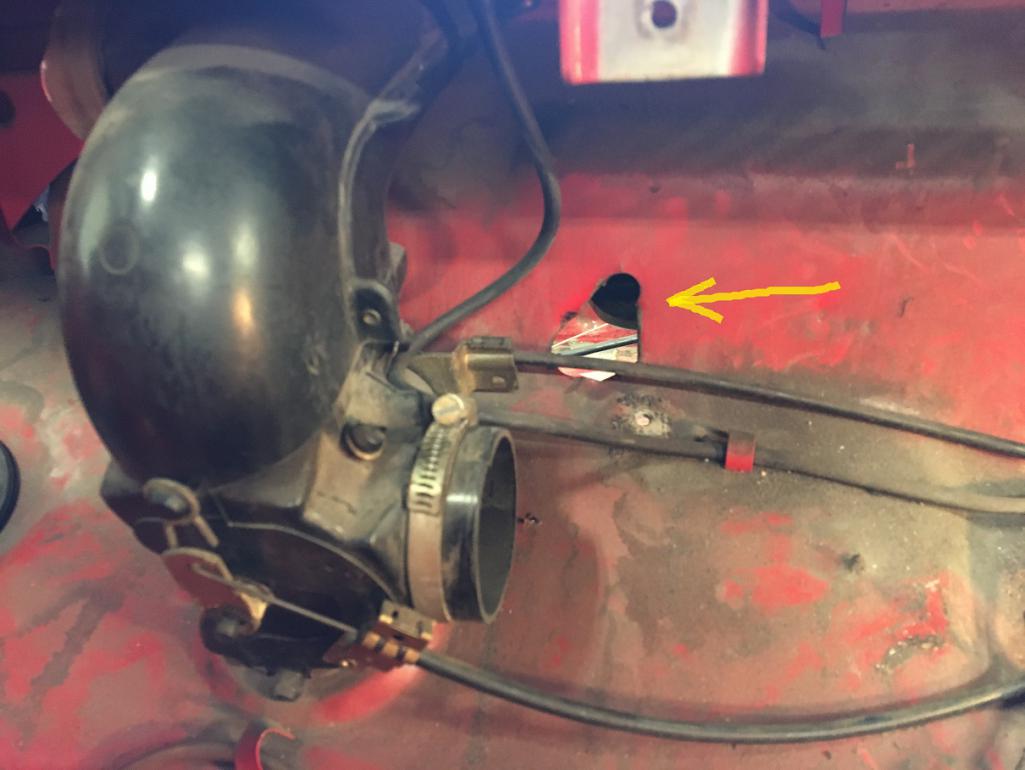 Another project car 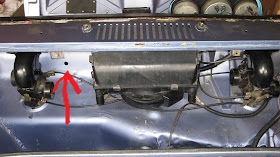 |
| Luke M |
 Dec 18 2021, 09:37 AM Dec 18 2021, 09:37 AM
Post
#65
|
|
Senior Member    Group: Members Posts: 1,394 Joined: 8-February 05 From: WNY Member No.: 3,574 Region Association: North East States 
|
After removing the blower box and the wiper assembly, I have noticed this "custom" enlargement of an original hole about 5/8" dia. I notice there is one too at the same spot on the driver side. Anyone knows the use of these hole? (IMG:style_emoticons/default/confused24.gif) My car  Another project car  I believe that's for the antenna wire. Here's pics of the fender air intake from my NOS panel. Attached image(s) 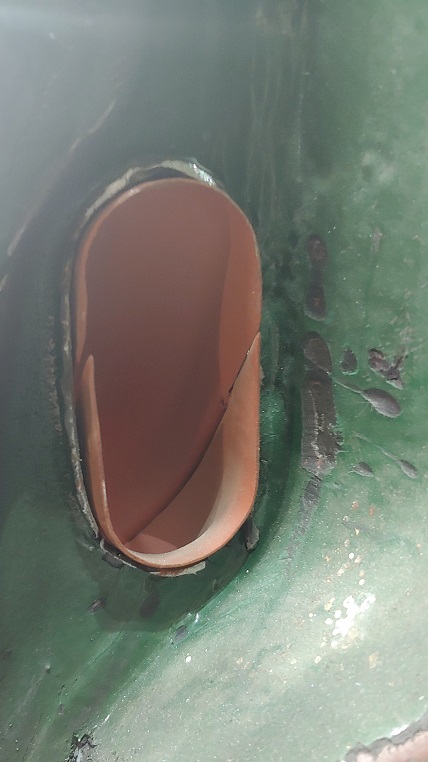 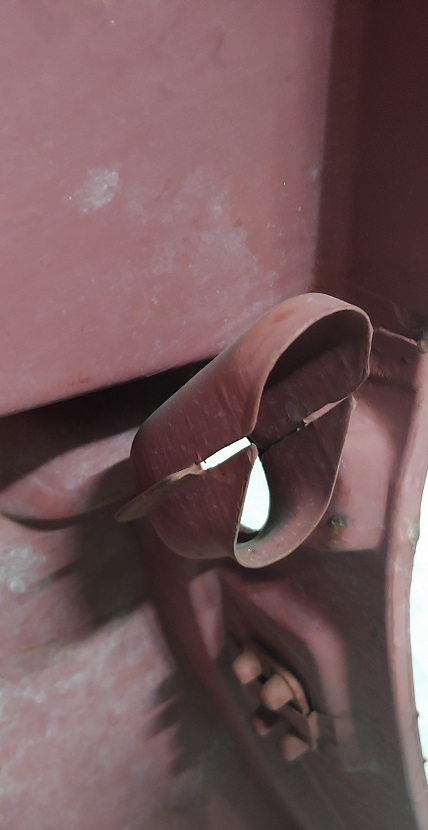 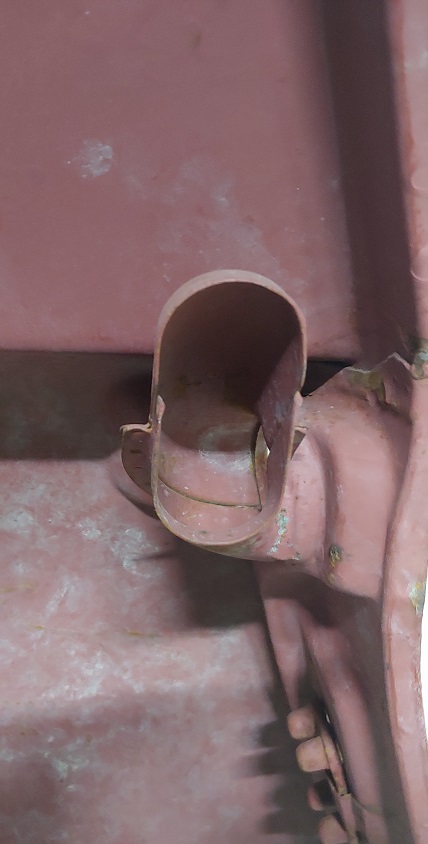
|
| Montreal914 |
 Dec 18 2021, 02:45 PM Dec 18 2021, 02:45 PM
Post
#66
|
|
Senior Member    Group: Members Posts: 1,700 Joined: 8-August 10 From: Claremont, CA Member No.: 12,023 Region Association: Southern California 
|
@Luke M Antenna, humm seems like a good explanation. (IMG:style_emoticons/default/idea.gif)
Thanks! This is very clear now as to how to tackle the fender vent area. (IMG:style_emoticons/default/thumb3d.gif) Those NOS panel... (IMG:style_emoticons/default/drooley.gif) |
| Montreal914 |
 Dec 20 2021, 09:14 PM Dec 20 2021, 09:14 PM
Post
#67
|
|
Senior Member    Group: Members Posts: 1,700 Joined: 8-August 10 From: Claremont, CA Member No.: 12,023 Region Association: Southern California 
|
A little progress this weekend. I delicately removed the rest of the ventilation system in the front trunk, i.e. the selector valves and diffuser. I did leave them connected together by the actuator cables in hopes of easing the process upon reassembly. I will probably take them apart though to see what needs rebuild. No picture, sorry...
I also plugged the two holes that had been done on the passenger side door for a stock mirror. Clearly, the person who did this wasn't aware that the threaded plate is behind the door metal and instead, simply drilled in the door skin. (IMG:style_emoticons/default/blink.gif) No wonder why I was never able to tighten that mirror properly... (IMG:style_emoticons/default/rolleyes.gif) In front of the now plugged holes are the ones I did a while back using a Dremel bit after drilling a 1/16" hole in the center. I took measurement references from the driver side door. Both of my 1/16" holes where close to the center void of the threaded plate. The rest was easy, carefully digging with a small burr. (IMG:style_emoticons/default/sunglasses.gif) Before: 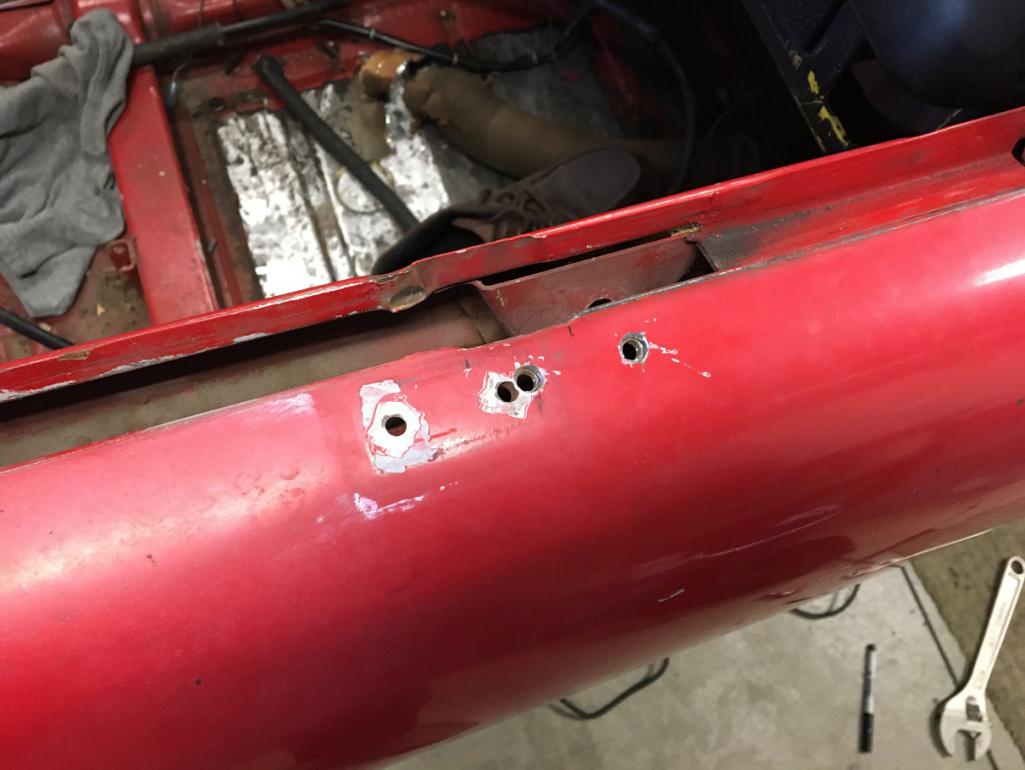 After: 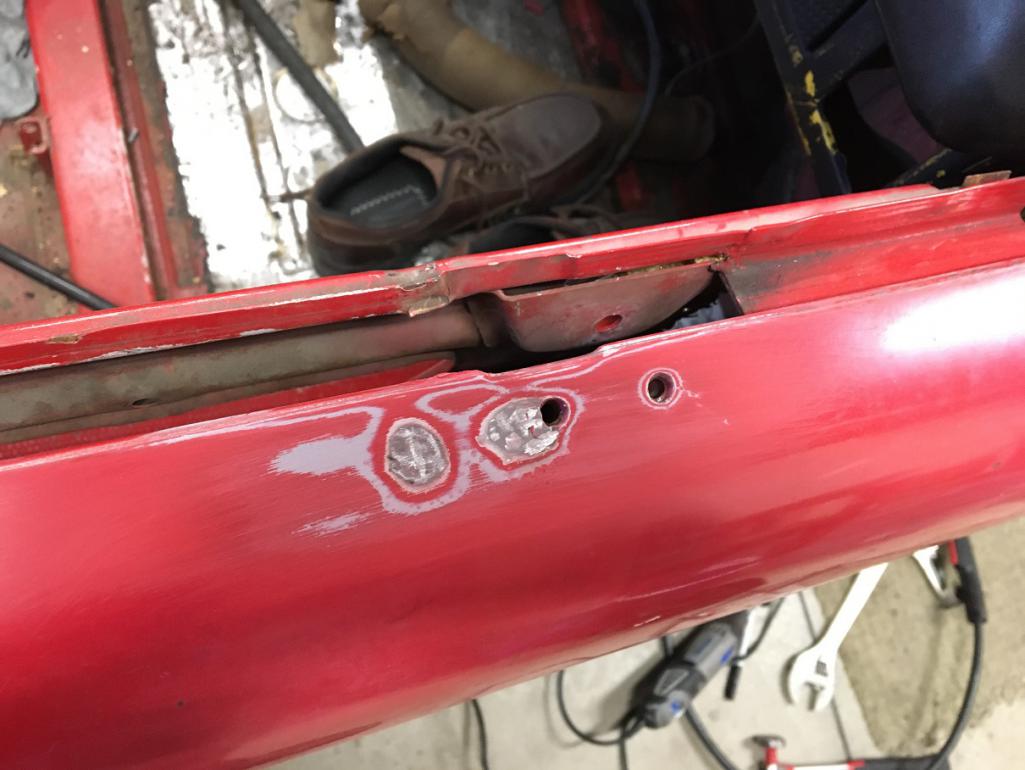 Finally, I moved on to finish the oil lines project. I fabricated a couple of brackets to support the front end of the aluminum rigid lines in the wheel well. Each bracket has an M6 nut welded on its back side allowing easy installation of the Abel clamp. Everything is now nicely secured. (IMG:style_emoticons/default/smile.gif) 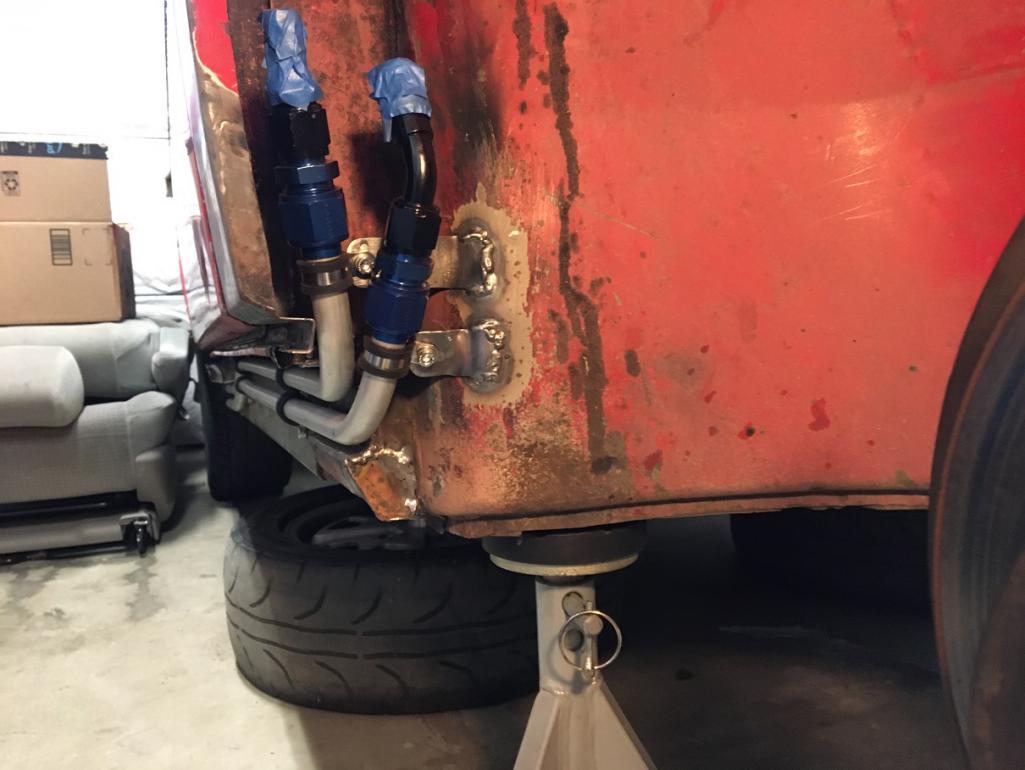 |
| Montreal914 |
 Dec 23 2021, 05:16 PM Dec 23 2021, 05:16 PM
Post
#68
|
|
Senior Member    Group: Members Posts: 1,700 Joined: 8-August 10 From: Claremont, CA Member No.: 12,023 Region Association: Southern California 
|
Today I removed the master cylinder and pedal assembly. This is a stock 17mm Ate. I removed all the parts from it in case I will need them on my new 19mm Ate MC once I reassemble the car. I will use a 19mm since I am upgrading to 911 front struts.
So, after removing the plastic/metal feed lines and grommet from the MC, here is what I am left with (picture). I thought there was supposed to be a washer underneath the rubber grommet? I drove this car daily for 10 years and the MC was bone dry. I thought without the washers, the feed lines would leak? (IMG:style_emoticons/default/confused24.gif) Do I have a different setup here? I will check to see if my new 19mm MC has the washers but please confirm that I do need the washers under the rubber grommet. Thank you! (IMG:style_emoticons/default/beerchug.gif) 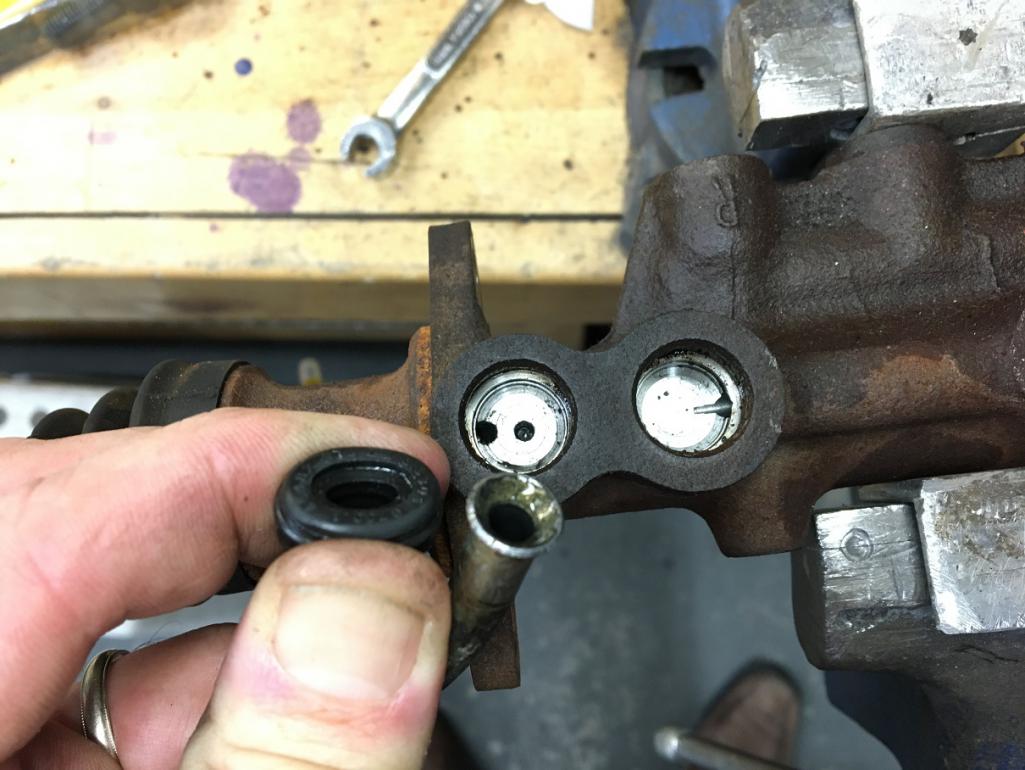 |
| Montreal914 |
 Jan 1 2022, 08:06 PM Jan 1 2022, 08:06 PM
Post
#69
|
|
Senior Member    Group: Members Posts: 1,700 Joined: 8-August 10 From: Claremont, CA Member No.: 12,023 Region Association: Southern California 
|
Happy New Year!
Being stuck at home for the Holiday's, I had the chance to work on the fuel pump relocation. I went the route Porsche did for the 75-76 models. Having bought a pump panel a while back from Bruce Stone, this was the foundation for this little project. I also have all of the hardware to install the new 2 port Bosch pump. New fuel pump assembly on my 75-76 panel (IMG:style_emoticons/default/smile.gif) 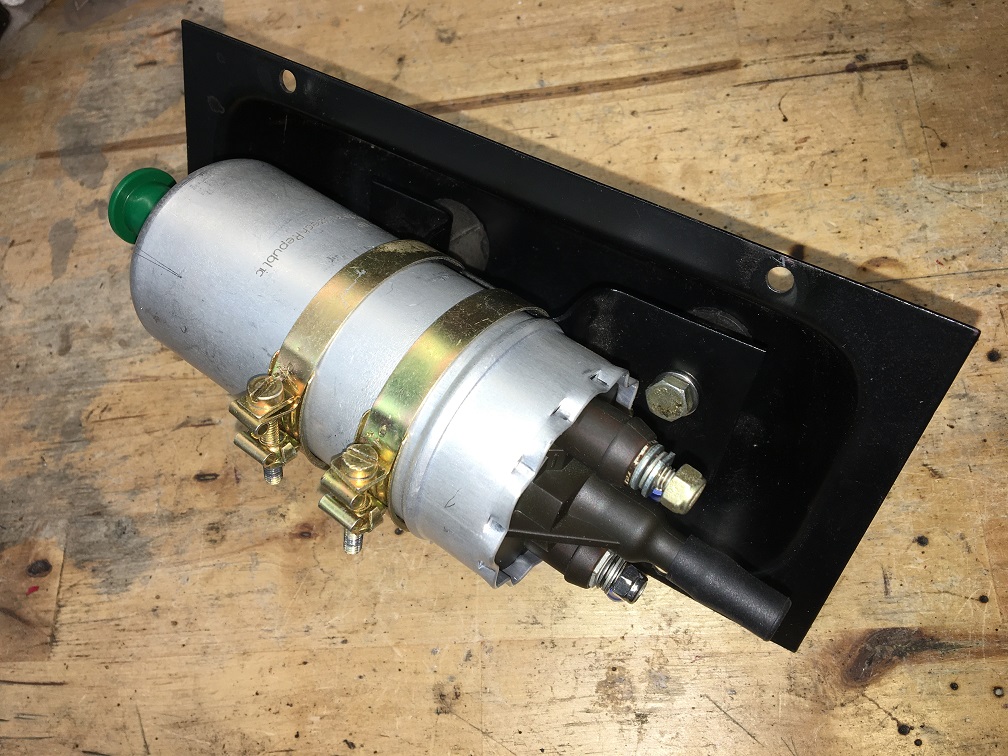 As mentioned, in 75 Porsche relocated the fuel pump to the front to eliminate the common fuel vapor lock issues that many of us have already encountered. (IMG:style_emoticons/default/rolleyes.gif) Below is a picture of a stock 75-76 setup. We can see the pump on the access panel, and the filter mounted on the opposite firewall. The fuel filter featured a tab on one of the mid plane ridges that would slide into the fork shaped bracket. Unfortunately these filters are very hard to find now. Since I plan on putting a lot of miles (IMG:style_emoticons/default/driving.gif) on my car over the next 30+ years (hopefully), I want to use the readily available square filter which looks identical to the rare one with the tab, but without the tab. (IMG:style_emoticons/default/smile.gif) Stock 75-76 fuel pump/filter setup: 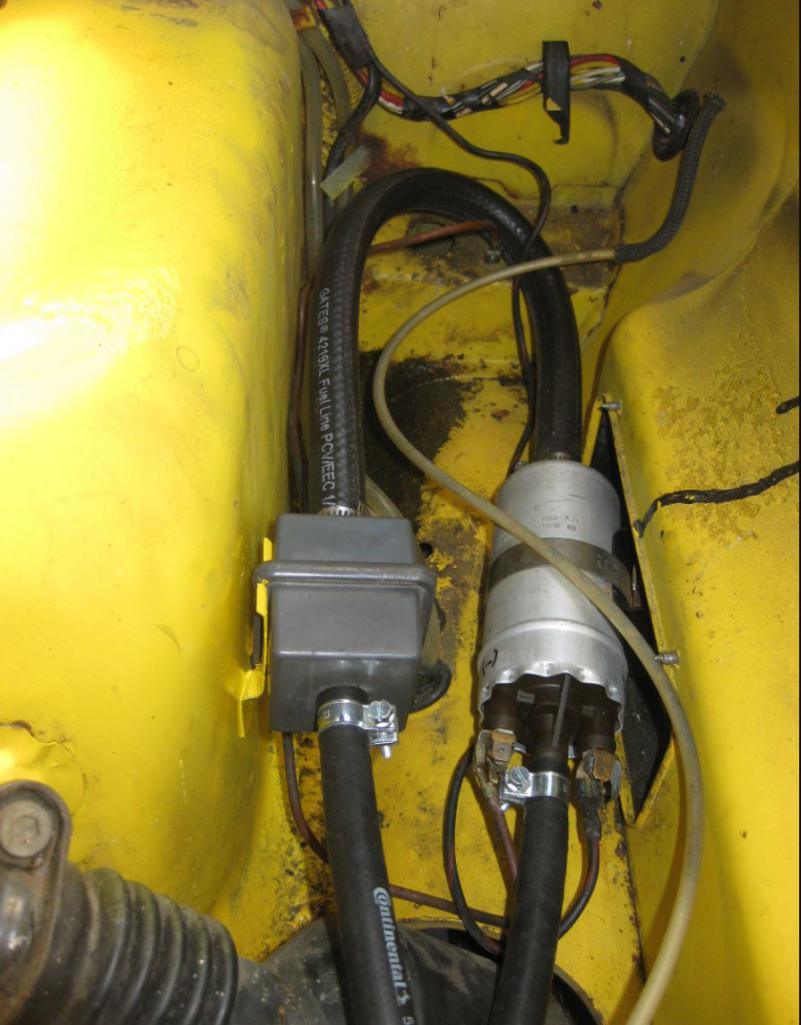 Hard to find 75-76 fuel filter: 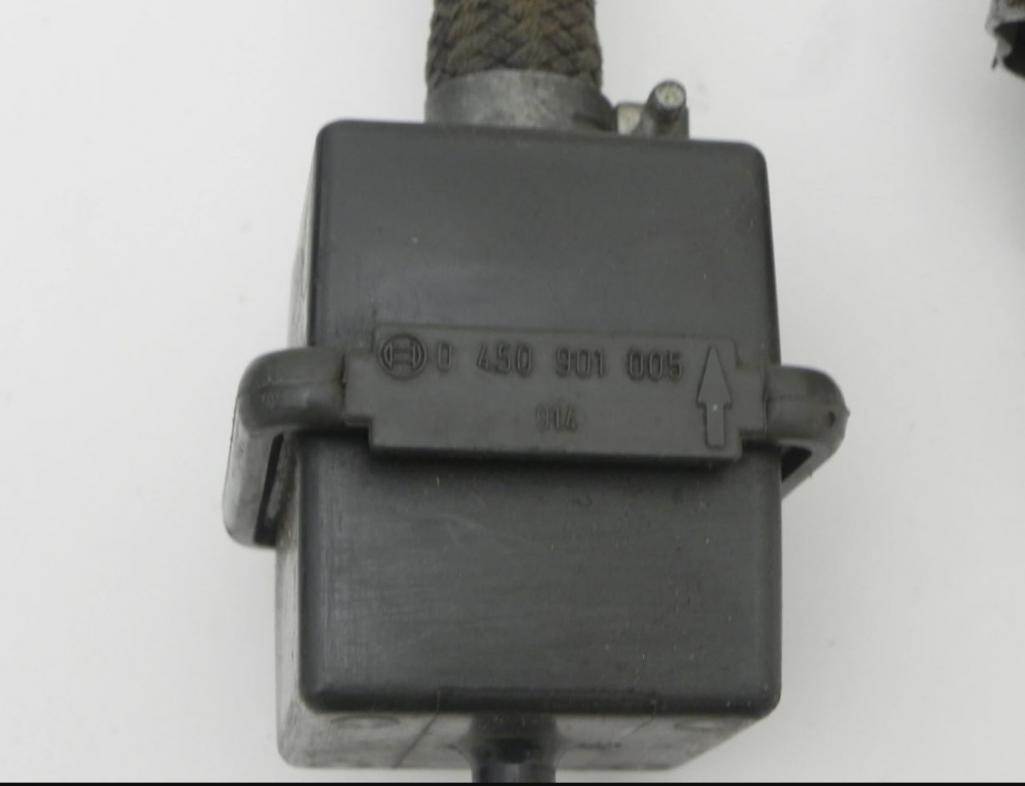 Based on Porsche's concept, I decide to removed the filter bracket located within the passenger side engine body mount as seen on the right side of this borrowed picture. I will recycle this filter mount and install it under the fuel tank. 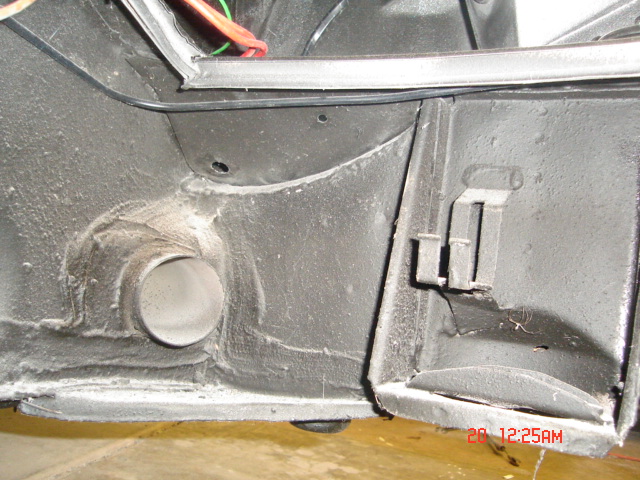 After cutting, straightening, and modifying the attachment points of the bracket, I tried my cheap and readily available square filter in it. Very nice snug fit, this will work as it was designed to work. 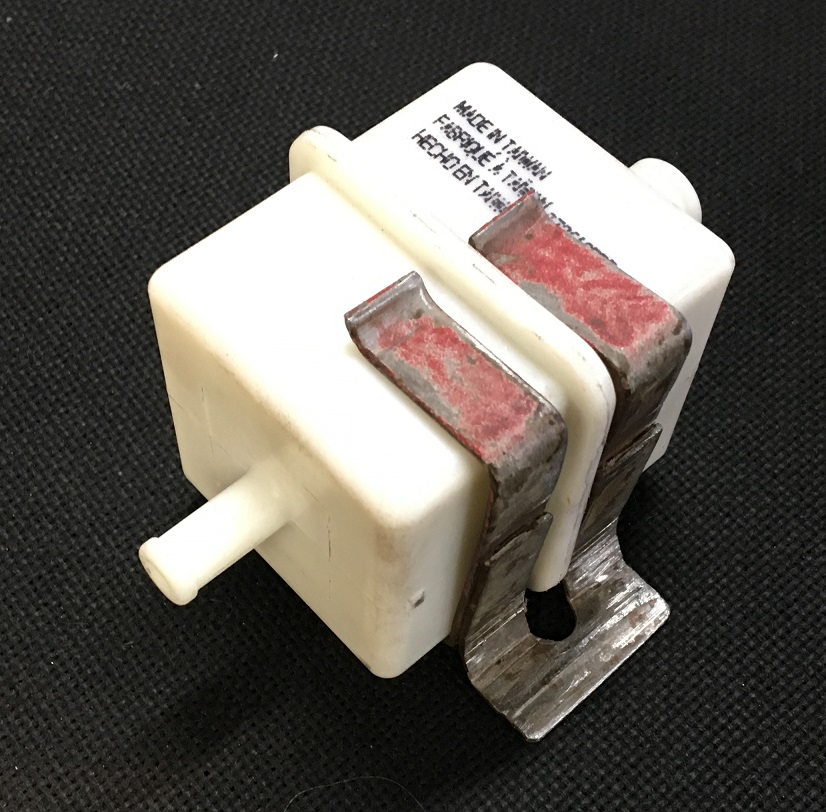 Now, on to the body modification. First step, establish the location for the 75-76 pump access panel and drill pilot holes in the firewall. Next, using a hole knockout tool, I generate the four corners. 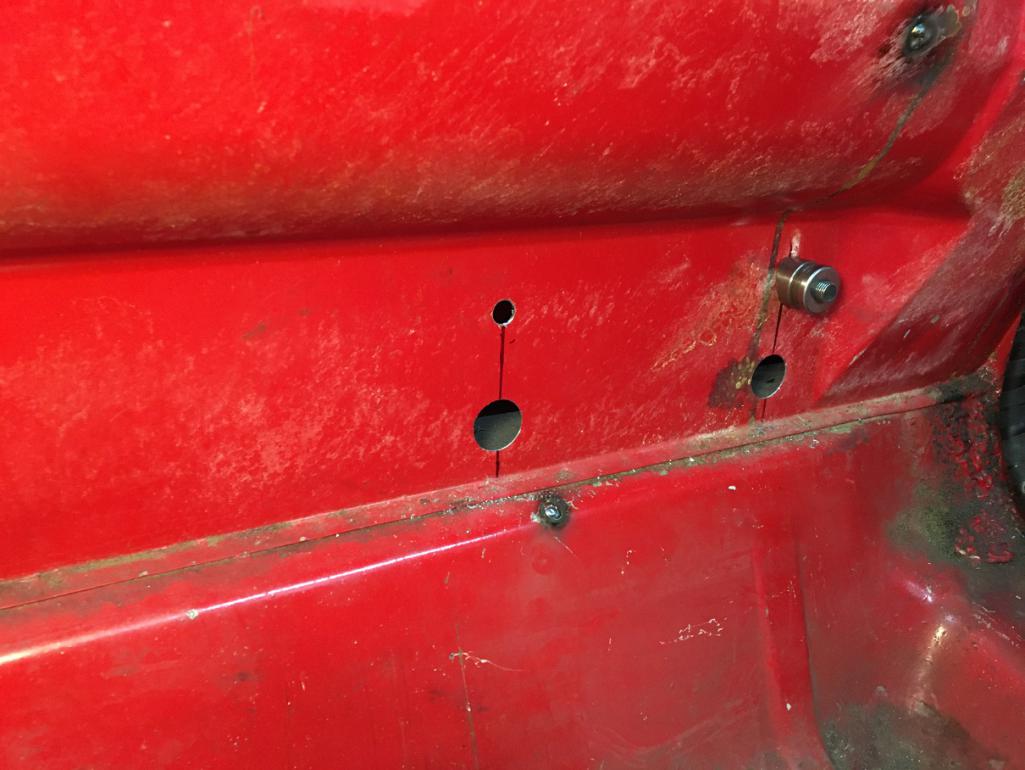 Then I cut the opening leaving about 1/4" metal to create a folded edge like the factory did, but not as nice though... (IMG:style_emoticons/default/rolleyes.gif) 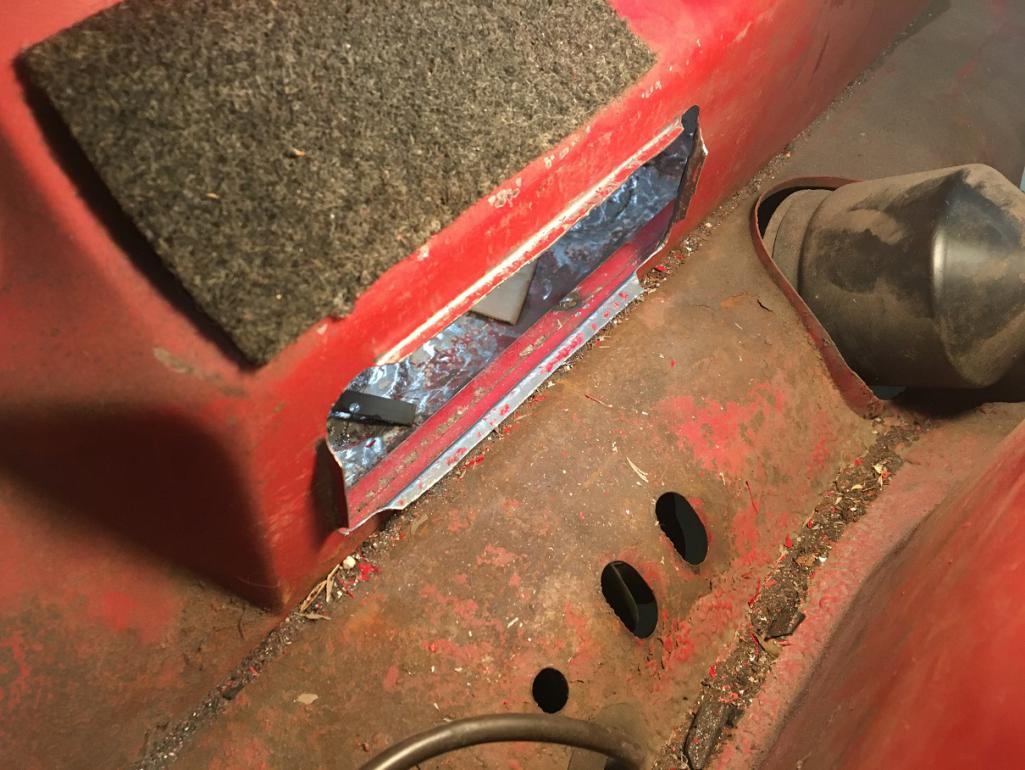 I should have kept material to create the folded corners but I thought it would be difficult to achieve in this tight area and without the proper tools. So instead, I welded in four strips to make the corners. Then I drilled the four holes and tacked M5 nuts to mount the pump access panel on the bulkhead. After some trimming and massaging, here is the final result with the pump access panel installed. The opening is pretty much the same size as the panel flange: 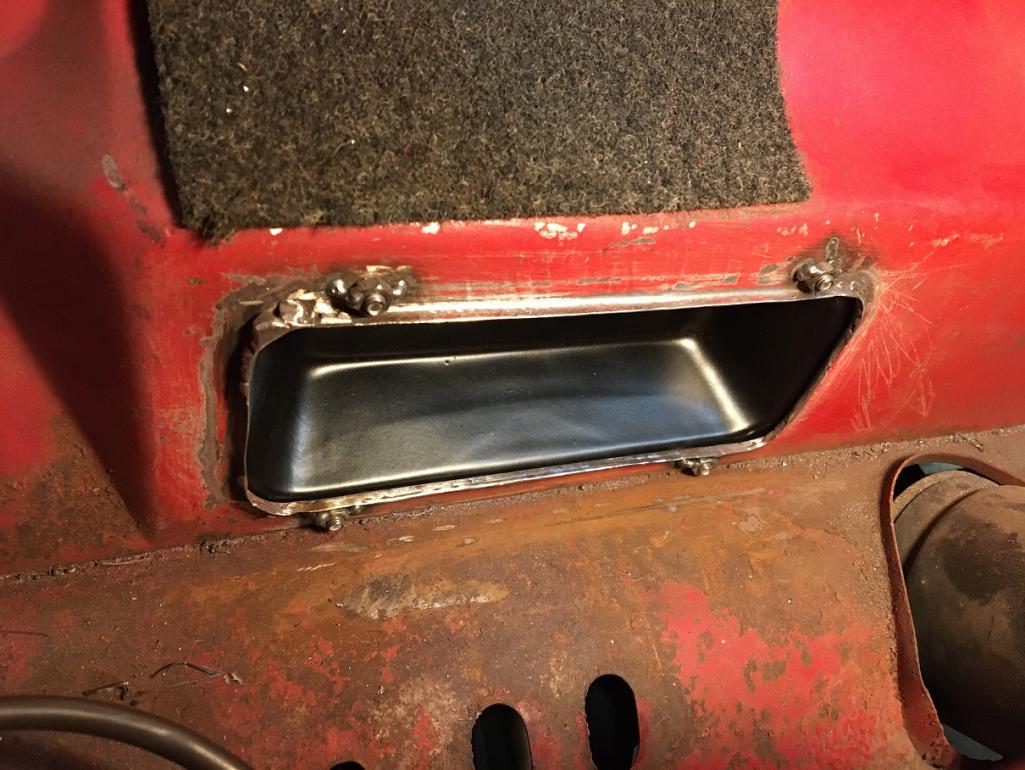 Trunk side view: 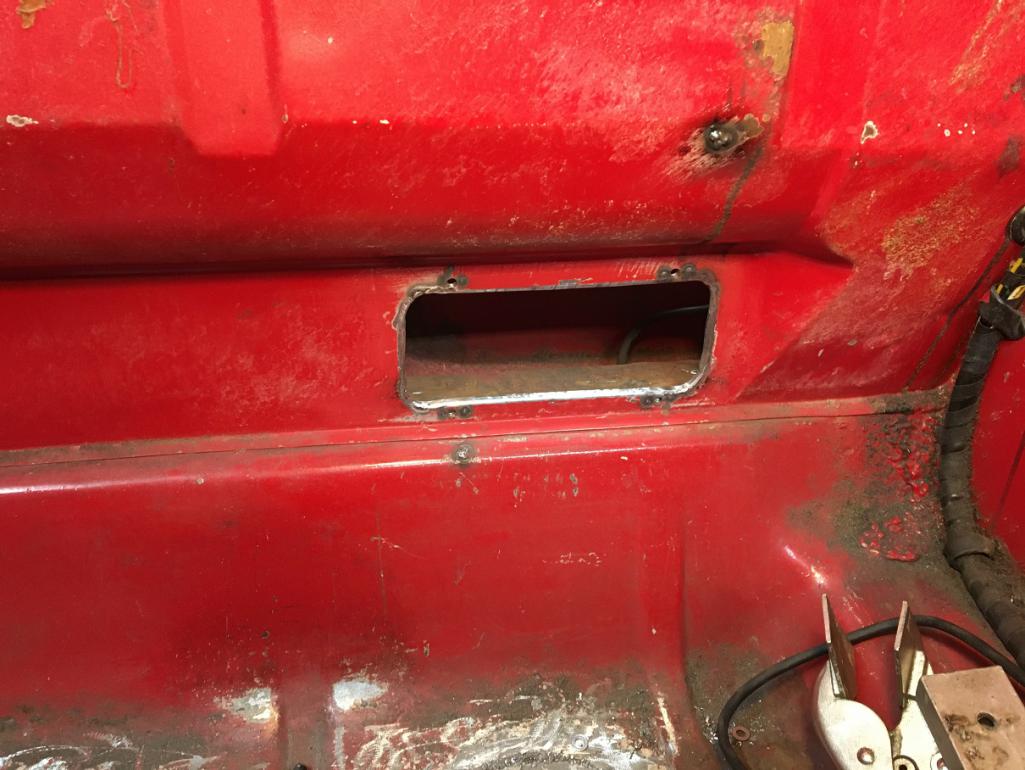 Last task, install the recycled filter bracket. Measure twice weld once... Using the new firewall opening, and installing the fuel tank back in, I carefully established the best location for the filter bracket, making sure there is enough space above the filter to remove it once the tank is in place. Mock up before welding in place. Notice the edge of the black fuel tank running above the filter. 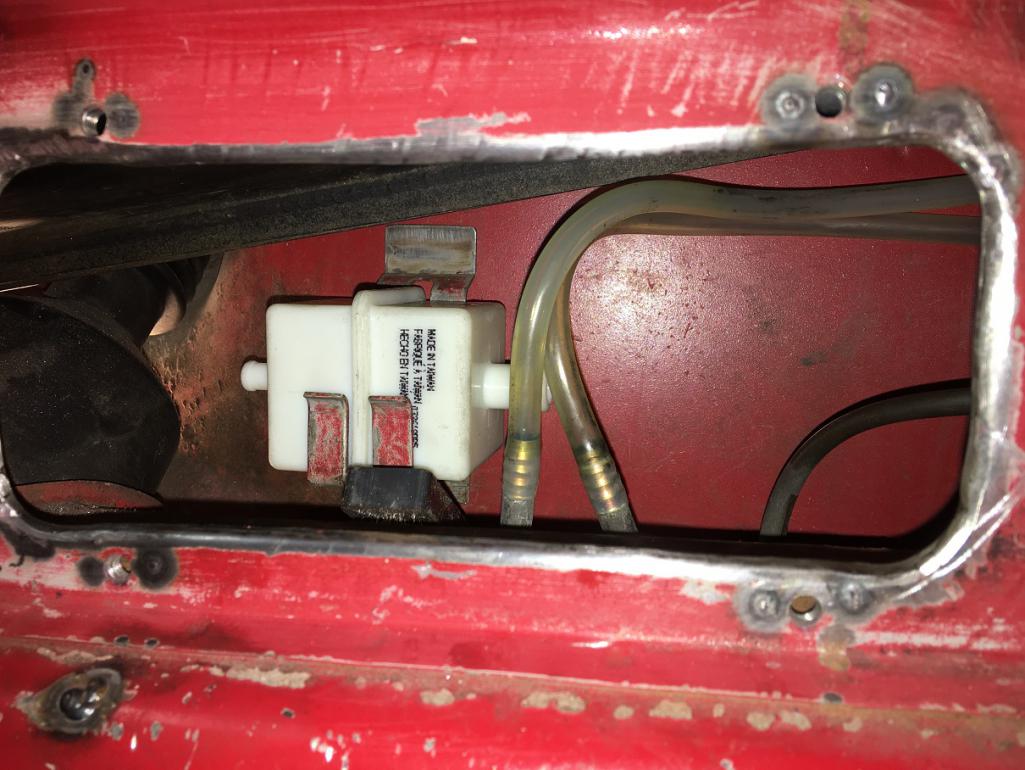 After fixing the filter bracket with a few tacks, here is the final result: 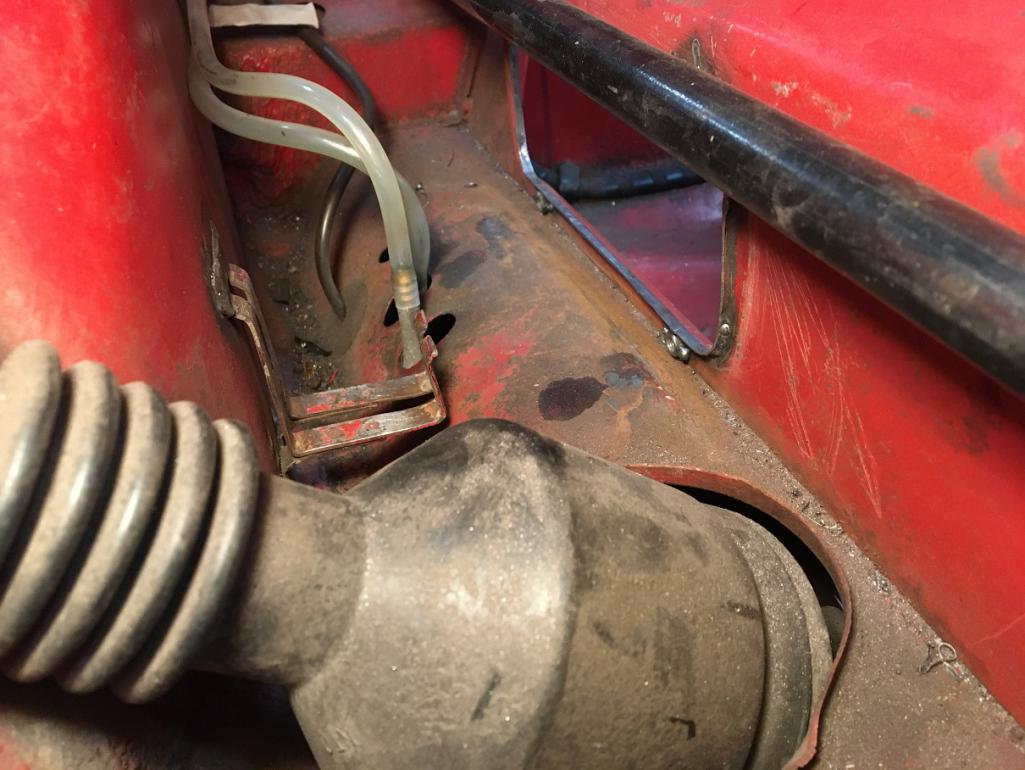 And now with the pump and filter in place: Another angle: 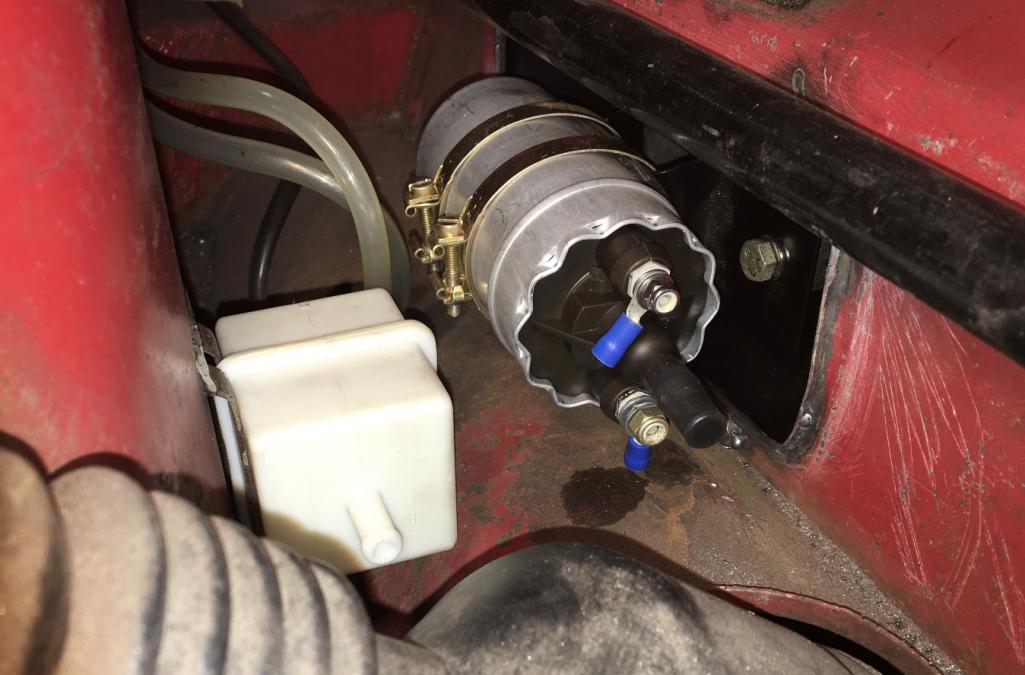 Front trunk view: 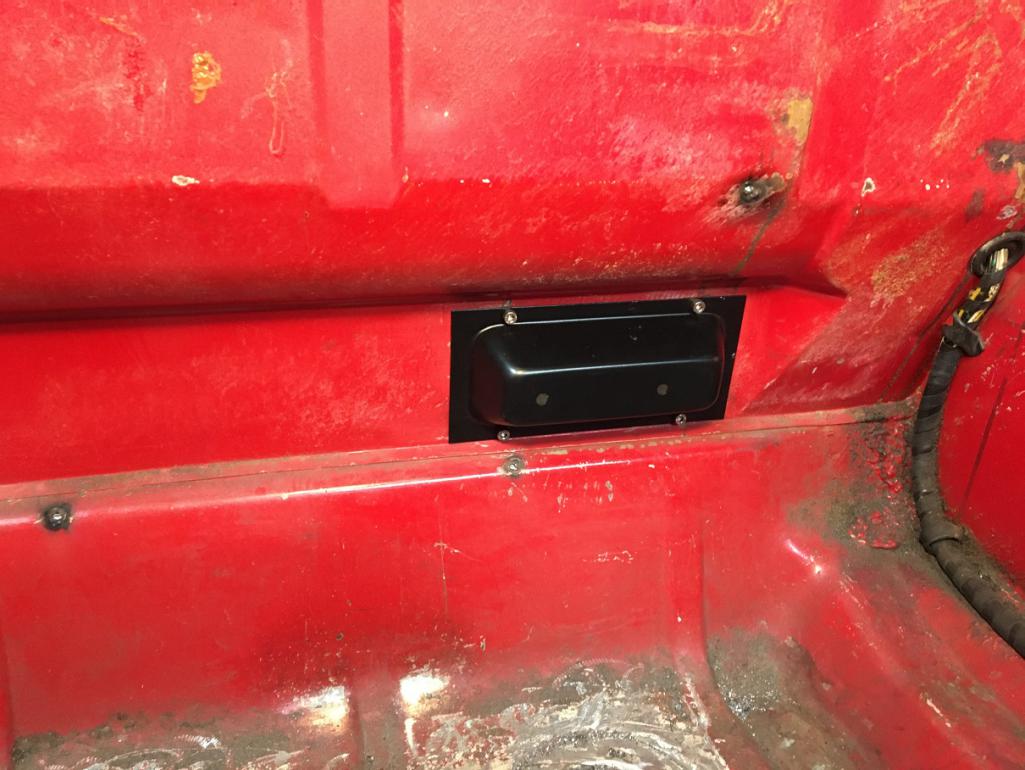 Another item crossed off from the list! (IMG:style_emoticons/default/beer3.gif) |
| bkrantz |
 Jan 1 2022, 09:32 PM Jan 1 2022, 09:32 PM
Post
#70
|
|
914 Guru      Group: Members Posts: 8,142 Joined: 3-August 19 From: SW Colorado Member No.: 23,343 Region Association: Rocky Mountains 
|
Very nice work!
|
| nivekdodge |
 Jan 20 2022, 09:57 PM Jan 20 2022, 09:57 PM
Post
#71
|
|
Member   Group: Members Posts: 273 Joined: 28-August 21 From: Pittsburgh Pa Member No.: 25,860 Region Association: MidAtlantic Region 
|
Looks good Eric, let me know if I can help
|
| Montreal914 |
 Apr 8 2022, 07:14 PM Apr 8 2022, 07:14 PM
Post
#72
|
|
Senior Member    Group: Members Posts: 1,700 Joined: 8-August 10 From: Claremont, CA Member No.: 12,023 Region Association: Southern California 
|
Time to add some of the progress... (IMG:style_emoticons/default/smash.gif)
Believe it or not, my car upon previous ownership was equipped with an alarm system (ok), power lock (IMG:style_emoticons/default/unsure.gif) , and not one, or two, but three individual speakers in each door! (IMG:style_emoticons/default/screwy.gif) So below is the result of the bastardization done by one of these too many stereo shop that shouldn't be allowed working on ANY car... (IMG:style_emoticons/default/icon8.gif) 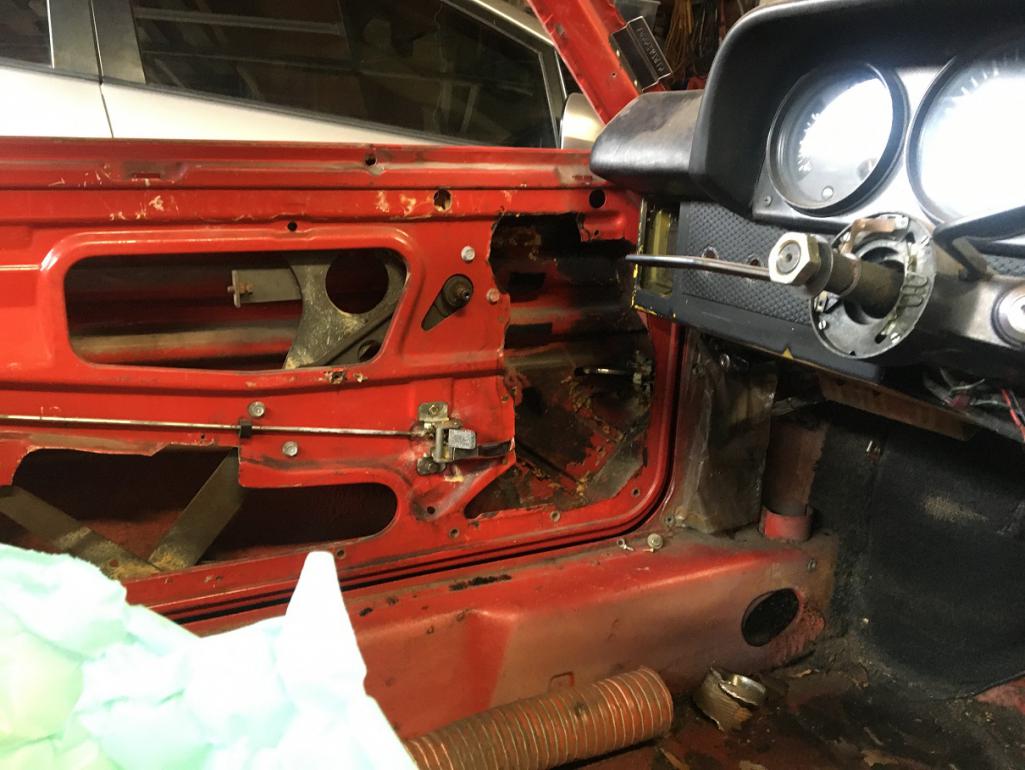 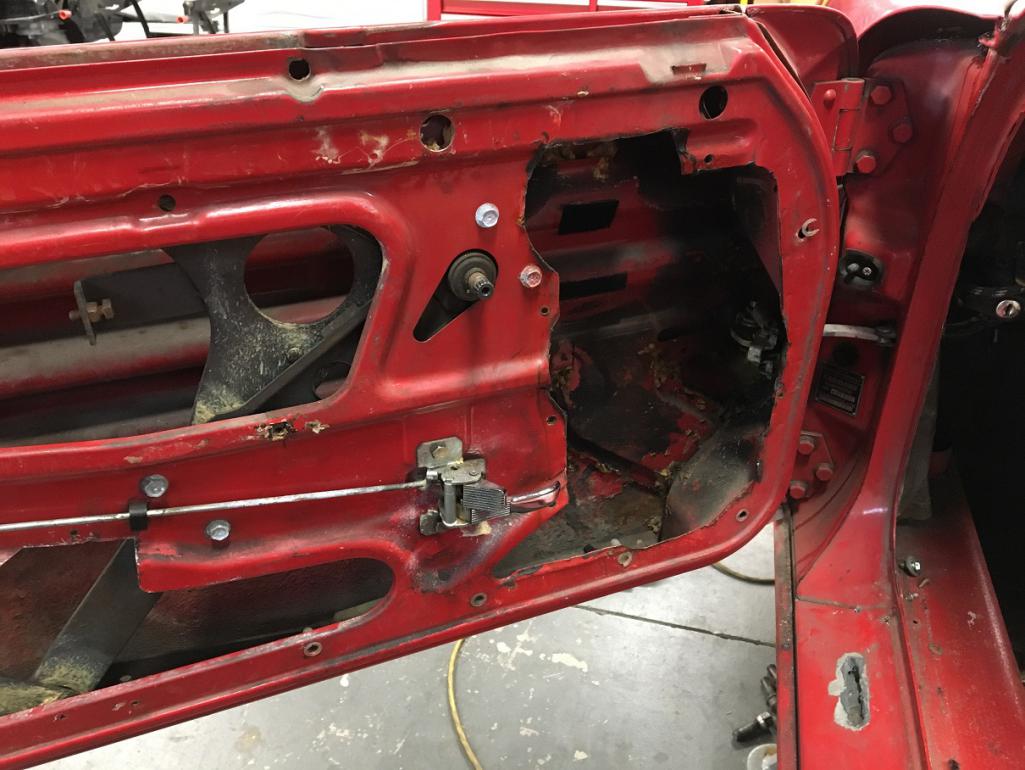 I guess the logical thing to do would be looking for a good set of doors, but who said restoring a 914 was a logical thing... (IMG:style_emoticons/default/wacko.gif) Anyhow, for some reason, I preferred giving a new life to the car's original doors, than getting another set (don't try to find the logic (IMG:style_emoticons/default/rolleyes.gif) )... So in comes Bruce Stone @bdstone914 to the rescue! Bruce had a set of heavily damaged door on the outside but un-messed with on the inside (IMG:style_emoticons/default/smile.gif) . And so the patch work begins! (IMG:style_emoticons/default/smash.gif) (IMG:style_emoticons/default/welder.gif) Donner door: 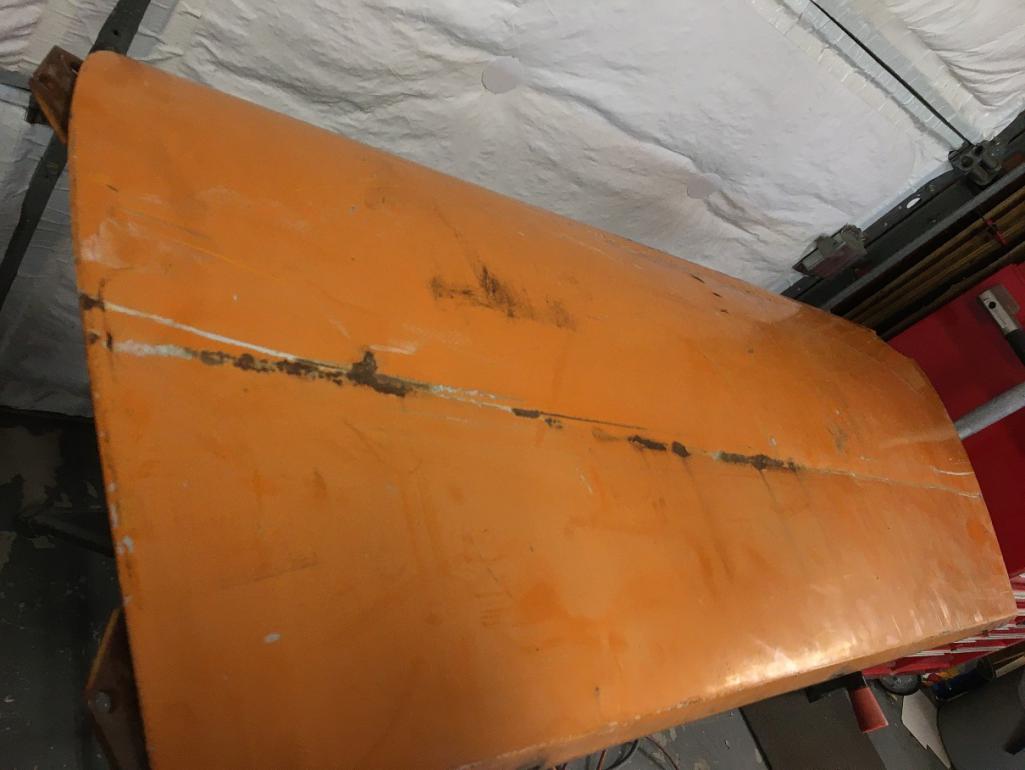 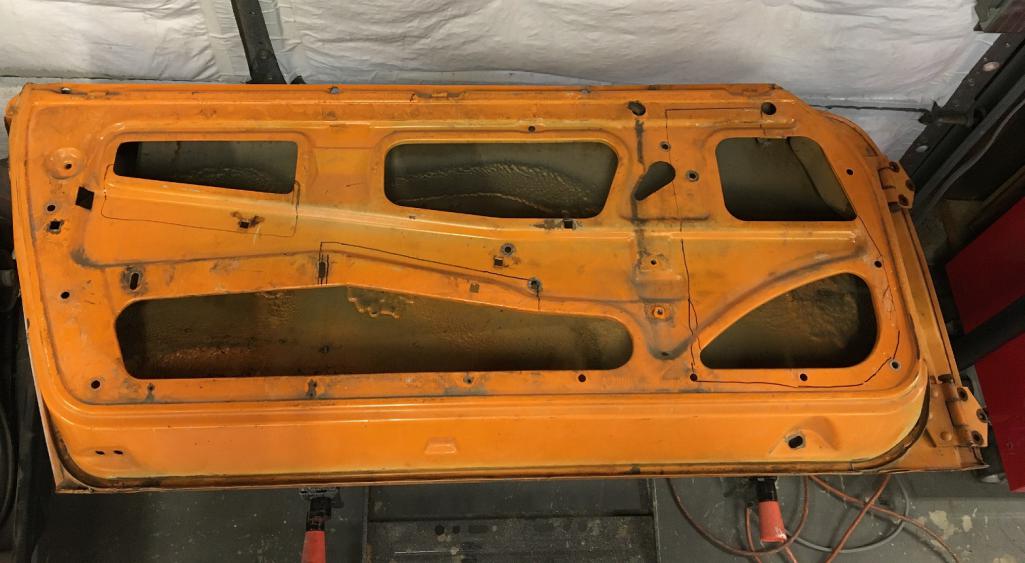 First step, repair the opening "created" for the power lock actuator. I cut that area out of the donner door while keeping half of the nearby holes as reference for positioning and prepping the car's door. 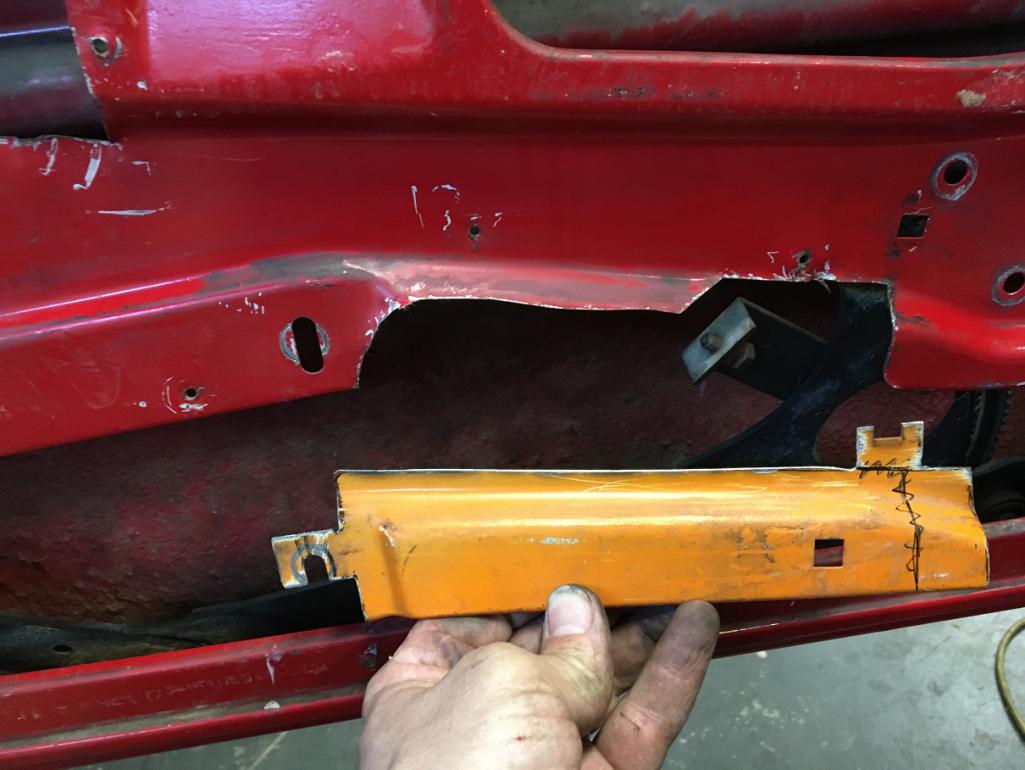 Seems to be fitting well! 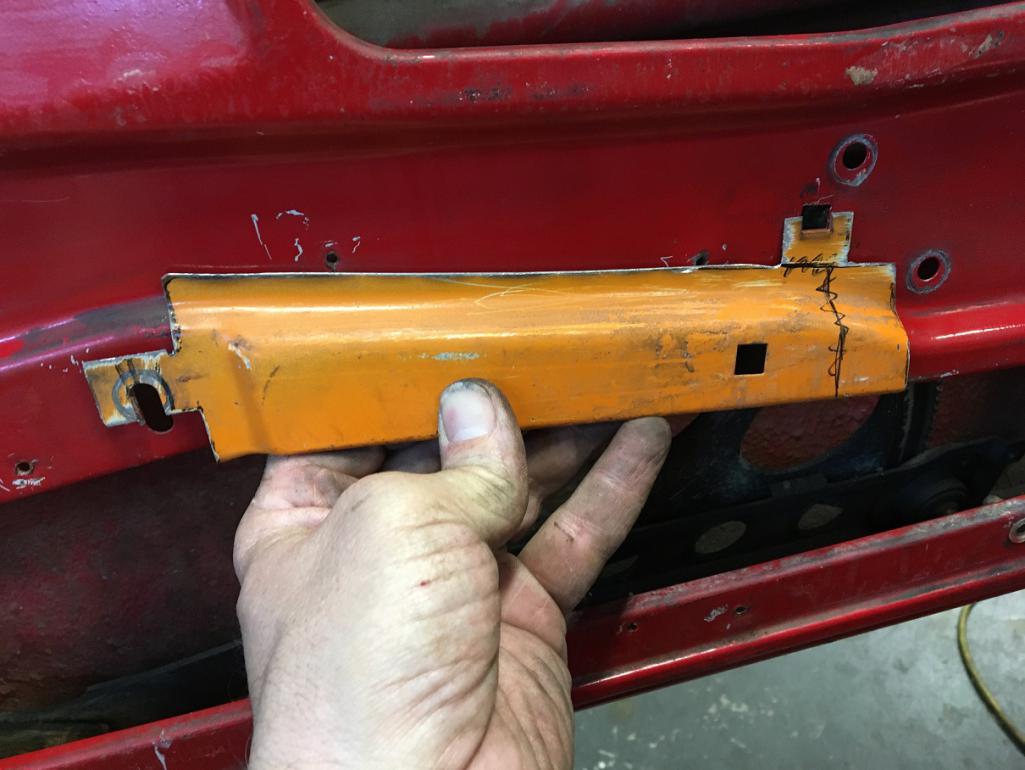 Now nicely cut the door to fit the piece. 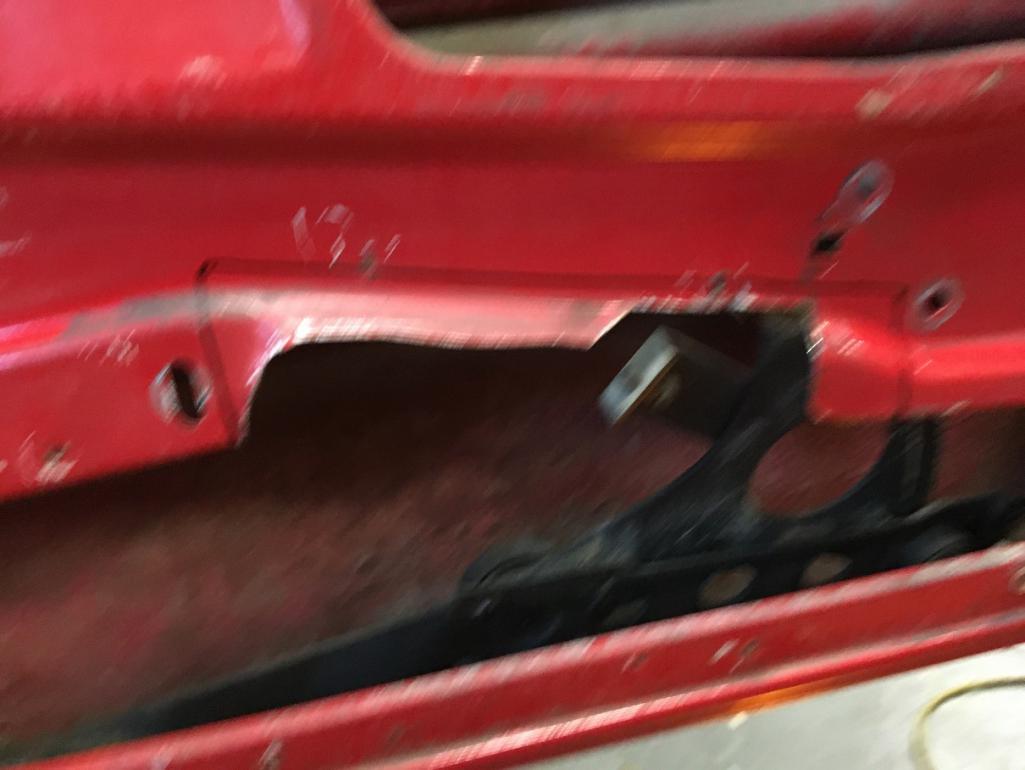 Finally, weld in place. 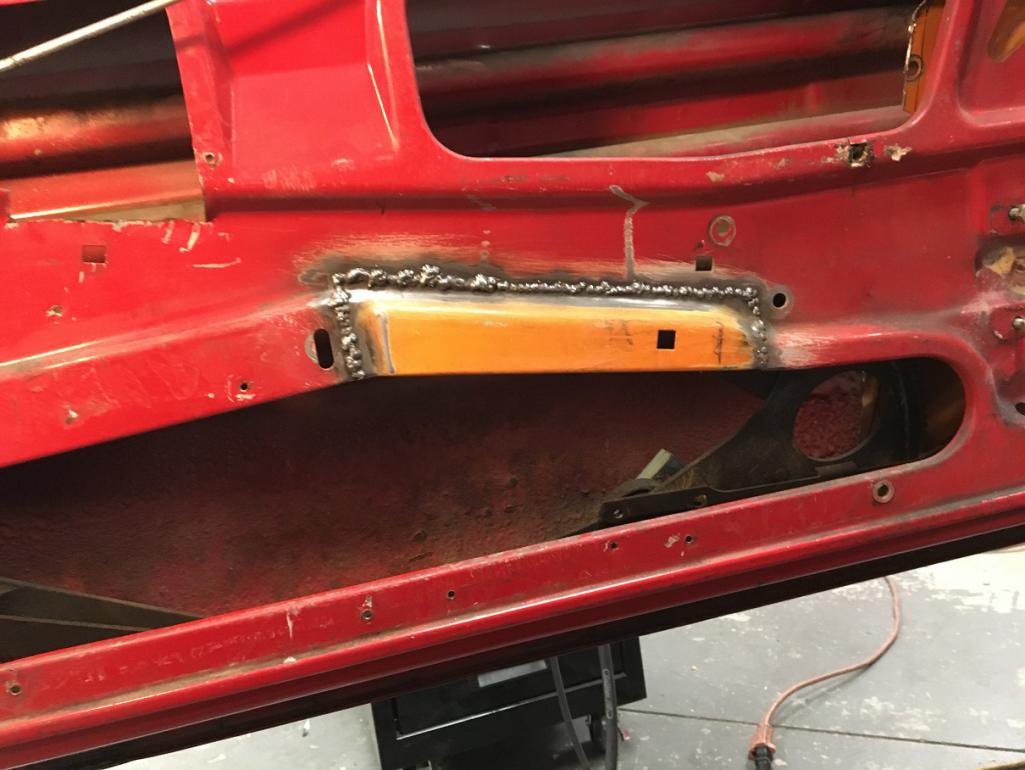 Now ready to tackle the large piece! (IMG:style_emoticons/default/smash.gif) Same concept, first cut a rough piece out of the donner door. Then trim down to what I wanted. Trace on the car's door and cut excess to make it clean, fit, once, twice, nineteen times... (IMG:style_emoticons/default/rolleyes.gif) 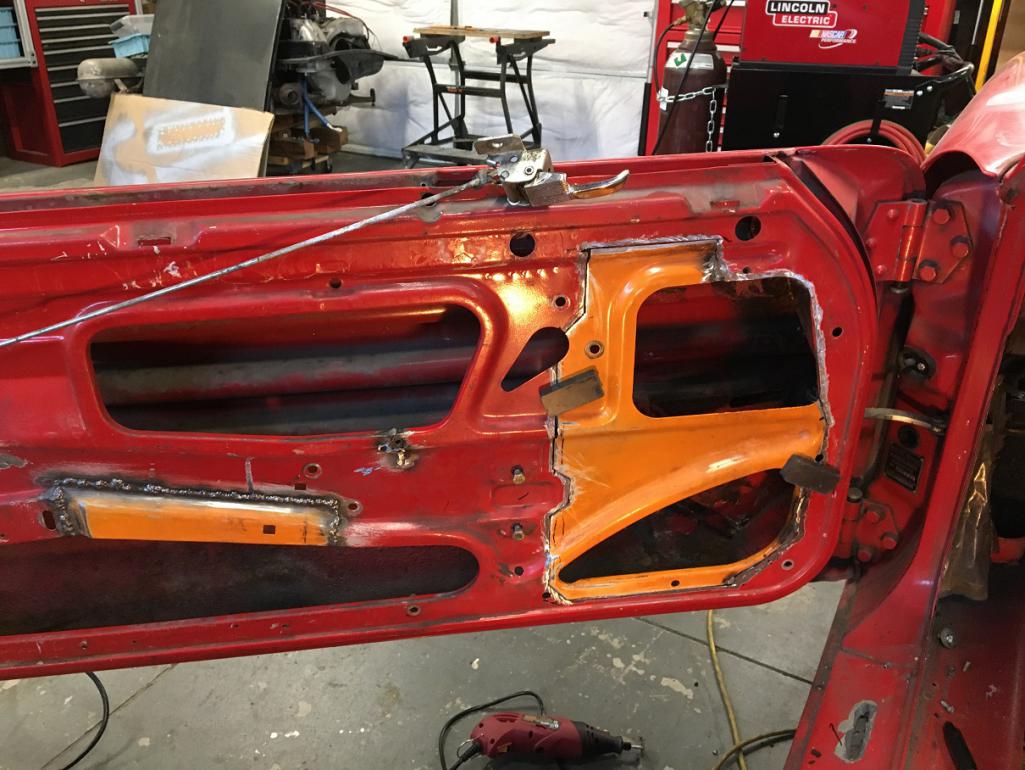 Then weld in place. (IMG:style_emoticons/default/welder.gif) Rince and repeat for all the areas and you get this! A door with character (IMG:style_emoticons/default/biggrin.gif) 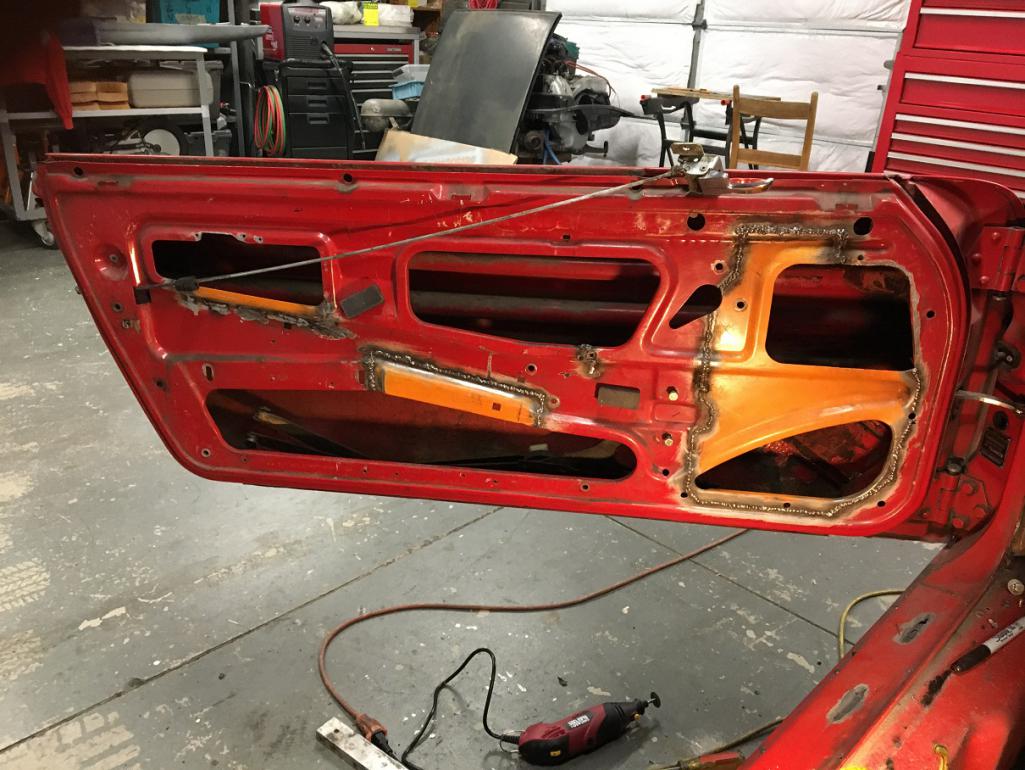 Next, the other door... (IMG:style_emoticons/default/dry.gif) 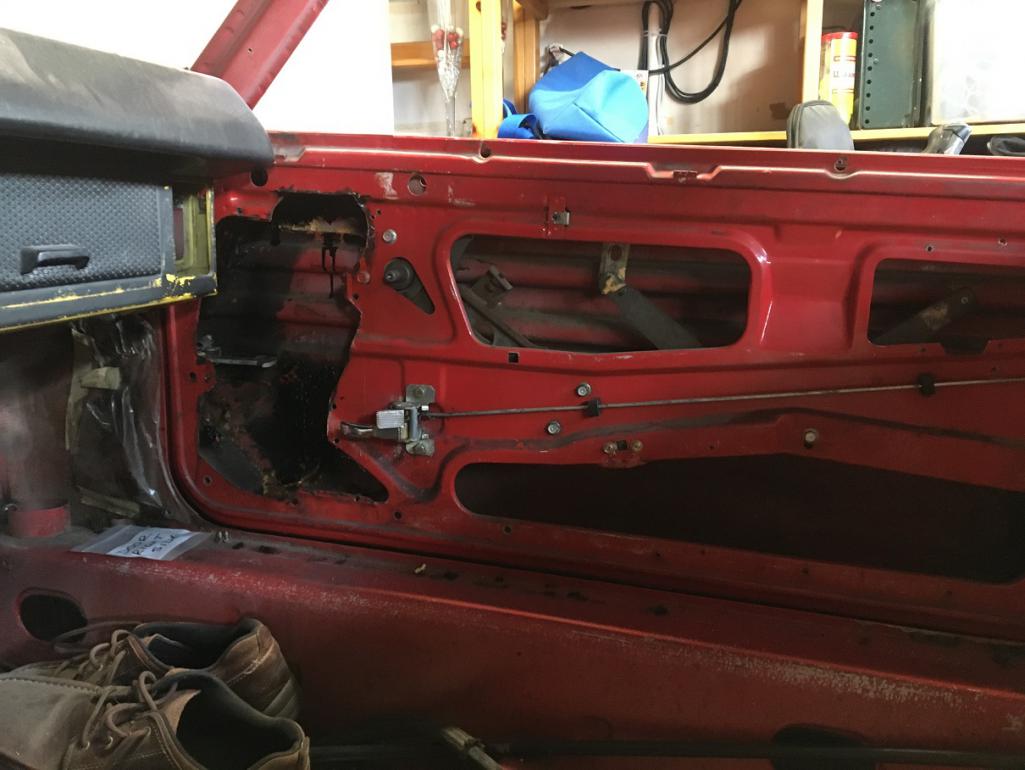 |
| nivekdodge |
 Sep 24 2022, 06:53 PM Sep 24 2022, 06:53 PM
Post
#73
|
|
Member   Group: Members Posts: 273 Joined: 28-August 21 From: Pittsburgh Pa Member No.: 25,860 Region Association: MidAtlantic Region 
|
How are you coming along?
|
| Montreal914 |
 Sep 25 2022, 01:01 AM Sep 25 2022, 01:01 AM
Post
#74
|
|
Senior Member    Group: Members Posts: 1,700 Joined: 8-August 10 From: Claremont, CA Member No.: 12,023 Region Association: Southern California 
|
Thank you for asking! Clearly not as much progress as I would wish for. More house work got in the way... (IMG:style_emoticons/default/dry.gif)
But the passenger door got the same treatment as the driver's side one. (IMG:style_emoticons/default/smile.gif) 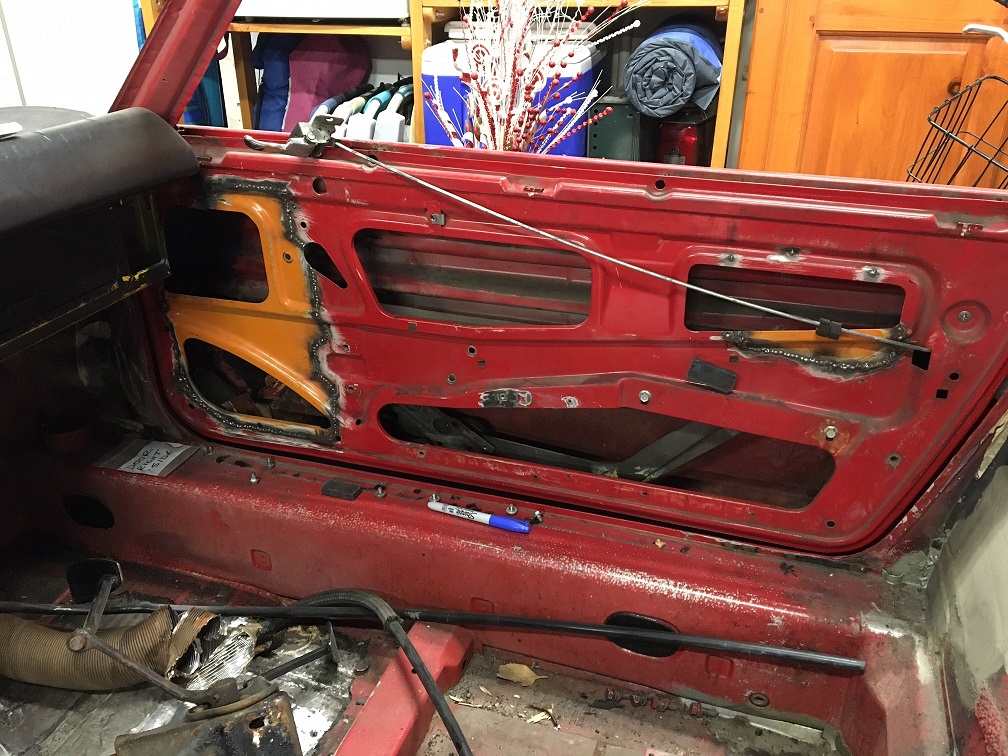 But now the next and hopefully the last major metal fix is the driver's side rear fender... (IMG:style_emoticons/default/sad.gif) The car had been hit and poorly repaired in the past. Here is what I have to deal with. The rear part of the fender bulges out. 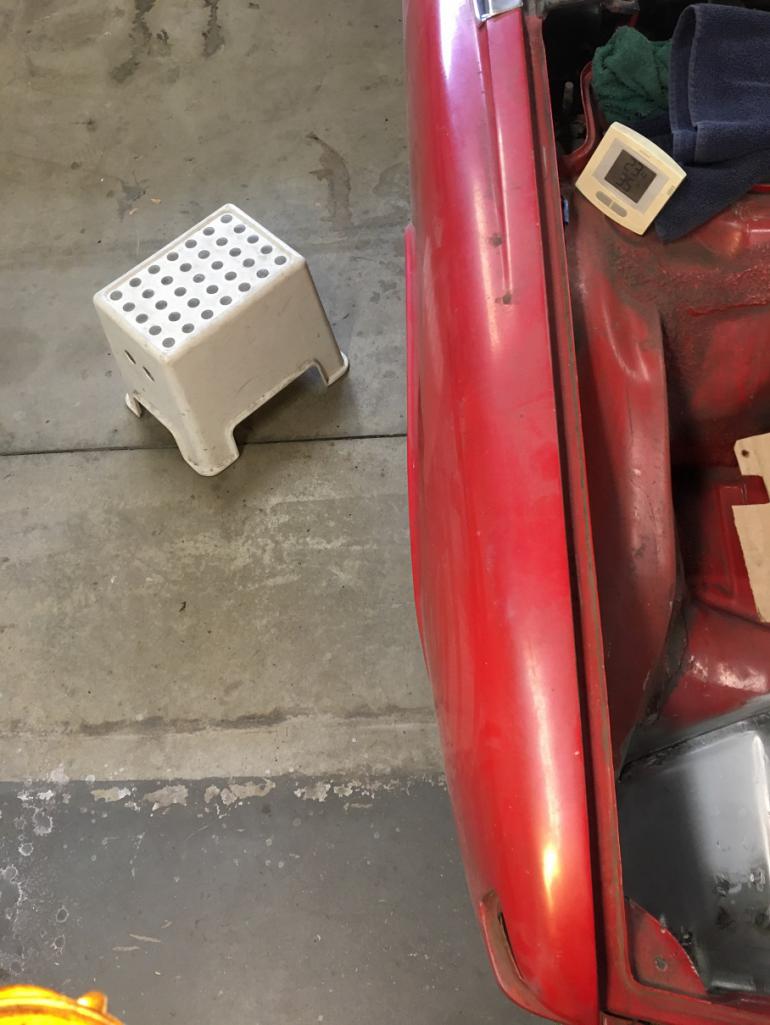 After removing the Bondo, not very surprising, here is what lies underneath. (IMG:style_emoticons/default/dry.gif) 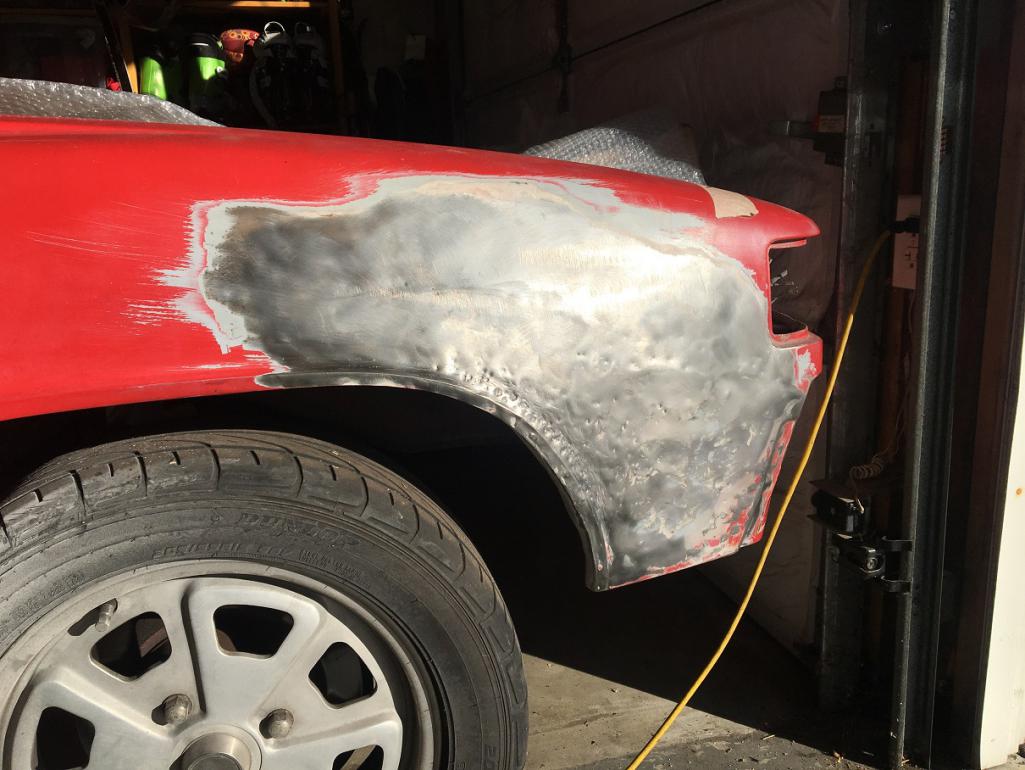 I have been looking at this for quite some time and have had a few recommendations as to how to tackle this. I have a couple of options: removing the rear half of the fender and fix it using this piece I got from Bruce Stone a few years back: 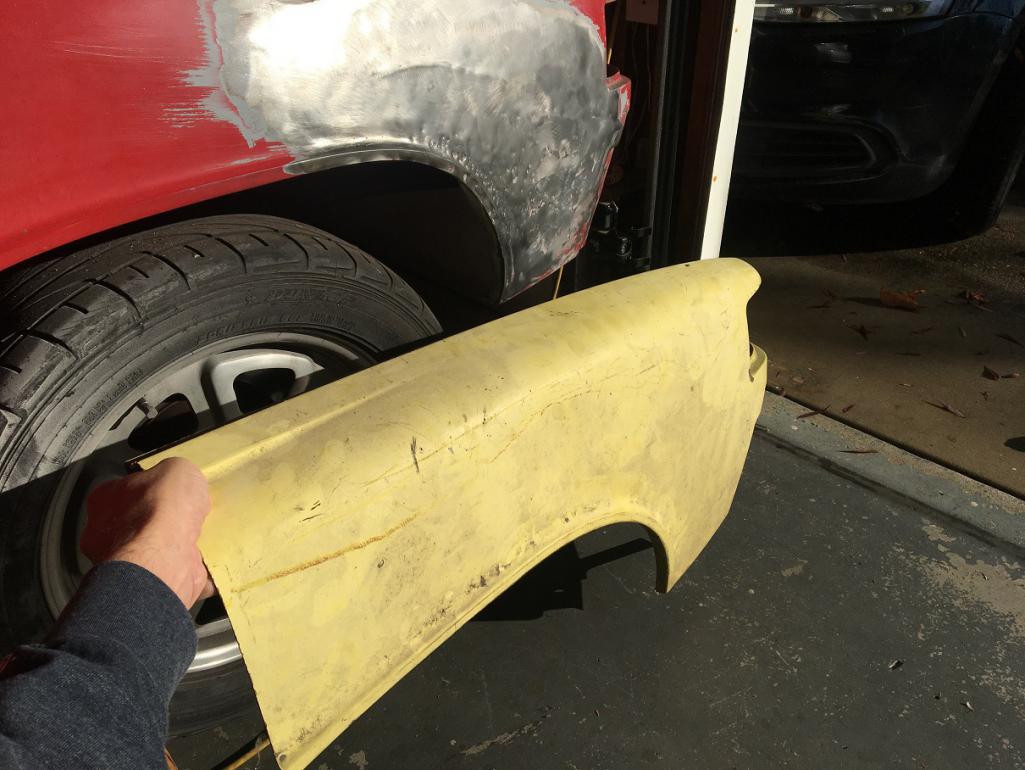 Although this might be a lesser intrusive surgery, I am very concerned at the vertical and other butt weld scars it would leave. I am working with a 120V Lincoln MIG with 0.025" wire, not a TIG welder, but most importantly, I am a beginner welder... (IMG:style_emoticons/default/rolleyes.gif) (IMG:style_emoticons/default/headbang.gif) (IMG:style_emoticons/default/welder.gif) The second option which is a lot more work would hopefully keep the line of the rear fender. I got this whole dry and straight fender from Vince and I have been starting to prepare it for the swap. The fender is almost complete but has been cut short in some areas that I will need to be address. That being said, these are somewhat in hidden areas so should be more or less masked. Here is the doner whole fender: 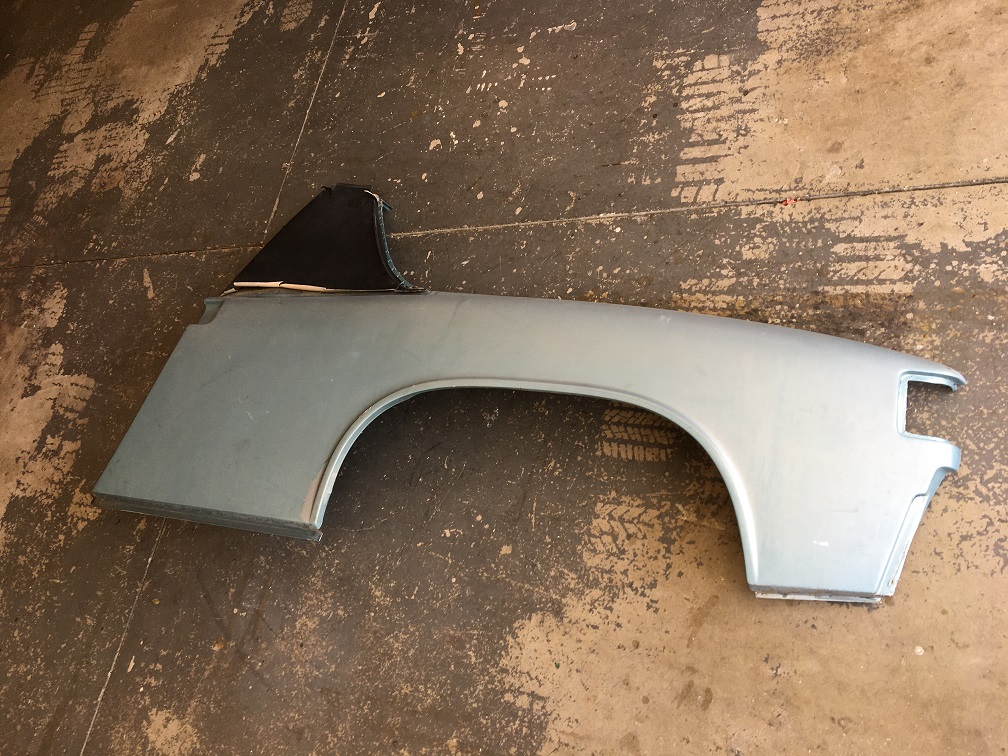 First area of some missing material: 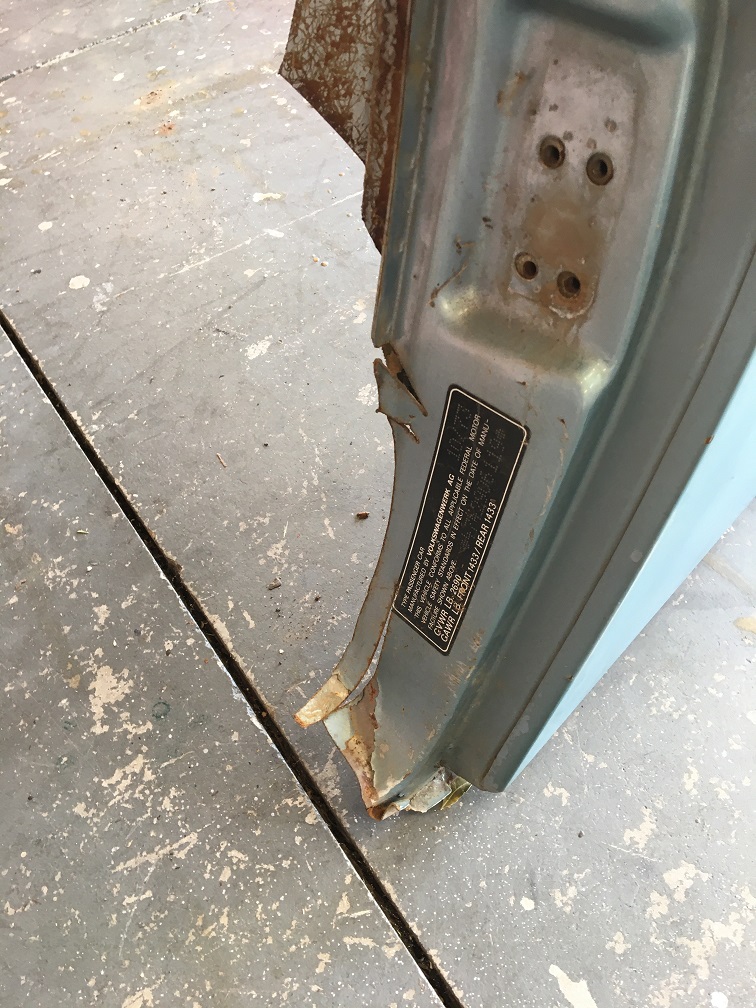 And second area missing metal (IMG:style_emoticons/default/dry.gif) 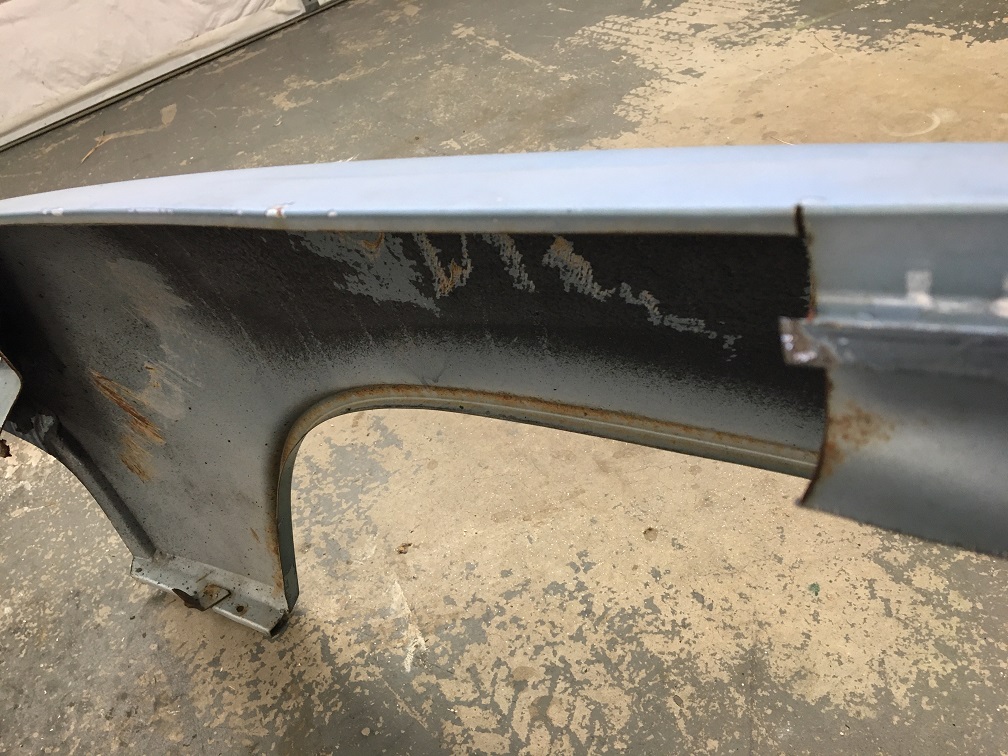 This means I will need to cut the car in the trunk seal gutter in the outer vertical portion and weld there. 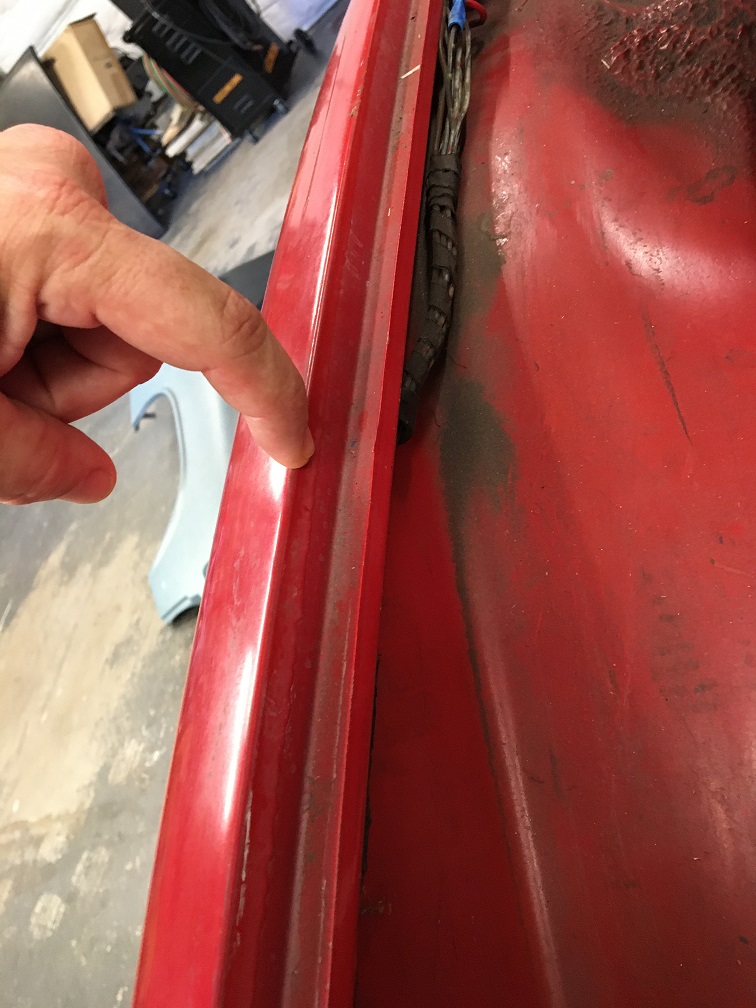 In the meantime. I have started preparing both doner parts the rear half yellow piece and the marathon blue fender. It is coming along but this actually more work that I expected. I drill through the spot welds in some areas, while I grind them down in others where I want the mating flange to be hole-less, all depending on which side I plan on doing the plug weld. 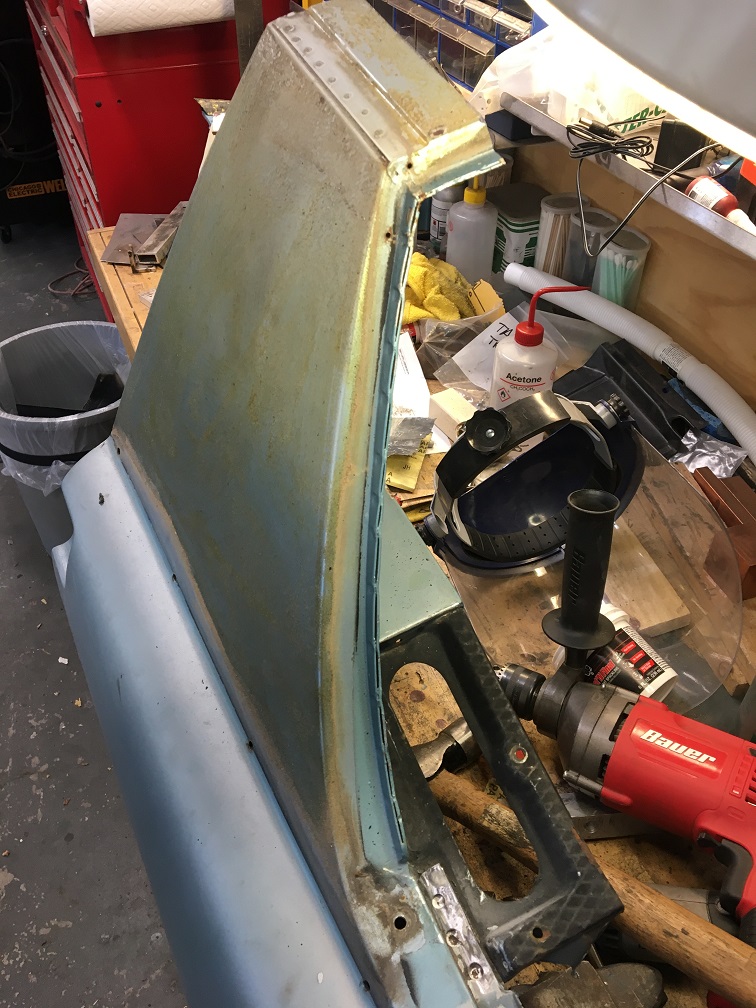 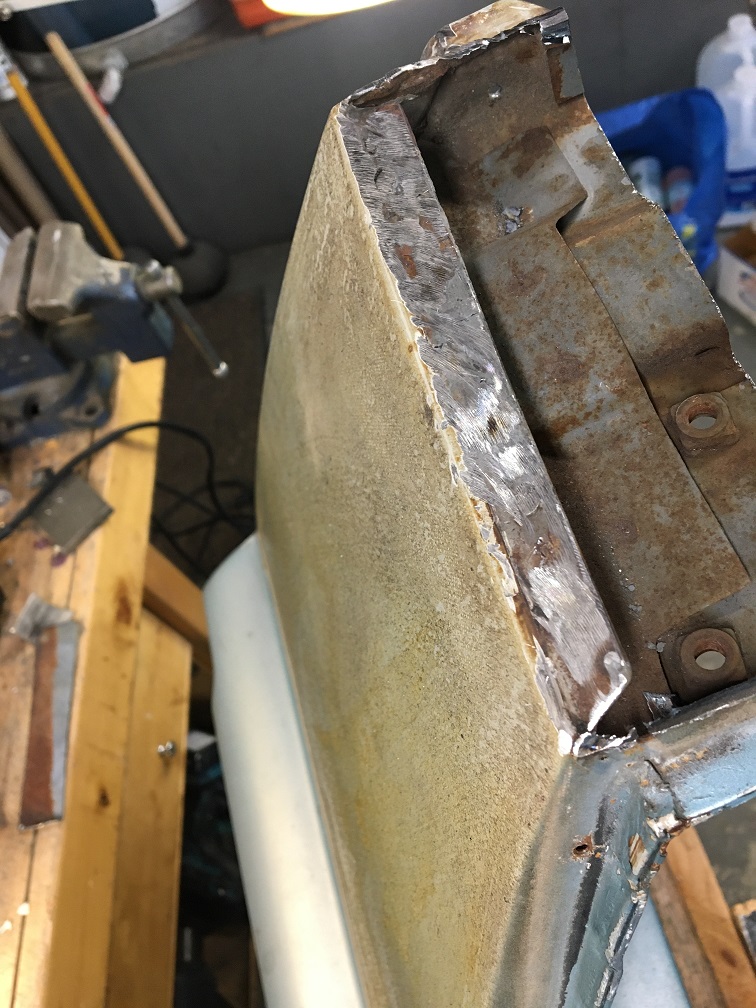 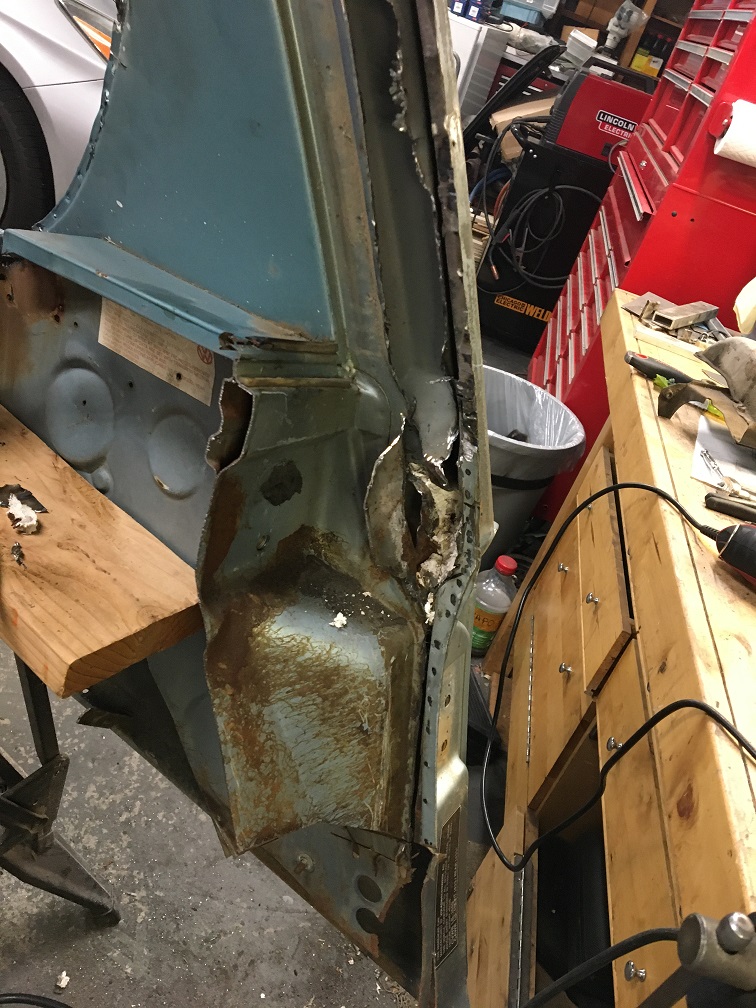 Finally the fender is almost relieved from the other parts (IMG:style_emoticons/default/smash.gif) 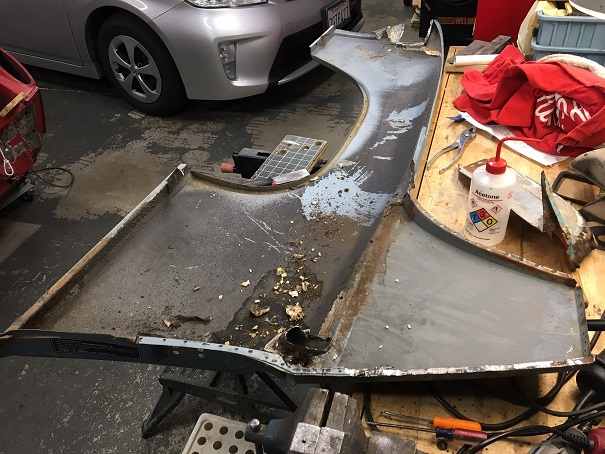 This corner was no fun to deal with... 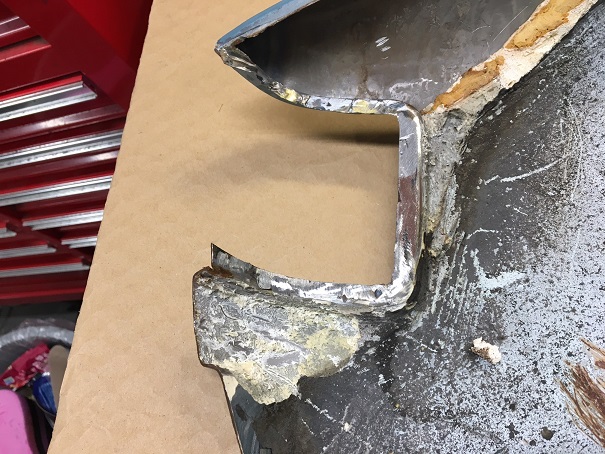 The work continues in the preparation of the donor parts. Still fully undecided as to which option to use, but I am leaning towards the whole fender replacement. I am definitely not looking forward to cutting the car's fender and prep the shell to match the "new" fender. There are a few zones that I can see as being tricky... (IMG:style_emoticons/default/sad.gif) |
| nivekdodge |
 Sep 25 2022, 07:57 PM Sep 25 2022, 07:57 PM
Post
#75
|
|
Member   Group: Members Posts: 273 Joined: 28-August 21 From: Pittsburgh Pa Member No.: 25,860 Region Association: MidAtlantic Region 
|
I think I'm still leaning to the whole fender also. The trickiest part will be the Trunk jamb. I would attempt to double flange it where you can. the strength will be better. There will be a lot of on-off- with the door and deck lid. the areas where the foam is I would clean and prime before install. Your welding skills seem more than accomplished enough to handle it
I'm stuck between FI and carb so don't feel bad. Kevin |
| Cairo94507 |
 Sep 26 2022, 07:36 AM Sep 26 2022, 07:36 AM
Post
#76
|
|
Michael           Group: Members Posts: 10,091 Joined: 1-November 08 From: Auburn, CA Member No.: 9,712 Region Association: Northern California 
|
Really nice work Eric. I agree with replacing the complete driver's rear quarter panel. The end result will be worth the additional work where it was cut short. Pretty soon all that rust and old damage will be a distant memory. (IMG:style_emoticons/default/beerchug.gif)
|
| Montreal914 |
 Sep 26 2022, 08:14 AM Sep 26 2022, 08:14 AM
Post
#77
|
|
Senior Member    Group: Members Posts: 1,700 Joined: 8-August 10 From: Claremont, CA Member No.: 12,023 Region Association: Southern California 
|
@nivekdodge : By double flange you mean this classic assembly setup?
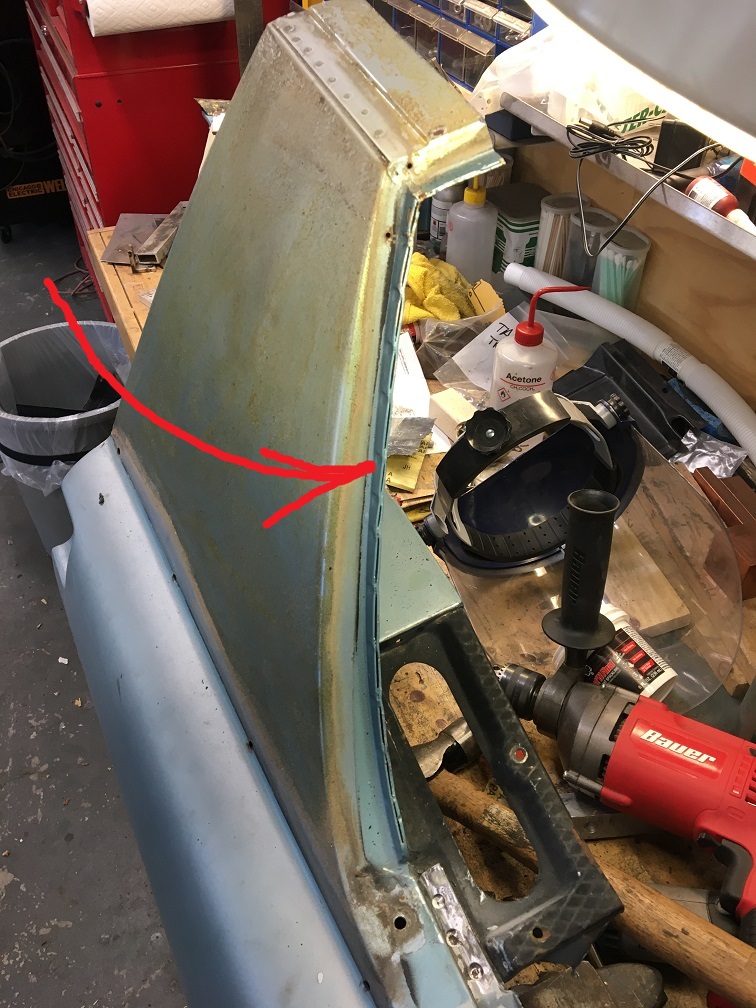 If so, yes that is the plan where the Marathon blue fender still has its flange. I originally was hoping to get a whole fender with all of its joining flanges but that was the best Vince had. Many passenger side fenders but that was the best driver side one. I hesitated a lot when purchasing it. The rear corner is a bit shot too and will require some thinking. I will post pictures of that area too when I get to the fitting part of the work. I appreciate all of the help and encouragement, I knew this was going to be a journey, and I am really looking forward to the end of the metal repair segment of the restoration. (IMG:style_emoticons/default/smash.gif) (IMG:style_emoticons/default/welder.gif) (IMG:style_emoticons/default/headbang.gif) |
| nathanxnathan |
 Sep 26 2022, 10:45 AM Sep 26 2022, 10:45 AM
Post
#78
|
|
Member   Group: Members Posts: 294 Joined: 16-February 18 From: Laguna Beach, CA Member No.: 21,899 Region Association: Southern California |
You know my original advice was to splice in just what you need, but if you do end up doing the whole fender, I would drill out the parts that the donor fender needs from the car and patch it on the bench.
Spot/resistance welding the donor in would be so much easier than plug welding. Every seam of it is spot weld-able except the top of the targa bar. If you want I could come by with my spot welder some weekend — if you have everything prepped and fit up/clamped, the whole thing would only be a few hours. PM me if you want to — seriously soo much easier — and easier to make it clean than with a mig. |
| Montreal914 |
 Sep 26 2022, 11:20 PM Sep 26 2022, 11:20 PM
Post
#79
|
|
Senior Member    Group: Members Posts: 1,700 Joined: 8-August 10 From: Claremont, CA Member No.: 12,023 Region Association: Southern California 
|
You know my original advice was to splice in just what you need, but if you do end up doing the whole fender, I would drill out the parts that the donor fender needs from the car and patch it on the bench. Spot/resistance welding the donor in would be so much easier than plug welding. Every seam of it is spot weld-able except the top of the targa bar. If you want I could come by with my spot welder some weekend — if you have everything prepped and fit up/clamped, the whole thing would only be a few hours. PM me if you want to — seriously soo much easier — and easier to make it clean than with a mig. Nathan, yes I still have all the pictures you sent me and did like the "simplicity" of cutting and replacing only what is damaged. That being said, I am very worried about the scars. (IMG:style_emoticons/default/sad.gif) If I understand what you are saying, you recommend I make the doner fender whole using parts from the car. Actually, I believe with the yellow fender and other loose body parts I could complete the doner fender before even cutting the car. (IMG:style_emoticons/default/smash.gif) Now, as for your spot weld idea, that is quite an offer! (IMG:style_emoticons/default/pray.gif) What kind of voltage is required for this 110 or 220V? I am getting more and more confident about this challenge. I will continue the prep work and keep you posted. (IMG:style_emoticons/default/smile.gif) |
| nathanxnathan |
 Sep 27 2022, 11:39 AM Sep 27 2022, 11:39 AM
Post
#80
|
|
Member   Group: Members Posts: 294 Joined: 16-February 18 From: Laguna Beach, CA Member No.: 21,899 Region Association: Southern California |
Nathan, yes I still have all the pictures you sent me and did like the "simplicity" of cutting and replacing only what is damaged. That being said, I am very worried about the scars. (IMG:style_emoticons/default/sad.gif) If I understand what you are saying, you recommend I make the doner fender whole using parts from the car. Actually, I believe with the yellow fender and other loose body parts I could complete the doner fender before even cutting the car. (IMG:style_emoticons/default/smash.gif) Now, as for your spot weld idea, that is quite an offer! (IMG:style_emoticons/default/pray.gif) What kind of voltage is required for this 110 or 220V? I am getting more and more confident about this challenge. I will continue the prep work and keep you posted. (IMG:style_emoticons/default/smile.gif) It's nice that you can build a complete fender without what's on the car. That means you can grind the spot welds and leave what remains on the car undamaged, and save having to fix any holes etc. Ah yeah I was thinking about what sort of outlets you have. My Spot welder is a Miller LMSW-52 which is 220 single phase with a 20 amp Nema 6-20P plug with a pretty long cord. I do have an extension cord that goes from the 6-20P to a Nema 6-50 which is what I have in my wall for my Synchrowave, but that's probably not going to help. It wants a 20 amp plug so converting to a 15 amp dryer plug isn't a great option. Miller Spot Welder Specs I do have a nice variety of tongs which are actually pretty hard to come by. The "standard" ones, the TT-9's, and the FF's shown in the spec sheet above. I've got more into the tongs than I do the welder — it's crazy what they go for. I don't know if you need anything special for tongs, possibly for the tail light area the FFs would help. I was looking at the 110v spot welder that Harbor Freight sells. If your plug/breaker situation is no good for 220v, it could be a good option. It's really low cost compared to what the miller stuff was. HF 110v Spot welder Let me know what you think. I'm happy to help. |
  |
8 User(s) are reading this topic (8 Guests and 0 Anonymous Users)
0 Members:

|
Lo-Fi Version | Time is now: 22nd November 2024 - 09:22 PM |
Invision Power Board
v9.1.4 © 2024 IPS, Inc.


