|
|

|
Porsche, and the Porsche crest are registered trademarks of Dr. Ing. h.c. F. Porsche AG.
This site is not affiliated with Porsche in any way. Its only purpose is to provide an online forum for car enthusiasts. All other trademarks are property of their respective owners. |
|
|
  |
| Montreal914 |
 Dec 17 2022, 05:43 PM Dec 17 2022, 05:43 PM
Post
#91
|
|
Senior Member    Group: Members Posts: 1,709 Joined: 8-August 10 From: Claremont, CA Member No.: 12,023 Region Association: Southern California 
|
I was able to continue the slow process of making one stitch at a time while cooling everything and moving around. Eventually, I closed all the gaps. (IMG:style_emoticons/default/smile.gif)
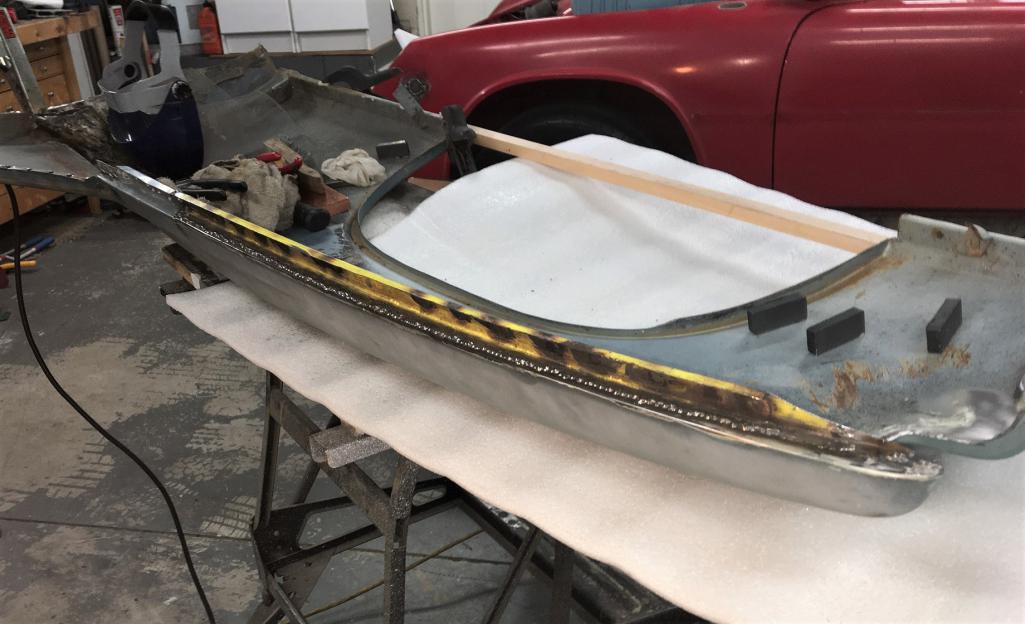 Then, time to grind down this long string, still trying to keep the metal cool with a wet towel stuffed in the back. Finally got to this. 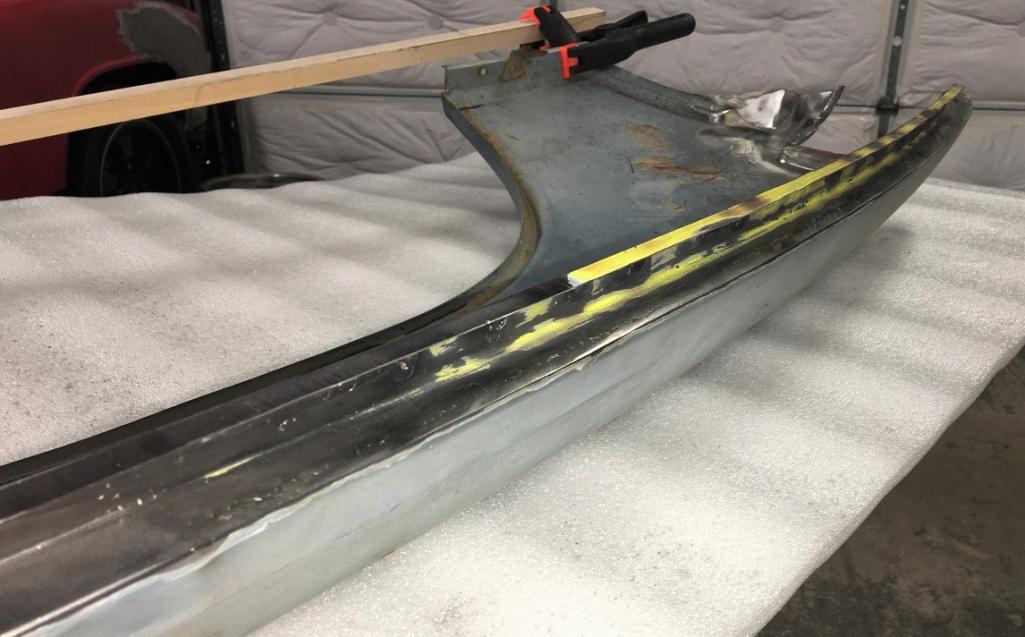 Another angle. 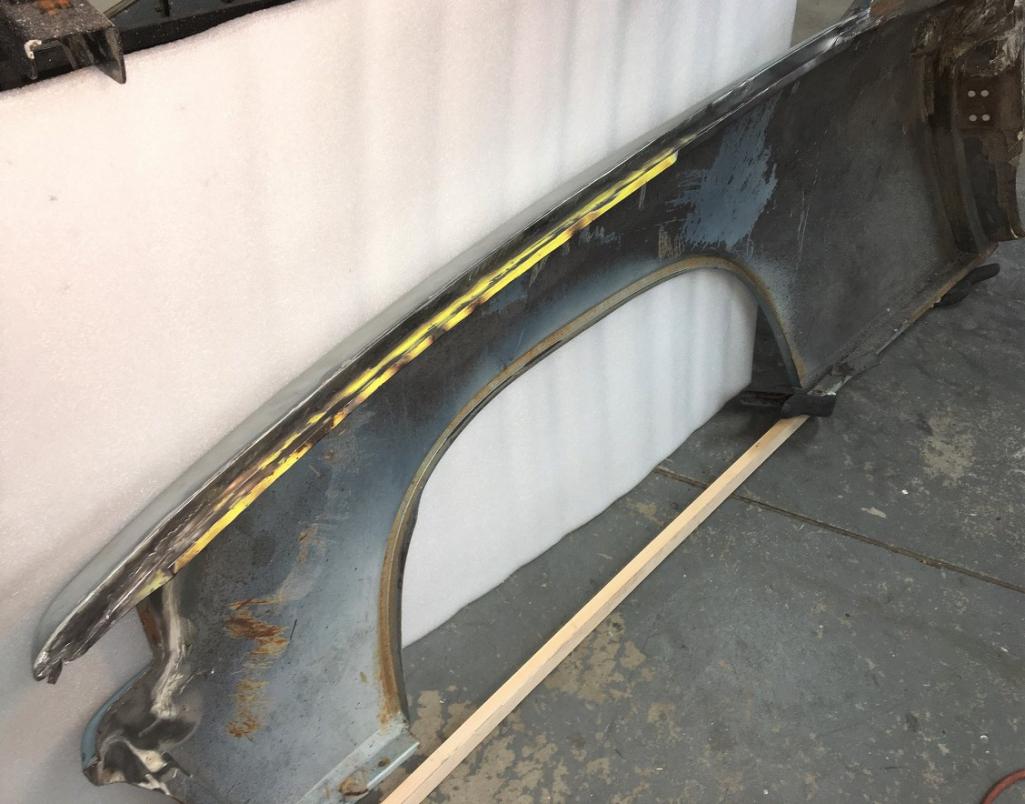 And just to make sure everyone understands... (IMG:style_emoticons/default/rolleyes.gif) 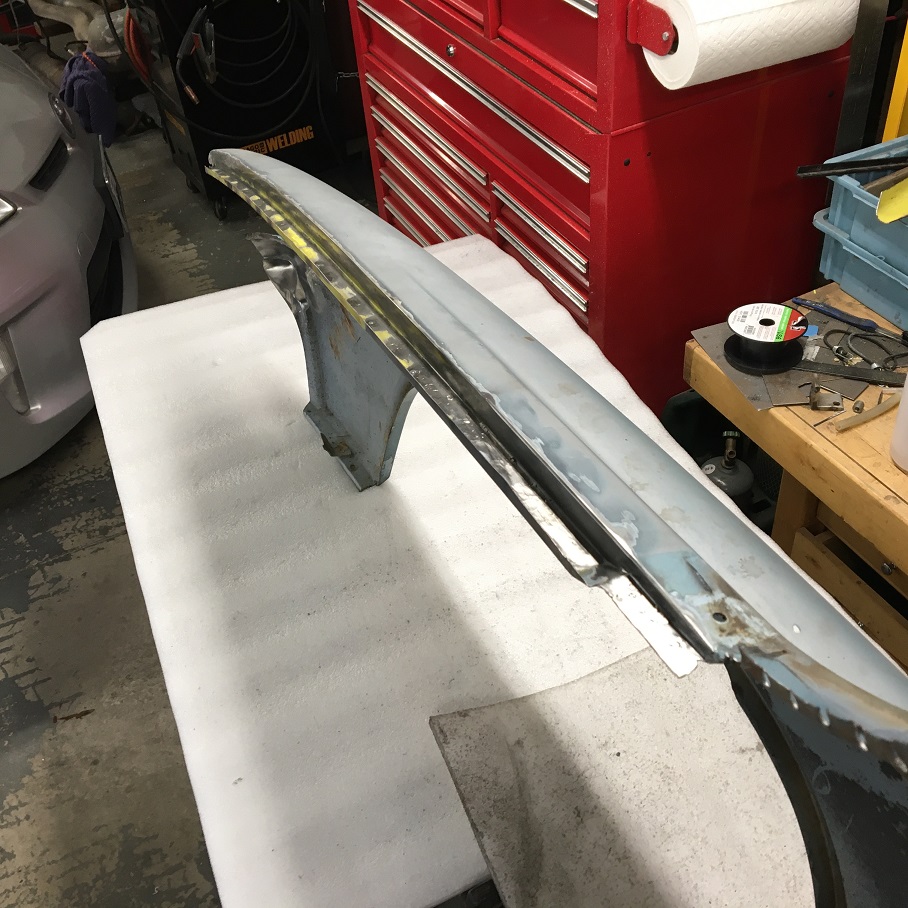 Needless to say that the fender is a lot stiffer now on its tail end. I think this area is pretty much done with metal work. (IMG:style_emoticons/default/cheer.gif) Now moving on to the other area needing attention before I can start thinking about installing this donner fender on my car. As shown before, the lower part of the door jamb was unfortunately cut where the fender mounts to the body. (IMG:style_emoticons/default/dry.gif) 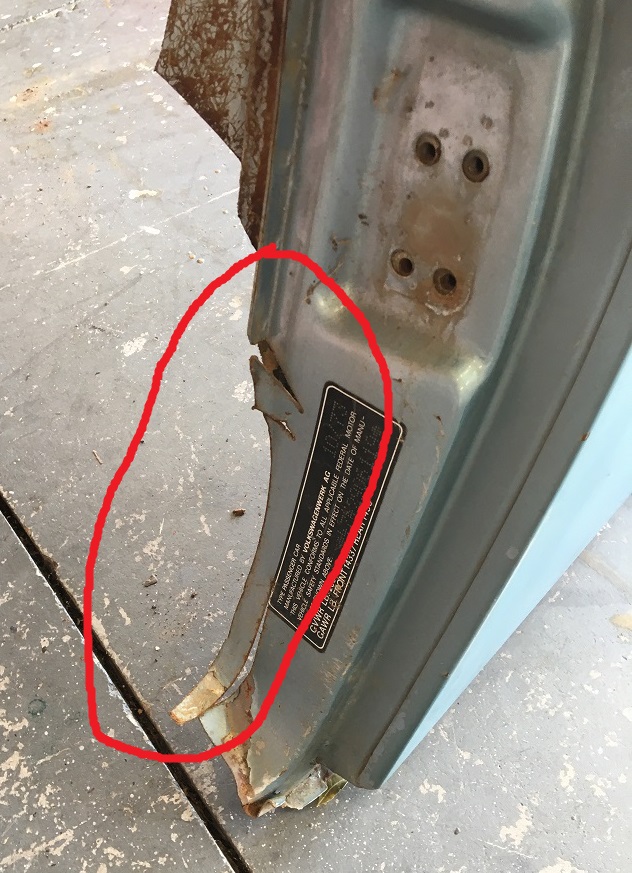 Luckily, when purchasing the fender, I was able to get this lower door jamb from another wreck. 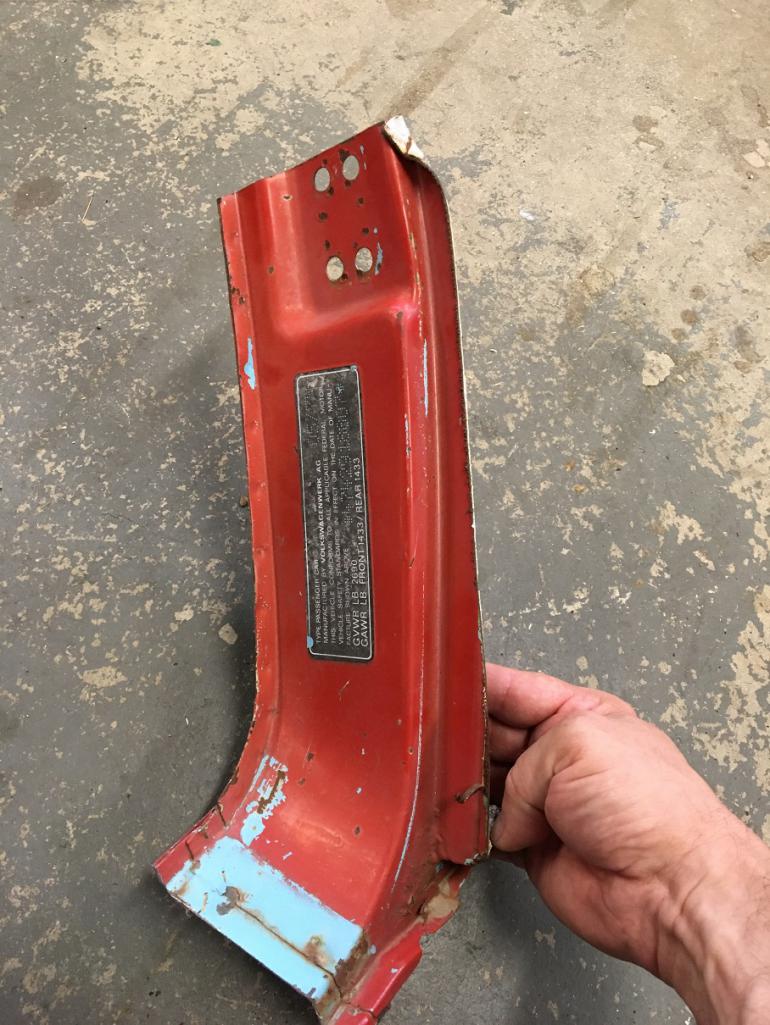 Time to remove the non-needed extra metal (IMG:style_emoticons/default/smash.gif) 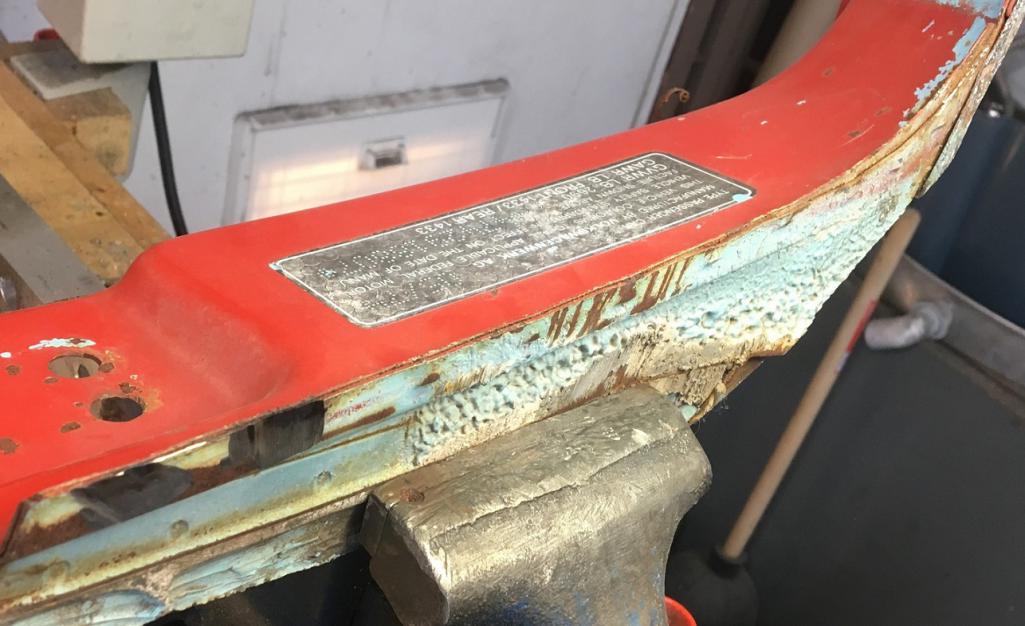 Now the part can be used. 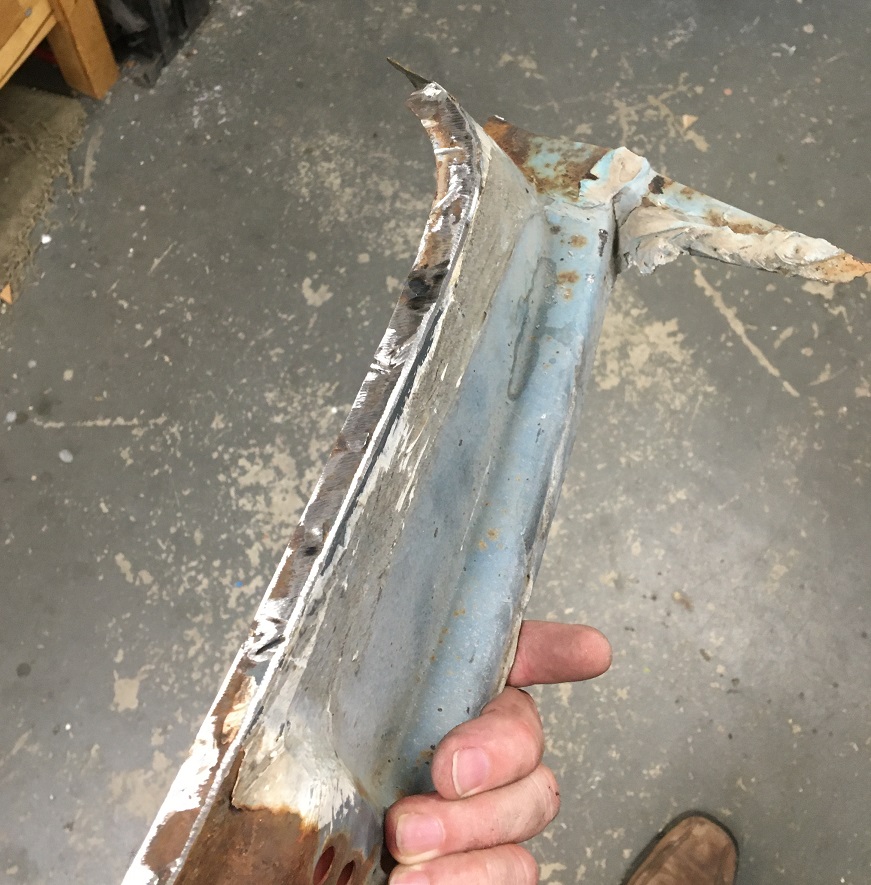 Here both the "new" door jamb area and the fender have been cut to be put together. The idea was to have a good portion of the jointed area to be hidden behind the VIN decal ( that I need to get...). You can also see the template I traced on the thin sheet of wood from the the car as a reference. When welding the repair piece in, the fender flange will lay flat on a 1/2" aluminum plate that is underneath. This part of the car being straight (vertical door jamb weld flange) makes that alignment portion easier when set on a flat plate. The gaps are a little larger than what I like them to be, but at this point, unfortunately, there is no going back. I will have to weld the two pieces like this, just a little more challenging for an beginner welder like myself (IMG:style_emoticons/default/headbang.gif) 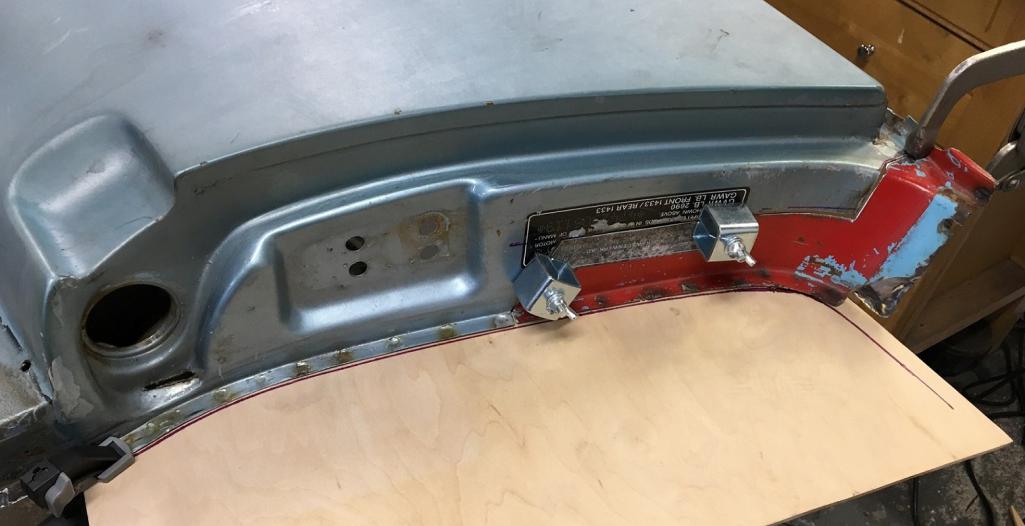 Second important view point, the lower curve. 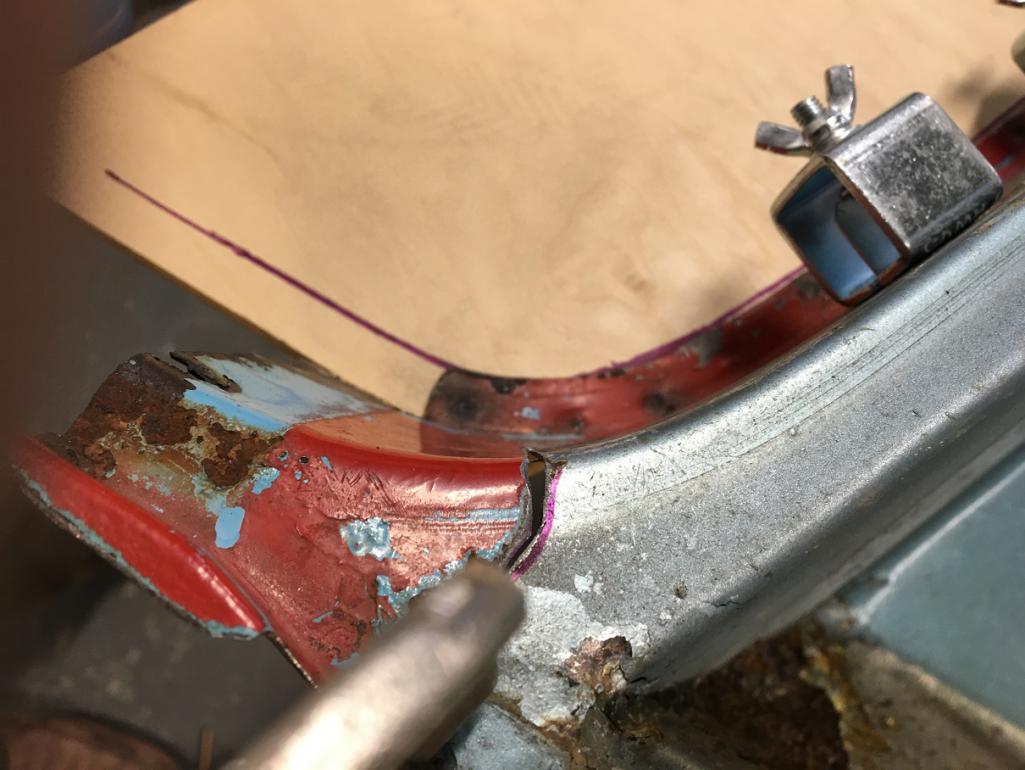 Looks like we are ready to go! (IMG:style_emoticons/default/smile.gif) (IMG:style_emoticons/default/welder.gif) And the result... (IMG:style_emoticons/default/wacko.gif) 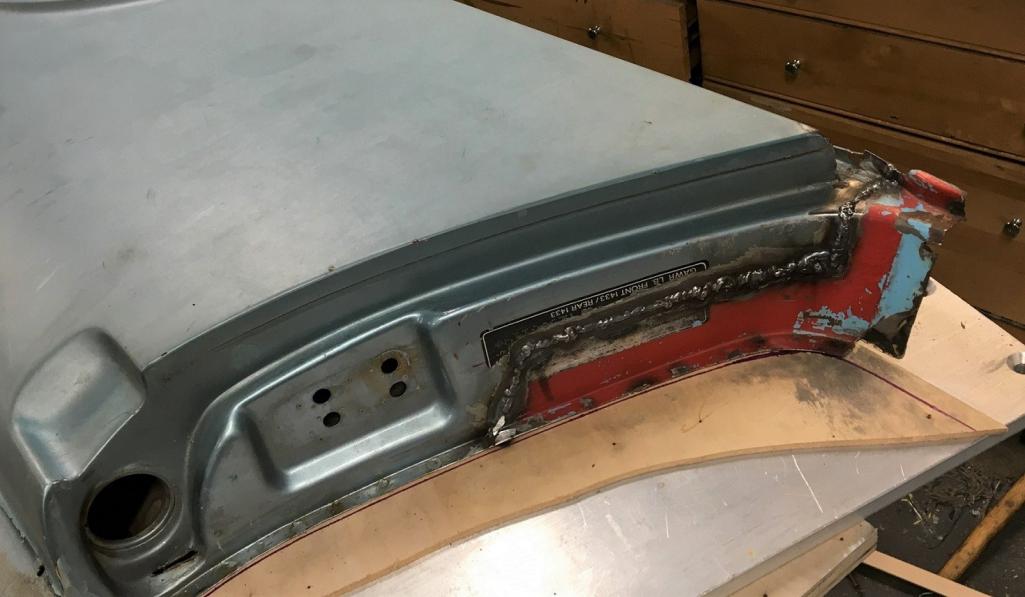 As they say, that'll buff out (IMG:style_emoticons/default/rolleyes.gif) . Well after grinding, I ended up with this. The jamb area did not give as good a result than the trunk seal fix, but overall I am happy. A few more areas to be looked at and it will be time to remove the car's original fender in preparation for the spot welding of this one! (IMG:style_emoticons/default/smile.gif) (IMG:style_emoticons/default/beer3.gif) 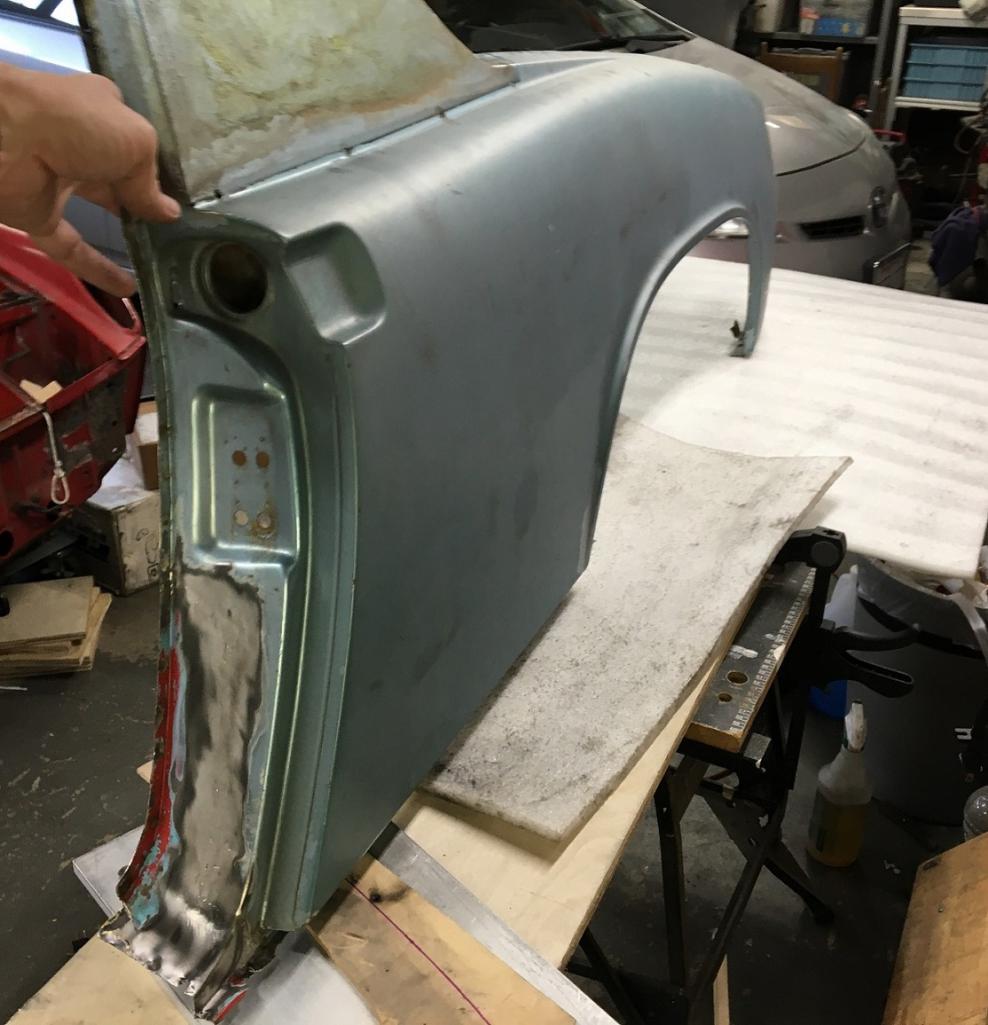 |
| nathanxnathan |
 Dec 18 2022, 02:39 AM Dec 18 2022, 02:39 AM
Post
#92
|
|
Member   Group: Members Posts: 294 Joined: 16-February 18 From: Laguna Beach, CA Member No.: 21,899 Region Association: Southern California |
Coming along nicely. (IMG:style_emoticons/default/smile.gif)
I'll have to take another look at the back of the trunk seal area to see how that ties in with the rear panel above the tail light. Other areas to think about... the bottom of the door jamb, how to tie that to the sill. The factory I think gas welded that joint with bronze, as there's an overlap of the 2 panels. The top of the sail panel where the flange goes I think under the top of the targa bar. Plug welding that seems like the best option. It's a tricky area because you can't back the weld. The other area to think about is the fresh air inlet. The ones I've seen, the factory mig welded the lip of the 2 layers. I've removed one, and was able to just grind off the lip/weld and carefully separate the tube inner from the flanged hole in the inner fender. What are your thoughts on prepping the inner fender before mounting it? Areas like behind the sail panels or the area where the foam is at the rear of the fender by the tail lights aren't going to be accessible once the fender is in. The factory I think there's just primer there. I've thought about this for my front cross panel project on my car. My thoughts are 3M Weld Thru Primer on both surfaces of the seams where it'll be spot or plug welded. ... tape off the flanges that will be welded, epoxy primer, then tape off and spray weld thru primer on just the flanges — seems like the best way. I'm not sure what others do? |
| Montreal914 |
 Dec 18 2022, 02:41 PM Dec 18 2022, 02:41 PM
Post
#93
|
|
Senior Member    Group: Members Posts: 1,709 Joined: 8-August 10 From: Claremont, CA Member No.: 12,023 Region Association: Southern California 
|
@nathanxnathan Thank you!
My comments in italic in your post (IMG:style_emoticons/default/smile.gif) Coming along nicely. (IMG:style_emoticons/default/smile.gif) I'll have to take another look at the back of the trunk seal area to see how that ties in with the rear panel above the tail light. Yes, that will need further investigation. My donner fender insn't 100% complete on the rear end either and there will be some butt welds needed there. So overall the installation will be a composition of spot and butt welds. Other areas to think about... the bottom of the door jamb, how to tie that to the sill. The factory I think gas welded that joint with bronze, as there's an overlap of the 2 panels. I was thinking just weld and grind. This gets hidden by the aluminum door sill. The top of the sail panel where the flange goes I think under the top of the targa bar. Plug welding that seems like the best option. It's a tricky area because you can't back the weld. Yes, plug welding seems to be the only option as the fender flange does go under the Targa bar panel. I made sure I didn't drill through the donner fender when I prepped that area. On the car those spot welds are more of an elongated shape instead of round and they are at an angle (Pictures below). Not sure yet how I will proceed to remove that part. I might try to grind from underneath to leave the Targa piece exempt from holes. Then, planned holes could be done for the plug welds. The other area to think about is the fresh air inlet. The ones I've seen, the factory mig welded the lip of the 2 layers. I've removed one, and was able to just grind off the lip/weld and carefully separate the tube inner from the flanged hole in the inner fender. The donner fender came with all of this and I had to proceed in grinding the factory weld to clean it up. I plan on doing the same on the car when removing its fender. I didn't do the cleanest job (IMG:style_emoticons/default/rolleyes.gif) (pictures below) but it is done. Once the "new" fender is in, I will put a few tacks. What are your thoughts on prepping the inner fender before mounting it? Areas like behind the sail panels or the area where the foam is at the rear of the fender by the tail lights aren't going to be accessible once the fender is in. The factory I think there's just primer there. I've thought about this for my front cross panel project on my car. My thoughts are 3M Weld Thru Primer on both surfaces of the seams where it'll be spot or plug welded. ... tape off the flanges that will be welded, epoxy primer, then tape off and spray weld thru primer on just the flanges — seems like the best way. I'm not sure what others do? AHHH YES! That is a great question that I have been asking myself... (IMG:style_emoticons/default/wacko.gif) How to prep the inner fender. If I was to apply epoxy paint, it would have to be with a brush or roller. I don't have a compressor/gun and any experience in painting. For under the car, I have been considering using those truck bed liner product and roll it on. Could this be used for both the inner fender and the fender back side? (IMG:style_emoticons/default/confused24.gif) I have seen that some can be colored to match(!) the car color. A lot of questions to be answered on everything prep and paint related... (IMG:style_emoticons/default/unsure.gif) Here is the sail panel top flange when I was cleaning up the extra metal from the donner fender. 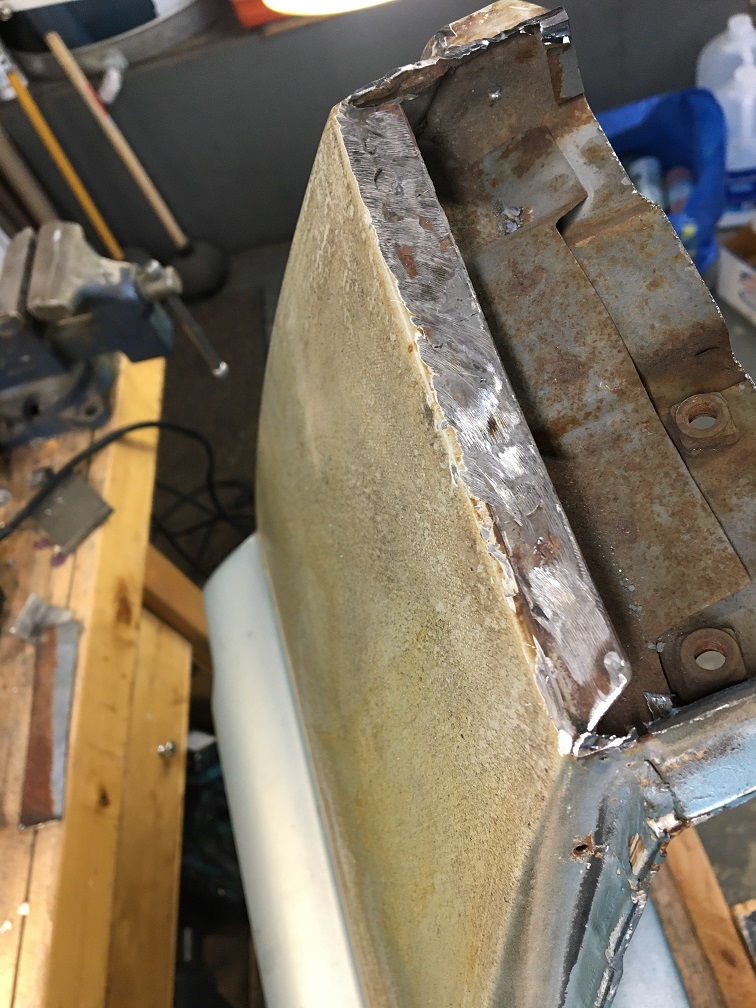 And this is the top of the Targa corner on the car. 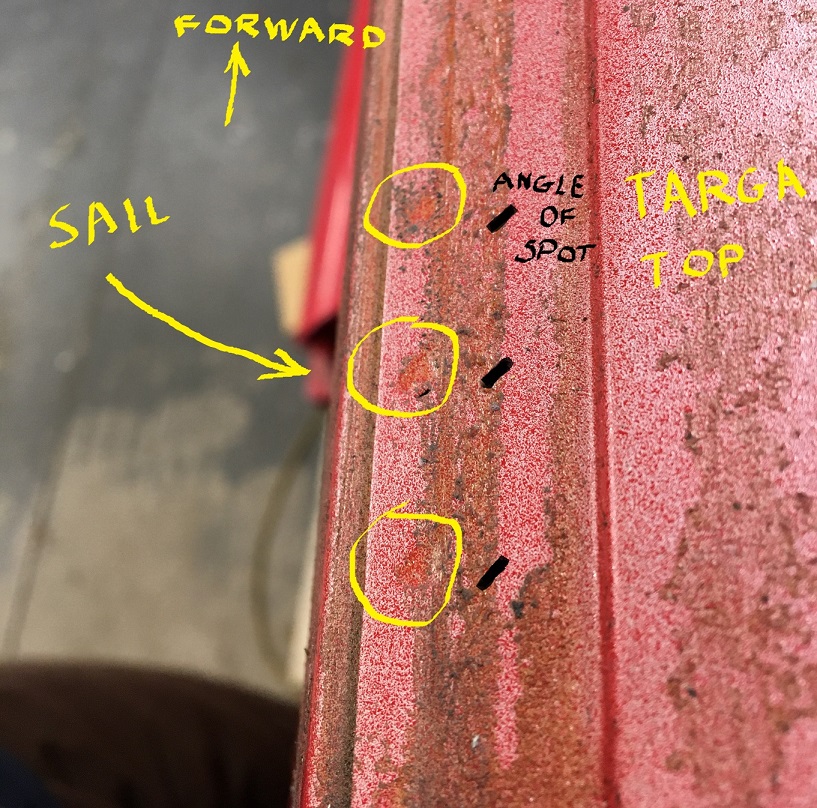 As for the vent tube, this is what I started with on the donner fender: 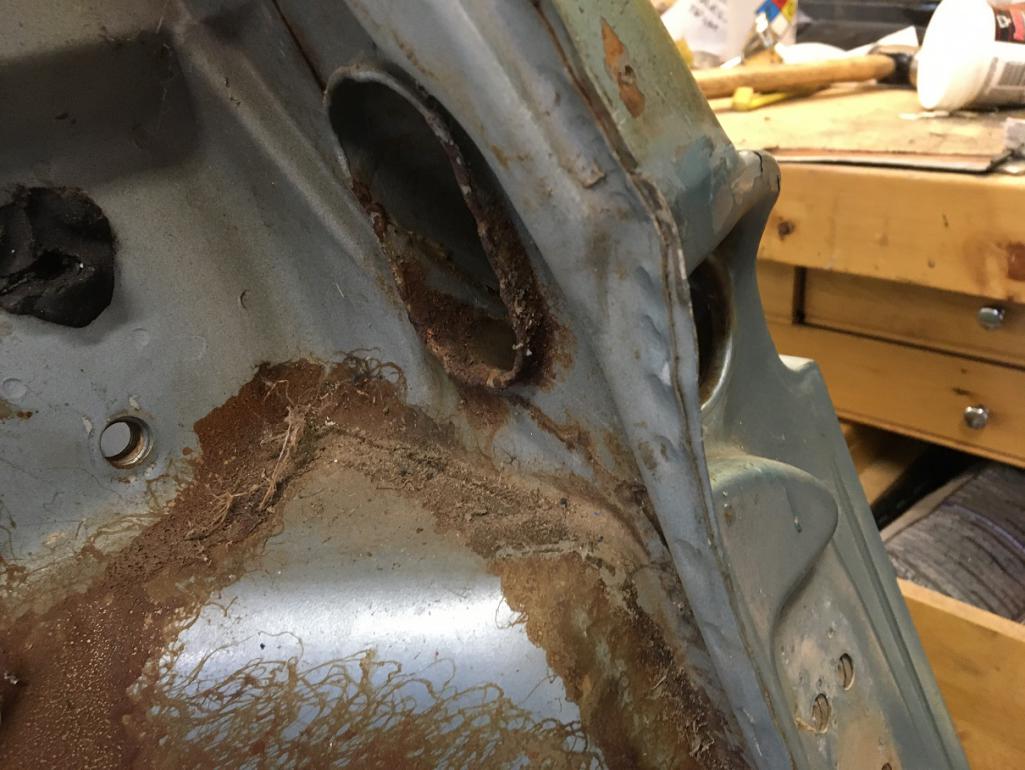 During the dismantling (IMG:style_emoticons/default/wacko.gif) A bit of a wrestle... I will try to do better when removing the fender from the car. 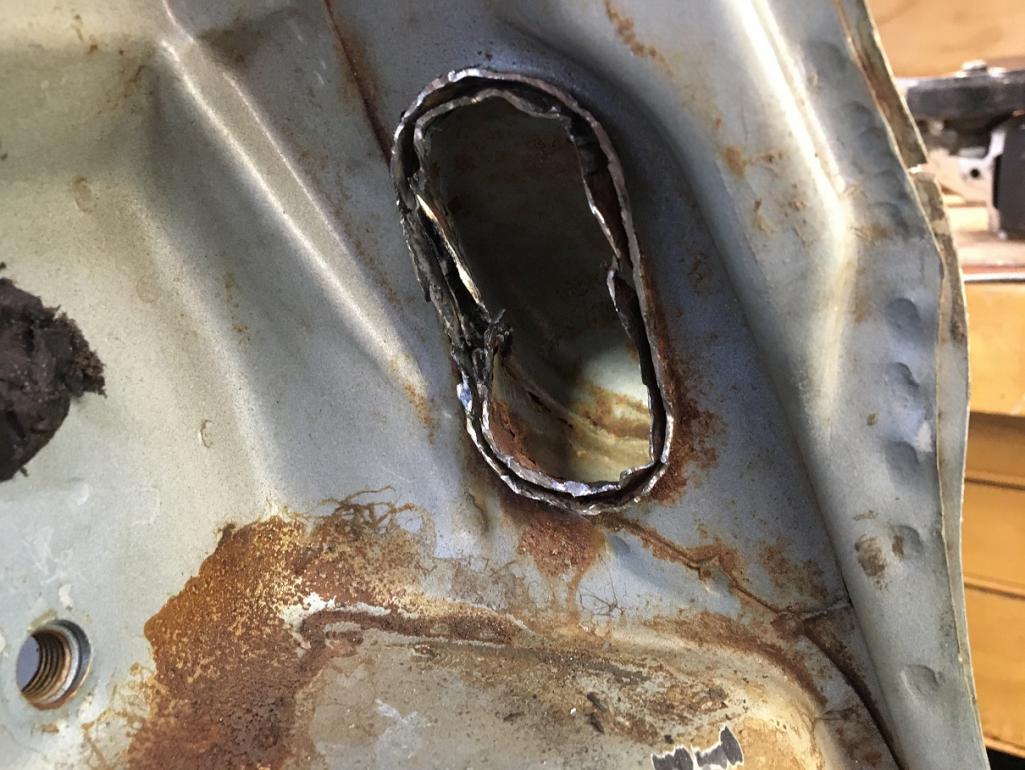 Once free and reshaped, this is what I am working with. 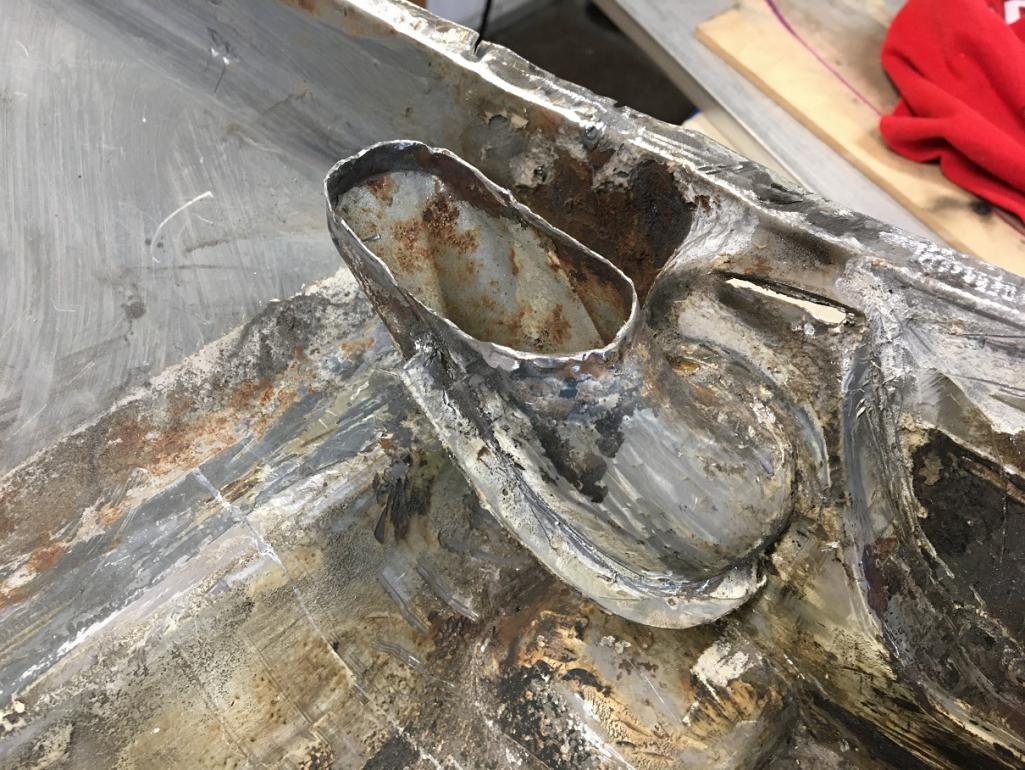 |
| nivekdodge |
 Dec 18 2022, 08:21 PM Dec 18 2022, 08:21 PM
Post
#94
|
|
Member   Group: Members Posts: 277 Joined: 28-August 21 From: Pittsburgh Pa Member No.: 25,860 Region Association: MidAtlantic Region 
|
https://www.semproducts.com/product/rust-sh.../28104#product-
For the insides . it can go on over rust and can be brushed. Se if there's a local jobber who can put stuff in spray cans. Kevin |
| Montreal914 |
 Feb 24 2023, 06:21 PM Feb 24 2023, 06:21 PM
Post
#95
|
|
Senior Member    Group: Members Posts: 1,709 Joined: 8-August 10 From: Claremont, CA Member No.: 12,023 Region Association: Southern California 
|
https://www.semproducts.com/product/rust-sh.../28104#product- For the insides . it can go on over rust and can be brushed. Se if there's a local jobber who can put stuff in spray cans. Kevin Thank you Kevin! (IMG:style_emoticons/default/smile.gif) Will definitely look into this! |
| Montreal914 |
 Feb 24 2023, 07:04 PM Feb 24 2023, 07:04 PM
Post
#96
|
|
Senior Member    Group: Members Posts: 1,709 Joined: 8-August 10 From: Claremont, CA Member No.: 12,023 Region Association: Southern California 
|
Another overdue update...
As mentioned in the previous post, the donner fender is pretty much ready (we'll get back to this...) so it was time to remove the original fender from the car. So here is the current situation which should seem 100% familiar to everyone, except the mess... (IMG:style_emoticons/default/rolleyes.gif) 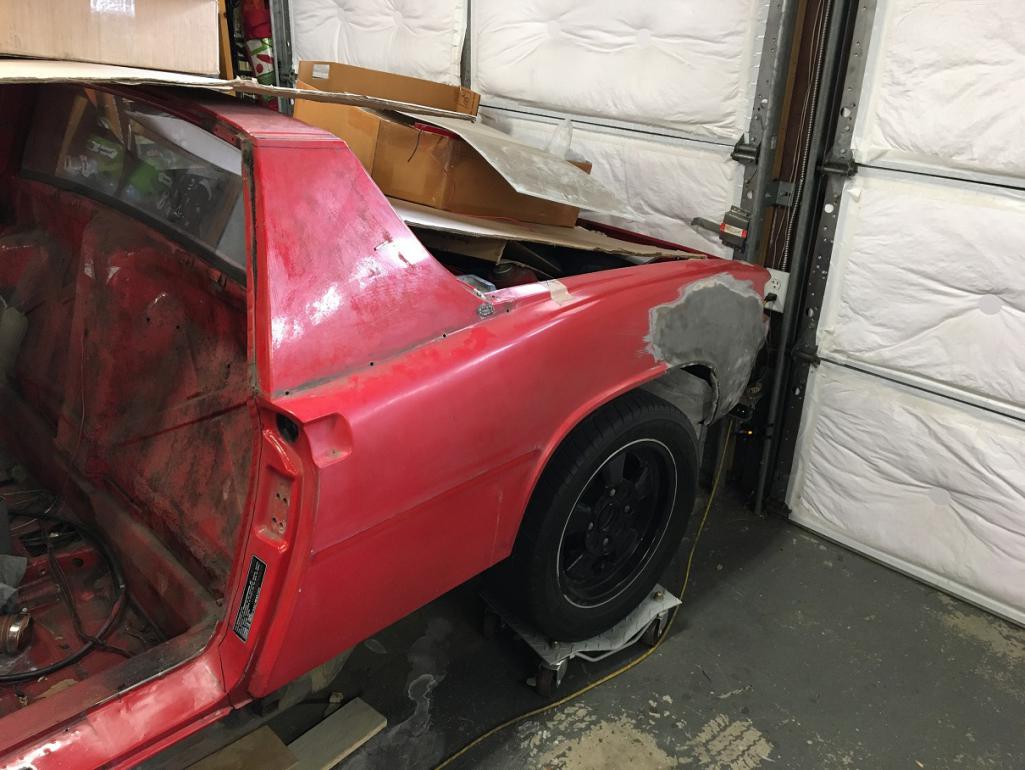 First, the vent tube in the door jamb needs to be freed. By grinding the edge weld, it allowed me to pry away the inner tube which is attached to the fender. 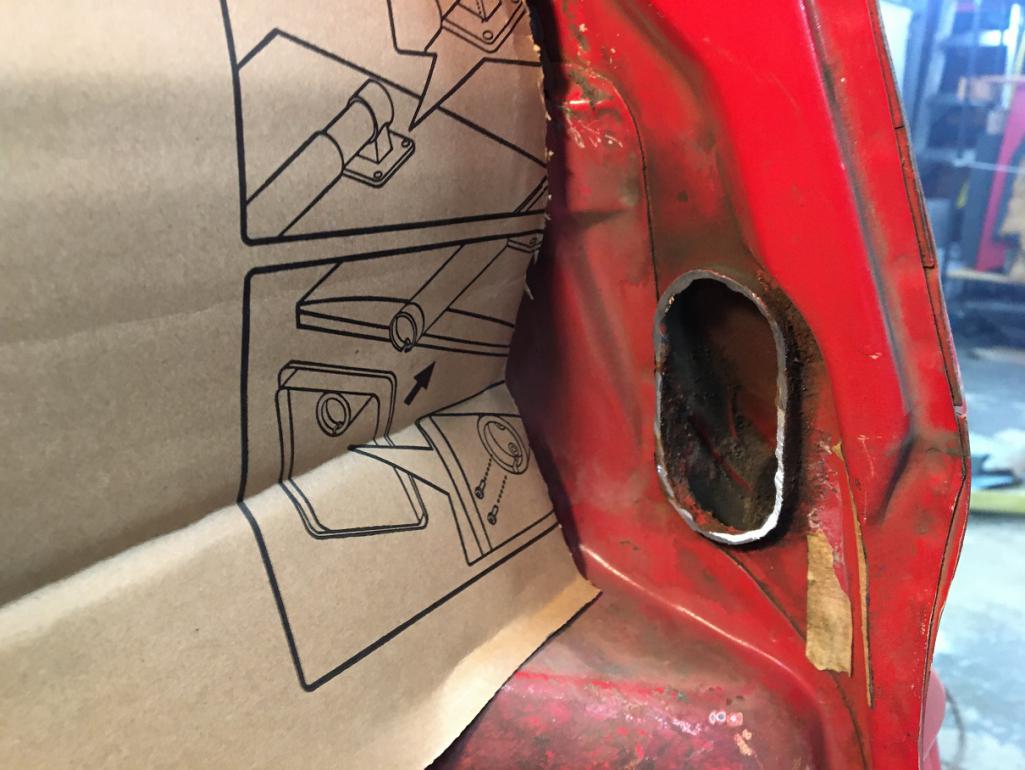 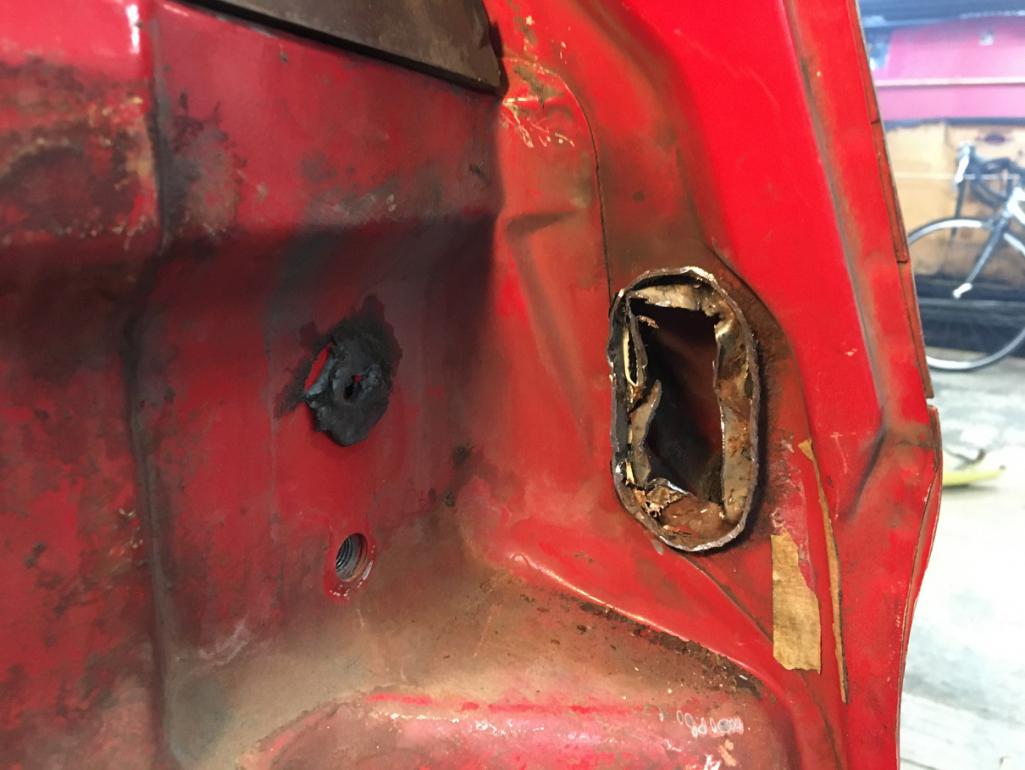 Then I cut the whole fender with a thin disk on a cheap angle grinder to leave only the spot welded strip attached to the car. This clears the access to grind the rest off in a second step. So here we go, rough cut, and out! (IMG:style_emoticons/default/smile.gif) 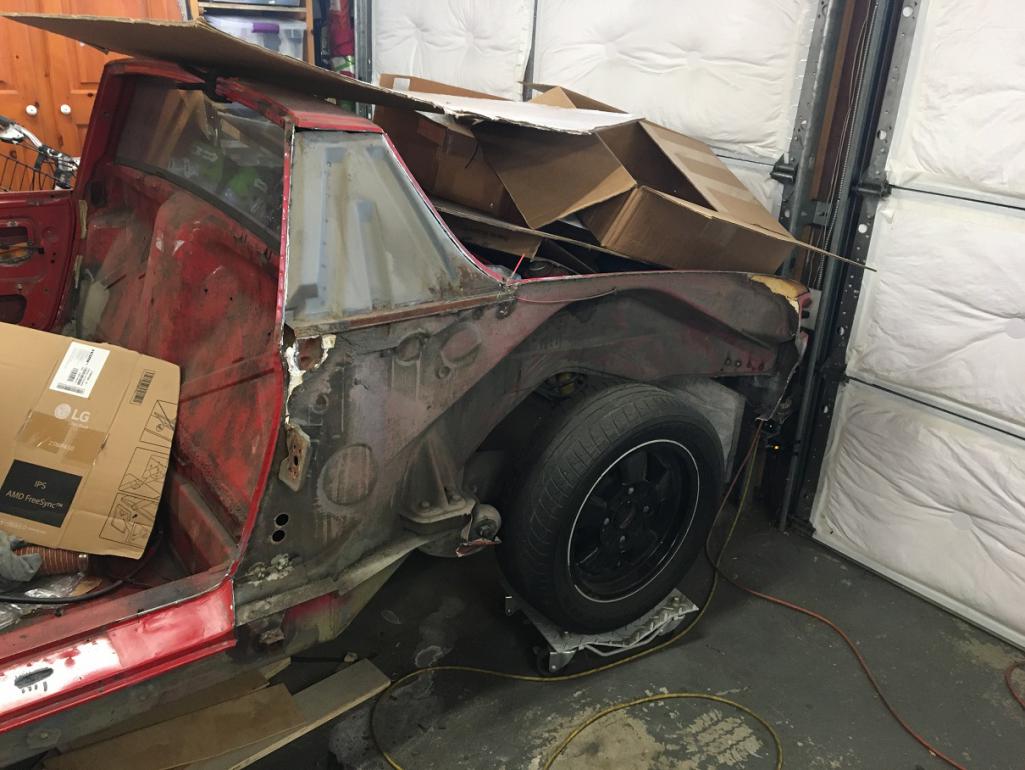 Next, I started on the top of the Targa bar. The spot welds have to be drilled here because the replacement fender will go underneath, and therefore will be plug welded in place. After drilling the welds I carefully pryed off the remnants. 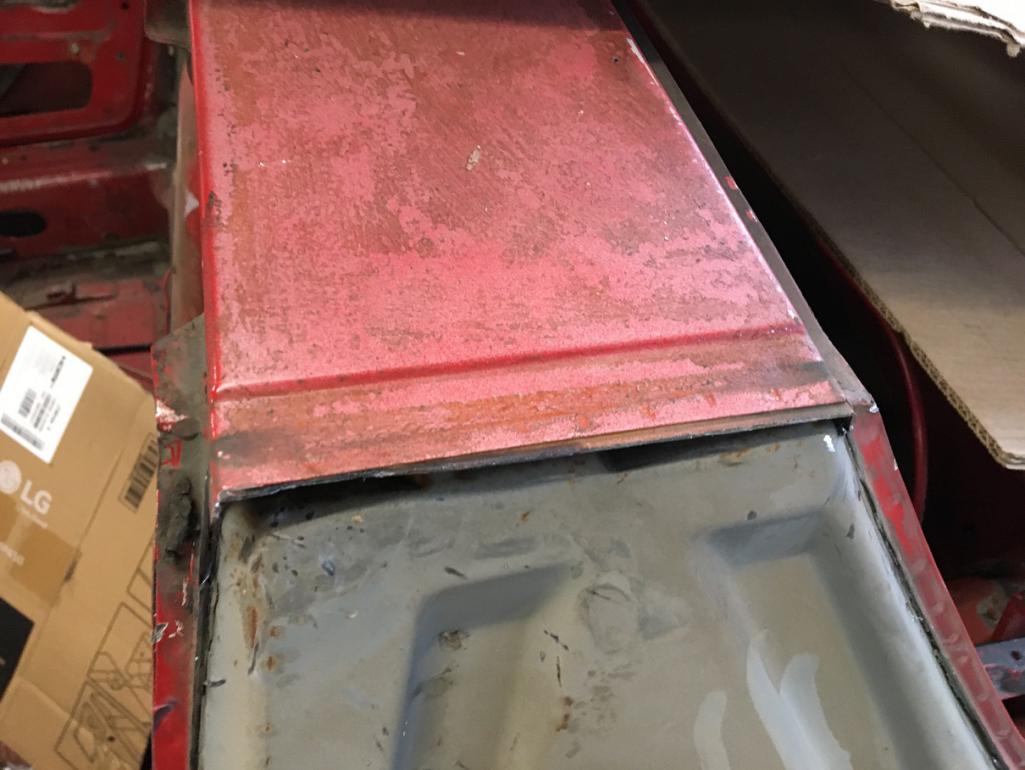 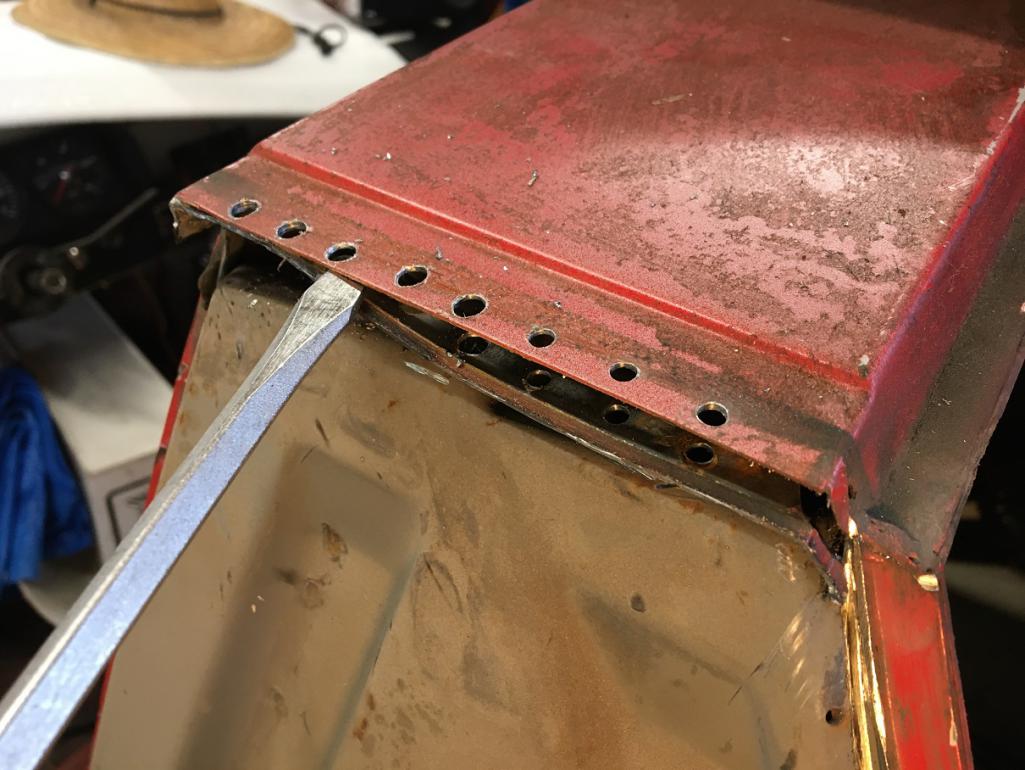 And here you have that segment pretty much done. (IMG:style_emoticons/default/smile.gif) 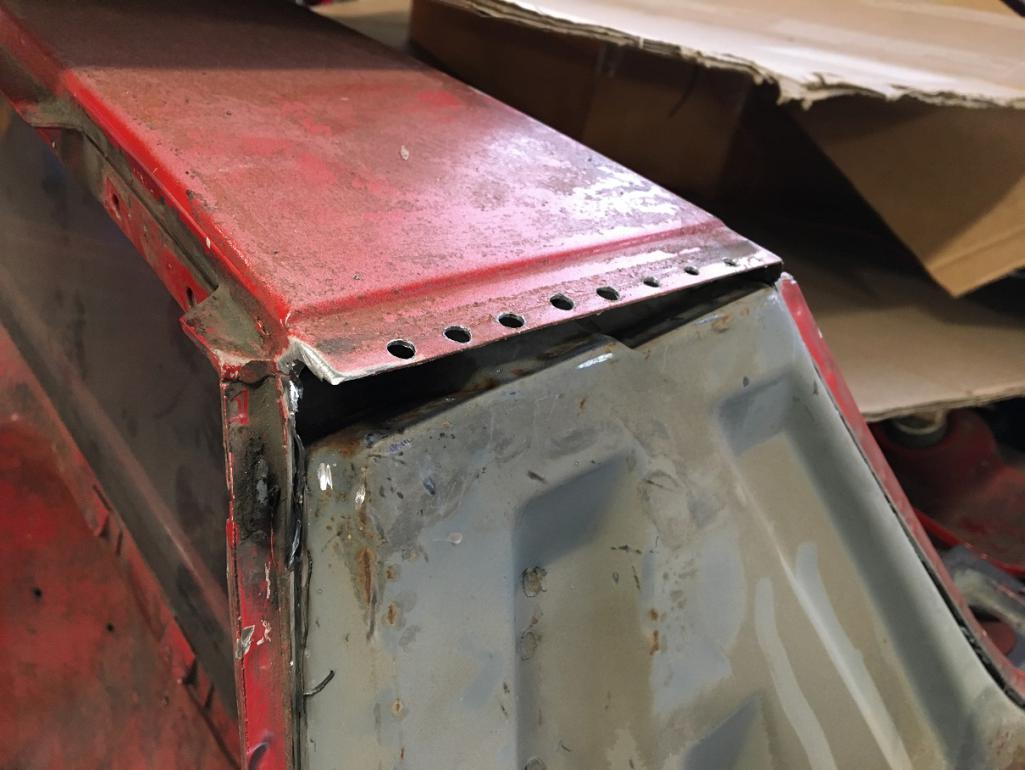 Next going down the edge on the door side. Along the Targa, there are actually three layers of metal, the inner fender/Targa panel, the corrugated reinforcement piece, and the fender. This transitions to only layers the inner fender and fender itself from the door down until the very bottom where there is again three layers. Carefully grinding away each spot weld, I was able to cleanup this flange to receive the donner fender flange. 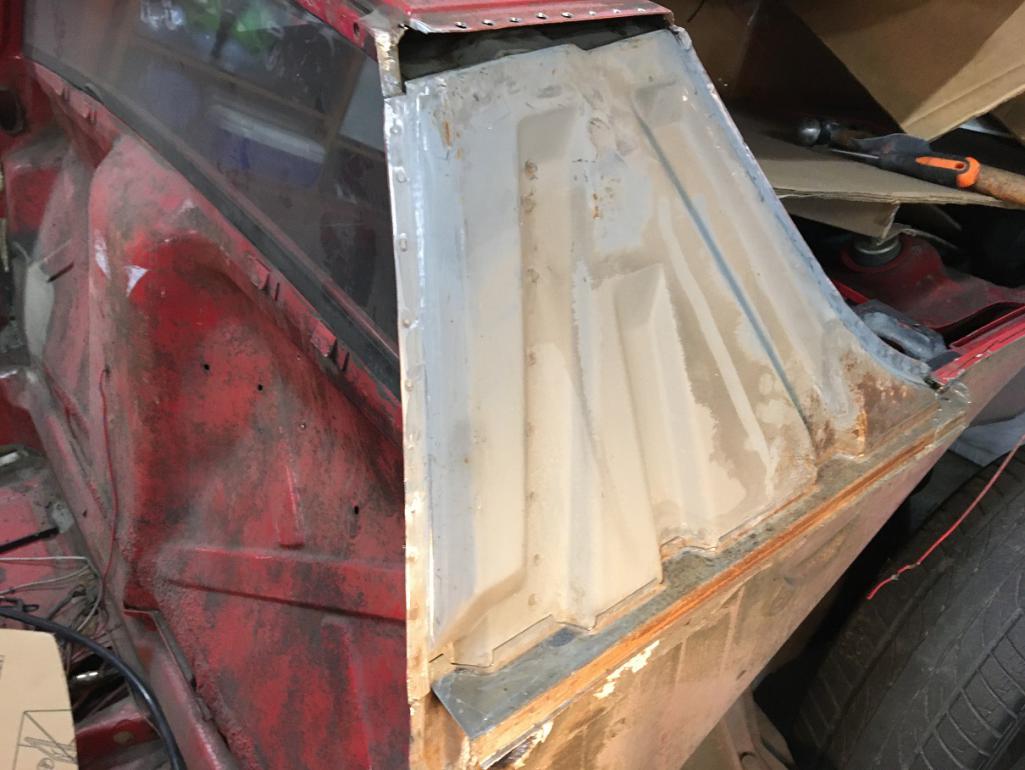 Cleanup almost finished. Note that the latch bracket is actually not attached to the fender. The fender gets sandwiched between it and the door latch. 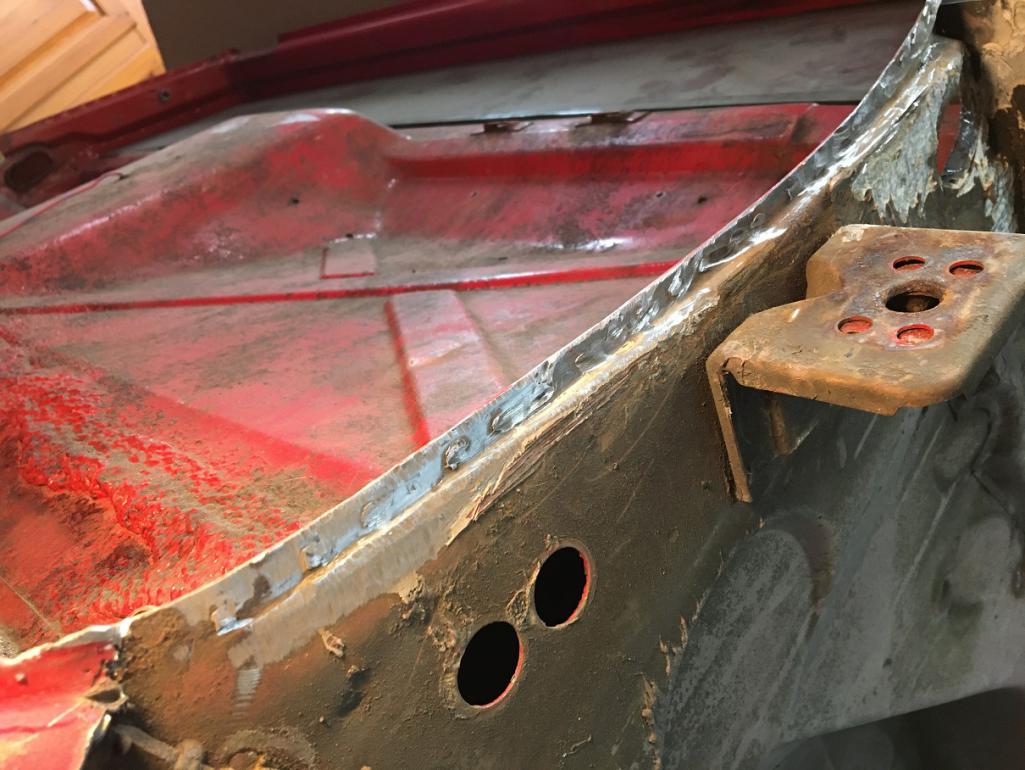 Now working my way along the trunk seal area, removing about 1 1/4" at time grinding each spot weld. 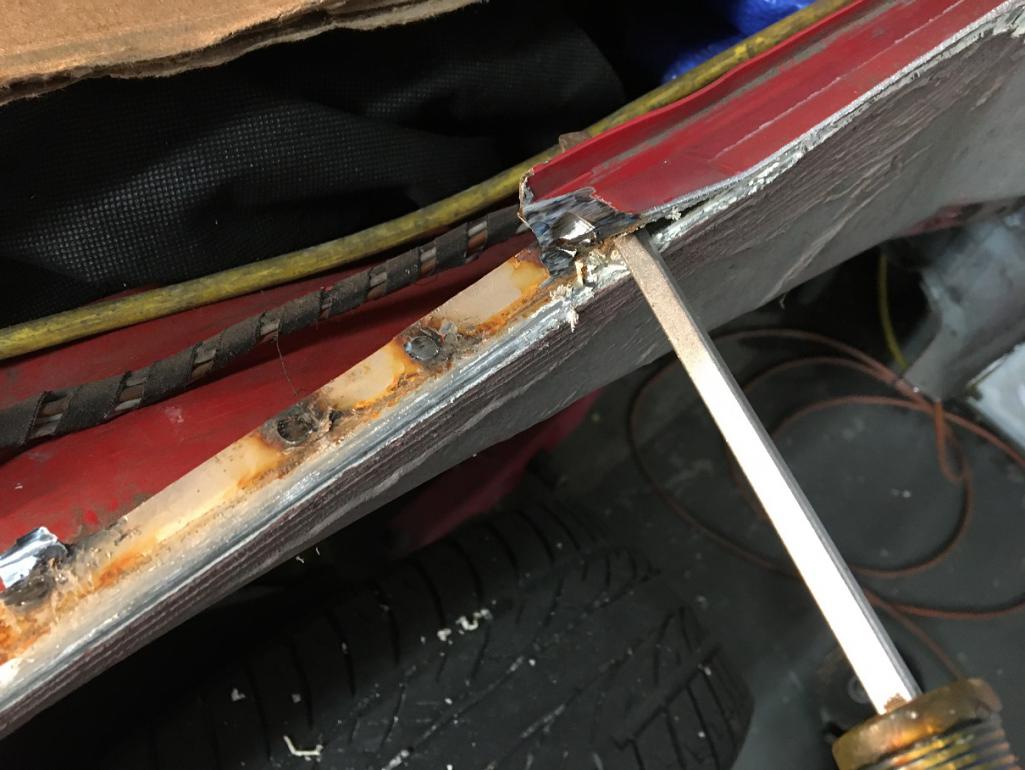 And there we have it! (IMG:style_emoticons/default/smile.gif) Well the rear corner will be addressed when the fender grafting strategy has been established... (IMG:style_emoticons/default/idea.gif) 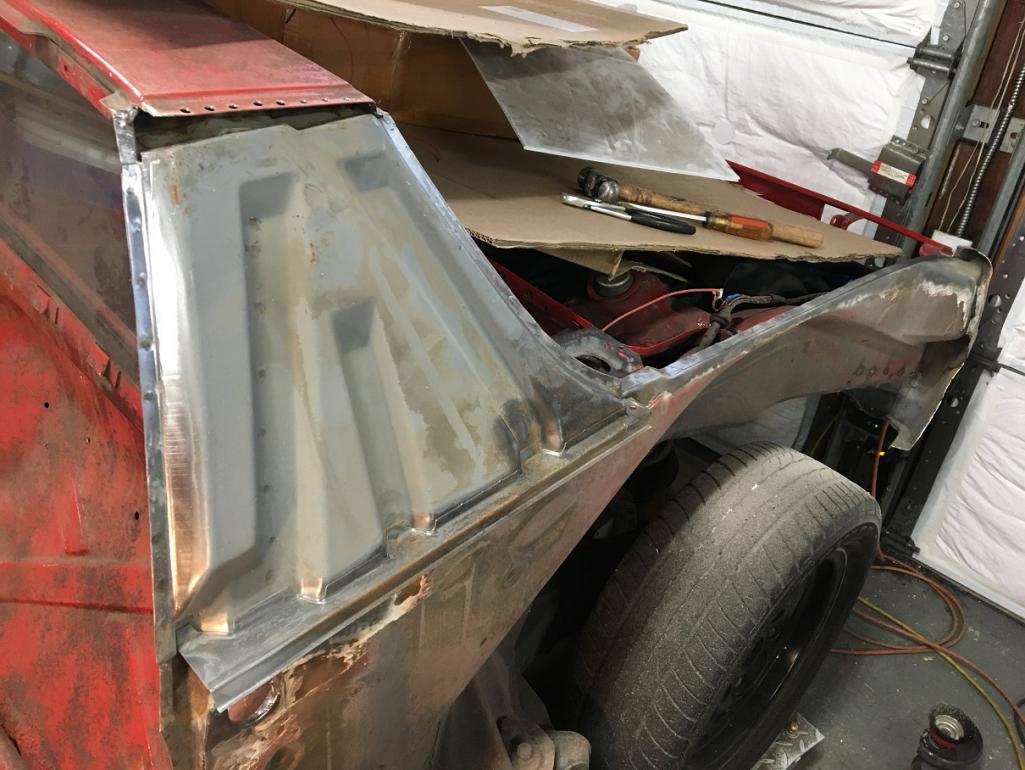 |
| Montreal914 |
 Feb 24 2023, 07:37 PM Feb 24 2023, 07:37 PM
Post
#97
|
|
Senior Member    Group: Members Posts: 1,709 Joined: 8-August 10 From: Claremont, CA Member No.: 12,023 Region Association: Southern California 
|
Next, time to fix some of the scars created during the rough fender cut. (IMG:style_emoticons/default/dry.gif)
The cutting disk actually cut a little in the trailing edge of the sail panel. Nothing that a little welding can't fix (IMG:style_emoticons/default/smile.gif). 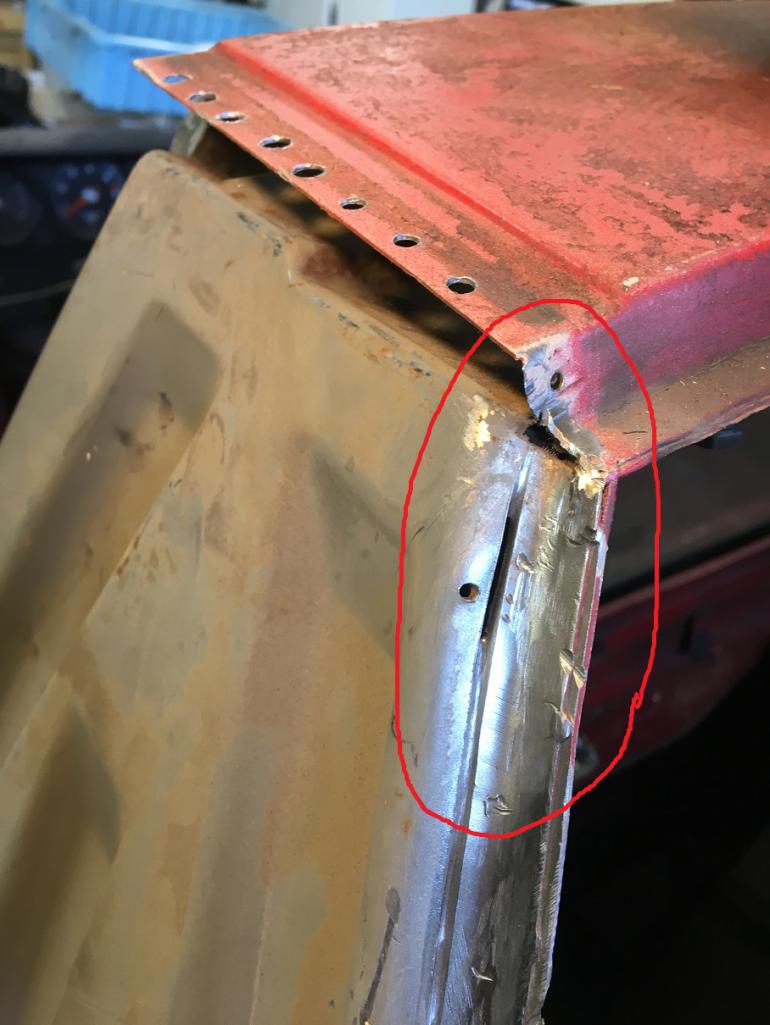 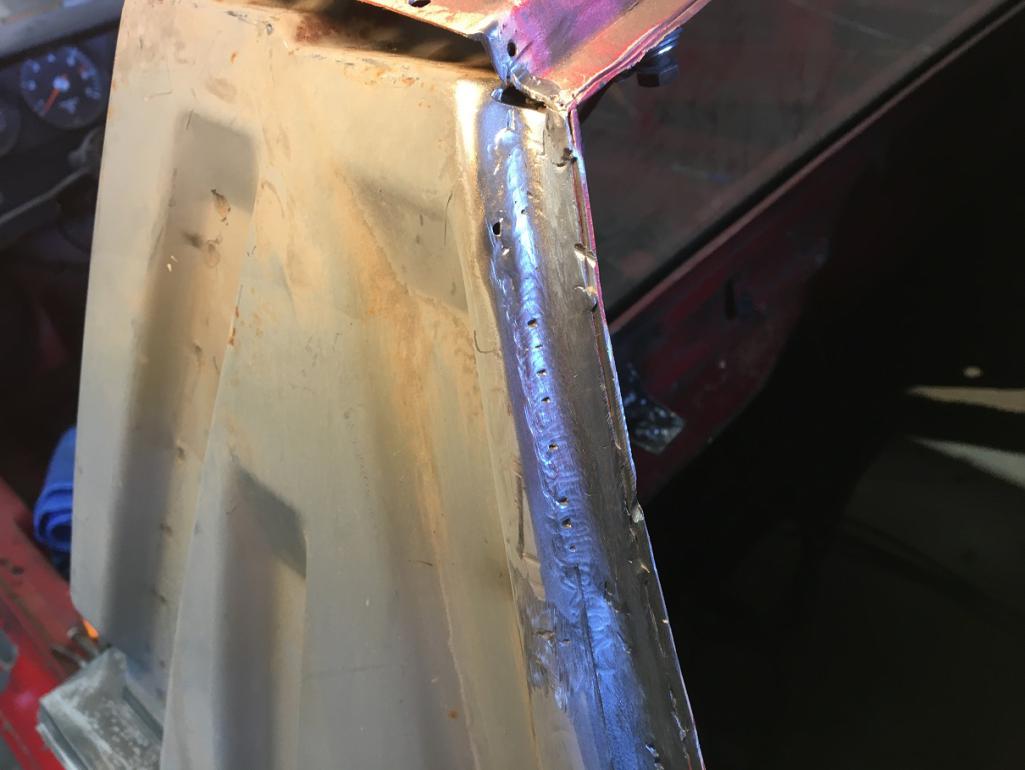 Moving along to the rear corner. Current situation, and donner fender current end cuts... 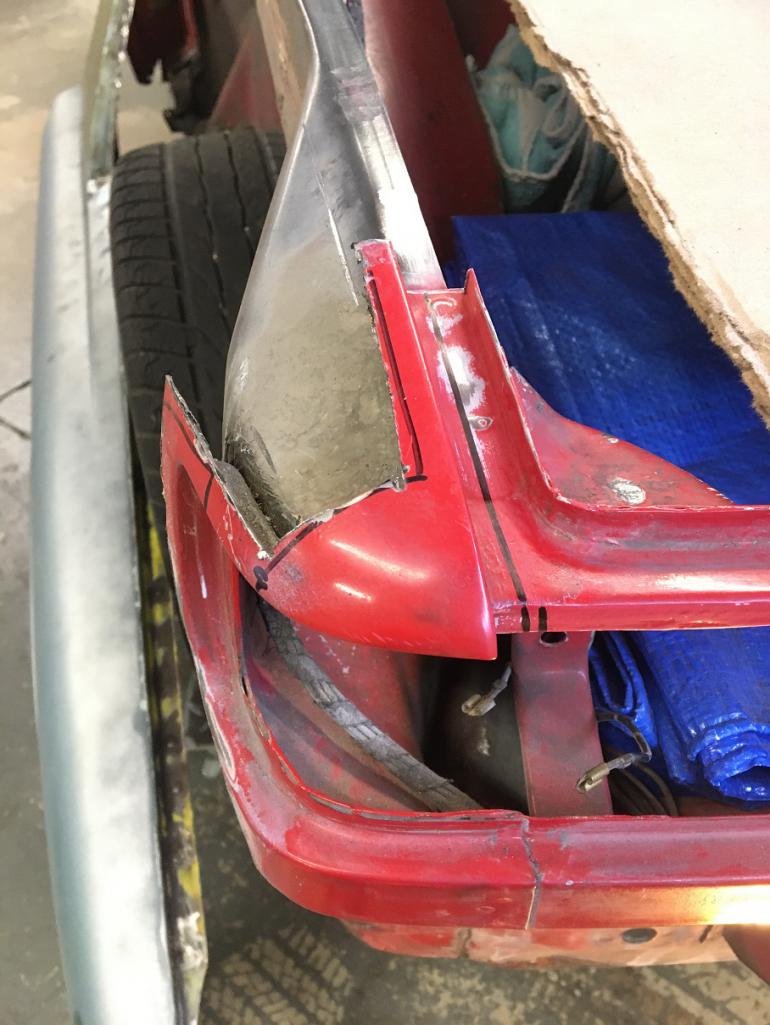 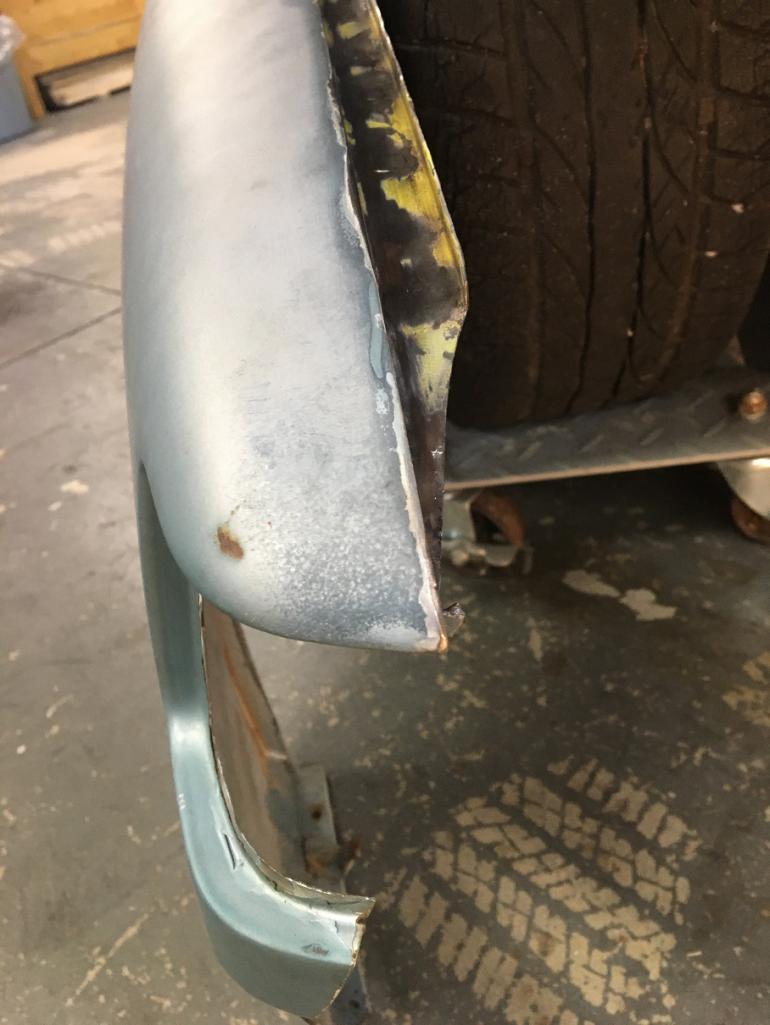 But what is hidden in the donner fender corner is the underside corner cut. (IMG:style_emoticons/default/headbang.gif) 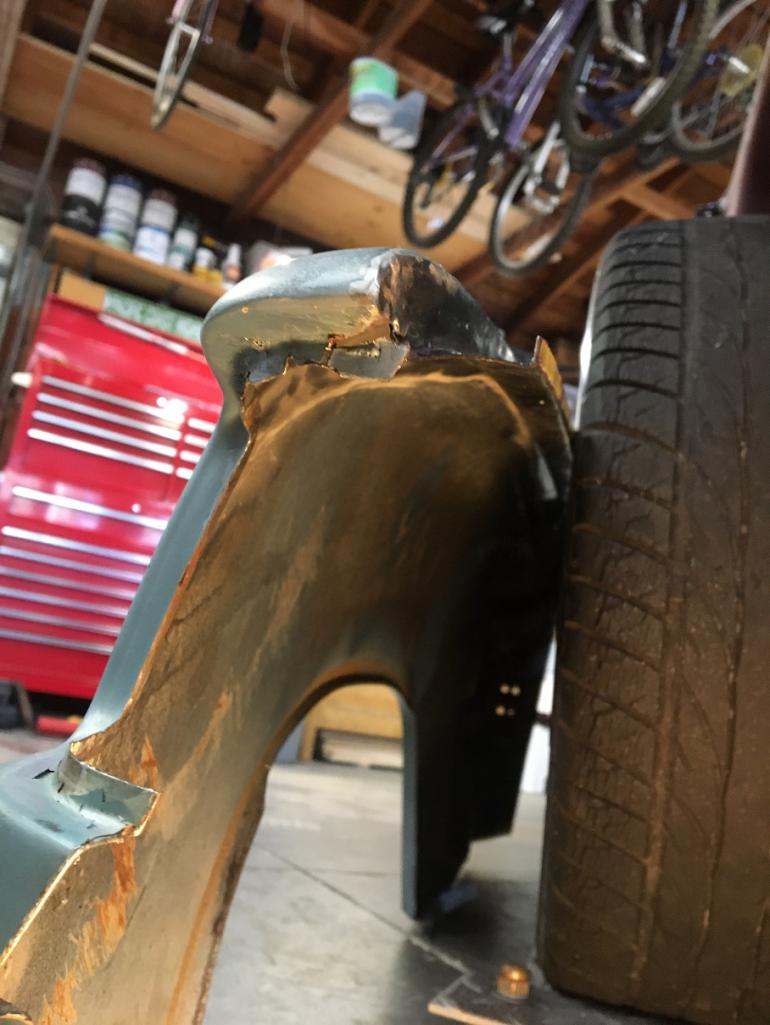 So before going any further, this needs to be addressed somehow... 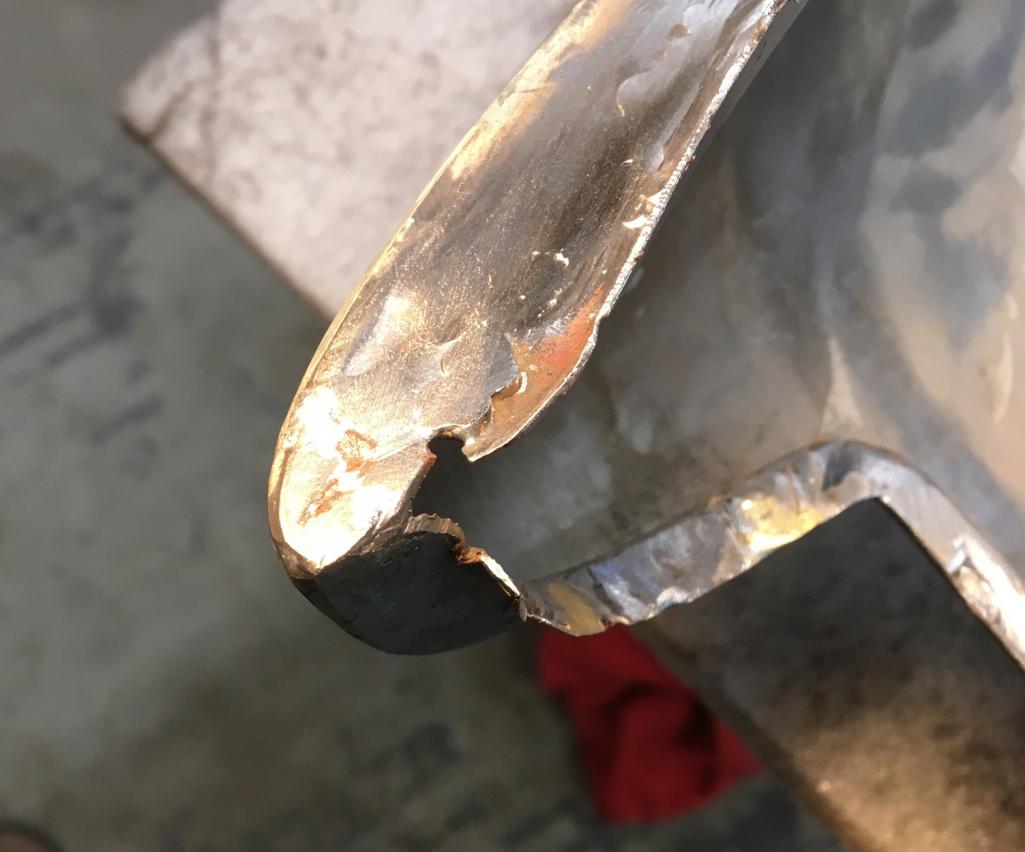 So I delicately cut off that missing portion from the removed original fender, now the "easy" task of welding this on the fender... (IMG:style_emoticons/default/wacko.gif) 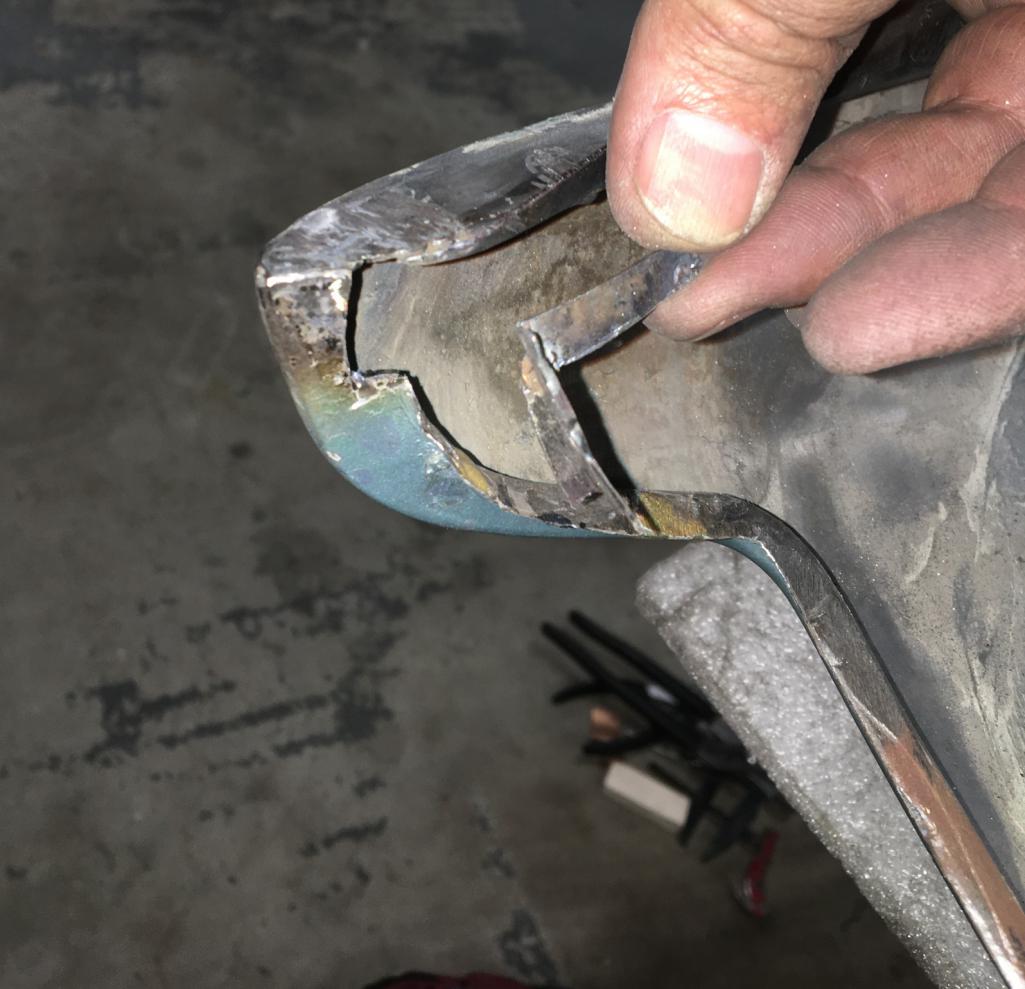 Crazy the amount of time one can spend fixing such a small area... (IMG:style_emoticons/default/rolleyes.gif) But it got done in the end... 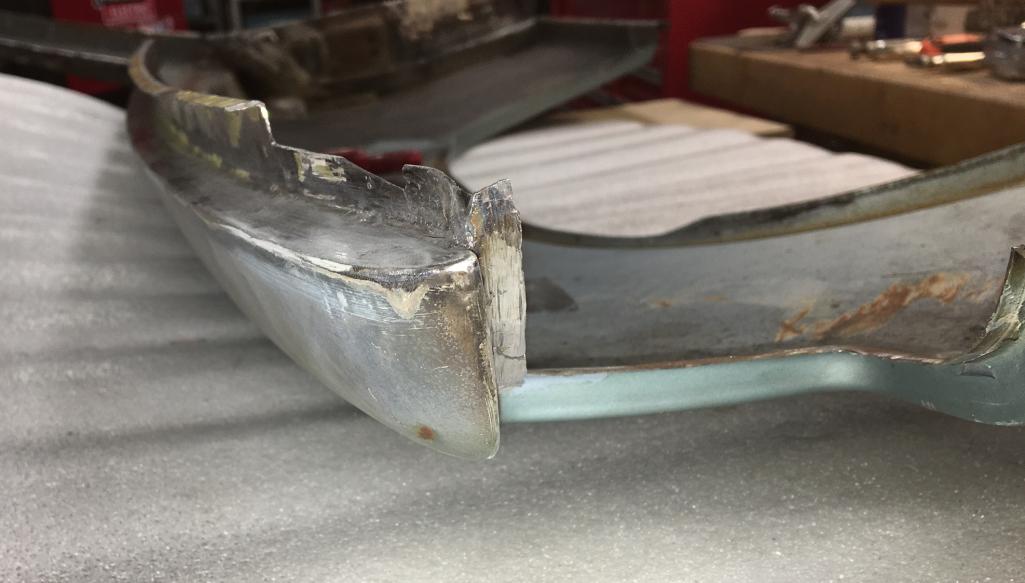 OK, now back to fitting the fender on the car. Very first placement is definitely very encouraging! (IMG:style_emoticons/default/smile.gif) 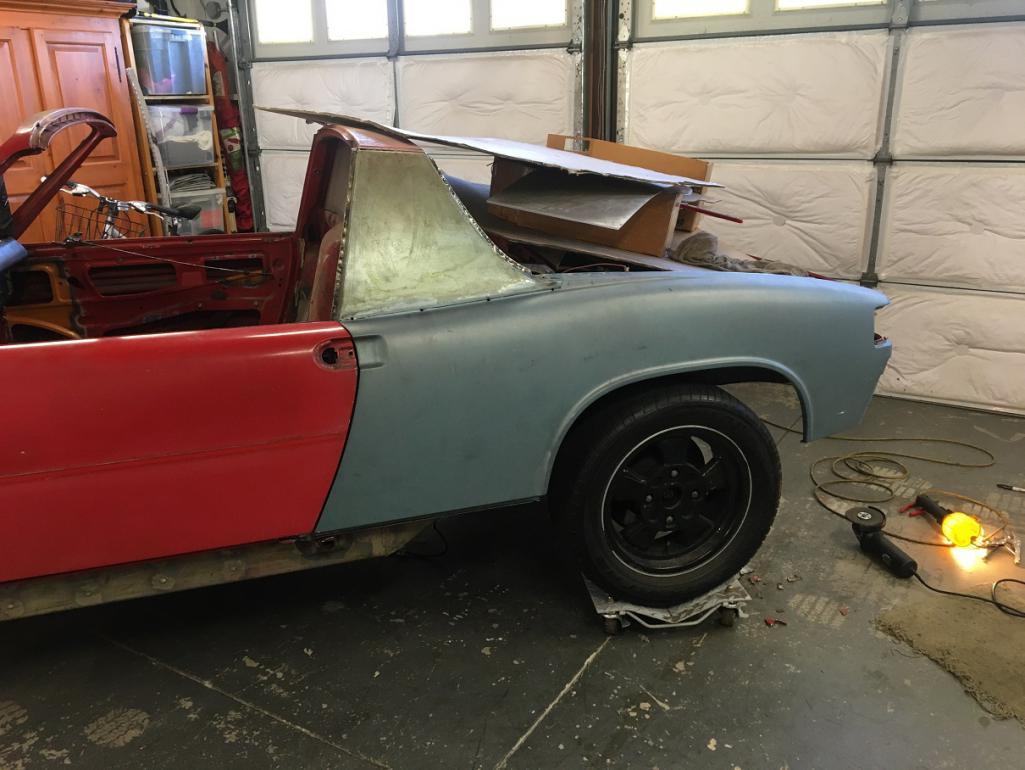 That being said the rear end still needs to be figured out. Now all of this wouldn't have been an issue if the donner fender was 100% complete, but it isn't, so we need to improvise a little. That corner (yellow arrow) has been deformed and isn't part of the fender... 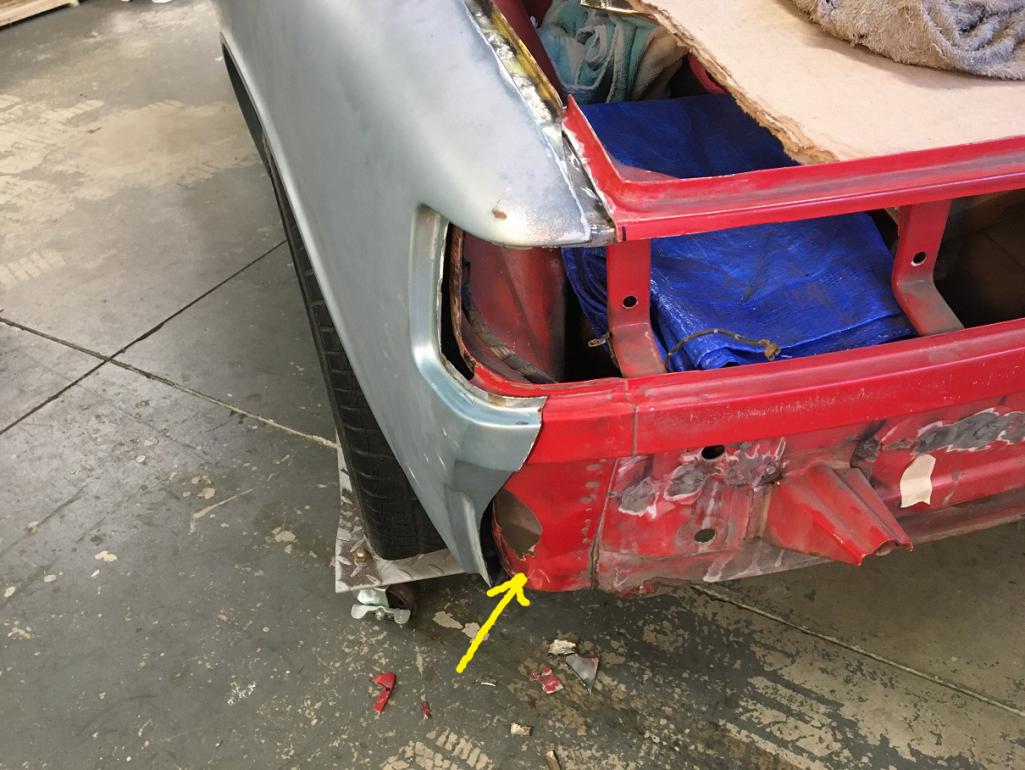 ...out of space for more pictures, to be continued! (IMG:style_emoticons/default/bye1.gif) |
| Montreal914 |
 Feb 24 2023, 08:03 PM Feb 24 2023, 08:03 PM
Post
#98
|
|
Senior Member    Group: Members Posts: 1,709 Joined: 8-August 10 From: Claremont, CA Member No.: 12,023 Region Association: Southern California 
|
OK, so let's continue with this problematic lower dented corner. After trying to hammer it back to match the shape of the fender, I realiazed I had cut to much material off of it and was left with too large of a gap. (IMG:style_emoticons/default/rolleyes.gif) (IMG:style_emoticons/default/headbang.gif)
So, luckily among my various sheet metal parts, I had one from the yellow fender piece. So here it is now attached to the car and nicely matching the new fender. 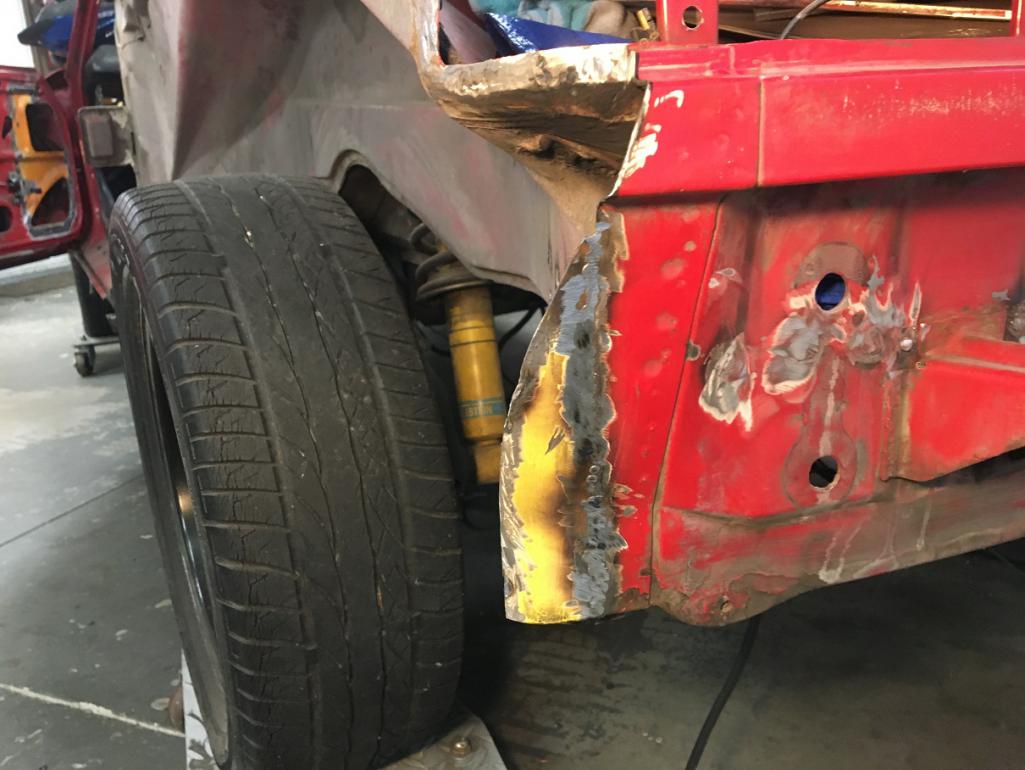 And now with the fender nicely matching ready for the butt weld. 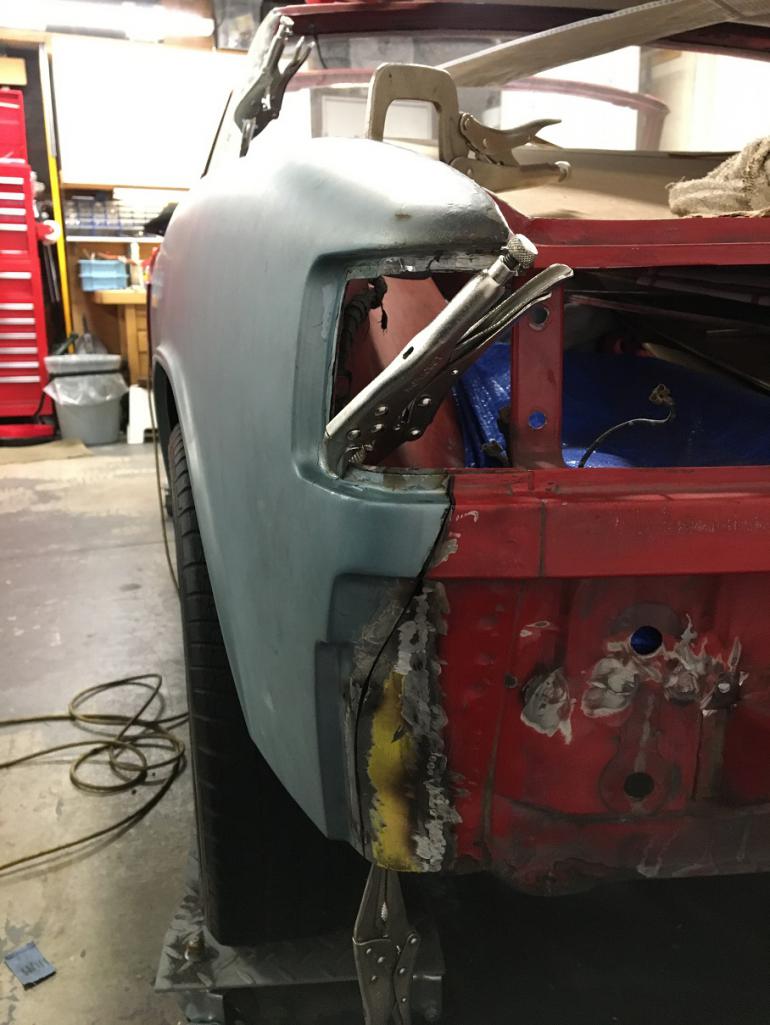 After many subtle little adjustments and on and off, I want to think the fit is pretty much ready for welding! (IMG:style_emoticons/default/smile.gif) The door gap is pretty uniform at 5.27mm near the top and 5.08 at the bottom held by a few vise grips. Let's hope it stays during welding... 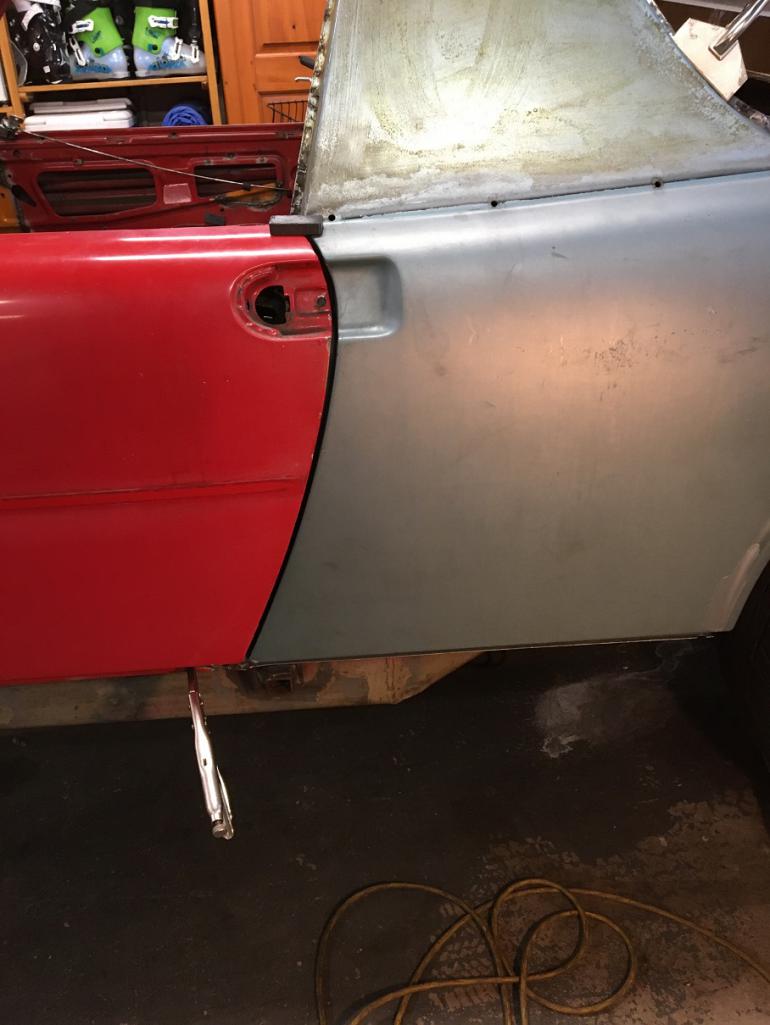 More pictures of it simply held by a few clamps. 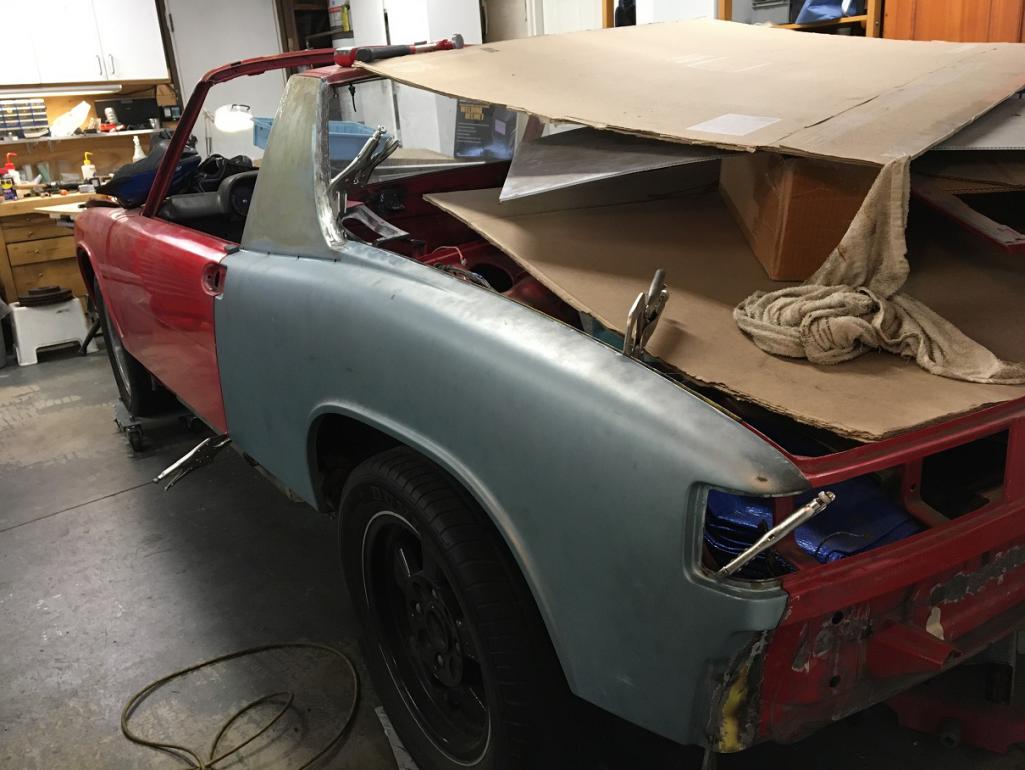 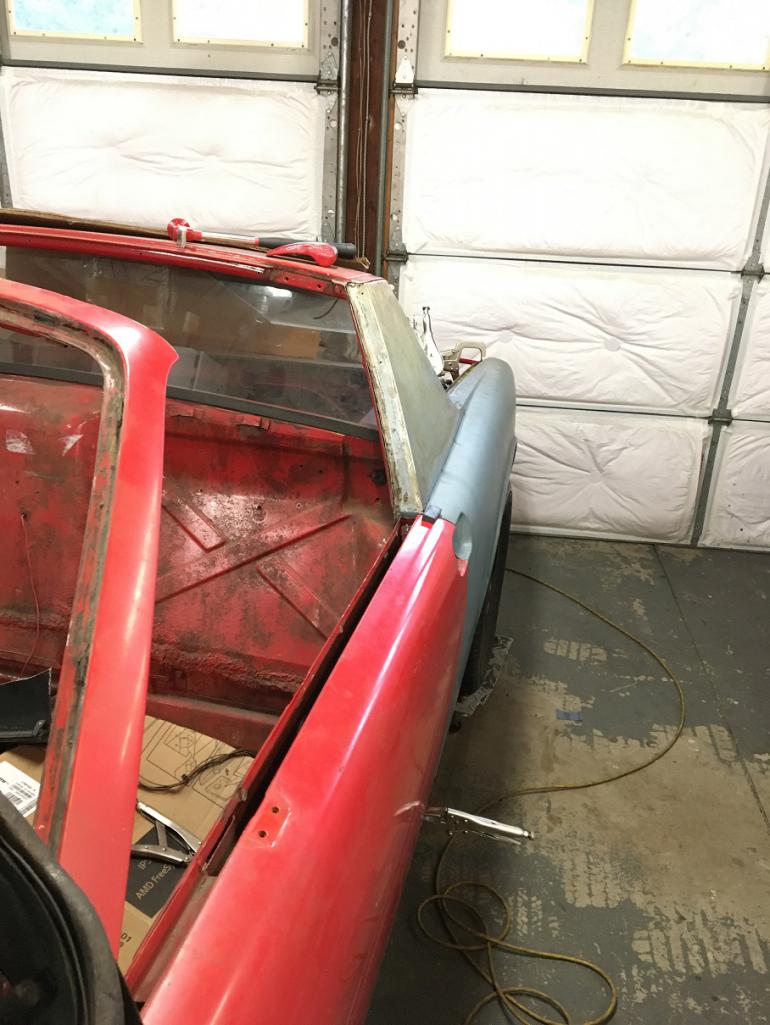 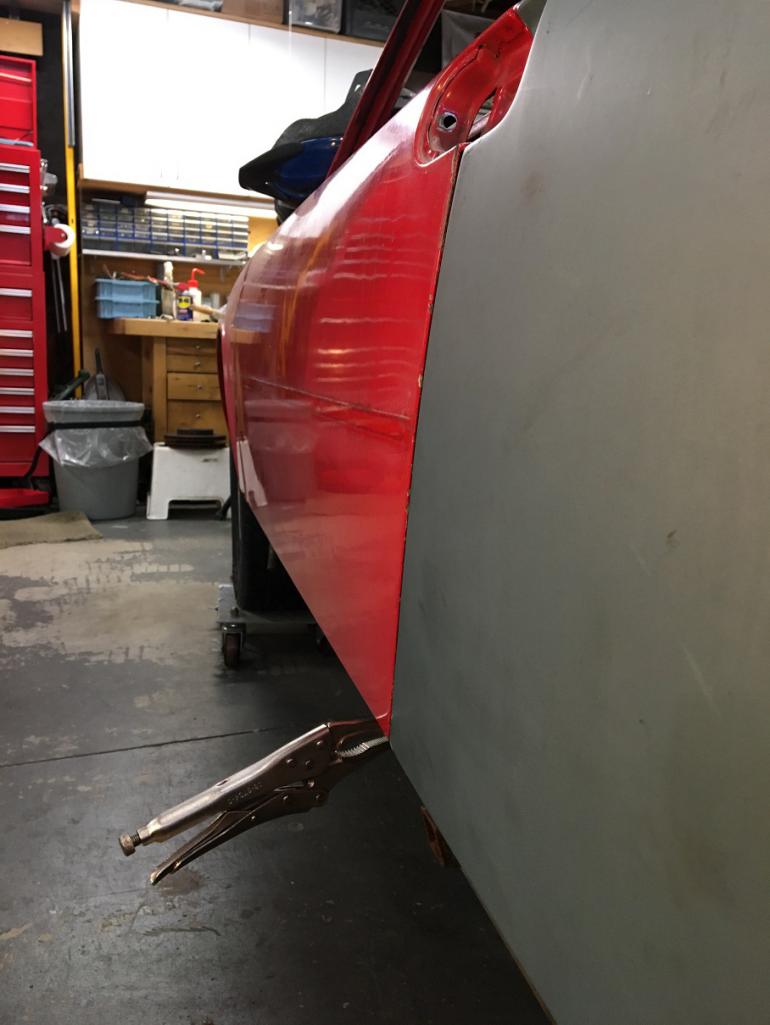 Next, prepping the surfaces and weld! (IMG:style_emoticons/default/smile.gif) (IMG:style_emoticons/default/beer3.gif) |
| bob164 |
 Feb 24 2023, 08:05 PM Feb 24 2023, 08:05 PM
Post
#99
|
|
Member   Group: Members Posts: 97 Joined: 10-February 18 From: SoCal Member No.: 21,877 Region Association: Southern California 
|
Great progress Eric, thanks for the detailed photos, you are an inspiration.
|
| Cairo94507 |
 Feb 25 2023, 08:57 AM Feb 25 2023, 08:57 AM
Post
#100
|
|
Michael           Group: Members Posts: 10,102 Joined: 1-November 08 From: Auburn, CA Member No.: 9,712 Region Association: Northern California 
|
Great work Eric; a thing of beauty when the new quarter goes on and lines up nicely. All that careful removal and prep pays off in perfection. (IMG:style_emoticons/default/beerchug.gif)
|
| rick 918-S |
 Mar 10 2023, 05:31 AM Mar 10 2023, 05:31 AM
Post
#101
|
|
Hey nice rack! -Celette                Group: Members Posts: 20,795 Joined: 30-December 02 From: Now in Superior WI Member No.: 43 Region Association: Northstar Region 

|
Got your text. I think I read at one time Chris Foley has a fixture for locating the suspension console if you end up having to remove it. Short of that I would spend the time and build something you could use to locate it before going too far. The car is progressing nicely.
|
| 930cabman |
 Mar 10 2023, 10:57 AM Mar 10 2023, 10:57 AM
Post
#102
|
|
Advanced Member     Group: Members Posts: 3,725 Joined: 12-November 20 From: Buffalo Member No.: 24,877 Region Association: North East States 
|
Great looking workmanship, keep it going.
the things we do for our 50 y/o machines!! |
| Superhawk996 |
 Mar 10 2023, 11:36 AM Mar 10 2023, 11:36 AM
Post
#103
|
|
914 Guru      Group: Members Posts: 6,544 Joined: 25-August 18 From: Woods of N. Idaho Member No.: 22,428 Region Association: Galt's Gulch 
|
Lots of good work going on here. (IMG:style_emoticons/default/smilie_pokal.gif)
|
| bkrantz |
 Mar 10 2023, 08:21 PM Mar 10 2023, 08:21 PM
Post
#104
|
|
914 Guru      Group: Members Posts: 8,156 Joined: 3-August 19 From: SW Colorado Member No.: 23,343 Region Association: Rocky Mountains 
|
Your panel fit and alignment looks at least as good as factory. (IMG:style_emoticons/default/smash.gif)
|
| Montreal914 |
 Mar 11 2023, 11:06 AM Mar 11 2023, 11:06 AM
Post
#105
|
|
Senior Member    Group: Members Posts: 1,709 Joined: 8-August 10 From: Claremont, CA Member No.: 12,023 Region Association: Southern California 
|
All, thank you for the compliment! (IMG:style_emoticons/default/pray.gif)
All of your build threads have been inspirational and an extremely valuable source of information. (IMG:style_emoticons/default/smilie_pokal.gif) I will be moving on a new dreaded phase of the project, the longs... (IMG:style_emoticons/default/unsure.gif) Hopefully, the level of repair needed will not be as extreme as what you guys had to deal with. I bought the car 13 years ago when I moved to California from Canada and this was my only means of transportation for many years! (IMG:style_emoticons/default/driving.gif) A few months after purchasing it and joining the forum, I discovered heavy rust in the jack point area. I did a temporary fix over a couple of weekends with a Brad Mayer repair kit that allowed me to drive and enjoy my car for many years. I think this was the right decision. Now the time has come to remove the Brad Mayer parts, investigate and properly address the rusted areas. I am hoping I can achieve the passenger side without removing the rear fender, and using methods shared by Rick and Superhawk. Fingers crossed. Stay tuned, more to come! (IMG:style_emoticons/default/smile.gif) |
| Montreal914 |
 Apr 8 2023, 06:40 PM Apr 8 2023, 06:40 PM
Post
#106
|
|
Senior Member    Group: Members Posts: 1,709 Joined: 8-August 10 From: Claremont, CA Member No.: 12,023 Region Association: Southern California 
|
Before I continue I need to take a few step back and investigate a repair the DACO (Dumb Ass Current Owner) did about 13 years ago... (IMG:style_emoticons/default/laugh.gif)
At the time, I had just moved to California from Canada and the 914 was my only mode or transportation (excluding my bicycle)! (IMG:style_emoticons/default/smile.gif) (IMG:style_emoticons/default/driving.gif) Therefore I needed a quick fix for both driver and passenger side jack point pyramids that were rusted and had impacted the longs. I bought a used 120V welder on Craigslist and proceeded to make this repair in my driveway (no garage on the rental). I had access to a few very basic tools too. Anyhow, the Brad Mayer repair panels did the trick and allowed me to enjoy my 914 for about 10 years before I started this now rebuild project. (IMG:style_emoticons/default/smash.gif) For the past while I debated weather I should go back and revisit this repair or simply continue as is. That was until I decided to remove the back portion of the Brad Mayer panel on the right side and discovered this! (IMG:style_emoticons/default/unsure.gif) 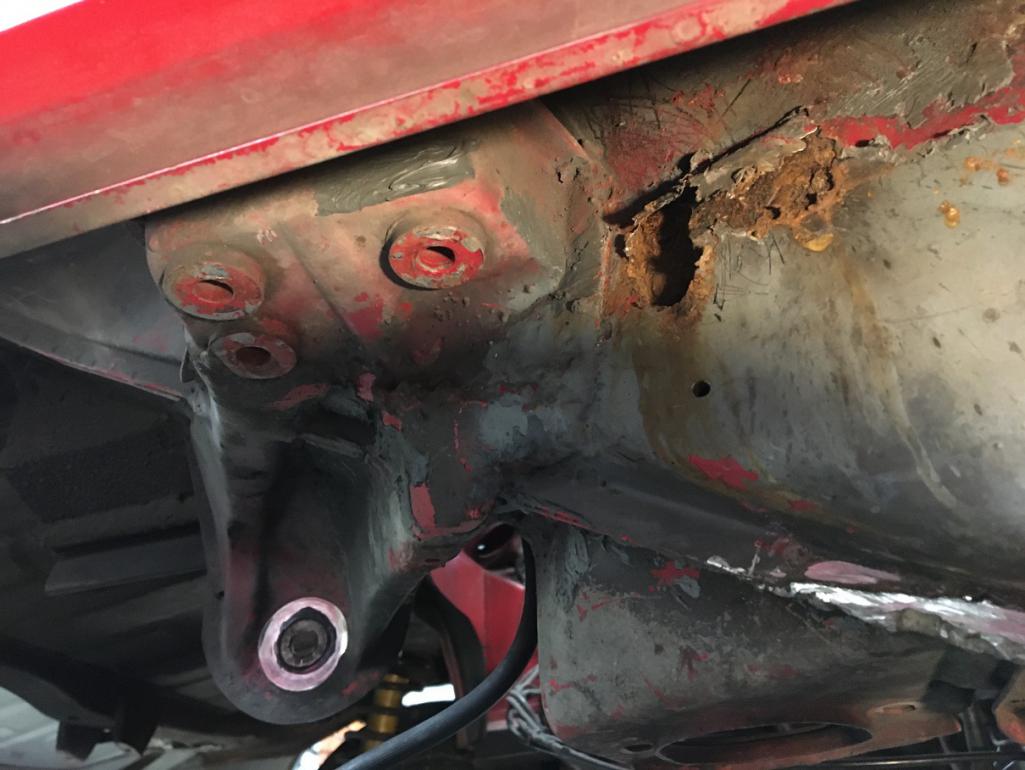 So clearly this will require a thorough investigation that will get pretty deep. (IMG:style_emoticons/default/icon8.gif) So, although the repair panels were a success as they did what was needed, it is time to go through all of this and fix it the right way. (IMG:style_emoticons/default/smash.gif) Step #1, getting the proper dolly for the car. I have no clue how far this will go, and I need something to move this shell around anyway so... After reading many of the rebuild threads here, I decided to make myself a similar copy of the Jigster engineered by @Jeff Hail (IMG:style_emoticons/default/pray.gif) With today's steel prices, the 4" x 2" x 1/8 20ft. that Jeff used are about $150 ea. and 2 are needed for this build. Instead, I went the frugal way and got some used racking beams and used heavy duty casters. (IMG:style_emoticons/default/smile.gif) Total investment, a whopping $72! (IMG:style_emoticons/default/sunglasses.gif) Here are the beams purchased: 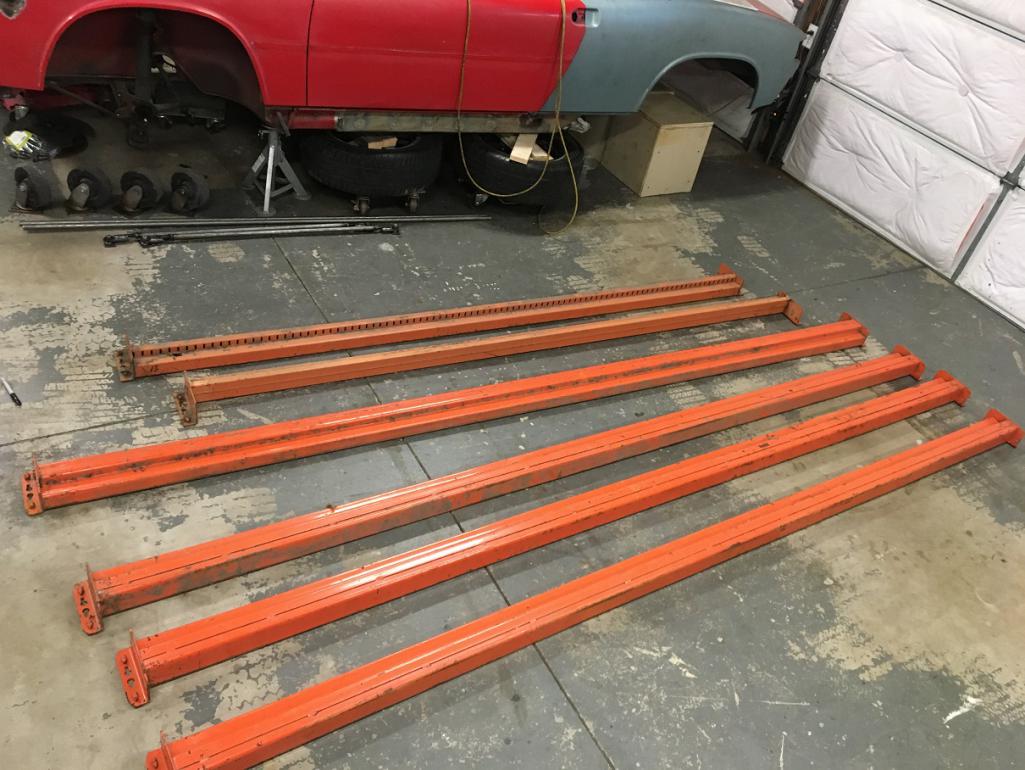 Now to cut these square requires the correct tool that I obviously don't have as I am not a metal fabrication shop... (IMG:style_emoticons/default/rolleyes.gif) This is where reading can give you tricks! (IMG:style_emoticons/default/smile.gif) I got myself a 10" thin abrasive disk with a 5/8" arbor and set it on my wood miter saw. Make sure your disk is rated for the speed of your saw! Time to do some cutting! 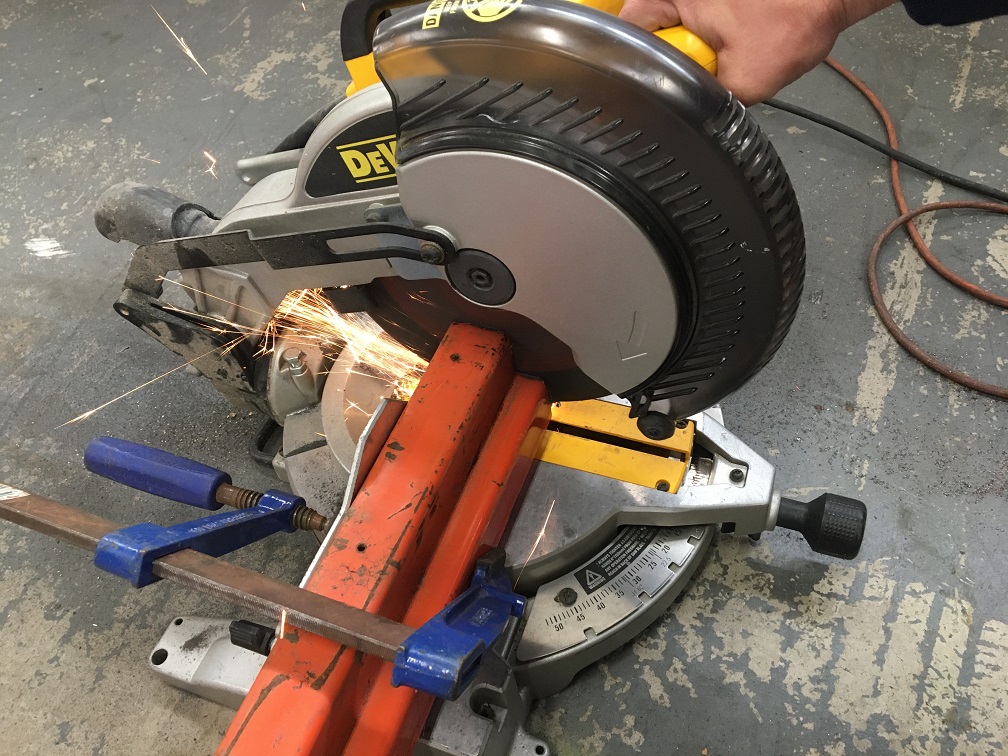 And here are all the parts cut to length within less that a 1/16" off. (IMG:style_emoticons/default/smile.gif) 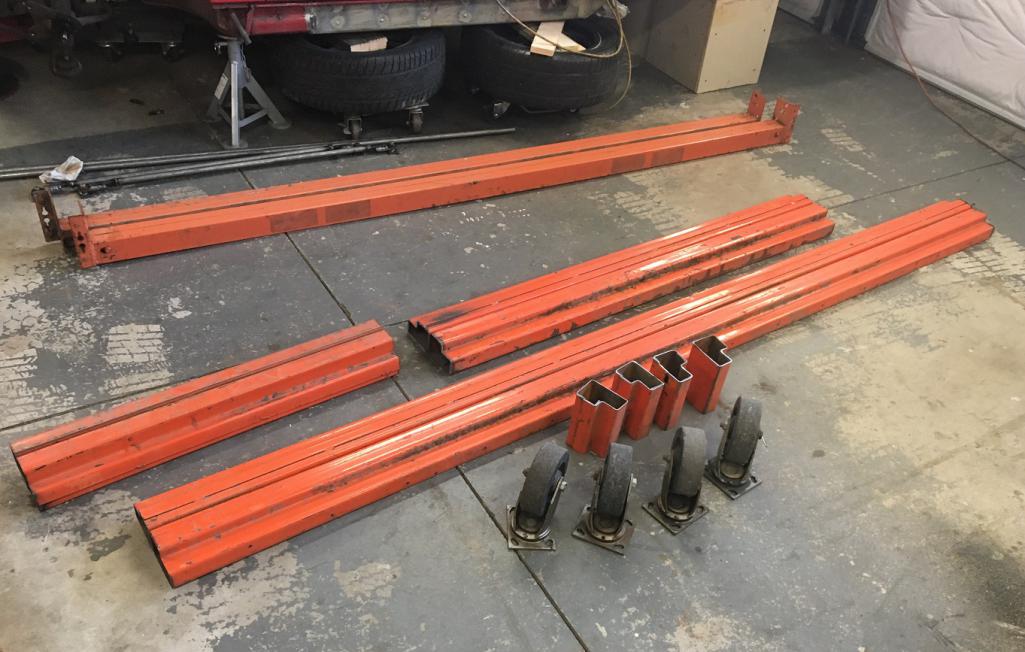 Time to burn metal (IMG:style_emoticons/default/welder.gif) Using a laser I set the beams leveled and tacked the 4 parts of the frame. After measuring the diagonals, I was within less than 1/16" and nicely leveled. Time to fully weld this thing! 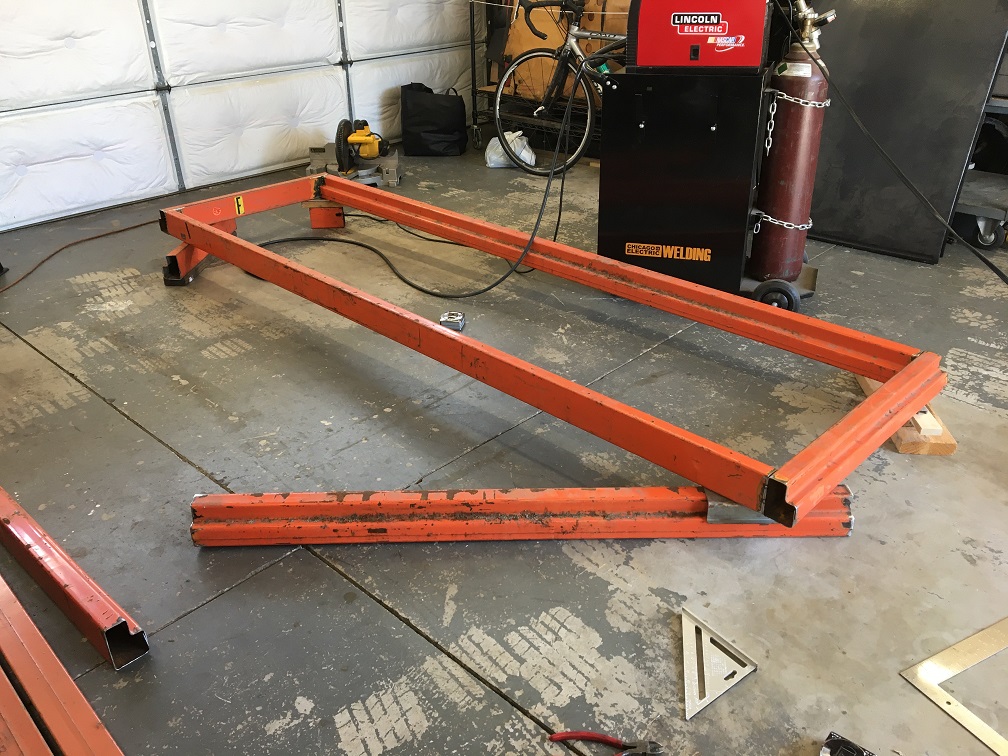 Flipped upside down to do the legs and casters. 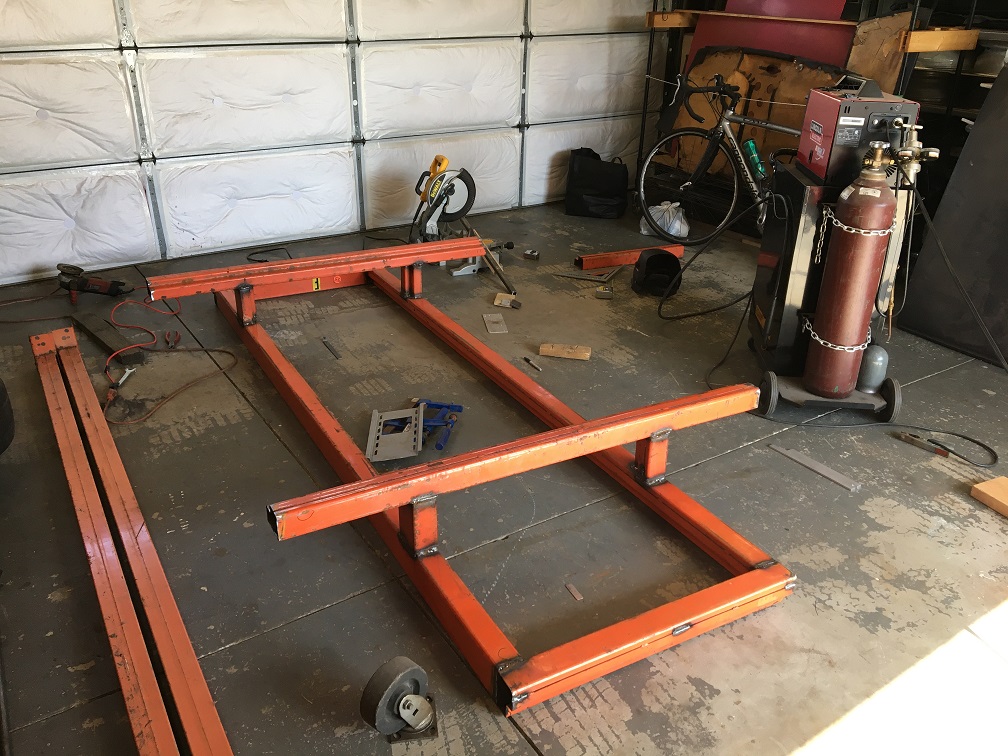 For the casters I got lucky as a piece of 1" x 1" tube I had made the perfect spacer for the caster plate. The correct way would have been to have a plate and bolt the casters, but I went the easy way and just welded them on. I doubt I will ever have to replace them anyway... 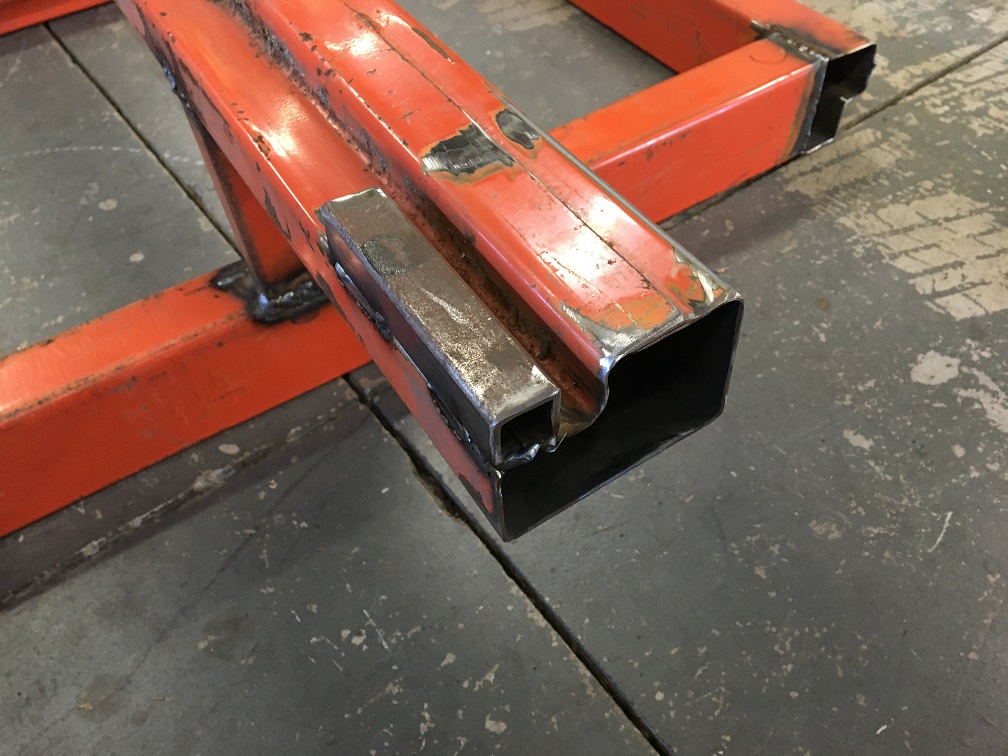 Once done I sprayed some left over rattle can paint over the welds after wire brushing the areas. I am very pleased with the result and can now plan on setting the shell on it and begin the long repair how ever deep I need to go. I know I will be able to make which ever brace will be needed for key reference points such as suspension console. It was a long day but well worth it! (IMG:style_emoticons/default/smile.gif) 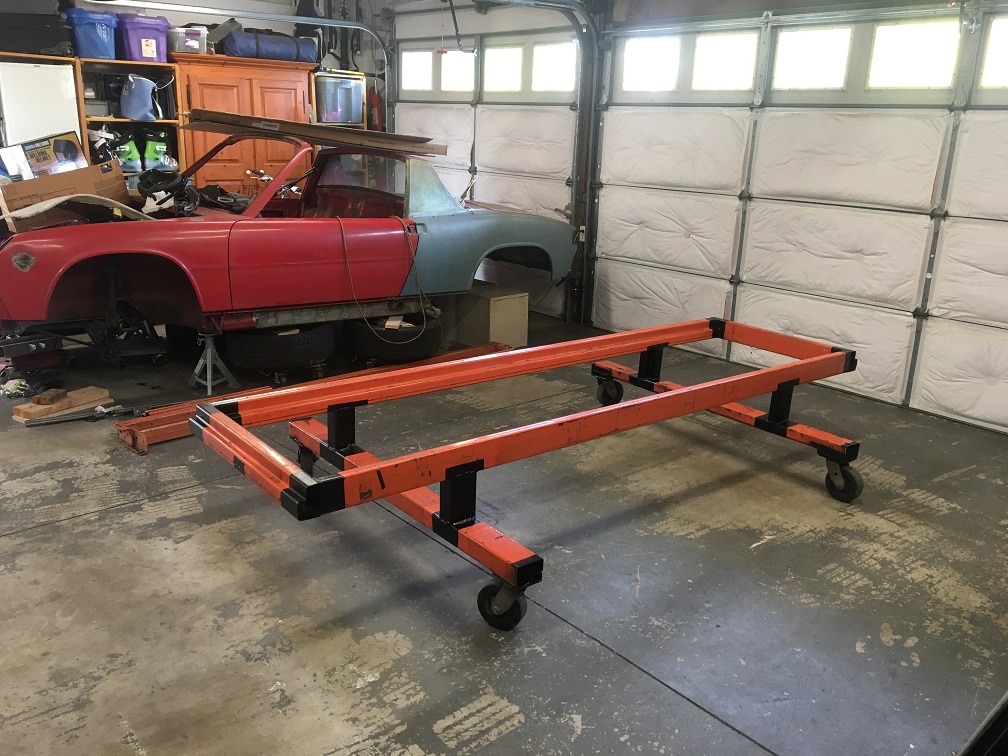 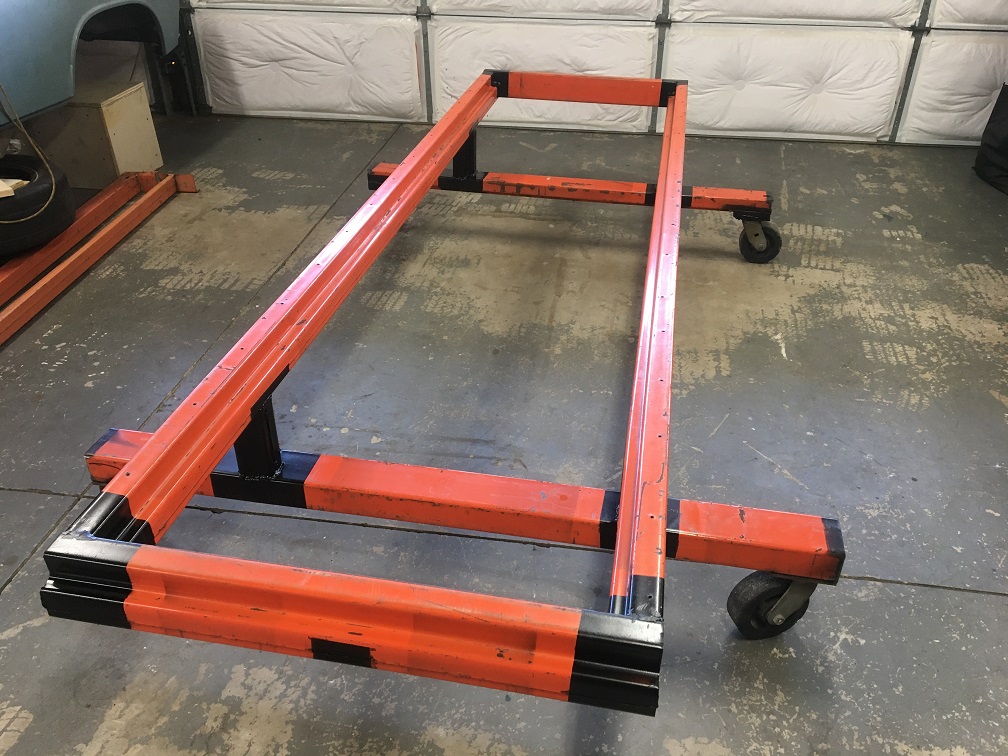 |
| rick 918-S |
 Apr 8 2023, 08:32 PM Apr 8 2023, 08:32 PM
Post
#107
|
|
Hey nice rack! -Celette                Group: Members Posts: 20,795 Joined: 30-December 02 From: Now in Superior WI Member No.: 43 Region Association: Northstar Region 

|
That should work nicely (IMG:style_emoticons/default/welder.gif)
|
| nivekdodge |
 Apr 8 2023, 10:19 PM Apr 8 2023, 10:19 PM
Post
#108
|
|
Member   Group: Members Posts: 277 Joined: 28-August 21 From: Pittsburgh Pa Member No.: 25,860 Region Association: MidAtlantic Region 
|
OK, so let's continue with this problematic lower dented corner. After trying to hammer it back to match the shape of the fender, I realiazed I had cut to much material off of it and was left with too large of a gap. (IMG:style_emoticons/default/rolleyes.gif) (IMG:style_emoticons/default/headbang.gif) So, luckily among my various sheet metal parts, I had one from the yellow fender piece. So here it is now attached to the car and nicely matching the new fender.  And now with the fender nicely matching ready for the butt weld.  After many subtle little adjustments and on and off, I want to think the fit is pretty much ready for welding! (IMG:style_emoticons/default/smile.gif) The door gap is pretty uniform at 5.27mm near the top and 5.08 at the bottom held by a few vise grips. Let's hope it stays during welding...  More pictures of it simply held by a few clamps.    Next, prepping the surfaces and weld! (IMG:style_emoticons/default/smile.gif) (IMG:style_emoticons/default/beer3.gif) Nail That Eric , looks excellent |
| ChrisFoley |
 Apr 9 2023, 03:52 AM Apr 9 2023, 03:52 AM
Post
#109
|
|
I am Tangerine Racing      Group: Members Posts: 7,965 Joined: 29-January 03 From: Bolton, CT Member No.: 209 Region Association: None 
|
I like that!
|
| Montreal914 |
 Apr 21 2023, 07:13 PM Apr 21 2023, 07:13 PM
Post
#110
|
|
Senior Member    Group: Members Posts: 1,709 Joined: 8-August 10 From: Claremont, CA Member No.: 12,023 Region Association: Southern California 
|
Time to put the tub on the Jigster (Jeff Hail's TM (IMG:style_emoticons/default/smile.gif) ).
Working alone as usual, so one step at a time. Need to bring the car 25" up (from long lower edge). Using a small 2 ton jack and all sorts of methods... (IMG:style_emoticons/default/unsure.gif) , I slowly raised the car in steps constantly checking how stable it was... 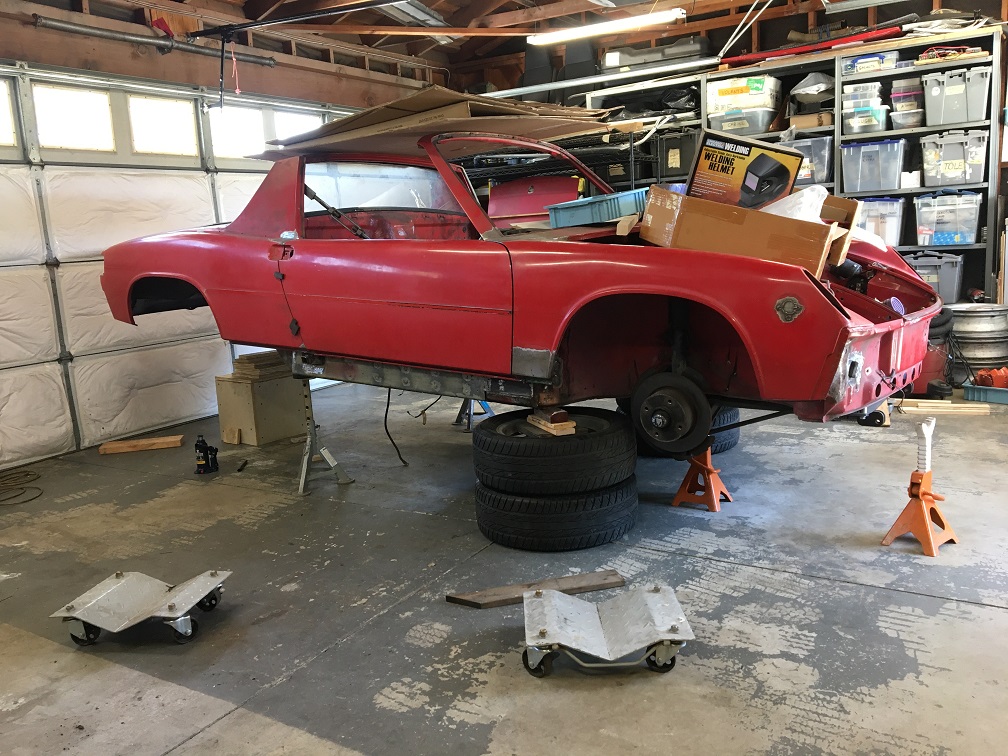 Once there, I wheeled the dolly delicately going around the jack stands. 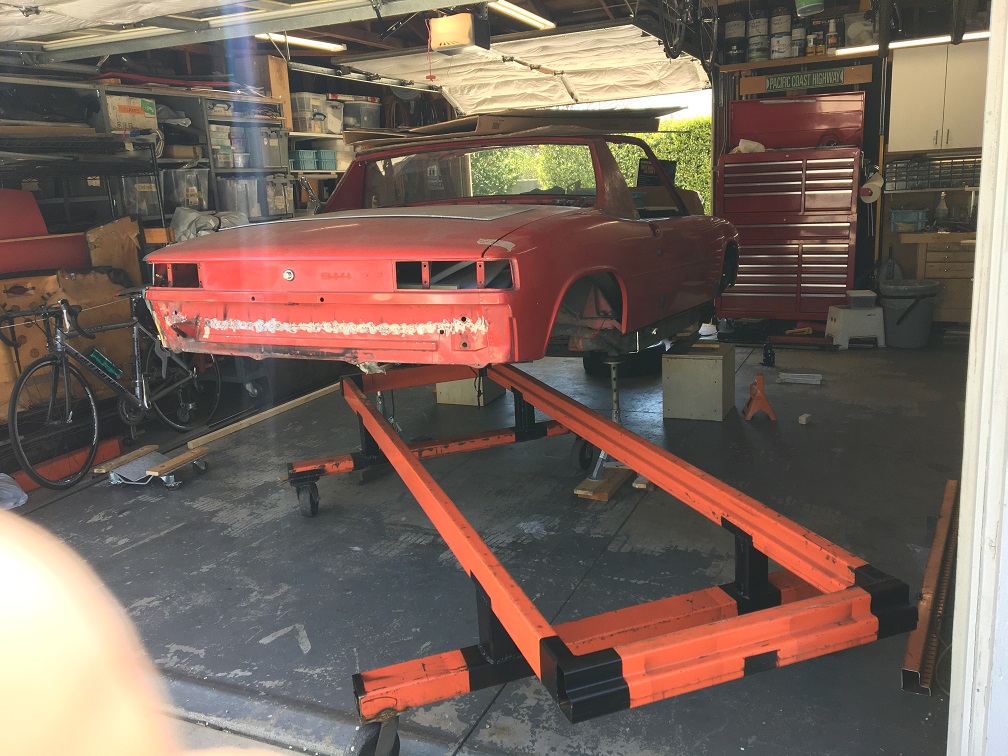 Sometimes you get lucky... The caster went by the rear driver side jack with about 1/16" clearance. (IMG:style_emoticons/default/sunglasses.gif) 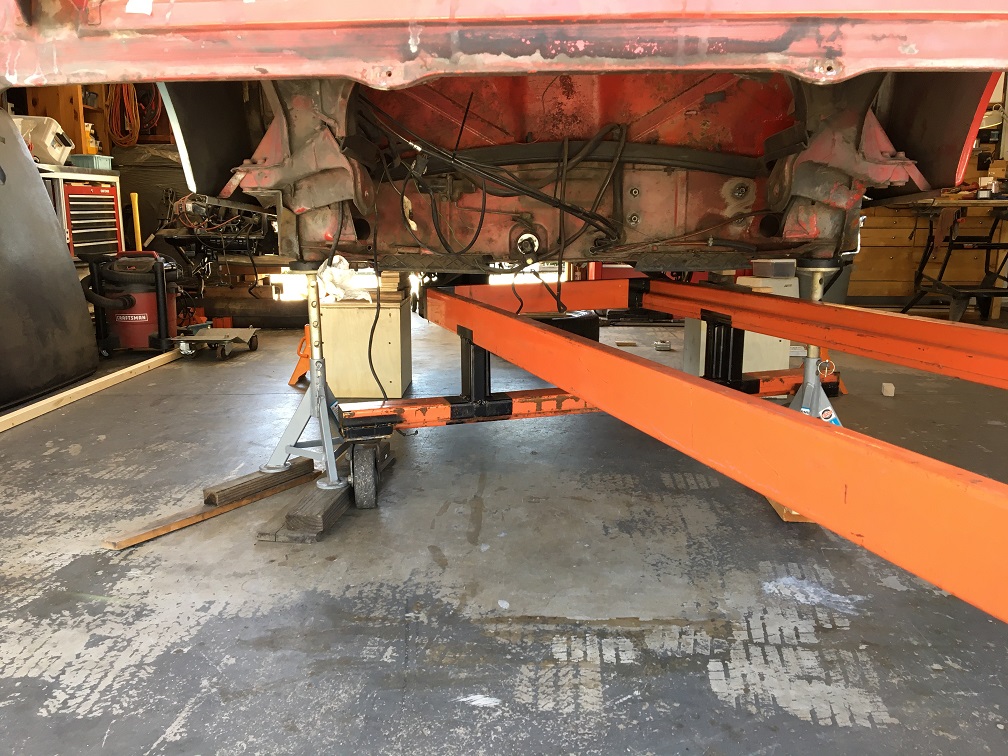 Almost there, just need a little more height in the front. (IMG:style_emoticons/default/smile.gif) 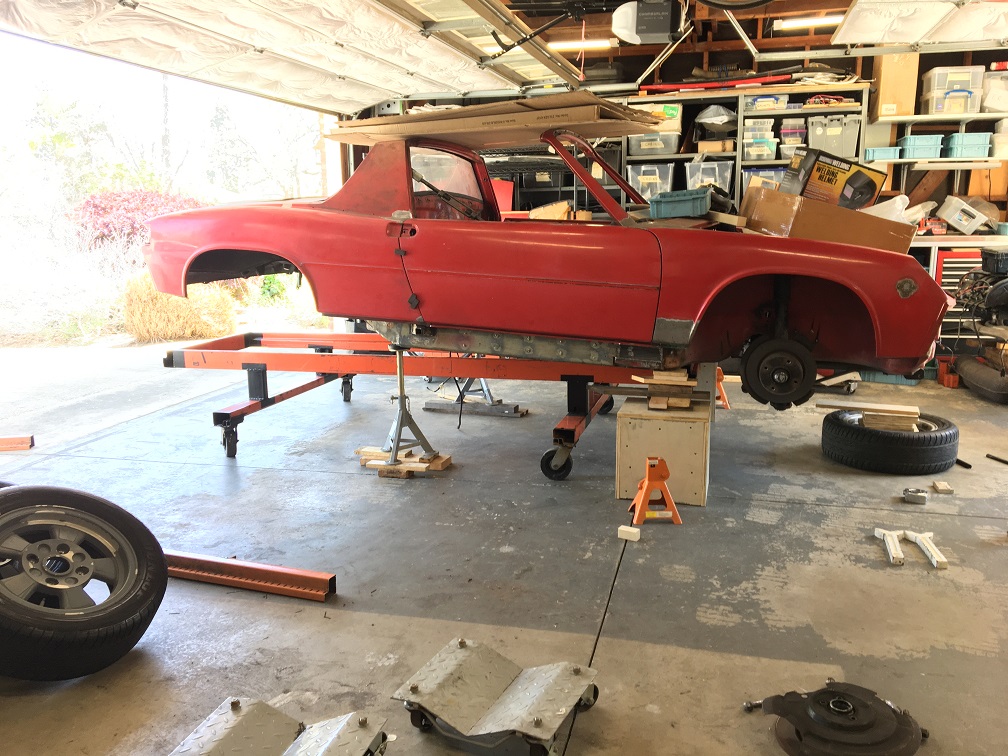 And finally, the tub is now resting on the Jigster and can almost too easily get moved around. 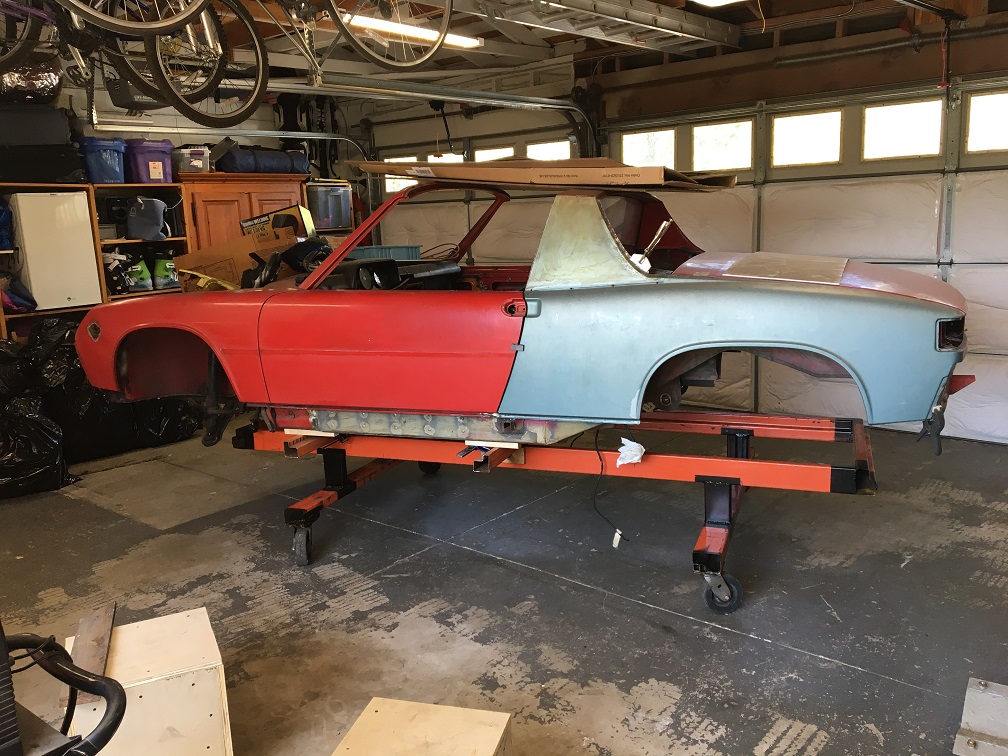 And at the end of the work day, it can be tucked in its corner, leaving the garage for the daily car. (IMG:style_emoticons/default/smile.gif) 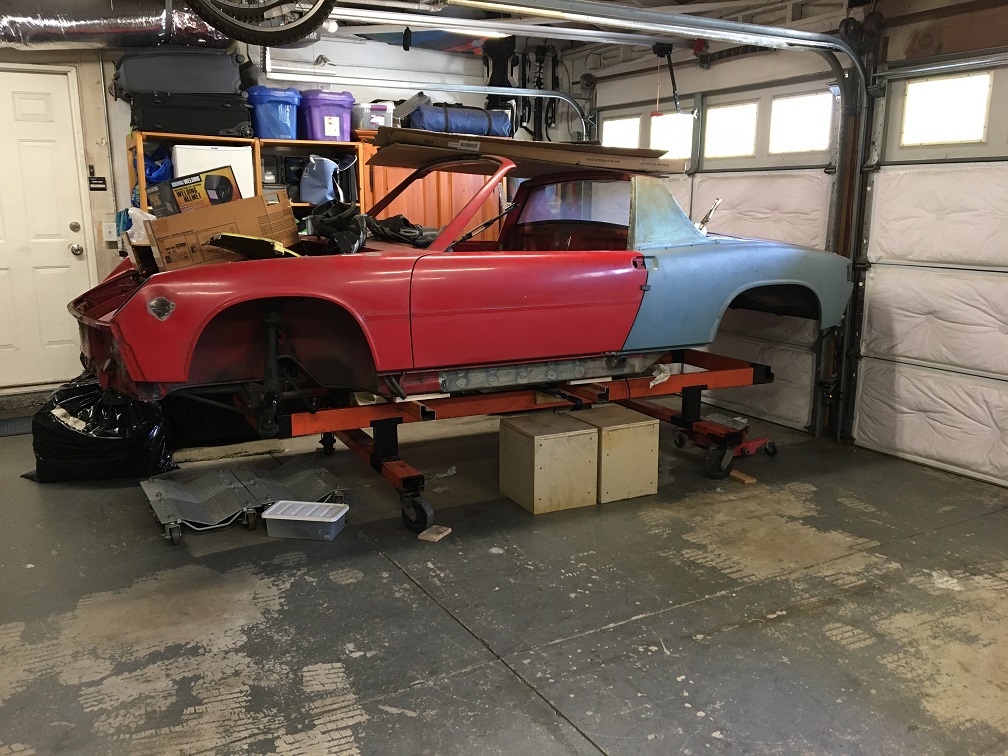 |
  |
3 User(s) are reading this topic (3 Guests and 0 Anonymous Users)
0 Members:

|
Lo-Fi Version | Time is now: 4th December 2024 - 08:45 PM |
Invision Power Board
v9.1.4 © 2024 IPS, Inc.


