|
|
|
Porsche, and the Porsche crest are registered trademarks of Dr. Ing. h.c. F. Porsche AG.
This site is not affiliated with Porsche in any way. Its only purpose is to provide an online forum for car enthusiasts. All other trademarks are property of their respective owners. |
|
|

  |

| 76-914 |
 Jan 26 2021, 11:10 PM Jan 26 2021, 11:10 PM
Post
#21
|
|
Repeat Offender & Resident Subaru Antagonist  Group: Members Posts: 13,698 Joined: 23-January 09 From: Temecula, CA Member No.: 9,964 Region Association: Southern California |
(IMG:style_emoticons/default/agree.gif) that is not a good thing!
|
   |

 
|
| Arno914 |
Jan 27 2021, 04:03 AM
Post
#22
|
|
Member Group: Members Posts: 233 Joined: 13-May 20 From: near Frankfurt, Germany Member No.: 24,260 Region Association: Germany |
I believe the small step in diameter on the original shafts is a result of cutting away and therefore smoothing the welds on an automatic lathe during production. The original rubber bushings are tight enough to compensate for those tolerances.
|
|
|
|
| bdstone914 |
Jan 27 2021, 06:36 AM
Post
#23
|
|
bdstone914 Group: Members Posts: 4,873 Joined: 8-November 03 From: Riverside CA Member No.: 1,319 |
QUOTE(Arno914 @ Jan 27 2021, 04:03 AM)  I believe the small step in diameter on the original shafts is a result of cutting away and therefore smoothing the welds on an automatic lathe during production. The original rubber bushings are tight enough to compensate for those tolerances. @arno914 I agree. Another argument as to why poly bushings are a poor material choice for trailing arm bushings. They will not contact the full surface of the original pivot shafts. |
|
|
|
| bbrock |
Feb 5 2021, 07:41 PM
Post
#24
|
|
914 Guru Group: Members Posts: 5,269 Joined: 17-February 17 From: Montana Member No.: 20,845 Region Association: Rocky Mountains |
Well, since it was clear the 914R bushings are not going to work for me, I decided to bite the bullet and buy a set of Elephant Racing bushings. You can buy just the bushings without tools or pivot shafts for $200 and they sell the two installation tools for $40 each. $280 for four little chunks of rubber still seems pretty steep, but that's $90 off the full kit price.
The ER bushings are significantly different from the 914R. Here is a Daystar poly/graphite on the left, 914Rubber OE replacement bushing in the middle, and ER on the right. 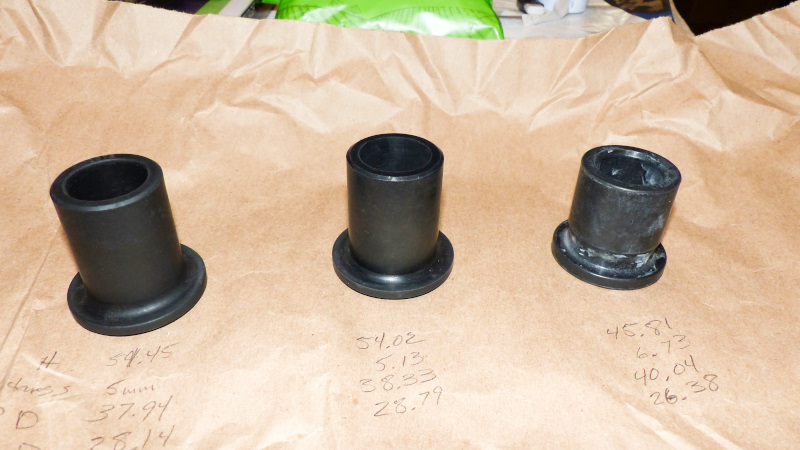 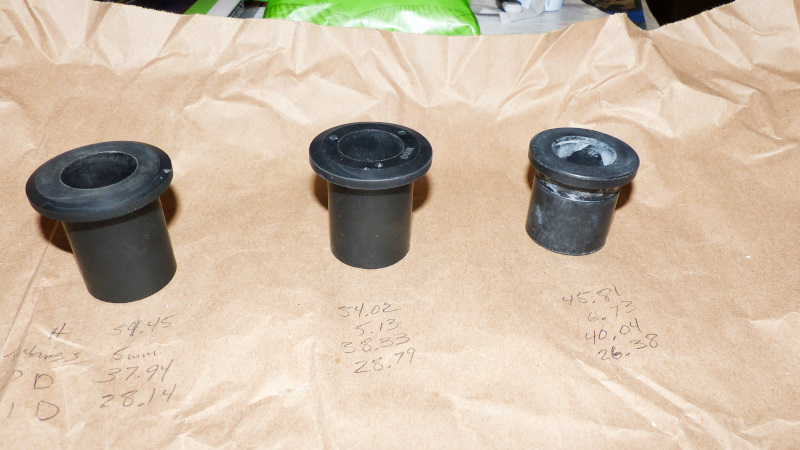 As expected, the poly/graphite is quite a bit harder than the others. I don't have a way to measure durometer but the old pinch test says it takes about the same force to compress the cylinders of the 914R and ER bushings. The 914R material might be a little harder than ER but the wall of the 914R bushing is thinner and that might make it appear harder. If there is a difference, it isn't easy to detect by pinching. Here is a side by side of 914R (left) and ER (right) where you can see a difference in wall thickness.  Another major difference is that the ER bushing is quite a bit shorter than the other two and has a recessed groove just below the outer flange. Here are some measurements of the three bushings in millimeters. Numbers are arranged Height, Wall Thickness, ID, OD Daystar 54.45, 5.0, 28.14, 37.94 914Rubber 54.02, 5.13, 28.79, 38.33 Elephant Racing 45.81, 6.73, 26.38, 40.04 Of course, the real test is how do the ER bushings fit. I installed a pair using a large pipe clamp and the instructions included. The bushings required liquid soap lube to push into the trailing arms. I did it by hand but it took considerable effort. That was a good sign. Cranking the shaft in with the pipe clamp wasn't the worst thing I've done, but it sure wore out my arm by the time it was done. It took some serious pressure to work it in and I sure wouldn't try doing both arms without a good break in between. The end result is that the shafts are in and they are TIGHT (IMG:style_emoticons/default/cheer.gif)  My honest opinion is that the 914R bushings need more development to fit the variances in trailing arm IDs out there. |
|
|
|
| Montreal914 |
Feb 5 2021, 11:05 PM
Post
#25
|
|
Senior Member Group: Members Posts: 1,809 Joined: 8-August 10 From: Claremont, CA Member No.: 12,023 Region Association: Southern California |
Thank you for sharing (IMG:style_emoticons/default/smilie_pokal.gif)
There is quite a difference in diameters (ID and OD) between the 3 candidates (IMG:style_emoticons/default/blink.gif) and a substantial increase in the interference fit for the Elephant Racing bushing! (IMG:style_emoticons/default/ohmy.gif) It will be interesting to compare the dimensions with @bdstone914 bushing's coming from Restoration Design EU. (IMG:style_emoticons/default/idea.gif) Can you share a picture of the tooling? |
|
|
|
| bbrock |
Feb 6 2021, 12:05 PM
Post
#26
|
|
914 Guru Group: Members Posts: 5,269 Joined: 17-February 17 From: Montana Member No.: 20,845 Region Association: Rocky Mountains |
QUOTE(Montreal914 @ Feb 5 2021, 10:05 PM) Can you share a picture of the tooling? Of course! Here are the two tools. Nicely made but honestly, I think they would work just as well if they were hard plastic like the 914Rubber A-arm bushing tools to reduce cost. 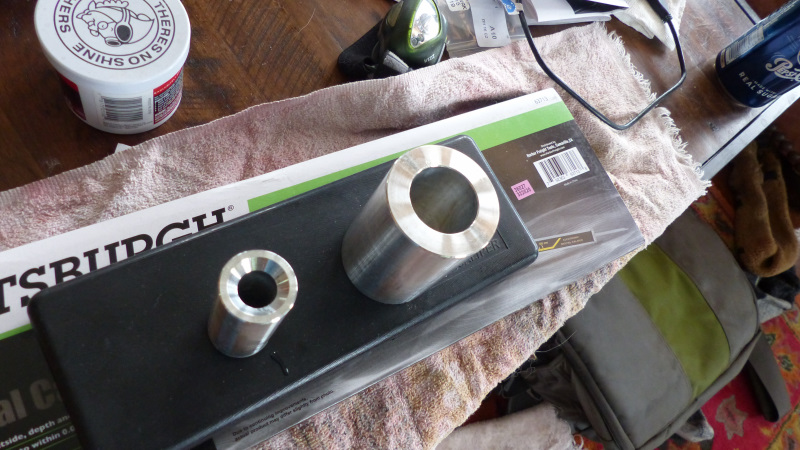 Here are a couple shots using a poly/graphite bushing to show how they work. The small tool gets pressed into one of the bushings and the pivot shaft is pressed in through the opposite bushing. When the shaft meets the bushing with the tool in it, the conical bevel centers the threaded portion of the shaft to align it to follow the tool through the bushing. The large tool acts as a stop to prevent pushing the bushing out of the trailing arm and is hollow to receive the small tool as it is pushed back out of the bushing by the pivot shaft. Works pretty slick. 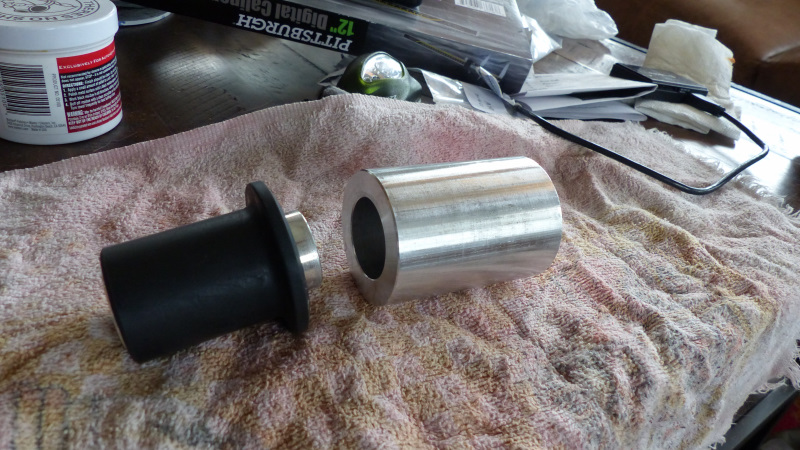 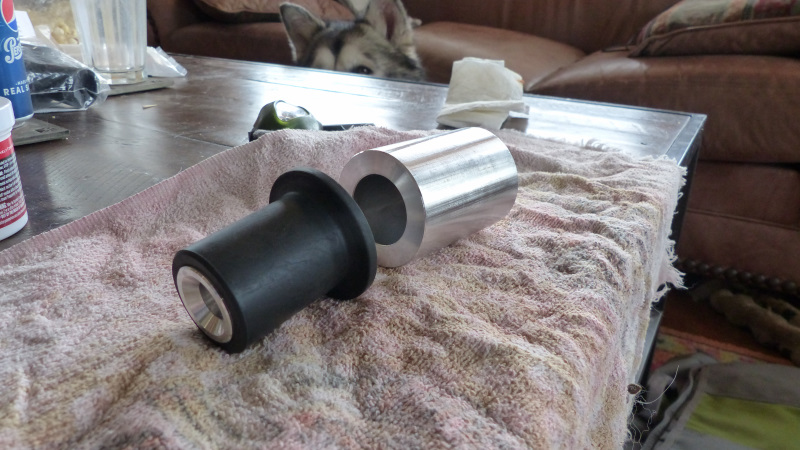 Here's a pic of them in action. 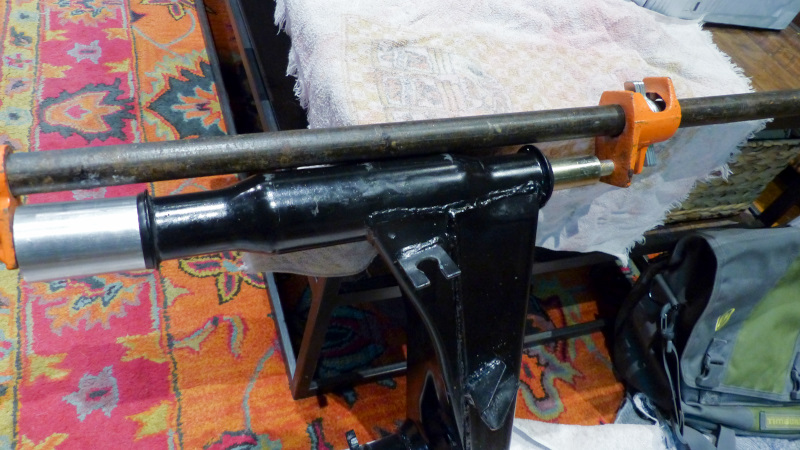 |
|
|
|
| Montreal914 |
Feb 6 2021, 12:37 PM
Post
#27
|
|
Senior Member Group: Members Posts: 1,809 Joined: 8-August 10 From: Claremont, CA Member No.: 12,023 Region Association: Southern California |
Very clear! (IMG:style_emoticons/default/smile.gif)
|
|
|
|
| Superhawk996 |
Feb 6 2021, 12:44 PM
Post
#28
|
|
914 Guru Group: Members Posts: 6,966 Joined: 25-August 18 From: Woods of N. Idaho Member No.: 22,428 Region Association: Galt's Gulch |
(IMG:style_emoticons/default/cheer.gif)
I've decided to go with 85 duro RD bushings vis Bruce . . It will be quite a while before I get around to using them but will be happy to post ID/OD when they become available. |
|
|
|
| 914_teener |
Feb 6 2021, 03:13 PM
Post
#29
|
|
914 Guru Group: Members Posts: 5,262 Joined: 31-August 08 From: So. Cal Member No.: 9,489 Region Association: Southern California |
QUOTE(bbrock @ Feb 5 2021, 05:41 PM) Well, since it was clear the 914R bushings are not going to work for me, I decided to bite the bullet and buy a set of Elephant Racing bushings. You can buy just the bushings without tools or pivot shafts for $200 and they sell the two installation tools for $40 each. $280 for four little chunks of rubber still seems pretty steep, but that's $90 off the full kit price. The ER bushings are significantly different from the 914R. Here is a Daystar poly/graphite on the left, 914Rubber OE replacement bushing in the middle, and ER on the right. As expected, the poly/graphite is quite a bit harder than the others. I don't have a way to measure durometer but the old pinch test says it takes about the same force to compress the cylinders of the 914R and ER bushings. The 914R material might be a little harder than ER but the wall of the 914R bushing is thinner and that might make it appear harder. If there is a difference, it isn't easy to detect by pinching. Here is a side by side of 914R (left) and ER (right) where you can see a difference in wall thickness. Another major difference is that the ER bushing is quite a bit shorter than the other two and has a recessed groove just below the outer flange. Here are some measurements of the three bushings in millimeters. Numbers are arranged Height, Wall Thickness, ID, OD Daystar 54.45, 5.0, 28.14, 37.94 914Rubber 54.02, 5.13, 28.79, 38.33 Elephant Racing 45.81, 6.73, 26.38, 40.04 Of course, the real test is how do the ER bushings fit. I installed a pair using a large pipe clamp and the instructions included. The bushings required liquid soap lube to push into the trailing arms. I did it by hand but it took considerable effort. That was a good sign. Cranking the shaft in with the pipe clamp wasn't the worst thing I've done, but it sure wore out my arm by the time it was done. It took some serious pressure to work it in and I sure wouldn't try doing both arms without a good break in between. The end result is that the shafts are in and they are TIGHT (IMG:style_emoticons/default/cheer.gif) My honest opinion is that the 914R bushings need more development to fit the variances in trailing arm IDs out there. The most important thing to remember about doing this is that the serrated portion on the end there is clear of the outside flange of the shaft which then is bolted to the suspension ear with the special nut. It is most important that the two surfaces are NOT in the same plane. Otherwise the nut can come loose because it will want to compress the flange of the bushing as shown in the first photo. The other thing about the poly bushings are that because of the material and the fit...they may squeak. To solve this you can drill a zerk fitting in the arm after the bushing is installed to just clear the inner surface. Use an angled zerk...unless you have an angled fitting on the the gun....ask me how I know. My .02 from experience. |
|
|
|
|
1 User(s) are reading this topic (1 Guests and 0 Anonymous Users)
0 Members:

|
Lo-Fi Version | Time is now: 20th April 2025 - 05:38 AM |
Invision Power Board
v9.1.4 © 2025 IPS, Inc.