|
|

|
Porsche, and the Porsche crest are registered trademarks of Dr. Ing. h.c. F. Porsche AG.
This site is not affiliated with Porsche in any way. Its only purpose is to provide an online forum for car enthusiasts. All other trademarks are property of their respective owners. |
|
|
  |
| rfinegan |
 Oct 5 2021, 02:07 PM Oct 5 2021, 02:07 PM
Post
#21
|
|
Senior Member    Group: Members Posts: 1,043 Joined: 8-February 13 From: NC Member No.: 15,499 Region Association: MidAtlantic Region 
|
|
| rfinegan |
 Oct 5 2021, 02:08 PM Oct 5 2021, 02:08 PM
Post
#22
|
|
Senior Member    Group: Members Posts: 1,043 Joined: 8-February 13 From: NC Member No.: 15,499 Region Association: MidAtlantic Region 
|
|
| rfinegan |
 Oct 5 2021, 02:10 PM Oct 5 2021, 02:10 PM
Post
#23
|
|
Senior Member    Group: Members Posts: 1,043 Joined: 8-February 13 From: NC Member No.: 15,499 Region Association: MidAtlantic Region 
|
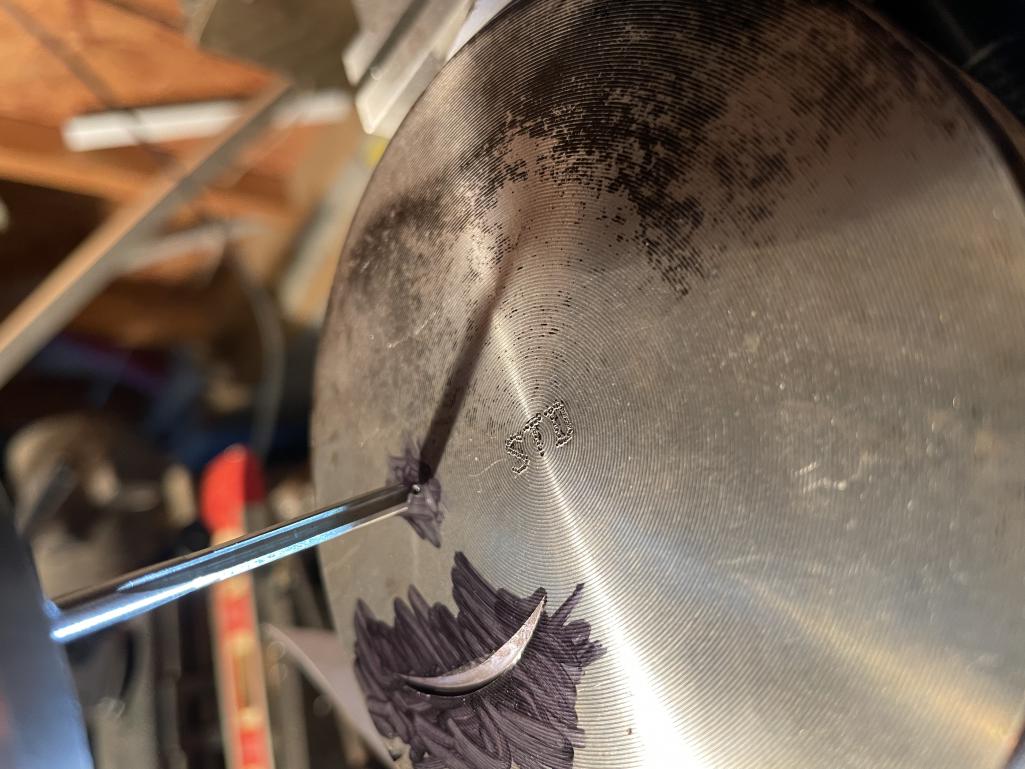
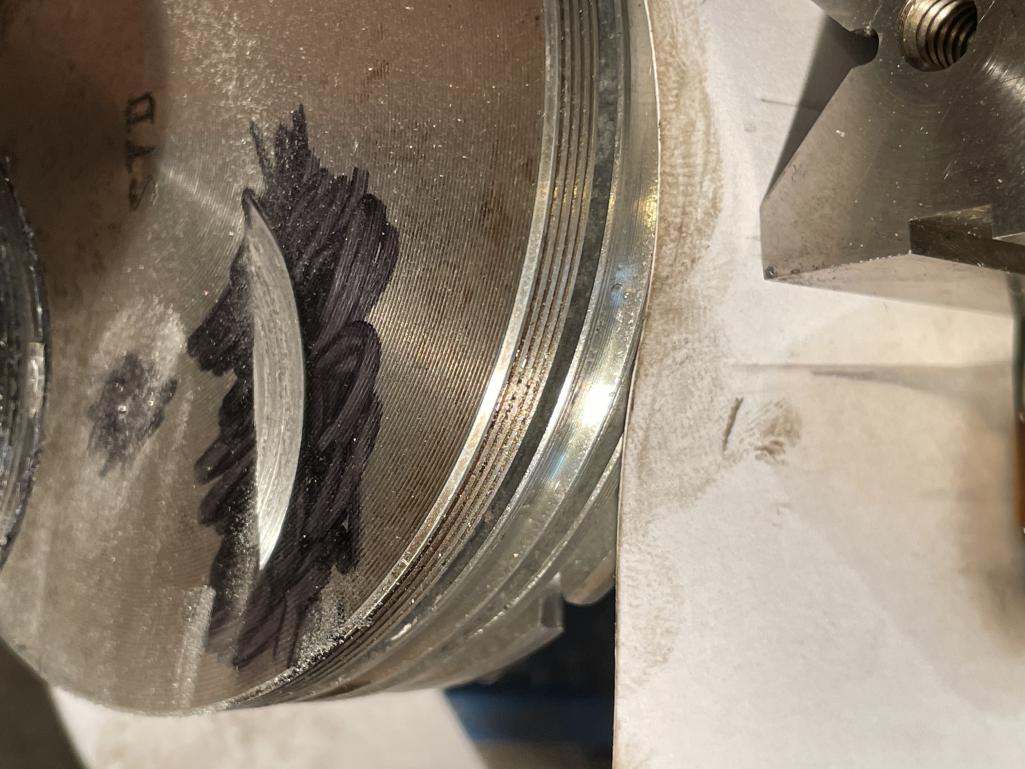
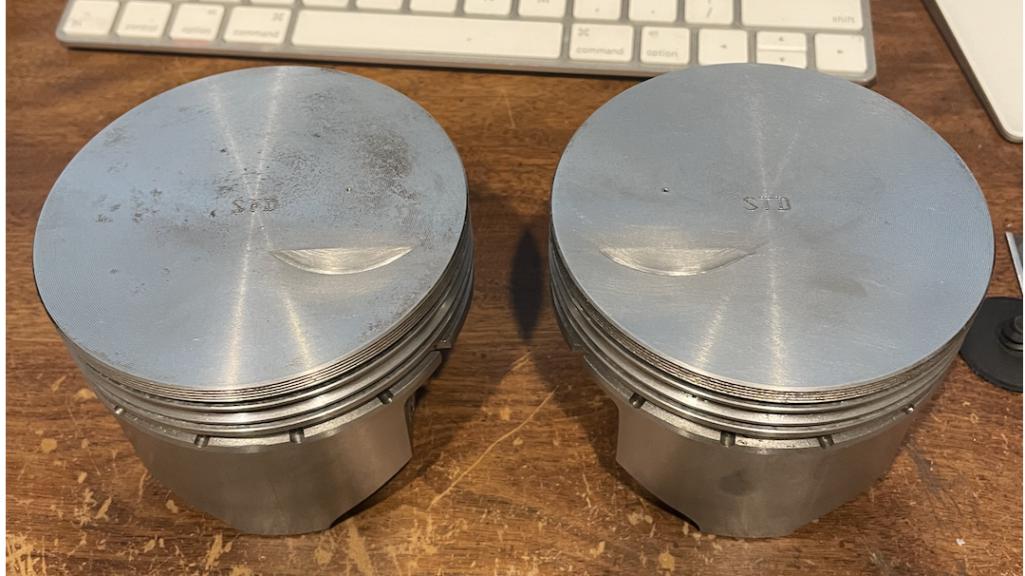
Now you too, have the information and skills to Valve notch your own pistons!
Only 3 more to go... |
| PatMc |
 Oct 5 2021, 05:10 PM Oct 5 2021, 05:10 PM
Post
#24
|
|
Member   Group: Members Posts: 120 Joined: 27-June 21 From: Long Beach Member No.: 25,669 Region Association: None 
|
|
| ChrisFoley |
 Oct 6 2021, 06:09 AM Oct 6 2021, 06:09 AM
Post
#25
|
|
I am Tangerine Racing      Group: Members Posts: 7,974 Joined: 29-January 03 From: Bolton, CT Member No.: 209 Region Association: None 
|
I made a fixture to hold pistons at the correct angle rather than reposition the quill.
While I generally wouldn't use abrasives like that on a milling machine, your process is certainly adequate to make small eyebrows. Looks good. Did you measure the intake clearance with playdoh on one of the unaffected pistons? I'm also curious if maybe the problem was initiated by valve guides that were too tight, and not an over-rev. |
| rfinegan |
 Oct 6 2021, 07:51 AM Oct 6 2021, 07:51 AM
Post
#26
|
|
Senior Member    Group: Members Posts: 1,043 Joined: 8-February 13 From: NC Member No.: 15,499 Region Association: MidAtlantic Region 
|
Final Clearance measured on # 1 cylinder . ( small smile fail) with dial indicator
Intake @ 10 degree first opening. 0.150 in min piston to valve clearance Exhaust 10 degree before closing. 0.118 in min piston to valve clearance I think that was correct ( I put tape on degree wheel as reference)THIS IS THE CLOSEST MEASUREMENT I also pulled the swivel feet and put regular adjusters in set to Zero lash. This was to ensure the feet were not binding and increasing the lift? I will ensure the clearance to the rocker when going back together after new valves and check that the geometry is correct too @ChrisFoley Next: I will measure the Clearances on # 2 cylinder ( this is a no fail Cylinder ) for a before and after comparing and notching BTB: 1) Both rear cylinders were Intake failures 2) Both intake failures shared the same come lobe 3) Both rear cylinders get hotter? # 3 gets the hottest 4) #3 intake had the most damage and severe Valve bend (Stuck valve) 5) #1 intake kissed but opens and closes (sticks some times ) perhaps a smaller bent valve |
| ChrisFoley |
 Oct 6 2021, 09:40 AM Oct 6 2021, 09:40 AM
Post
#27
|
|
I am Tangerine Racing      Group: Members Posts: 7,974 Joined: 29-January 03 From: Bolton, CT Member No.: 209 Region Association: None 
|
How much larger is the eyebrow radius than the valve head? It should be at least a couple mm.
|
| rfinegan |
 Oct 6 2021, 10:38 AM Oct 6 2021, 10:38 AM
Post
#28
|
|
Senior Member    Group: Members Posts: 1,043 Joined: 8-February 13 From: NC Member No.: 15,499 Region Association: MidAtlantic Region 
|
|
| rfinegan |
 Oct 6 2021, 02:25 PM Oct 6 2021, 02:25 PM
Post
#29
|
|
Senior Member    Group: Members Posts: 1,043 Joined: 8-February 13 From: NC Member No.: 15,499 Region Association: MidAtlantic Region 
|
I did a valve to piston check on Cylinder 2 both intake and exhaust...
Intake piston to valve has a min clearance of 0.100 in Exhaust piston to valve has a min clearance of 0.110 in I wish the numbers we a perfect match for each cylinder, but I am sure the valve geometry has something to do with the Max lift. or The Deck height Cylinder 1= 0.037 in Cylinder 2= 0.040 in The #2 intake of .100 + .050 notch relief=.150. this is the same or very close the the results above |
| 930cabman |
 Oct 6 2021, 05:23 PM Oct 6 2021, 05:23 PM
Post
#30
|
|
Advanced Member     Group: Members Posts: 3,816 Joined: 12-November 20 From: Buffalo Member No.: 24,877 Region Association: North East States 
|
Are your valve springs up to the task?
|
| rfinegan |
 Oct 6 2021, 08:16 PM Oct 6 2021, 08:16 PM
Post
#31
|
|
Senior Member    Group: Members Posts: 1,043 Joined: 8-February 13 From: NC Member No.: 15,499 Region Association: MidAtlantic Region 
|
|
| rfinegan |
 Oct 7 2021, 03:53 AM Oct 7 2021, 03:53 AM
Post
#32
|
|
Senior Member    Group: Members Posts: 1,043 Joined: 8-February 13 From: NC Member No.: 15,499 Region Association: MidAtlantic Region 
|
|
| rfinegan |
 Oct 7 2021, 04:56 AM Oct 7 2021, 04:56 AM
Post
#33
|
|
Senior Member    Group: Members Posts: 1,043 Joined: 8-February 13 From: NC Member No.: 15,499 Region Association: MidAtlantic Region 
|
|
| 930cabman |
 Oct 7 2021, 06:46 AM Oct 7 2021, 06:46 AM
Post
#34
|
|
Advanced Member     Group: Members Posts: 3,816 Joined: 12-November 20 From: Buffalo Member No.: 24,877 Region Association: North East States 
|
Thanks for reporting with this good information. Conclusion: .100/.110 is not enough clearance?
|
| rfinegan |
 Oct 7 2021, 07:19 AM Oct 7 2021, 07:19 AM
Post
#35
|
|
Senior Member    Group: Members Posts: 1,043 Joined: 8-February 13 From: NC Member No.: 15,499 Region Association: MidAtlantic Region 
|
@930cabman
Racer Chris comment in the past that 0.120 on intake and 0.080 on exhaust is desired. Other internet research said:There are some racers who go as low as 0.060 and others say the exhaust have to be lager clearance for thermal expansion. Who knows? I am still not sure of the root cause here. Other than the obvious , "Kiss" of the valves to piston. 1)Over Rev? Was running good before 3k rev to set timing (Occasional Spark knock) 2)Sticking Valve: Guide to tight 3)Previous over Rev: Slight kiss to bend valve and tighten valve guide. Causing sticking valve and collision with piston ( never hit rev limiter 6500)but engine has seen over 6k on strong pull 4) Oil temp never above 240*f. Stock gauge estimate 3/8" from red (350) mark when running hard Notching for the valve relief is EZ with engine apart. Other then a slight drop in compression and perhaps a little change in the Quench area it should have little negative impact. I do plan on re-balancing the Pistons when I am done... Should I also open the clearance for the Exhaust side too? With a smaller notch for the smaller exhaust valve? Lets see where this thread takes us... -Robert Thanks for reporting with this good information. Conclusion: .100/.110 is not enough clearance? |
| rfinegan |
 Oct 7 2021, 04:10 PM Oct 7 2021, 04:10 PM
Post
#36
|
|
Senior Member    Group: Members Posts: 1,043 Joined: 8-February 13 From: NC Member No.: 15,499 Region Association: MidAtlantic Region 
|
|
| maf914 |
 Oct 7 2021, 04:41 PM Oct 7 2021, 04:41 PM
Post
#37
|
|
Not a Guru!     Group: Members Posts: 3,049 Joined: 30-April 03 From: Central Florida Member No.: 632 Region Association: None 
|
rfinegan,
Thanks for posting your engine build and these latest piston valve notch details. While I understand what you are doing I have nowhere near the skill to do detail work like this, nor the equipment to do it. I really would like to see you put this thing back together and say that it is running great. One thing I was wondering is that when you do the valve notch do you then polish the piston top and valve notch to eliminate possible sharp edges that might cause hot spot pre-ignition? That just some stuff I remember from engine build magazine articles. (IMG:style_emoticons/default/laugh.gif) |
| rfinegan |
 Oct 7 2021, 05:04 PM Oct 7 2021, 05:04 PM
Post
#38
|
|
Senior Member    Group: Members Posts: 1,043 Joined: 8-February 13 From: NC Member No.: 15,499 Region Association: MidAtlantic Region 
|
@maf914
Thank you for the encouragement. There will be a Dyno day in my future! I hope it will be before the new year. As for the sharp edges and preignition and hot spots, you are correct. Same with the stress risers on sharp milled edges. They need to be radiuses too. I was referencing this a little as I used grinding/sanding and not a Cutter to make my notches. It is what had/could make . But it does make for softer edges. A bit harder to make things repeatable for volume depth and weight. But EZ to take a few 0.10 of a gram out for final balancing. For those wondering how to get the depth correct on an angle quill? MATH? I do not know either. No DRO (digital read out) here. So I got out my feeler gages. Or more correctly Wire Spark plug gages. I selected the 0.50 wire gage and lay it flat along the milled pocket at the deepest. I guest a straight edge razor blade across the piston top to feel for it to catch. I continued to cut till the razor no longer catches on the gage. Then some sanding sticks to clean up and radius. |
| rfinegan |
 Oct 8 2021, 11:42 AM Oct 8 2021, 11:42 AM
Post
#39
|
|
Senior Member    Group: Members Posts: 1,043 Joined: 8-February 13 From: NC Member No.: 15,499 Region Association: MidAtlantic Region 
|
FROM THE WEB:
According to WebCam the minimum clearance is .050 for the intake and .080 for the exhaust. Massive T4 says do not go below 0.080 Here is a video of cutting the Intake valve notch https://www.youtube.com/watch?v=E99SJnPKX4k |
| rfinegan |
 Oct 8 2021, 01:38 PM Oct 8 2021, 01:38 PM
Post
#40
|
|
Senior Member    Group: Members Posts: 1,043 Joined: 8-February 13 From: NC Member No.: 15,499 Region Association: MidAtlantic Region 
|
I am not convinced my clearances were an issue. But an ounce of preventions they say....
I did find my Deck height is the following: 1) =0.037 2) =0.040 3) =0.040 4) =0.037 Each valve notch is 0.050 and is indexed off the Center line of the valve guide Piston weight in at less than .5 gram of each other with piston pins installed Valve to piston clearance Was Intake 0.100 Exhaust = 0.110 Math calculation. Old + 0.050= Total clearance NOW: Intake = 0.150 Exhaust = 0.160 I will measure real clearances again once the heads are repaired... But for now.... Thank you to all that contributed and checked in on this thread (IMG:style_emoticons/default/beerchug.gif) Best Regards -Robert 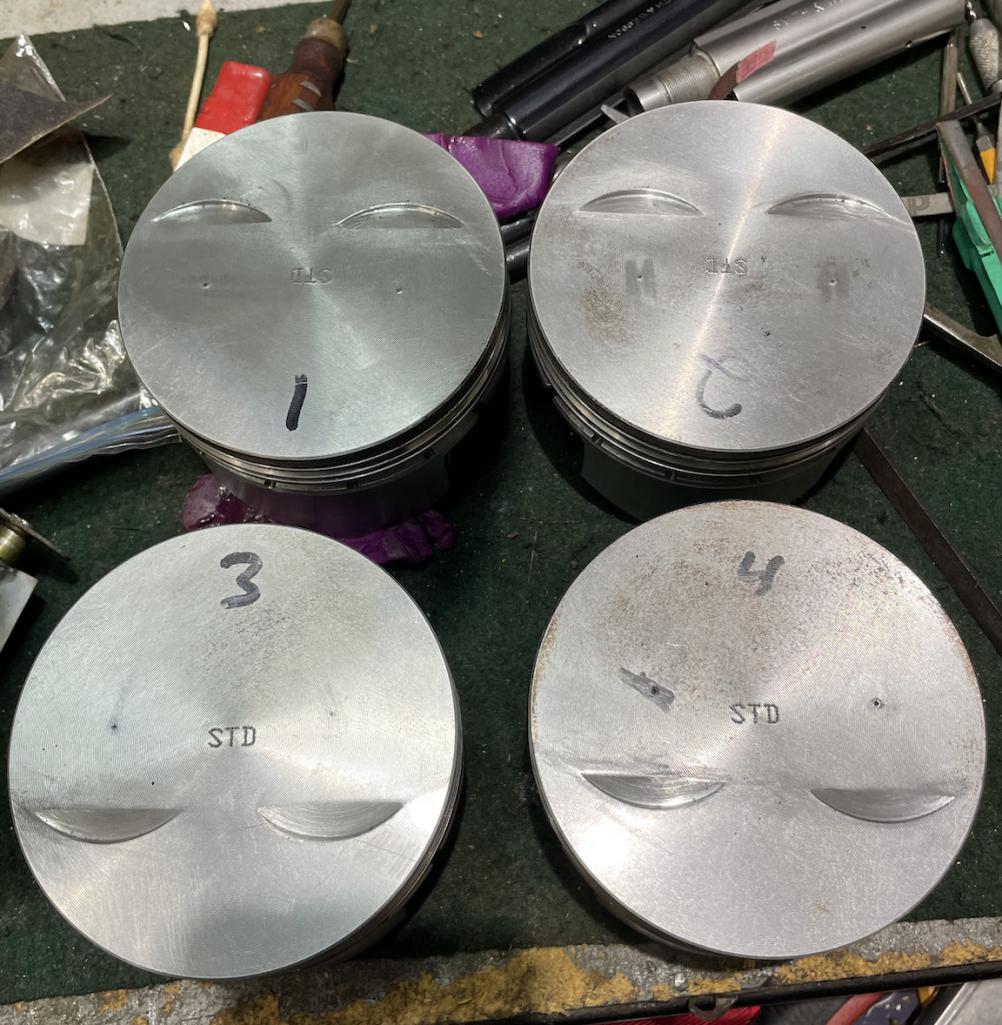 |
  |
1 User(s) are reading this topic (1 Guests and 0 Anonymous Users)
0 Members:

|
Lo-Fi Version | Time is now: 9th January 2025 - 08:57 AM |
Invision Power Board
v9.1.4 © 2025 IPS, Inc.


