|
|

|
Porsche, and the Porsche crest are registered trademarks of Dr. Ing. h.c. F. Porsche AG.
This site is not affiliated with Porsche in any way. Its only purpose is to provide an online forum for car enthusiasts. All other trademarks are property of their respective owners. |
|
|
  |
| Puebloswatcop |
 Jan 22 2023, 04:50 PM Jan 22 2023, 04:50 PM
Post
#901
|
|
Senior Member    Group: Members Posts: 1,431 Joined: 27-December 14 From: Mineola, Texas Member No.: 18,258 Region Association: Southwest Region |
After trimming the stud, the cover fit nicely. So I installed the wires, the cover and bolted it closed. I am pleased with the way it looks with the gun metal gray cover and pully.... I suggest you check the continuity between the red wire for the alternator and the body of the alternator. 914 alternators are notorious for shorting out the stud on the alternator rear cover. The factory used a very short stud and a thin nut to prevent this. Thanks for the tip Clay. I will do that. I also found that there is supposed to be a gasket between the cover and the alternator body, but of course itis no longer available, so I am going to get some gaske material and make my own, which will give a bit more space, although very minimal, I'm sure. There is also supposed to be a rubber boot over the stud. But most of them are long gone. And if the stud it too long it will tear the boot and still short out against the cover. The new harness did come with the rubber boot on it, so some insurance, but that was my concern that over time if the cover was rubbing on it it would wear through. |
| Puebloswatcop |
 Jan 25 2023, 04:01 PM Jan 25 2023, 04:01 PM
Post
#902
|
|
Senior Member    Group: Members Posts: 1,431 Joined: 27-December 14 From: Mineola, Texas Member No.: 18,258 Region Association: Southwest Region |
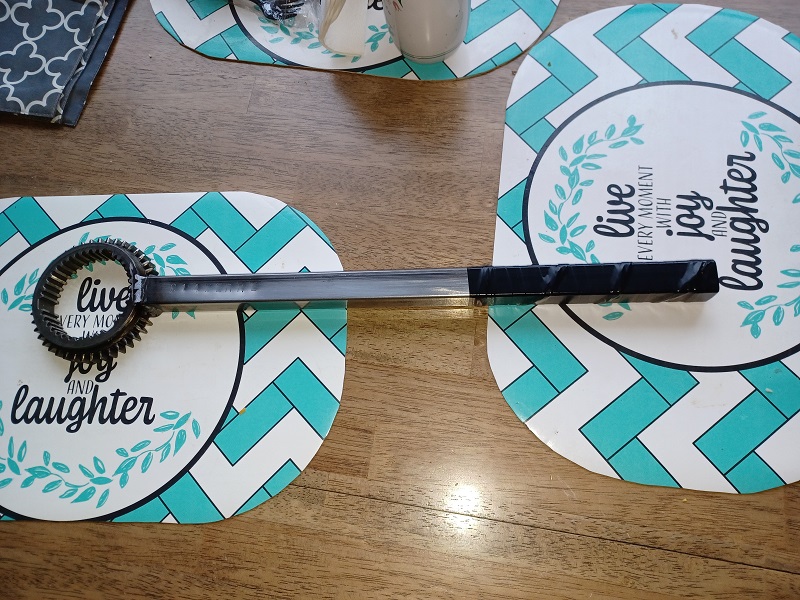
Well. the first of my transmission tools arrived today from 914 Werke, waiting on a couple more and then it will be transmission work time.......
 |
| Puebloswatcop |
 Feb 12 2023, 04:59 PM Feb 12 2023, 04:59 PM
Post
#903
|
|
Senior Member    Group: Members Posts: 1,431 Joined: 27-December 14 From: Mineola, Texas Member No.: 18,258 Region Association: Southwest Region |
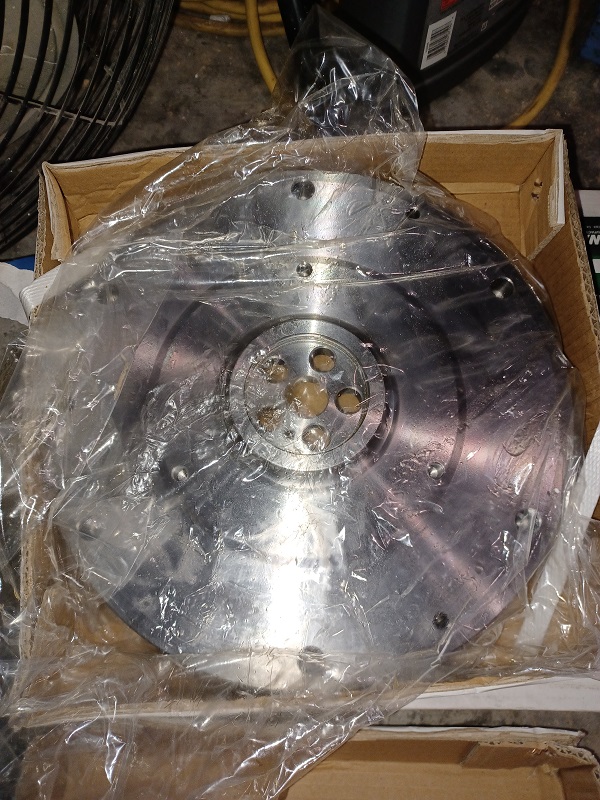
Well, finally after nearly 4 weeks of waiting, I received my flywheel from Jorge at European Auto. Not his fault it took so long, just still having supply issues.
 |
| Puebloswatcop |
 Feb 12 2023, 05:03 PM Feb 12 2023, 05:03 PM
Post
#904
|
|
Senior Member    Group: Members Posts: 1,431 Joined: 27-December 14 From: Mineola, Texas Member No.: 18,258 Region Association: Southwest Region |
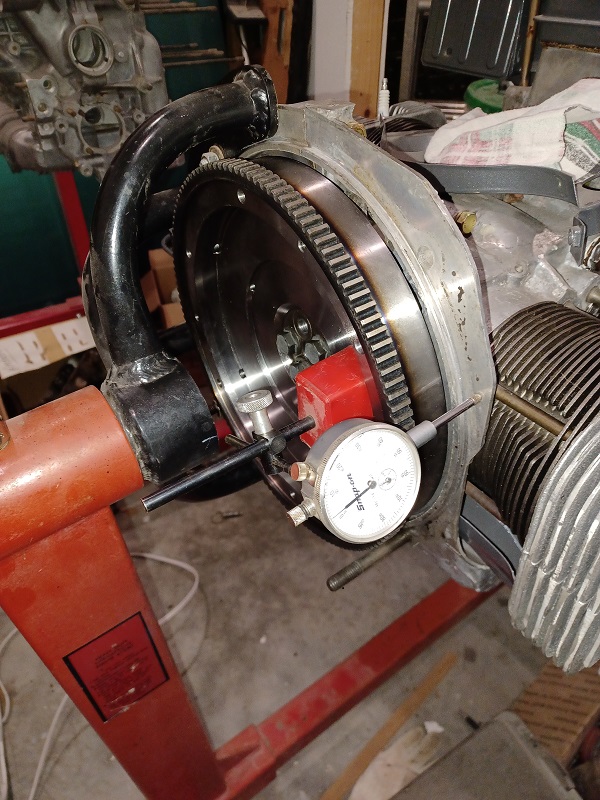
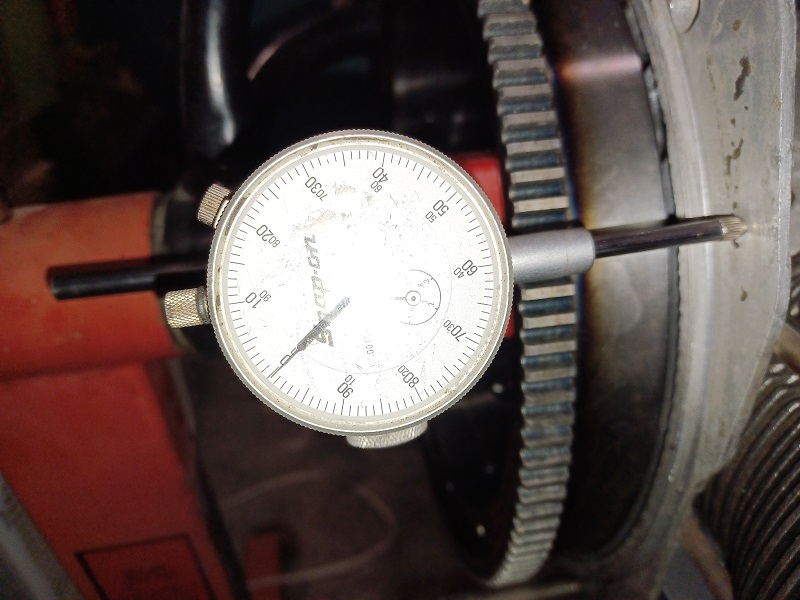
So I mounted the flywheel and set it up with a dial indicator. Then worked on zeroing the dial. Measured it several times, Making sure I zeroed it each time.
  |
| Puebloswatcop |
 Feb 12 2023, 05:16 PM Feb 12 2023, 05:16 PM
Post
#905
|
|
Senior Member    Group: Members Posts: 1,431 Joined: 27-December 14 From: Mineola, Texas Member No.: 18,258 Region Association: Southwest Region |
It was a pain converting all the numbers from inches to mm's but I was able to get that done....when I was done the average measurement was .9906 mm, which meant I needed to fill about .8906 mm, with shims. I used a combination until I got it to .0040 inches, which converted to .1016 mm.
In the photo I know it shows .035 inches, but I had the dial guage set up poorly, so re-did the setup. Tomorrow, I will remove the flywheel and put the rear seal, the pilot bearing, etc. before bolting it in for good. 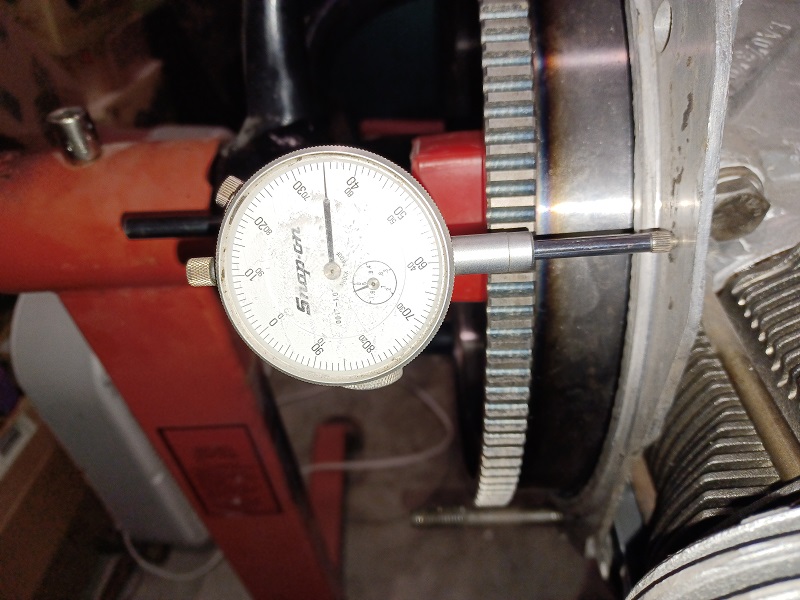 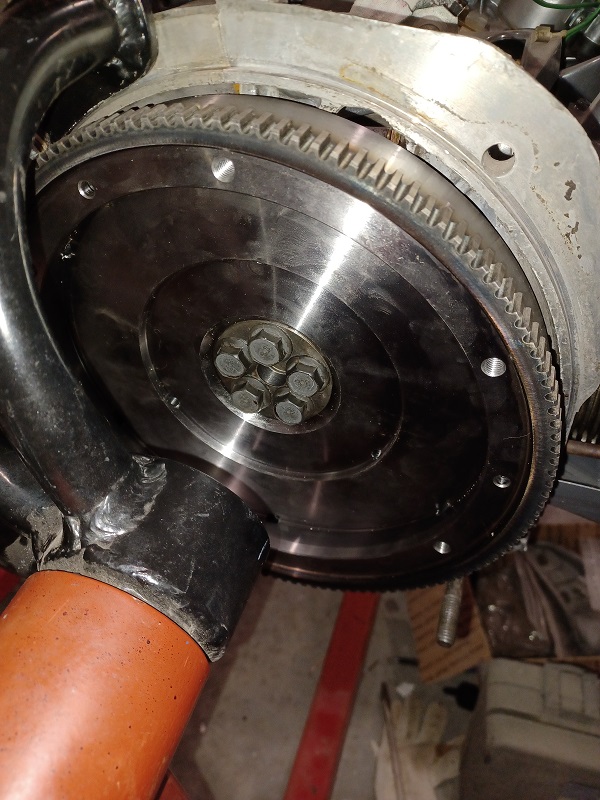 |
| Puebloswatcop |
 Feb 12 2023, 05:22 PM Feb 12 2023, 05:22 PM
Post
#906
|
|
Senior Member    Group: Members Posts: 1,431 Joined: 27-December 14 From: Mineola, Texas Member No.: 18,258 Region Association: Southwest Region |
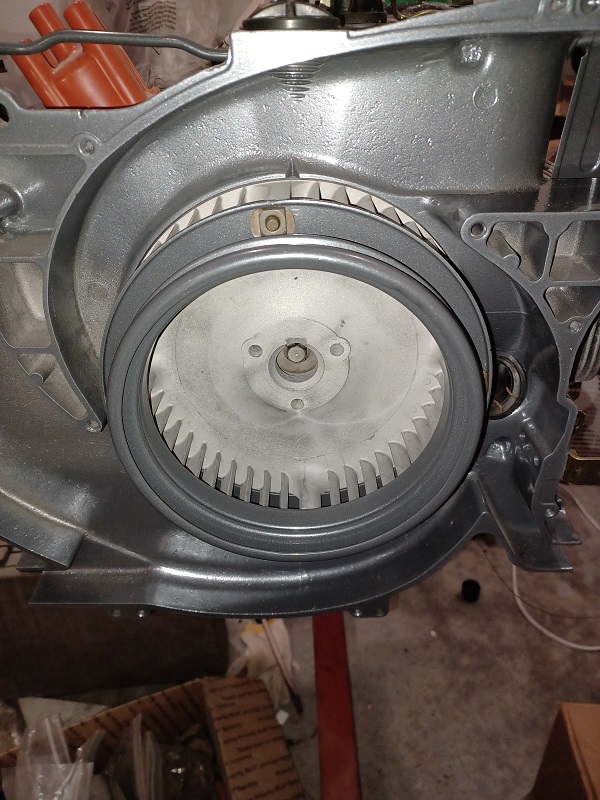
Meanwhile I wanted to get the cooling fan installed so it didn't get damaged sitting around the garage.
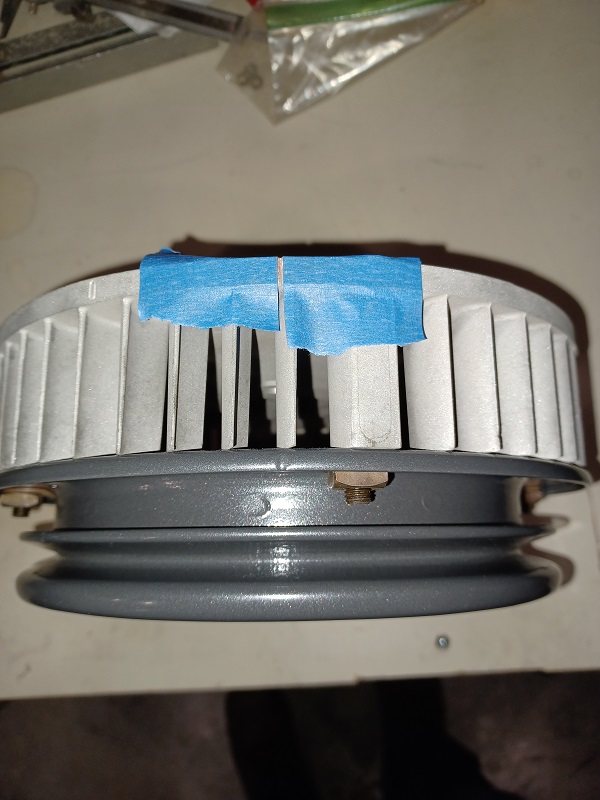
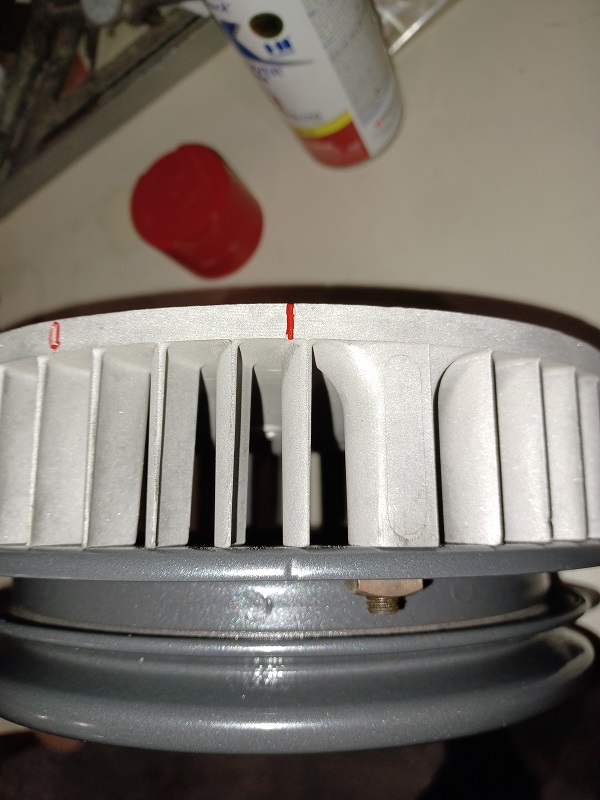
The first photo shows how bad it looked prior to disassembling it, blasting it, having the belt ring powder coated. Etc. Before disassembly I indexed the fan in orientation to the ring, with an index dot where the balance weight was installed in the belt ring. Since these came balanced from the factory, I believed this was the only way I could come back with as close to being balanced in the end. 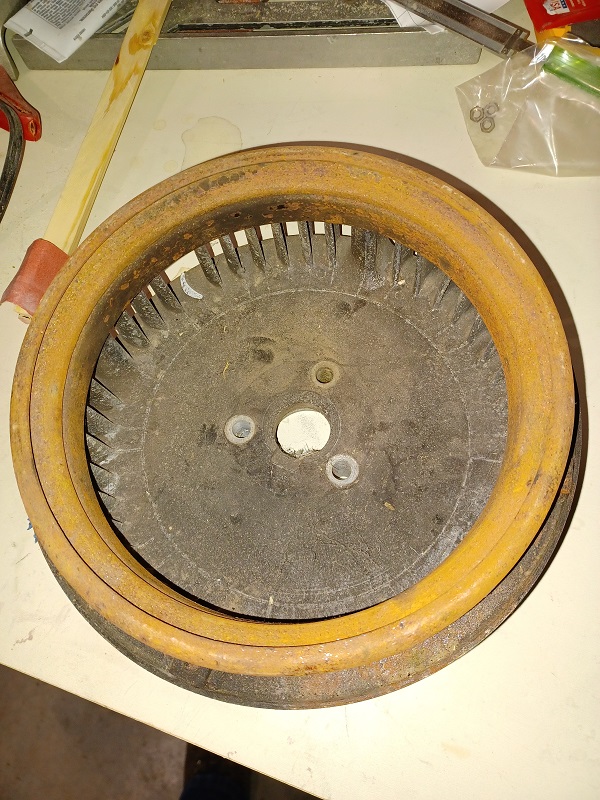 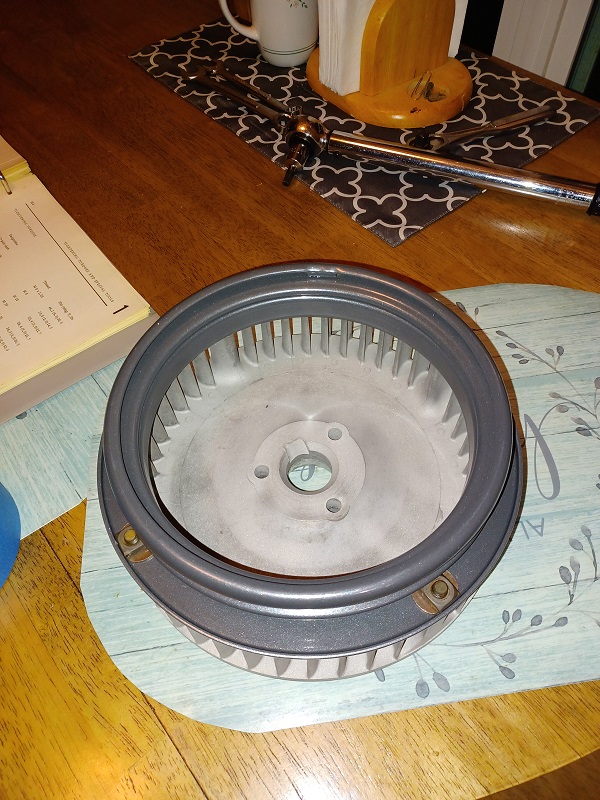 |
| Puebloswatcop |
 Feb 12 2023, 05:26 PM Feb 12 2023, 05:26 PM
Post
#907
|
|
Senior Member    Group: Members Posts: 1,431 Joined: 27-December 14 From: Mineola, Texas Member No.: 18,258 Region Association: Southwest Region |
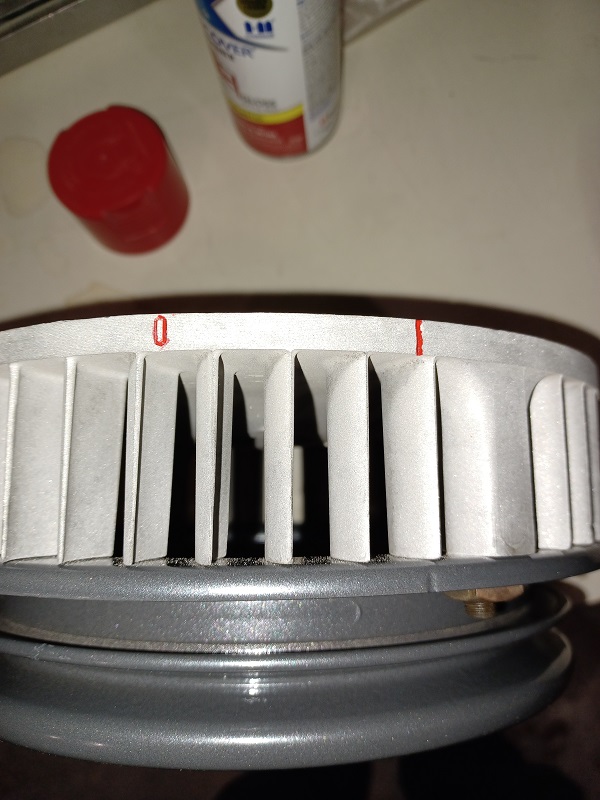
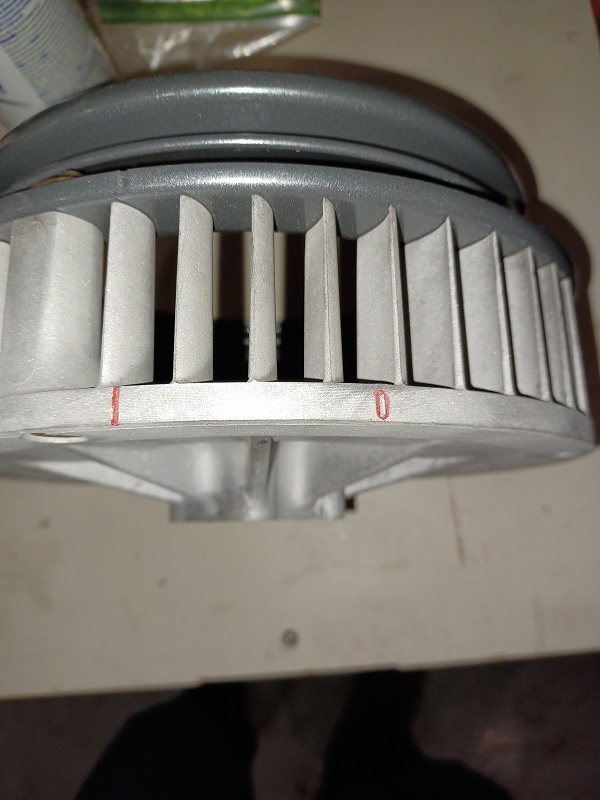
After re-assembling the fan, I used a tooth pick and red paint to highlight the timing marks on the fan.
  |
| Puebloswatcop |
 Feb 12 2023, 05:29 PM Feb 12 2023, 05:29 PM
Post
#908
|
|
Senior Member    Group: Members Posts: 1,431 Joined: 27-December 14 From: Mineola, Texas Member No.: 18,258 Region Association: Southwest Region |
As yo can see, a bit too much coffee made it difficult to keep the paint in the lines....lol, so I sanded the marks with 300 grit paper to sharpen it up a bit....
  |
| Puebloswatcop |
 Feb 12 2023, 05:34 PM Feb 12 2023, 05:34 PM
Post
#909
|
|
Senior Member    Group: Members Posts: 1,431 Joined: 27-December 14 From: Mineola, Texas Member No.: 18,258 Region Association: Southwest Region |
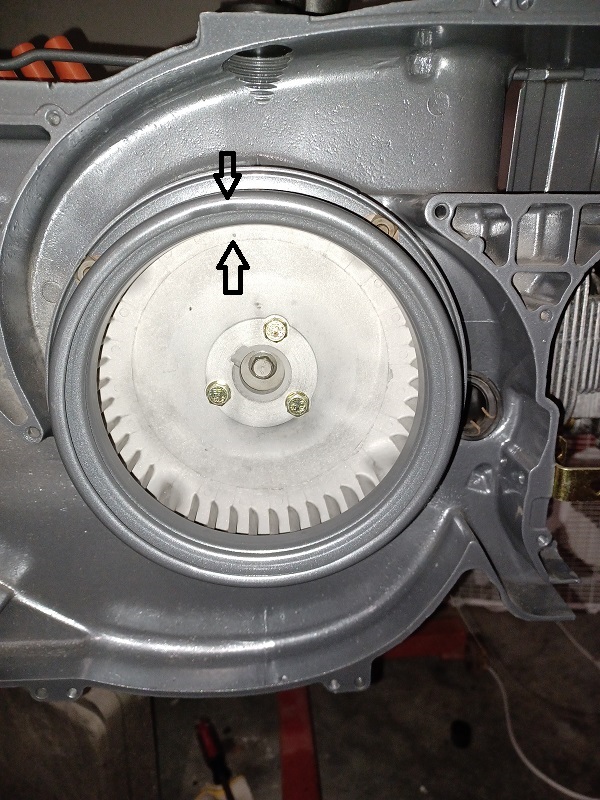
Then I installed the spacer, the fan and all new hardware. The two arrows show the location of the weight on the ring and the indentation I used to mark the fan so they could be re-assembled the way it was originally oriented.
  |
| bkrantz |
 Feb 12 2023, 08:30 PM Feb 12 2023, 08:30 PM
Post
#910
|
|
914 Guru      Group: Members Posts: 8,320 Joined: 3-August 19 From: SW Colorado Member No.: 23,343 Region Association: Rocky Mountains 
|
Progress!
|
| Puebloswatcop |
 Feb 20 2023, 06:57 PM Feb 20 2023, 06:57 PM
Post
#911
|
|
Senior Member    Group: Members Posts: 1,431 Joined: 27-December 14 From: Mineola, Texas Member No.: 18,258 Region Association: Southwest Region |
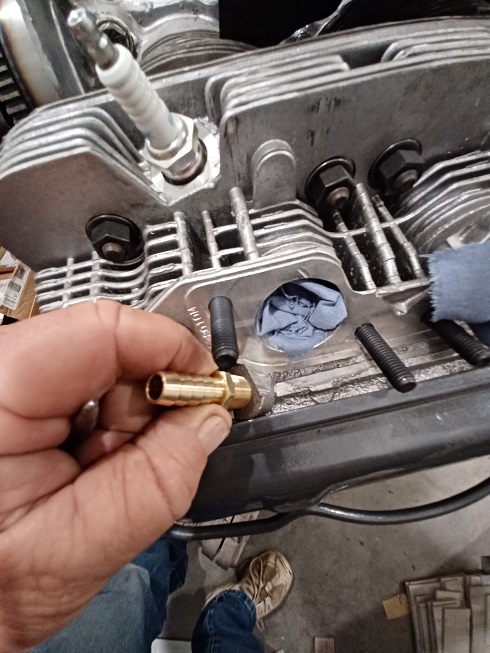
Well stupid me...I forgot to drill the breather holes into the heads before assembling the engine......so now I have to devise a way to do it without dumping metal shavings into the engine....
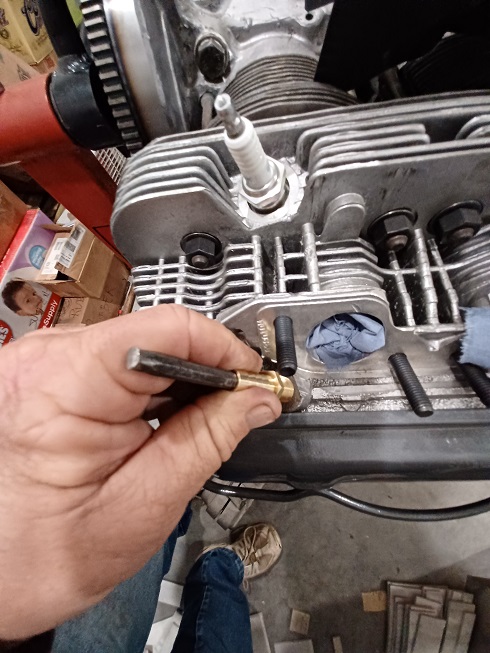
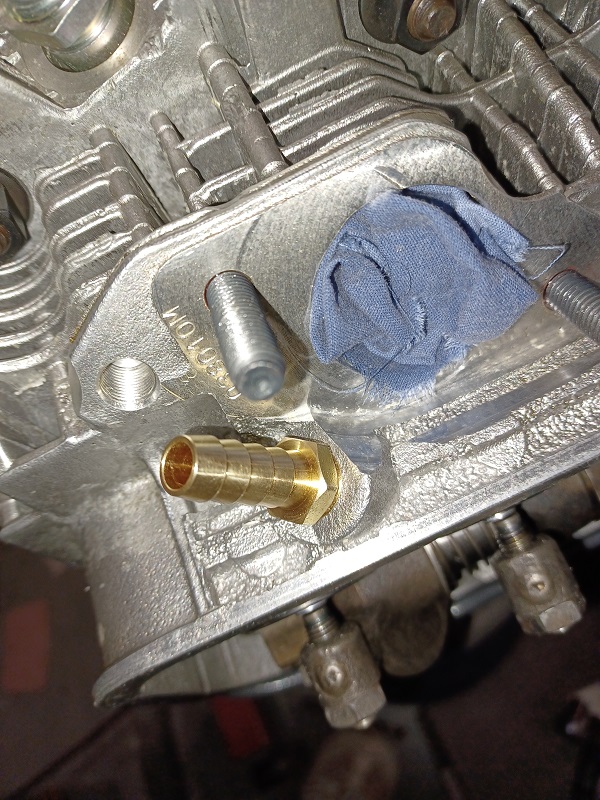
First I needed to mark the boss where the hole needed to be drilled. The fittings for the hoses are 1/4"NPT to barbed fittings..... 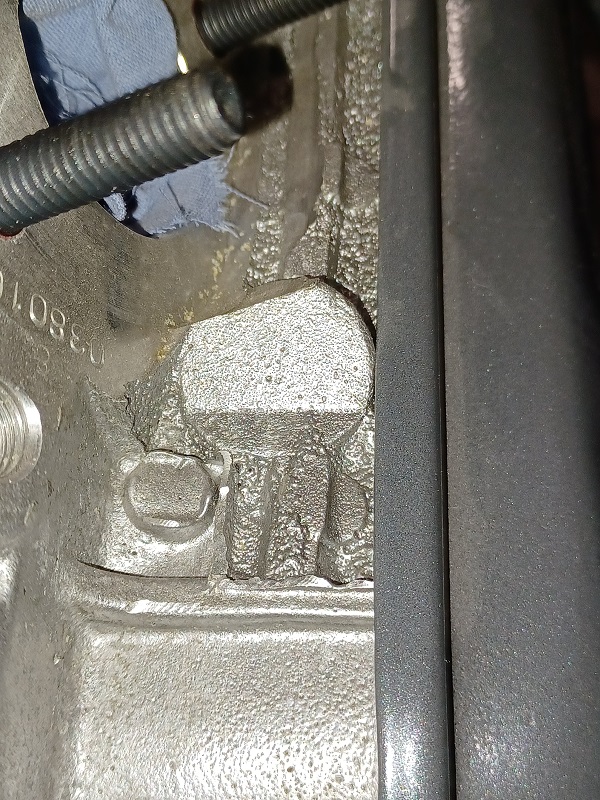 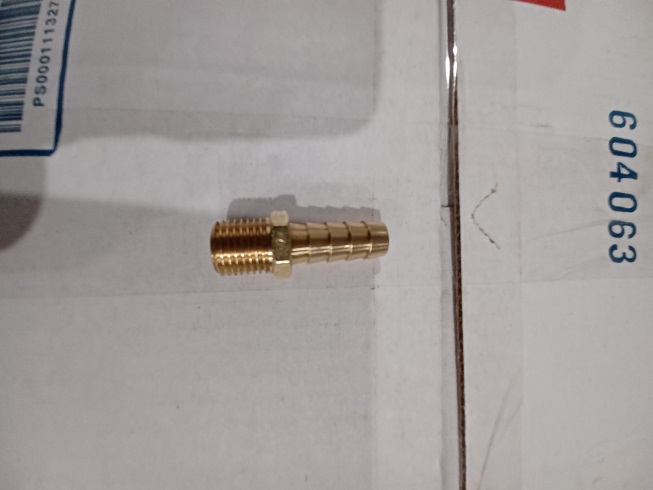 |
| Puebloswatcop |
 Feb 20 2023, 07:00 PM Feb 20 2023, 07:00 PM
Post
#912
|
|
Senior Member    Group: Members Posts: 1,431 Joined: 27-December 14 From: Mineola, Texas Member No.: 18,258 Region Association: Southwest Region |
After getting the alignment of where the fitting needed to go on the boss of the head, I found a punch that fit exactly into the fitting so it made centering the mark quite easy.
  |
| Puebloswatcop |
 Feb 20 2023, 07:10 PM Feb 20 2023, 07:10 PM
Post
#913
|
|
Senior Member    Group: Members Posts: 1,431 Joined: 27-December 14 From: Mineola, Texas Member No.: 18,258 Region Association: Southwest Region |
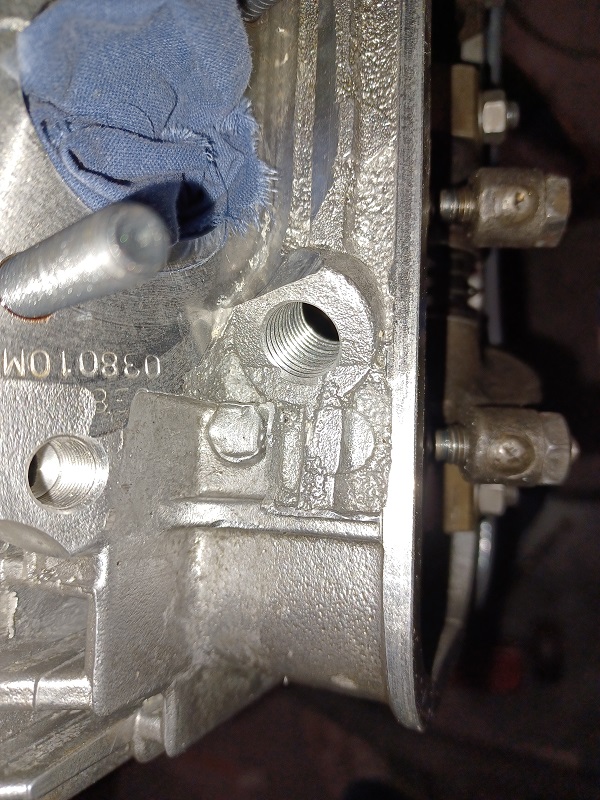
Then came the hard part, drilling the hole, without dumping all of the shavings into the heads and valve train. So after removing the valve covers, I stuffed rags down into the pushrod tubes, then covered the valve springs with a rag, kind of like a blanket. I started with a 1/8 drill bit and started my hole.
After getting it drilled into the head, I checked the alignment of the drill bit to the boss with a straight edge.....The 1/8 whole was a little out of alignment, but I was able to square it up with the next sized bit. Then I drilled it 1/16 th of an inch larger with each bit until I reached the required 7/16 inch hole. That way I could double check the alignment and vacuum the shavings and replace my blanket rag after each size up. Tedious, but worth the time in the end. 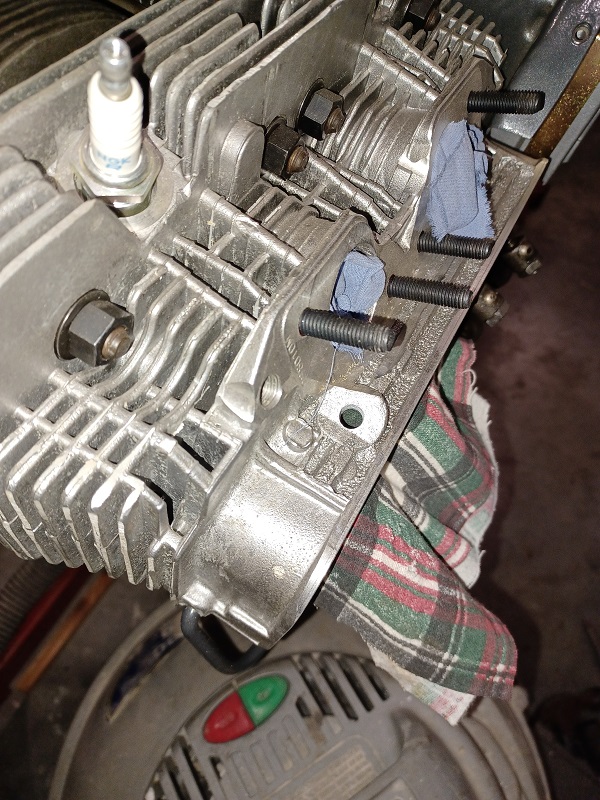 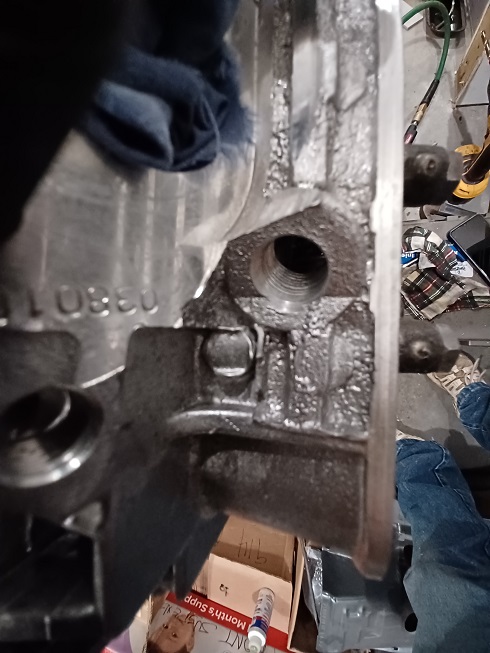 |
| Puebloswatcop |
 Feb 20 2023, 07:14 PM Feb 20 2023, 07:14 PM
Post
#914
|
|
Senior Member    Group: Members Posts: 1,431 Joined: 27-December 14 From: Mineola, Texas Member No.: 18,258 Region Association: Southwest Region |
Then using lots of machine lube and a 1/4 inch NPT Tap, I tapped out the hole, cleaning the hole, tap and changing out the blanket rag several times during the process. In the end, I have very little cleaning to do, but will remove the rocker assemblies and insure everything is cleaned out. The and result came out very nice.... so one down, one to go.
  |
| bkrantz |
 Feb 20 2023, 09:23 PM Feb 20 2023, 09:23 PM
Post
#915
|
|
914 Guru      Group: Members Posts: 8,320 Joined: 3-August 19 From: SW Colorado Member No.: 23,343 Region Association: Rocky Mountains 
|
Hmm, have you read all the pros and cons on venting the heads? After buying mine from Len Hoffman, he explained his position firmly: no vents.
|
| bob164 |
 Feb 21 2023, 02:44 AM Feb 21 2023, 02:44 AM
Post
#916
|
|
Member   Group: Members Posts: 98 Joined: 10-February 18 From: SoCal Member No.: 21,877 Region Association: Southern California 
|
Maybe an optical illusion but you may need to remove the hose fitting to install the intake manifolds.
|
| Puebloswatcop |
 Feb 21 2023, 07:01 PM Feb 21 2023, 07:01 PM
Post
#917
|
|
Senior Member    Group: Members Posts: 1,431 Joined: 27-December 14 From: Mineola, Texas Member No.: 18,258 Region Association: Southwest Region |
Hmm, have you read all the pros and cons on venting the heads? After buying mine from Len Hoffman, he explained his position firmly: no vents. So Bob, I guess my question is if you don't vent the heads, how do you vent bypass gasses so they don't build up in the engine case? Did, Len give you any insight? I can always plug the hole(s) since they are threaded. My concern is the pressure building in the engine case would lead to oil leakage...etc. |
| Puebloswatcop |
 Feb 21 2023, 07:02 PM Feb 21 2023, 07:02 PM
Post
#918
|
|
Senior Member    Group: Members Posts: 1,431 Joined: 27-December 14 From: Mineola, Texas Member No.: 18,258 Region Association: Southwest Region |
|
| ClayPerrine |
 Feb 21 2023, 08:25 PM Feb 21 2023, 08:25 PM
Post
#919
|
|
Life's been good to me so far.....                Group: Admin Posts: 16,224 Joined: 11-September 03 From: Hurst, TX. Member No.: 1,143 Region Association: NineFourteenerVille 
|
Hmm, have you read all the pros and cons on venting the heads? After buying mine from Len Hoffman, he explained his position firmly: no vents. So Bob, I guess my question is if you don't vent the heads, how do you vent bypass gasses so they don't build up in the engine case? Did, Len give you any insight? I can always plug the hole(s) since they are threaded. My concern is the pressure building in the engine case would lead to oil leakage...etc. Any 914 with L-Jet didn't have vents in the heads. The crankcase was vented to the intake hose, and that was on the downstream side of the air flow meter. Any blowby was pulled into the intake and burned. IIRC... the late 2.0 engines didn't have head vents either. |
| yeahmag |
 Feb 21 2023, 08:38 PM Feb 21 2023, 08:38 PM
Post
#920
|
|
Advanced Member     Group: Members Posts: 2,448 Joined: 18-April 05 From: Pasadena, CA Member No.: 3,946 Region Association: Southern California 
|
MIght consider asking around for another fan. That one appears to be missing a fin.
Meanwhile I wanted to get the cooling fan installed so it didn't get damaged sitting around the garage. The first photo shows how bad it looked prior to disassembling it, blasting it, having the belt ring powder coated. Etc. Before disassembly I indexed the fan in orientation to the ring, with an index dot where the balance weight was installed in the belt ring. Since these came balanced from the factory, I believed this was the only way I could come back with as close to being balanced in the end.   |
  |
2 User(s) are reading this topic (2 Guests and 0 Anonymous Users)
0 Members:

|
Lo-Fi Version | Time is now: 3rd April 2025 - 05:40 AM |
Invision Power Board
v9.1.4 © 2025 IPS, Inc.


