|
|
|
Porsche, and the Porsche crest are registered trademarks of Dr. Ing. h.c. F. Porsche AG.
This site is not affiliated with Porsche in any way. Its only purpose is to provide an online forum for car enthusiasts. All other trademarks are property of their respective owners. |
|
|

  |

| Tom1394racing |
 Aug 2 2024, 11:40 AM Aug 2 2024, 11:40 AM
Post
#401
|
|
Member  Group: Members Posts: 439 Joined: 25-August 07 From: CT Member No.: 8,039 Region Association: North East States |
QUOTE(Cairo94507 @ Aug 2 2024, 10:59 AM)  Hi Tom, @Tom1394racing My high torque started is installed with he terminals on top like you have. It fits and the terminals can be accessed. (IMG:style_emoticons/default/beerchug.gif) Thanks I appreciate how you guys keep me out of trouble. |
   |

 
|
| BillJ |
Aug 2 2024, 11:49 AM
Post
#402
|
|
Senior Member Group: Members Posts: 1,273 Joined: 4-March 13 From: charlotte, NC Member No.: 15,610 Region Association: None |
QUOTE(rgalla9146 @ Jul 26 2024, 05:34 PM) Hey Tom Your project is coming along beautifully. See pics of my lower ignition wire routing. The grommits are 993 or 996 OEM I'm away at the moment so can't provide the part # Also, I used full size lower spark plugs and found the only plug wrench that would work was the one included in '69-'73 OEM tool kits. I also used 12 point cyl. head nuts for additional clearance. The lower valve covers are milleded 996 items with the rubber perimeter seals. Have you considered adding the spark plug retainers on the bottom plugs? I use them on my car and consider them cheap insurance and peace of mind. Attached thumbnail(s) 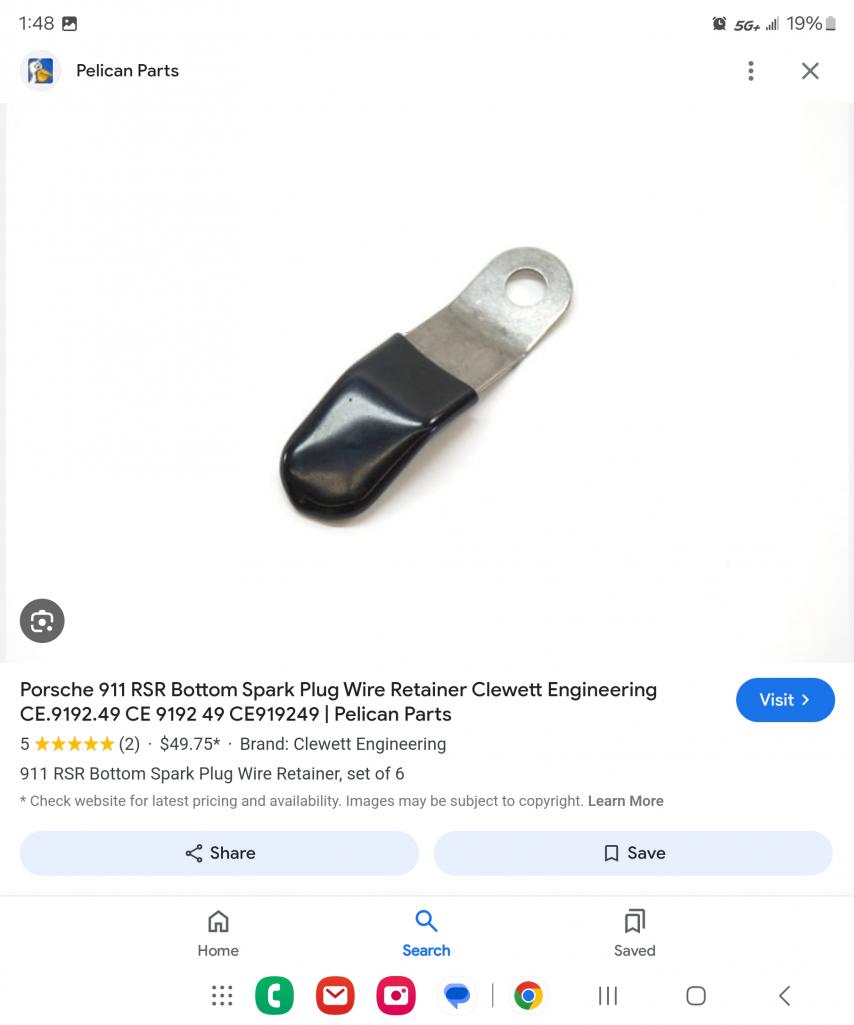
|
|
|
|
| Tom1394racing |
Aug 3 2024, 08:23 AM
Post
#403
|
|
Member Group: Members Posts: 439 Joined: 25-August 07 From: CT Member No.: 8,039 Region Association: North East States |
QUOTE(BillJ @ Aug 2 2024, 01:49 PM) QUOTE(rgalla9146 @ Jul 26 2024, 05:34 PM) Hey Tom Your project is coming along beautifully. See pics of my lower ignition wire routing. The grommits are 993 or 996 OEM I'm away at the moment so can't provide the part # Also, I used full size lower spark plugs and found the only plug wrench that would work was the one included in '69-'73 OEM tool kits. I also used 12 point cyl. head nuts for additional clearance. The lower valve covers are milleded 996 items with the rubber perimeter seals. Have you considered adding the spark plug retainers on the bottom plugs? I use them on my car and consider them cheap insurance and peace of mind. Thanks Bill....I have a set ready to go. |
|
|
|
| Tom1394racing |
Aug 15 2024, 07:15 AM
Post
#404
|
|
Member Group: Members Posts: 439 Joined: 25-August 07 From: CT Member No.: 8,039 Region Association: North East States |
Last finishing touches on the engine build.
I installed the twin plug wire set from Patrick Motorsports. I had planned to build my own set, but I found that I did not have any good Beru plug connectors remaining in my stash. The price on the Patrick set was considerably less that if I had purchased new connectors and bulk wire. I tried to follow the wire management for the plug wires and engine harness used on the factory GT motors as close as possible. I also installed the new PMO 46 card kit and linkages and filled the gearbox with Swepco 201. I plan to install the external Mocal T-stat, the MSD CD boxes, coils and fuel lines to the carbs before doing the engine install. I also need to install the fuel tank and fuel pumps up front before the engine goes in. I'll have to sort out all the electrical connections between the engine, the chassis harness and the MSD system before the engine install. I expect this will require some modifications to the engine and chassis harness connections as well as the creation of some new wiring harness. Anyone who has already been down this path is welcome to make some suggestions to point me in the right direction. 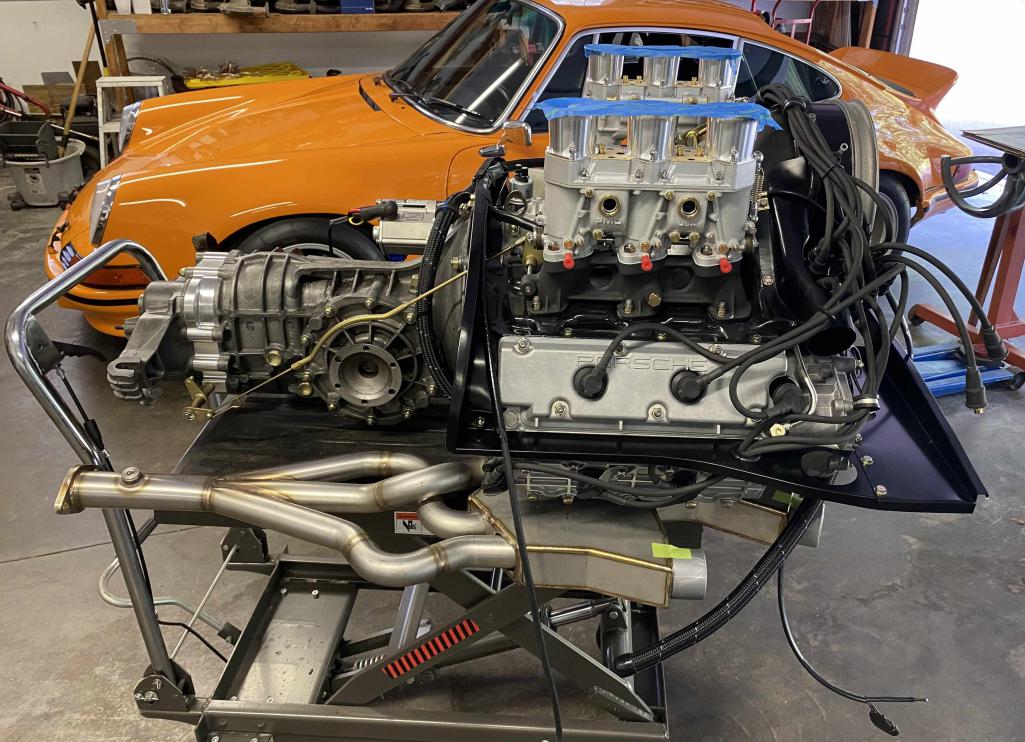 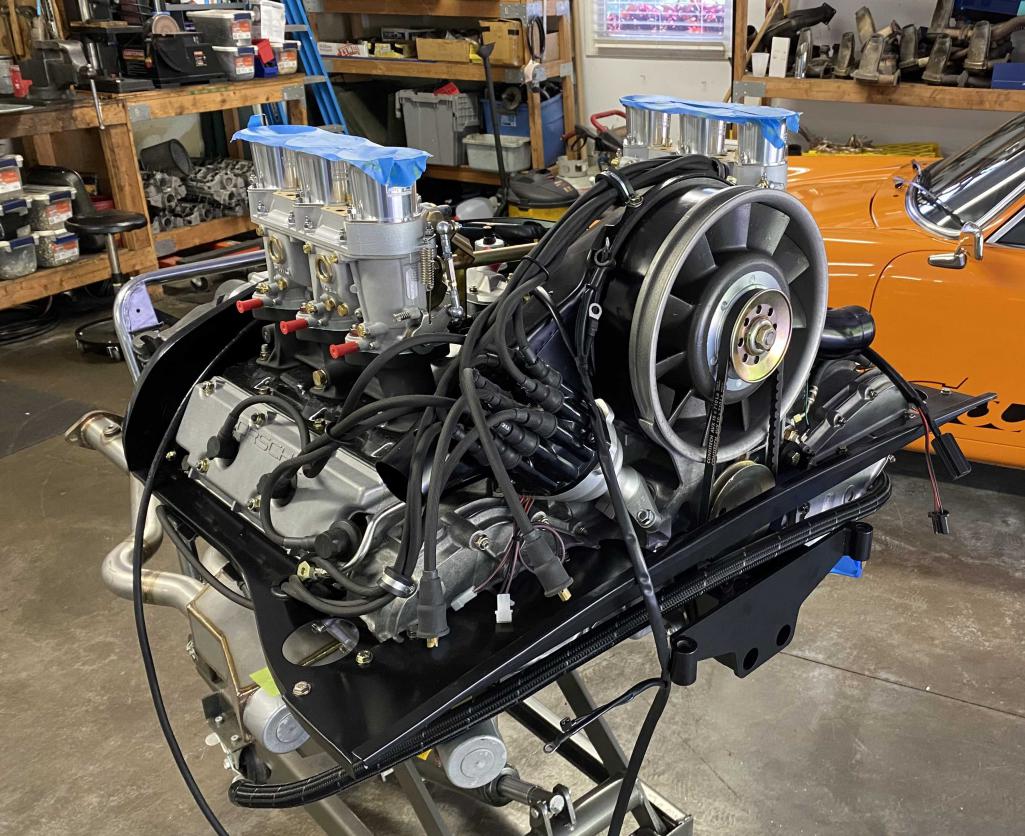 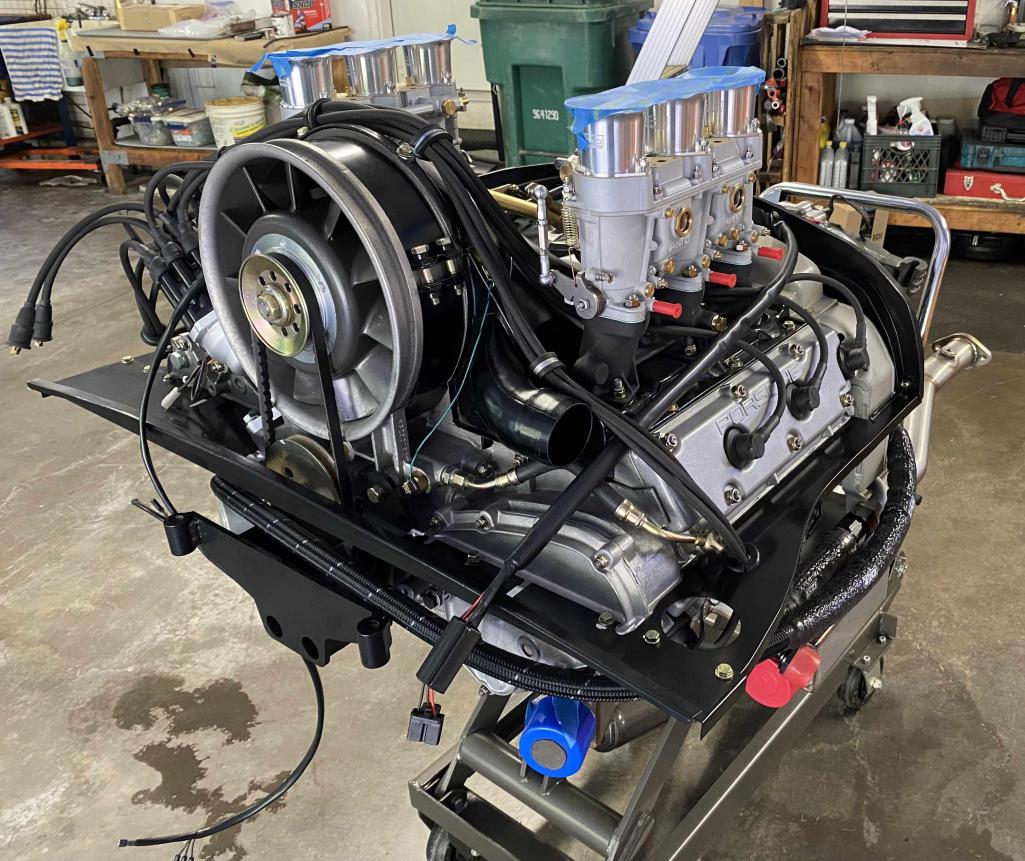 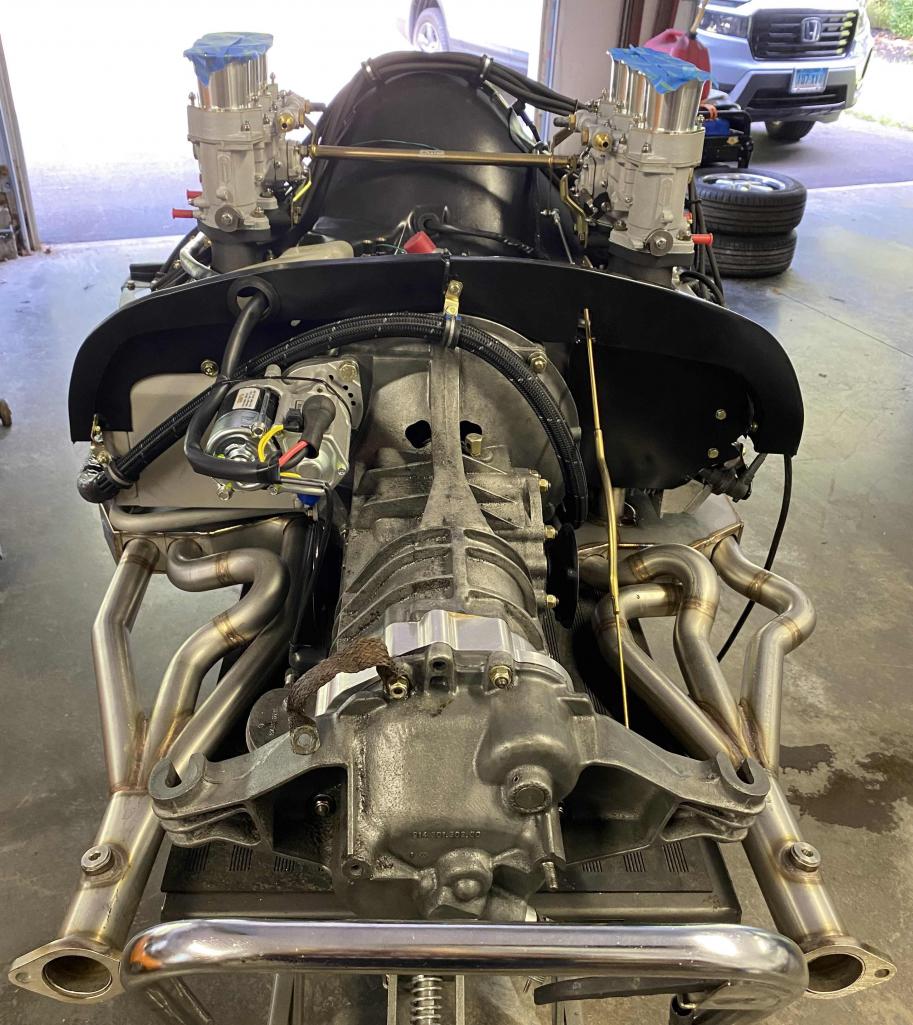 |
|
|
|
| Cairo94507 |
Aug 15 2024, 08:53 AM
Post
#405
|
|
Michael Group: Members Posts: 10,297 Joined: 1-November 08 From: Auburn, CA Member No.: 9,712 Region Association: Northern California |
(IMG:style_emoticons/default/drooley.gif) Very nice; looking forward to seeing it in the car. (IMG:style_emoticons/default/beerchug.gif)
|
|
|
|
| Tom1394racing |
Sep 6 2024, 06:09 PM
Post
#406
|
|
Member Group: Members Posts: 439 Joined: 25-August 07 From: CT Member No.: 8,039 Region Association: North East States |
It has been a few weeks since my last update. With the engine completed, I have been focused on getting the chassis ready for the engine installation. This includes the fuel delivery system, the engine oil cooling system and the engine electricals. My plan is to get these completed and installed before mating the engine to the chassis.
First up I decided to focus on the fuel delivery system. In the spirit of the GT project, I plan to use (2) early Bosch carb pumps installed in the front trunk. I plan to use a recirculating system along with a PMO pressure regulator and 46 mm PMO carbs on the engine. I will use (2) in-line Mahle fuel filters in front of each carb and a standard plastic filter at the fuel pump discharge. My plan is to install the engine, complete the fuel line connections, run the pump through the system, check for leaks and set the fuel pressure. Before engine installation, I plan to complete the oil cooling system and the twin MSD/twin coil electricals. Am I on the right track with this sequence? 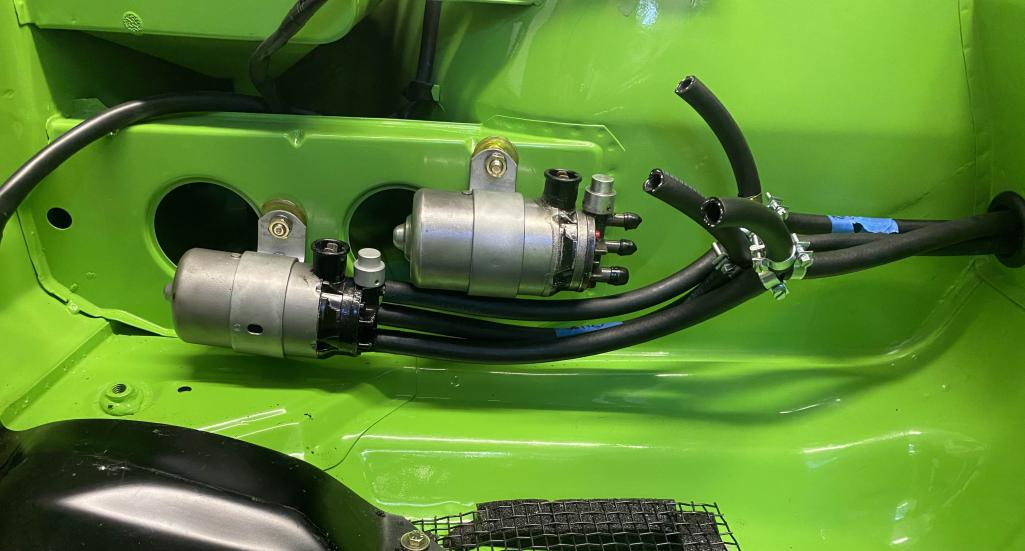  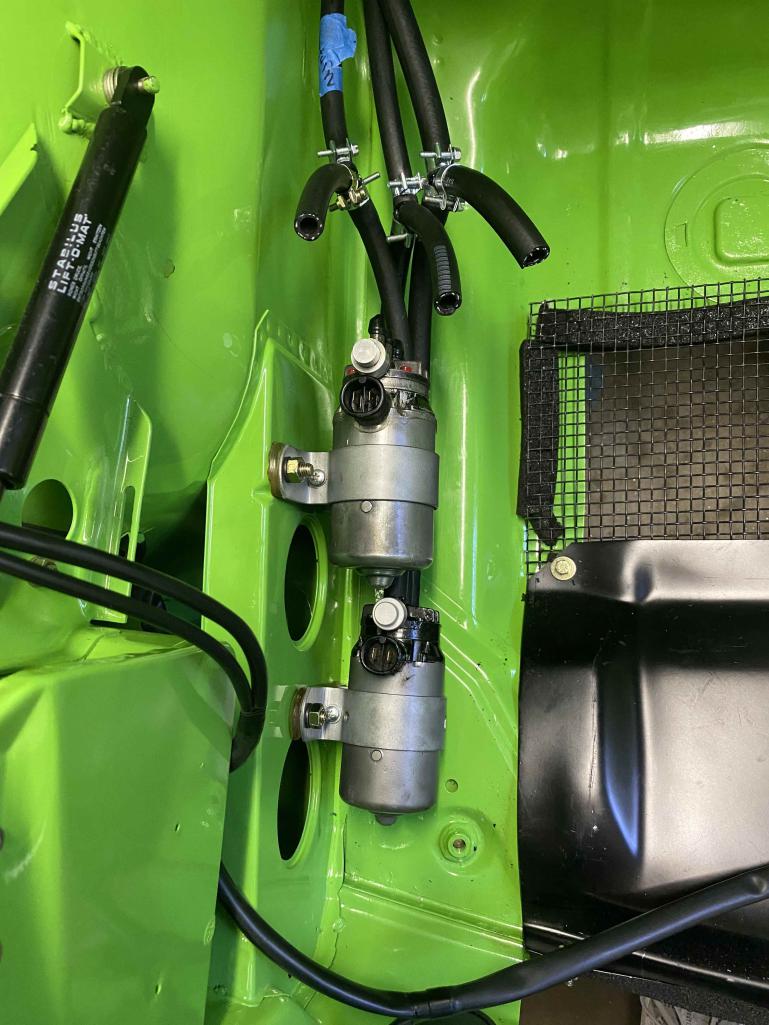 |
|
|
|
| mb911 |
Sep 7 2024, 05:43 AM
Post
#407
|
|
914 Guru Group: Members Posts: 7,544 Joined: 2-January 09 From: Burlington wi Member No.: 9,892 Region Association: Upper MidWest |
Looks good to me and 2 fuel pumps that seems like overkill but looks great
|
|
|
|
| Tom1394racing |
Sep 7 2024, 08:28 AM
Post
#408
|
|
Member Group: Members Posts: 439 Joined: 25-August 07 From: CT Member No.: 8,039 Region Association: North East States |
QUOTE(mb911 @ Sep 7 2024, 07:43 AM) Looks good to me and 2 fuel pumps that seems like overkill but looks great Hi Ben Many of the factory GT's had the dual fuel pumps. I was told the second pump was for redundancy in case the primary pump failed. The driver had a switch to engage the second pump. For me, the coolness factor was too much to resist even though it makes the setup more complicated and susceptible to leaks. In my case, the lower pump is a dummy with the ports and connections sealed up. The upper pump will be supplying all the fuel. |
|
|
|
| technicalninja |
Sep 7 2024, 09:33 AM
Post
#409
|
|
Advanced Member Group: Members Posts: 2,523 Joined: 31-January 23 From: Granbury Texas Member No.: 27,135 Region Association: Southwest Region |
QUOTE(mb911 @ Sep 7 2024, 06:43 AM) Looks good to me and 2 fuel pumps that seems like overkill but looks great (IMG:style_emoticons/default/agree.gif) I saw the two pumps and thought the same. Every time I've seen someone using two pumps (at the same time) they haven't worked like the owner wanted. Pumps seem to fight against each other, and one always wins. Your installation is the first use of a "dummy" for appearance I've seen! (IMG:style_emoticons/default/smilie_pokal.gif) Now, if you're really looking for "period correct" shouldn't the fuel hose have a cloth braided outer covering? Your car and the work you have done to it is World Class IMO! Everything is too perfect to use! (IMG:style_emoticons/default/ninja.gif) |
 |
|
| Tom1394racing |
Sep 8 2024, 05:05 AM
Post
#410
|
|
Member Group: Members Posts: 439 Joined: 25-August 07 From: CT Member No.: 8,039 Region Association: North East States |
QUOTE(technicalninja @ Sep 7 2024, 11:33 AM) QUOTE(mb911 @ Sep 7 2024, 06:43 AM) Looks good to me and 2 fuel pumps that seems like overkill but looks great (IMG:style_emoticons/default/agree.gif) I saw the two pumps and thought the same. Every time I've seen someone using two pumps (at the same time) they haven't worked like the owner wanted. Pumps seem to fight against each other, and one always wins. Your installation is the first use of a "dummy" for appearance I've seen! (IMG:style_emoticons/default/smilie_pokal.gif) Now, if you're really looking for "period correct" shouldn't the fuel hose have a cloth braided outer covering? Your car and the work you have done to it is World Class IMO! Everything is too perfect to use! (IMG:style_emoticons/default/ninja.gif) Thanks for the compliments. I will drive and enjoy this car once it is done. I’m actually planning to cover the entire pump area with a protective grate like this GT rally car. https://pbase.com/9146gt/image/54417625 |
|
|
|
| Tom1394racing |
Sep 9 2024, 05:30 PM
Post
#411
|
|
Member Group: Members Posts: 439 Joined: 25-August 07 From: CT Member No.: 8,039 Region Association: North East States |
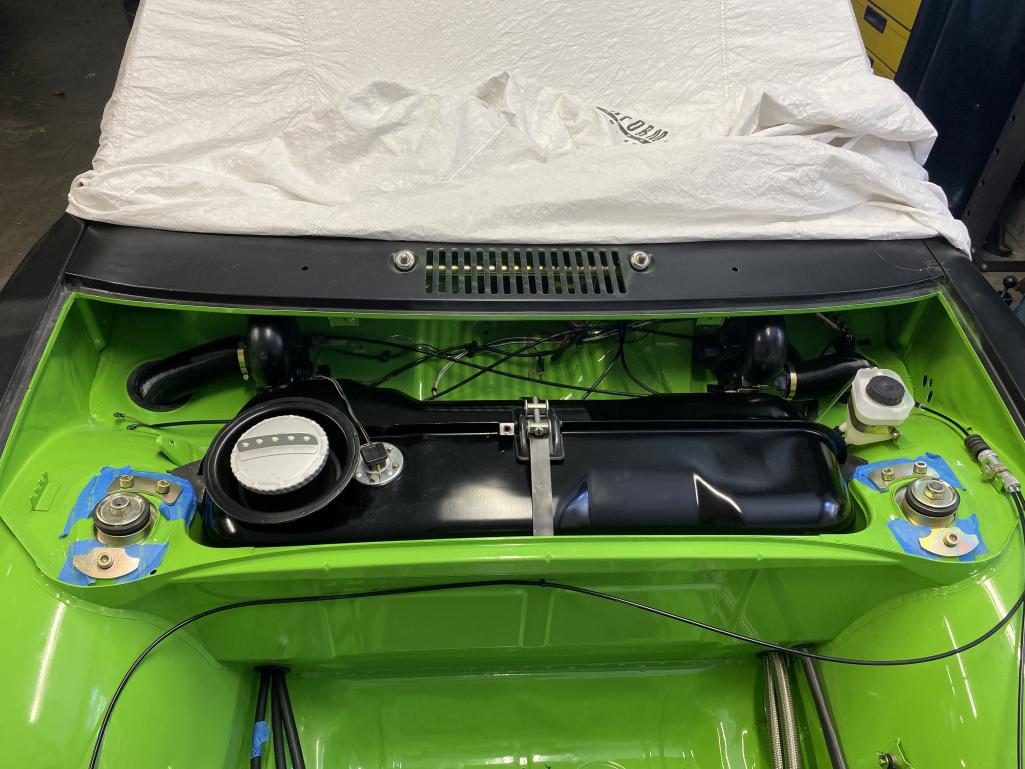
I installed the fuel tank with the GT style filler and the sending unit today. Checked for kinks at the bottom of the tank before leveling and installing the retaining strap.
 |
|
|
|
| Luke M |
Sep 10 2024, 06:41 AM
Post
#412
|
|
Senior Member Group: Members Posts: 1,407 Joined: 8-February 05 From: WNY Member No.: 3,574 Region Association: North East States |
Looking good there Tom.. Are you planning on installing the air box??
If so that fuel tank needs to come back out. |
|
|
|
| Tom1394racing |
Sep 11 2024, 07:03 AM
Post
#413
|
|
Member Group: Members Posts: 439 Joined: 25-August 07 From: CT Member No.: 8,039 Region Association: North East States |
QUOTE(Luke M @ Sep 10 2024, 08:41 AM) Looking good there Tom.. Are you planning on installing the air box?? If so that fuel tank needs to come back out. Hi Luke Thanks for your feedback. The exterior of the car still needs final body work and paint. My plan is to install the engine and get the car running before it goes back to Auto Associates for the finishing touches. Since they will be painting the front cowl area, Kenny and I decided not to install the airbox until after the final paint to avoid overspray in the top of the airbox. I know it will be easier to install the airbox with tank out of the car and I will drain and remove it if necessary. |
|
|
|
| Tom1394racing |
Sep 12 2024, 02:48 PM
Post
#414
|
|
Member Group: Members Posts: 439 Joined: 25-August 07 From: CT Member No.: 8,039 Region Association: North East States |
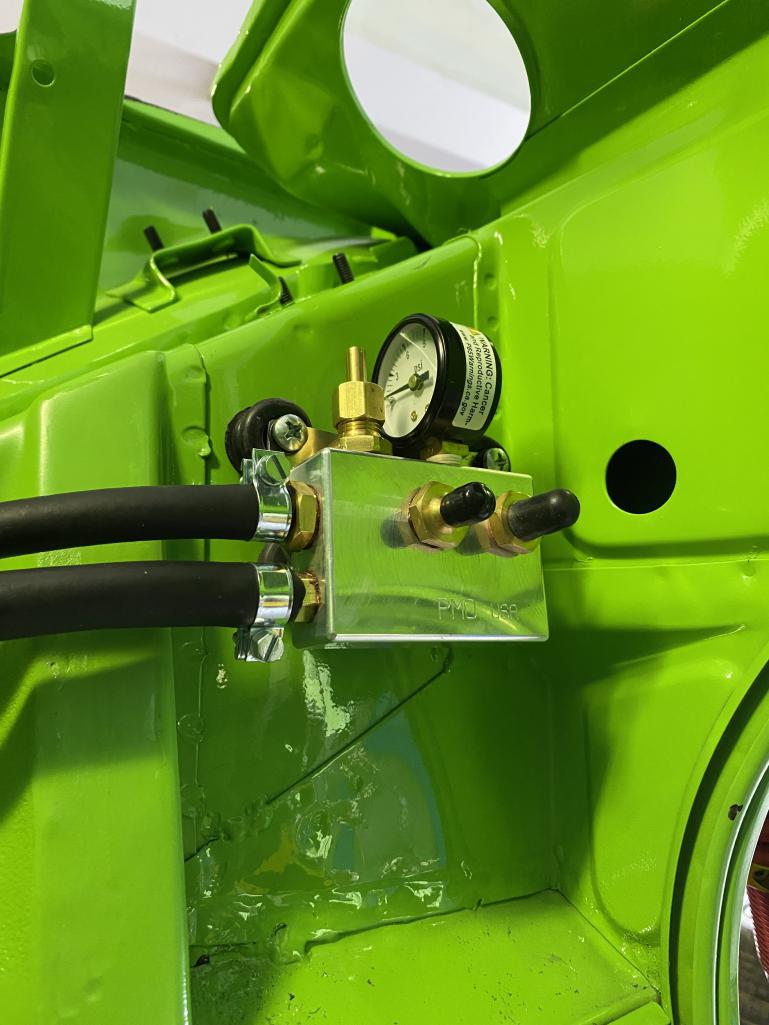
Finishing up the fuel delivery system. I installed the PMO pressure regulator in what I think will be a good location for easy unimpeded delivery to the carbs. (2) in-line Mahle filters will go between the regulator outputs and the carb inputs.
One issue I am having here is that the fuel delivery line is 10 mm ID and the input line on the regulator is for an 8 mm line. I tried locating a new fitting for the regulator inlet with a 10 mm barb but I am having trouble determining the male thread type on the inlet to the regulator. I need a fitting with a 10 mm barb with a male thread to fit the regulator. The dimensions of the original 8 mm barb fitting are shown here. The inside thread diameter is about 10.9 mm and the outside diameter is about 11.9 mm. Anyone know what type of fitting this is and where I might find one with a 10 mm barb? 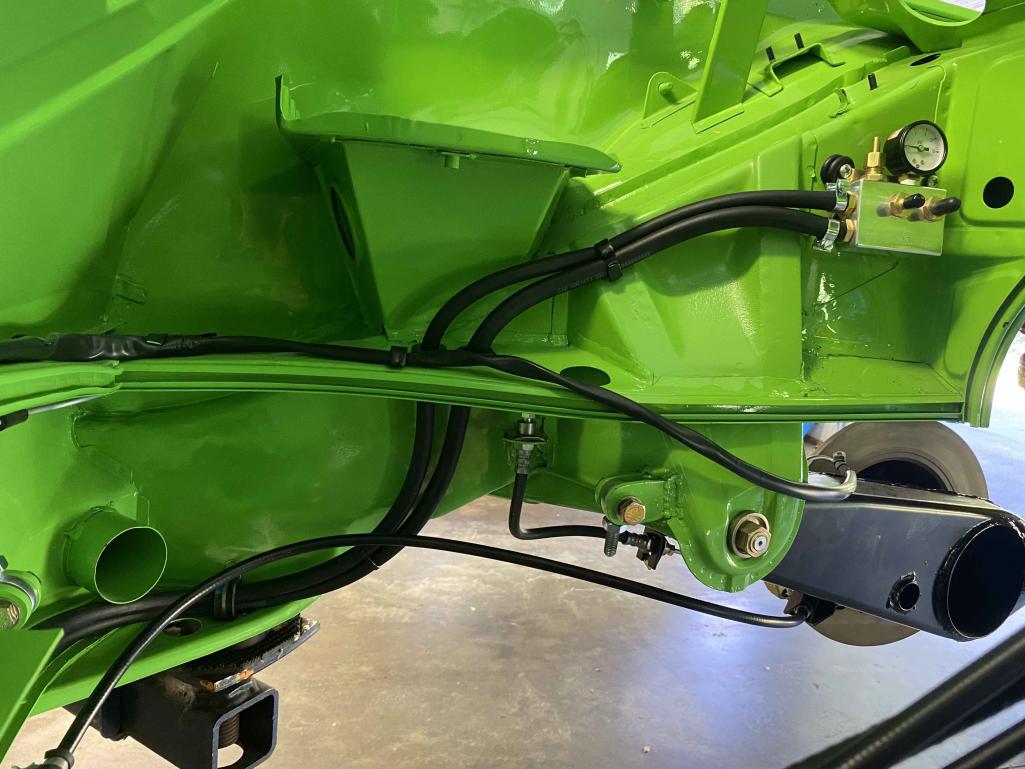 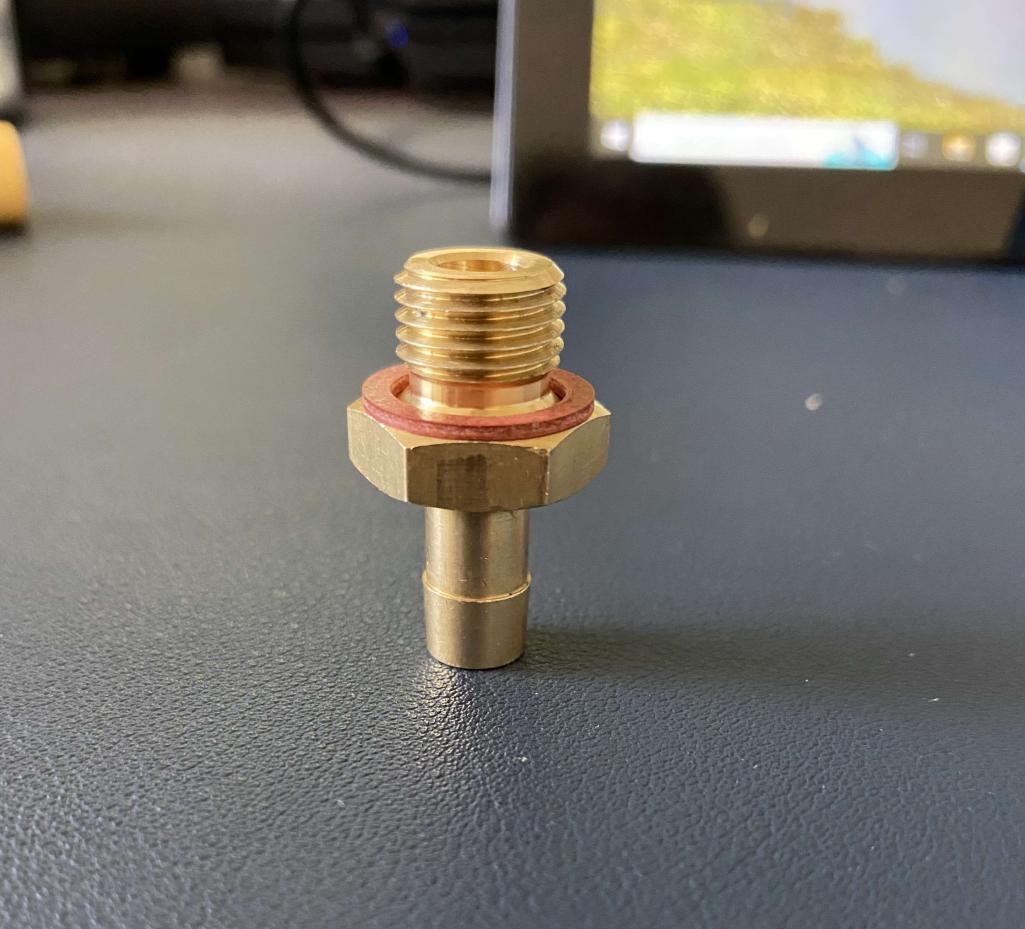 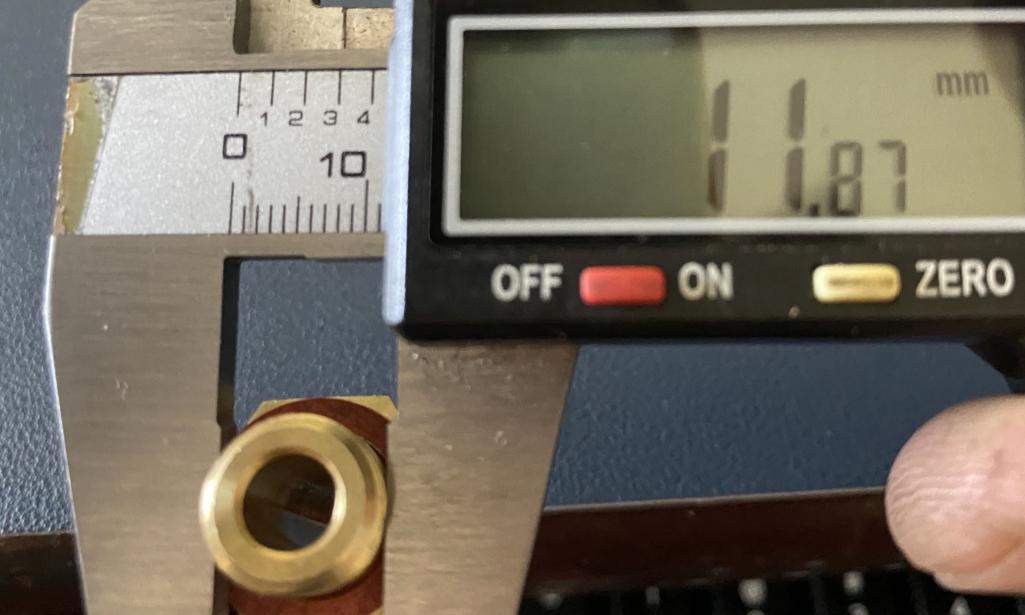 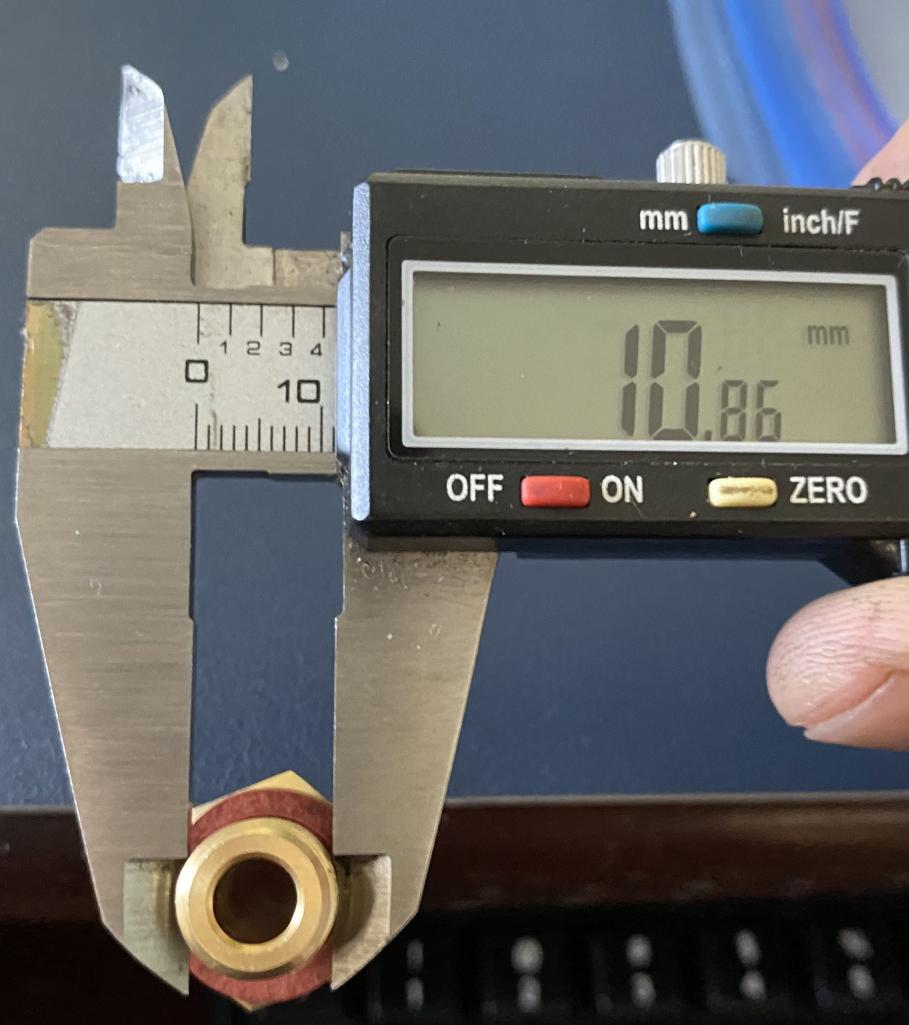 |
|
|
|
| BillJ |
Sep 12 2024, 03:16 PM
Post
#415
|
|
Senior Member Group: Members Posts: 1,273 Joined: 4-March 13 From: charlotte, NC Member No.: 15,610 Region Association: None |
I can't answer your question but not sure I love where you mounted that. Might be a little challenging to read that gauge once everything is in? Most place it between the carbs centered on the engine as I have seen it done. Just a thought. Looking forward to this piece of art completing
|
|
|
|
| Tom1394racing |
Sep 23 2024, 05:28 PM
Post
#416
|
|
Member Group: Members Posts: 439 Joined: 25-August 07 From: CT Member No.: 8,039 Region Association: North East States |
To circle back on the fuel pressure regulator.... The fitting was an M12X1.25 thread. I finally found a 10 mm barb X M12/1,25 fitting on Amazon. I also reinstalled the gauge to make it easier to read.
 |
|
|
|
| Tom1394racing |
Sep 23 2024, 05:35 PM
Post
#417
|
|
Member Group: Members Posts: 439 Joined: 25-August 07 From: CT Member No.: 8,039 Region Association: North East States |
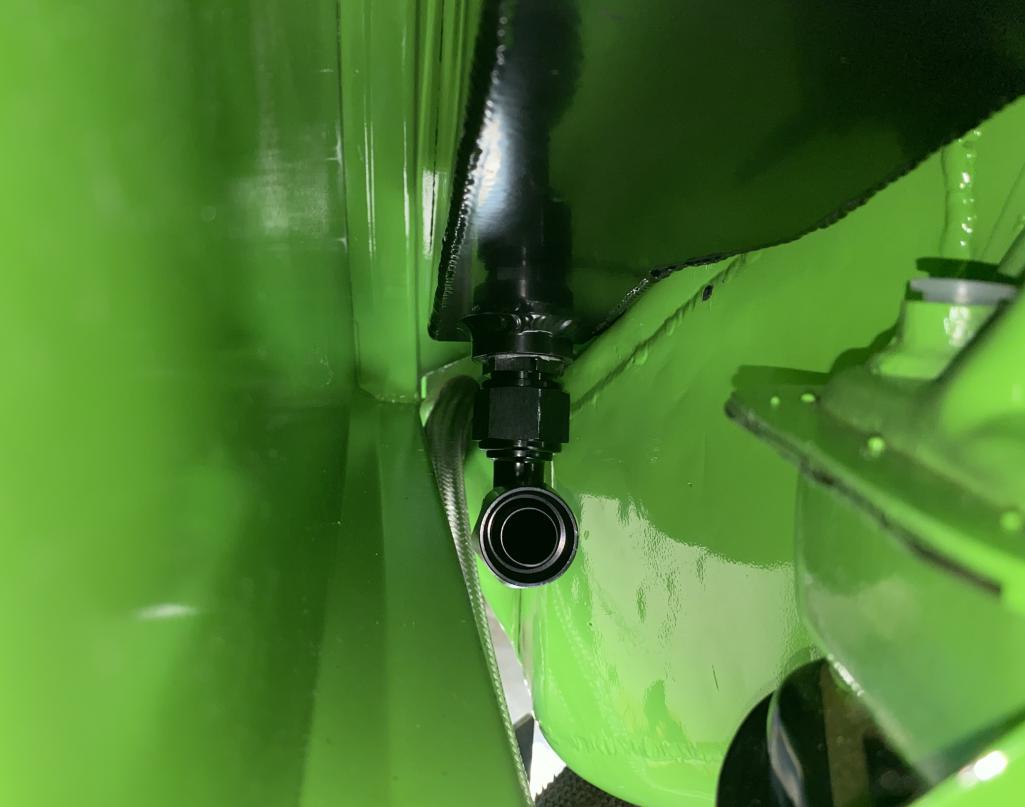
While waiting for the fuel fitting, I started test fitting the T-stat and connections to the tank, cooler and engine.
  |
|
|
|
| rgalla9146 |
Sep 24 2024, 10:23 PM
Post
#418
|
|
Advanced Member Group: Members Posts: 4,735 Joined: 23-November 05 From: Paramus NJ Member No.: 5,176 Region Association: None |
Hey Tom
What I did. Not the ideal orientation of the gauge. Two 356 bango fittings with seals pointed at each carb. Hollow bolts will be safety wired. Starter button incorporated. Rory Attached thumbnail(s) 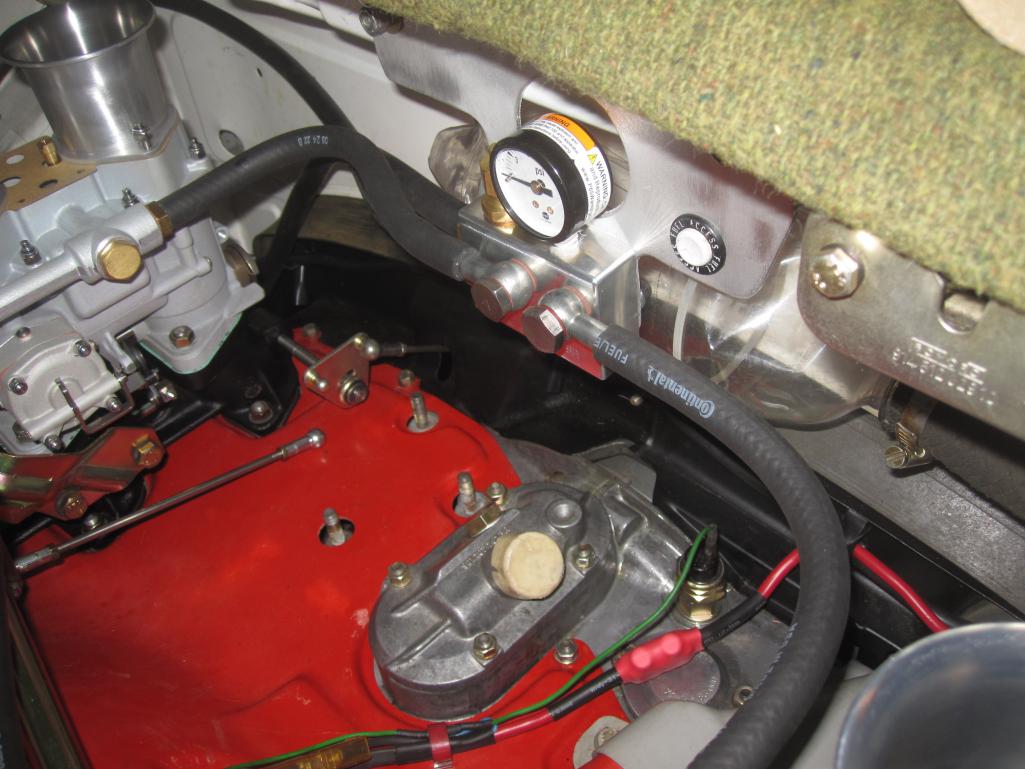
|
|
|
|
| Tom1394racing |
Sep 25 2024, 07:46 AM
Post
#419
|
|
Member Group: Members Posts: 439 Joined: 25-August 07 From: CT Member No.: 8,039 Region Association: North East States |
QUOTE(rgalla9146 @ Sep 25 2024, 12:23 AM) Hey Tom What I did. Not the ideal orietation of the gauge. Two 356 bango fittings with seals pointed at each carb. Hollow bolts will be safety wired. Starter button incorporated. Rory Hi Rory...Thanks for your suggestion. I thought about that location. That's the spot I've used on my 911 with PMO's and the spot most commonly used on 911's with carbs. However, I like to use two in-line filters between the pressure regulator and the carbs. My experience is that the PMO's are very susceptible to idle jet plugging and that the in-line filters minimize this problem. It seemed to me that placing the regulator on the back bulkhead wall of the 914 would not leave enough room for the filters. I am going to try the side wall location and see how that plumbing works out once I get the engine installed. I'll move it if need be. |
|
|
|
| flat4guy |
Sep 27 2024, 07:50 PM
Post
#420
|
|
Member Group: Members Posts: 469 Joined: 10-October 16 From: nor cal Member No.: 20,484 Region Association: Northern California |
QUOTE(mlindner @ Feb 16 2022, 12:57 PM) I was thinking of the exact same thing....forgot, just did that. You are going to have so much fun, post lots of pictures often. Best, Mark @mlindner Nice orange car. 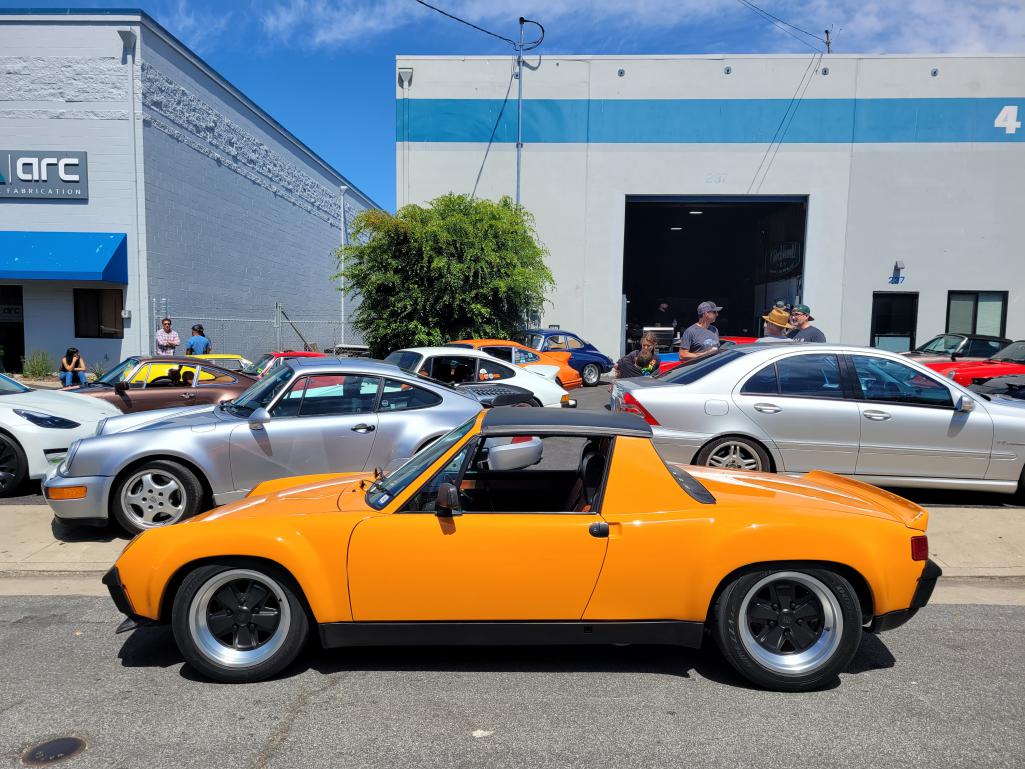 |
|
|
|
|
2 User(s) are reading this topic (2 Guests and 0 Anonymous Users)
0 Members:

|
Lo-Fi Version | Time is now: 19th April 2025 - 01:35 PM |
Invision Power Board
v9.1.4 © 2025 IPS, Inc.