|
|

|
Porsche, and the Porsche crest are registered trademarks of Dr. Ing. h.c. F. Porsche AG.
This site is not affiliated with Porsche in any way. Its only purpose is to provide an online forum for car enthusiasts. All other trademarks are property of their respective owners. |
|
|
  |
| bbrock |
 Aug 1 2022, 06:55 PM Aug 1 2022, 06:55 PM
Post
#61
|
|
914 Guru      Group: Members Posts: 5,269 Joined: 17-February 17 From: Montana Member No.: 20,845 Region Association: Rocky Mountains 
|
GENIUS!
Dug through my spares and found an unopened package of 1N4001 power diodes. Good for 50v and [EDIT: misread the data sheet. Only rated for 1 amp so I need to source a beefier diode, but the proof of concept is valid] Should I add a third diode for an extra margin of isolation? So stoked! So the conversion now is down to: - ~ $20 for a washer pump. - A couple feet of wire - 2-3 diodes - (1) 3-way connector - (1) 1/4" female spade crimp connector with locking tab - (2) 1/4" female spade crimp connectors - (1) ring connector (forgot the size I used) Maybe $25 all in? @lesorubcheek in my short remedial reading on diodes, I read that Schottky diodes have exceptionally low forward voltage so probably not the best choice. It seems cheap power diodes with high forward voltage are a better option. Thank you, thank you for suggesting this. So simple and elegant. I'll use the LVD I ordered on my snow plow so it will go to good use. That was part of the calculation in ordering it. |
| Spoke |
 Aug 2 2022, 03:50 AM Aug 2 2022, 03:50 AM
Post
#62
|
|
Jerry      Group: Members Posts: 7,145 Joined: 29-October 04 From: Allentown, PA Member No.: 3,031 Region Association: None 
|
Sounds like the intermittent relay needs a couple of volts to engage. If 2 diodes work then fantastic. The 1N4001 may be ok to use as the motor may not draw that much current. Also as you get higher current diodes the diode needs more current to get the same voltage drop so a larger diode may not work well.
You are correct about Schottky diodes; they have much lower ON voltage and not well suited for your application. |
| bbrock |
 Aug 2 2022, 08:12 AM Aug 2 2022, 08:12 AM
Post
#63
|
|
914 Guru      Group: Members Posts: 5,269 Joined: 17-February 17 From: Montana Member No.: 20,845 Region Association: Rocky Mountains 
|
Sounds like the intermittent relay needs a couple of volts to engage. If 2 diodes work then fantastic. The 1N4001 may be ok to use as the motor may not draw that much current. Also as you get higher current diodes the diode needs more current to get the same voltage drop so a larger diode may not work well. You are correct about Schottky diodes; they have much lower ON voltage and not well suited for your application. @Spoke Oh right. I guess the "groan" I heard with only one diode was relay chatter and as long as the relay gets enough voltage to latch, it will be fine. I was worried about under voltage on the wiper motor and had forgotten about the relay. I confirmed that 3 diodes still work but seems to not be necessary. I measured 4.4 amps draw on the washer motor which was higher than I expected, but in line with what I could find for similar washer pumps online. I noticed the 1N4001s were warm after running intermittent for a few minutes, which is what prompted rechecking the specs. I'm thinking these BY880-50 diodes might be a good way to go. Same "ON" voltage but rated for 8A, or would 5A diodes like the BY550-100 be a better choice? |
| Spoke |
 Aug 2 2022, 08:31 AM Aug 2 2022, 08:31 AM
Post
#64
|
|
Jerry      Group: Members Posts: 7,145 Joined: 29-October 04 From: Allentown, PA Member No.: 3,031 Region Association: None 
|
@bbrock
Either BY880 diodes will work. According to their datasheets, both drop between 0.8 to 1.0V with 4A current. I didn't see a price for the -100 part. The -50 part has 15 piece minimum which is no big deal. Both are 'marketplace products' which means Digikey lists them but they come from another supplier/distributor. They usually require minimum quantities. |
| Superhawk996 |
 Aug 2 2022, 08:35 AM Aug 2 2022, 08:35 AM
Post
#65
|
|
914 Guru      Group: Members Posts: 6,907 Joined: 25-August 18 From: Woods of N. Idaho Member No.: 22,428 Region Association: Galt's Gulch 
|
Getting close. (IMG:style_emoticons/default/smilie_pokal.gif)
|
| bbrock |
 Aug 2 2022, 10:55 AM Aug 2 2022, 10:55 AM
Post
#66
|
|
914 Guru      Group: Members Posts: 5,269 Joined: 17-February 17 From: Montana Member No.: 20,845 Region Association: Rocky Mountains 
|
@bbrock Either BY880 diodes will work. According to their datasheets, both drop between 0.8 to 1.0V with 4A current. I didn't see a price for the -100 part. The -50 part has 15 piece minimum which is no big deal. Both are 'marketplace products' which means Digikey lists them but they come from another supplier/distributor. They usually require minimum quantities. Thanks. Yeah, I noticed the marketplace and minimum qty too. The only digikey diode I could find that is in their stock and matched my specs is 1 kV and over $6 each. Mouser has the BY diodes in stock with no min but doesn't off USPS first class postage like Digikey. Not sure if I'll be able to get that through the market place anyway so might must order some additional supplies to so I don't pay $12 to ship a $3 order. Thanks for your help! (IMG:style_emoticons/default/beerchug.gif) @Superhawk996 I just picked up replacement tags for the car so you can stop looking for junk by the roadside next time you pass through. (IMG:style_emoticons/default/lol-2.gif) The new tags even end in '73' like the old ones. (IMG:style_emoticons/default/aktion035.gif) |
| bbrock |
 Aug 6 2022, 02:26 PM Aug 6 2022, 02:26 PM
Post
#67
|
|
914 Guru      Group: Members Posts: 5,269 Joined: 17-February 17 From: Montana Member No.: 20,845 Region Association: Rocky Mountains 
|
Unbelievable! The diodes arrived yesterday. I wound up ordering these from Mouser because Digikey's system was screwed up and wouldn't let me add the other diodes to my cart.
My plan was to do a quick test to make sure they worked, solder them into the wire, and be done with this project. So I twisted the diodes into the wire and pulled back on the wiper lever and yep, the washer pump ran although I could see it was spraying weaker than it had been. Pulled the lever down and the intermittent wipers ran. Looked good. Moved the lever back to the off position and pulled back on the lever again. Nothing. (IMG:style_emoticons/default/WTF.gif) Pulled one of the diodes out to see if just one would work. Nope. No washer, but intermittents worked. Broke out the DMM to start trouble shooting. I was getting 11.9v at the pump end of the wire with lever pulled back. Pulled the pump out and hooked it up to my power supply set to 12v. Nothing. 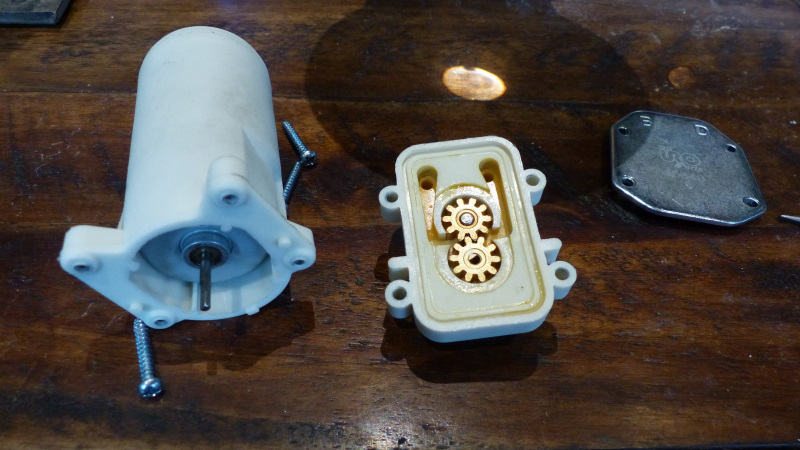 The motor runs when disconnected from the pump. It struggles but runs when the motor shaft is inserted through the rubber seal in the pump, and chokes when brass gear is on the shaft even if the other gear is missing. Couldn't get the motor out without breaking the housing so that's as far as I went. I'm just assuming the pump puts too much load on a cheap-ass motor. Anyway, the testing with the DMM showed that the 2 diodes wired in series will work, so I went ahead and soldered up the pump power wire. 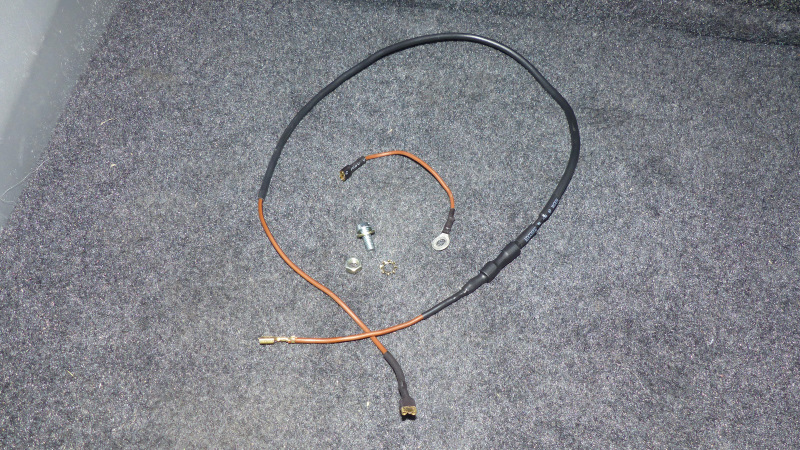 I have a VDO pump on order so will have to wait for that before I can finish this up. |
| bbrock |
 Aug 13 2022, 07:44 PM Aug 13 2022, 07:44 PM
Post
#68
|
|
914 Guru      Group: Members Posts: 5,269 Joined: 17-February 17 From: Montana Member No.: 20,845 Region Association: Rocky Mountains 
|
Well that escalated quickly (IMG:style_emoticons/default/blink.gif)
The new VDO pump came yesterday so this morning I went out to the garage just like last Saturday, thinking I'd spend 15 minutes tops swapping out the windscreen pumps and declare victory on this project. Two hours later I had this: 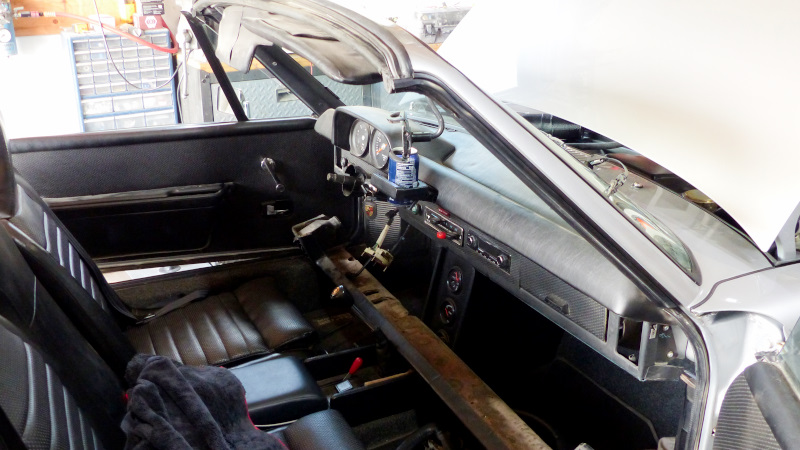 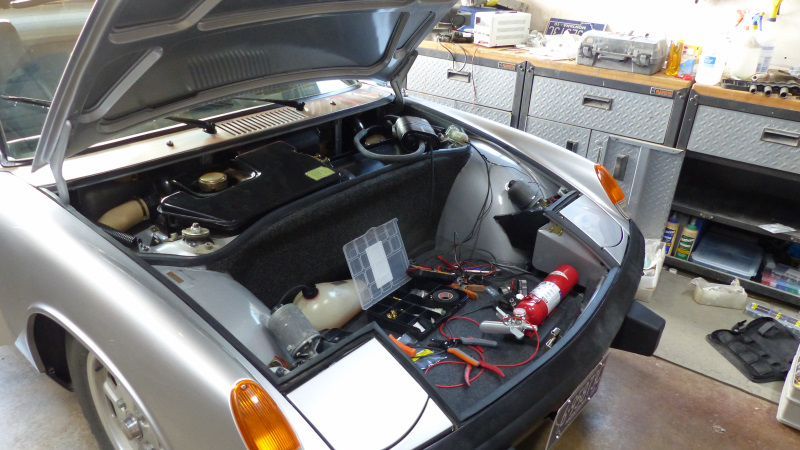 So what happened? (IMG:style_emoticons/default/confused24.gif) Well, when I installed the new pump, it wouldn't engage pulling back on the wiper lever. More curious, the flick wipe feature was being reluctant too. I pulled the pump and hooked it up to my power supply and couldn't get it to run. I knew it was unlikely both the URO and new pump were bad, so I did what anyone with half a brain would have done last week - hook it directly to the battery. Yep, fired right up. Grabbed the URO pump and did the same. Yep, works fine. Turns out my cheap power supply just wasn't pumping enough amps to get the pumps going. Could have saved $50 had I done that last weekend. However, the VDO pump is much quieter than the URO. The URO screams so loud, it made me jump a couple times when I used it while driving. So I'm not that upset I bought the VDO. Anyway, so what the hell? I unhooked the pump and checked voltage on the end of the brwn/blk wire again. 12v when the lever was pulled. Hooked the pump back up. Less than 1v. Hmmm. (IMG:style_emoticons/default/idea.gif) I cut open the brwn/blk wire so I could bypass the diodes to rule them out. Same results. I cut the diodes out completely just to make sure they weren't draining power somehow. Nope, same thing. I had an idea of what might be happening but continued to troubleshoot everything in the fuel compartment before acting on my hunch. Ground was good. Everything was connected correctly and working fine as long as the pump wasn't connected. Okay, time to pull the wiper switch. I swear I took a pic of the switch inside the wiper control assembly but apparently not. Anyway, it is easy to see and is part of the same mechanism that pushes the plunger on the valve for the pneumatic washer gizmo. When the switch is in zero position and the lever is pulled back, there should be zero resistant between the terminals that connect to the red/blk and brwn/blk wires on the harness. I was getting varying resistance values, but always resistance. Then on the harness side, I connected a very small gauge jumper between the same wires on the connector socket on the harness and turned on the key. Flick wipers ran. Now I connected the pump and tried again. The little jumper got hot as hell and I yanked it. So my hunch was correct. The switch in the wiper assembly isn't rated for the amperage needed to start those pumps. I figured I'd probably fried the switch but I have spares so wasn't worried. On close inspection, it made more sense. There was a spot of carbon on the contact of the switch. Apparently running the pump directly off that switch was causing it to spark and build up carbon until the resistance was too high to flow enough current. After cleaning off the contact with a little 1000 grit polishing paper and a spray with contact cleaner, I was consistently getting 0 ohms resistance with the lever pulled back. The solution, of course, was to add a relay so I grabbed the relay that came with the Car Magic kit and set about designing the circuit. Where to get power and ground without running wires all over the place which is part of what I wanted to avoid? Everything I needed was right there in the intermittent relay socket which would make for a nice, compact install. Here's the fully functioning test circuit. Pretty, ain't it? (IMG:style_emoticons/default/biggrin.gif) 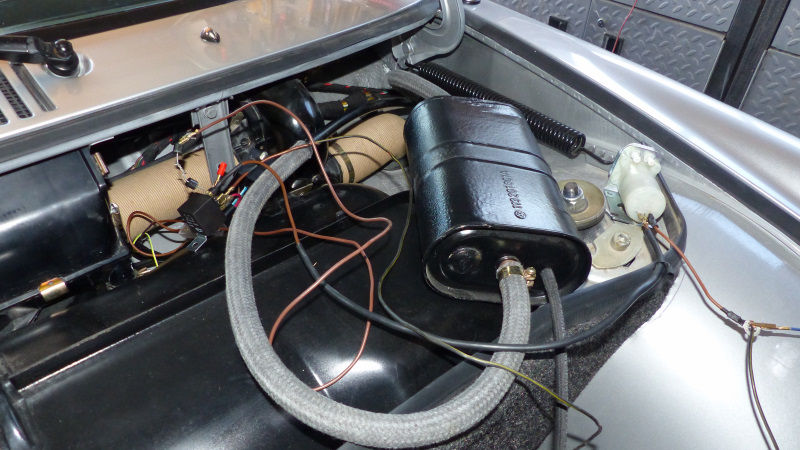 Let's fix up some connections to tidy things up. The relay coil still creates a path to ground, so I still needed the diodes to fully disconnect the brwn/blk wire for the intermittent function to work. Since the brwn/blk was now just switching on the relay, I went back to the 1N4001 diodes because they are smaller so easier to solder and shrink wrap. Then a couple pigtail connections to split power and ground off the intermittent relay. I also changed the wire from the relay to the pump to red/blk to reflect it is switched power. Here's the full spread of all the bits. This could easily be done up as a kit. I'm not doing it, but if anyone else wants to, please do. 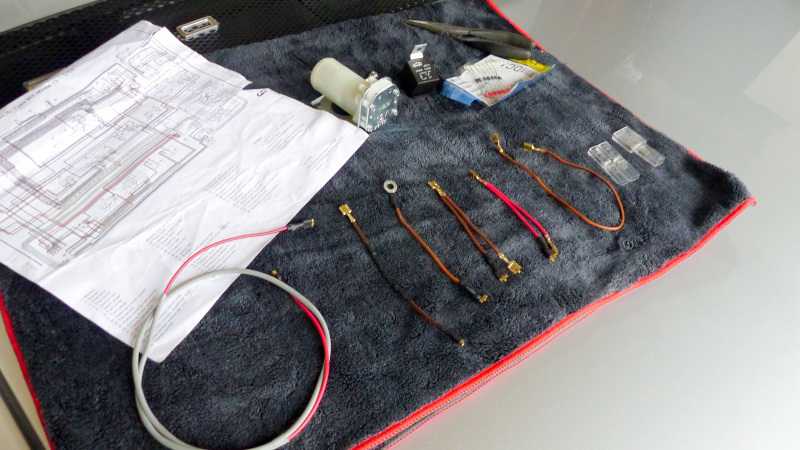 After tidying things up with the new connectors, I gave everything another test to make sure all was working before putting the fuel compartment back together. Washers worked, flick wiper worked, intermittent wiper worked... and kept working. Intermittent wipers never turned off. WTF? That meant the brwn/blk wire wasn't grounded in positions 0-2 as it should be. As soon as I looked inside the car and saw the wiper switch assembly dangling on the harness, I knew what the deal was. You know that weird little copper tab on the wiper switch that gets lost and causes trouble? Yeah, that's where the brwn/blk wire connects to ground. Mystery solved. After putting the column switches back together, everything worked as it should. Only thing left was to button everything up. Here's what the final installation of the relay looks like. Very stealth and very factory looking. (IMG:style_emoticons/default/shades.gif) 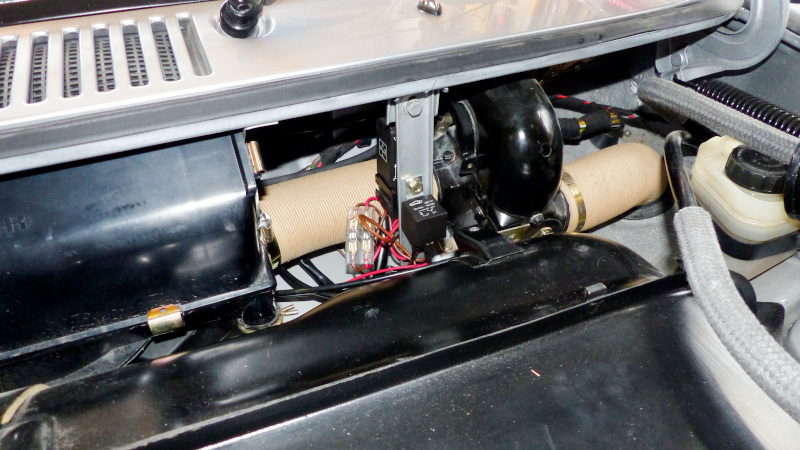 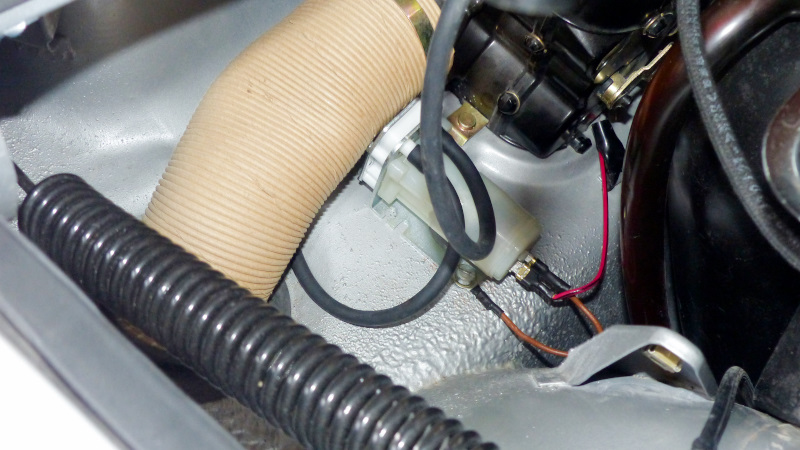 I'll write up a how-to on this. Was it easier than installing the Car Magic kit? (IMG:style_emoticons/default/av-943.gif) Of course not. I like the install better though. Less drilling/molesting the car, less wire strung around, and everything is color matched to the factory scheme. It will also be a little cheaper and a LOT easier than the Car Magic kit for the next person. R&D can be a bitch. (IMG:style_emoticons/default/rolleyes.gif) Thanks to everyone for helping work through this project. It was really pretty fun. |
| FlacaProductions |
 Aug 13 2022, 10:29 PM Aug 13 2022, 10:29 PM
Post
#69
|
|
Senior Member    Group: Members Posts: 1,893 Joined: 24-November 17 From: LA Member No.: 21,628 Region Association: Southern California 
|
Very cool - and everyone likes a graceful recovery! Good troubleshooting.
|
| davep |
 Aug 13 2022, 10:31 PM Aug 13 2022, 10:31 PM
Post
#70
|
|
914 Historian      Group: Benefactors Posts: 5,254 Joined: 13-October 03 From: Burford, ON, N0E 1A0 Member No.: 1,244 Region Association: Canada  |
A very interesting discussion. I have been kicking this around in my head for years, but had other priorities. However, years ago I 3-D printed a switch mount to replace the water valve on the wiper switch assembly. This gave me the trigger for the pump. I believe the switch (a tiny momentary pushbutton) does not have the necessary current capacity, so an additional relay would be needed to actually power the pump. I also 3-D printed a disc to fit in the washer tank cap to allow the tank to vent; this allows us to use the regular 914/4 washer tank with just a simple and reversible modification. All I have left to do is figure out the wire lengths and route it. I could have 20 sets of these parts available.
http://www.914world.com/bbs2/index.php?sho...7916&st=29# |
| bbrock |
 Aug 13 2022, 11:33 PM Aug 13 2022, 11:33 PM
Post
#71
|
|
914 Guru      Group: Members Posts: 5,269 Joined: 17-February 17 From: Montana Member No.: 20,845 Region Association: Rocky Mountains 
|
A very interesting discussion. I have been kicking this around in my head for years, but had other priorities. However, years ago I 3-D printed a switch mount to replace the water valve on the wiper switch assembly. This gave me the trigger for the pump. I believe the switch (a tiny momentary pushbutton) does not have the necessary current capacity, so an additional relay would be needed to actually power the pump. I also 3-D printed a disc to fit in the washer tank cap to allow the tank to vent; this allows us to use the regular 914/4 washer tank with just a simple and reversible modification. All I have left to do is figure out the wire lengths and route it. I could have 20 sets of these parts available. http://www.914world.com/bbs2/index.php?sho...7916&st=29# I just realized I never posted a link to the CarMagic kit I keep mentioning in this thread. I added it in the first post starting the thread have added it here too. That kit sounds just like what you are describing, including he little disc to vent the bottle. I know several people have installed these and really like them. I decided not to use it after reading SirAndy's tech article on adding an electric windshield pump. There I learned there is already an electrical switch inside the wiper switch assembly that can be used to trigger the pump. Even better is that most 914s already have a wire running from that switch to fuel compartment to trigger a relay when the wiper lever is pulled back. Figuring out how to get that to work with the optional intermittent wiper feature was a little tricky as the last four pages show. The CarMagic kit requires too much drilling for my taste. This method only requires a single hole drilled to screw the pump to the chassis. The installation also doesn't require touching anything inside the cabin of the car except to pull or clip the water hoses from the switch valve, which I was able to do from under the dash. The rest is all done up front in the fuel tank compartment. I'm kind of psychotic about wiring and making modification be as stealth as possible, so I used a little different approach for venting the bottle. I ran a drill down the small hole that is already in bottle cap and then drilled two small holes from the side into the channel created to turn it into a vented cap. Here you can see the drill bit sticking out the original hole and can just see it through one of the side holes. 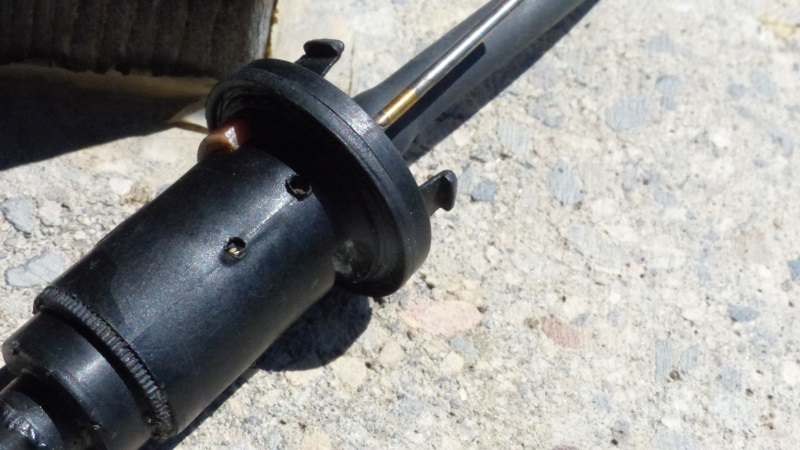 I also left the tube from the cap to tire attached to the bottle to pay homage to the fantastically quirky pneumatic system that I regret having to replace. It's really there for the stealth effect, but does have a practical purpose in creating a tether for the bottle cap so it doesn't fall down into the fuel compartment when refilling the bottle. If I connected it to the spare tire, that hose also has a schrader valve in it that can be used to refill the spare without having to dig out you luggage and lift the frunk board. I'm not using that feature but might if I take a long trip with a frunk full of luggage. When everything is back together, this setup is completely stealth and looks like an ordinary spare tire powered washer system. Here's what my now electrified washer system using an unmodified stock wiper switch looks like. (IMG:style_emoticons/default/beerchug.gif) 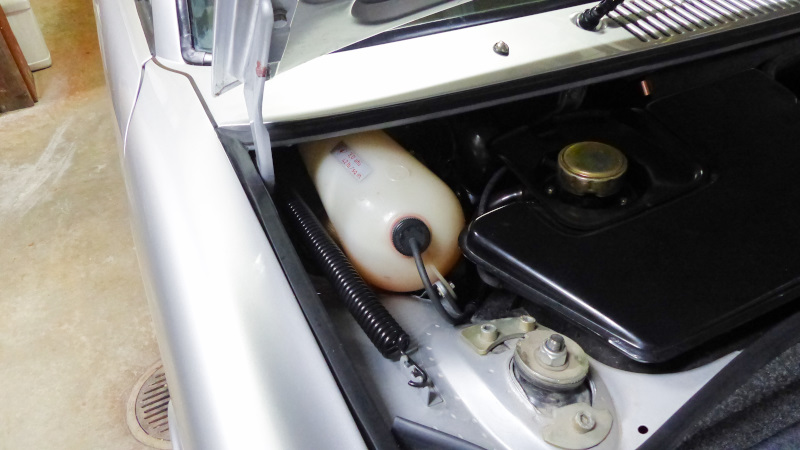 |
| Superhawk996 |
 Aug 14 2022, 08:38 AM Aug 14 2022, 08:38 AM
Post
#72
|
|
914 Guru      Group: Members Posts: 6,907 Joined: 25-August 18 From: Woods of N. Idaho Member No.: 22,428 Region Association: Galt's Gulch 
|
(IMG:style_emoticons/default/cool.gif) Bookmarking this thread.
|
| 930cabman |
 Aug 14 2022, 09:30 AM Aug 14 2022, 09:30 AM
Post
#73
|
|
Advanced Member     Group: Members Posts: 4,004 Joined: 12-November 20 From: Buffalo Member No.: 24,877 Region Association: North East States 
|
Well that escalated quickly (IMG:style_emoticons/default/blink.gif) The new VDO pump came yesterday so this morning I went out to the garage just like last Saturday, thinking I'd spend 15 minutes tops swapping out the windscreen pumps and declare victory on this project. Two hours later I had this:   So what happened? (IMG:style_emoticons/default/confused24.gif) Well, when I installed the new pump, it wouldn't engage pulling back on the wiper lever. More curious, the flick wipe feature was being reluctant too. I pulled the pump and hooked it up to my power supply and couldn't get it to run. I knew it was unlikely both the URO and new pump were bad, so I did what anyone with half a brain would have done last week - hook it directly to the battery. Yep, fired right up. Grabbed the URO pump and did the same. Yep, works fine. Turns out my cheap power supply just wasn't pumping enough amps to get the pumps going. Could have saved $50 had I done that last weekend. However, the VDO pump is much quieter than the URO. The URO screams so loud, it made me jump a couple times when I used it while driving. So I'm not that upset I bought the VDO. Anyway, so what the hell? I unhooked the pump and checked voltage on the end of the brwn/blk wire again. 12v when the lever was pulled. Hooked the pump back up. Less than 1v. Hmmm. (IMG:style_emoticons/default/idea.gif) I cut open the brwn/blk wire so I could bypass the diodes to rule them out. Same results. I cut the diodes out completely just to make sure they weren't draining power somehow. Nope, same thing. I had an idea of what might be happening but continued to troubleshoot everything in the fuel compartment before acting on my hunch. Ground was good. Everything was connected correctly and working fine as long as the pump wasn't connected. Okay, time to pull the wiper switch. I swear I took a pic of the switch inside the wiper control assembly but apparently not. Anyway, it is easy to see and is part of the same mechanism that pushes the plunger on the valve for the pneumatic washer gizmo. When the switch is in zero position and the lever is pulled back, there should be zero resistant between the terminals that connect to the red/blk and brwn/blk wires on the harness. I was getting varying resistance values, but always resistance. Then on the harness side, I connected a very small gauge jumper between the same wires on the connector socket on the harness and turned on the key. Flick wipers ran. Now I connected the pump and tried again. The little jumper got hot as hell and I yanked it. So my hunch was correct. The switch in the wiper assembly isn't rated for the amperage needed to start those pumps. I figured I'd probably fried the switch but I have spares so wasn't worried. On close inspection, it made more sense. There was a spot of carbon on the contact of the switch. Apparently running the pump directly off that switch was causing it to spark and build up carbon until the resistance was too high to flow enough current. After cleaning off the contact with a little 1000 grit polishing paper and a spray with contact cleaner, I was consistently getting 0 ohms resistance with the lever pulled back. The solution, of course, was to add a relay so I grabbed the relay that came with the Car Magic kit and set about designing the circuit. Where to get power and ground without running wires all over the place which is part of what I wanted to avoid? Everything I needed was right there in the intermittent relay socket which would make for a nice, compact install. Here's the fully functioning test circuit. Pretty, ain't it? (IMG:style_emoticons/default/biggrin.gif)  Let's fix up some connections to tidy things up. The relay coil still creates a path to ground, so I still needed the diodes to fully disconnect the brwn/blk wire for the intermittent function to work. Since the brwn/blk was now just switching on the relay, I went back to the 1N4001 diodes because they are smaller so easier to solder and shrink wrap. Then a couple pigtail connections to split power and ground off the intermittent relay. I also changed the wire from the relay to the pump to red/blk to reflect it is switched power. Here's the full spread of all the bits. This could easily be done up as a kit. I'm not doing it, but if anyone else wants to, please do.  After tidying things up with the new connectors, I gave everything another test to make sure all was working before putting the fuel compartment back together. Washers worked, flick wiper worked, intermittent wiper worked... and kept working. Intermittent wipers never turned off. WTF? That meant the brwn/blk wire wasn't grounded in positions 0-2 as it should be. As soon as I looked inside the car and saw the wiper switch assembly dangling on the harness, I knew what the deal was. You know that weird little copper tab on the wiper switch that gets lost and causes trouble? Yeah, that's where the brwn/blk wire connects to ground. Mystery solved. After putting the column switches back together, everything worked as it should. Only thing left was to button everything up. Here's what the final installation of the relay looks like. Very stealth and very factory looking. (IMG:style_emoticons/default/shades.gif)   I'll write up a how-to on this. Was it easier than installing the Car Magic kit? (IMG:style_emoticons/default/av-943.gif) Of course not. I like the install better though. Less drilling/molesting the car, less wire strung around, and everything is color matched to the factory scheme. It will also be a little cheaper and a LOT easier than the Car Magic kit for the next person. R&D can be a bitch. (IMG:style_emoticons/default/rolleyes.gif) Thanks to everyone for helping work through this project. It was really pretty fun. I may be able to piece together an original washer system if you like, cheap!! (IMG:style_emoticons/default/poke.gif) |
| bbrock |
 Aug 14 2022, 11:32 AM Aug 14 2022, 11:32 AM
Post
#74
|
|
914 Guru      Group: Members Posts: 5,269 Joined: 17-February 17 From: Montana Member No.: 20,845 Region Association: Rocky Mountains 
|
I may be able to piece together an original washer system if you like, cheap!! (IMG:style_emoticons/default/poke.gif) (IMG:style_emoticons/default/lol-2.gif) I'm way past that of course. Countless hours and $ wasted trying to refurbish the old system. First problem was hoses. You need washer hose that can withstand 42 psi and it turns out that is not easy to find. I finally tracked down some NOS hose. Next problem was the valve in the wiper switch assembly. I have three wiper switches and the valves were blocked and wouldn't function. Try soaking in vinegar and Lime Away without luck so I bought a repro CIP1 valve. It leaks. Not into the cabin, but through the system so the washer nozzles constantly ooze liquid until the bottle was empty. In hind sight, I probably spent 3x as much time an money trying to get the original system to work as I did figuring out this one. Now that the system is worked out, this conversion should be possible for $40-$70 in parts depending on which pump you choose, and ~2-3 hours if you are already familiar with crimping wire connectors etc., add an hour if you are not. I do miss the brilliant stupidity of the tire system though. |
  |
1 User(s) are reading this topic (1 Guests and 0 Anonymous Users)
0 Members:

|
Lo-Fi Version | Time is now: 2nd April 2025 - 11:40 PM |
Invision Power Board
v9.1.4 © 2025 IPS, Inc.


