|
|
|
Porsche, and the Porsche crest are registered trademarks of Dr. Ing. h.c. F. Porsche AG.
This site is not affiliated with Porsche in any way. Its only purpose is to provide an online forum for car enthusiasts. All other trademarks are property of their respective owners. |
|
|

  |

| blabla914 |
 Feb 25 2023, 05:24 PM Feb 25 2023, 05:24 PM
Post
#21
|
|
I like primer  Group: Members Posts: 330 Joined: 1-March 04 From: Connecticut Member No.: 1,740 Region Association: None |
Superhawk has your back here. I'll add to his most excellent response is pits are fine. high spots are a problem
I'll also add my own 914 fan story...... The first 914 I bought I put like 70k on it and the motor started making some bad noises. My dad was a VW tech in the early 70's so this wasn't a big deal and the car was a beater so 70k was about expected. Well we get the motor on the stand and my dad is pulling the FI off and I go to pull the fan. Well I go in there with a socket and I get nothing. Upon closer inspection I'm surprised to find the bolt is GONE! Motor was spinning almost 6k just days ago with just the press fit holding that hub on. Again. Pits aren't a big deal. high spots are a problem. clean up that slot. fit a new key. Set your motor at #1 TDC by putting a long thin screwdriver or dowel down the #1 plug hole. Line up your marks on the fan to zero best you can. put on the bolt with the proper washer and torque to spec. you'll be good to go. kelly |
   |

 
|
| malcolm2 |
Feb 26 2023, 08:20 AM
Post
#22
|
|
Advanced Member Group: Members Posts: 2,747 Joined: 31-May 11 From: Nashville Member No.: 13,139 Region Association: South East States |
Amazon has let me down. I did purchase the Prussian Blue yesterday from them with the promise that it would arrive today.....
Now expected on Monday. Gives me a few extra days to lap, I guess. I have a new 0-ring, and found a woodruff key, so it is all down to lapping and re-checking. Thank you to everyone that has chimed in. I always learn good stuff from this forum.... Fingers are crossed that I will never deal with this again. I can certainly imagine the real damage that could be done if the fan were to come off or even just become disengaged. |
|
|
|
| ClayPerrine |
Feb 26 2023, 09:33 AM
Post
#23
|
|
Life's been good to me so far..... Group: Admin Posts: 15,901 Joined: 11-September 03 From: Hurst, TX. Member No.: 1,143 Region Association: NineFourteenerVille |
30+ years ago we lost the fan on Betty's 914 at an AX in Coppers Cove Texas. She had her fastest AX run that day after the fan disconnected itself, and it made an oily mess of the bottom of the engine.
I was able to replace the lost woodruff key and bolt after a local auto parts store owner opened up and sold me the needed parts, and some locktite. I pulled the front tin, and did the work through the fan housing laying under the engine. She was able to drive it the 2.5 hours home later that evening. The fan stayed on the crank for years after that, untouched from the parking lot fix. Just make sure the bolt is torqued to factory specs, and put some red locktite on it before assembly. You will be fine. |
|
|
|
| technicalninja |
Feb 26 2023, 10:21 AM
Post
#24
|
|
Advanced Member Group: Members Posts: 2,003 Joined: 31-January 23 From: Granbury Texas Member No.: 27,135 Region Association: Southwest Region |
QUOTE(malcolm2 @ Feb 26 2023, 08:20 AM)  Amazon has let me down. I did purchase the Prussian Blue yesterday from them with the promise that it would arrive today..... Now expected on Monday. Gives me a few extra days to lap, I guess. I have a new 0-ring, and found a woodruff key, so it is all down to lapping and re-checking. Thank you to everyone that has chimed in. I always learn good stuff from this forum.... Fingers are crossed that I will never deal with this again. I can certainly imagine the real damage that could be done if the fan were to come off or even just become disengaged. I stopped using Prussian Blue years ago. I've found a large tip black sharpie works just as well, has a much longer shelf life (than the spray cans) and shows lap patterns equally well. It's easy, quick, and you can find the markers at the grocery store. I only use the Sharpie brand. |
 |
|
| malcolm2 |
Feb 26 2023, 11:49 AM
Post
#25
|
|
Advanced Member Group: Members Posts: 2,747 Joined: 31-May 11 From: Nashville Member No.: 13,139 Region Association: South East States |
I remember lapping my Ski Nautique prop and using Prussian Blue.....
Lot's of web stuff on lapping valves, this is as close as I could find that was not a valve. Lap-Fitting-a Propeller Post keeps telling me that the pictures were bad.... so you don't get great pix, but does help greatly. I did find one post where they used a pencil to mark vs prussian blue (engineer's blue) |
|
|
|
| Superhawk996 |
Feb 26 2023, 11:59 AM
Post
#26
|
|
914 Guru Group: Members Posts: 6,520 Joined: 25-August 18 From: Woods of N. Idaho Member No.: 22,428 Region Association: Galt's Gulch |
I could see pictures just fine. That can’t be a cheap prop! (IMG:style_emoticons/default/aktion035.gif)
|
|
|
|
| malcolm2 |
Feb 26 2023, 12:53 PM
Post
#27
|
|
Advanced Member Group: Members Posts: 2,747 Joined: 31-May 11 From: Nashville Member No.: 13,139 Region Association: South East States |
he called it MULTI-THOUSAND dollar prop, so yes.
Here is my Prussian Blue... I wiped it on the hub and hand installed the hub. I slid it on with the key-way semi-aligned, At 1st I just rotated right and left a bit. Less blue transferred, but here in the same place. Then I rotated the hub 360* and got this.... 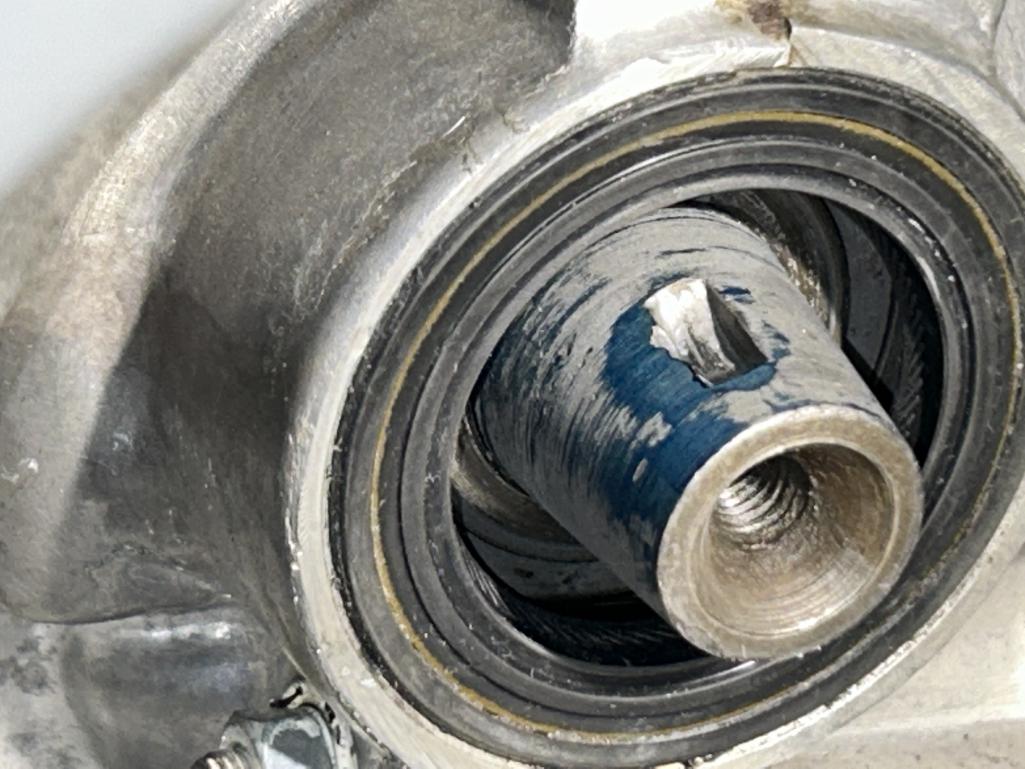 |
|
|
|
| Superhawk996 |
Feb 26 2023, 01:15 PM
Post
#28
|
|
914 Guru Group: Members Posts: 6,520 Joined: 25-August 18 From: Woods of N. Idaho Member No.: 22,428 Region Association: Galt's Gulch |
That’s starting to look pretty good. Might lap it a little more just to see if you can get a bit more contact but I wouldn’t spend 8 hours doing it either.
|
|
|
|
| Olympic 914 |
Feb 26 2023, 01:24 PM
Post
#29
|
|
Group: Members Posts: 1,707 Joined: 7-July 11 From: Pittsburgh PA Member No.: 13,287 Region Association: North East States |
Looks like something that should be done on every engine build, but no one tells you about it.
|
|
|
|
| Superhawk996 |
Feb 26 2023, 01:39 PM
Post
#30
|
|
914 Guru Group: Members Posts: 6,520 Joined: 25-August 18 From: Woods of N. Idaho Member No.: 22,428 Region Association: Galt's Gulch |
QUOTE(Superhawk996 @ Feb 26 2023, 02:15 PM) That’s starting to look pretty good. Might lap it a little more just to see if you can get a bit more contact but I wouldn’t spend 8 hours doing it either. Edit: oh - wait - you applied blue to the hub? So the only transfer is at the high spot on the nose. Need to get that high spot to the left of the key slot down so that it begins to make contact everywhere When I first saw picture I assumed you put blue on the nose and it was wiped just leaving blue low spots. Makes sense to have a high spot to left of the slot since that is where material was displaced when the key almost sheared. |
|
|
|
| malcolm2 |
Feb 26 2023, 02:04 PM
Post
#31
|
|
Advanced Member Group: Members Posts: 2,747 Joined: 31-May 11 From: Nashville Member No.: 13,139 Region Association: South East States |
QUOTE(Olympic 914 @ Feb 26 2023, 01:24 PM) Looks like something that should be done on every engine build, but no one tells you about it. Like the propeller installation link, I added. He states in that every new prop should have that done to match the new prop and the old shaft. So for your comment if you have a new hub or a new crank, then it makes sense that the taper should be lapped using the parts that the engine will run with. I did not do that. Used gifted crank and an unknown hub. Oops on me. |
|
|
|
| porschetub |
Feb 27 2023, 05:11 PM
Post
#32
|
|
Advanced Member Group: Members Posts: 4,729 Joined: 25-July 15 From: New Zealand Member No.: 18,995 Region Association: None |
QUOTE(malcolm2 @ Feb 27 2023, 07:53 AM) he called it MULTI-THOUSAND dollar prop, so yes. Here is my Prussian Blue... I wiped it on the hub and hand installed the hub. I slid it on with the key-way semi-aligned, At 1st I just rotated right and left a bit. Less blue transferred, but here in the same place. Then I rotated the hub 360* and got this.... Getting there but you still have a long way to go as you have a raised area around the keyway,I would get a guality flat file and just carefully work it down then redo your lapping and see what you get,don't be afraid to use course lapping paste as I will give you a good indicator when you blue it again ,then you can go finer if good result. Your final result will be if the hub can be tapped on with a socket and will be hard to pop back off the taper you need this as it won't be an issue later . Remove the old seal so you can see better whats going on and keep rotating the crank,cheers. |
|
|
|
| 930cabman |
Feb 27 2023, 06:36 PM
Post
#33
|
|
Advanced Member Group: Members Posts: 3,695 Joined: 12-November 20 From: Buffalo Member No.: 24,877 Region Association: North East States |
I would want to see at least 80 or 90% contact area
|
|
|
|
| bkrantz |
Feb 27 2023, 08:33 PM
Post
#34
|
|
914 Guru Group: Members Posts: 8,142 Joined: 3-August 19 From: SW Colorado Member No.: 23,343 Region Association: Rocky Mountains |
QUOTE(porschetub @ Feb 27 2023, 04:11 PM) QUOTE(malcolm2 @ Feb 27 2023, 07:53 AM) he called it MULTI-THOUSAND dollar prop, so yes. Here is my Prussian Blue... I wiped it on the hub and hand installed the hub. I slid it on with the key-way semi-aligned, At 1st I just rotated right and left a bit. Less blue transferred, but here in the same place. Then I rotated the hub 360* and got this.... Getting there but you still have a long way to go as you have a raised area around the keyway,I would get a guality flat file and just carefully work it down then redo your lapping and see what you get,don't be afraid to use course lapping paste as I will give you a good indicator when you blue it again ,then you can go finer if good result. Your final result will be if the hub can be tapped on with a socket and will be hard to pop back off the taper you need this as it won't be an issue later . Remove the old seal so you can see better whats going on and keep rotating the crank,cheers. Hmm. Filing the end of the crank with the inside of the case so close would make me nervous, no matter how the opening is sealed. Steel filings in the oil would be a very sad thing. |
|
|
|
| ClayPerrine |
Feb 28 2023, 07:15 AM
Post
#35
|
|
Life's been good to me so far..... Group: Admin Posts: 15,901 Joined: 11-September 03 From: Hurst, TX. Member No.: 1,143 Region Association: NineFourteenerVille |
QUOTE(bkrantz @ Feb 27 2023, 08:33 PM) QUOTE(porschetub @ Feb 27 2023, 04:11 PM) QUOTE(malcolm2 @ Feb 27 2023, 07:53 AM) he called it MULTI-THOUSAND dollar prop, so yes. Here is my Prussian Blue... I wiped it on the hub and hand installed the hub. I slid it on with the key-way semi-aligned, At 1st I just rotated right and left a bit. Less blue transferred, but here in the same place. Then I rotated the hub 360* and got this.... Getting there but you still have a long way to go as you have a raised area around the keyway,I would get a guality flat file and just carefully work it down then redo your lapping and see what you get,don't be afraid to use course lapping paste as I will give you a good indicator when you blue it again ,then you can go finer if good result. Your final result will be if the hub can be tapped on with a socket and will be hard to pop back off the taper you need this as it won't be an issue later . Remove the old seal so you can see better whats going on and keep rotating the crank,cheers. Hmm. Filing the end of the crank with the inside of the case so close would make me nervous, no matter how the opening is sealed. Steel filings in the oil would be a very sad thing. Take a 1 inch wide strip of all-mag about 3 inches long and lay it under the crank in the seal opening. Any filings will be caught on the magnet instead of going into the motor. |
|
|
|
| Superhawk996 |
Feb 28 2023, 08:29 AM
Post
#36
|
|
914 Guru Group: Members Posts: 6,520 Joined: 25-August 18 From: Woods of N. Idaho Member No.: 22,428 Region Association: Galt's Gulch |
QUOTE(ClayPerrine @ Feb 28 2023, 08:15 AM) Take a 1 inch wide strip of all-mag about 3 inches long and lay it under the crank in the seal opening. Any filings will be caught on the magnet instead of going into the motor. (IMG:style_emoticons/default/agree.gif) (IMG:style_emoticons/default/pray.gif) Just set a neodymium magnet underneath and it will literally “grab” the shavings out of the air assuming it doesn’t “fly” itself up to the crank. The magnet might need a drop of hot melt glue or double sided adhesive to stay put. Crazy strong magnets! |
|
|
|
| ClayPerrine |
Feb 28 2023, 09:42 AM
Post
#37
|
|
Life's been good to me so far..... Group: Admin Posts: 15,901 Joined: 11-September 03 From: Hurst, TX. Member No.: 1,143 Region Association: NineFourteenerVille |
QUOTE(Superhawk996 @ Feb 28 2023, 08:29 AM) QUOTE(ClayPerrine @ Feb 28 2023, 08:15 AM) Take a 1 inch wide strip of all-mag about 3 inches long and lay it under the crank in the seal opening. Any filings will be caught on the magnet instead of going into the motor. (IMG:style_emoticons/default/agree.gif) (IMG:style_emoticons/default/pray.gif) Just set a neodymium magnet underneath and it will literally “grab” the shavings out of the air assuming it doesn’t “fly” itself up to the crank. The magnet might need a drop of hot melt glue or double sided adhesive to stay put. Crazy strong magnets! Before you put the allmag strip in there, pack it with wheel bearing grease. It will get any shavings the magnet misses. |
|
|
|
|
1 User(s) are reading this topic (1 Guests and 0 Anonymous Users)
0 Members:

|
Lo-Fi Version | Time is now: 22nd November 2024 - 07:44 PM |
Invision Power Board
v9.1.4 © 2024 IPS, Inc.