|
|
|
Porsche, and the Porsche crest are registered trademarks of Dr. Ing. h.c. F. Porsche AG.
This site is not affiliated with Porsche in any way. Its only purpose is to provide an online forum for car enthusiasts. All other trademarks are property of their respective owners. |
|
|

  |

| 930cabman |
 Oct 30 2023, 01:07 PM Oct 30 2023, 01:07 PM
Post
#21
|
|
Advanced Member  Group: Members Posts: 3,695 Joined: 12-November 20 From: Buffalo Member No.: 24,877 Region Association: North East States |
Ouch
Any idea how long this had been loose? Think this item will go on my list of winter projects, check and double check the taper fit |
   |

 
|
| GregAmy |
Oct 30 2023, 01:36 PM
Post
#22
|
|
Advanced Member Group: Members Posts: 2,397 Joined: 22-February 13 From: Middletown CT Member No.: 15,565 Region Association: North East States |
QUOTE(930cabman @ Oct 30 2023, 02:07 PM)  Any idea how long this had been loose? Just a wild-assed guess, but "not long at all". My fuel logs indicate I've driven it only about 400 miles since October 2021 (not a typo)... The engine was rebuilt in November 2020 by a company out west, and I installed it over that winter. Fuel logs indicate that was roughly 2,000 miles ago. Most of the miles I put on it since were in 2021. I seem to recall hearing a light banging noise from the front of the engine earlier this year or maybe late last year, but it went away off idle. Since I had installed a crank position sensor toothed gear behind the fan pulley when I installed the rebuilt engine I thought ok maybe I didn't tighten the fan? So I actually stuck a socket in there to check those bolts but they were fine...but I didn't think to check the hub bolt since I had not removed it since the engine rebuild; there was no reason to. How long was the bolt loose? Anyone's guess. But with two o-rings stuck in there, maybe it wasn't even tight when I got the engine (or maybe the crushed o-rings affected the torque). I don't recall if I ever checked it. I'd suggest it was a major failure of imagination on my part for continuing to drive the car once I heard that light knocking happening, and I should have parked the car right then and there to investigate it. That's my fault. I'd also have to offer that, absent the cranked tooth gear getting massively off time causing the engine to basically stop running, it's quite possible I'd still be driving it anyway. What a mess. We'll see if we can repair it. Otherwise I think the car will have to get stored somewhere long-term, as I recently got laid off and I have no desire, money, or patience to pay for a replacement crankshaft and new engine rebuild. We'll see what happens. Fingers crossed. - GA |
 |
|
| AZBanks |
Oct 30 2023, 01:49 PM
Post
#23
|
|
Senior Member Group: Members Posts: 1,063 Joined: 7-December 05 From: New River, AZ Member No.: 5,245 Region Association: Southwest Region |
This happened to me.
The guy who put the engine back together got distracted and didn't tighten the crank bolt properly. It was just finger tight when the whole engine went back in the car. It worked loose and sheared the woodruff key just like the previous pictures. I noticed it at the emissions testing station. I was watching as the engine was running but the fan was not turning. It got hot enough to deform the rubber grommets around the spark plug wires. The next time I saw the guy, I told him he was an idiot and tried to kick his @$$. My wife is not happy about the broken mirror. |
|
|
|
| GregAmy |
Oct 30 2023, 01:58 PM
Post
#24
|
|
Advanced Member Group: Members Posts: 2,397 Joined: 22-February 13 From: Middletown CT Member No.: 15,565 Region Association: North East States |
QUOTE(AZBanks @ Oct 30 2023, 02:49 PM) The next time I saw the guy, I told him he was an idiot and tried to kick his @$$. . . . . My wife is not happy about the broken mirror. You owe my a keyboard. |
|
|
|
| Superhawk996 |
Oct 30 2023, 02:21 PM
Post
#25
|
|
914 Guru Group: Members Posts: 6,520 Joined: 25-August 18 From: Woods of N. Idaho Member No.: 22,428 Region Association: Galt's Gulch |
Pretty good chance you can repair it with careful file work, emery cloth, lapping and Prussian Blue.
Patience I’ve repaired worse looking Morse tapers to useable condition with just those basic items. Don’t lose hope. Sorry to hear about the layoff - that hurts. Why do those (IMG:style_emoticons/default/sheeplove.gif) companies always pull this (IMG:style_emoticons/default/stromberg.gif) around the holidays. (IMG:style_emoticons/default/flipa.gif) them! |
|
|
|
| ChrisFoley |
Oct 30 2023, 06:07 PM
Post
#26
|
|
I am Tangerine Racing Group: Members Posts: 7,964 Joined: 29-January 03 From: Bolton, CT Member No.: 209 Region Association: None |
QUOTE(Superhawk996 @ Oct 30 2023, 03:21 PM) Pretty good chance you can repair it with careful file work, emery cloth, lapping and Prussian Blue. ... I'm a bit more worried about the damaged keygroove. Considering how to reshape the groove after doing some weld buildup on the edge... or possibly using bronze to secure the key on the crank. I'm pondering if I can do it on the assembled longblock. Tough spot to work in. First step will be to practice on another crank, without all the challenges. |
|
|
|
| 930cabman |
Oct 30 2023, 06:22 PM
Post
#27
|
|
Advanced Member Group: Members Posts: 3,695 Joined: 12-November 20 From: Buffalo Member No.: 24,877 Region Association: North East States |
QUOTE(Superhawk996 @ Oct 30 2023, 02:21 PM) Pretty good chance you can repair it with careful file work, emery cloth, lapping and Prussian Blue. Patience I’ve repaired worse looking Morse tapers to useable condition with just those basic items. Don’t lose hope. Sorry to hear about the layoff - that hurts. Why do those (IMG:style_emoticons/default/sheeplove.gif) companies always pull this (IMG:style_emoticons/default/stromberg.gif) around the holidays. (IMG:style_emoticons/default/flipa.gif) them! This is not an easy repair. It's possible you can pull it off, but ..... From what I know the key/keyway do little work other than indexing the hub. At least 90% of the work is done with a well fitting tight tapered connection. |
|
|
|
| Superhawk996 |
Oct 30 2023, 06:40 PM
Post
#28
|
|
914 Guru Group: Members Posts: 6,520 Joined: 25-August 18 From: Woods of N. Idaho Member No.: 22,428 Region Association: Galt's Gulch |
QUOTE(ChrisFoley @ Oct 30 2023, 08:07 PM) QUOTE(Superhawk996 @ Oct 30 2023, 03:21 PM) Pretty good chance you can repair it with careful file work, emery cloth, lapping and Prussian Blue. ... I'm a bit more worried about the damaged keygroove. Woodruff key only determines timing mark location relative to crank. If the key is a little loose side to side it will only affect timing as seen with a timing light. Example 27 degrees may now be 25. A little trial and error will figure out the offset. The key has no significant effect upon securing the fan to the crank once the taper is engaged properly. This is borne out by how easily the key shears once the taper comes loose and can no longer handle the torque. |
|
|
|
| Superhawk996 |
Oct 30 2023, 06:45 PM
Post
#29
|
|
914 Guru Group: Members Posts: 6,520 Joined: 25-August 18 From: Woods of N. Idaho Member No.: 22,428 Region Association: Galt's Gulch |
QUOTE(930cabman @ Oct 30 2023, 08:22 PM) At least 90% of the work is done with a well fitting tight tapered connection. The taper does 100% of the work. Machine tools like Jacob’s tapers, and Morse tapers, ER collets; all can take a lot of torque and none of them have a key way or positive engagement feature to resist torque. R8 taper has a key way, but that is only to prevent the collet from rotating while the draw bar is tightened, pulling the collet tight into the R8 taper. |
|
|
|
| GregAmy |
Oct 31 2023, 07:05 AM
Post
#30
|
|
Advanced Member Group: Members Posts: 2,397 Joined: 22-February 13 From: Middletown CT Member No.: 15,565 Region Association: North East States |
I was recently reminded that early Miatas had a problem with the valve drive gear bolt coming loose; we used to lose Miata crankshafts often in racing, and checking the crankshaft bolt became a regular pre-weekend prep item. The design was fixed after '91 with a longer nose and bigger bolt.
The Miata design is different, in that it's a straight fit and the keyway drives the pulley. But a buddy reminded me of the DIY trick for "repairing" the situation if you're on a budget. https://www.miata.net/garage/hsue/Loctite%2...%20Part%201.htm And a video from Loctite: https://www.youtube.com/watch?v=LLSLtr0ECbc...%AENorthAmerica I'm leaning toward small files to knock down the high bits on the backside of the key damage and then valve-lapping-compound the taper all the way around with a replacement hub (and bolt and key). Chris is leaning toward having me schlep the assembly to his shop for bronze TIG, but I'm wondering, given a good taper, if something as simple as Loctite 660 to stabilize the key would be fine. Loctite lists the shear strength of 660 as approaching 3000 psi, which is more than adequate. What I can't tell if the keyway would removable; I'm guessing not. Let's check those bolts, team. It's not hard at all to do and I fear there may be more of us out there...23 ft-lbs and use Loctite 243 on the bolt. - GA |
|
|
|
| Superhawk996 |
Oct 31 2023, 08:18 AM
Post
#31
|
|
914 Guru Group: Members Posts: 6,520 Joined: 25-August 18 From: Woods of N. Idaho Member No.: 22,428 Region Association: Galt's Gulch |
QUOTE(GregAmy @ Oct 31 2023, 09:05 AM) What I can't tell if the keyway would removable; I'm guessing not. Loctite site says 500F heat to remove the key. I have no experience with that product but sure looks interesting and appropriate for the application. I would imagine you’ll still get minor variation in timing depending on how perpendicular the key is to the crank. I remember the Miata fiasco vividly - had a friend with a 90’. Mine was a 91’ specifically to avoid that issue. Pretty rare for the Japanese to screw up the engineering that badly but it happened - probably in the rush to get it to market. Put 220k miles on my 91 and never had an issue after they fixed it. Completely different design than a taper though! https://www.youtube.com/watch?v=6-m2IT4Xojo |
|
|
|
| GregAmy |
Oct 31 2023, 08:34 AM
Post
#32
|
|
Advanced Member Group: Members Posts: 2,397 Joined: 22-February 13 From: Middletown CT Member No.: 15,565 Region Association: North East States |
What grit lapping compound do we suggest?
Amazon cart has: - Loctite 660 "quick metal" - Loctite 22355 cleaner/degreaser - Loctite 7649 primer - Loctite 243 Blue threadlocker - Small set of needle diamond jeweler's files Add in some lapping compound and I can probably get this done for less than $120 and an hour or so of patient work (plus reinstall)...we'll see. - GA P.S., I'm not worried about small timing variations. I can set my baseline timing off the mark I put on the flywheel, visible by moving the rear sheet metal back. I can even adjust it in the Microsquirt so that the pulley matches. The important part is ensuring the hub is secure and never to move again... |
|
|
|
| Superhawk996 |
Oct 31 2023, 10:03 AM
Post
#33
|
|
914 Guru Group: Members Posts: 6,520 Joined: 25-August 18 From: Woods of N. Idaho Member No.: 22,428 Region Association: Galt's Gulch |
Start coarse and work down - use Prussian blue to monitor progress until you have uniform contact around - across the entire taper . With lapping compound it’s not like you’ll ever take too much material off.
Pits below the surface are of zero concern but you don’t want any high spots. |
|
|
|
| Superhawk996 |
Oct 31 2023, 10:12 AM
Post
#34
|
|
914 Guru Group: Members Posts: 6,520 Joined: 25-August 18 From: Woods of N. Idaho Member No.: 22,428 Region Association: Galt's Gulch |
Budget three hours (IMG:style_emoticons/default/biggrin.gif)
Anytime I tell my wife it will only take an hour in the garage - it’s three or four. (IMG:style_emoticons/default/happy11.gif) Per other thread, Clay’s suggestion to pack the seal pocket with grease and/or magnet to catch shavings should be a good one. |
|
|
|
| 930cabman |
Oct 31 2023, 12:58 PM
Post
#35
|
|
Advanced Member Group: Members Posts: 3,695 Joined: 12-November 20 From: Buffalo Member No.: 24,877 Region Association: North East States |
QUOTE(Superhawk996 @ Oct 31 2023, 10:03 AM) Start coarse and work down - use Prussian blue to monitor progress until you have uniform contact around - across the entire taper . With lapping compound it’s not like you’ll ever take too much material off. Pits below the surface are of zero concern but you don’t want any high spots. (IMG:style_emoticons/default/agree.gif) Knock down the high spots, the low spots will be 0 contact, but will not hurt you The high spots create point loads and will in a short time start to rock. You are looking for as close to 100% contact as you can get. The Prussian Blue will tell that story |
|
|
|
| GregAmy |
Nov 3 2023, 08:11 AM
Post
#36
|
|
Advanced Member Group: Members Posts: 2,397 Joined: 22-February 13 From: Middletown CT Member No.: 15,565 Region Association: North East States |
Is this a build blog now...? (IMG:style_emoticons/default/beer.gif) Hey, maybe it'll help someone else in the future.
More conversation-via-photos, as follows: - Reminder of the original discovery - First pass at finding the high spots (using the sharpie method) - 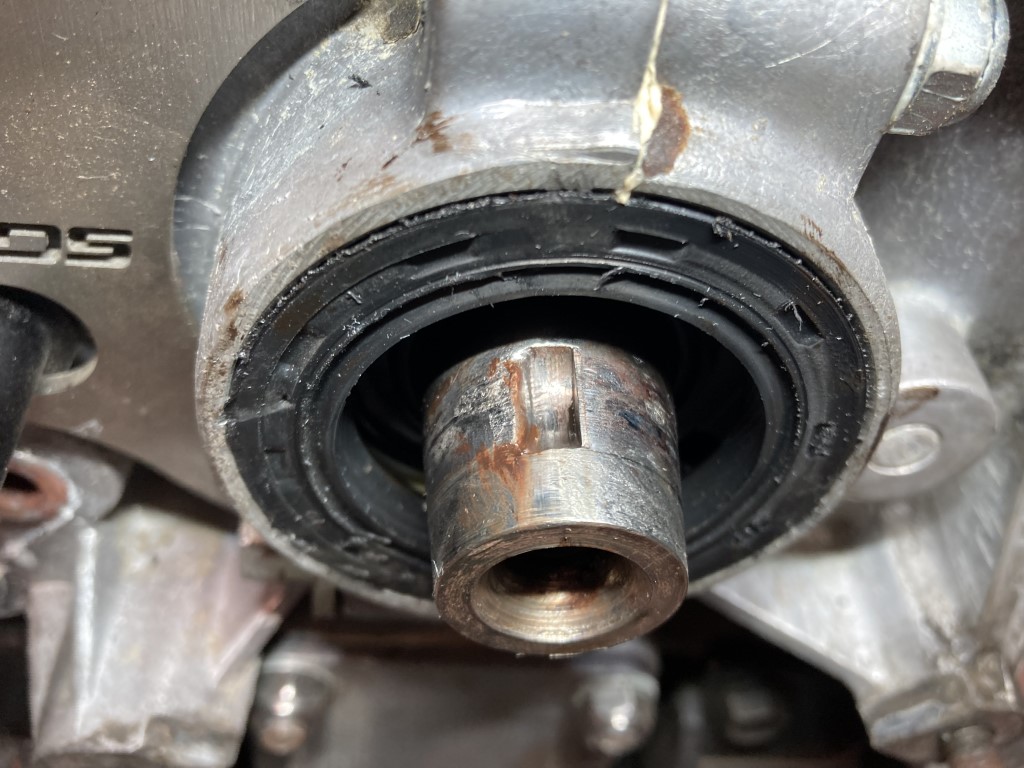 |
|
|
|
| GregAmy |
Nov 3 2023, 08:20 AM
Post
#37
|
|
Advanced Member Group: Members Posts: 2,397 Joined: 22-February 13 From: Middletown CT Member No.: 15,565 Region Association: North East States |
Is this a build blog now...? (IMG:style_emoticons/default/beer.gif) Hey, maybe it'll help someone else in the future.
More conversation-via-photos, as follows: - Reminder of the original discovery - First pass at finding the high spots (using the sharpie method) - Surprisingly little rework with small jeweler's files and then a couple passes with 150 grit lapping compound - Couple more 150 grit passes and the nose came in - Couple passes with 280 grit lapping compound. Not much difference so I'm going with this - Nighty-nite for the Loctite 660 to cure overnight Wake up this AM expecting it to all be good...and the Loctite 660 hasn't set. I was listed as anerobic and for spaces up to 20-thou (my gap is about 1.5mm) so maybe I shouldn't be so disappointed. I sent a note to Loctite for guidance. Maybe steel-infused JBWeld is the answer...? <shudder> More soon. - GA 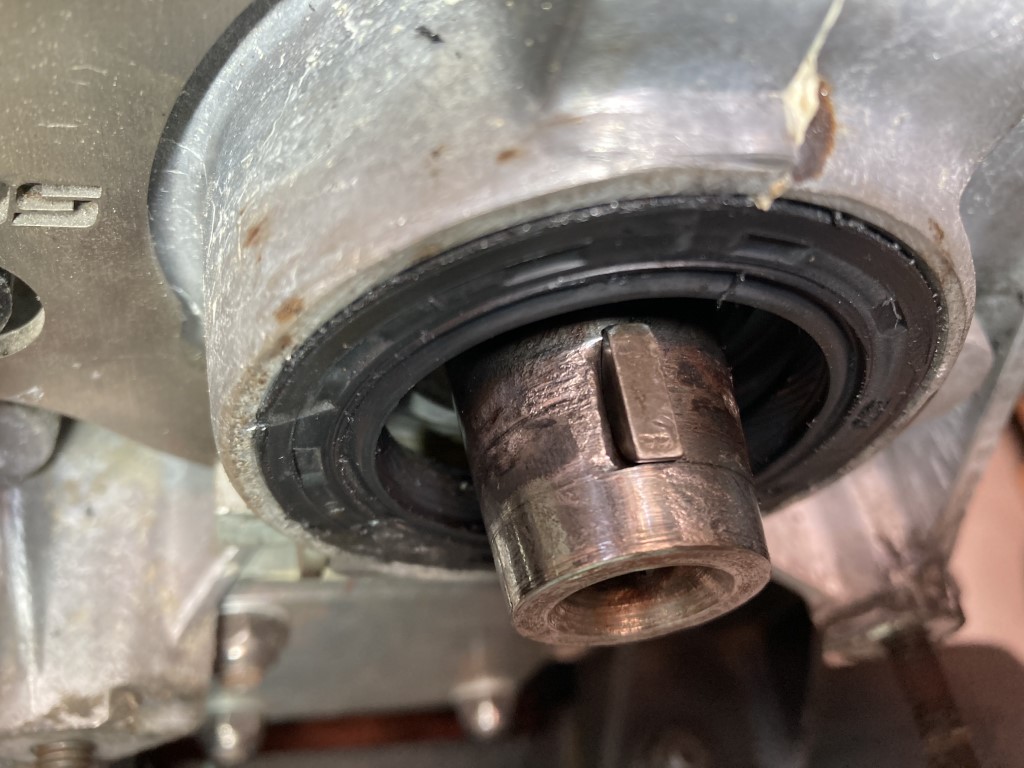 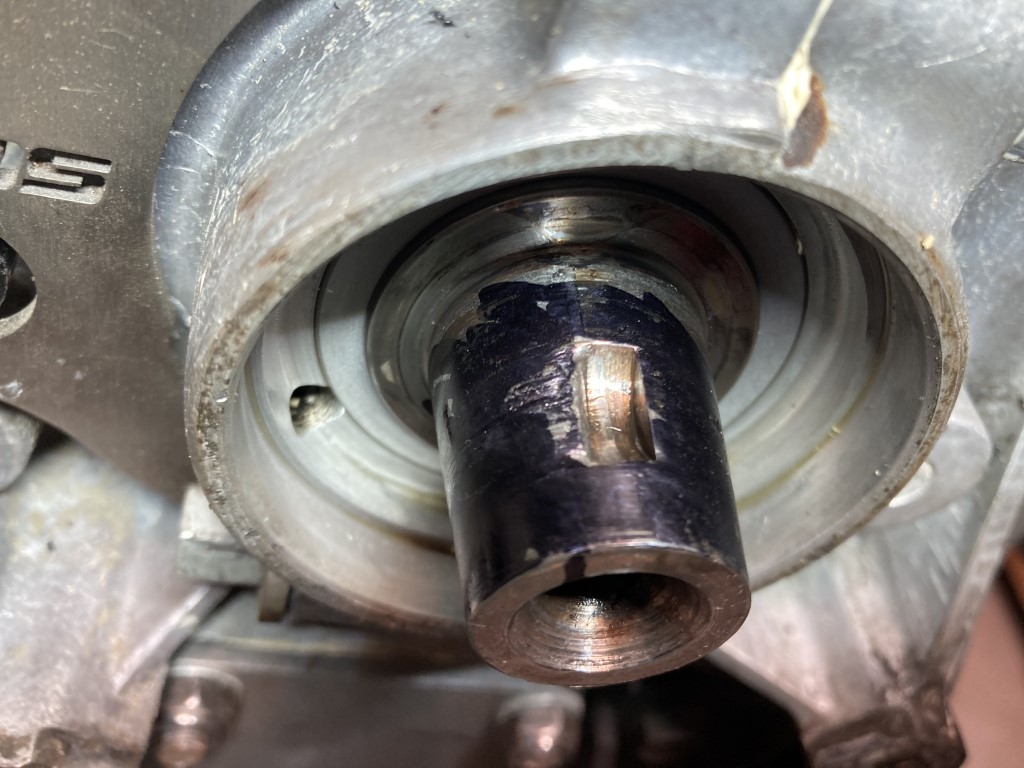 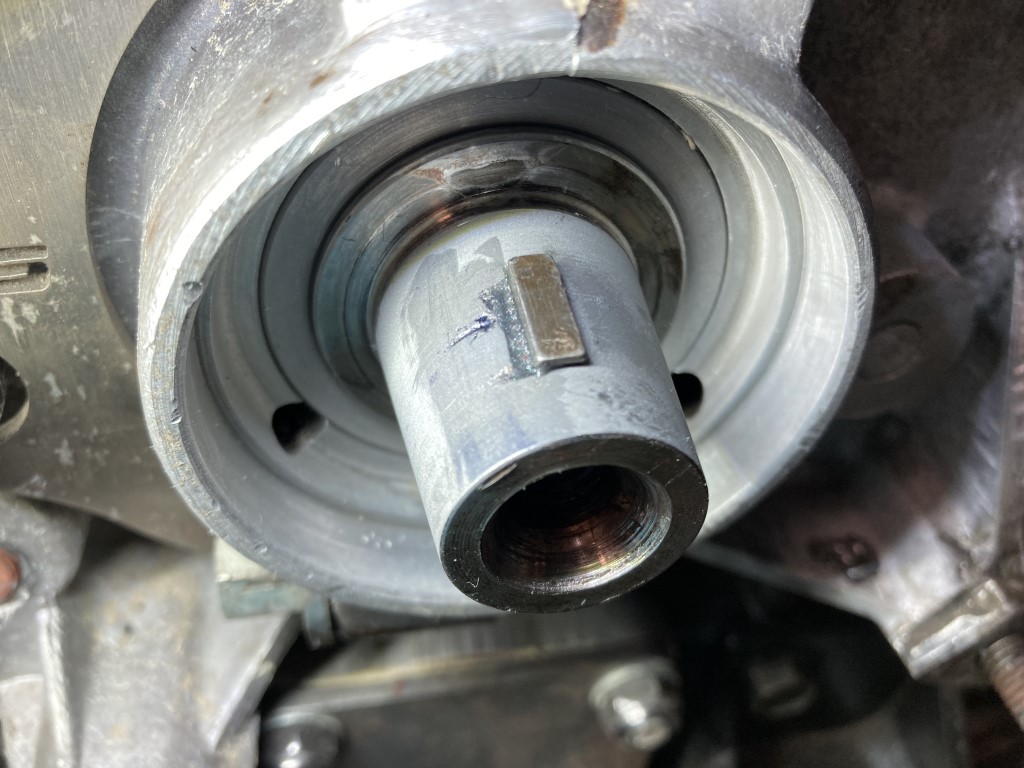  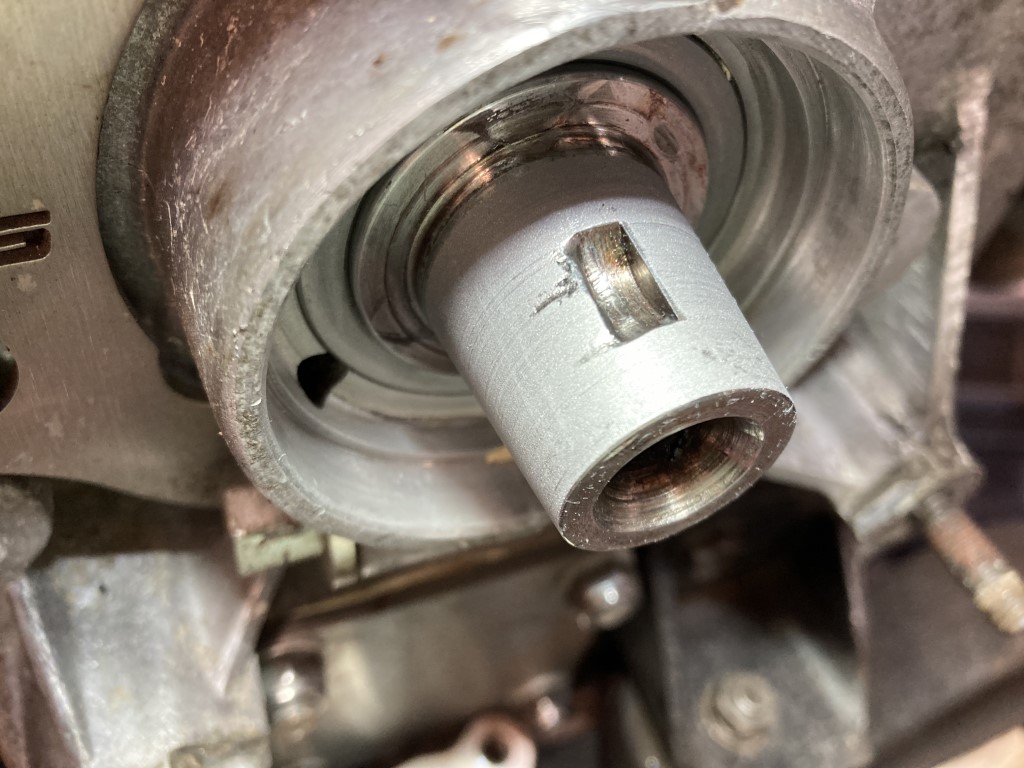 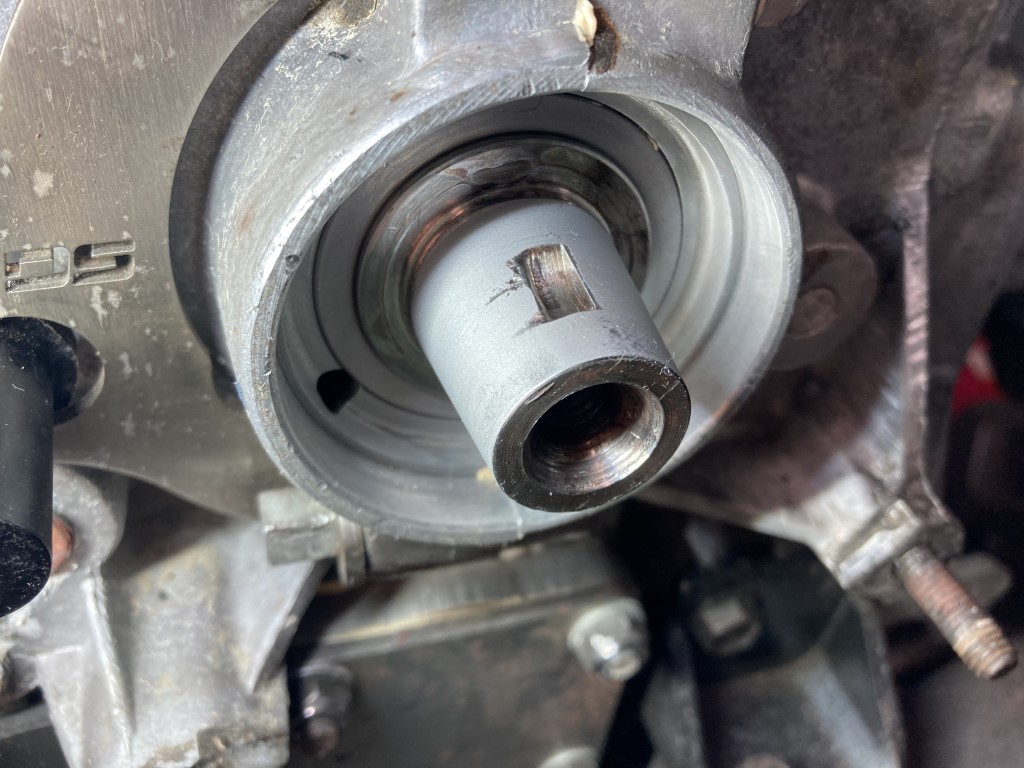 |
|
|
|
| Porschef |
Nov 3 2023, 08:35 AM
Post
#38
|
|
How you doin' Group: Members Posts: 2,177 Joined: 7-September 10 From: LawnGuyland Member No.: 12,152 Region Association: North East States |
That looks pretty good Greg (IMG:style_emoticons/default/beerchug.gif)
Tedious work, no doubt. I know lots of folks swear by JB Weld but has anyone tried Marine Tex? It’s pretty tough stuff that’s also workable, on the package it says can be used to repair manifolds, etc... |
|
|
|
| GregAmy |
Nov 3 2023, 08:44 AM
Post
#39
|
|
Advanced Member Group: Members Posts: 2,397 Joined: 22-February 13 From: Middletown CT Member No.: 15,565 Region Association: North East States |
QUOTE(Porschef @ Nov 3 2023, 09:35 AM) Tedious work, no doubt. Surprisingly, easier than expected. Really, only an hour or so worth of work (with another hour tossed in for being careful). I'm all ears for any alternative materials; Loctite's response was, "It could be likely that your product is counterfeit as we do not support Industrial products sold though Amazon. Or you could not be using the product correctly, a primer is needed if the product is used on a passive metal." GA |
|
|
|
| 930cabman |
Nov 3 2023, 09:07 AM
Post
#40
|
|
Advanced Member Group: Members Posts: 3,695 Joined: 12-November 20 From: Buffalo Member No.: 24,877 Region Association: North East States |
Looks like you are getting a decent amount of contact. What did you use as an abrasive?
|
|
|
|
|
7 User(s) are reading this topic (7 Guests and 0 Anonymous Users)
0 Members:

|
Lo-Fi Version | Time is now: 22nd November 2024 - 03:51 PM |
Invision Power Board
v9.1.4 © 2024 IPS, Inc.