|
|
|
Porsche, and the Porsche crest are registered trademarks of Dr. Ing. h.c. F. Porsche AG.
This site is not affiliated with Porsche in any way. Its only purpose is to provide an online forum for car enthusiasts. All other trademarks are property of their respective owners. |
|
|

  |

| Artfrombama |
 Apr 16 2025, 09:49 PM Apr 16 2025, 09:49 PM
Post
#441
|
|
Member  Group: Members Posts: 271 Joined: 21-January 24 From: Alabama Member No.: 27,870 Region Association: South East States |
QUOTE(friethmiller @ Apr 16 2025, 02:59 PM)  QUOTE(Root_Werks @ Apr 16 2025, 01:18 PM) Boy, that corner on 914 fenders can really get rusted out. Kudos on the patch instead of just getting an entirely different fender! I bet you can't wait to get those fenders back on. (IMG:style_emoticons/default/welder.gif) To be honest I'm a little concern with the fit as my patch might be slightly oversized at the critical point where it meets the door and the A-pillar. But.... I'm in it now! (IMG:style_emoticons/default/stromberg.gif) Can't wait to figure out how to make this all work (IMG:style_emoticons/default/huh.gif) Will likely need to pull out the Clecos for the fender and mount the door. Yes, I want these fenders back on before I get the call from the machine shop about the other 914's engine parts. It'll be a great stopping point to then flip over and rebuild the engine. You are a master at sheet metal and persistence. It will be awesome |
   |

 
|
| friethmiller |
Apr 18 2025, 05:04 PM
Post
#442
|
|
Senior Member Group: Members Posts: 845 Joined: 10-February 19 From: Austin, TX Member No.: 22,863 Region Association: Southwest Region |
Fender Repair - Passenger Side (part 2): (4/17/2025):
With a few hours of daylight after work, I spent some time working on the main patch at the back of the fender. My goal was to at least get the rest of the metal welded in and then deal with the fitment issues tomorrow. I started by creating a reinforcement patch that gives support to the outer skin. This first patch is only the first of two pieces that will make up this very important structural part of the fender. The first three photos so this process. The 4th photo shows the current state of the fender. Oops! Look at that gap! (IMG:style_emoticons/default/bootyshake.gif) Going to have to deal with that later. 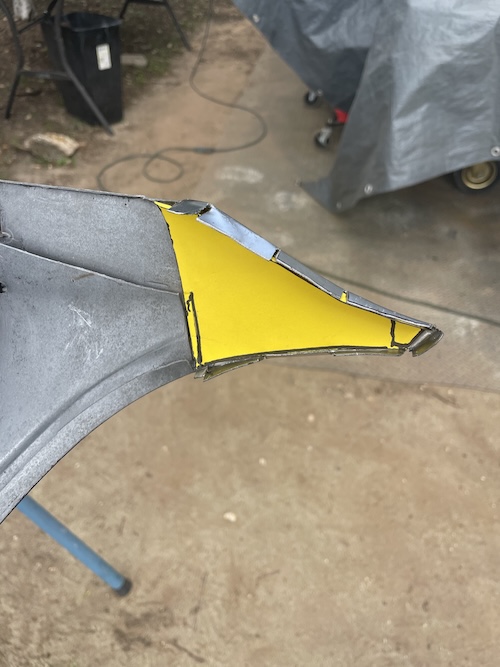 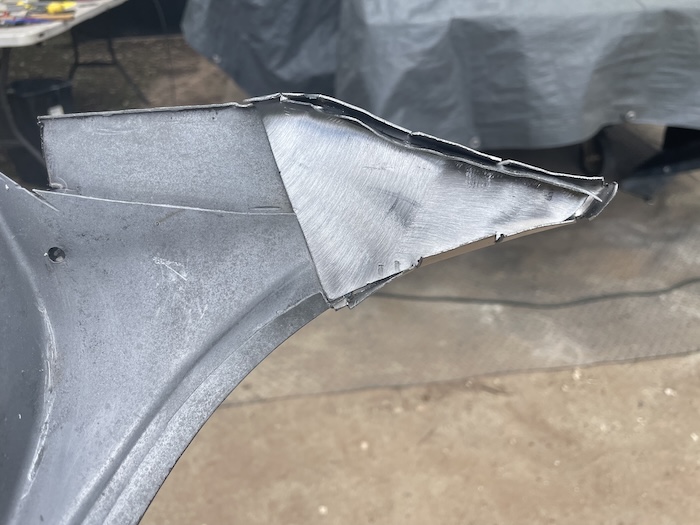 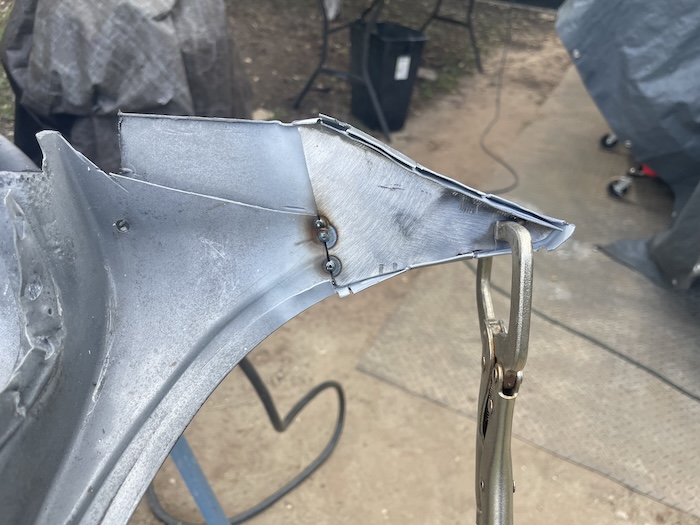 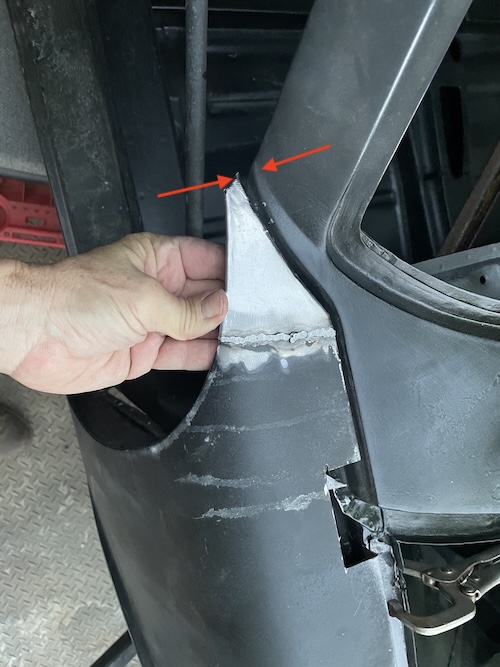 Moving on to the next patch. The following 5 photos show this repair. I used the other fender to make measurements for sizing. I decide to make it slightly larger than needed. I ground down the excess later. Note how this area was drilled out for rosettes to secure the support to the fender down the seam. 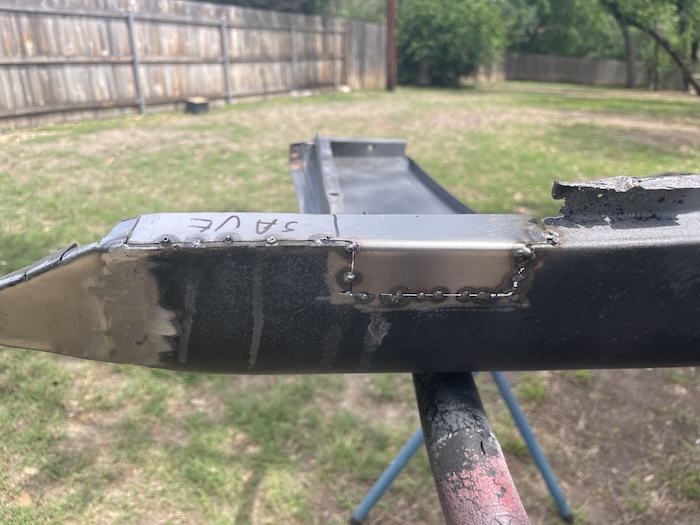 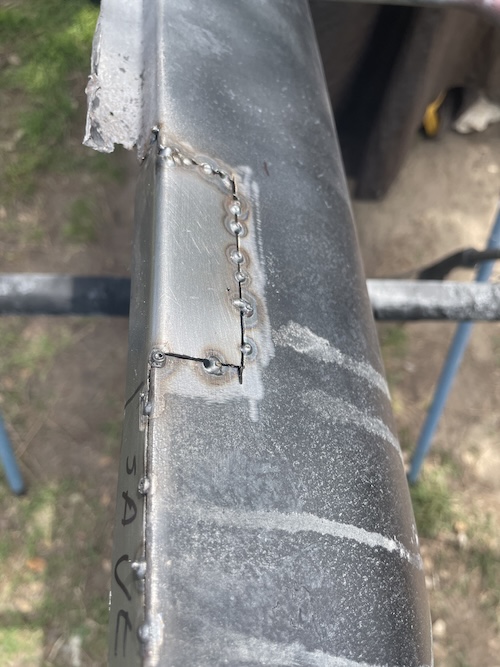 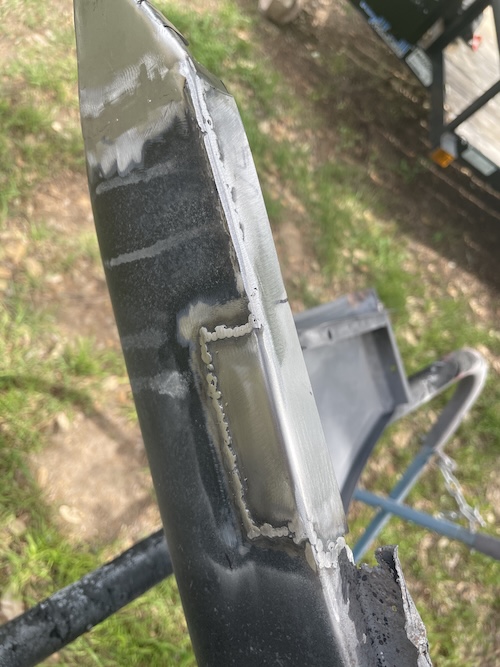 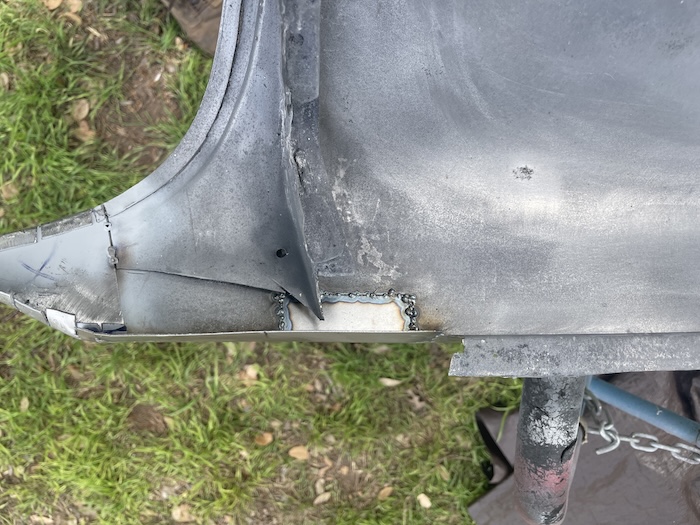 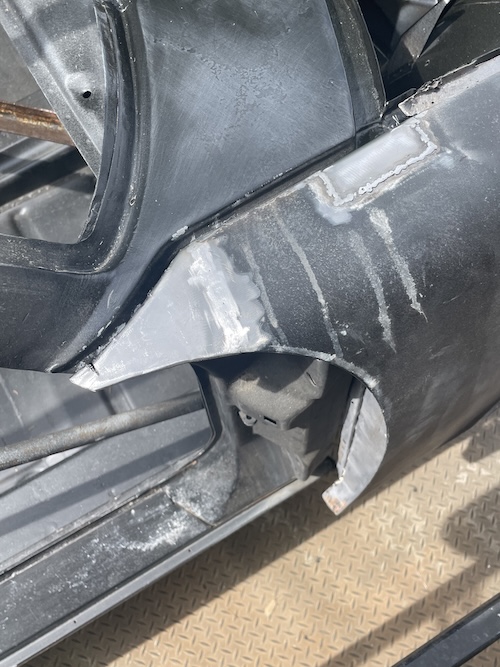 The final set of photos show the 3rd patch going in. This one was a little tricky to form but I was able to get it trimmed up and welded in place. It's interesting how this piece works to support the fender. It was getting pretty late so I decided to wait and grind the welds down next time. 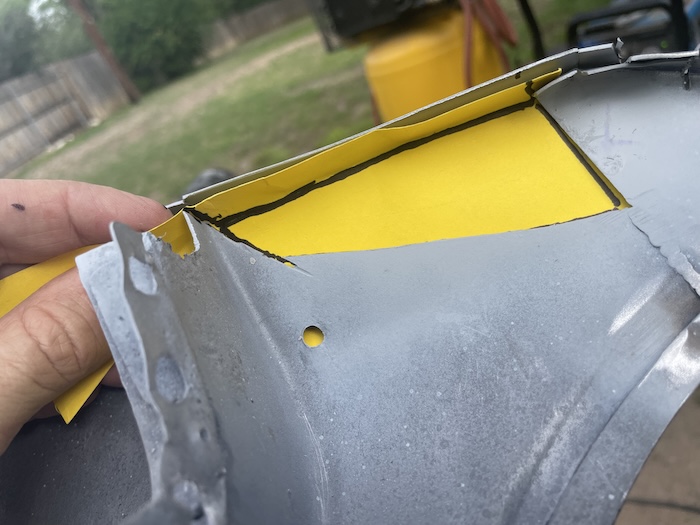 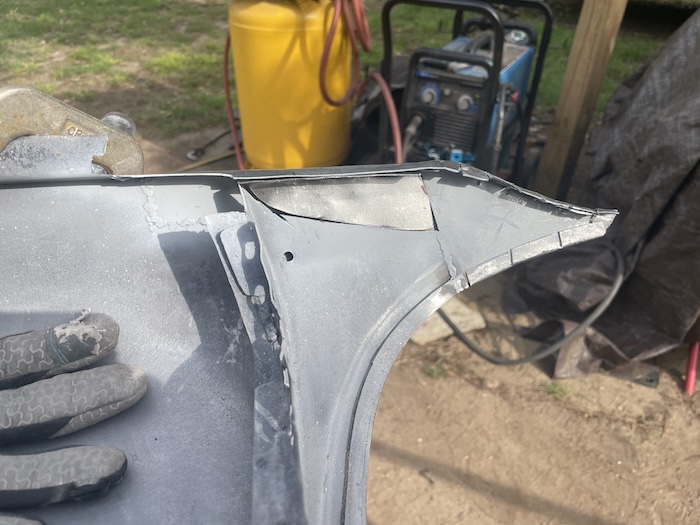 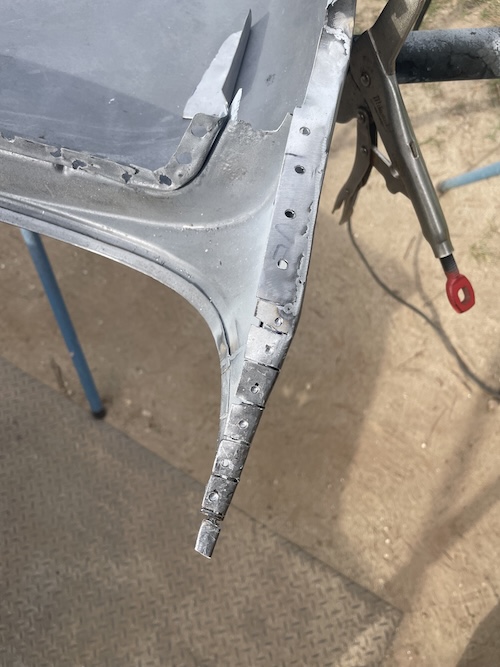 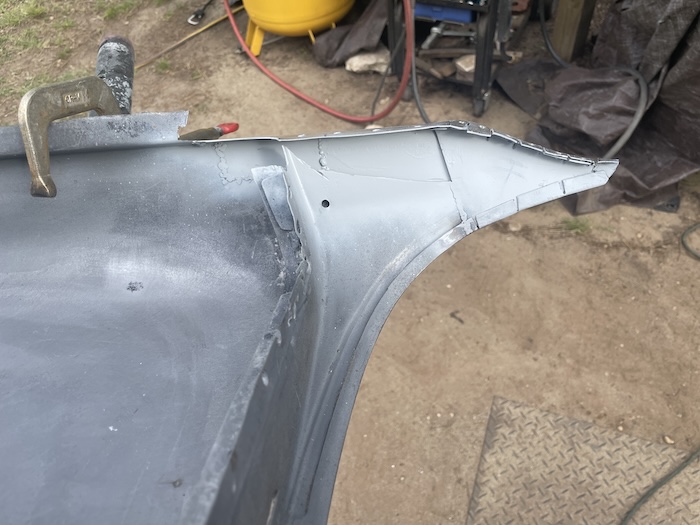 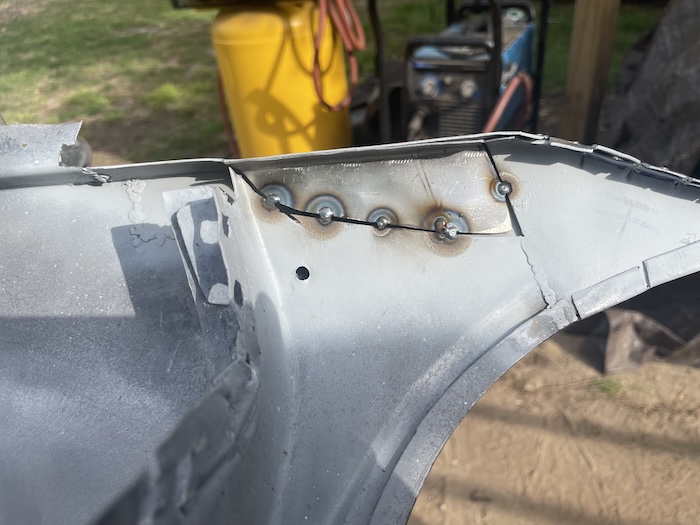 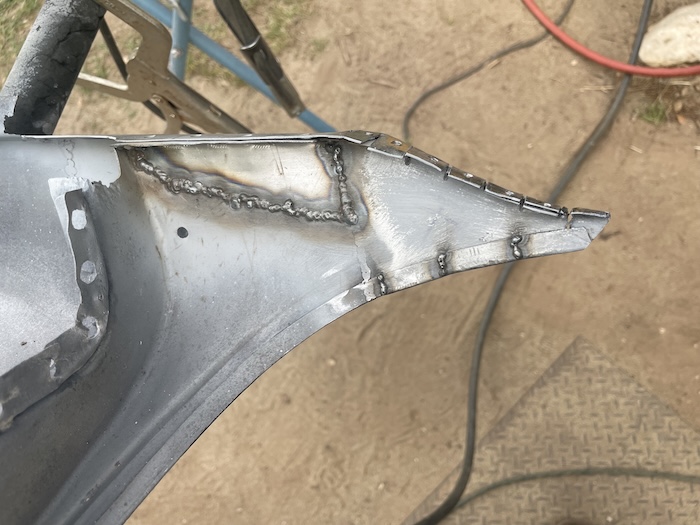 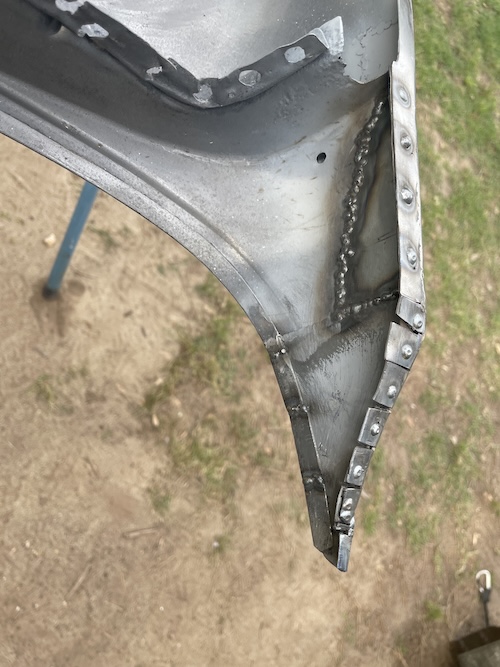 |
|
|
|
| friethmiller |
Apr 18 2025, 05:50 PM
Post
#443
|
|
Senior Member Group: Members Posts: 845 Joined: 10-February 19 From: Austin, TX Member No.: 22,863 Region Association: Southwest Region |
Fender Repair - Passenger Side (part 3): (4/18/2025):
It was extremely windy today. Not very good for welding but the temperatures were in the 80's (IMG:style_emoticons/default/aktion035.gif) Starting things off by jumping right in on the size/fitment issue with the back tip of this passenger side fender. Photo #1 shows the cut (arrow) the other is a marker line that I decided not to use. Pic #2 shows two more perpendicular cuts that were made to allow the gap to be closed. 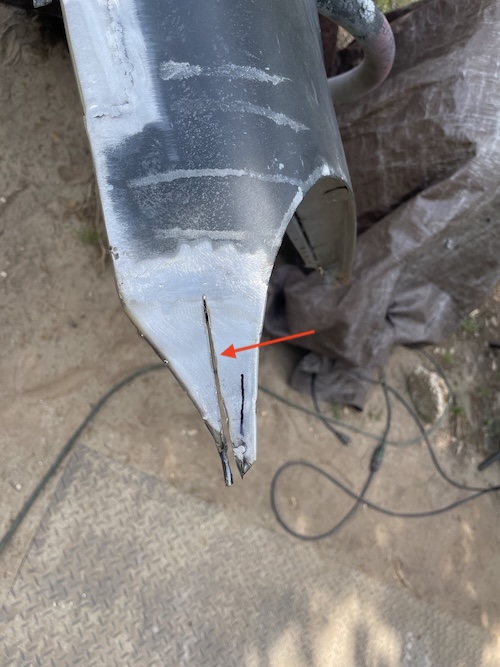 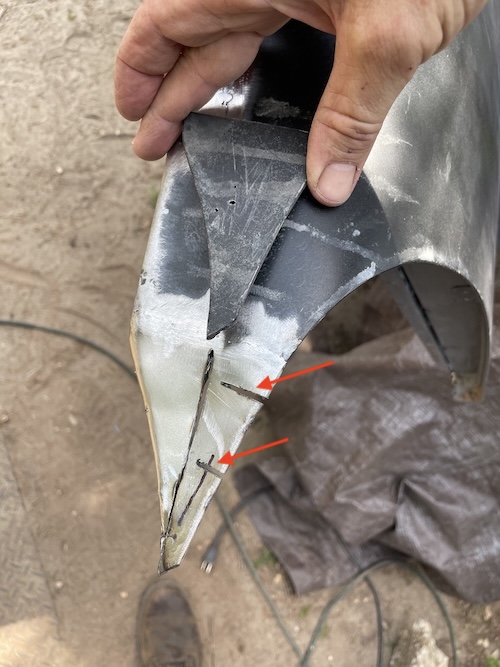 I used a cutting blade to widen the initial cut till I was able to get the sizing correct and the alignment was good with the fender mount to the car. The following photos so more sausage being made as everything is welded close. The amount of heat generated was a major concern for me. I had to keep cooling everything after a just a few welds. This entire process to over two hours to complete. The final photos in this set show the sizing to the original and final grinding of this area. No doubt body filler will be needed but this should be a good starting point. 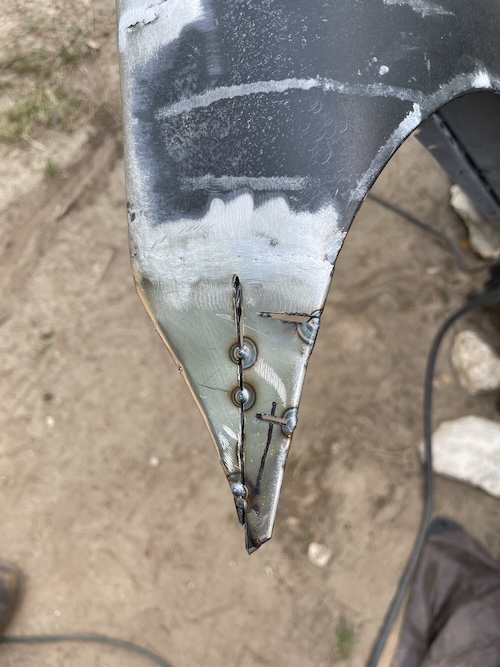 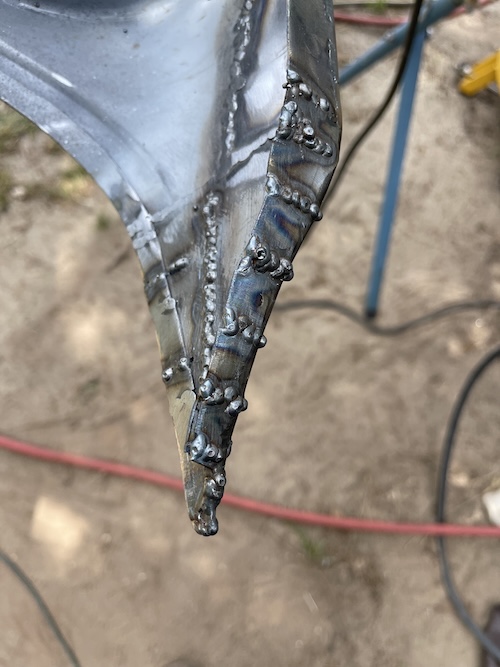 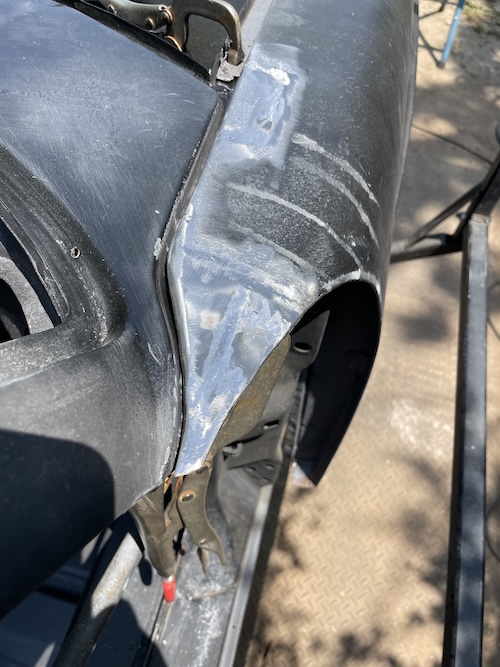 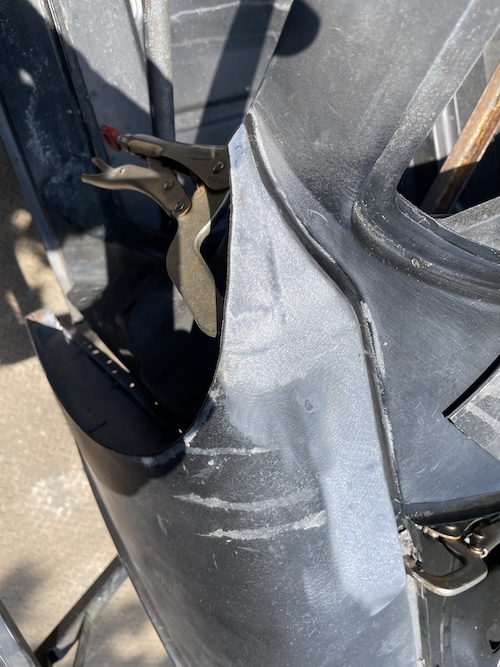  With all that done, I flipped the fender over and gave the backside welds a quick final out, as well (see pic #1). Moving on to the sealant track next. I started off by cutting out the rusted sections and forming new patches. Pic #2 shows this first patch. Pic #3 shows both patches getting welded in. The final 3 photos in this set show the finishing work done to complete the upper portion of the sealant track. 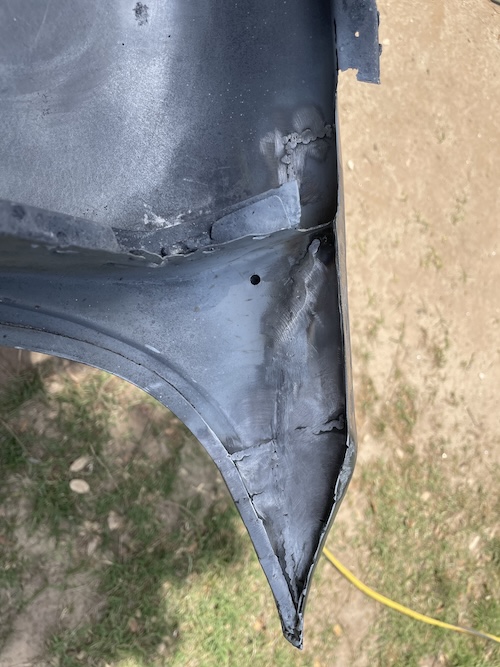 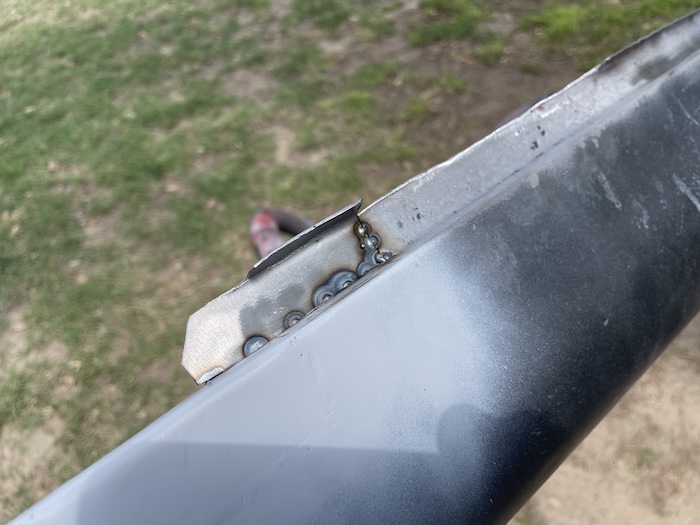 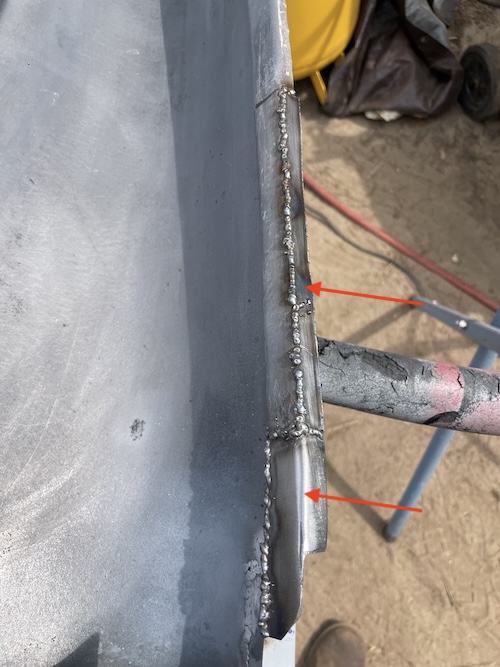 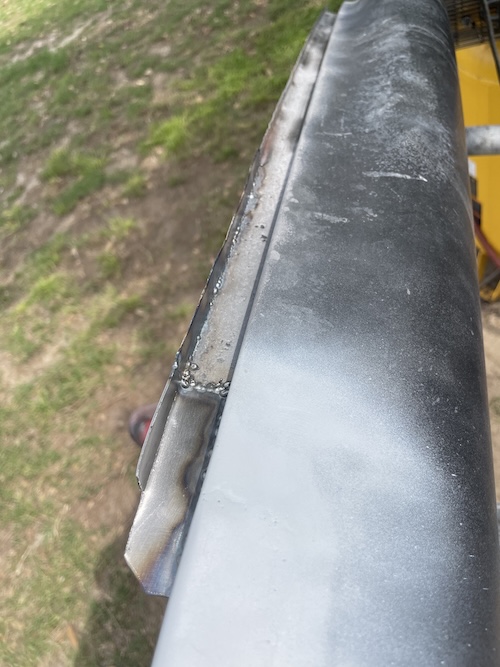 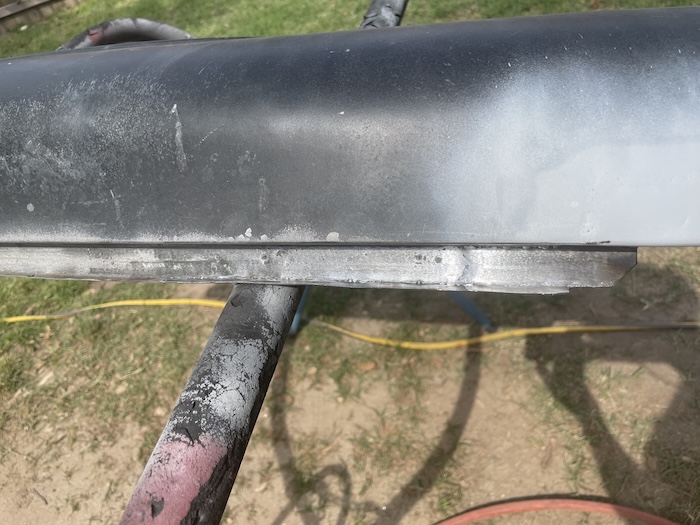 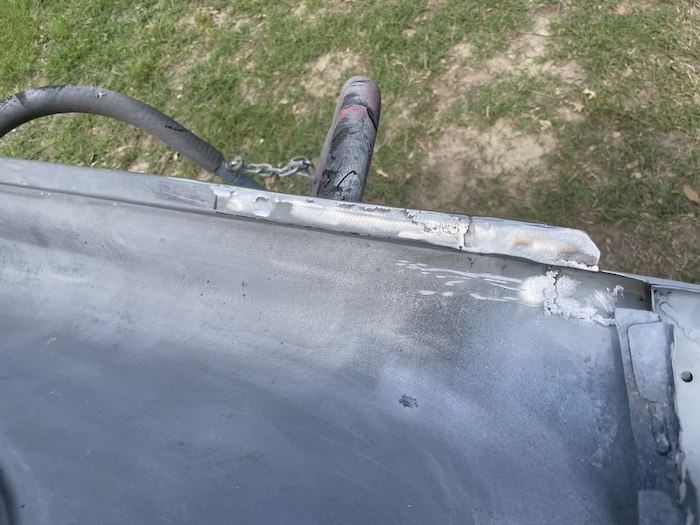 More work was also required at the bottom end of the track right before it hits the light bucket. These patches were small and, once tacked in place, were pretty easy to finish out. 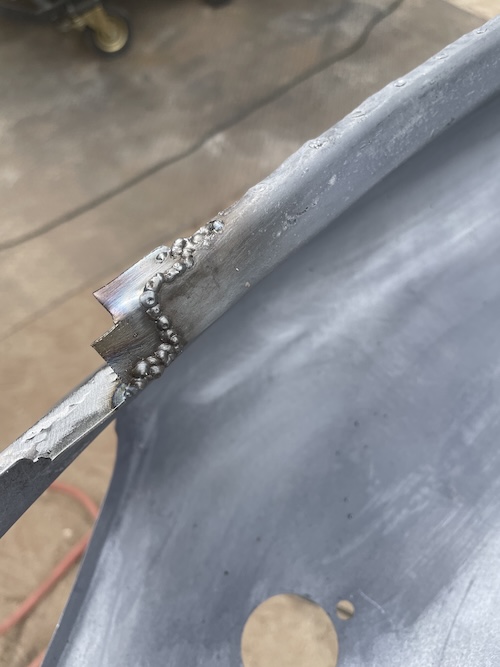 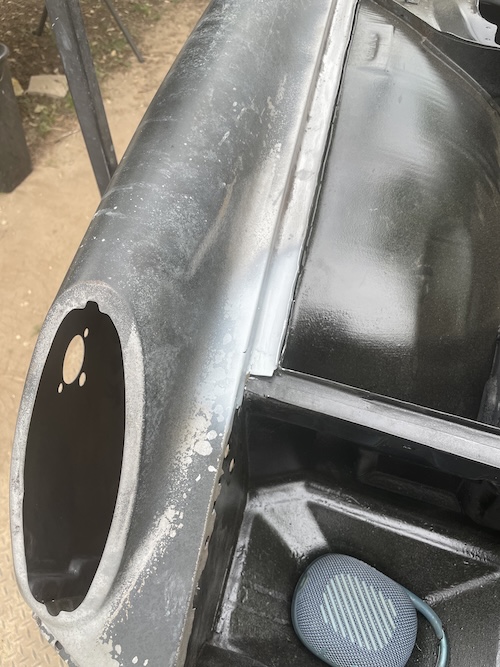 And... with all that... this fender is ready for final prep and install. Next up is the Driver Side Fender Repair. Cheers! (IMG:style_emoticons/default/beerchug.gif) 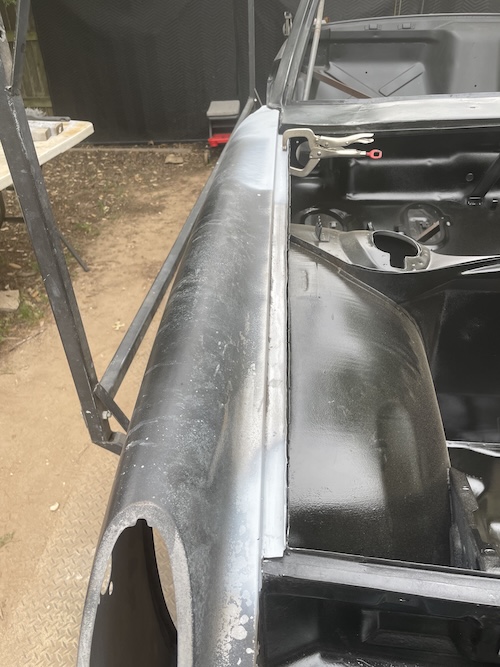 |
|
|
|
| Cairo94507 |
Apr 18 2025, 06:29 PM
Post
#444
|
|
Michael Group: Members Posts: 10,297 Joined: 1-November 08 From: Auburn, CA Member No.: 9,712 Region Association: Northern California |
Amazing; I love seeing the progress shots. (IMG:style_emoticons/default/beerchug.gif)
|
|
|
|
| 930cabman |
Apr 19 2025, 06:11 AM
Post
#445
|
|
Advanced Member Group: Members Posts: 4,044 Joined: 12-November 20 From: Buffalo Member No.: 24,877 Region Association: North East States |
QUOTE(Cairo94507 @ Apr 18 2025, 06:29 PM) Fred's got this (IMG:style_emoticons/default/beerchug.gif) great skills, fortitude, .... (IMG:style_emoticons/default/sawzall-smiley.gif) |
|
|
|
| Puebloswatcop |
Apr 19 2025, 07:14 AM
Post
#446
|
|
Senior Member Group: Members Posts: 1,442 Joined: 27-December 14 From: Mineola, Texas Member No.: 18,258 Region Association: Southwest Region |
It was a pleasure to stop by yesterday and see this piece of art in person. Fred does excellent work and it was so fun seeing his passion for these little cars. We spent over an hour talking 914. Seeing this project in person has given this thread a much more personal experience for me, as well as what I can see as a new long term friendship built around our common passion for these cars. Thanks Fred.
|
|
|
|
|
1 User(s) are reading this topic (1 Guests and 0 Anonymous Users)
0 Members:

|
Lo-Fi Version | Time is now: 19th April 2025 - 01:37 PM |
Invision Power Board
v9.1.4 © 2025 IPS, Inc.