|
|
|
Porsche, and the Porsche crest are registered trademarks of Dr. Ing. h.c. F. Porsche AG.
This site is not affiliated with Porsche in any way. Its only purpose is to provide an online forum for car enthusiasts. All other trademarks are property of their respective owners. |
|
|

  |

| DennisV |
 Jan 1 2024, 08:54 AM Jan 1 2024, 08:54 AM
Post
#1
|
|
Senior Member  Group: Members Posts: 605 Joined: 8-August 20 From: Santa Rosa, CA Member No.: 24,575 Region Association: Northern California |
Are there any tips or tricks to reinstalling the steering rack?
I rebuilt ours and attempted to get it back in over the weekend. I could never get the shaft from the steering rack to align well enough with the universal joint to insert it. I was in the passenger compartment and had a helper under the car supporting the rack. With the bellows, gasket, etc. on there it took a little bit of effort to hold it up far enough to meet the bottom of the knuckle joint. The joint is still attached to the upper shaft connected to the steering wheel. Nothing on the rack other than what is shown. The bolt is out of the universal joint. The gas tank is out. The bearing support bracket (in the gas tank area) is removed. All of the suspension is out. So the only thing I'm really contending with in terms of clearance is the brake master cylinder. Is this just a try, try again scenario, or am I overlooking something? Seems like it should be a 10 minute job. 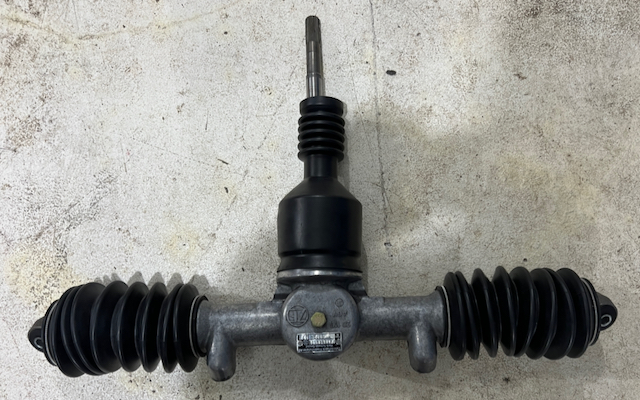 |
   |

 
|
| jhynesrockmtn |
Jan 1 2024, 09:20 AM
Post
#2
|
|
Member Group: Members Posts: 437 Joined: 13-June 16 From: spokane wa Member No.: 20,100 Region Association: Pacific Northwest |
I did this, I guess I say last year now. I first tried a few ways to do it myself with some supports, zip ties, etc. No go. Had a buddy come over, took a few minutes. I'm not sure what might be going wrong in your case. Sounds like just the scenario I had. I'd say try again. I had to make a few adjustments to the steering wheel to get it perfectly centered once everything was back together.
|
|
|
|
| burton73 |
Jan 1 2024, 01:00 PM
Post
#3
|
|
Senior member, and old dude Group: Members Posts: 3,796 Joined: 2-January 07 From: Los Angeles Member No.: 7,414 Region Association: Southern California |
I have done this a few times. It is not an easy fit, but it is much easier with a partner. You must massage it till it fits. It must go in just so and that can take a few stabs. If you get tired, rest for a moment, and take another stab at it.
Best Bob B |
|
|
|
| iankarr |
Jan 1 2024, 03:17 PM
Post
#4
|
|
The wrencher formerly known as Cuddy_K Group: Members Posts: 2,554 Joined: 22-May 15 From: Heber City, UT Member No.: 18,749 Region Association: Intermountain Region |
Def a 2 person job. The tough part is that it’s difficult to get any leverage to push the splined piece into the coupler insider the car. Recommend either wedging the coupler open, or using a pry bar to widen it so the splines can more easily slide in. You can then use a vise grip to squeeze it together and get the bolt through.
|
|
|
|
| rgalla9146 |
Jan 2 2024, 11:22 AM
Post
#5
|
|
Advanced Member Group: Members Posts: 4,727 Joined: 23-November 05 From: Paramus NJ Member No.: 5,176 Region Association: None |
Don't forget the lipped collar on the gastank side of the bulkhead (IMG:style_emoticons/default/smile.gif) |
|
|
|
| DennisV |
Jan 3 2024, 11:25 AM
Post
#6
|
|
Senior Member Group: Members Posts: 605 Joined: 8-August 20 From: Santa Rosa, CA Member No.: 24,575 Region Association: Northern California |
Thanks everyone for the feedback.
QUOTE(rgalla9146 @ Jan 2 2024, 09:22 AM)  Don't forget the lipped collar on the gastank side of the bulkhead (IMG:style_emoticons/default/smile.gif) Number 32 in the diagram? Not shown in my original photo, but the bearing (#26) and the collar (#32) are on there, and adding to the challenge of seating things I think. Probably doesn't help that it is old and a little bit deformed. NLA. BTW - Best I can tell there should only be the bearing (#26) and the bracket (#27) securing things in the gas tank area. No additional rubber mounting (#30) which seems to go the same place the needle bearing is? 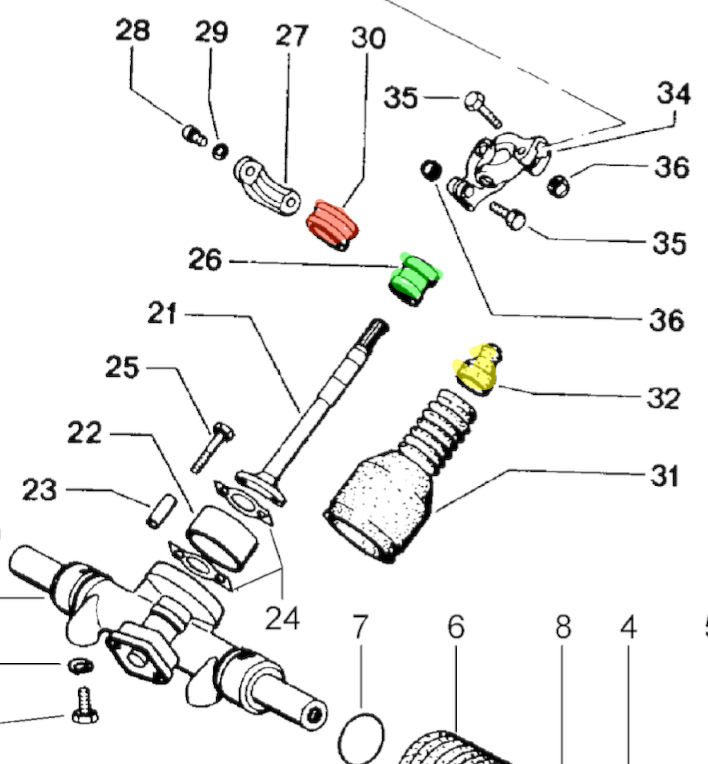 |
|
|
|
| DennisV |
Jul 8 2024, 01:33 PM
Post
#7
|
|
Senior Member Group: Members Posts: 605 Joined: 8-August 20 From: Santa Rosa, CA Member No.: 24,575 Region Association: Northern California |
Finally got this installed, after a lot of grief. A couple things I learned that might help someone else.
(IMG:style_emoticons/default/confused24.gif) |
|
|
|
| rjames |
Jul 8 2024, 02:28 PM
Post
#8
|
|
I'm made of metal Group: Members Posts: 4,225 Joined: 24-July 05 From: Shoreline, WA Member No.: 4,467 Region Association: Pacific Northwest |
QUOTE(DennisV @ Jul 8 2024, 12:33 PM) Finally got this installed, after a lot of grief. A couple things I learned that might help someone else.
(IMG:style_emoticons/default/confused24.gif) It's probably doable solo with a jack, but I couldn't make it happen. After I had a helper, it only took a few minutes to get the splines in the knuckles. Unfortunately, I thought we had it centered, but after my helper left I found out later that wasn't the case. Thankfully, I was able to move it over a spline or two myself. Installing the bearing to the shaft ahead of time is a must. I think got it all aligned and then installed the metal collar. |
|
|
|
|
1 User(s) are reading this topic (1 Guests and 0 Anonymous Users)
0 Members:

|
Lo-Fi Version | Time is now: 4th April 2025 - 05:00 AM |
Invision Power Board
v9.1.4 © 2025 IPS, Inc.