|
|
|
Porsche, and the Porsche crest are registered trademarks of Dr. Ing. h.c. F. Porsche AG.
This site is not affiliated with Porsche in any way. Its only purpose is to provide an online forum for car enthusiasts. All other trademarks are property of their respective owners. |
|
|

  |

| SirAndy |
 May 5 2024, 10:40 AM May 5 2024, 10:40 AM
Post
#61
|
|
Resident German  Group: Admin Posts: 42,035 Joined: 21-January 03 From: Oakland, Kalifornia Member No.: 179 Region Association: Northern California |
I think that short 90 degree bend piece between the throttle body and the air flow sensor is from a 3.2L.
Anyways, it's a tight fit but i didn't have to cut any sheet metal for all that to fit, the air filter tucks into the area under of the engine bay that's under the rear trunk lid, meaning it's protected from rain even when running an open GT engine lid. Oh, and yes, that's a Gatorade bottle posing as a overflow catch can. (IMG:style_emoticons/default/biggrin.gif) |
   |

 
|
| Steve |
May 5 2024, 11:39 AM
Post
#62
|
|
914 Guru Group: Members Posts: 5,797 Joined: 14-June 03 From: Orange County, CA Member No.: 822 Region Association: Southern California |
(IMG:style_emoticons/default/beerchug.gif) Thanks @sirandy !! Time to take it back apart. Not that much work. Glad it’s still out of the car. PMS sells the reproduction shorter 3.2 elbow.
Thanks again for the help!! https://patrickmotorsports.com/collections/...eng914993ibkpmp Time for a cinco de mayo corona light and continue on my 3.6 quest. |
 |
|
| Cairo94507 |
May 5 2024, 02:21 PM
Post
#63
|
|
Michael Group: Members Posts: 10,204 Joined: 1-November 08 From: Auburn, CA Member No.: 9,712 Region Association: Northern California |
@SirAndy and @Steve - Thanks to you both; your pictures and insights are very helpful.
Cheers, Michael (IMG:style_emoticons/default/beer3.gif) (IMG:style_emoticons/default/beerchug.gif) |
|
|
|
| Steve |
May 5 2024, 03:38 PM
Post
#64
|
|
914 Guru Group: Members Posts: 5,797 Joined: 14-June 03 From: Orange County, CA Member No.: 822 Region Association: Southern California |
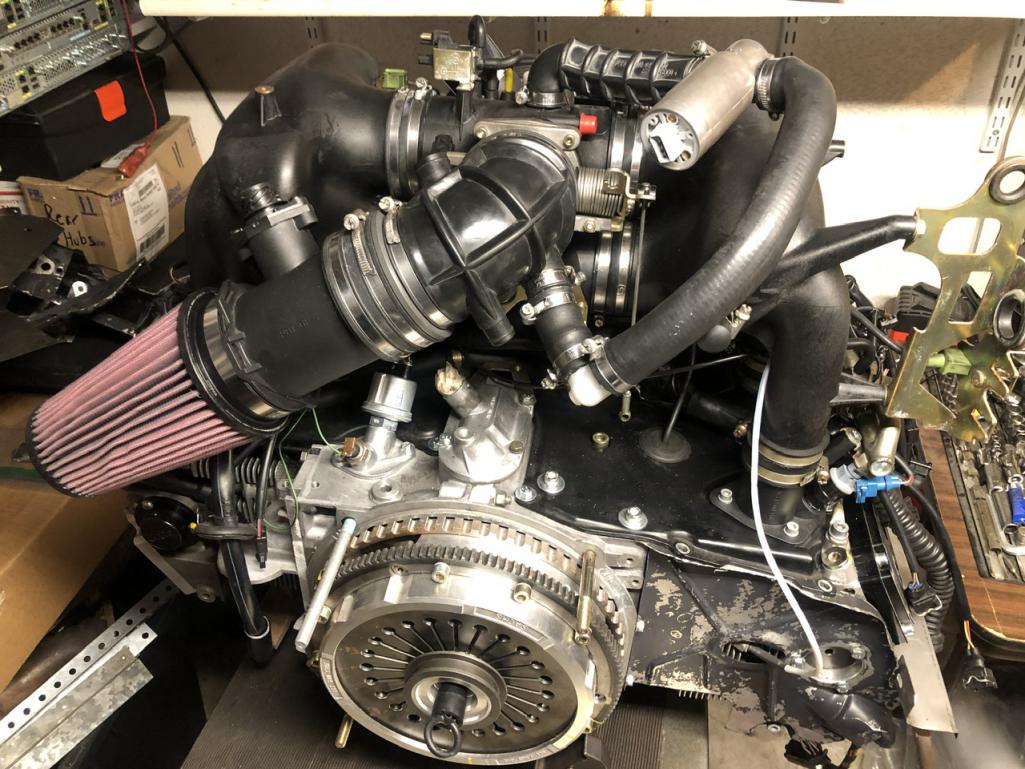
@sirandy looks like you added another 45 degree elbow to the 3.2 elbow.
This allowed you to point the 3.2 elbow more down, so you could run the idle control valve hose on top. I found this PMS picture with the 3.2 elbow flipped, so the idle control valve hose is underneath. I think this picture is the big Laguna motor. 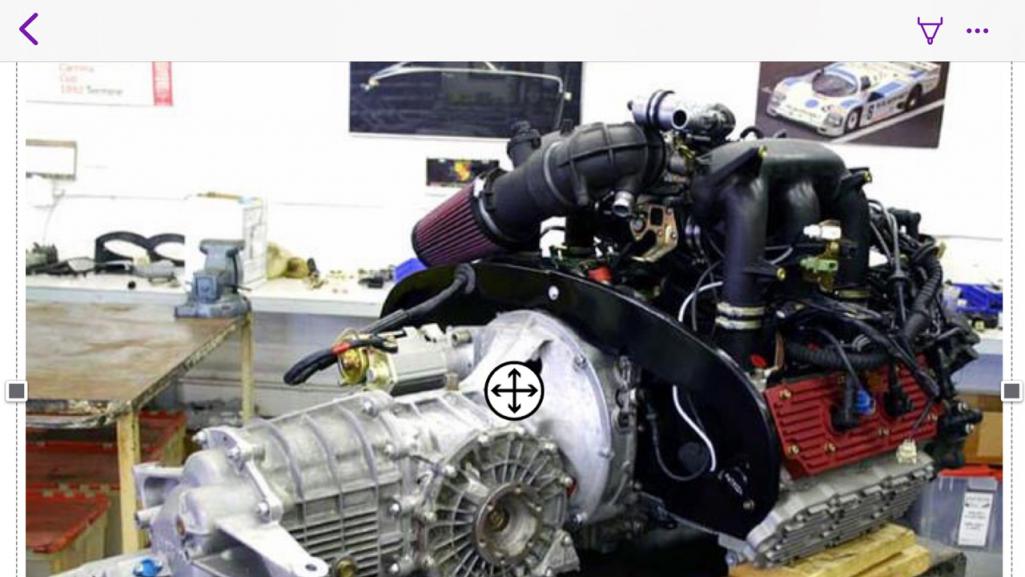 |
|
|
|
| SirAndy |
May 5 2024, 05:11 PM
Post
#65
|
|
Resident German Group: Admin Posts: 42,035 Joined: 21-January 03 From: Oakland, Kalifornia Member No.: 179 Region Association: Northern California |
QUOTE(Steve @ May 5 2024, 02:38 PM)  @sirandy looks like you added another 45 degree elbow to the 3.2 elbow. This allowed you to point the 3.2 elbow more down, so you could run the idle control valve hose on top. I found this PMS picture with the 3.2 elbow flipped, so the idle control valve hose is underneath. I think this picture is the big Laguna motor. @Steve Ah yes, you are correct. The second elbow is a Mustang part, must have been from a pre 2006-ish model since that's when i did the conversion. (IMG:style_emoticons/default/driving.gif) |
|
|
|
| Steve |
May 5 2024, 05:44 PM
Post
#66
|
|
914 Guru Group: Members Posts: 5,797 Joined: 14-June 03 From: Orange County, CA Member No.: 822 Region Association: Southern California |
QUOTE(SirAndy @ May 5 2024, 04:11 PM) QUOTE(Steve @ May 5 2024, 02:38 PM) @sirandy looks like you added another 45 degree elbow to the 3.2 elbow. This allowed you to point the 3.2 elbow more down, so you could run the idle control valve hose on top. I found this PMS picture with the 3.2 elbow flipped, so the idle control valve hose is underneath. I think this picture is the big Laguna motor. @Steve Ah yes, you are correct. The second elbow is a Mustang part, must have been from a pre 2006-ish model since that's when i did the conversion. (IMG:style_emoticons/default/driving.gif) (IMG:style_emoticons/default/beerchug.gif) Awesome! Thanks!! This is the easy part. I will figure this out with the engine in the car. I will most likely run the hose underneath. |
|
|
|
| ClayPerrine |
May 5 2024, 07:36 PM
Post
#67
|
|
Life's been good to me so far..... Group: Admin Posts: 16,061 Joined: 11-September 03 From: Hurst, TX. Member No.: 1,143 Region Association: NineFourteenerVille |
I did the same thing. I cut the two tubes apart so I could lower the throttle body.
Mine being a 964 motor, I was able to extend it so the air flow meter was mounted on the vehicle right of the intake and the air filter just cleared the firewall. |
|
|
|
| Steve |
May 5 2024, 10:06 PM
Post
#68
|
|
914 Guru Group: Members Posts: 5,797 Joined: 14-June 03 From: Orange County, CA Member No.: 822 Region Association: Southern California |
QUOTE(ClayPerrine @ May 5 2024, 06:36 PM) I did the same thing. I cut the two tubes apart so I could lower the throttle body. Mine being a 964 motor, I was able to extend it so the air flow meter was mounted on the vehicle right of the intake and the air filter just cleared the firewall. Thanks Clay! (IMG:style_emoticons/default/beerchug.gif) I forgot yours is a 964 motor. Didn't know the tubes were similar. It was pretty easy to cut them with a dremel tool and tin snips. |
|
|
|
| Steve |
May 6 2024, 08:45 PM
Post
#69
|
|
914 Guru Group: Members Posts: 5,797 Joined: 14-June 03 From: Orange County, CA Member No.: 822 Region Association: Southern California |
Idle control valve connected from the bottom of the PMS 3.2 boot.
 |
|
|
|
| Steve |
Jun 3 2024, 01:45 PM
Post
#70
|
|
914 Guru Group: Members Posts: 5,797 Joined: 14-June 03 From: Orange County, CA Member No.: 822 Region Association: Southern California |
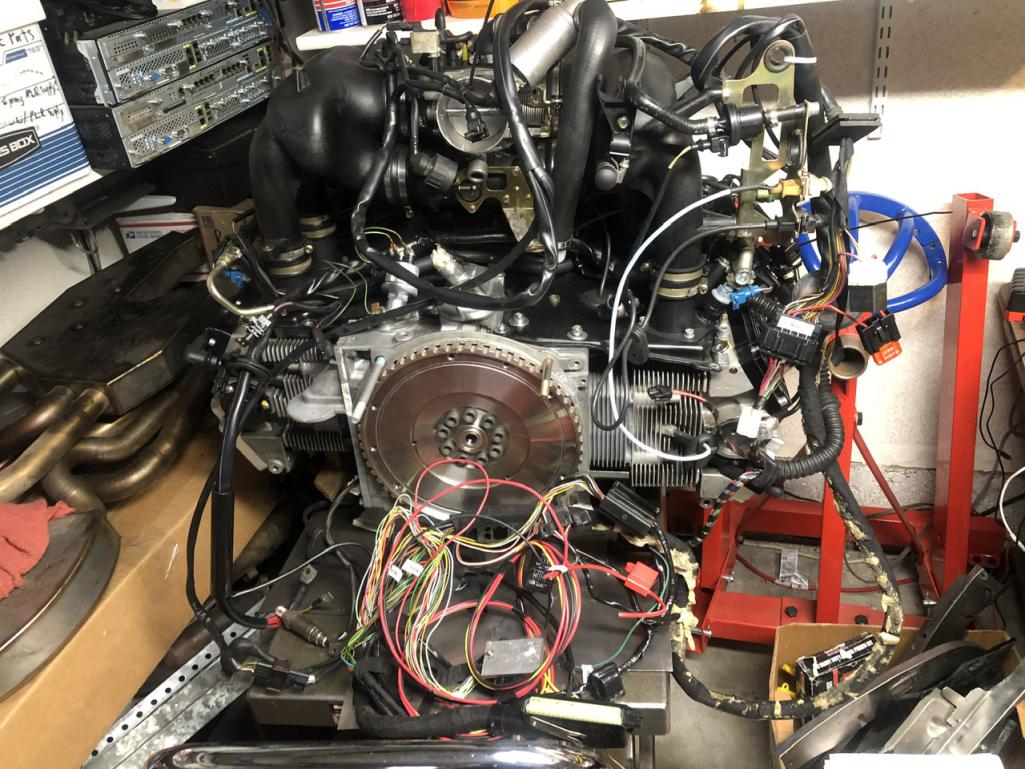
While I am waiting for my tin to come back from powder coating, I thought I would tackle the wiring. Pretty straight forward. When I installed my first six back in 86, I dumped the relay board, bought a 14 pin connector and made my own adapter. I moved the pins around in the 14 pin connector to match up with the 3.2. The 3.6 is a little different, but no big deal to move the pins around again. Hear is a picture of the mess and my adapter notes. Tons of left over sensors and power plugs.
  |
|
|
|
| East coaster |
Jun 3 2024, 05:02 PM
Post
#71
|
|
Senior Member Group: Members Posts: 1,811 Joined: 28-March 03 From: Millville, NJ Member No.: 487 Region Association: None |
I remember doing this on my 3.6, it’s really not too bad.
|
|
|
|
| Steve |
Aug 23 2024, 10:41 AM
Post
#72
|
|
914 Guru Group: Members Posts: 5,797 Joined: 14-June 03 From: Orange County, CA Member No.: 822 Region Association: Southern California |
Hard to find time for this project, but getting closer. Tin done, wiring done, engine compartment redone. Next step install drivetrain. Hopefully this weekend.
   |
|
|
|
| Cairo94507 |
Aug 23 2024, 11:10 AM
Post
#73
|
|
Michael Group: Members Posts: 10,204 Joined: 1-November 08 From: Auburn, CA Member No.: 9,712 Region Association: Northern California |
@Steve Very exciting; looking forward to seeing that beauty in your car. (IMG:style_emoticons/default/beerchug.gif)
|
|
|
|
| Lucky9146 |
Aug 23 2024, 09:34 PM
Post
#74
|
|
Always Wanted A Bigger Go Cart Group: Members Posts: 1,669 Joined: 22-September 14 From: Poway California Member No.: 17,942 Region Association: Southern California |
So glad to hear it is moving forward! Rooting for you! Long time in the works, got to feel good at this point! (IMG:style_emoticons/default/beerchug.gif)
(IMG:style_emoticons/default/driving.gif) (IMG:style_emoticons/default/white914.jpg) |
|
|
|
| Steve |
Aug 25 2024, 07:57 AM
Post
#75
|
|
914 Guru Group: Members Posts: 5,797 Joined: 14-June 03 From: Orange County, CA Member No.: 822 Region Association: Southern California |
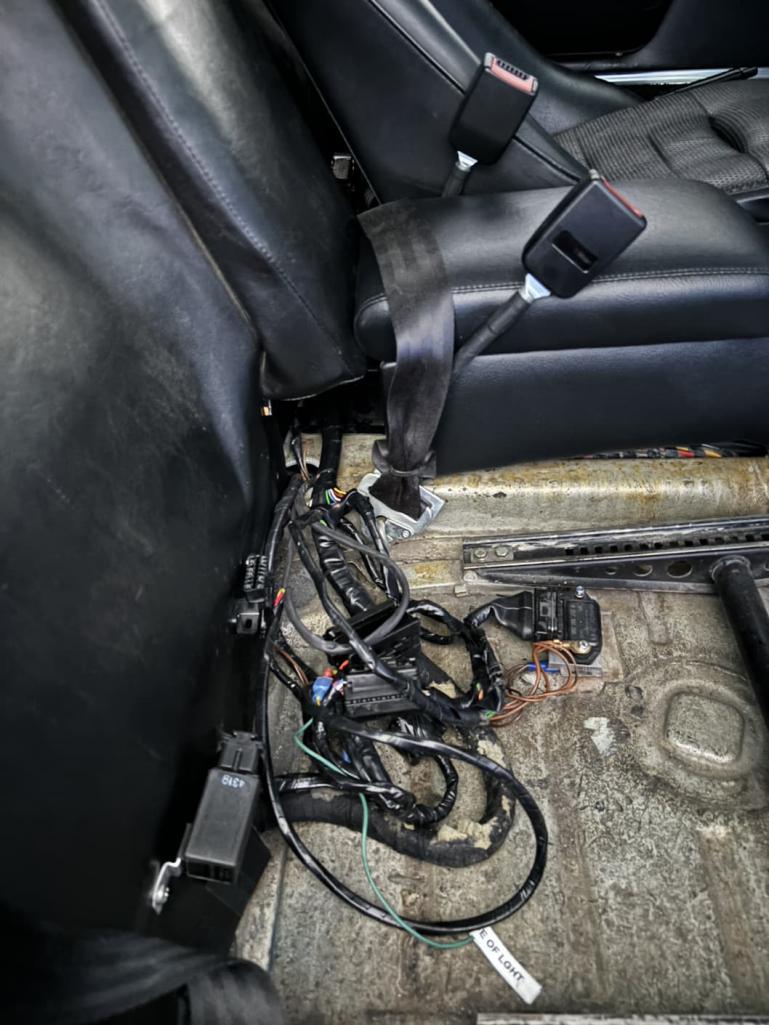
QUOTE(Steve @ Aug 23 2024, 09:41 AM) Hard to find time for this project, but getting closer. Tin done, wiring done, engine compartment redone. Next step install drivetrain. Hopefully this weekend! That wire mess behind the seat is the Patrick Motorsports wiring harness adapter. I made my own for the 3.2, but the 3.6 is a mess. All that crap to just four wires to the 914. Battery, ignition key positive, tachometer and fuel pump. Worth every penny to not have to figure it out. |
|
|
|
| Cairo94507 |
Aug 25 2024, 01:10 PM
Post
#76
|
|
Michael Group: Members Posts: 10,204 Joined: 1-November 08 From: Auburn, CA Member No.: 9,712 Region Association: Northern California |
I agree; but the PMS harness is not inexpensive. (IMG:style_emoticons/default/blink.gif)
|
|
|
|
| Steve |
Aug 29 2024, 08:01 AM
Post
#77
|
|
914 Guru Group: Members Posts: 5,797 Joined: 14-June 03 From: Orange County, CA Member No.: 822 Region Association: Southern California |
It’s always something..
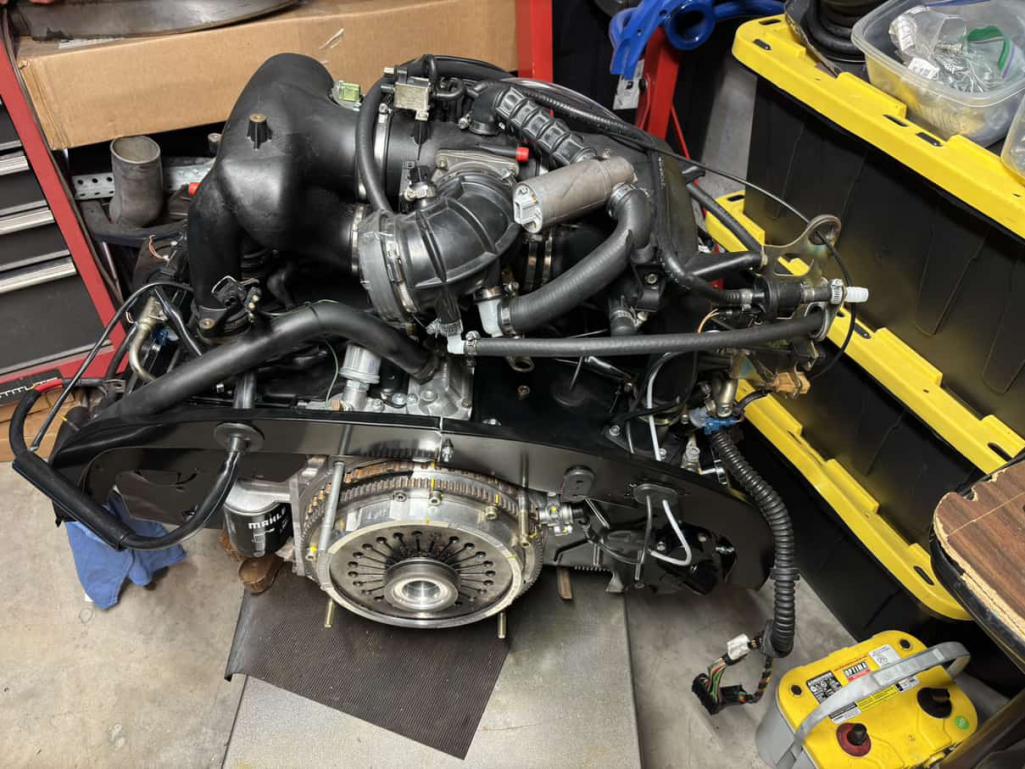
I had to separate the 915 trans to make the 3.2 sensor hole bigger. I removed quite a bit and you can see it’s still a tight fit. I also drilled out the bottom hole of the sensor hole with a 1/4” drill bit to get the flywheel clearance closer to .8mm. The Martin Bott kit also has a different backup light switch, so had to swap that out. The starter wire is also a spade connector. On another note, verify your gauges match the 3.6 senders or you will need to change the gauge senders. I verified my 3.2 gauges use the same senders as the 3.6, so I am good to go. See picture below of my combo gauge.. ah well. all done and ready to go in the car this weekend. 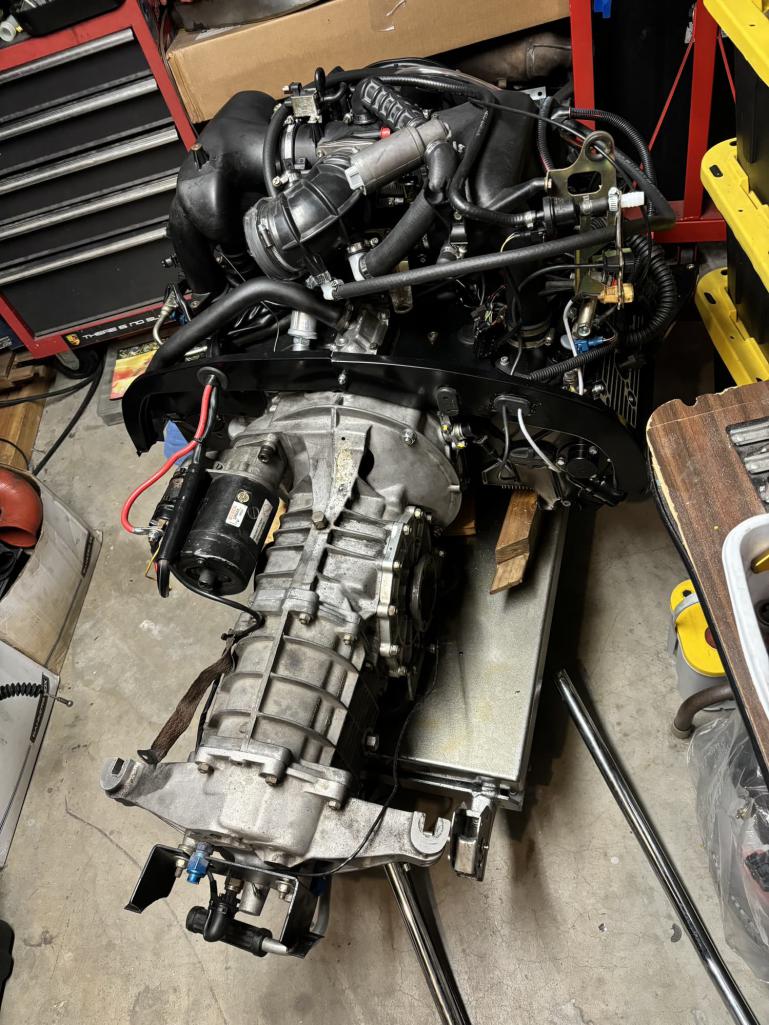 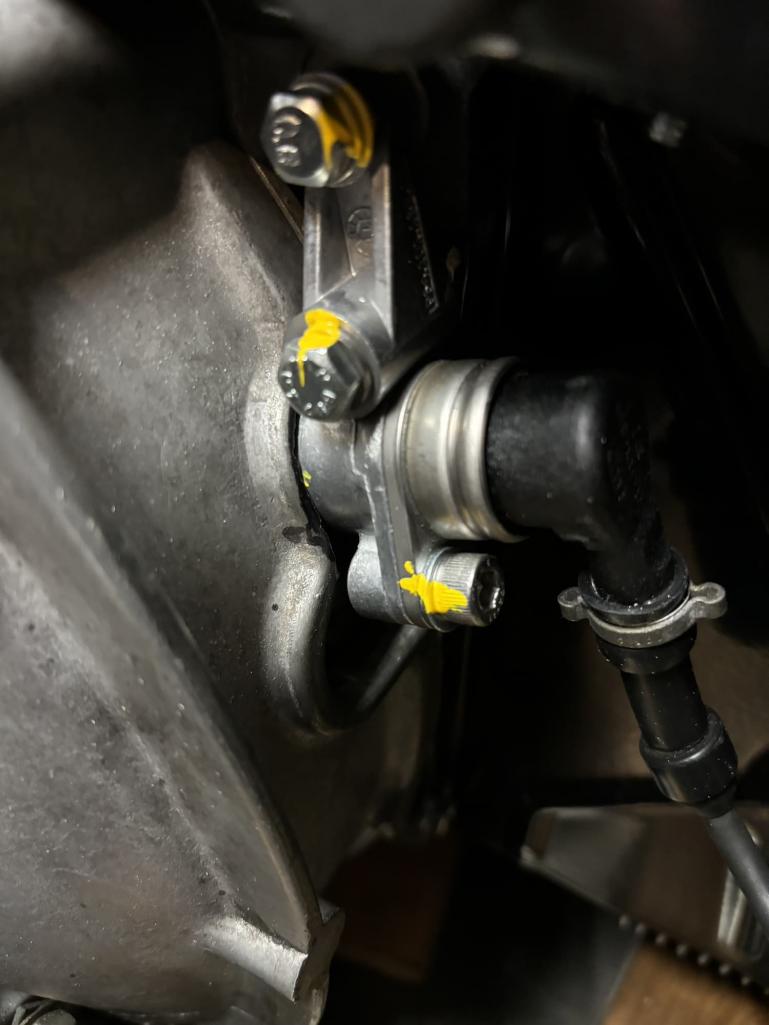 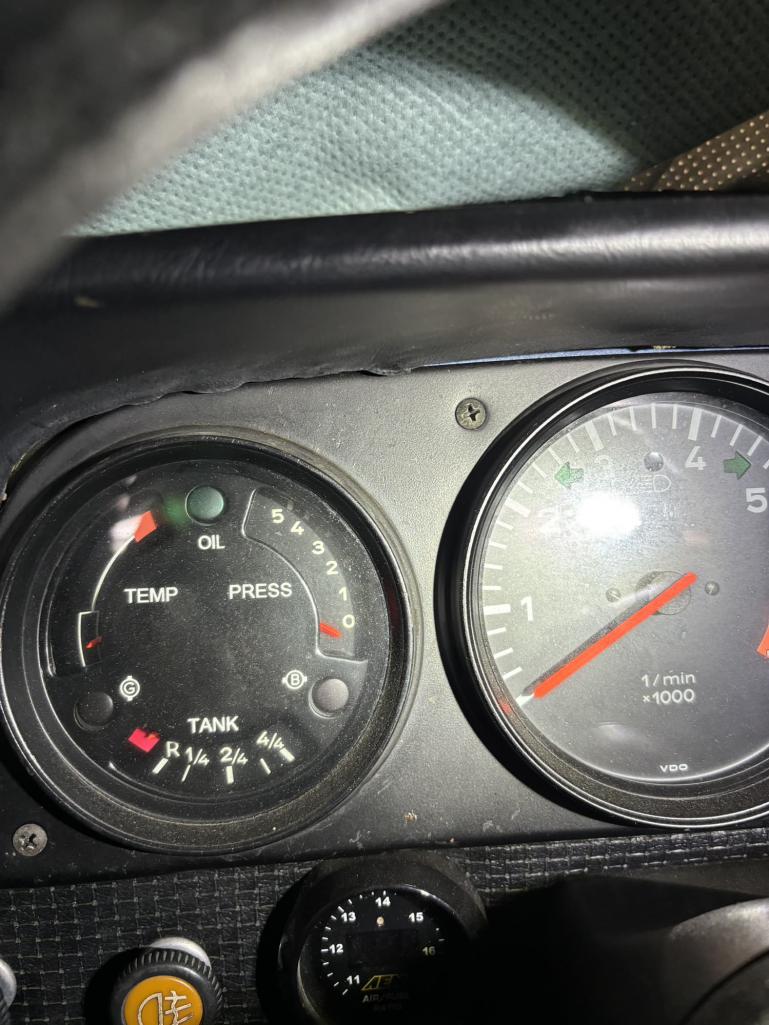 |
|
|
|
| Cairo94507 |
Aug 29 2024, 09:53 AM
Post
#78
|
|
Michael Group: Members Posts: 10,204 Joined: 1-November 08 From: Auburn, CA Member No.: 9,712 Region Association: Northern California |
Damn, I wish I was down in LA to lend a hand. Quite the milestone to get the engine/transaxle in the car. It looks like you have everything else sorted regarding wiring, fuel, exhaust, throttle linkage (I used the PMS throttle cable and it worked nicely). (IMG:style_emoticons/default/beerchug.gif)
|
|
|
|
| Steve |
Aug 29 2024, 10:37 AM
Post
#79
|
|
914 Guru Group: Members Posts: 5,797 Joined: 14-June 03 From: Orange County, CA Member No.: 822 Region Association: Southern California |
QUOTE(Cairo94507 @ Aug 29 2024, 08:53 AM) Damn, I wish I was down in LA to lend a hand. Quite the milestone to get the engine/transaxle in the car. It looks like you have everything else sorted regarding wiring, fuel, exhaust, throttle linkage (I used the PMS throttle cable and it worked nicely). (IMG:style_emoticons/default/beerchug.gif) Thanks Michael!! Having three daughters, I have their boy friends to help out! I also plan on using the PMS throttle cable. I read an article on how to convert a 3.6 to the coat hanger / 914-6 setup. Future project, but if the PMS cable works out, I won't bother with it. Although PMS parts are expensive. I would rather stay stock if I can. |
|
|
|
| Steve |
Sep 13 2024, 10:59 AM
Post
#80
|
|
914 Guru Group: Members Posts: 5,797 Joined: 14-June 03 From: Orange County, CA Member No.: 822 Region Association: Southern California |
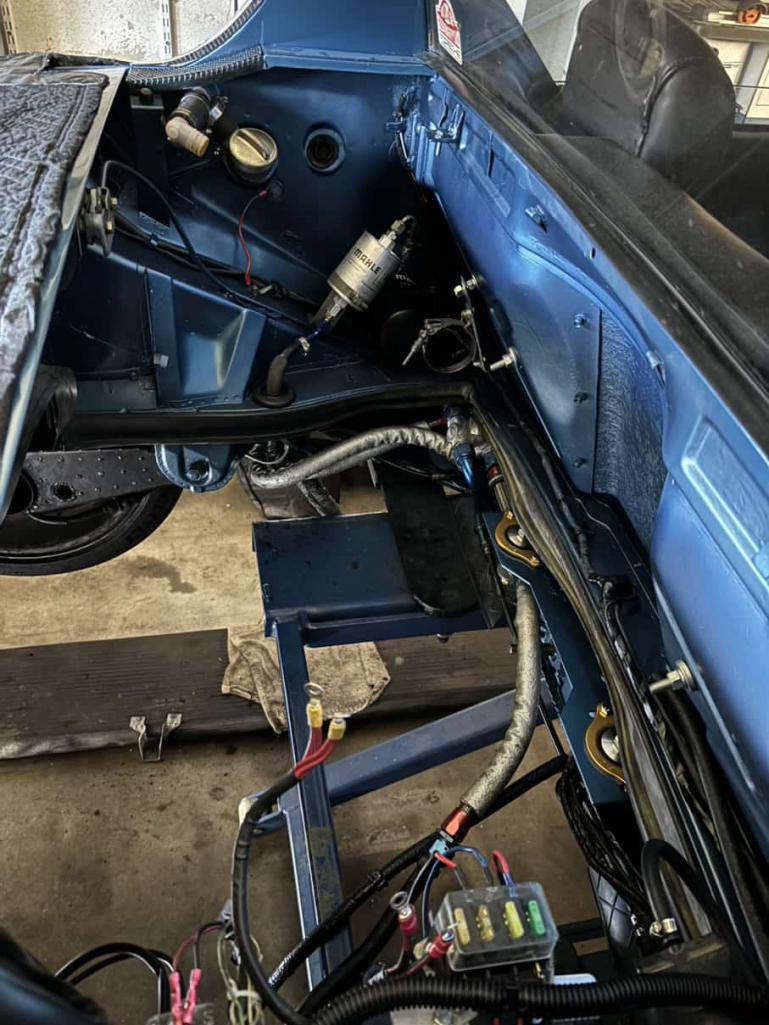
Getting close. Drive train in car. Oil line leaking from bottom of tank. Going to replace fitting that's easier to tighten. The rest is just bolting on the axles, shift linkage, cables and exhaust. Slowly, but surely. I did have to cut clearance a couple of things rubbing on trunk and oil line rubbing on tin, but no big deal. I will add more pictures as I go.
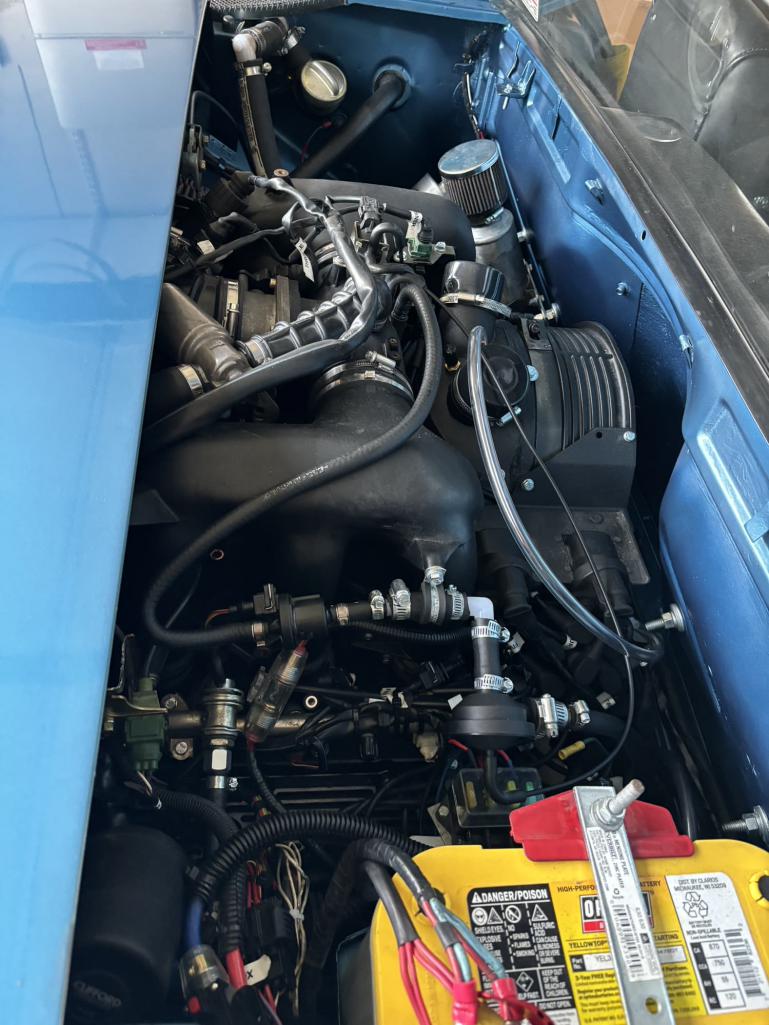 Had to cut right above the sensors to not hit trunk. Not my picture, but same outcome. 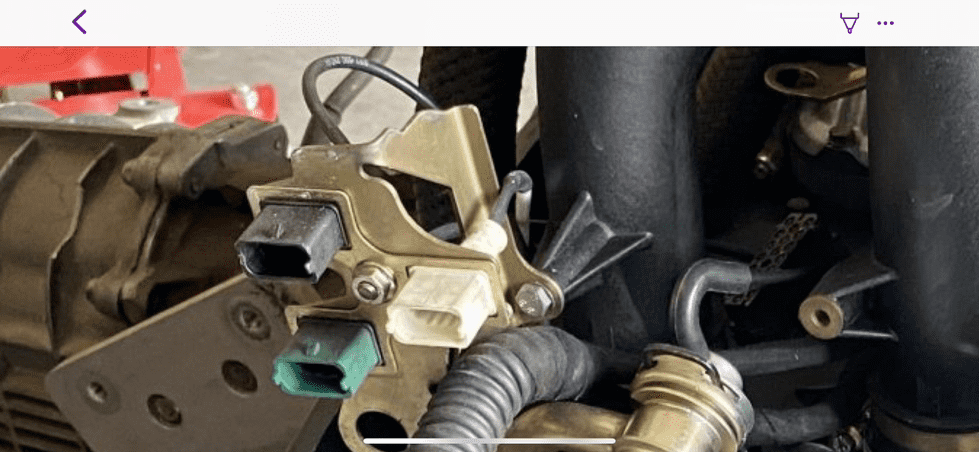 Current oil line 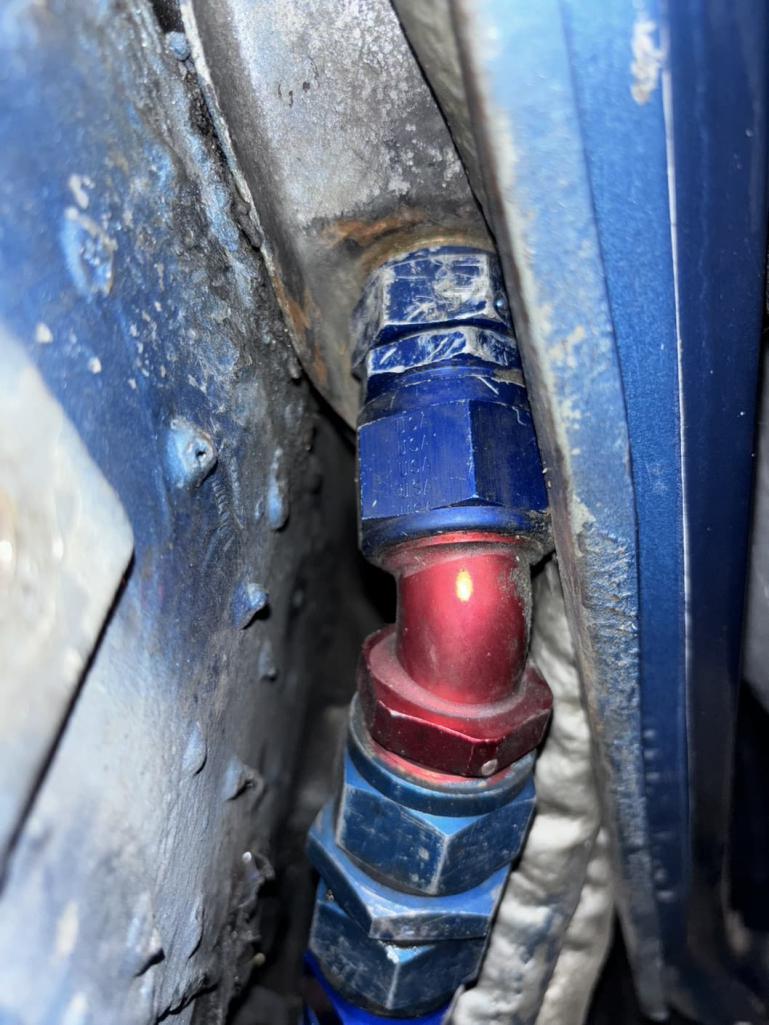 New line, not my picture but similar. I also have the same crows foot that I need to grind down to fit. 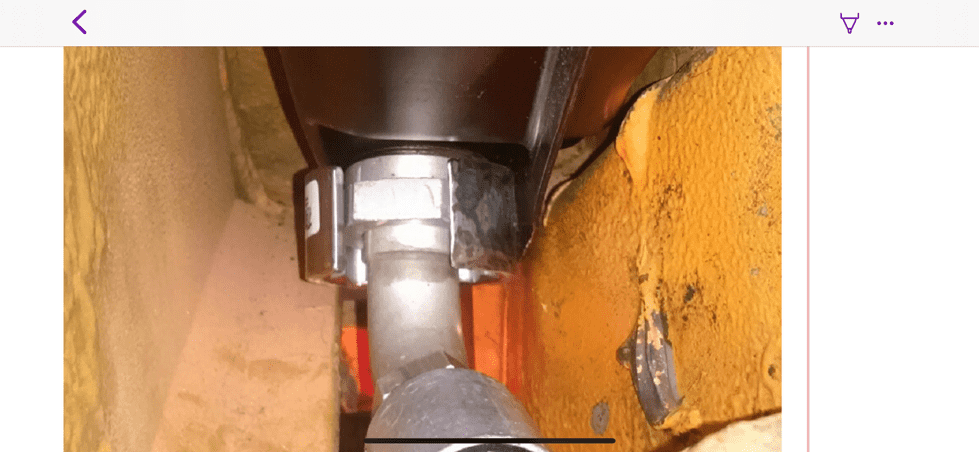 |
|
|
|
|
84 User(s) are reading this topic (84 Guests and 0 Anonymous Users)
0 Members:

|
Lo-Fi Version | Time is now: 5th February 2025 - 08:15 AM |
Invision Power Board
v9.1.4 © 2025 IPS, Inc.