|
|
|
Porsche, and the Porsche crest are registered trademarks of Dr. Ing. h.c. F. Porsche AG.
This site is not affiliated with Porsche in any way. Its only purpose is to provide an online forum for car enthusiasts. All other trademarks are property of their respective owners. |
|
|

  |

| windforfun |
 Jun 9 2024, 07:53 PM Jun 9 2024, 07:53 PM
Post
#21
|
|
Senior Member  Group: Members Posts: 1,936 Joined: 17-December 07 From: Blackhawk, CA Member No.: 8,476 Region Association: None |
QUOTE(Superhawk996 @ Jun 8 2024, 10:20 PM)  QUOTE(windforfun @ Jun 8 2024, 08:46 PM) Crimp, solder, & then cover with shrink tubing. This is how Mercedes does it. Oh & BTW, don't cut any strands. Crimping alone isn't really quality. Please be careful with this advice as it is a misrepresentation of the approved Mercedes repair procedure. Crimping alone is standard practice in automotive wiring for new construction of harness. Yes, there are instances where Mercedes authorizes a solder repair in the field, but they are not done with old fashioned soldering iron, and shrink tubing. This is as clear as mud. So what do you recommend for a quality repair? Standard practice? These days standard practice is whatever is the least expensive. And what kind of soldering tool would you use? What I recommended is what Mercedes does. Look at what's in a 300E. I would post some pics if I still had the car. Please prove me wrong. I have an open mind, if I can still find it. Enjoy your evening. (IMG:style_emoticons/default/lol-2.gif) (IMG:style_emoticons/default/lol-2.gif) (IMG:style_emoticons/default/lol-2.gif) |
   |

 
|
| Superhawk996 |
Jun 9 2024, 10:20 PM
Post
#22
|
|
914 Guru Group: Members Posts: 6,419 Joined: 25-August 18 From: Woods of N. Idaho Member No.: 22,428 Region Association: Galt's Gulch |
QUOTE(windforfun @ Jun 9 2024, 09:53 PM) This is as clear as mud. So what do you recommend for a quality repair? Standard practice? These days standard practice is whatever is the least expensive. And what kind of soldering tool would you use? What I recommended is what Mercedes does. Look at what's in a 300E. I would post some pics if I still had the car. Please prove me wrong. I have an open mind, … Crimping is standard practice for automotive wiring not due to cost but because it provides a superior connection. A crimped connection is far more robust to the vibration that is ever present in automobiles. Don’t believe me - take a look at NASA documents or how wiring harness are fabricated at the highest levels of Motorsport such as F1. 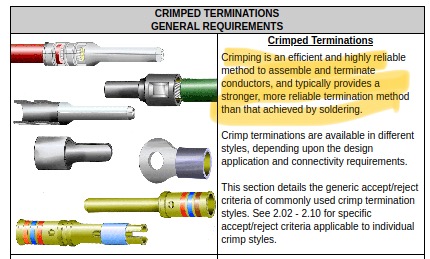 I don’t want to hijack this thread so please reference this link for more info and the link to the NASA document . http://www.914world.com/bbs2/index.php?sho...amp;pid=2991842 With respect to Mercedes approved soldering technique: per my previous post, Mercedes recommends a Raychem solder sleeve, not a soldering iron. The reason for this is because the Raychem solder sleeve precisely controls how much solder is applied. This is to minimize the wicking of solder up into the wiring strands and to limit the possibility of thermal damage to insulation via a standard soldering iron. Note: Mercedes vehicles from 90s (including 300E’s) also used wiring with biodegradable insulation that has a well documented history of premature cracking and massively accelerated, catastrophic deterioration so I wouldn’t necessarily consider everything Mercedes does with their wiring to be a gold standard of any sort. |
|
|
|
| Superhawk996 |
Jun 9 2024, 10:32 PM
Post
#23
|
|
914 Guru Group: Members Posts: 6,419 Joined: 25-August 18 From: Woods of N. Idaho Member No.: 22,428 Region Association: Galt's Gulch |
Francis - this link to video from HP academy is a great video on why crimping is the preferred solution in both production automotive world as well as top level Motorsport.
https://www.hpacademy.com/blog/why-is-solde...ping-tech-talk/ https://www.youtube.com/watch?v=pOTrS6-mNtA?si=juq9mEb0He97_EzH |
|
|
|
| Superhawk996 |
Jun 9 2024, 10:56 PM
Post
#24
|
|
914 Guru Group: Members Posts: 6,419 Joined: 25-August 18 From: Woods of N. Idaho Member No.: 22,428 Region Association: Galt's Gulch |
One more item of note.
For what ever reason when crimping is referred to, most people immediately think of the cheap red, blue, and yellow hardware store connections and low grade $5.00 crimping tool. These hardware store crimp connectors will work well enough if done well but they are the lowest common denominator type fix that we usually see in the hobby. When I’m referring to crimping, we are taking about quality crimping tools (which can be had for reasonable prices) and quality, properly sized terminals and butt splices. Example of better quality butt splice: 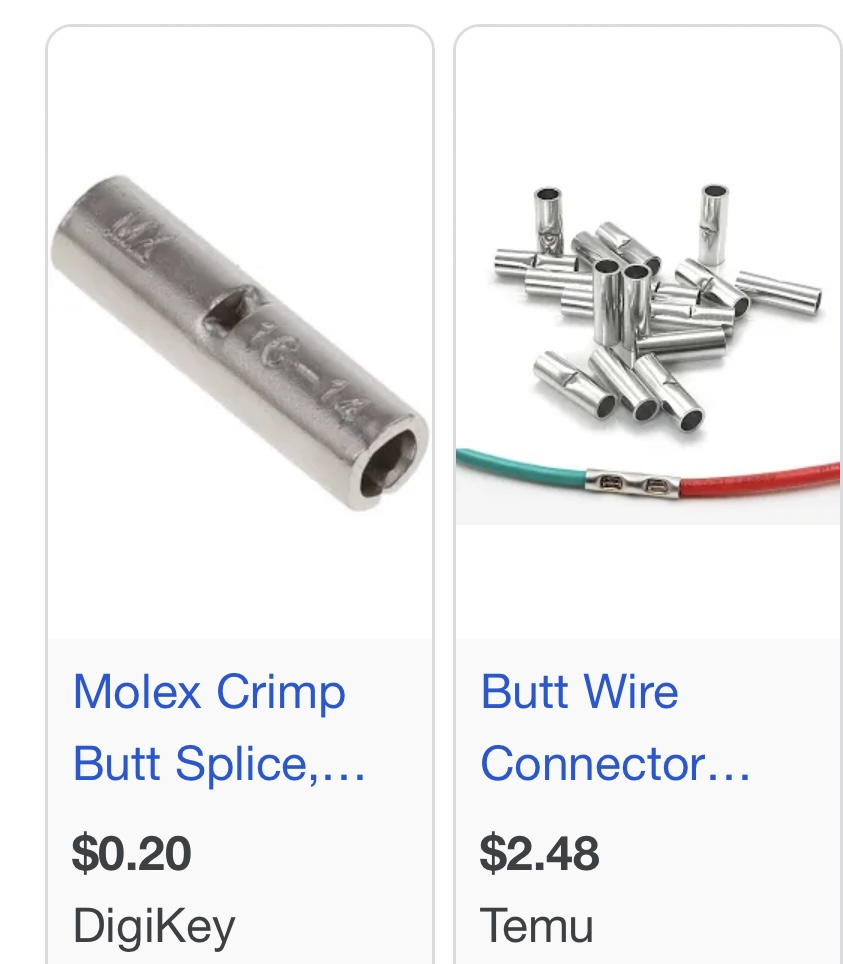 Or example of Tygaboys work with open barrel butt connectors:   |
|
|
|
| technicalninja |
Jun 10 2024, 12:41 AM
Post
#25
|
|
Senior Member Group: Members Posts: 1,807 Joined: 31-January 23 From: Granbury Texas Member No.: 27,135 Region Association: Southwest Region |
Francis, decide for yourself which method is best for a specific joint.
Just saying "always solder" or "always crimp" is short sighted IMO. Soldering takes more skill to do properly and more prep than crimping. If you have a bunch of wires going into gang plug crimping is better. Usually crimping works better on new installations. Crimping is ONLY effective if you use exactly the correct tools, terminals, and nothing goes sideways. Splicing old stuff together below 16 gauge I'm normally soldering but I have a BUNCH of little things I do that most others don't. I use more heat than necessary and as little solder as I can. I "spot-weld" my joints in a very short amount of time. I don't have much trouble with wicking. I use a small drop of solder on the gun tip as my complete load. I'm not adding solder after applying the gun. I'm under magnification and the solder has to go "chrome like" before I'm happy. It will "wick" up into the joint if you're doing it right. Takes less than 1 second. Most of the time I'll get a little tiny mushroom cloud from the flux I previously added to the wires. Fans should be used for ventilation. I don't have problems with "cold" soldered joints. I fan the individual strands out and apply flux to all then twist them back together and remove the extra flux with a paper towel. Two pair of hemostats are used as "heat sinks" on either side of my joints. I quench my joints with a fairly damp cotton dish towel. This happens instantly after the gun is removed. This removes the extra flux that surfaced during the melt phase. If I'm repairing multiple wires, I stagger my joints as to not have the connections next to each other. If you solder 20 wires at the same point you end up with a big bulge in the harness. When I'm done there is no increase in resistance and the joint is stronger than the original wire. All soldered joints are heat shrunk with #2 style shrink. This is the stuff with the glue on the insides and I verify glue "filets" at each end after the shrink. I use a Gar-tech heat gun (made in Germany!) for all shrinking and I've made a special "tip" for it that forms an almost complete circle. The "shrinking" happens evenly and quickly. Using a lighter is not an option. I don't have problems with corrosion down the road. Crimping takes FAR less finesse but requires perfection in the tools and terminals. Crimping is far easier to achieve nice looking harness, especially if your using brand-new high-end stuff like they do in the video. Crimped gang plugs CAN be taken apart and re-assembled. This might be a hyper-critical feature to have. When I'm done with a solder joint it's NEVER coming apart again and should I have to go back in, it has to be chopped out of the circuit, and sometimes replace with a small section of wire with a soldered connection on both ends. This is the NASA style connection I use for splicing individual wires https://www.youtube.com/watch?v=uhzXRIj5FaY That guy would NOT like working for me! His joint looks like crap. He took 10 times too long to get it done. He left a huge amount of exposed wire on either side of the twisted sections. Mine looks like a 1/8 inch long rolled copper section that is the same size as the OD of the insulation. After the heat shrink is applied you CANNOT tell exactly where the joint is in the shrink. So, rules are for fools, wise men (and women) use good judgment! I've been making electrical connections in cars for 40 years. I've paid the price in burns, blood, and having to eat comebacks. There definitely is a place for soldering in car repairs. I have not had a failure in a solder repair in 25+ years. Above 16 gauge I'll use a molex butt splice (as SH shows) and add the solder INTO the tiny open hole in the center. When you see the wires exiting the crimp go chrome, you're done. This takes a bit more time but never more than 3 seconds. The best "standard" crimpers are made by Thomas & Betts Co out of Elizabeth NJ. https://www.amazon.com/Thomas-Betts-WT111M-...mp;gad_source=1 I don't know if they are still built in New Jersey. Mine are old and NOT for sale. And the Molex butt splice SH showed is the seamed style, I prefer seamless. When using a seamed style, the "tooth" of the crimper HAS to hit exactly on the seam. You have to bend BOTH sides of the seam in. Hope this helps. |
 |
|
| TINKERGINEERING |
Jun 10 2024, 09:51 AM
Post
#26
|
|
Member Group: Members Posts: 207 Joined: 15-March 20 From: Sierra Madre, CA Member No.: 24,031 Region Association: Southern California |
Thanks so much for looking out for me! I am currently just working on the original car accessories and lights and such in the stock wiring harness, but when I get to the electric components I will be sure to take extra caution and reference more people who are experts in that field!
QUOTE(technicalninja @ Jun 8 2024, 11:06 PM) I'll add another issue you will have to overcome. All the previous advice is for the standard automotive wiring that we are all accustomed too. You will have MUCH higher voltage and amperage for your drive package. I am well acquainted with standard 12V stuff; I don't have to research methods or tricks. I would do a DEEP dive into the EV world regarding best practices for your chosen drive package. The EV geeks may have different procedures for the high amperage stuff. Be careful here! You can hurt yourself if you don't have all of the necessary info. One of my acquaintances, who is Tesla swapping an MR2, built a pretty serious electric go cart... It "got away" from him in his shop and did a bunch of damage before they were able to kill it. Had it been the MR2 folks might have gotten killed. It was a wiring issue that caused the run-away... If you haven't joined an EV forum yet that is the single most important thing you need to do IMO. I've never even looked for an EV forum, so I don't have a good recommendation. Maybe someone else does. You need an "experimental" friendly forum. A bunch of "tinkerers" is exactly what I'd be hunting in your shoes... |
|
|
|
| TINKERGINEERING |
Jun 10 2024, 09:55 AM
Post
#27
|
|
Member Group: Members Posts: 207 Joined: 15-March 20 From: Sierra Madre, CA Member No.: 24,031 Region Association: Southern California |
This is awesome! This is actually really similar to how another on of my mentors told me to create strong connections as well and has been the method I have been using so far! It works really well. Thanks for looking out for me.
QUOTE(technicalninja @ Jun 9 2024, 11:41 PM) Francis, decide for yourself which method is best for a specific joint. Just saying "always solder" or "always crimp" is short sighted IMO. Soldering takes more skill to do properly and more prep than crimping. If you have a bunch of wires going into gang plug crimping is better. Usually crimping works better on new installations. Crimping is ONLY effective if you use exactly the correct tools, terminals, and nothing goes sideways. Splicing old stuff together below 16 gauge I'm normally soldering but I have a BUNCH of little things I do that most others don't. I use more heat than necessary and as little solder as I can. I "spot-weld" my joints in a very short amount of time. I don't have much trouble with wicking. I use a small drop of solder on the gun tip as my complete load. I'm not adding solder after applying the gun. I'm under magnification and the solder has to go "chrome like" before I'm happy. It will "wick" up into the joint if you're doing it right. Takes less than 1 second. Most of the time I'll get a little tiny mushroom cloud from the flux I previously added to the wires. Fans should be used for ventilation. I don't have problems with "cold" soldered joints. I fan the individual strands out and apply flux to all then twist them back together and remove the extra flux with a paper towel. Two pair of hemostats are used as "heat sinks" on either side of my joints. I quench my joints with a fairly damp cotton dish towel. This happens instantly after the gun is removed. This removes the extra flux that surfaced during the melt phase. If I'm repairing multiple wires, I stagger my joints as to not have the connections next to each other. If you solder 20 wires at the same point you end up with a big bulge in the harness. When I'm done there is no increase in resistance and the joint is stronger than the original wire. All soldered joints are heat shrunk with #2 style shrink. This is the stuff with the glue on the insides and I verify glue "filets" at each end after the shrink. I use a Gar-tech heat gun (made in Germany!) for all shrinking and I've made a special "tip" for it that forms an almost complete circle. The "shrinking" happens evenly and quickly. Using a lighter is not an option. I don't have problems with corrosion down the road. Crimping takes FAR less finesse but requires perfection in the tools and terminals. Crimping is far easier to achieve nice looking harness, especially if your using brand-new high-end stuff like they do in the video. Crimped gang plugs CAN be taken apart and re-assembled. This might be a hyper-critical feature to have. When I'm done with a solder joint it's NEVER coming apart again and should I have to go back in, it has to be chopped out of the circuit, and sometimes replace with a small section of wire with a soldered connection on both ends. This is the NASA style connection I use for splicing individual wires https://www.youtube.com/watch?v=uhzXRIj5FaY That guy would NOT like working for me! His joint looks like crap. He took 10 times too long to get it done. He left a huge amount of exposed wire on either side of the twisted sections. Mine looks like a 1/8 inch long rolled copper section that is the same size as the OD of the insulation. After the heat shrink is applied you CANNOT tell exactly where the joint is in the shrink. So, rules are for fools, wise men (and women) use good judgment! I've been making electrical connections in cars for 40 years. I've paid the price in burns, blood, and having to eat comebacks. There definitely is a place for soldering in car repairs. I have not had a failure in a solder repair in 25+ years. Above 16 gauge I'll use a molex butt splice (as SH shows) and add the solder INTO the tiny open hole in the center. When you see the wires exiting the crimp go chrome, you're done. This takes a bit more time but never more than 3 seconds. The best "standard" crimpers are made by Thomas & Betts Co out of Elizabeth NJ. https://www.amazon.com/Thomas-Betts-WT111M-...mp;gad_source=1 I don't know if they are still built in New Jersey. Mine are old and NOT for sale. And the Molex butt splice SH showed is the seamed style, I prefer seamless. When using a seamed style, the "tooth" of the crimper HAS to hit exactly on the seam. You have to bend BOTH sides of the seam in. Hope this helps. |
|
|
|
| windforfun |
Jun 10 2024, 08:51 PM
Post
#28
|
|
Senior Member Group: Members Posts: 1,936 Joined: 17-December 07 From: Blackhawk, CA Member No.: 8,476 Region Association: None |
QUOTE(technicalninja @ Jun 9 2024, 11:41 PM) Francis, decide for yourself which method is best for a specific joint. Just saying "always solder" or "always crimp" is short sighted IMO. Soldering takes more skill to do properly and more prep than crimping. If you have a bunch of wires going into gang plug crimping is better. Usually crimping works better on new installations. Crimping is ONLY effective if you use exactly the correct tools, terminals, and nothing goes sideways. Splicing old stuff together below 16 gauge I'm normally soldering but I have a BUNCH of little things I do that most others don't. I use more heat than necessary and as little solder as I can. I "spot-weld" my joints in a very short amount of time. I don't have much trouble with wicking. I use a small drop of solder on the gun tip as my complete load. I'm not adding solder after applying the gun. I'm under magnification and the solder has to go "chrome like" before I'm happy. It will "wick" up into the joint if you're doing it right. Takes less than 1 second. Most of the time I'll get a little tiny mushroom cloud from the flux I previously added to the wires. Fans should be used for ventilation. I don't have problems with "cold" soldered joints. I fan the individual strands out and apply flux to all then twist them back together and remove the extra flux with a paper towel. Two pair of hemostats are used as "heat sinks" on either side of my joints. I quench my joints with a fairly damp cotton dish towel. This happens instantly after the gun is removed. This removes the extra flux that surfaced during the melt phase. If I'm repairing multiple wires, I stagger my joints as to not have the connections next to each other. If you solder 20 wires at the same point you end up with a big bulge in the harness. When I'm done there is no increase in resistance and the joint is stronger than the original wire. All soldered joints are heat shrunk with #2 style shrink. This is the stuff with the glue on the insides and I verify glue "filets" at each end after the shrink. I use a Gar-tech heat gun (made in Germany!) for all shrinking and I've made a special "tip" for it that forms an almost complete circle. The "shrinking" happens evenly and quickly. Using a lighter is not an option. I don't have problems with corrosion down the road. Crimping takes FAR less finesse but requires perfection in the tools and terminals. Crimping is far easier to achieve nice looking harness, especially if your using brand-new high-end stuff like they do in the video. Crimped gang plugs CAN be taken apart and re-assembled. This might be a hyper-critical feature to have. When I'm done with a solder joint it's NEVER coming apart again and should I have to go back in, it has to be chopped out of the circuit, and sometimes replace with a small section of wire with a soldered connection on both ends. This is the NASA style connection I use for splicing individual wires https://www.youtube.com/watch?v=uhzXRIj5FaY That guy would NOT like working for me! His joint looks like crap. He took 10 times too long to get it done. He left a huge amount of exposed wire on either side of the twisted sections. Mine looks like a 1/8 inch long rolled copper section that is the same size as the OD of the insulation. After the heat shrink is applied you CANNOT tell exactly where the joint is in the shrink. So, rules are for fools, wise men (and women) use good judgment! I've been making electrical connections in cars for 40 years. I've paid the price in burns, blood, and having to eat comebacks. There definitely is a place for soldering in car repairs. I have not had a failure in a solder repair in 25+ years. Above 16 gauge I'll use a molex butt splice (as SH shows) and add the solder INTO the tiny open hole in the center. When you see the wires exiting the crimp go chrome, you're done. This takes a bit more time but never more than 3 seconds. The best "standard" crimpers are made by Thomas & Betts Co out of Elizabeth NJ. https://www.amazon.com/Thomas-Betts-WT111M-...mp;gad_source=1 I don't know if they are still built in New Jersey. Mine are old and NOT for sale. And the Molex butt splice SH showed is the seamed style, I prefer seamless. When using a seamed style, the "tooth" of the crimper HAS to hit exactly on the seam. You have to bend BOTH sides of the seam in. Hope this helps. (IMG:style_emoticons/default/agree.gif) (IMG:style_emoticons/default/agree.gif) (IMG:style_emoticons/default/agree.gif) Crimp, wick in solder, & then cover with shrink tubing. Crimp & solder!!! You want to minimize the voltage drop at the connection. Don't cut or nick any strands. I use a thermal insulation stripper to prevent this. Crimping alone does not make for the best current flow IMO. It can splay or put gaps between the strands. The solder that flows into the strands (or gaps) makes for an ideal conductor. If your wire is solid (not stranded) then crimping is "adequate." Mechanical vibration isn't an issue. I mean really, what's going to "pull" on the connection? Okay. That's it. No more commentary from this old fart. Except... Just because you've been doing something for 50 years doesn't mean you've been doing it correctly. (IMG:style_emoticons/default/dead horse.gif) (IMG:style_emoticons/default/dead horse.gif) (IMG:style_emoticons/default/dead horse.gif) |
|
|
|
|
3 User(s) are reading this topic (3 Guests and 0 Anonymous Users)
0 Members:

|
Lo-Fi Version | Time is now: 7th September 2024 - 06:50 PM |
Invision Power Board
v9.1.4 © 2024 IPS, Inc.