|
|
|
Porsche, and the Porsche crest are registered trademarks of Dr. Ing. h.c. F. Porsche AG.
This site is not affiliated with Porsche in any way. Its only purpose is to provide an online forum for car enthusiasts. All other trademarks are property of their respective owners. |
|
|

  |

| Superhawk996 |
 Jul 10 2024, 07:24 PM Jul 10 2024, 07:24 PM
Post
#61
|
|
914 Guru  Group: Members Posts: 6,633 Joined: 25-August 18 From: Woods of N. Idaho Member No.: 22,428 Region Association: Galt's Gulch |
QUOTE(Robroe @ Jul 10 2024, 09:17 PM)  What is a legion spacer? looks like multiple spacers stacked. Sign of amateur build. A pro build would only use one spacer. Multiple spacers are multiple leak paths. Likewise multiple spacers can be less rigid than a single spacer unless flatness of each is perfect. This affects head bolt torque. |
   |

 
|
| technicalninja |
Jul 10 2024, 07:26 PM
Post
#62
|
|
Advanced Member Group: Members Posts: 2,195 Joined: 31-January 23 From: Granbury Texas Member No.: 27,135 Region Association: Southwest Region |
Positives:
Heads- look like Raby heads with welding around the spark plug wells (Raby did this). Proper retainers/springs. Look like oversize rocker arm studs. Negatives: Raised numbers on piston crowns. I believe those would have been machined off if built by someone knowledgeable. I'd have removed them. And then I'd have ceramic coated the tops... I've NEVER seen raised numbers in forged stuff. The forging process would destroy them. Someone else said "cast" and I'm prone to agree due to those numbers and the rough valve depressions. Cast iron jugs. Stock head studs and re-used head nuts. Grey RTV on case studs. If they used grey RTV, a master would use a x-acto knife during curing to trim the excess. Possibility of internal clips in the lifters. The value of the heads FAR exceeds the posibility of destroying said heads without a full tear down. I'd take lots of pictures and check a bunch of stuff during the tear down but that would get reduced to individual componets before I'd put fire to it. It's looking more like a kit build with RAT heads. Still a KILLER deal IMO! |
|
|
|
| emerygt350 |
Jul 11 2024, 05:53 AM
Post
#63
|
|
Advanced Member Group: Members Posts: 2,526 Joined: 20-July 21 From: Upstate, NY Member No.: 25,740 Region Association: North East States |
I think the raised numbers are just an optical illusion but I could be mistaken. The multiple spacers is concerning.
|
 |
|
| technicalninja |
Jul 11 2024, 07:26 AM
Post
#64
|
|
Advanced Member Group: Members Posts: 2,195 Joined: 31-January 23 From: Granbury Texas Member No.: 27,135 Region Association: Southwest Region |
95.95mm in a 96mm bore equals .05mm PTW clearance or .002".
This is a clearance for cast pistons... It's a TIGHT clearance for cast pistons in an air-cooled application! |
|
|
|
| Superhawk996 |
Jul 11 2024, 08:10 AM
Post
#65
|
|
914 Guru Group: Members Posts: 6,633 Joined: 25-August 18 From: Woods of N. Idaho Member No.: 22,428 Region Association: Galt's Gulch |
QUOTE(technicalninja @ Jul 11 2024, 09:26 AM) 95.95mm in a 96mm bore equals .05mm PTW clearance or .002". This is a clearance for cast pistons... It's a TIGHT clearance for cast pistons in an air-cooled application! Not really. 0.03 mm was initial clearance when 914 engines were built. Per the Tech bulletin for the Bus engines the clearance was later opened to 0.05mm Here are OEM 914 shallow dish pistons for a 2.0L 94mm - marked 93.97 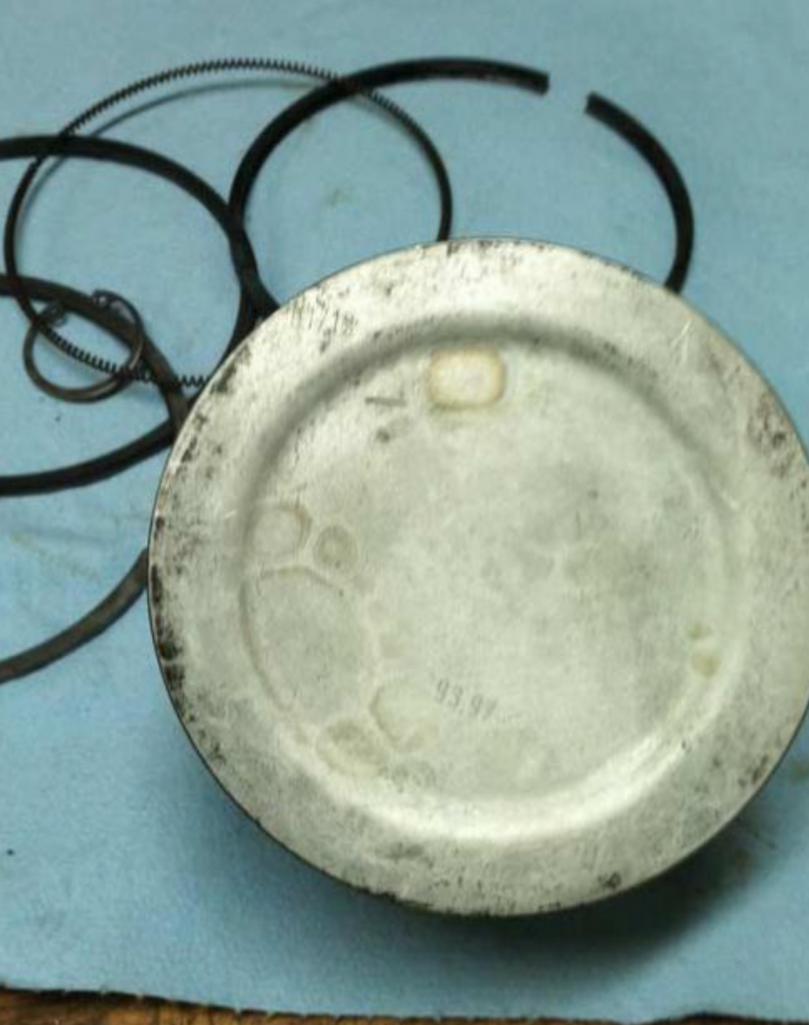 Here’s is the excerpt from the bus bulletin that has later been applied genetically by the aftermarket to Type 4 pistons and cylinders 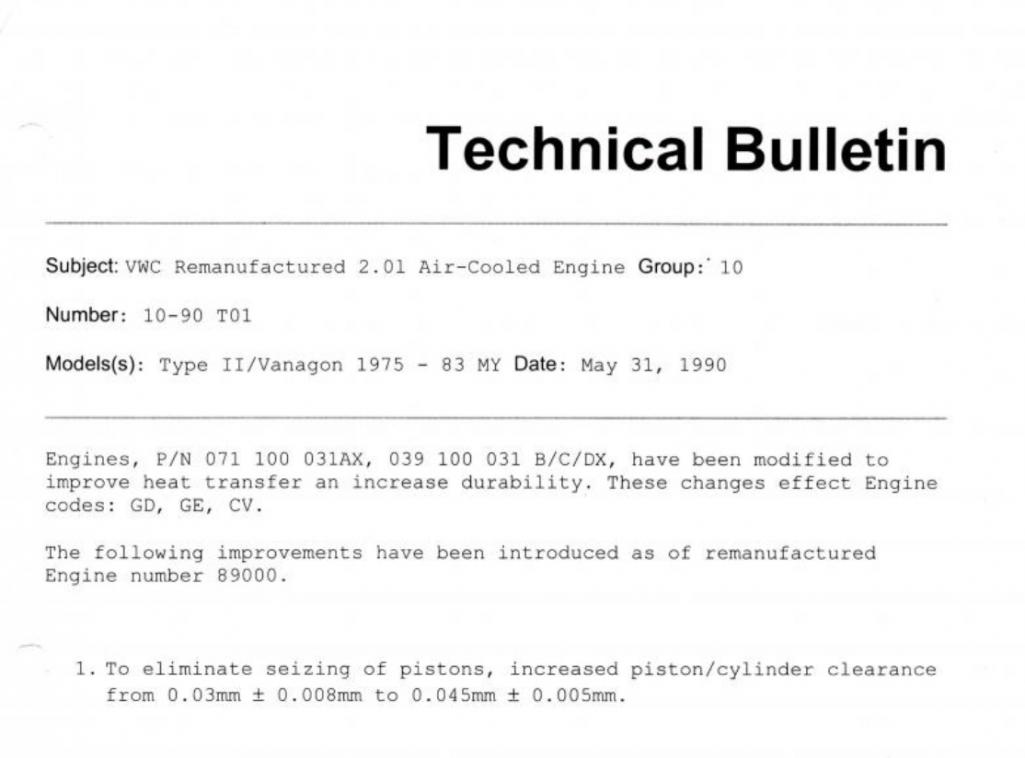 Bus would have had more susceptibility to seizing due to the brick in the wind aerodynamic loads plus the cargo loads that are way, way higher than the load imposed on a 914. So 0.05mm of clearance is more than adequate for a 914. I believe Raby has run Nickies with as low as .00075” (0.019mm) piston to cylinder clearance somewhere along the line. I can’t find the source for that so take it as unverified. That of course would be possible because the piston is running in an aluminum cylinder that is expanding as fast as the piston as it heats up. Side topic @technicalninja Comparison of HAM head to OEM (2.0L)  |
|
|
|
| Jack Standz |
Jul 11 2024, 08:48 AM
Post
#66
|
|
Member Group: Members Posts: 425 Joined: 15-November 19 From: Happy Place (& surrounding area) Member No.: 23,644 Region Association: None |
QUOTE(Superhawk996 @ Jul 11 2024, 08:19 AM) I guess I’ll wear the old fuddy duddie title with honor. (IMG:style_emoticons/default/biggrin.gif) Did the cam get a single thrust bearing or was it done Raby style with a double thrust bearing? For that matter what cam is in there? Yes. Forgot about the double cam thrust bearing (actually just an extra thrust bearing taken from another regular cam bearing set). When we mocked up the motor, we had some binding with a double thrust bearing set from the type 4 store. Required some clearancing. Pretty sure the RAT motor kits had them. Would want to check that before start-up. As you wish, we can grant you the title of "Old Fuddy Duddy". RAT/HAM heads welded around the spark plug holes to relocate them to the more favorable 2 liter position. |
|
|
|
| technicalninja |
Jul 11 2024, 11:25 AM
Post
#67
|
|
Advanced Member Group: Members Posts: 2,195 Joined: 31-January 23 From: Granbury Texas Member No.: 27,135 Region Association: Southwest Region |
QUOTE(Superhawk996 @ Jul 11 2024, 09:10 AM) QUOTE(technicalninja @ Jul 11 2024, 09:26 AM) 95.95mm in a 96mm bore equals .05mm PTW clearance or .002". This is a clearance for cast pistons... It's a TIGHT clearance for cast pistons in an air-cooled application! Not really. 0.03 mm was initial clearance when 914 engines were built. Per the Tech bulletin for the Bus engines the clearance was later opened to 0.05mm Here are OEM 914 shallow dish pistons for a 2.0L 94mm - marked 93.97 Here’s is the excerpt from the bus bulletin that has later been applied genetically by the aftermarket to Type 4 pistons and cylinders Bus would have had more susceptibility to seizing due to the brick in the wind aerodynamic loads plus the cargo loads that are way, way higher than the load imposed on a 914. So 0.05mm of clearance is more than adequate for a 914. I believe Raby has run Nickies with as low as .00075” (0.019mm) piston to cylinder clearance somewhere along the line. I can’t find the source for that so take it as unverified. That of course would be possible because the piston is running in an aluminum cylinder that is expanding as fast as the piston as it heats up. Side topic @technicalninja Comparison of HAM head to OEM (2.0L) Thanks for the pics SH! Answered some questions I had. That has minimal chamber re-shaping. I'm betting your Nickies will not fit in your HAM heads as is... You're going to have to have those fly cut to the larger diameter and then re-ceramic coated due to the loss of coatings on the flat sections. Got the heads BEFORE the Nickies did you? That would piss me off! |
|
|
|
| Robroe |
Jul 11 2024, 11:33 AM
Post
#68
|
|
Member Group: Members Posts: 76 Joined: 10-August 21 From: Wenatchee, WA Member No.: 25,793 Region Association: Pacific Northwest |
QUOTE(technicalninja @ Jul 11 2024, 08:26 AM) 95.95mm in a 96mm bore equals .05mm PTW clearance or .002". This is a clearance for cast pistons... It's a TIGHT clearance for cast pistons in an air-cooled application! Sorry to be such a newbie….what is “PTW” clearance? How would I measure that? |
|
|
|
| technicalninja |
Jul 11 2024, 11:48 AM
Post
#69
|
|
Advanced Member Group: Members Posts: 2,195 Joined: 31-January 23 From: Granbury Texas Member No.: 27,135 Region Association: Southwest Region |
Piston to wall
Bore clearance. You measure the bore with an inside micrometer and the piston skirt with an outside micrometer and the difference is the PTW clearance. The point you measure the piston is CRITICAL. Most manufactures have a specific spot, normally about halfway down the skirt below the pin bore as the measuring spot. Pistons ARE NOT perfectly cylindrical. They are shaped like a barrel (a little tint bit) and measuring diameter of the crown or skirt will give you different readings... |
|
|
|
| 930cabman |
Jul 11 2024, 12:14 PM
Post
#70
|
|
Advanced Member Group: Members Posts: 3,803 Joined: 12-November 20 From: Buffalo Member No.: 24,877 Region Association: North East States |
QUOTE(technicalninja @ Jul 11 2024, 11:48 AM) Piston to wall Bore clearance. You measure the bore with an inside micrometer and the piston skirt with an outside micrometer and the difference is the PTW clearance. The point you measure the piston is CRITICAL. Most manufactures have a specific spot, normally about halfway down the skirt below the pin bore as the measuring spot. Pistons ARE NOT perfectly cylindrical. They are shaped like a barrel (a little tint bit) and measuring diameter of the crown or skirt will give you different readings... I have used a feeler gauge, will get you close. maybe not close enough for a race application, but for the street I think it's fine. Generally at 90 degrees to the pin |
|
|
|
| Robroe |
Jul 11 2024, 06:49 PM
Post
#71
|
|
Member Group: Members Posts: 76 Joined: 10-August 21 From: Wenatchee, WA Member No.: 25,793 Region Association: Pacific Northwest |
QUOTE(930cabman @ Jul 11 2024, 01:14 PM) QUOTE(technicalninja @ Jul 11 2024, 11:48 AM) Piston to wall Bore clearance. You measure the bore with an inside micrometer and the piston skirt with an outside micrometer and the difference is the PTW clearance. The point you measure the piston is CRITICAL. Most manufactures have a specific spot, normally about halfway down the skirt below the pin bore as the measuring spot. Pistons ARE NOT perfectly cylindrical. They are shaped like a barrel (a little tint bit) and measuring diameter of the crown or skirt will give you different readings... I have used a feeler gauge, will get you close. maybe not close enough for a race application, but for the street I think it's fine. Generally at 90 degrees to the pin Cylinders are 96mm bore. Intake valves are 44.06 or so. Exhaust valves are 35.95 mm or so. Will measure pistons and deck height next. 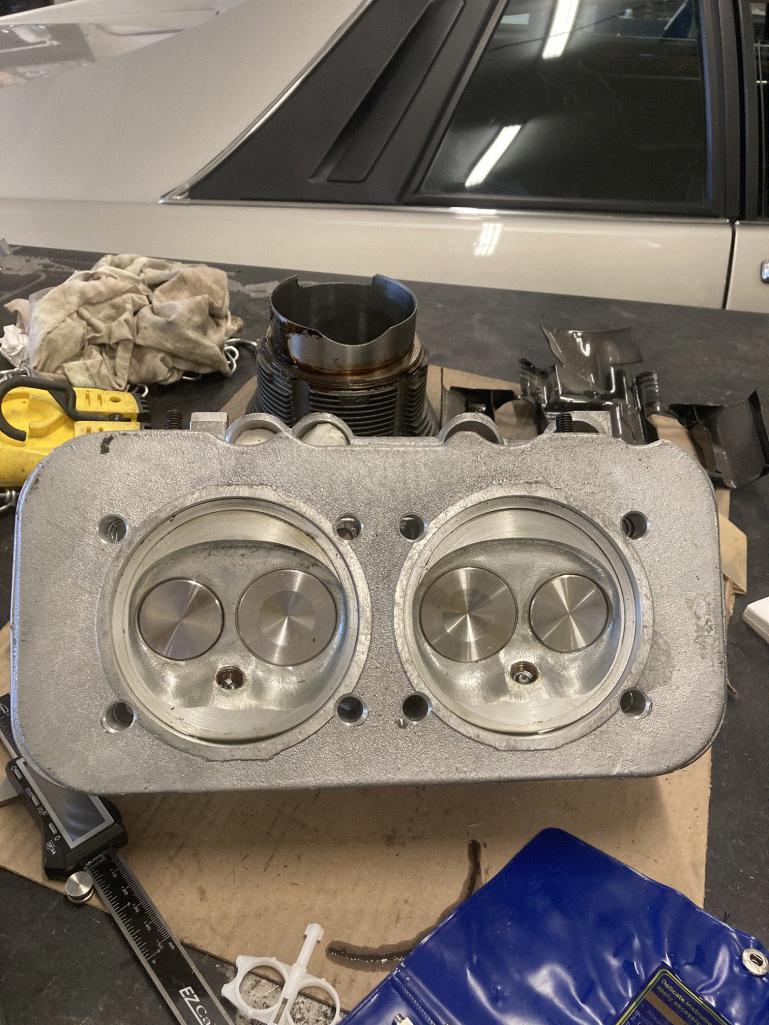 |
|
|
|
| Robroe |
Jul 11 2024, 07:00 PM
Post
#72
|
|
Member Group: Members Posts: 76 Joined: 10-August 21 From: Wenatchee, WA Member No.: 25,793 Region Association: Pacific Northwest |
QUOTE(Robroe @ Jul 11 2024, 07:49 PM) QUOTE(930cabman @ Jul 11 2024, 01:14 PM) QUOTE(technicalninja @ Jul 11 2024, 11:48 AM) Piston to wall Bore clearance. You measure the bore with an inside micrometer and the piston skirt with an outside micrometer and the difference is the PTW clearance. The point you measure the piston is CRITICAL. Most manufactures have a specific spot, normally about halfway down the skirt below the pin bore as the measuring spot. Pistons ARE NOT perfectly cylindrical. They are shaped like a barrel (a little tint bit) and measuring diameter of the crown or skirt will give you different readings... I have used a feeler gauge, will get you close. maybe not close enough for a race application, but for the street I think it's fine. Generally at 90 degrees to the pin pistons appear to be from AA. Are these cast and not forged? Cylinders are 96mm bore. Intake valves are 44.06 or so. Exhaust valves are 35.95 mm or so. Will measure pistons and deck height next. 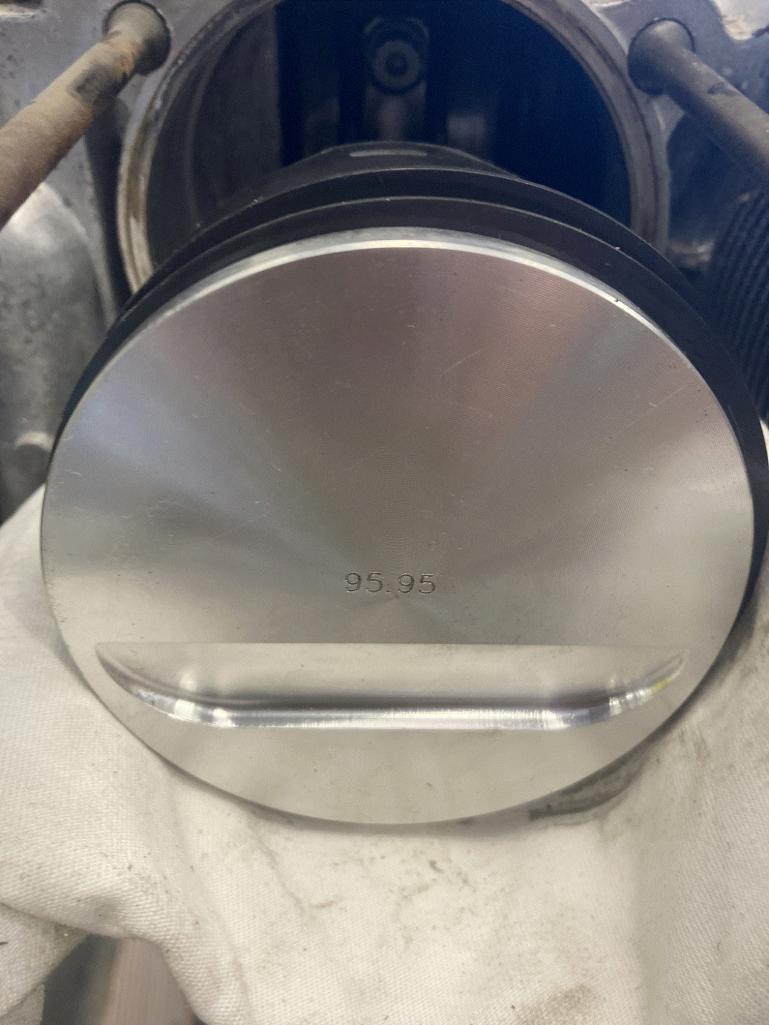 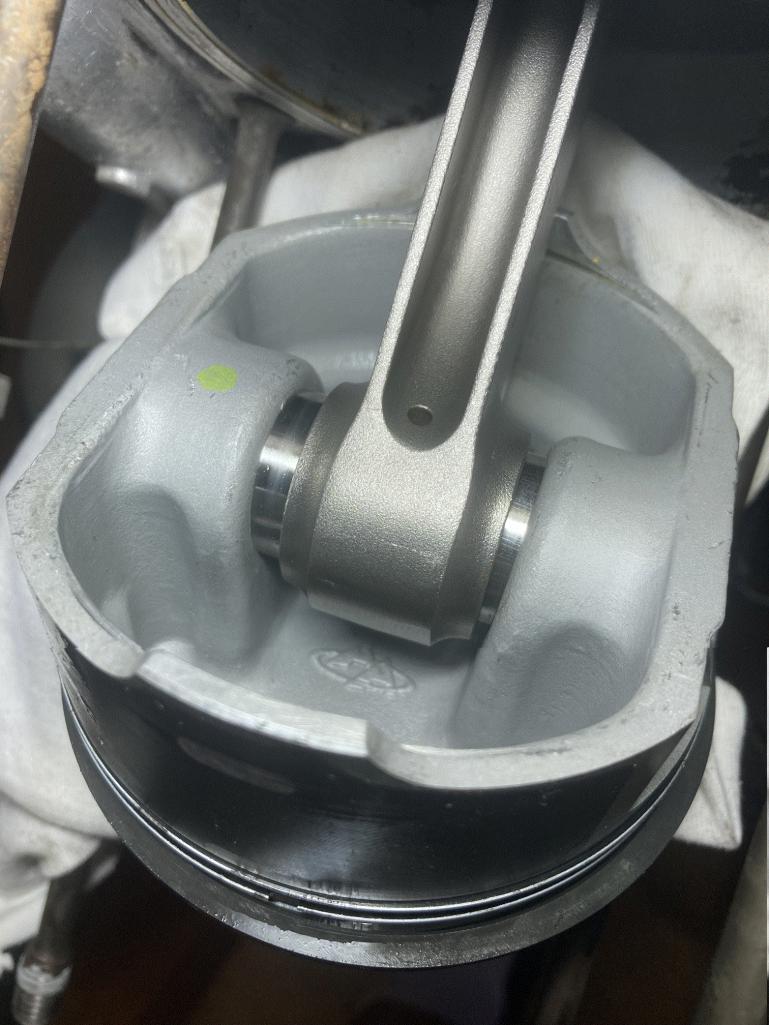 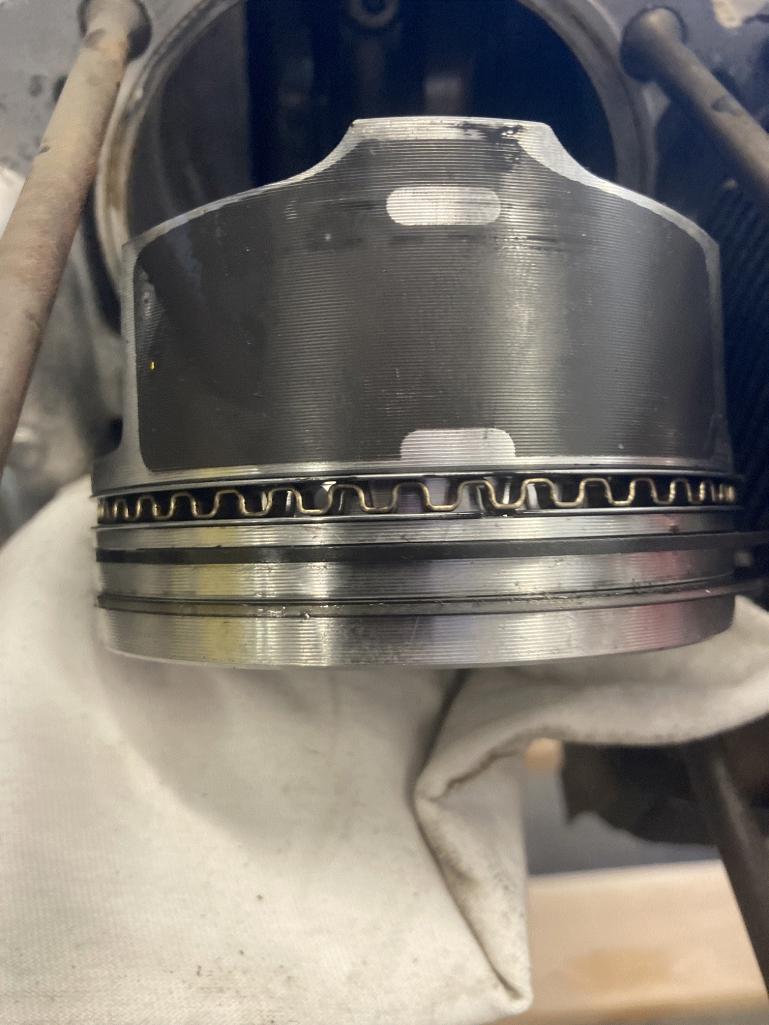 |
|
|
|
| technicalninja |
Jul 11 2024, 07:22 PM
Post
#73
|
|
Advanced Member Group: Members Posts: 2,195 Joined: 31-January 23 From: Granbury Texas Member No.: 27,135 Region Association: Southwest Region |
Those have had the chambers worked far more than SuperHawks!
I LIKE your heads! Please take pictures of the intake and exhaust ports. I'd REALLY, REALLY like pictures of the ports directly below the valves. You would have to take the valves out which, if you've not done that before, you shouldn't "learn how" on those heads. I can't have everything I want... Now, if it was me, I'd rip those apart to change the valve stem seals (or O-rings) and hand lap ALL of the valves. If those have been sitting for years hand lapping should be done. Yes, go ahead and take them apart! (IMG:style_emoticons/default/devil.gif) (IMG:style_emoticons/default/devil.gif) I will walk you through a hand lapping if you desire it. A quick test to test valve sealing is to fill up the intake and exhaust port with a liquid and watch if the liquid seeps by the valve into the chamber. I normally use mineral spirits as I'm planning tear down anyway. A safer fluid (for using the heads without tear down if sealing is good) would be liquid WD40. You can buy this stuff in gallons. https://www.homedepot.com/p/WD-40-1-Gal-Mul...mp;gclsrc=aw.ds Wouldn't bother me at all to test heads with WD, drain, blow them out, and then run without pulling them down. Stand the heads so the port face is horizontal at the top and fill the port up. Wait 5-10 minutes and see if the level has dropped. A TINY amount of leakage may occur through the valve stem. You will see that around the springs. Active dripping will require attention. Water or Mineral spirits I'd want to tear down to fully remove. Tearing down is easy with the proper tools. You need a valve spring depressor. You slightly compress each valve spring, remove the keepers, release the compressor and remove the springs and retainer. Keep everything in order and mark the parts to allow replacement in the same port. I could easily pull the valves in less than 5 minutes per head. |
|
|
|
| Superhawk996 |
Jul 11 2024, 07:27 PM
Post
#74
|
|
914 Guru Group: Members Posts: 6,633 Joined: 25-August 18 From: Woods of N. Idaho Member No.: 22,428 Region Association: Galt's Gulch |
So lighter than OEM con rods. Looking good.
Pistons and cylinders from AA Performance Products. Budget oriented parts vs the big names but nothing wrong with their stuff at all - lots of folks using them. Mahle style slipper coating on the skirts is a nice touch. Decent amateur build based on what we’ve seen. Did you measure stroke? |
|
|
|
| technicalninja |
Jul 11 2024, 07:28 PM
Post
#75
|
|
Advanced Member Group: Members Posts: 2,195 Joined: 31-January 23 From: Granbury Texas Member No.: 27,135 Region Association: Southwest Region |
Did you check the stroke during disassembly?
You measure the depth of the piston at BDC versus the deck height at TDC. Did you check deck height during tear down? You measure how far down the bore the piston is at TDC. This is done with feeler gauges or dial indicator Have you checked crankshaft endplay yet? This is done with a dial indicator. If you don't know BDC = bottom dead center TDC = top dead center Those are ends of the stroke. |
|
|
|
| technicalninja |
Jul 11 2024, 07:32 PM
Post
#76
|
|
Advanced Member Group: Members Posts: 2,195 Joined: 31-January 23 From: Granbury Texas Member No.: 27,135 Region Association: Southwest Region |
The cast pistons, which I agree are FINE, need cleaning bigtime!
You can probably re-use the rings, but you need to clean the piss out of them and their respective groves in the pistons. Those appear to have never been run... |
|
|
|
| Superhawk996 |
Jul 11 2024, 07:35 PM
Post
#77
|
|
914 Guru Group: Members Posts: 6,633 Joined: 25-August 18 From: Woods of N. Idaho Member No.: 22,428 Region Association: Galt's Gulch |
QUOTE(technicalninja @ Jul 11 2024, 09:22 PM) Those have had the chambers worked far more than SuperHawks! I LIKE your heads! My heads are the AA 2.0L china casting but valves, seats, springs reworked by HAM. IIRC the RAT / HAM are the AMC 1.8L casting (better quality history) but then welded and reworked to mimic the 2.0L generally. I’m going to go with Emery here - if valves are sealing properly (they will be) - I wouldn’t tear down the heads. RAT & HAM are top notch and I don’t see that their work needs to be double checked or re-done. I guess maybe I’m not so fuddy duddie after all. (IMG:style_emoticons/default/sad.gif) |
|
|
|
| technicalninja |
Jul 11 2024, 07:46 PM
Post
#78
|
|
Advanced Member Group: Members Posts: 2,195 Joined: 31-January 23 From: Granbury Texas Member No.: 27,135 Region Association: Southwest Region |
QUOTE(Superhawk996 @ Jul 11 2024, 08:35 PM) QUOTE(technicalninja @ Jul 11 2024, 09:22 PM) Those have had the chambers worked far more than SuperHawks! I LIKE your heads! My heads are the AA 2.0L china casting but valves, seats, springs reworked by HAM. IIRC the RAT / HAM are the AMC 1.8L casting (better quality history) but then welded and reworked to mimic the 2.0L generally. I’m going to go with Emery here - if valves are sealing properly (they will be) - I wouldn’t tear down the heads. RAT & HAM are top notch and I don’t see that their work needs to be double checked or re-done. I guess maybe I’m not so fuddy duddie after all. (IMG:style_emoticons/default/sad.gif) I'm actually in agreement with you. I did say "don't learn how on these heads" and provided a method of verification that did not require tear down. I STILL want to see the ports however! Badly! (IMG:style_emoticons/default/devil.gif) |
|
|
|
| Superhawk996 |
Jul 11 2024, 07:51 PM
Post
#79
|
|
914 Guru Group: Members Posts: 6,633 Joined: 25-August 18 From: Woods of N. Idaho Member No.: 22,428 Region Association: Galt's Gulch |
QUOTE(technicalninja @ Jul 11 2024, 09:46 PM) I'm actually in agreement with you. I did say "don't learn how on these heads" and provided a method of verification that did not require tear down. My bad. For some reason I read it the opposite; ie now is the time to learn. (IMG:style_emoticons/default/headbang.gif) |
|
|
|
| technicalninja |
Jul 11 2024, 07:55 PM
Post
#80
|
|
Advanced Member Group: Members Posts: 2,195 Joined: 31-January 23 From: Granbury Texas Member No.: 27,135 Region Association: Southwest Region |
SuperHawk, how would you test to see if the valves were seating properly?
The statement of "not needing to be double checked" IS the ROOT of ALL mechanical failures in my book. You insult Mr. Murphy by stating that. Mr. Murphy likes kicking you in the nuts... I double and triple check everything ALWAYS! I caught WAY TOO much shit to ever stop. The only other way to test valve sealing is with a dedicated valve seat vacuum tester and that is something even I don't have... |
|
|
|
|
1 User(s) are reading this topic (1 Guests and 0 Anonymous Users)
0 Members:

|
Lo-Fi Version | Time is now: 4th January 2025 - 06:08 PM |
Invision Power Board
v9.1.4 © 2025 IPS, Inc.