|
|
|
Porsche, and the Porsche crest are registered trademarks of Dr. Ing. h.c. F. Porsche AG.
This site is not affiliated with Porsche in any way. Its only purpose is to provide an online forum for car enthusiasts. All other trademarks are property of their respective owners. |
|
|

  |

| Superhawk996 |
 Jul 11 2024, 07:59 PM Jul 11 2024, 07:59 PM
Post
#81
|
|
914 Guru  Group: Members Posts: 6,633 Joined: 25-August 18 From: Woods of N. Idaho Member No.: 22,428 Region Association: Galt's Gulch |
I’m going to reiterate what Ninja said earlier
Be sure you are indexing the flywheel to the crank and keeping all parts indexed and identified so they can go back to the EXACT same location. Not sure if this Flywheel, crank, rods, fan assembly was dynamically balanced as an assembly. Probably not with amateur build but if it was you want things in the same spot. A tell on dynamic balancing is if you find what seem to be drilled or ground spots where minor amounts of weight are removed to balance the assembly. The book / DVD will have details. If I couldn’t find evidence of dynamic balance work having done, I’d seriously consider doing it if you intend to really spin this motor up beyond factory redline. Should be able to outsource to a local performance shop - maybe Seattle or Tacoma area if necessary. |
   |

 
|
| Superhawk996 |
Jul 11 2024, 08:06 PM
Post
#82
|
|
914 Guru Group: Members Posts: 6,633 Joined: 25-August 18 From: Woods of N. Idaho Member No.: 22,428 Region Association: Galt's Gulch |
QUOTE(technicalninja @ Jul 11 2024, 09:55 PM)  SuperHawk, how would you test to see if the valves were seating properly? What you’ve proposed is perfectly fine. Low viscosity, low surface tension fluid. |
|
|
|
| Front yard mechanic |
Jul 11 2024, 08:12 PM
Post
#83
|
|
Senior Member Group: Members Posts: 1,245 Joined: 23-July 15 From: New Mexico Member No.: 18,984 Region Association: None |
We should change the name of this forum from 914 world to supper ninja technical hawk
|
 |
|
| technicalninja |
Jul 11 2024, 08:15 PM
Post
#84
|
|
Advanced Member Group: Members Posts: 2,195 Joined: 31-January 23 From: Granbury Texas Member No.: 27,135 Region Association: Southwest Region |
QUOTE(Superhawk996 @ Jul 11 2024, 08:59 PM) I’m going to reiterate what Ninja said earlier Be sure you are indexing the flywheel to the crank and keeping all parts indexed and identified so they can go back to the EXACT same location. Not sure if this Flywheel, crank, rods, fan assembly was dynamically balanced as an assembly. Probably not with amateur build but if it was you want things in the same spot. A tell on dynamic balancing is if you find what seem to be drilled or ground spots where minor amounts of weight are removed to balance the assembly. The book / DVD will have details. If I couldn’t find evidence of dynamic balance work having done, I’d seriously consider doing it if you intend to really spin this motor up beyond factory redline. Should be able to outsource to a local performance shop - maybe Seattle or Tacoma area if necessary. (IMG:style_emoticons/default/agree.gif) (IMG:style_emoticons/default/agree.gif) (IMG:style_emoticons/default/agree.gif) (IMG:style_emoticons/default/agree.gif) (IMG:style_emoticons/default/agree.gif) (IMG:style_emoticons/default/agree.gif) (IMG:style_emoticons/default/agree.gif) 100%! If they put those nice rods in and DIDN'T balance, I'd FIRE THEM!!! |
|
|
|
| Superhawk996 |
Jul 11 2024, 08:21 PM
Post
#85
|
|
914 Guru Group: Members Posts: 6,633 Joined: 25-August 18 From: Woods of N. Idaho Member No.: 22,428 Region Association: Galt's Gulch |
QUOTE(Front yard mechanic @ Jul 11 2024, 10:12 PM) We should change the name of this forum from 914 world to supper ninja technical hawk Point taken (IMG:style_emoticons/default/biggrin.gif) |
|
|
|
| technicalninja |
Jul 11 2024, 09:03 PM
Post
#86
|
|
Advanced Member Group: Members Posts: 2,195 Joined: 31-January 23 From: Granbury Texas Member No.: 27,135 Region Association: Southwest Region |
QUOTE(Front yard mechanic @ Jul 11 2024, 09:12 PM) We should change the name of this forum from 914 world to supper ninja technical hawk OK! Should we NOT have discussions regarding builds? Would the other members prefer to not have SuperHawks and my input? |
|
|
|
| burton73 |
Jul 11 2024, 10:29 PM
Post
#87
|
|
burton73 Group: Members Posts: 3,705 Joined: 2-January 07 From: Los Angeles Member No.: 7,414 Region Association: Southern California |
QUOTE(technicalninja @ Jul 10 2024, 06:26 PM) Positives: Heads- look like Raby heads with welding around the spark plug wells (Raby did this). Proper retainers/springs. Look like oversize rocker arm studs. Negatives: Raised numbers on piston crowns. I believe those would have been machined off if built by someone knowledgeable. I'd have removed them. And then I'd have ceramic coated the tops... I've NEVER seen raised numbers in forged stuff. The forging process would destroy them. Someone else said "cast" and I'm prone to agree due to those numbers and the rough valve depressions. Cast iron jugs. Stock head studs and re-used head nuts. Grey RTV on case studs. If they used grey RTV, a master would use a x-acto knife during curing to trim the excess. Possibility of internal clips in the lifters. The value of the heads FAR exceeds the posibility of destroying said heads without a full tear down. I'd take lots of pictures and check a bunch of stuff during the tear down but that would get reduced to individual componets before I'd put fire to it. It's looking more like a kit build with RAT heads. Still a KILLER deal IMO! @technicalninja Picture of RAT case with Serial number Just so all can see what one of these RAT cases done my Jake looks like Best Bob B 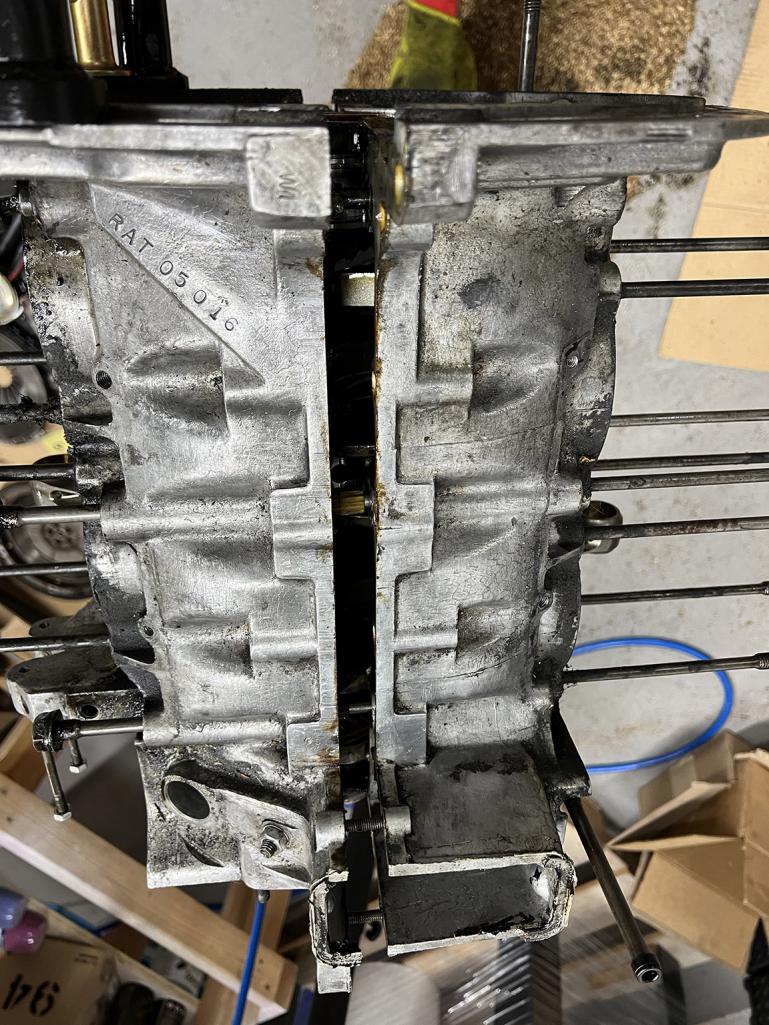 |
|
|
|
| Jack Standz |
Jul 11 2024, 11:59 PM
Post
#88
|
|
Member Group: Members Posts: 425 Joined: 15-November 19 From: Happy Place (& surrounding area) Member No.: 23,644 Region Association: None |
+1 on the suggestions to dynamically balance the motor if you don't see evidence of balancing or drill marks on the pressure plate/flywheel, etc. Dynamic balancing, not static "balancing."
Take all the reciprocating parts to the balancer. Crank, Rods, pistons, flywheel, clutch/pressure plate, etc. One of the signs of a RAT built motor (not a kit) is the fasteners were indexed to the location on the clutch/flywheel. |
|
|
|
| Robroe |
Jul 12 2024, 04:51 PM
Post
#89
|
|
Member Group: Members Posts: 76 Joined: 10-August 21 From: Wenatchee, WA Member No.: 25,793 Region Association: Pacific Northwest |
Here are measurements so far. I still need cam lift.
Stroke 78mm Cylinder Diameter 96mm Deck Height .052 in 1.32 mm Intake Valve 44.06 mm Exhaust Valve 35.95 mm |
|
|
|
| technicalninja |
Jul 12 2024, 05:08 PM
Post
#90
|
|
Advanced Member Group: Members Posts: 2,195 Joined: 31-January 23 From: Granbury Texas Member No.: 27,135 Region Association: Southwest Region |
Good looking numbers!
I'd pick a single shim to reduce deck height to .040. I've always balanced my pistons and rods myself. The machine shop won't invest the time that I am willing to, and they are never as accurate. If you have a V configuration engine the machine shop needs the pistons/rods/rings/pins/clips to calculate "bob" weight. I still don't let them do the balancing of the above. If you're an inline or a boxer they machine shop does not need the above to balance the crank and I'm a HUGE believer in sending the absolute minimum parts to the machine shop. It's hard for them to lose stuff that you keep in your shop... Now, they DO NEED EVERYTHING that attaches to the crank. If they are doing a proper job, they will balance the crank first by itself and then add an item and rebalance (doing the metal reduction to the new addition only), add another part, and so on. This is time consuming. The quick and dirty way is to assemble it all and just balance it once... Both ways will give you the same result but the long way will allow you to replace a single part and effect the total out of balance the least amount. You also have the option to balance just that item and be near perfect. SO two ways to balance... One is the old school proper way One is the new "Get-er-done" varity that is far more common now |
|
|
|
| Robroe |
Jul 12 2024, 06:25 PM
Post
#91
|
|
Member Group: Members Posts: 76 Joined: 10-August 21 From: Wenatchee, WA Member No.: 25,793 Region Association: Pacific Northwest |
QUOTE(technicalninja @ Jul 12 2024, 06:08 PM) Good looking numbers! I'd pick a single shim to reduce deck height to .040. I've always balanced my pistons and rods myself. The machine shop won't invest the time that I am willing to, and they are never as accurate. If you have a V configuration engine the machine shop needs the pistons/rods/rings/pins/clips to calculate "bob" weight. I still don't let them do the balancing of the above. If you're an inline or a boxer they machine shop does not need the above to balance the crank and I'm a HUGE believer in sending the absolute minimum parts to the machine shop. It's hard for them to lose stuff that you keep in your shop... Now, they DO NEED EVERYTHING that attaches to the crank. If they are doing a proper job, they will balance the crank first by itself and then add an item and rebalance (doing the metal reduction to the new addition only), add another part, and so on. This is time consuming. The quick and dirty way is to assemble it all and just balance it once... Both ways will give you the same result but the long way will allow you to replace a single part and effect the total out of balance the least amount. You also have the option to balance just that item and be near perfect. SO two ways to balance... One is the old school proper way One is the new "Get-er-done" varity that is far more common now I need an engine stand yoke for my build. My welding table would be a fine bench mount. What engine stand combination due you use? Hate to spend $400 for a one time use. |
|
|
|
| 930cabman |
Jul 12 2024, 06:25 PM
Post
#92
|
|
Advanced Member Group: Members Posts: 3,803 Joined: 12-November 20 From: Buffalo Member No.: 24,877 Region Association: North East States |
QUOTE(Front yard mechanic @ Jul 11 2024, 08:12 PM) We should change the name of this forum from 914 world to supper ninja technical hawk I am glad to have top notch guys here to share their experiences, generally invaluable information. Thanks all contributors |
|
|
|
| Superhawk996 |
Jul 12 2024, 08:23 PM
Post
#93
|
|
914 Guru Group: Members Posts: 6,633 Joined: 25-August 18 From: Woods of N. Idaho Member No.: 22,428 Region Association: Galt's Gulch |
QUOTE(Robroe @ Jul 12 2024, 08:25 PM) I need an engine stand yoke for my build. My welding table would be a fine bench mount. What engine stand combination due you use? Hate to spend $400 for a one time use. I use a Harbor Freight rolling base and a nice 3 arm yoke that I got off Thesamba.com. Unfortunately I tried to get a link for you and it looks like the guy that used to build them (very affordable ~$120) has passed away and is no longer found in classifieds over at Samba. You might post a WTB here and and see if someone has one they might sell but isn’t using. They were well made and capable of holding a six cylinder engine fully dressed. The two arm yoke would work in a pinch for a /4 but the 3, 4, or 5 arm yokes are way stronger but get more expensive too. The 3 arm was a good compromise that works for me. |
|
|
|
| technicalninja |
Jul 12 2024, 08:45 PM
Post
#94
|
|
Advanced Member Group: Members Posts: 2,195 Joined: 31-January 23 From: Granbury Texas Member No.: 27,135 Region Association: Southwest Region |
I bought a cheap ass one as I was NOT planning on building a six.
Mine has two arms and came with a bracket that could be mounted on a bench. Mine fits in a normal cheap ass engine stand of which I have 10-15. Way too many! It's like they BREED when I'm not looking... I make 3/4" plywood bases on the engine stands and I'll add wheel/tire until I'm close to have a second safety. The 2-arm stand has worked fine with 2 complete 2.0l on it now. I had to "fab" mounting hardware as its not perfect. If you can get 3 or 4 arm used inexpensively that's probably money well spent. You should always be able to get what you paid for it from another member down the road. You MIGHT get an offer to borrow one from another member in the next few posts. This happens far more often than you would think on this forum! Should this happen, you should buy the beer! (IMG:style_emoticons/default/beerchug.gif) |
|
|
|
| technicalninja |
Jul 12 2024, 08:48 PM
Post
#95
|
|
Advanced Member Group: Members Posts: 2,195 Joined: 31-January 23 From: Granbury Texas Member No.: 27,135 Region Association: Southwest Region |
https://aapistons.com/products/bench-mount-...AiABEgIgNPD_BwE
That's the one I bought! $50! Your engine is too nice to use a cheapy. But, that will actually work... EDIT: The thread title needs to be changed! It should read "Killer find 2256 Raby headed engine thrash" or something similar. |
|
|
|
| technicalninja |
Jul 13 2024, 10:26 AM
Post
#96
|
|
Advanced Member Group: Members Posts: 2,195 Joined: 31-January 23 From: Granbury Texas Member No.: 27,135 Region Association: Southwest Region |
On balancing...
Pistons/rods I will balance to +/- 0.5 grams But the entire assembly I will accept +/- 2 grams. Doesn't have to be super close! When an engine runs it ends up with oil entrained on all of the parts and this oil "ropes" differently on different parts. Due to the amount of oil hanging on the parts the engine will NEVER be in "perfect balance". It CANNOT happen unless you get rid of the oil! Dry sump has less of this happening but it's still significant. When someone tells me the entire assembly is +/- some tiny amount it just means that they don't understand what is happening inside an engine while it's running... When a good machine shop calculates "bob weights" for a V engine they should ALWAYS include 5 grams for this entrained oil in each bob weight. |
|
|
|
| Robroe |
Jul 13 2024, 02:11 PM
Post
#97
|
|
Member Group: Members Posts: 76 Joined: 10-August 21 From: Wenatchee, WA Member No.: 25,793 Region Association: Pacific Northwest |
QUOTE(technicalninja @ Jul 13 2024, 11:26 AM) On balancing... Pistons/rods I will balance to +/- 0.5 grams But the entire assembly I will accept +/- 2 grams. Doesn't have to be super close! When an engine runs it ends up with oil entrained on all of the parts and this oil "ropes" differently on different parts. Due to the amount of oil hanging on the parts the engine will NEVER be in "perfect balance". It CANNOT happen unless you get rid of the oil! Dry sump has less of this happening but it's still significant. When someone tells me the entire assembly is +/- some tiny amount it just means that they don't understand what is happening inside an engine while it's running... When a good machine shop calculates "bob weights" for a V engine they should ALWAYS include 5 grams for this entrained oil in each bob weight. Head porting photos. Just ordered AA 2 arm bench mount yoke. Looks pretty solid but will weld additional material if it looks questionable. 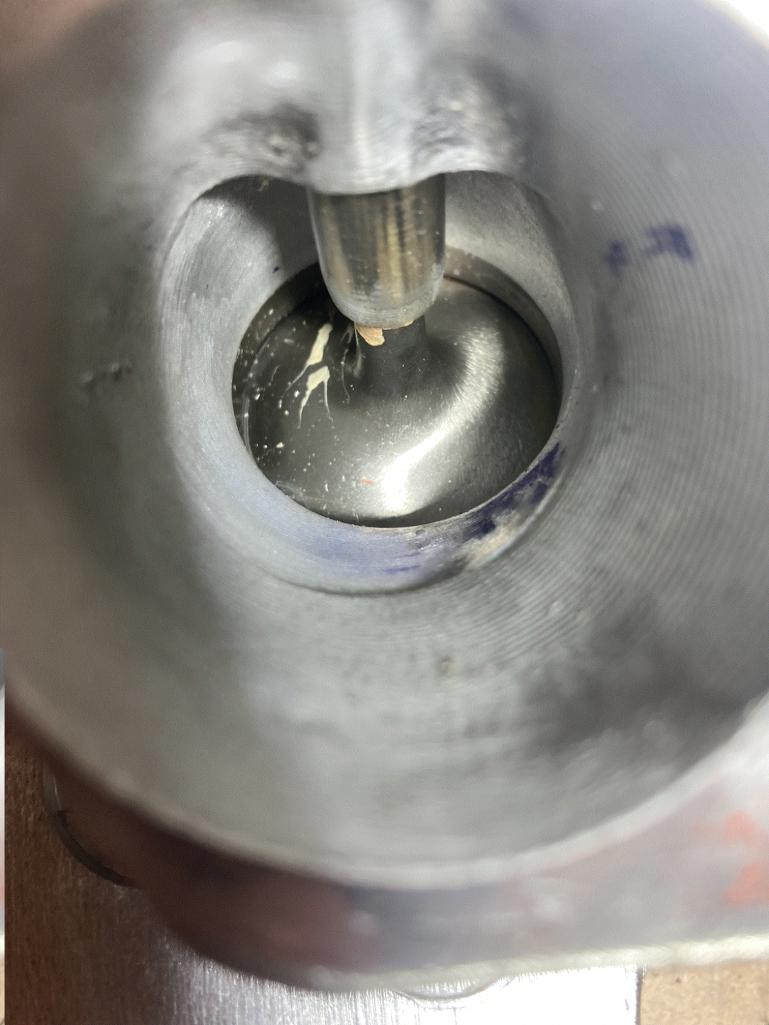 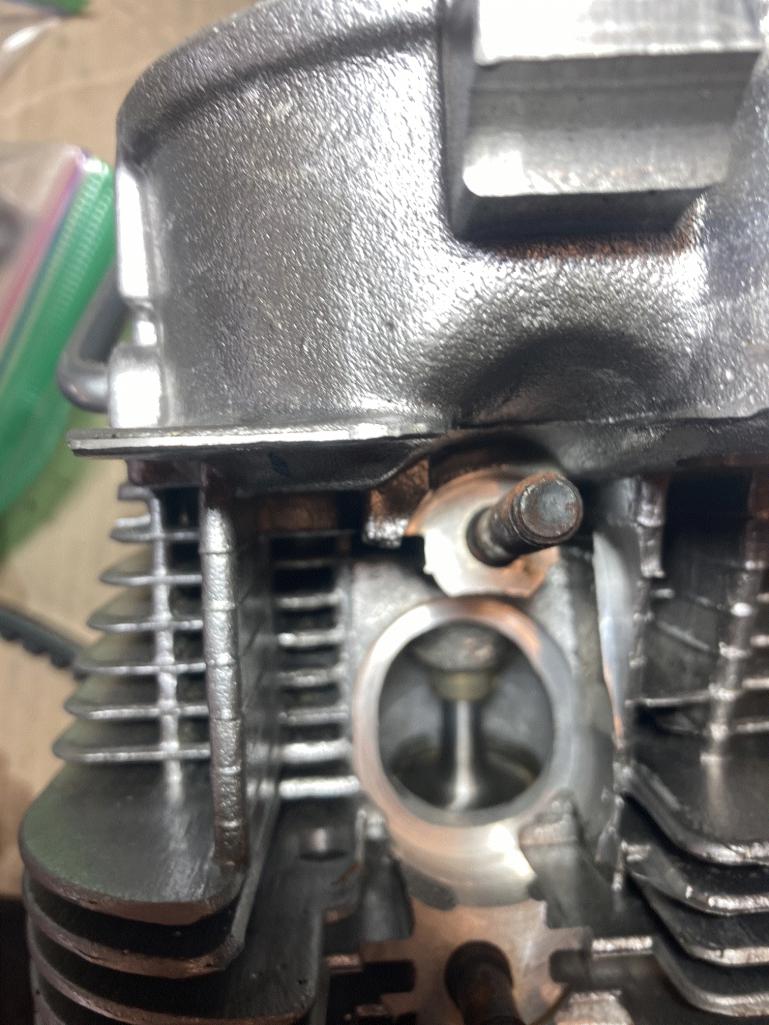 |
|
|
|
| technicalninja |
Jul 13 2024, 02:29 PM
Post
#98
|
|
Advanced Member Group: Members Posts: 2,195 Joined: 31-January 23 From: Granbury Texas Member No.: 27,135 Region Association: Southwest Region |
Thanks for the pics!
Those ridges in the port say "CNC" ported. It ALMOST looks like the port is undercut just beyond the valve seat. That "flies in the face" of normal porting techniques... Most ports work best with throats at 85% of the seat diameter. Those throats look bigger than the seat! (IMG:style_emoticons/default/screwy.gif) Maybe it's a "Type4" type of thing... I'd love different angles and better shots of the exhaust port which I believe is the "Achilles Heel" of Type 4 head flow. The 2.0l heads I've messed with had pretty decent intakes and the VERY WORST exhaust ports I've seen. It didn't look like there was a decent way to "fix" the exhaust port IMO. |
|
|
|
| 930cabman |
Jul 13 2024, 05:51 PM
Post
#99
|
|
Advanced Member Group: Members Posts: 3,803 Joined: 12-November 20 From: Buffalo Member No.: 24,877 Region Association: North East States |
QUOTE(Robroe @ Jul 13 2024, 02:11 PM) QUOTE(technicalninja @ Jul 13 2024, 11:26 AM) On balancing... Pistons/rods I will balance to +/- 0.5 grams But the entire assembly I will accept +/- 2 grams. Doesn't have to be super close! When an engine runs it ends up with oil entrained on all of the parts and this oil "ropes" differently on different parts. Due to the amount of oil hanging on the parts the engine will NEVER be in "perfect balance". It CANNOT happen unless you get rid of the oil! Dry sump has less of this happening but it's still significant. When someone tells me the entire assembly is +/- some tiny amount it just means that they don't understand what is happening inside an engine while it's running... When a good machine shop calculates "bob weights" for a V engine they should ALWAYS include 5 grams for this entrained oil in each bob weight. Head porting photos. Just ordered AA 2 arm bench mount yoke. Looks pretty solid but will weld additional material if it looks questionable. Looks like you might have a rockin /4 engine. Take you time with the assembly and keep us posted with your results |
|
|
|
| emerygt350 |
Jul 14 2024, 04:46 AM
Post
#100
|
|
Advanced Member Group: Members Posts: 2,526 Joined: 20-July 21 From: Upstate, NY Member No.: 25,740 Region Association: North East States |
It looks like a ton of work for a little old 4, tell you what, why don't I just take that off your hands? I have a old bus engine fully assembled that I could give you instead.
|
|
|
|
|
2 User(s) are reading this topic (2 Guests and 0 Anonymous Users)
0 Members:

|
Lo-Fi Version | Time is now: 4th January 2025 - 06:09 PM |
Invision Power Board
v9.1.4 © 2025 IPS, Inc.