|
|
|
Porsche, and the Porsche crest are registered trademarks of Dr. Ing. h.c. F. Porsche AG.
This site is not affiliated with Porsche in any way. Its only purpose is to provide an online forum for car enthusiasts. All other trademarks are property of their respective owners. |
|
|

  |

| Robroe |
 Aug 3 2024, 02:39 PM Aug 3 2024, 02:39 PM
Post
#121
|
|
Member  Group: Members Posts: 76 Joined: 10-August 21 From: Wenatchee, WA Member No.: 25,793 Region Association: Pacific Northwest |
Dumbest newbie question so far. Looking at the crank/rod assembly on the bench. Want to make sure I know which rod goes to which cylinder before I take it apart. So when I remove the rods from the crank and weigh them, I'm sure the rod is being weighed with the correct piston to verify balance. So, from flywheel end to fan end of the crank, which cylinder number does each rod go to? Sorry to be such a dummy. But I'm nervous about getting this right. I've found lots of pictures of the engine layout when assembled, just not with the crank/rods out of the crankcase on the bench. Can figure it out myself, but I want to make sure. Thanks so much ..... and flame away.... I don't blame you.
|
   |

 
|
| 930cabman |
Aug 3 2024, 02:45 PM
Post
#122
|
|
Advanced Member Group: Members Posts: 3,523 Joined: 12-November 20 From: Buffalo Member No.: 24,877 Region Association: North East States |
QUOTE(Robroe @ Aug 3 2024, 02:39 PM)  Dumbest newbie question so far. Looking at the crank/rod assembly on the bench. Want to make sure I know which rod goes to which cylinder before I take it apart. So when I remove the rods from the crank and weigh them, I'm sure the rod is being weighed with the correct piston to verify balance. So, from flywheel end to fan end of the crank, which cylinder number does each rod go to? Sorry to be such a dummy. But I'm nervous about getting this right. I've found lots of pictures of the engine layout when assembled, just not with the crank/rods out of the crankcase on the bench. Can figure it out myself, but I want to make sure. Thanks so much ..... and flame away.... I don't blame you. Have you spoken with an engine builder, with all these cool (expensive) parts you might want to job this out. Not being a jerk, but have you built any engines in your past? |
|
|
|
| Superhawk996 |
Aug 3 2024, 02:46 PM
Post
#123
|
|
914 Guru Group: Members Posts: 6,469 Joined: 25-August 18 From: Woods of N. Idaho Member No.: 22,428 Region Association: Galt's Gulch |
No dumb questions. Better to ask and be sure vs guessing
Yellow is flywheel end 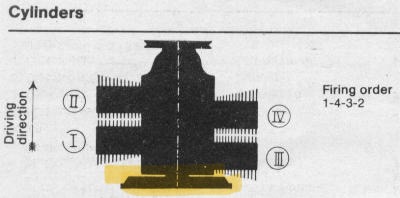 Your engine picture 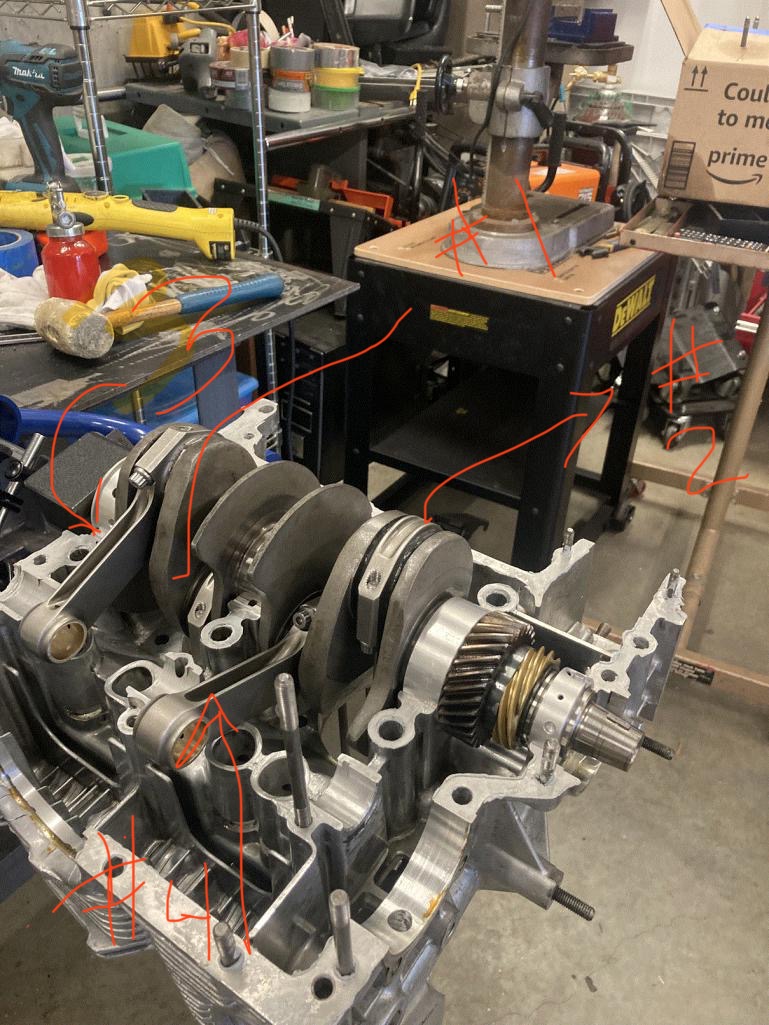 Review Ninjas comments earlier about putting a varying index mark on the rod ends so that they cannot get mixed up. Also number the rod ends that way you have two ways to ID and verify they end up back on the same rod and in the correct orientation (I.e haven’t flipped an end cap). |
 |
|
| Superhawk996 |
Aug 3 2024, 03:15 PM
Post
#124
|
|
914 Guru Group: Members Posts: 6,469 Joined: 25-August 18 From: Woods of N. Idaho Member No.: 22,428 Region Association: Galt's Gulch |
QUOTE(930cabman @ Aug 3 2024, 04:45 PM) Have you spoken with an engine builder, with all these cool (expensive) parts you might want to job this out. Not being a jerk, but have you built any engines in your past? Imma’ gonna riff on this for a second. So far it seems like you are pretty detail oriented which is what you have to be to build engines. So keep it up. Ask lots of questions, post pictures, ask for advice if you are unsure about anything. Mock up and measure as many times as needed to be 100% sure it is assembled correctly and that everything spins freely. Given that this thread started with you engine not spinning freely, you are off to a good start and doing due diligence by disassembling this engine. Read this link to get an idea of how it goes if you aren’t detail oriented and methodical in what you do. https://www.itinerant-air-cooled.com/viewtopic.php?t=14092 Now having said all that - there are plenty of “engine builders” out there that I wouldn’t let rebuild a lawnmower engine. Sometimes it can be hard to sort them out. Buyer beware. If an engine builder doesn’t have a dyno that is the first red flag. But if you are overwhelmed, and don’t feel that you can be detail oriented and methodical, Cabman’s suggestion may be warranted. Only you can decide. |
|
|
|
| technicalninja |
Aug 3 2024, 04:01 PM
Post
#125
|
|
Senior Member Group: Members Posts: 1,827 Joined: 31-January 23 From: Granbury Texas Member No.: 27,135 Region Association: Southwest Region |
The cylinder numbering sequence on the T4 is THE MOST NON-INTUITIVE method out there!
Most (75%) engines number the cylinders from the front of the crank and the first one is #1, 2nd is #2 and so on. Most V8s have all the odd numbers on bank 1 and evens on bank 2. Bank 1 cylinder head is usually shifted forward of bank2 head. Ford is bad about 1-4 on one bank and 5-8 on the other. The engines have "different" firing orders that actually do the exact same pattern. (IMG:style_emoticons/default/screwy.gif) (IMG:style_emoticons/default/screwy.gif) (IMG:style_emoticons/default/screwy.gif) The T4 (and other air-cooled VWs I think) have a jacked-up numbering system. Having #1 and #4 as the center two crank throws seems "alien" (IMG:style_emoticons/default/alien.gif) as hell to me. I'm guessing it was "GOOD DRUGS" during the design phase in Germany! (IMG:style_emoticons/default/smoke.gif) (IMG:style_emoticons/default/smoke.gif) (IMG:style_emoticons/default/smoke.gif) (IMG:style_emoticons/default/smoke.gif) (IMG:style_emoticons/default/smoke.gif) (IMG:style_emoticons/default/smoke.gif) (IMG:style_emoticons/default/smoke.gif) My point on this matter... Even with 4 decades of doing this for my dinner I CONSTANTLY check both firing order and cylinder numbering sequence as it can lead you down the "Primrose path" so quickly. It is not "newbie" to ask such questions at all. It's smart... (IMG:style_emoticons/default/ninja.gif) On engine building, I AGREE with the Hawk 100% except for one thing... Not a single APEX engine builder I know has an engine dyno. I'd MUCH rather see a 5 axis CNC over a dyno cell. I don't have one and I don't feel any of the other builders that I know are actually BETTER than me. I do believe they are FASTER at completing the engine build over me. And most of them are cheaper. I would expect the guy who did have a cell WOULD be excellent and also the VERY MOST EXPENSIVE! SuperHawk is describing Jake Raby here. Jake Raby is an even stranger case, not only does he have it all he is completely dedicated to air-cooled engines and has DECADES of experience on his dynos. I would bet Jake has had MULTIPLE dynos over the years. Jake is probably the only guy in history to wear out an engine dyno on VW engines ALONE... I don't know if that's actually happened, but it wouldn't surprise me a bit. Most modern engine builders rely on a chassis dyno (at another shop) to get their "published" numbers. Chassis dynos are NOT accurate IMO. The gains you create on a single dyno in a single day are accurate (i.e. tuning gained 40hp) but the final number is a "guestimate." The exact same dyno will give you different numbers on a different day. ALL of them have a correction number that is inputted after calculations and anyone who has ever messed with one will agree that the VERY easiest "way" to see a HP increase is to alter this correction factor a little tiny bit... This happens all of the time! If you every see two comparison plots, they don't mean shit unless they show the same correction number, and most don't include that info on the dyno plots. Another "dyno cheat" is to release NO2 from a nitrous bottle into the air filter. This can be "worth" an instant 5-15% increase. It is FAR too easy to alter the outcome on any dyno to completely believe the numbers unless you saw the test done yourself and you've checked the correction number against altitude, temperature, and humidity by doing the calculation yourself! I DO agree with the Hawk about the use of a dedicated engine cell. When you are doing research and development of an engine at the "cutting edge" a dyno IS a requirement. The correction number BS is the same on a dyno cell. The dyno cell eliminates the installed restrictions. It's much easier to be consistent in a cell and a SHITLOAD easier to make major changes to the engine quickly. Not only do I know how to do this crap, I know how to CHEAT as well! This is NOT what you are doing with this engine! This is a fairly simple build with what look like decent parts. I say "go for it". You've got multiple "heavies" watching and bitching. The only way it could be better is if they were actually in your shop (this would have eliminated the first 80 posts). |
|
|
|
| Superhawk996 |
Aug 3 2024, 04:46 PM
Post
#126
|
|
914 Guru Group: Members Posts: 6,469 Joined: 25-August 18 From: Woods of N. Idaho Member No.: 22,428 Region Association: Galt's Gulch |
QUOTE(technicalninja @ Aug 3 2024, 06:01 PM) The T4 (and other air-cooled VWs I think) have a jacked-up numbering system. Having #1 and #4 as the center two crank throws seems "alien" (IMG:style_emoticons/default/alien.gif) as hell to me. Only if you’ve been spending too much time around water pumpers. (IMG:style_emoticons/default/shades.gif) Porsche follows a similar scheme . . . Wait for it. . . Because Dr. Porsche also did the VW engine. |
|
|
|
| Robroe |
Aug 3 2024, 04:51 PM
Post
#127
|
|
Member Group: Members Posts: 76 Joined: 10-August 21 From: Wenatchee, WA Member No.: 25,793 Region Association: Pacific Northwest |
This is NOT what you are doing with this engine! This is a fairly simple build with what look like decent parts. I say "go for it". You've got multiple "heavies" watching and bitching. The only way it could be better is if they were actually in your shop (this would have eliminated the first 80 posts). [/quote] First - Thank you Hawk and Ninja! Both of you are so generous with your knowledge and advice!! I am one blessed newbie. Second - You are both very kind, supportive with your constructive knowledge and suggestions. The forum is the beneficiary. Third - This is more fun than I can remember in a long time. Learning from the best with confidence of a steller outcome. Thank you very much! Wish you could be in the shop with me. Now - I will continue on the path to disassemble the crankshaft (marking the rods first as Ninja suggested), then weigh the rods and add the numbers to my spreadsheet with pistons/wrist pins) to record what we have. Continue cleaning the case halves, fasteners and parts until the gasket kit arrives. Then I expect to start assembly, test fit everything and checking with the forum as I go before painting myself into a corner. |
|
|
|
| technicalninja |
Aug 3 2024, 04:52 PM
Post
#128
|
|
Senior Member Group: Members Posts: 1,827 Joined: 31-January 23 From: Granbury Texas Member No.: 27,135 Region Association: Southwest Region |
I'd rather be wet and juicy over dry and crusty any day!
(IMG:style_emoticons/default/ninja.gif) Don't you hate on my water pumpers now! Even Porsche agrees! Edit: Even I would NOT consider myself the slightest bit kind. Raving asshole is far closer! I'm really good but I AM NOT "user friendly"... I have been described as "diplomatic as a sawed-off double barrel". The person who said that was my father. He was right... |
|
|
|
| Robroe |
Aug 4 2024, 04:24 PM
Post
#129
|
|
Member Group: Members Posts: 76 Joined: 10-August 21 From: Wenatchee, WA Member No.: 25,793 Region Association: Pacific Northwest |
Weights and Measures
Piston Weight (gm) Rod Weight (gm) Total 2 620 589 1209 4 622 589 1211 1 620 589 1209 3 621 590 1211 Rod End Diameter Rod L end .941" Rod B end 1.967" Crank Bearing Journal OD 1.576" 2.360" 2.360" 2.360" Weights should be accurate as I used my wifes weight watcher food scale (IMG:style_emoticons/default/blink.gif) We all know how good I am at measurements, but these are pretty close as I took them about 30 times. |
|
|
|
| technicalninja |
Aug 4 2024, 05:36 PM
Post
#130
|
|
Senior Member Group: Members Posts: 1,827 Joined: 31-January 23 From: Granbury Texas Member No.: 27,135 Region Association: Southwest Region |
you've got a 2-gram difference.
I'd run that. The oil "roaping" around the reciprocating bits adds more imbalance than 2 grams. |
|
|
|
| technicalninja |
Aug 4 2024, 06:00 PM
Post
#131
|
|
Senior Member Group: Members Posts: 1,827 Joined: 31-January 23 From: Granbury Texas Member No.: 27,135 Region Association: Southwest Region |
Just went back through the pics looking for rod pictures.
Are the pushrods aluminum or steel? They don't look my stock fat aluminum ones but it's hard to tell what they are made out of. You want them to be steel. The pic of the rocker arm upside down looks like one of the adjusters might have a concavity in it. Look at all the adjuster tips, they should be slightly crowned and have no flat spots on them. It looks like they have been changed over to solid shim style over springs (which is a requirement). Ian Karr's video on setting these up is excellent! On the rods... Do you have piston squirters built into crank end of each rod? Looks like a pimple with a hole in it near the bottom of the shaft section. Another way is to have a v-passage from the rod bearing allowing oil to spray towards the pistons. Do you have any oil being directed intentionally towards the piston? I think you should. What do you think regarding bore/piston oiling @Superhawk996 ? |
|
|
|
| 930cabman |
Aug 4 2024, 06:17 PM
Post
#132
|
|
Advanced Member Group: Members Posts: 3,523 Joined: 12-November 20 From: Buffalo Member No.: 24,877 Region Association: North East States |
100% agree with giving the pistons a squirt, IIRC it was a TSB. Small V notch easily done and I'm sure effective
|
|
|
|
| Shivers |
Aug 4 2024, 06:55 PM
Post
#133
|
|
Senior Member Group: Members Posts: 2,655 Joined: 19-October 20 From: La Quinta, CA Member No.: 24,781 Region Association: Southern California |
QUOTE(930cabman @ Aug 4 2024, 05:17 PM) 100% agree with giving the pistons a squirt, IIRC it was a TSB. Small V notch easily done and I'm sure effective (IMG:style_emoticons/default/popcorn[1].gif) |
|
|
|
| Superhawk996 |
Aug 4 2024, 07:44 PM
Post
#134
|
|
914 Guru Group: Members Posts: 6,469 Joined: 25-August 18 From: Woods of N. Idaho Member No.: 22,428 Region Association: Galt's Gulch |
QUOTE(technicalninja @ Aug 4 2024, 08:00 PM) On the rods... Do you have piston squirters built into crank end of each rod? Looks like a pimple with a hole in it near the bottom of the shaft section. Another way is to have a v-passage from the rod bearing allowing oil to spray towards the pistons. Do you have any oil being directed intentionally towards the piston? I think you should. What do you think regarding bore/piston oiling @Superhawk996 ? I’m going to politely offer an opinion but it has the be understood every T1 and T4 engine I have built over the years used OEM rods. I don’t build strokers or High RPM motors. I’ve always built motors that were dead stock, 1911 or 2056. I like the v-notch mod for OEM rods because it can’t hurt (too much) and per the tech bulletin is a minor cooling improvement which makes sense from a heat transfer standpoint. Getting more oil up under the piston crown helps cool and increases heat transfer. It also loosely follows what Porsche did by adding oil squirters as they struggled to get heat out of their engines as displacement increased. The down side is we all know crank windage and whipping oil around robs horsepower. The 911 engines deal with this via dry sump minimizing oil in the case to be caught up in windage. On an aftermarket steel con-rod (I beam - H beam) I don’t know what the safety margin is for grinding in a v-notch. The OEM rods aren’t highly stressed and don’t turn high RPMs so the notch isn’t much of a risk. Personally, I wouldn’t risk grinding a stress riser into an aftermarket rod that is going to see more stress (via displacement, and increased piston velocity). Would be a cool dyno exercise someday. Maybe someone knows what Raby does? I don’t so I wouldn’t risk it. The last thing I want to do is be less than conservative with someone else’s engine by offering advice to do something I’ve never done personally. |
|
|
|
| Robroe |
Aug 4 2024, 10:45 PM
Post
#135
|
|
Member Group: Members Posts: 76 Joined: 10-August 21 From: Wenatchee, WA Member No.: 25,793 Region Association: Pacific Northwest |
No oiler holes in connecting rods. No grooves. Saw a few aftermarket high end connecting rods are optionally available with oiler grooves. Not many though. Rods are labeled VW5.158". See picts.
Push rods are aluminum. Isn't alum preferred over steel push rods? 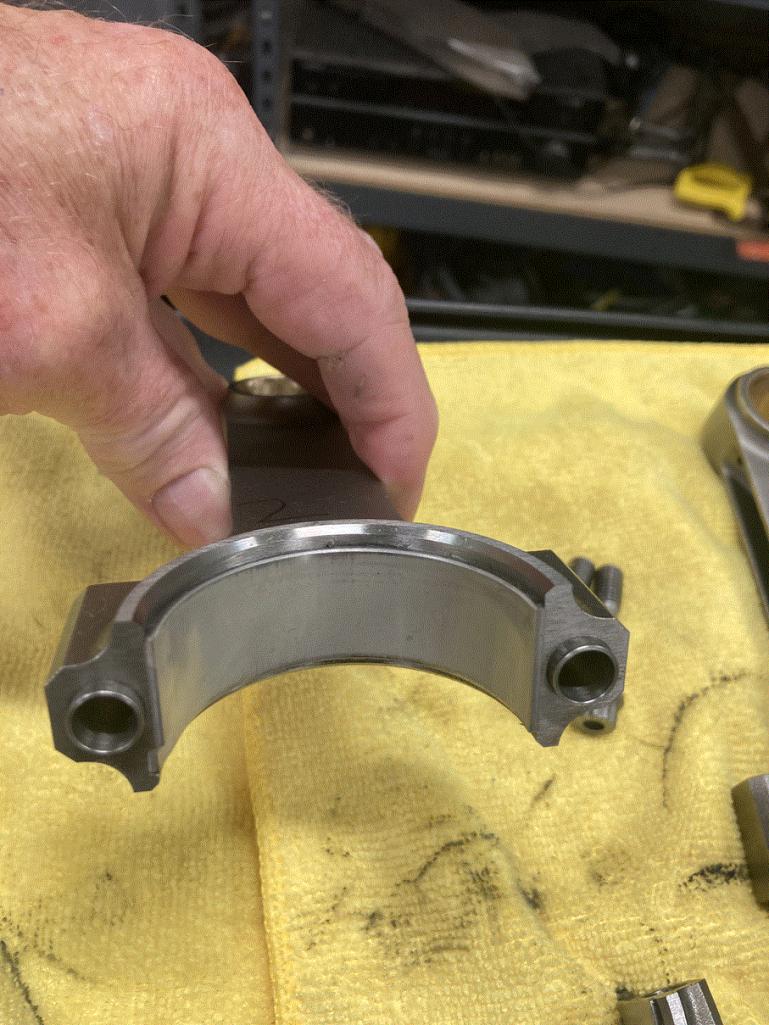 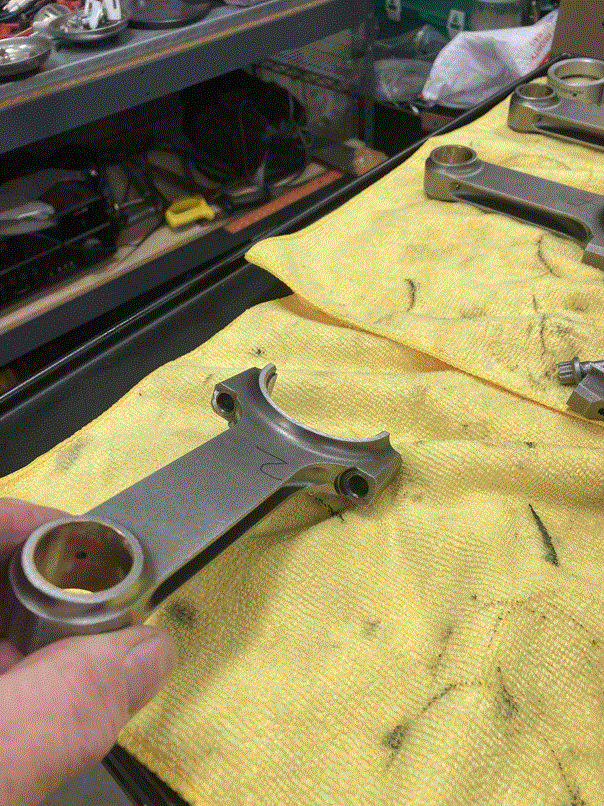 |
|
|
|
| Robroe |
Aug 4 2024, 10:51 PM
Post
#136
|
|
Member Group: Members Posts: 76 Joined: 10-August 21 From: Wenatchee, WA Member No.: 25,793 Region Association: Pacific Northwest |
Like this? both sides? All the way to the bearing?
 |
|
|
|
| Superhawk996 |
Aug 4 2024, 10:55 PM
Post
#137
|
|
914 Guru Group: Members Posts: 6,469 Joined: 25-August 18 From: Woods of N. Idaho Member No.: 22,428 Region Association: Galt's Gulch |
Chromoly push rods preferred due to ability to set them to zero lash and to customize their length to suit geometry changes that come wirh having the case decked, cylinder base shims, heads milled, etc that changes length and geometry.
Rod bearings look good / unscuffed from any previous cranking. Any evidence of assembly lube other than oil? Don’t forget to measure for clearance while they are apart. Speaking of case decking does yours show evidence of having been machined to bring the cylinders into the same plane and parallel with the crank? |
|
|
|
| Superhawk996 |
Aug 4 2024, 10:58 PM
Post
#138
|
|
914 Guru Group: Members Posts: 6,469 Joined: 25-August 18 From: Woods of N. Idaho Member No.: 22,428 Region Association: Galt's Gulch |
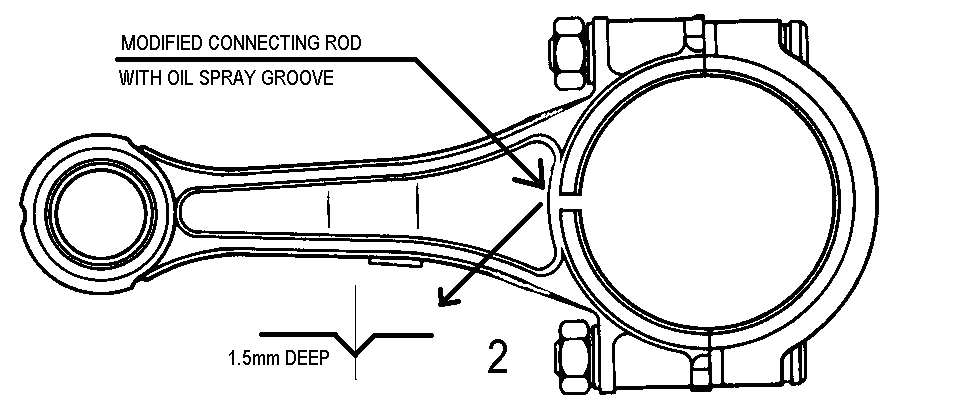
QUOTE(Robroe @ Aug 5 2024, 12:51 AM) Like this? both sides? All the way to the bearing? No doesn’t have to be all the way to the bearing. The idea is just enough to have a bit of a gap between the rod side and the crank cheek to allow oil to be directed toward the piston crown. Per TSB - the groove is only 1.5mm deep (0.060”) and on both sides of the rod. For what it’s worth - if you decide to do the groove, I use a bull nose (radius) end mill. I don’t want a sharp v-notch as shown; sharp notches create stress risers. Per my previous post there is plenty of margin in stock rods but I use a radius out of caution. |
|
|
|
| Jack Standz |
Aug 5 2024, 03:50 AM
Post
#139
|
|
Member Group: Members Posts: 364 Joined: 15-November 19 From: Happy Place (& surrounding area) Member No.: 23,644 Region Association: None |
Aluminum pushrods are more than OK to use, if they're cut-to-length (we have some in our 2056). Those do not look stock.
They have benefits. Unlike steel they expand at approximately the same rate as your case/motor. They are lighter weight, yet strong. Drag racers with very heavy springs that rev to the moon run them, so you'll be fine if you decide they fit your needs. And, you already have them, so they are essentially free at this point. You probably wouldn't even notice the difference until you set the valve lash. Aluminum and steel pushrods run a different lash setting. They might even be the right length. You will find out when you check the valve train geometry. At that point, if they don't fit, you can decide whether to get some steel ones. |
|
|
|
| Robroe |
Aug 5 2024, 12:59 PM
Post
#140
|
|
Member Group: Members Posts: 76 Joined: 10-August 21 From: Wenatchee, WA Member No.: 25,793 Region Association: Pacific Northwest |
QUOTE(Superhawk996 @ Aug 4 2024, 11:55 PM) Chromoly push rods preferred due to ability to set them to zero lash and to customize their length to suit geometry changes that come wirh having the case decked, cylinder base shims, heads milled, etc that changes length and geometry. Rod bearings look good / unscuffed from any previous cranking. Any evidence of assembly lube other than oil? Don’t forget to measure for clearance while they are apart. Speaking of case decking does yours show evidence of having been machined to bring the cylinders into the same plane and parallel with the crank? Hawk - Not sure what to look for regarding case decking. Does this pict provide enough detail for you to see evidence of machining? If not, what do you need to see to determine? I'll take a photo. 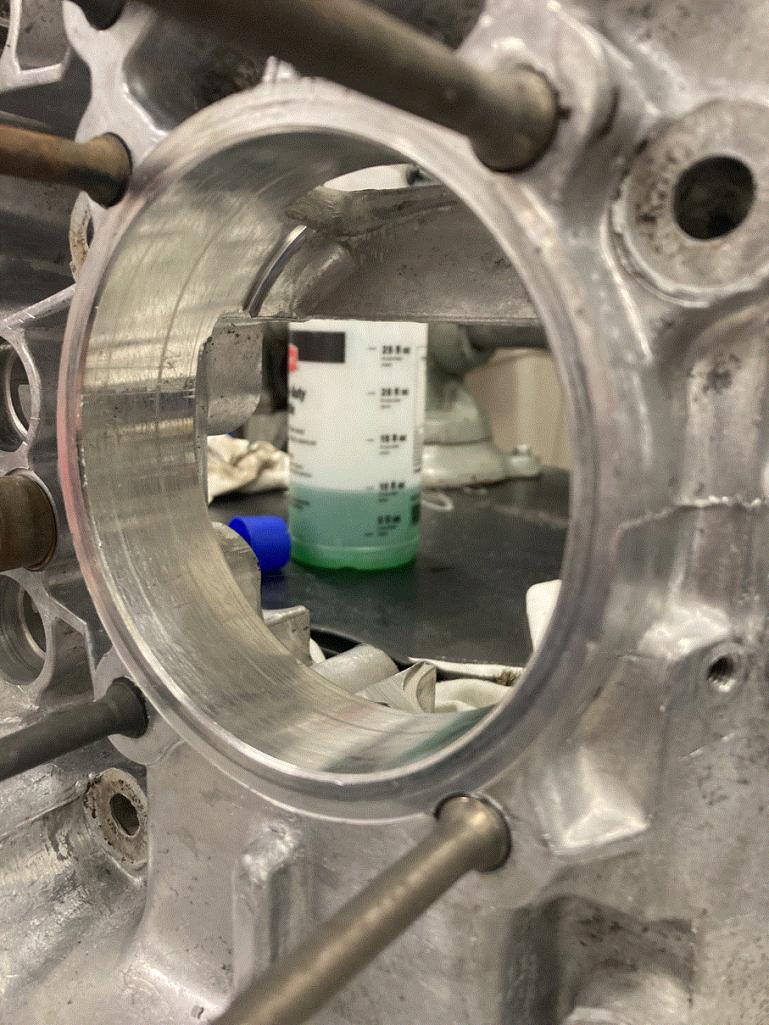 |
|
|
|
|
1 User(s) are reading this topic (1 Guests and 0 Anonymous Users)
0 Members:

|
Lo-Fi Version | Time is now: 19th September 2024 - 09:54 AM |
Invision Power Board
v9.1.4 © 2024 IPS, Inc.