|
|

|
Porsche, and the Porsche crest are registered trademarks of Dr. Ing. h.c. F. Porsche AG.
This site is not affiliated with Porsche in any way. Its only purpose is to provide an online forum for car enthusiasts. All other trademarks are property of their respective owners. |
|
|
  |
| didenpx |
 Oct 5 2024, 02:06 PM Oct 5 2024, 02:06 PM
Post
#1
|
|
Newbie  Group: Members Posts: 44 Joined: 1-September 23 From: Usa Member No.: 27,556 Region Association: North East States 
|
I’m a newcomer to the air cooled world. I picked up a 1975 914 1.8 project car last Fall that I’m just now beginning to work on. It seems to be mechanically stock and structurally sound and has ~120K miles on what appears to be the original engine (it doesn’t look to me as if it’s ever been pulled).
I found it on Craiglist in Maine where it was in the hands of a VW bus/bug enthusiast who was the third owner and had decided to focus his energies on a bus restoration instead. It was last registered an on the road in 2017 when the second owner had it. When I bought it it lot drove and came with an assortment of Restoration Design repair panels, several spare doors from earlier cars, some foglight front bumpers, spare seats, etc.. In a first for me when it comes to project cars the electrics all function properly and appear never to have been monkeyed with. Lights, blinkers, engine heater fan, hazards, everything. Photos below tell the story but the worst of the rust appears to be in the aft section of the LH outer longitudinal. I haven’t pulled the battery and ECU out yet, but from what I can see underneath the car, inside the engine bay, and between the quarter panel and the engine compartment tin the hell hole appears solid (but I’m prepared to find surprises). The rear of the car seems worst off with rot from the foam above the tail lights partially cut out and partially corrected (I’ll be cutting that all back out and starting the job fresh). It was also hit from behind on the LH side and although I haven’t measured everything out yet, from what I can see underneath things don’t seem to be out of whack (maybe wishful thinking as the panel gaps for the rear trunk are uneven). The trunk lid itself somehow didn’t rust out along the rear edge, but it’s suffered a lot of abuse in the form of a now missing luggage rack and a black fiberglass spoiler that had been attached with wood screws. The front of the car doesn’t show any signs of impact damage but the trunk lid sits high when latched on the LH side. My plans are to do a driver quality restoration (between a Hagerty 2 and 3) and get it on the road where I can enjoy it; I’ll cut out and weld the rusty sections, do as much of the body work myself as possible (thankfully it is very straight and the paint meter indicates there shouldn’t be a lot of bondo hiding under the old re-spray) and get a professional re-spray at a local body shop. I’ll either farm out or attempt to DIY the engine work myself. Since I’m assuming the engine will need a rebuild (see below) I’d definitely like to increase the displacement while staying with the stock FI setup. I just started assessing the car in the last couple of weeks and have focused on the health of the engine. It’s still got the original L-jet FI (which I intend to keep). When I got it, it fired up easily but was extremely lumpy and stumbled badly coming off idle. After fixing vacuum hose routing (mostly anyways), adjusting points, doing timing, and adjusting valves it idles well at 850 rpm, sounds much healthier, and revs up from idle nicely (all this is based on stationary testing as the car is not on the road). Today I warmed the engine up and did compression test (throttle propped open with screwdriver) followed by a leak down test. I think the results tell me that I have a tired engine needing rebuilding: Cylinder Compression Leakdown 1 105 15% 2 105 20% 3 105 21% 4 105 23% I didn’t crawl around under the car to listen for leaking valves, but for each the cylinders I could hear hissing in the crankcase as soon as I pressurized the cylinders, which I assume is a bad thing. I’m going to discuss rebuild options at a local multi-generation family garage that started out as a VW shop; if they can do the work within my budget then I’ll probably go that route. I plan to drop the engine sometime late this month. One thing I need help on at this point is figuring out the remaining vacuum lines. I have a large inlet on the air box that looks from the diagrams as if it should go to the charcoal canister but there was no hose on it when I got the car and I don’t know where it should be routed, or even where the canister is (is it that plastic contraption sitting on top of the fuel tank!?). And just yesterday I noticed there is another nipple on the metal thing that the coil bracket attaches to…what’s that supposed to go to?? Looking forward to sharing my progress. This is a great forum that I’ve already learned a lot from! 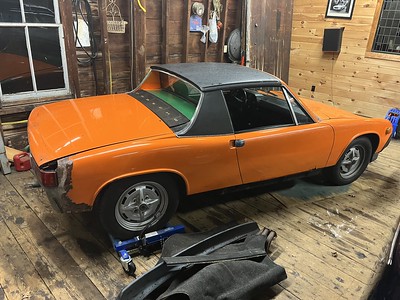 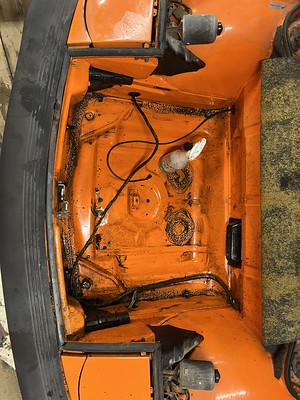 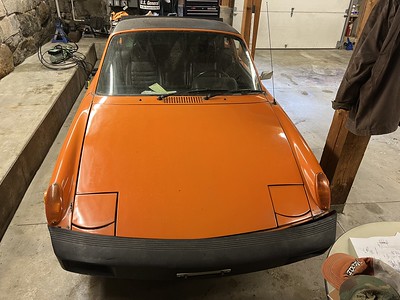 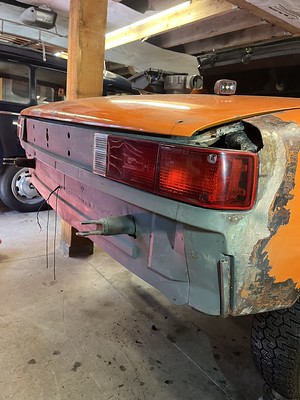 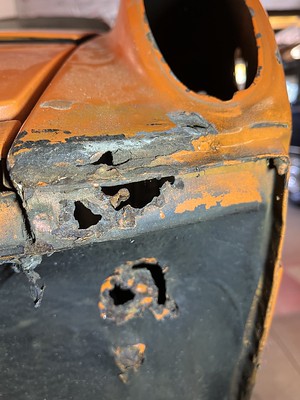 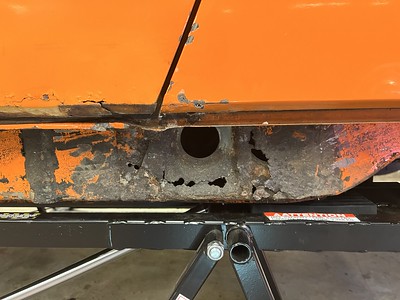 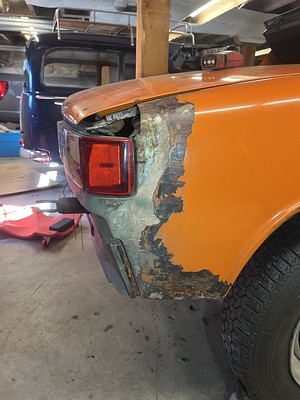 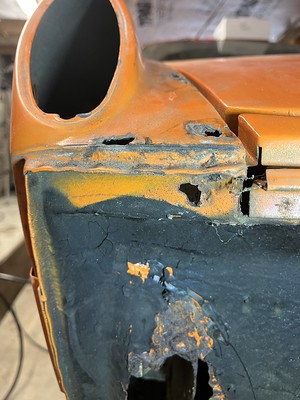 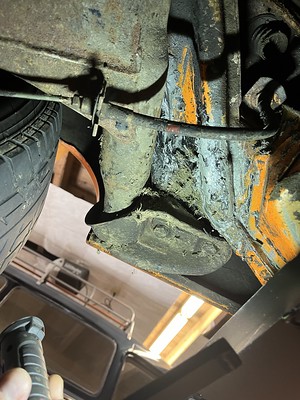 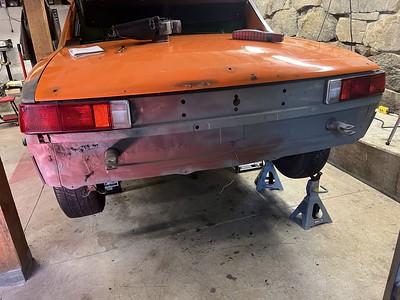 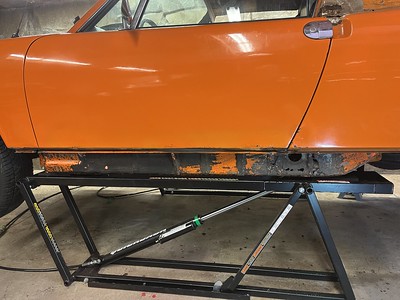 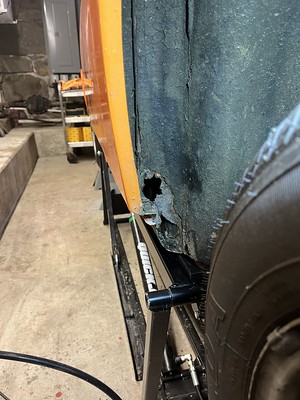 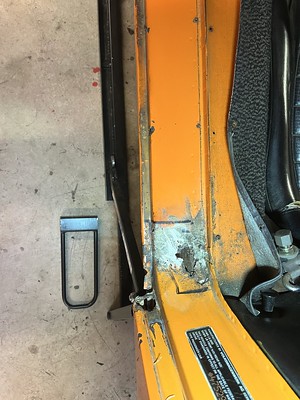 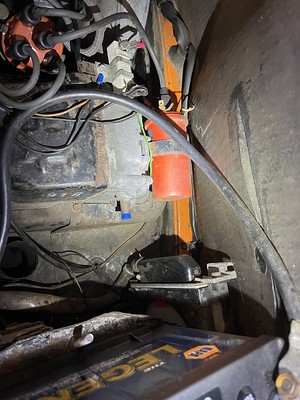 Attached image(s) 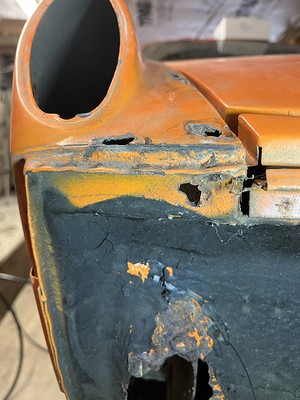
|
| Montreal914 |
 Oct 5 2024, 02:21 PM Oct 5 2024, 02:21 PM
Post
#2
|
|
Senior Member    Group: Members Posts: 1,812 Joined: 8-August 10 From: Claremont, CA Member No.: 12,023 Region Association: Southern California 
|
(IMG:style_emoticons/default/welcome.png)
Best place for anything 914! (IMG:style_emoticons/default/smilie_pokal.gif) Unfortunately your pictures link doesn't seem to work. You can post pictures directly here but make sure they aren't large phone pictures (3meg+), reduce them to ~300k and you'll be able to post many in one post. Good luck with your project! (IMG:style_emoticons/default/driving.gif) |
| didenpx |
 Oct 5 2024, 02:45 PM Oct 5 2024, 02:45 PM
Post
#3
|
|
Newbie  Group: Members Posts: 44 Joined: 1-September 23 From: Usa Member No.: 27,556 Region Association: North East States 
|
(IMG:style_emoticons/default/welcome.png) Best place for anything 914! (IMG:style_emoticons/default/smilie_pokal.gif) Unfortunately your pictures link doesn't seem to work. You can post pictures directly here but make sure they aren't large phone pictures (3meg+), reduce them to ~300k and you'll be able to post many in one post. Good luck with your project! (IMG:style_emoticons/default/driving.gif) Thanks Montreal914: I did the unthinkable and read the instructions on adding the photos. Kind of jumbled up but at least they're there. I will improve over time. |
| technicalninja |
 Oct 5 2024, 03:41 PM Oct 5 2024, 03:41 PM
Post
#4
|
|
Advanced Member     Group: Members Posts: 2,531 Joined: 31-January 23 From: Granbury Texas Member No.: 27,135 Region Association: Southwest Region 
|
(IMG:style_emoticons/default/welcome.png)
You have a running engine... And you going to need a bunch of rust repairs... I'd not worry so much regarding the engine. If it has been in non-use for some time you need to put it under load to help everything reseal. Just warming it up doesn't clear all of the problems. Drive it around like you stole it and I bet your numbers will improve. Having all the compression numbers exact says two things. It's in pretty good shape AND your valve adjustments are consistent. The biggest factor that effects compression readings is intake valve closure point and yours are all damn close to each other. My 75 1.8, that sat 33 years, and really has less than 32K on it hit 120 on all cylinders but leak downs were 4-12%. This was cold but you can see you are close to my numbers. These engines are now EXPENSIVE to rebuild, and it appears few machine shops can complete the machine work properly. Even Ian Karr's Bumble Bee had trouble and he's a "cost no object" type of guy. His videos are all worth watching... https://www.youtube.com/ @IanKarr In your shoes I'd concentrate on body stuff and educate yourself regarding an improved engine. Often times buying a stalled project can reap dividends. @Montreal914 kicked ass recently on a stalled project and scored a 3.2 911 engine with a shitload of other stuff. He is currently selling off the un-needed parts and vastly improving his project. At some point he may have a serious T4 for sale that might fit into your plans better... A recent thread showing excellent metal work can be found here. http://www.914world.com/bbs2/index.php?showtopic=368359 The fact that Fred's doing this in his backyard just adds to the WOW factor. Having a project that can move under its own power is a nice luxury to have. You have that NOW! |
| fiacra |
 Oct 5 2024, 03:48 PM Oct 5 2024, 03:48 PM
Post
#5
|
|
Person.Woman.Man.Camera.TV    Group: Members Posts: 544 Joined: 1-March 19 From: East Bay Region - California Member No.: 22,920 Region Association: Northern California 
|
Welcome. Looks like you have some work ahead of you, but sounds like you're up for it. Lots of resources here, but if you haven't discovered Jeff Bowlsby's website yet it is worth exploring. https://bowlsby.net/914/Classic/. You can find the vacuum diagrams there. Just click on the "tech notebook" section and keep scrolling down. You'll find it. I have a really nice very original 1975 1.8 and can get pictures of things if you need them. It's at my other garage right now but when I get a chance to get over there, maybe even tomorrow, I'll take a picture of the hose routing you asked about. The charcoal canister on the 1975 should be attached to the battery tray. It is black plastic. The "plastic contraption sitting on top of the fuel tank" you are referring to is the expansion tank for the fuel tank. Pictures of things you are asking about are always helpful in getting the correct answer.
|
| 930cabman |
 Oct 5 2024, 04:54 PM Oct 5 2024, 04:54 PM
Post
#6
|
|
Advanced Member     Group: Members Posts: 4,056 Joined: 12-November 20 From: Buffalo Member No.: 24,877 Region Association: North East States 
|
(IMG:style_emoticons/default/welcome.png)
Welcome to the madness. Great looking example and she runs! Keep us posted with your progress |
| didenpx |
 Oct 5 2024, 05:18 PM Oct 5 2024, 05:18 PM
Post
#7
|
|
Newbie  Group: Members Posts: 44 Joined: 1-September 23 From: Usa Member No.: 27,556 Region Association: North East States 
|
This is encouraging and unexpected feedback; I was expecting to hear that engine removal and rebuild were a must....so this is making me re-think things.
Should I instead just do the body work (what I'm facing here is trivial in comparison to a Volvo 1800E that I resurrected), reupholster the seats, get a re-spray and drive it? @technicalninja and @fiacra : thanks for the links and suggestions which I will study. I've already been carefully watching Ian K's excellent YouTube videos. @fiacra very much appreciate the offer of photos of a living breathing 75 1.8: thank you! The two vacuum ports that I referred to in the earlier posts are these (note the blue silicone plugs): 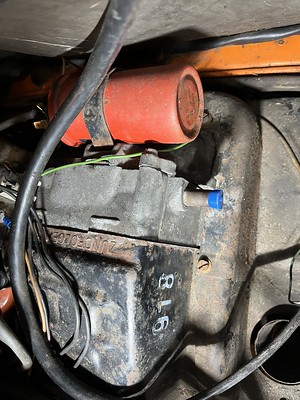 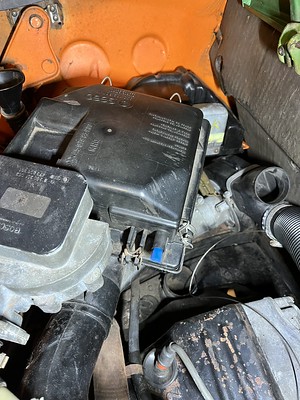 And here's what the engine bay looks like near the battery - no charcoal canister apparent, so I guess I need to source one of those?? 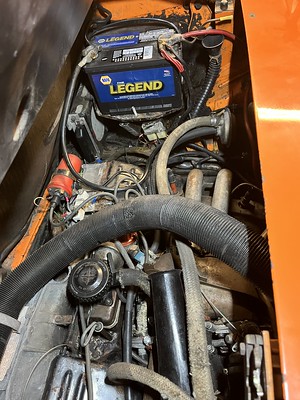 I definitely like the idea of less $$ investment and sooner enjoyment factor.... Paul |
| Montreal914 |
 Oct 5 2024, 05:23 PM Oct 5 2024, 05:23 PM
Post
#8
|
|
Senior Member    Group: Members Posts: 1,812 Joined: 8-August 10 From: Claremont, CA Member No.: 12,023 Region Association: Southern California 
|
I hate to break the news to you but I can see a full-on rustoration ahead. Once you start opening this, there will be a lot more rust. (IMG:style_emoticons/default/sad.gif)
Good thing the car came with the RD panels. Plenty of excellent restoration thread here including Fred’s one. Welcome to the madness!! (IMG:style_emoticons/default/smash.gif) (IMG:style_emoticons/default/welder.gif) |
| didenpx |
 Oct 5 2024, 06:26 PM Oct 5 2024, 06:26 PM
Post
#9
|
|
Newbie  Group: Members Posts: 44 Joined: 1-September 23 From: Usa Member No.: 27,556 Region Association: North East States 
|
I hate to break the news to you but I can see a full-on rustoration ahead. Once you start opening this, there will be a lot more rust. (IMG:style_emoticons/default/sad.gif) Good thing the car came with the RD panels. Plenty of excellent restoration thread here including Fred’s one. Welcome to the madness!! (IMG:style_emoticons/default/smash.gif) (IMG:style_emoticons/default/welder.gif) I'll try to be prepared for surprises, but in the meantime I'm generally optimistic based on my screwdriver poking. On the entire floor pan I can only find a few small pin holes under the driver's seat. But I'm sure there's stuff that will appear with paint stripping and so forth. Fingers crossed. I'll detail all of the good, the bad, and the ugly right here. |
| technicalninja |
 Oct 5 2024, 06:52 PM Oct 5 2024, 06:52 PM
Post
#10
|
|
Advanced Member     Group: Members Posts: 2,531 Joined: 31-January 23 From: Granbury Texas Member No.: 27,135 Region Association: Southwest Region 
|
You have enough engine to get it through the resurrection...
It has a staggering 70-80 hp and, if you've ever driven a modern car, won't be enough! You end up with this cool little sportscar that is slower accelerating than almost ANY new car made today. That's not my "cup of tea"! I researched the high power T4 route pretty hard. I've purchased most of the core parts I need already. Couple of 2.0L T4 cores, bunch of intake stuff, both FI and IDF (40 and 44s), cams, distributors, etc... After a year of being on this site, due to the issues I've seen others report, I've decided to NOT walk the T4 path. I'll be doing a swap in my near perfect 75. Current candidates are 99 Boxster 2.5L/ 5 speed (I have a complete donor car that runs) or a 3.6L GM LGX V6 / Boxster 6 speed (IMG:style_emoticons/default/devil.gif) But, my drivetrain runs too and the T4 will power it long after I return it to service. Look at Freds thread to get some idea of what you will probably be looking at. Freds car is a SE so it was worth saving (maybe!!). It is FUN to watch Fred fix it; I have called him a masochist in the thread. My background is Automotive Technician 40 years, and I restore old sports cars, mostly Japanese with a sprinkling of German. I have extensive engine/manual transmission building expertise. I have an Automotive AC specialist shop now and still wrench for my dinner... |
| wonkipop |
 Oct 5 2024, 07:22 PM Oct 5 2024, 07:22 PM
Post
#11
|
|
Advanced Member     Group: Members Posts: 4,753 Joined: 6-May 20 From: north antarctica Member No.: 24,231 Region Association: NineFourteenerVille 
|
This is encouraging and unexpected feedback; I was expecting to hear that engine removal and rebuild were a must....so this is making me re-think things. Should I instead just do the body work (what I'm facing here is trivial in comparison to a Volvo 1800E that I resurrected), reupholster the seats, get a re-spray and drive it? @technicalninja and @fiacra : thanks for the links and suggestions which I will study. I've already been carefully watching Ian K's excellent YouTube videos. @fiacra very much appreciate the offer of photos of a living breathing 75 1.8: thank you! The two vacuum ports that I referred to in the earlier posts are these (note the blue silicone plugs):   And here's what the engine bay looks like near the battery - no charcoal canister apparent, so I guess I need to source one of those??  I definitely like the idea of less $$ investment and sooner enjoyment factor.... Paul another L jet that might be saved from the junkyard in the sky. the engine has an eyewatering 76hp in original form. i am not laughing at this. i have one and have had it for 35 years. l love the experience of an underpowered car with an overpowered chassis. (IMG:style_emoticons/default/biggrin.gif) (IMG:style_emoticons/default/biggrin.gif) the 918 white paint stamp on the engine tin means its a 49 state car - USEPA 1975. probably been in the locailty you bought it in all its life maybe. the 49 state cars did not have the cat in the exhaust or the EGR as the californian cars had. nice little set up of L jet. you will probably discover the hose off the advance can on the distributor goes nowhere. its just tucked under the inlet plenum and left open. if so don't worry they are meant to be like that. good luck with it. (IMG:style_emoticons/default/beerchug.gif) its got a bit of the jack dancer to cut out judging by the photos. but is very original looking. i can tell you as you surmise that the engine bay is fully intact. all the EFI is there. not meddled with. yes its missing its charcoal cannister evap system. the cannister is mounted off the side of the battery. you will find the diagrams for the cannister hookup here. whats shown is the 74 cars where the can was in a slightly different spot. but plumbing is the same. (note plumbing changed for evap emissions in late november 1973 so diagrams for earlier cars give the wrong hookup. http://www.914world.com/bbs2/index.php?sho...57407&st=40 the complete vacuum hose diagrams are for the 74 model year cars. the 75 L jets for 49 states have the same vac hose hook up as the 74 california models. the 74 california model is shown in the hose diagrams in the thread link. |
| fiacra |
 Oct 7 2024, 06:40 PM Oct 7 2024, 06:40 PM
Post
#12
|
|
Person.Woman.Man.Camera.TV    Group: Members Posts: 544 Joined: 1-March 19 From: East Bay Region - California Member No.: 22,920 Region Association: Northern California 
|
@didenpx
I haven't made it over to my second garage yet, although I plan on going tomorrow. However someone else just posted pictures of the engine bay of another 1.8 and I think these will answer your question about those two ports. The one near the coil does go to the charcoal canister. Not clearly pictured, but "reconstructing" the pictures the port off the airbox also goes to the canister. See post #17. I'll double check tomorrow. http://www.914world.com/bbs2/index.php?sho...p;#entry3171678 |
| bkrantz |
 Oct 7 2024, 07:09 PM Oct 7 2024, 07:09 PM
Post
#13
|
|
914 Guru      Group: Members Posts: 8,347 Joined: 3-August 19 From: SW Colorado Member No.: 23,343 Region Association: Rocky Mountains 
|
Welcome! And good luck. I agree with others that you have a fair amount of rust to deal with already, and will probably find more. I recommend you do a complete search for rust before getting started on anything. And then you might decide how (if) to proceed.
|
| didenpx |
 Oct 8 2024, 09:55 AM Oct 8 2024, 09:55 AM
Post
#14
|
|
Newbie  Group: Members Posts: 44 Joined: 1-September 23 From: Usa Member No.: 27,556 Region Association: North East States 
|
@fiacra thanks again for the offer of photos but the link you provided and one earlier tell the story; as you say the port I was wondering about should connect to the missing charcoal canister.
I appreciate the admonitions about rust but I'm remaining optimistic. I pulled the battery yesterday and disconnected ground straps in preps to begin some welding. There is a fully intact battery tray and battery tray support that looks to me as if they've never been replaced. I also don't see acid corrosion in the other places associated with hell hole problems. Maybe the massive quantity of Ziebart goop over this entire side of the engine bay protected it? Based on what I've seen so far I expect the biggest rust work to be in the driver side inner rocker area. There's also some evidence of previous work on the driver side rear suspension ?console? (not sure if I am using the right term). I'll detail these as I get to them. The remainder of the rust that I have identified looks like non-structural and not very extensive....but it's all a PITA to address, regardless. I have started on the patching in the nose area because it seems very straightforward....but of course cutting and shaping small patch pieces is time consuming, unless you do this sort of thing for a living. |
| dr914@autoatlanta.com |
 Oct 8 2024, 10:18 AM Oct 8 2024, 10:18 AM
Post
#15
|
|
914 Guru      Group: Members Posts: 8,161 Joined: 3-January 07 From: atlanta georgia Member No.: 7,418 Region Association: None |
we are doing a bunch of metal restoration on a 74 914 right now, started in the right front of the engine compartment and now onto the left front of the engine compartment
I’m a newcomer to the air cooled world. I picked up a 1975 914 1.8 project car last Fall that I’m just now beginning to work on. It seems to be mechanically stock and structurally sound and has ~120K miles on what appears to be the original engine (it doesn’t look to me as if it’s ever been pulled). I found it on Craiglist in Maine where it was in the hands of a VW bus/bug enthusiast who was the third owner and had decided to focus his energies on a bus restoration instead. It was last registered an on the road in 2017 when the second owner had it. When I bought it it lot drove and came with an assortment of Restoration Design repair panels, several spare doors from earlier cars, some foglight front bumpers, spare seats, etc.. In a first for me when it comes to project cars the electrics all function properly and appear never to have been monkeyed with. Lights, blinkers, engine heater fan, hazards, everything. Photos below tell the story but the worst of the rust appears to be in the aft section of the LH outer longitudinal. I haven’t pulled the battery and ECU out yet, but from what I can see underneath the car, inside the engine bay, and between the quarter panel and the engine compartment tin the hell hole appears solid (but I’m prepared to find surprises). The rear of the car seems worst off with rot from the foam above the tail lights partially cut out and partially corrected (I’ll be cutting that all back out and starting the job fresh). It was also hit from behind on the LH side and although I haven’t measured everything out yet, from what I can see underneath things don’t seem to be out of whack (maybe wishful thinking as the panel gaps for the rear trunk are uneven). The trunk lid itself somehow didn’t rust out along the rear edge, but it’s suffered a lot of abuse in the form of a now missing luggage rack and a black fiberglass spoiler that had been attached with wood screws. The front of the car doesn’t show any signs of impact damage but the trunk lid sits high when latched on the LH side. My plans are to do a driver quality restoration (between a Hagerty 2 and 3) and get it on the road where I can enjoy it; I’ll cut out and weld the rusty sections, do as much of the body work myself as possible (thankfully it is very straight and the paint meter indicates there shouldn’t be a lot of bondo hiding under the old re-spray) and get a professional re-spray at a local body shop. I’ll either farm out or attempt to DIY the engine work myself. Since I’m assuming the engine will need a rebuild (see below) I’d definitely like to increase the displacement while staying with the stock FI setup. I just started assessing the car in the last couple of weeks and have focused on the health of the engine. It’s still got the original L-jet FI (which I intend to keep). When I got it, it fired up easily but was extremely lumpy and stumbled badly coming off idle. After fixing vacuum hose routing (mostly anyways), adjusting points, doing timing, and adjusting valves it idles well at 850 rpm, sounds much healthier, and revs up from idle nicely (all this is based on stationary testing as the car is not on the road). Today I warmed the engine up and did compression test (throttle propped open with screwdriver) followed by a leak down test. I think the results tell me that I have a tired engine needing rebuilding: Cylinder Compression Leakdown 1 105 15% 2 105 20% 3 105 21% 4 105 23% I didn’t crawl around under the car to listen for leaking valves, but for each the cylinders I could hear hissing in the crankcase as soon as I pressurized the cylinders, which I assume is a bad thing. I’m going to discuss rebuild options at a local multi-generation family garage that started out as a VW shop; if they can do the work within my budget then I’ll probably go that route. I plan to drop the engine sometime late this month. One thing I need help on at this point is figuring out the remaining vacuum lines. I have a large inlet on the air box that looks from the diagrams as if it should go to the charcoal canister but there was no hose on it when I got the car and I don’t know where it should be routed, or even where the canister is (is it that plastic contraption sitting on top of the fuel tank!?). And just yesterday I noticed there is another nipple on the metal thing that the coil bracket attaches to…what’s that supposed to go to?? Looking forward to sharing my progress. This is a great forum that I’ve already learned a lot from!               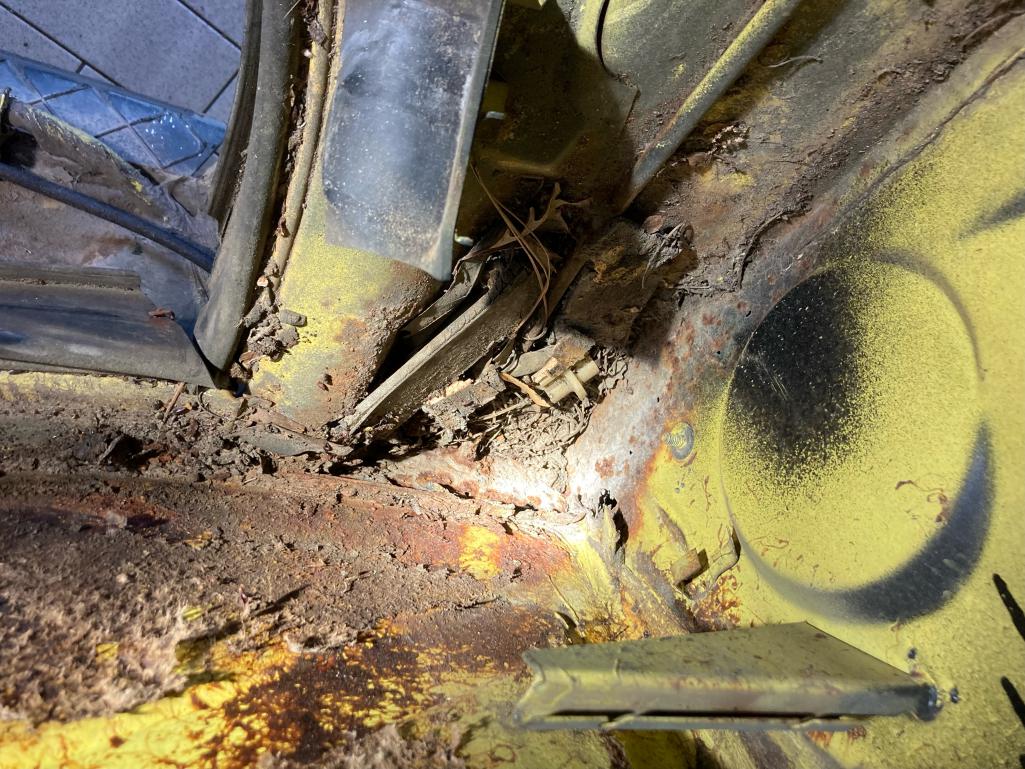  |
| didenpx |
 Oct 9 2024, 04:04 PM Oct 9 2024, 04:04 PM
Post
#16
|
|
Newbie  Group: Members Posts: 44 Joined: 1-September 23 From: Usa Member No.: 27,556 Region Association: North East States 
|
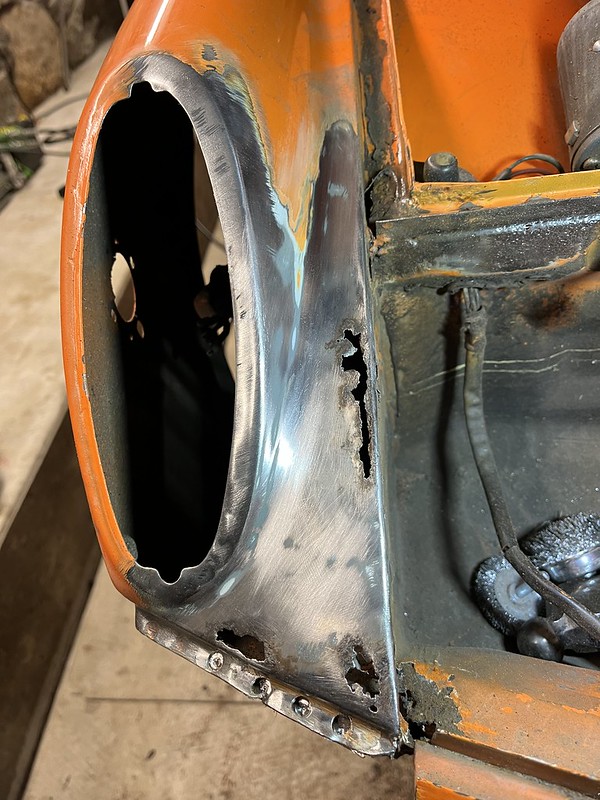
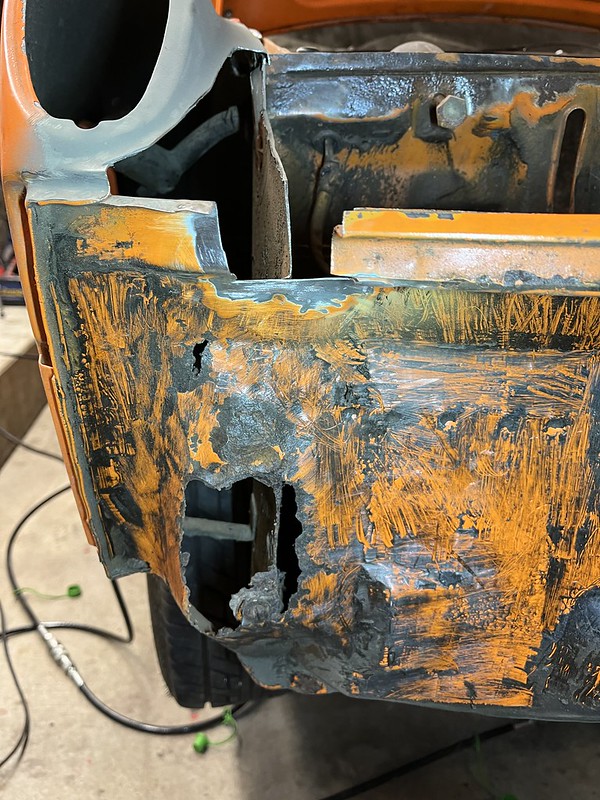
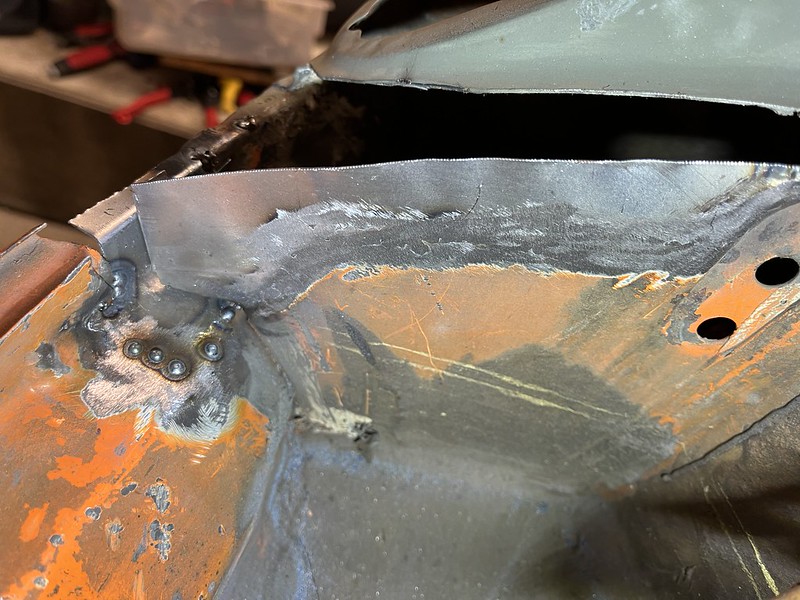
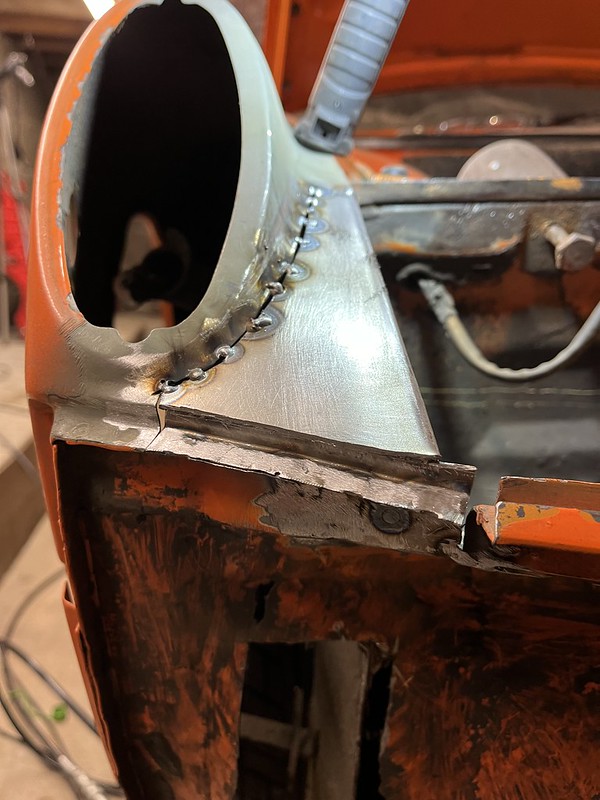
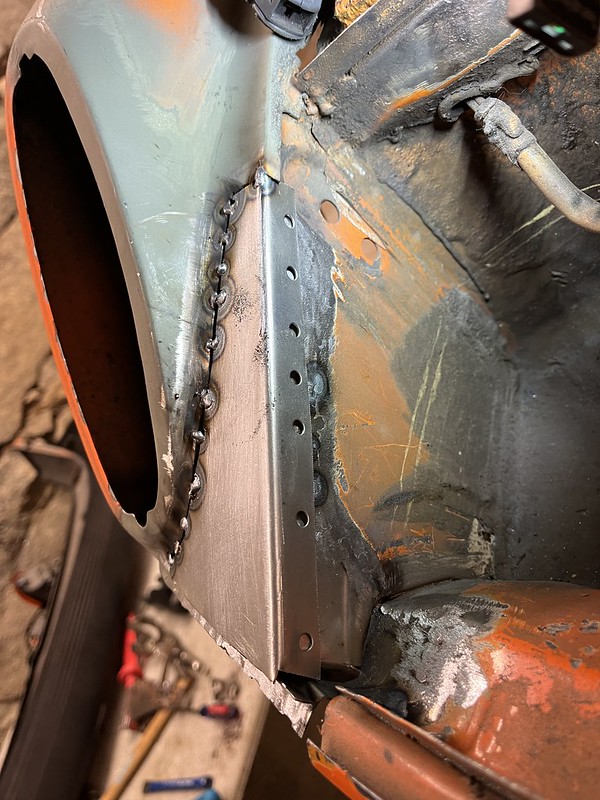
Been plugging away on the right hand wing rot between the side and headlights. My plan is to start at the front and move toward the back of the car. I think I'll strip the paint on my way back to make sure I'm not missing any bad spots; would appreciate advice on approaches. I'd like to avoid using messy chemicals and am considering (even messier) flap wheel disks.
     |
| didenpx |
 Oct 26 2024, 01:07 PM Oct 26 2024, 01:07 PM
Post
#17
|
|
Newbie  Group: Members Posts: 44 Joined: 1-September 23 From: Usa Member No.: 27,556 Region Association: North East States 
|
Nearing completion on rust work in the right front section of car.
Cut out and patched the rotted metal on the nose underneath the right front headlight area. It is an area where several panels overlap and seem to have received a lot of spot weld heat during construction...not to mention lots of mud, water and probably salt. 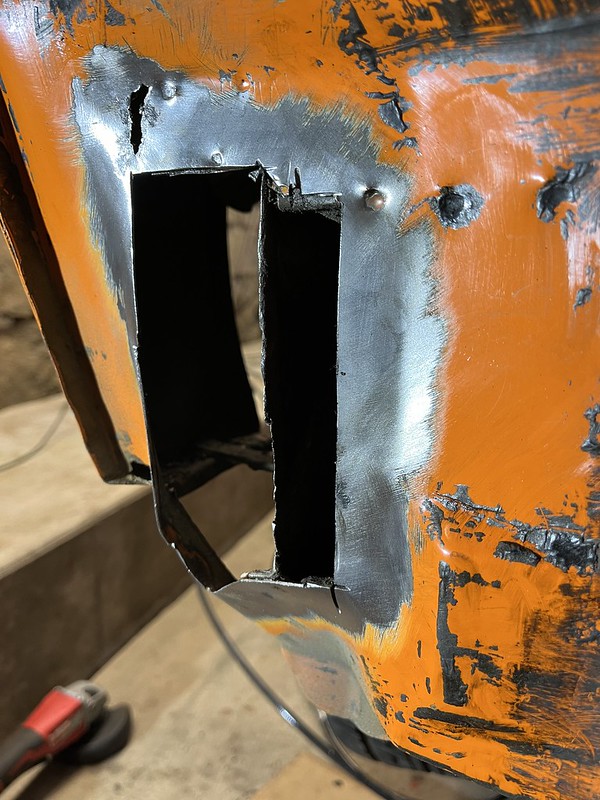 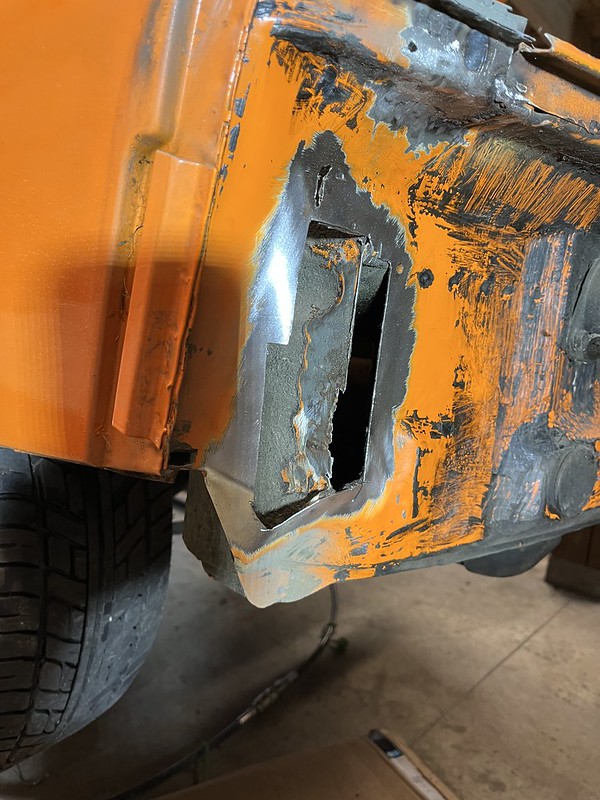 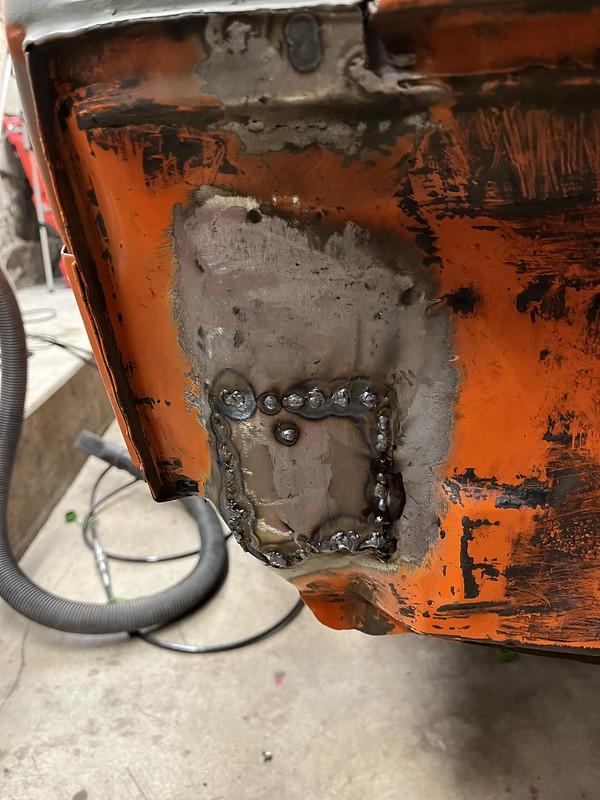 As I was working on the nose patching I noticed that the passenger side shock mount was skewed....hmmm. Turns out the car was in what seems to have been a minor right front corner shunt. The structural piece that the bumper strut mounts to was pushed about 1" or more toward the outside of the car. Someone dealt with it by putting a bunch of spacers between the bumper strut and the panel. I managed to get it mostly straight by fashioning a crude puller. It's not perfect but it will have to do. 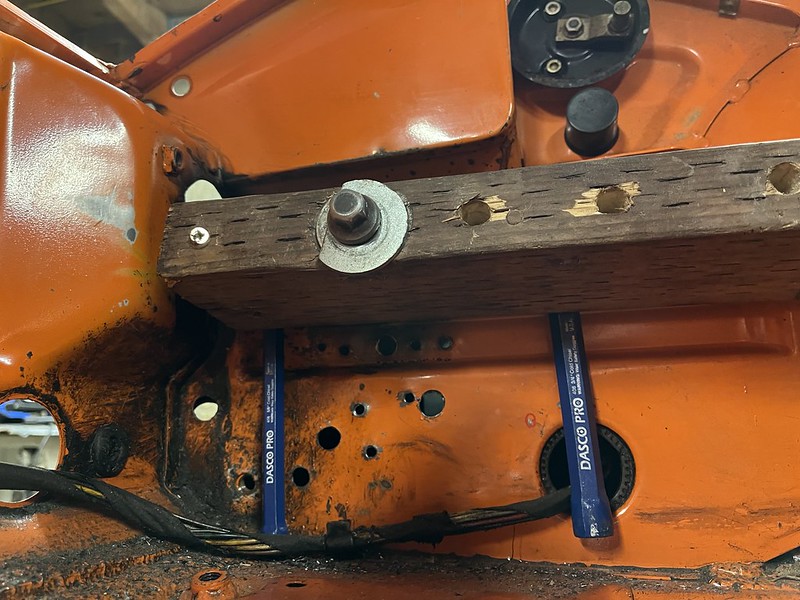 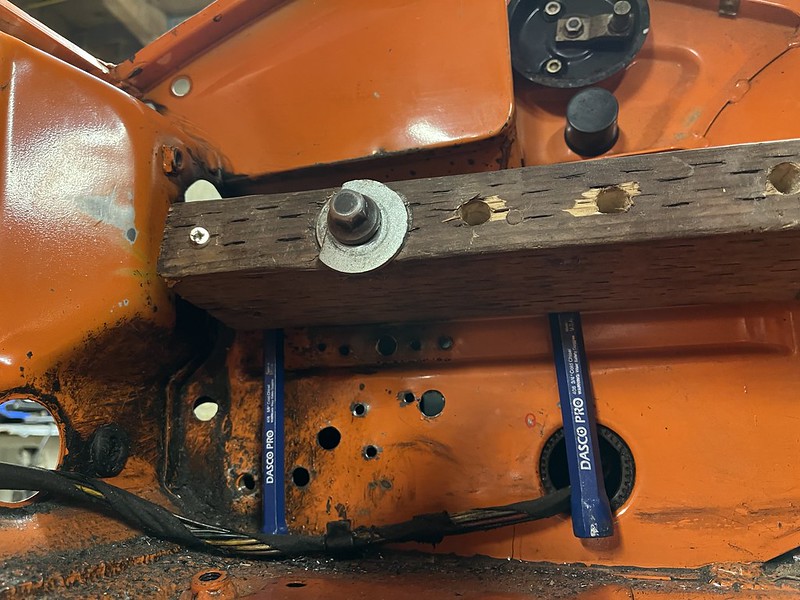 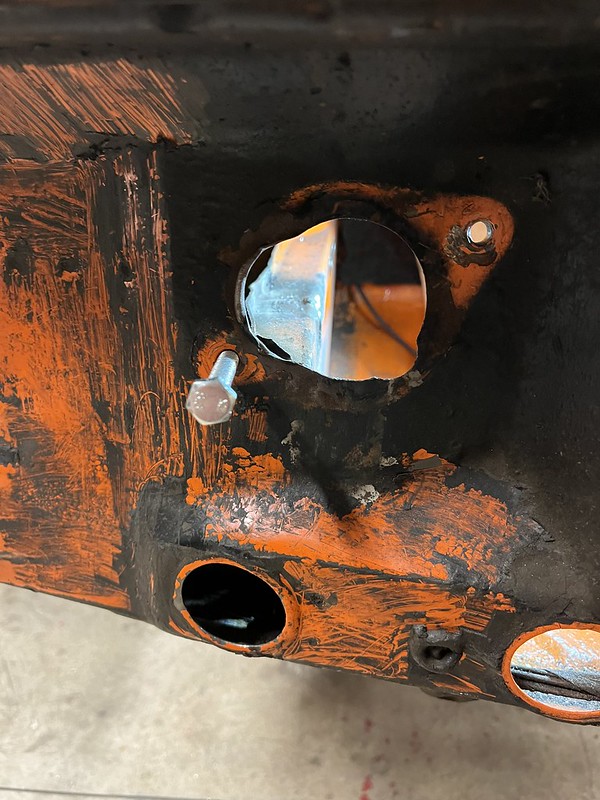 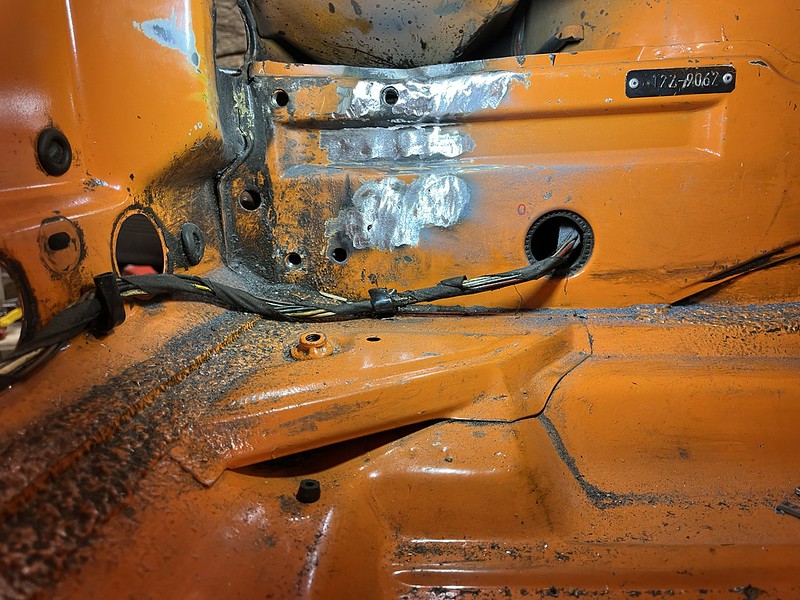 I also realized that I didn't carry the patch of the area between the turn signal and the inner lip of that panel in the headlight bucket far enough. I took a lot of measurements using the driver's side as ground truth and will need to make a relief cut in the top of the patch that I welded in and shift things between 1-3mm inwards. Probably the first of many stupid mistakes to come. 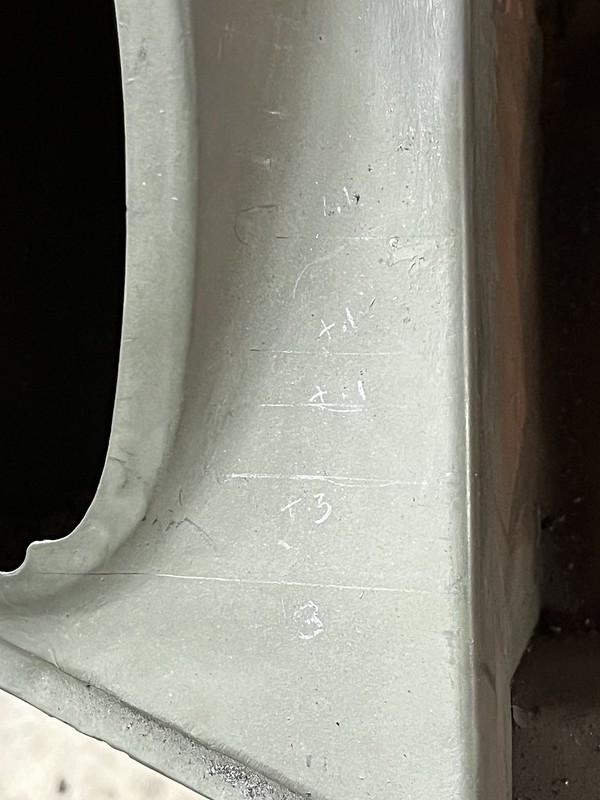 There are probably about six or more small spots in the frunk weather stip channel that must have trapped water and rotted through over the years. Most seem to be on the LH side, but there was one in this area as well. Got that patched up this morning. 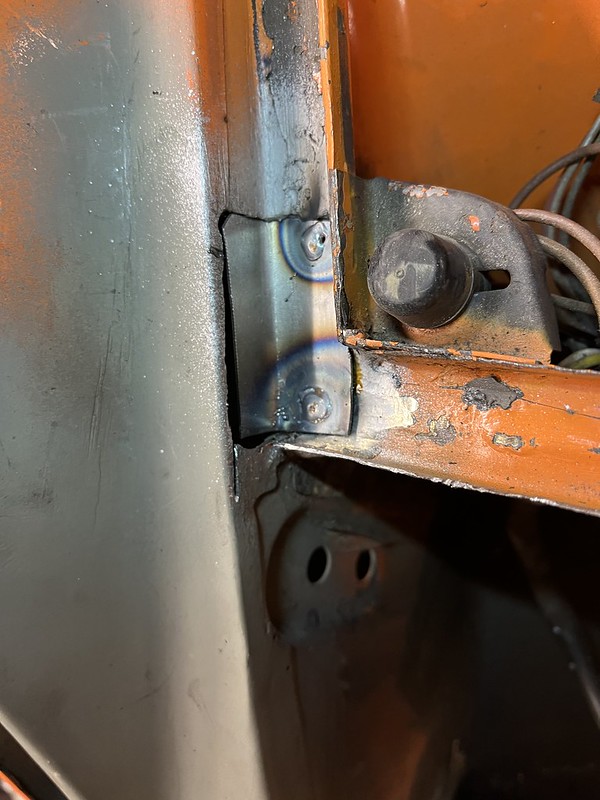 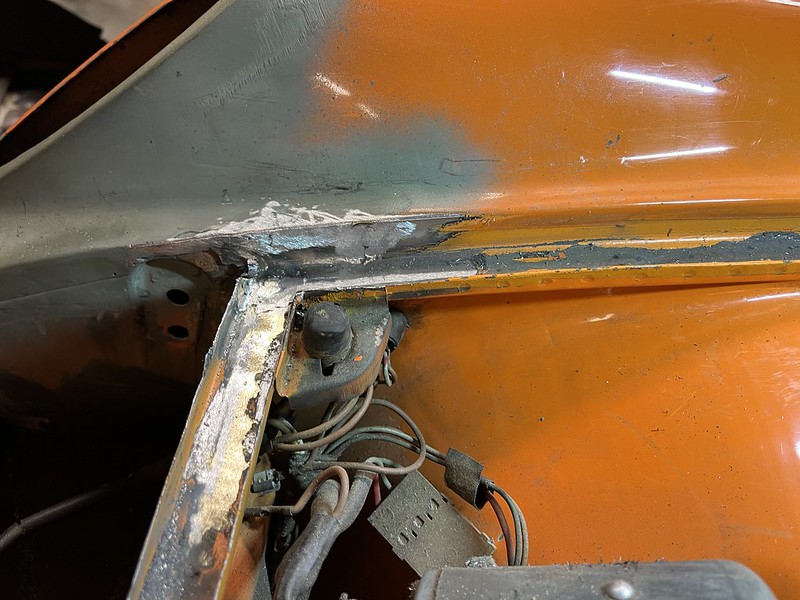 Once I get the relief cut and welding done I'll be cleaning up the underside of all of the welds, seam sealing, undercoating, and then moving on to the LH front welding. The rot between the directional light and headlight there is not as extensive. Same goes for the rot on the bottom of the nose section behind the bumper. Aside from in-filling a bunch of frunk weather stripping channel rot-through areas there, the most annoying fix will be the cup-shaped depression where the captive nuts are for the frunk release handle; water had been pooling up there and there is probably a quarter-sized hole that will need to be patched. It's not a great spot to get to with a mig welder...at least with the frunk lid still on. |
| friethmiller |
 Oct 26 2024, 05:56 PM Oct 26 2024, 05:56 PM
Post
#18
|
|
Senior Member    Group: Members Posts: 859 Joined: 10-February 19 From: Austin, TX Member No.: 22,863 Region Association: Southwest Region 
|
Hey @didenpx! Welcome to the fun (IMG:style_emoticons/default/biggrin.gif)
I like the way you are diving into these small repairs. This is obviously not your first rodeo. With that said, the stuff you're doing I consider to be the easy repairs that I typically do at the end of the body restoration process. I'd evaluate the hell hole damage, both longitudinals, and the rear suspension consoles to get a sense of the condition (might need to clean/remove paint/undercoating). I think mounting this on a rotisserie or at least a body cart might be warranted. Again, if this was me, I'd drop the engine / transmission and leave them for later. My focus would be on the body. I would be glad to help out in anyway I can. Keep posting photos of these critical areas. I'd like to see how much work might be in store for you. Fred |
| didenpx |
 Oct 27 2024, 02:23 PM Oct 27 2024, 02:23 PM
Post
#19
|
|
Newbie  Group: Members Posts: 44 Joined: 1-September 23 From: Usa Member No.: 27,556 Region Association: North East States 
|
Fred,
It's been a number of years since I did any welding, which is why I chose to start with some smaller and simpler stuff before I have to tackle the sills. But your (and others') comments warning about getting into the project only to find major structural rot later caused me to pause and do some more investigating. The driver's side inner rockers obviously need patching. When I get to that point I plan to cut out the rusted parts enough to clean up any scale inside the structure, coat them with the Eastwood Internal Frame Rail coating, and seal them back up. 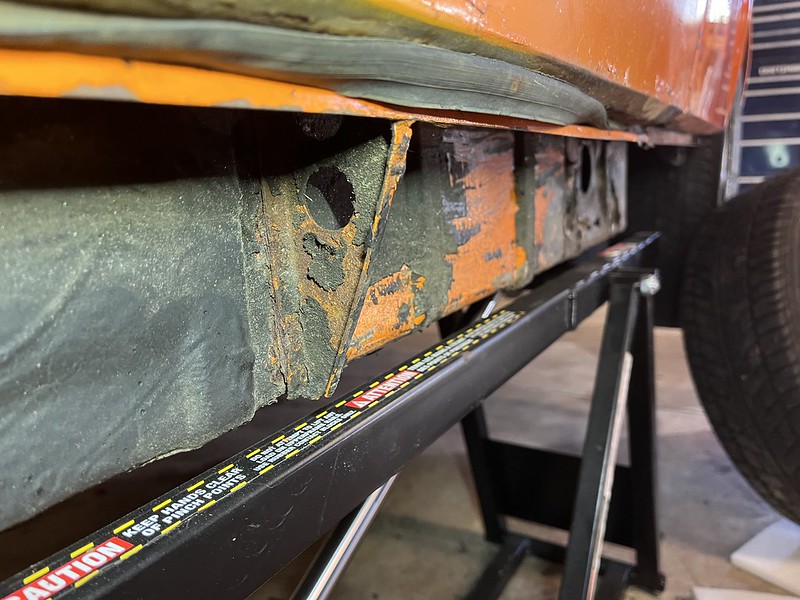 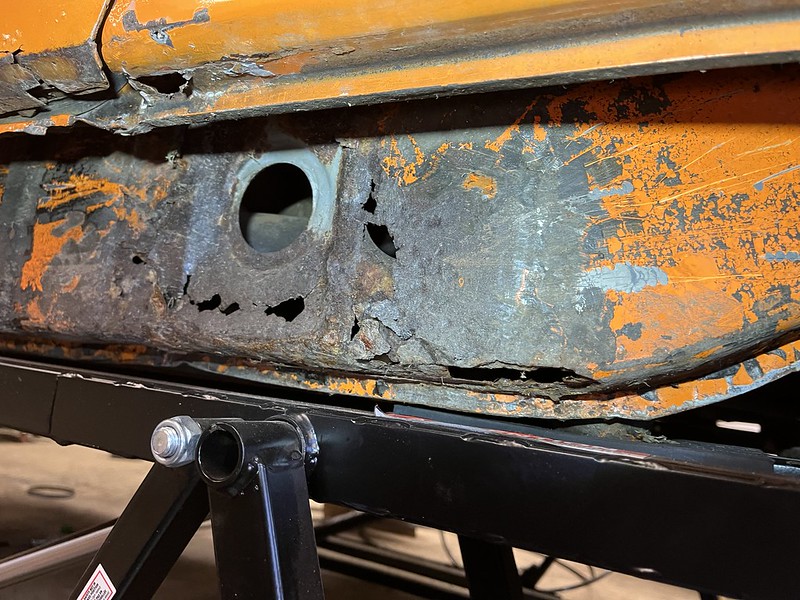 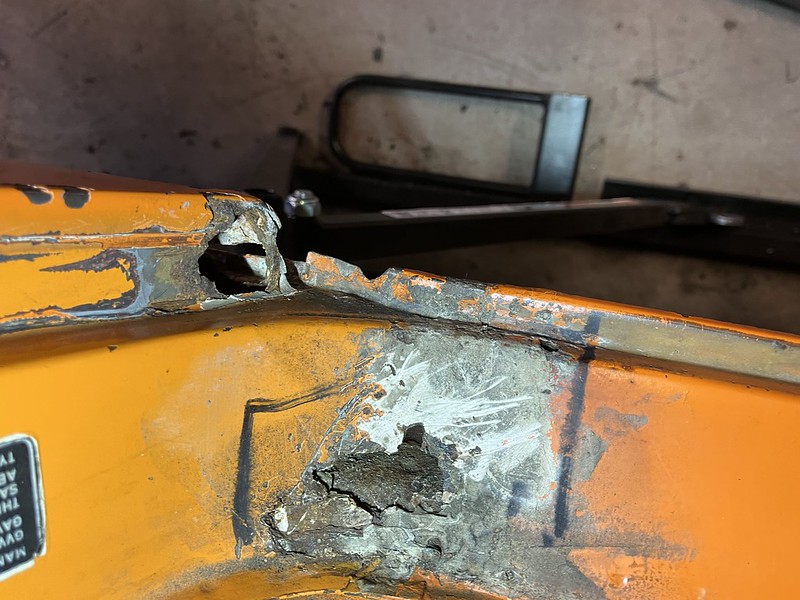 Some work has been done to beef up/repair the LH rear suspension console. It seems solid and I'm inclined to trust that it is ok as is (should I?). 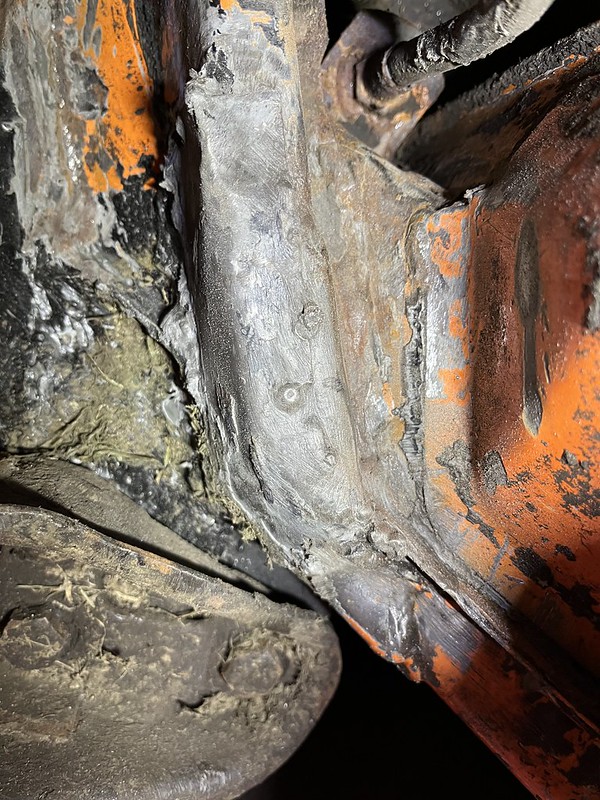 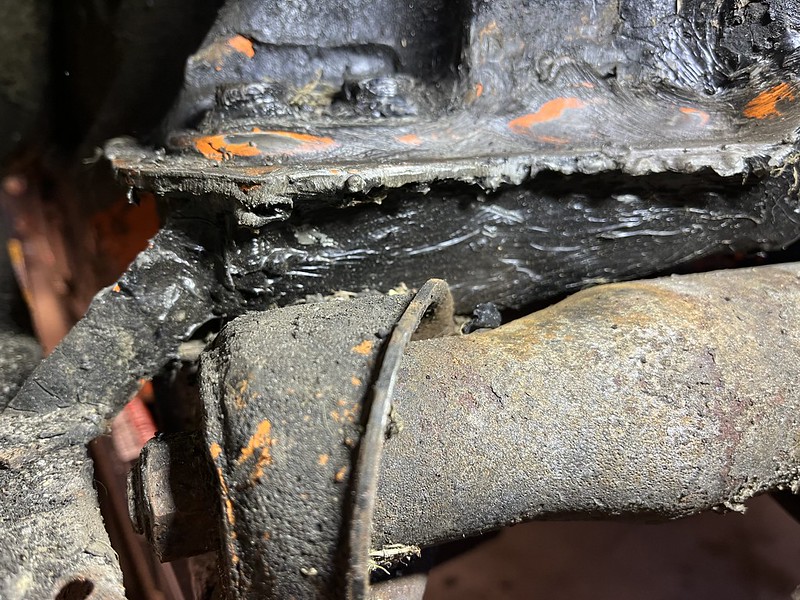 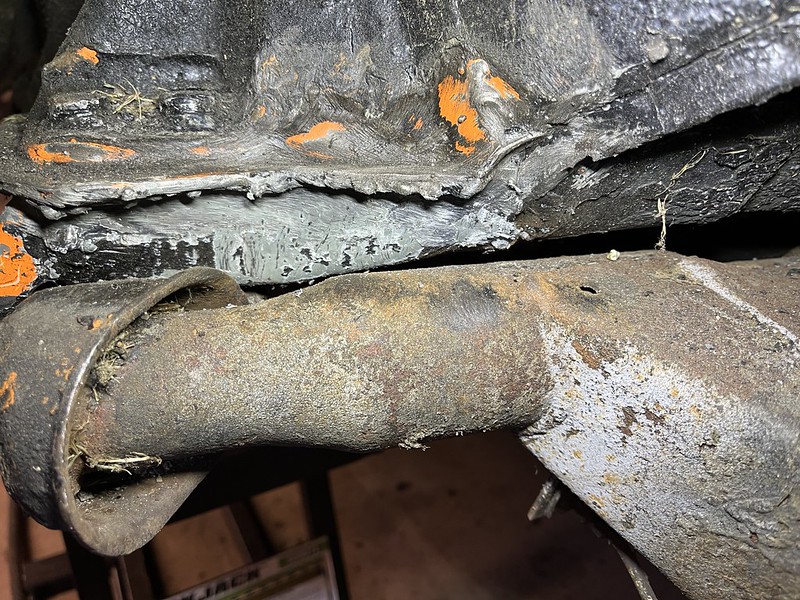 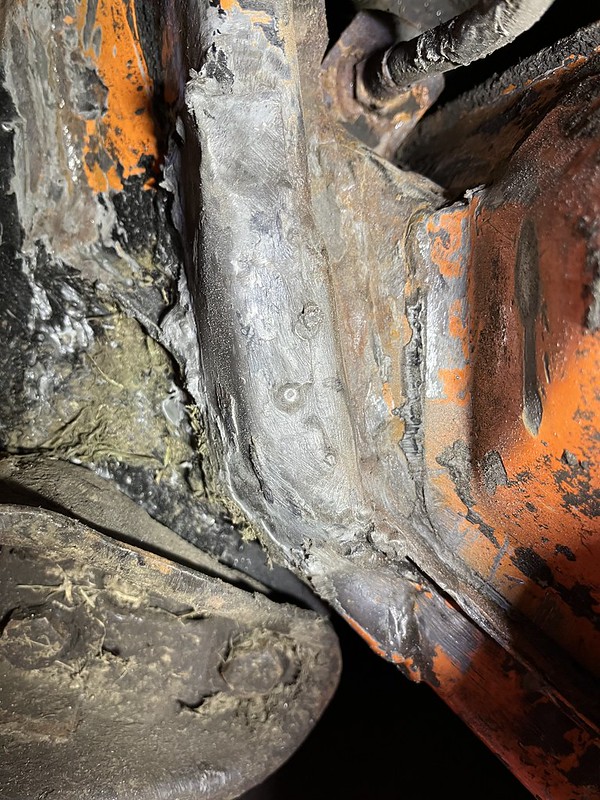 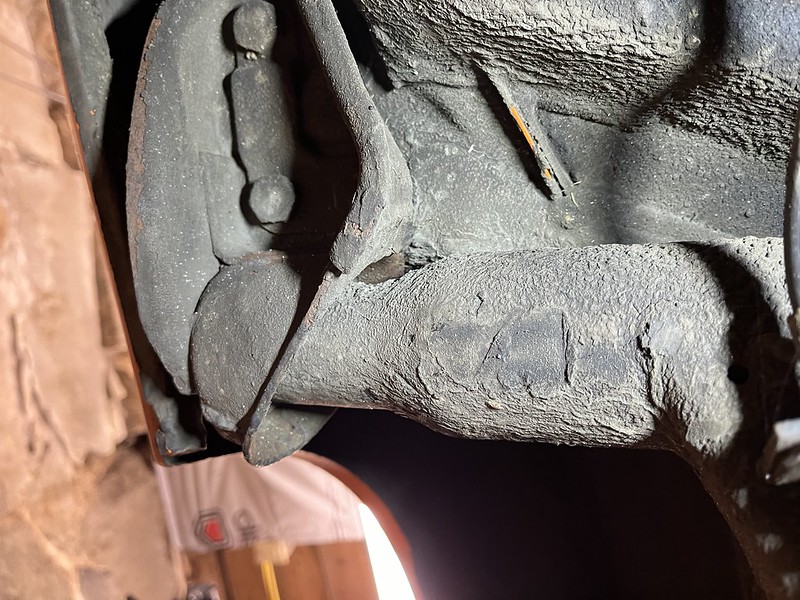 I did a thorough investigation of the hell hole area and finally took out the seats and carpets to get a look at the rear firewall. From underneath I was able to see perforation of the engine shelf near the hell hole. 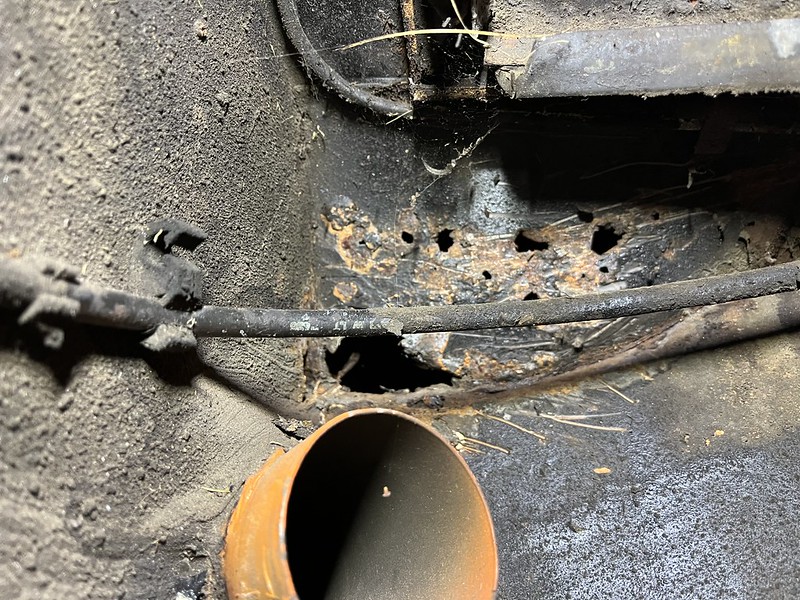 Once I got the interior out I found a perforation in the lower corner of the firewall next to the door jamb that allowed me to get direct eyes on the hell hole/longitudinal. I think what I found is a good news story (is it?). Based on what I saw after grinding off scale, I'm thinking of further cleaning, patching pin holes, and possibly ply welding another layer of metal on top of the long. Based on scraping and banging the long seems solid to me. 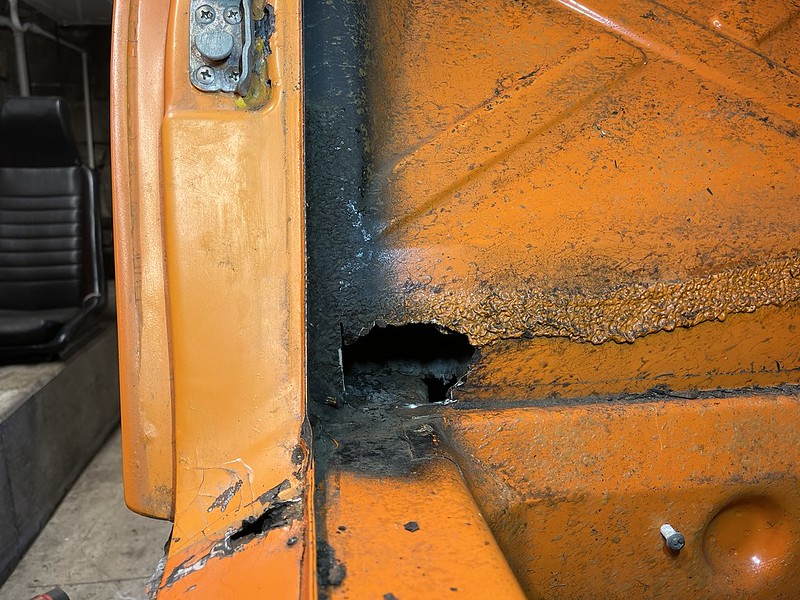 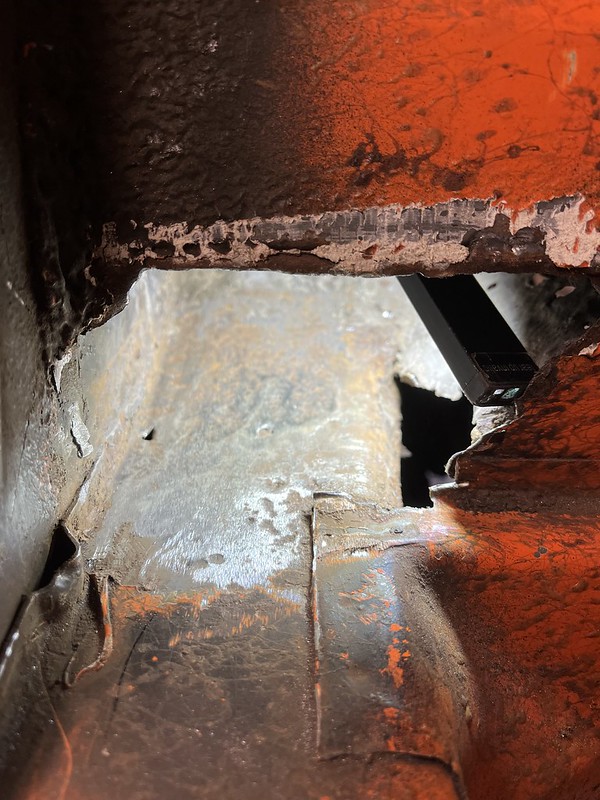 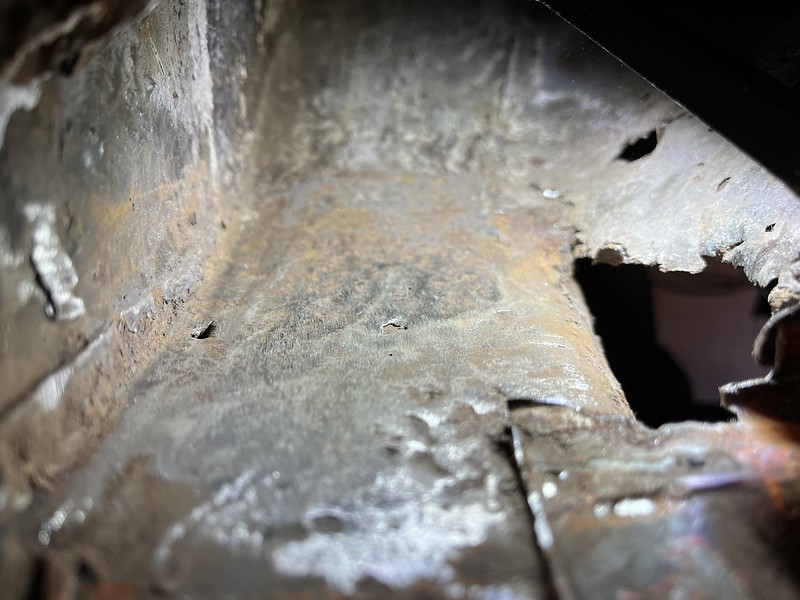 I also found rot where the floor pan ties into the rear firewall, but I assume that's pretty usual when the rear window gaskets fail and leak. I know mine is leaky as I discovered someone feebly attempted to seal the bottom of it with a long strip of electrician's tape. 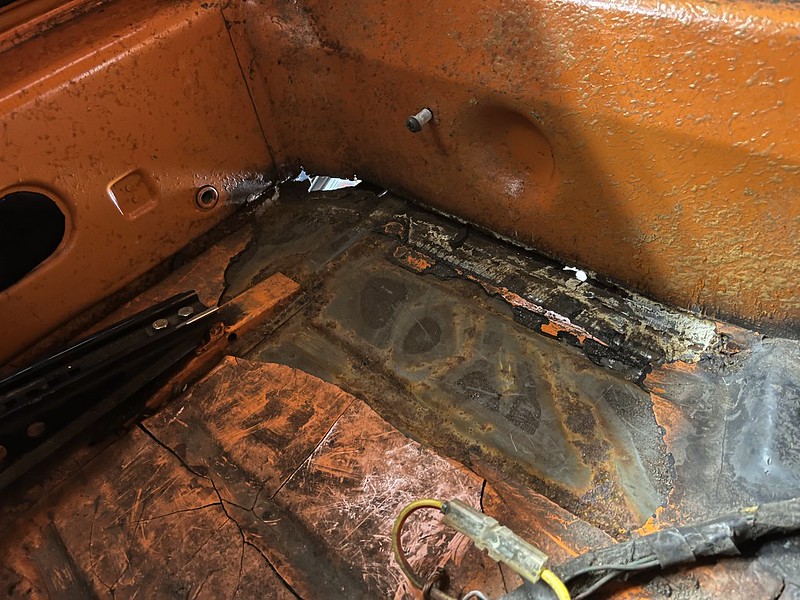 I found this between the center console and rear firewall padding. It feels pretty flimsy and doesn't have any mounting tabs on the back so I'm guessing it's not authentic...but nice artifact anyway. 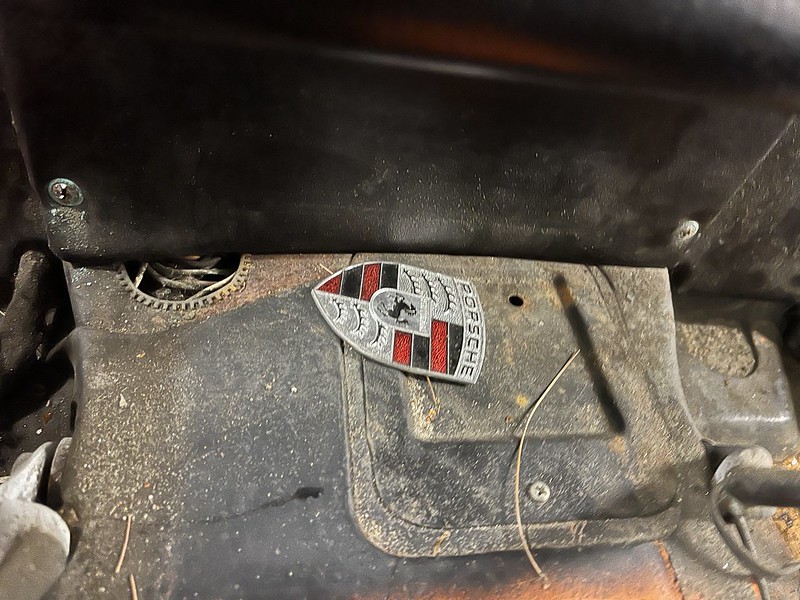 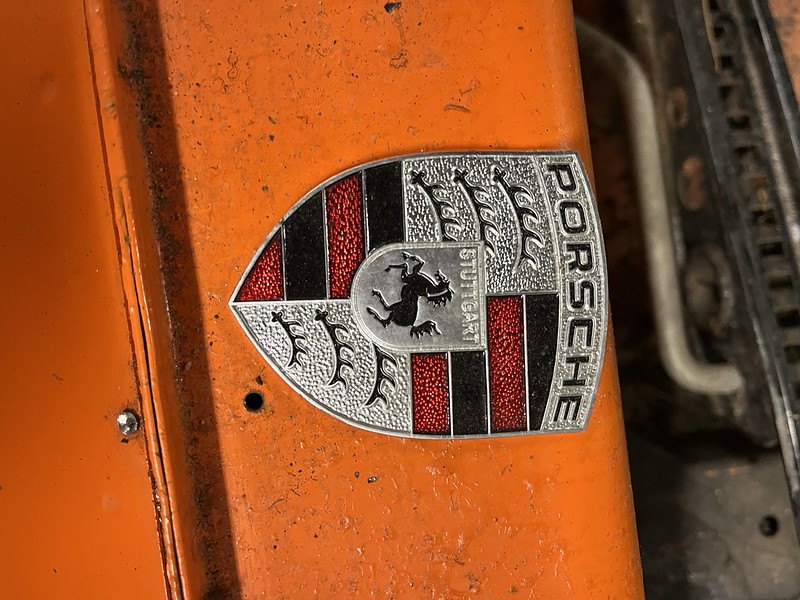 I got so involved with the hell hole investigation that I didn't take a lot of photos of the RH inner rocker. The worst part of it is near the jacking point, but it's also perforated in the front of the car, about the same as the driver's side. Again - it doesn't look very concerning to me (am I in denial?). 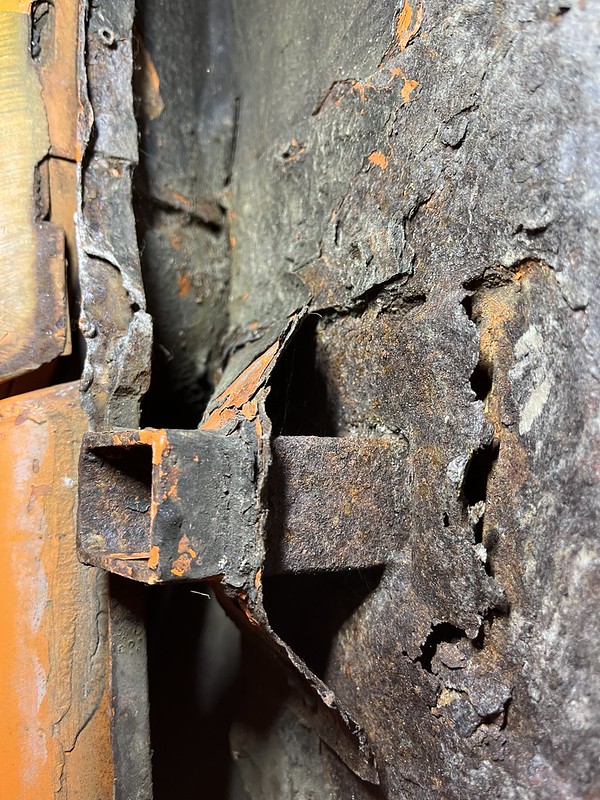 |
| 930cabman |
 Oct 27 2024, 02:47 PM Oct 27 2024, 02:47 PM
Post
#20
|
|
Advanced Member     Group: Members Posts: 4,056 Joined: 12-November 20 From: Buffalo Member No.: 24,877 Region Association: North East States 
|
" Again - it doesn't look very concerning to me (am I in denial?)."
This will be an adventure for sure, but it seems as though you are into it. I have a set of Chris Foley's door braces that allow to stabilize the chassis while the structural work is being completed and allow the doors to remain for checking as you go. |
  |
7 User(s) are reading this topic (7 Guests and 0 Anonymous Users)
0 Members:

|
Lo-Fi Version | Time is now: 30th April 2025 - 07:07 AM |
Invision Power Board
v9.1.4 © 2025 IPS, Inc.


