|
|
|
Porsche, and the Porsche crest are registered trademarks of Dr. Ing. h.c. F. Porsche AG.
This site is not affiliated with Porsche in any way. Its only purpose is to provide an online forum for car enthusiasts. All other trademarks are property of their respective owners. |
|
|

  |

| seanpaulmc |
 Oct 15 2024, 05:26 PM Oct 15 2024, 05:26 PM
Post
#1
|
|
Member  Group: Members Posts: 445 Joined: 6-December 16 From: Orlando, FL Member No.: 20,649 Region Association: South East States |
Greetings 914World !
I am seeking advice / guidance / instruction from you metal masters on how to approach and tackle this rear corner repair. Panels involved include: • Left rear quarter • Taillight panel • Trunk floor & cross brace • Left side inner trunk fender Some initial questions: • Does the whole quarter panel need to be replaced, or just part? • Does the whole tail panel need to be replaced, or just part? • Can this repair be done well with partial panels spliced in? (Like what was done to the fender in the past but better executed with butt joints and less, a lot less, filler.) • Should I start with cutting off what I think is bad or begin by striping the whole quarter panel of paint and bondo? Exposed metal rusts quickly in Florida. • How and where to cut? What tools and wire size to use? How to finish, prep, and paint? -This is where I need your expertise to lead me. 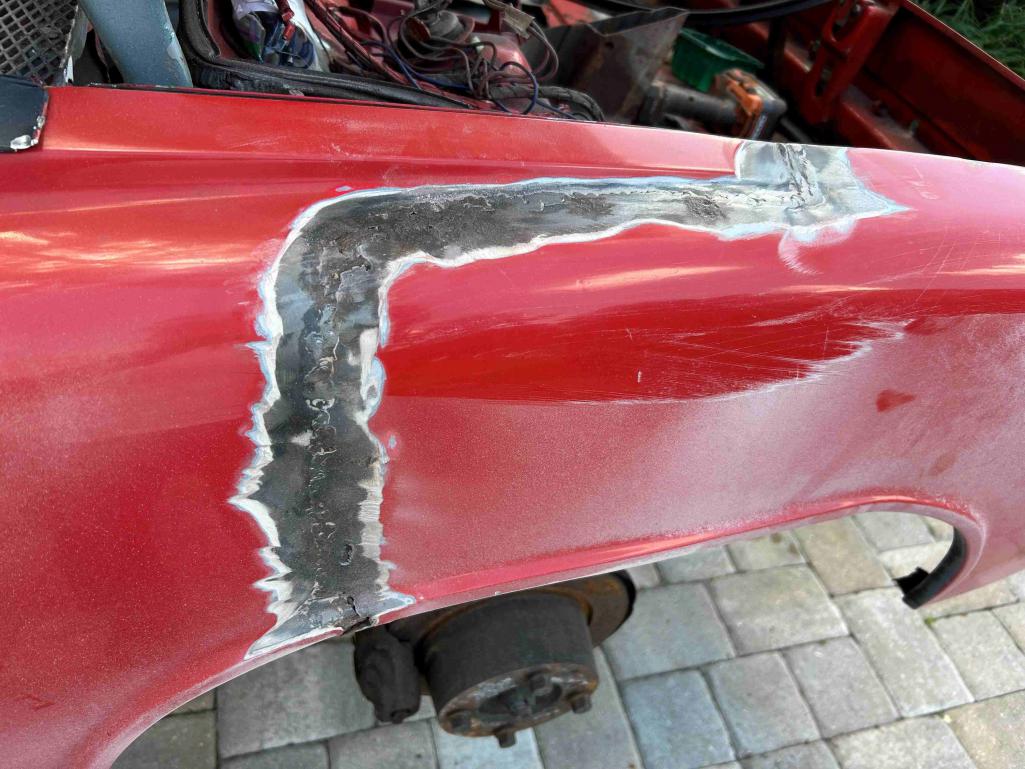 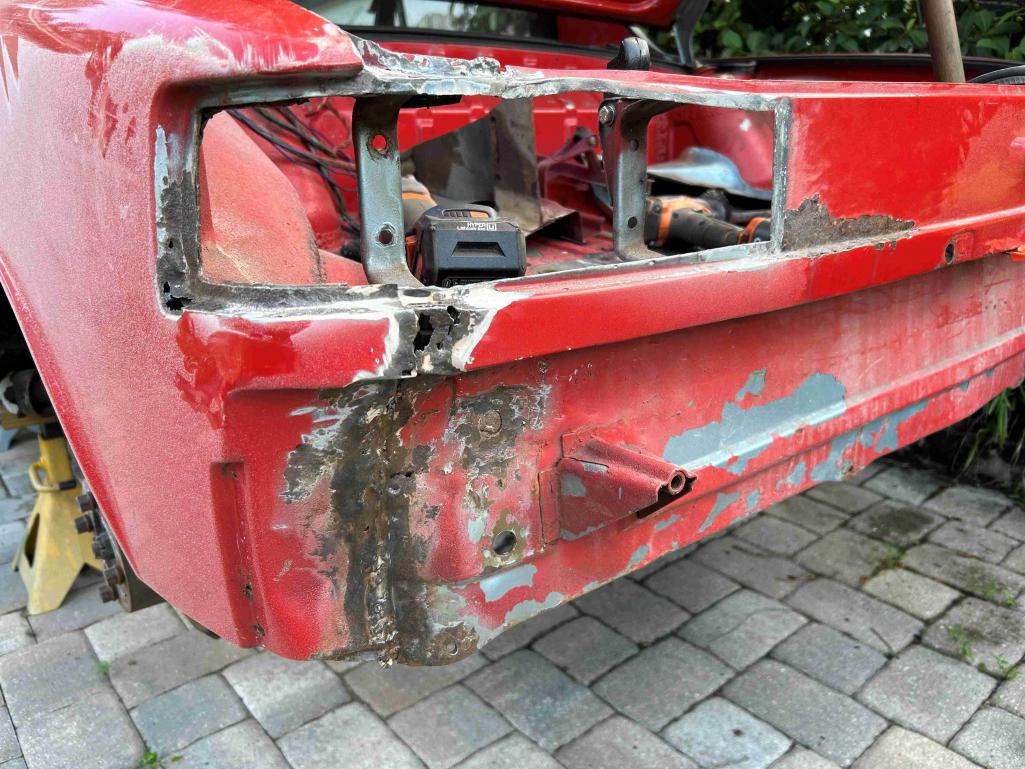 This is my first go around at this. Everything I do is a first-time attempt, and thinking about fixing this fender and taillight area while making it look presentable gives me a lot of apprehension. So far, I have learned to MIG weld and do simple panel forming by working on this project – jack points, floor, hell hole, longs, firewall, and some tools and fixtures. I can make solid welds in structural areas that are strong but don’t necessarily have to be pretty. I do not (yet) have the metal finishing skills for this fender and am hoping I can get your guidance along the way to help me get through what I see to be a complicated, multi panel repair. By making this fender repair its own topic thread, hopefully it encourages greater feedback from the community rather than if it stays buried in my long, slow build thread. If interested in how it got here and the work done to the car thus far, then the thread is this one: here I know I need to go take some measurements before cutting it apart just to get the baseline of where things are at. I hope to do that this coming weekend. Thank you in advance for the feedback and support. Gratefully, Sean |
   |

 
|
| worn |
Oct 15 2024, 07:00 PM
Post
#2
|
|
Winner of the Utah Twisted Joint Award Group: Members Posts: 3,561 Joined: 3-June 11 From: Madison, WI and North Bend WA Member No.: 13,152 Region Association: Upper MidWest |
gives me a lot of apprehension.
So far, I have learned to MIG weld and do simple Been there pretty much. A few questions. How much do you enjoy welding and shaping metal? I found that I could form and fabricate patches. There are some breathtaking threads in which whole panels are perfectly welded in prepped and painted. Sometimes at what must be great expense. I found that the panels are fine: except at the end or bottom or some fairly limited space. There you can peal everything back like an onion and start fabricating patches. One thing that I highly recommend is to go online and buy a sheet of galvaneal steel. Welds nice and holds up. Good luck. |
|
|
|
| bkrantz |
Oct 15 2024, 08:02 PM
Post
#3
|
|
914 Guru Group: Members Posts: 8,652 Joined: 3-August 19 From: SW Colorado Member No.: 23,343 Region Association: Rocky Mountains |
It al depends on what results you want. Perfectionist purists (if they had a car like this at all) would get all new panels and set things up on a jig. Their goal would be exactly like new, and undetectable repair.
Us mortals might be less fussy. 95 or even 98% right, with visible evidence of repair, is OK, as is "impure" ingredients and methods. For example, you can fix that nasty fender with cleaner butt-joint welds, make the fender straight, and smooth the outside with filler. The inside would be a bit rough, but sealed. Is that satisfactory? |
|
|
|
| Ishley |
Oct 15 2024, 08:56 PM
Post
#4
|
|
Member Group: Members Posts: 338 Joined: 4-October 21 From: Clarendon Hills Il Member No.: 25,957 Region Association: Upper MidWest |
I would buy panels before you cut anything apart. Also… invest some time in watching metal working and panel rebuild on YouTube. One guy I watch is “Fitzees Fabrication” on YouTube. He really does some impressive work with minimal tools. Pay special attention to how he does cut and butt…. And Works to manage warping. He also is brilliant and breaking Down parts to make complex curves etc. Take it one bite at a time.
|
|
|
|
| rick 918-S |
Oct 16 2024, 05:53 AM
Post
#5
|
|
Hey nice rack! -Celette Group: Members Posts: 21,242 Joined: 30-December 02 From: Now in Superior WI Member No.: 43 Region Association: Northstar Region |
I would check to see if someone has a used quarter panel and replace the whole thing. It takes alot of time to split apart spot welds. I have some production methods from my collision shop days that work just fine to shorten some of the time spent. Dont try and fool yourself. This is a time consuming repair. You need the space and need to be committed to the process. As far as the rest of it goes, finish stripping off the filler and see how bad it is.
|
|
|
|
| mepstein |
Oct 16 2024, 06:30 AM
Post
#6
|
|
914-6 GT in waiting Group: Members Posts: 20,625 Joined: 19-September 09 From: Landenberg, PA/Wilmington, DE Member No.: 10,825 Region Association: MidAtlantic Region |
Remember that almost every panel on the car is structural. So if you cut out one panel and there’s rust elsewhere, the end of the car can settle a bit. Keep that in mind and don’t cut out too much metal at once unless the car is on a jig or held level in place.
|
|
|
|
| Montreal914 |
Oct 16 2024, 08:34 AM
Post
#7
|
|
Advanced Member Group: Members Posts: 2,079 Joined: 8-August 10 From: Claremont, CA Member No.: 12,023 Region Association: Southern California |
Sean, I too am at my first round in this type of work and I elected to replace the whole fender as mine was deforned from a previous small hit in the car's life.
This also gave me all sorts of access to the driver's side long which turned out to require derustation... My fender is now pretty much fitted, but not yet installed as I am still working on the long... That is when I am working... Luckily my rear panel isn't affected and I still have that reference in place. |
|
|
|
| 930cabman |
Oct 16 2024, 09:44 AM
Post
#8
|
|
Advanced Member Group: Members Posts: 4,582 Joined: 12-November 20 From: Buffalo Member No.: 24,877 Region Association: North East States |
QUOTE(Ishley @ Oct 15 2024, 08:56 PM)  I would buy panels before you cut anything apart. Also… invest some time in watching metal working and panel rebuild on YouTube. One guy I watch is “Fitzees Fabrication” on YouTube. He really does some impressive work with minimal tools. Pay special attention to how he does cut and butt…. And Works to manage warping. He also is brilliant and breaking Down parts to make complex curves etc. Take it one bite at a time. (IMG:style_emoticons/default/agree.gif) I am starting a new project that has a previously repaired rear quarter similar to yours, using a lap joint. I am unsure how to go at it, but I am hoping to salvage what I have, if your panel is not salvageable, find a decent quarter and go from there. |
|
|
|
| MikeK |
Oct 16 2024, 10:41 AM
Post
#9
|
|
Member Group: Members Posts: 132 Joined: 15-June 23 From: 80906 Member No.: 27,418 Region Association: Rocky Mountains |
Looking at what you have, I'd suggest stripping it all down. I see a lot of filler.
As far as tools for stripping, I've been using something similar to this: My Webpage It's messy, but fairly fast and effective without grinding into the metal. More detailed areas can be stripped with a wire wheel on a grinder. Once you see what your working with you can determine a plan. And I also agree with not making any cuts until you have the new parts. |
|
|
|
| dtmehall |
Oct 16 2024, 05:27 PM
Post
#10
|
|
Member Group: Members Posts: 267 Joined: 21-December 23 From: Michigan Member No.: 27,808 Region Association: Upper MidWest |
Try this youtube video for starters. He also has one tackling repairs to the rear tail light area.
Restoring SHMEE150's Classic Porsche 914 - Tackling Bodge Repairs! https://www.youtube.com/watch?v=XaT918goCTI |
|
|
|
| seanpaulmc |
Oct 16 2024, 05:34 PM
Post
#11
|
|
Member Group: Members Posts: 445 Joined: 6-December 16 From: Orlando, FL Member No.: 20,649 Region Association: South East States |
You guys are great! I appreciate all the good comments. (IMG:style_emoticons/default/biggrin.gif)
And, 250+ views with 8 replies...pretty good. Feedback so far does give me things to think about. Which is what I asked for, and I appreciate. Some replies on the comments I've gotten thus far: I do like the welding and fab part. The car sits outside so I am constrained by weather and general exposure when a repair is left for too long. And, I do have a sheet of gavaneal that I've been chipping away at. I like Fitzee's videos. I wouldn't have gotten this far without them! (IMG:style_emoticons/default/smile.gif) I also like Yorshire Car Restoration vids. Check out "Patches" if you haven't yet. I had considered the structural nature of all these panels coming together, not just the ugly failed lap weld in the fender, and that, I suppose, is why I'm more concerned about getting this right. Other repairs I've kind of just jumped in (after reading about them here), but wanted more of a plan with this one. This project is more like a resurrection so I'm not looking for perfection. I will be pleased with a good, solid body for the base of a rolling restoration. Pretty comes down the road. Thanks again! Please keep it coming. |
|
|
|
| Ishley |
Oct 16 2024, 07:10 PM
Post
#12
|
|
Member Group: Members Posts: 338 Joined: 4-October 21 From: Clarendon Hills Il Member No.: 25,957 Region Association: Upper MidWest |
Honestly looking at your pics I think you might be able to fix that. Replacing the whole fender will take you up the sail panel and into the door pillar. A big complicated job for sure.
Get a paint stripper disc and take the paint Back much wider… and all the way back. You need To make sure what is there is usable. I think it might be. Think about doing a patch job. Likely do it in small sections following up the bad weld. Once you have the fender lip area reproduced and patched in… you could just work your way up and fix that bad overlap Area. You’ll need a mig that you can really dial in the temp and feed rate. Too much heat will warp the panel and you’ll have a mess on your hands. Plan to go slow and let it cool slowly to avoid shrinking and hardening the weld panel. Use .02 wire. Stitch weld really slow. Walk away after a few stitch blasts. Use .023 wire and gas. Flux wire will be way too hot. Even better if you have a tig but takes more practice and $$$. Fitzees Fabrications will show you how to do it. Around the back you can fab all those pieces with practice and patience. Make it all in small pieces and work thru it. The challenges with getting cut out parts from another car is that they will be thinner Metal and likely rusty and have their own issues. Personally think your better off fab’ing parts when you can. Welding new metal is easier. Good luck and have fun with it. It can be very satisfying to do. |
|
|
|
| seanpaulmc |
Oct 18 2024, 05:07 AM
Post
#13
|
|
Member Group: Members Posts: 445 Joined: 6-December 16 From: Orlando, FL Member No.: 20,649 Region Association: South East States |
QUOTE(Ishley @ Oct 16 2024, 09:10 PM) Honestly looking at your pics I think you might be able to fix that. Replacing the whole fender will take you up the sail panel and into the door pillar. A big complicated job for sure. Get a paint stripper disc and take the paint Back much wider… and all the way back. You need To make sure what is there is usable. I think it might be. Think about doing a patch job. Likely do it in small sections following up the bad weld. Once you have the fender lip area reproduced and patched in… you could just work your way up and fix that bad overlap Area. You’ll need a mig that you can really dial in the temp and feed rate. Too much heat will warp the panel and you’ll have a mess on your hands. Plan to go slow and let it cool slowly to avoid shrinking and hardening the weld panel. Use .02 wire. Stitch weld really slow. Walk away after a few stitch blasts. Use .023 wire and gas. Flux wire will be way too hot. Even better if you have a tig but takes more practice and $$$. Fitzees Fabrications will show you how to do it. Around the back you can fab all those pieces with practice and patience. Make it all in small pieces and work thru it. The challenges with getting cut out parts from another car is that they will be thinner Metal and likely rusty and have their own issues. Personally think your better off fab’ing parts when you can. Welding new metal is easier. Good luck and have fun with it. It can be very satisfying to do. Thanks, Ishley. I appreciate the details and the optimism! I watched Yorkshire Car Restoration fab up the same corner on their Patches 914 project and find it amazing that can be done from scratch. Hoping to have the time this weekend to strip it down and see what else might be under that filler. |
|
|
|
| friethmiller |
Oct 18 2024, 06:05 AM
Post
#14
|
|
Senior Member Group: Members Posts: 1,227 Joined: 10-February 19 From: Austin, TX Member No.: 22,863 Region Association: Southwest Region |
Interesting... that previous fender weld looks like it was a lap welded (IMG:style_emoticons/default/icon8.gif) . Probably salvageable but I would need to see it up close. I also believe that, based on the other rust, the top tip of that rear fender is going to have rust holes covered with filler.
If it were me, I'd completely strip the paint and filler from the rear fender and then remove the back part from the car. With this out of the way, I could fix/restore the inner fender end, trunk, and the back crossing panel (might want to consider a donor or the new RD part). Once all that was in good order, I'd fix any damage on the removed part of the fender, finishing with the large new butt welded seam/patch on the rear fender. Totally doable! |
|
|
|
| seanpaulmc |
Oct 19 2024, 10:26 AM
Post
#15
|
|
Member Group: Members Posts: 445 Joined: 6-December 16 From: Orlando, FL Member No.: 20,649 Region Association: South East States |
The diagonal rear truck dimension is given as “s”.
It is easy to understand where it is measured at the tail panel. However, with the black and white picture and black line I cannot make out where the reference point is by the engine lid side. Further it looks like the trunk hinges may be in the way of taking the measurement. Would someone confirm the measurement location for me? 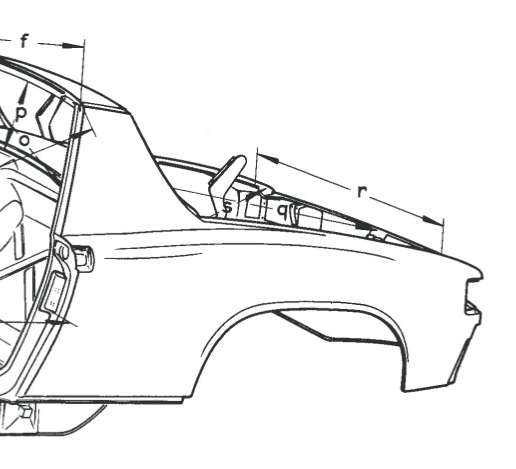 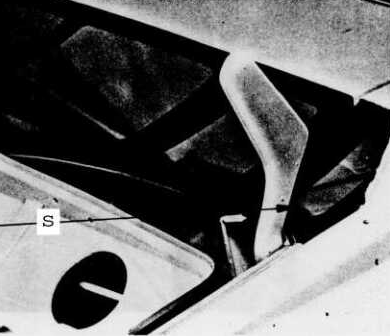 s 17 18 Diagonal distance across rear luggage compartment 1588 mm, 62 17/32" Measured between inner corners of the lid weatherstrip seat Thanks |
|
|
|
| dr914@autoatlanta.com |
Oct 19 2024, 12:14 PM
Post
#16
|
|
914 Guru Group: Members Posts: 8,233 Joined: 3-January 07 From: atlanta georgia Member No.: 7,418 Region Association: None |
Install a new quarter panel and new rear panel for a clean repair
QUOTE(seanpaulmc @ Oct 15 2024, 04:26 PM) Greetings 914World ! I am seeking advice / guidance / instruction from you metal masters on how to approach and tackle this rear corner repair. Panels involved include: • Left rear quarter • Taillight panel • Trunk floor & cross brace • Left side inner trunk fender Some initial questions: • Does the whole quarter panel need to be replaced, or just part? • Does the whole tail panel need to be replaced, or just part? • Can this repair be done well with partial panels spliced in? (Like what was done to the fender in the past but better executed with butt joints and less, a lot less, filler.) • Should I start with cutting off what I think is bad or begin by striping the whole quarter panel of paint and bondo? Exposed metal rusts quickly in Florida. • How and where to cut? What tools and wire size to use? How to finish, prep, and paint? -This is where I need your expertise to lead me. This is my first go around at this. Everything I do is a first-time attempt, and thinking about fixing this fender and taillight area while making it look presentable gives me a lot of apprehension. So far, I have learned to MIG weld and do simple panel forming by working on this project – jack points, floor, hell hole, longs, firewall, and some tools and fixtures. I can make solid welds in structural areas that are strong but don’t necessarily have to be pretty. I do not (yet) have the metal finishing skills for this fender and am hoping I can get your guidance along the way to help me get through what I see to be a complicated, multi panel repair. By making this fender repair its own topic thread, hopefully it encourages greater feedback from the community rather than if it stays buried in my long, slow build thread. If interested in how it got here and the work done to the car thus far, then the thread is this one: here I know I need to go take some measurements before cutting it apart just to get the baseline of where things are at. I hope to do that this coming weekend. Thank you in advance for the feedback and support. Gratefully, Sean |
|
|
|
| seanpaulmc |
Oct 22 2024, 05:25 AM
Post
#17
|
|
Member Group: Members Posts: 445 Joined: 6-December 16 From: Orlando, FL Member No.: 20,649 Region Association: South East States |
QUOTE(seanpaulmc @ Oct 19 2024, 12:26 PM) The diagonal rear truck dimension is given as “s”. It is easy to understand where it is measured at the tail panel. However, with the black and white picture and black line I cannot make out where the reference point is by the engine lid side. Further it looks like the trunk hinges may be in the way of taking the measurement. Would someone confirm the measurement location for me? s 17 18 Diagonal distance across rear luggage compartment 1588 mm, 62 17/32" Measured between inner corners of the lid weatherstrip seat Thanks I’m thinking “s” gets measured at the edge of the seal’s track near the engine lid. Anyone able to confirm that? |
|
|
|
| SirAndy |
Oct 22 2024, 10:13 AM
Post
#18
|
|
Resident German Group: Admin Posts: 42,473 Joined: 21-January 03 From: Oakland, Kalifornia Member No.: 179 Region Association: Northern California |
QUOTE(seanpaulmc @ Oct 22 2024, 04:25 AM) I’m thinking “s” gets measured at the edge of the seal’s track near the engine lid. Anyone able to confirm that? @seanpaulmc http://www.914world.com/specs/bodydims.php Scroll down to "S" and click on the "17" and "18" links for more detail. "Measured between inner corners of the lid weatherstrip seat" "1588 mm, 62 17/32" Should be pretty easy to find the spots that correspond to that measurement. Also, this is really about everything being square, so once you find your spot(s), you need to make sure the cross measurements are the same for both sides. (IMG:style_emoticons/default/bye1.gif) |
|
|
|
| 930cabman |
Oct 22 2024, 10:21 AM
Post
#19
|
|
Advanced Member Group: Members Posts: 4,582 Joined: 12-November 20 From: Buffalo Member No.: 24,877 Region Association: North East States |
QUOTE(SirAndy @ Oct 22 2024, 10:13 AM) QUOTE(seanpaulmc @ Oct 22 2024, 04:25 AM) I’m thinking “s” gets measured at the edge of the seal’s track near the engine lid. Anyone able to confirm that? @seanpaulmc http://www.914world.com/specs/bodydims.php Scroll down to "S" and click on the "17" and "18" links for more detail. "Measured between inner corners of the lid weatherstrip seat" "1588 mm, 62 17/32" Should be pretty easy to find the spots that correspond to that measurement. Also, this is really about everything being square, so once you find your spot(s), you need to make sure the cross measurements are the same for both sides. (IMG:style_emoticons/default/bye1.gif) "Being square" is the key phrase here. The diagonals must be the same dimension |
|
|
|
| friethmiller |
Oct 22 2024, 12:39 PM
Post
#20
|
|
Senior Member Group: Members Posts: 1,227 Joined: 10-February 19 From: Austin, TX Member No.: 22,863 Region Association: Southwest Region |
Having just replaced both of my rear quarters a few weeks ago, I just went out and remeasured. I'm within 1/32". (IMG:style_emoticons/default/idea.gif) I think I'm good. Now that I think of it, I think I verified this before started to weld.
|
|
|
|
|
1 User(s) are reading this topic (1 Guests and 0 Anonymous Users)
0 Members:

|
Lo-Fi Version | Time is now: 13th April 2026 - 02:35 AM |
Invision Power Board
v9.1.4 © 2026 IPS, Inc.