|
|

|
Porsche, and the Porsche crest are registered trademarks of Dr. Ing. h.c. F. Porsche AG.
This site is not affiliated with Porsche in any way. Its only purpose is to provide an online forum for car enthusiasts. All other trademarks are property of their respective owners. |
|
|
  |
| Chad911sc |
 Dec 17 2024, 09:46 AM Dec 17 2024, 09:46 AM
Post
#21
|
|
Newbie  Group: Members Posts: 21 Joined: 24-September 24 From: Florida Member No.: 28,374 Region Association: South East States |
Awesome! Thanks Sean!
I’ve heard of Rev masters, but was unaware they did Type 4 work. I will def check out the VW shop in Winter park. It will go ahead and pull it apart and have it decked properly. I only want to do this once. Not sure how much metal work you need on your 914, I spent the last 10 months doing all of mine as well. I had to replace both of the longs due to rot from the engine bay eating through them. Also had to repair the Hell Hole, it was a major undertaking! I’m on the other side of it now, and just need to finish the motor and install the Tangerine racing transmission linkage. Hopefully smooth sailing after that. |
| seanpaulmc |
 Dec 17 2024, 06:52 PM Dec 17 2024, 06:52 PM
Post
#22
|
|
Member   Group: Members Posts: 375 Joined: 6-December 16 From: Orlando, FL Member No.: 20,649 Region Association: South East States 
|
Okay, so where is the build thread? As you may not know yet, we love pictures- especially when documenting the resurrection of another 914.
(IMG:style_emoticons/default/thisthreadisworthlesswithoutpics.gif) |
| Chad911sc |
 Dec 18 2024, 01:17 PM Dec 18 2024, 01:17 PM
Post
#23
|
|
Newbie  Group: Members Posts: 21 Joined: 24-September 24 From: Florida Member No.: 28,374 Region Association: South East States |
So I have the case halves back apart and now just need to decide where I’m going to ship it off to. Going to ask them to take .015 thousands off the deck. This should get me into the ballpark of where I need to be. I still need to address the head volume. With all the calculations for compression ratio, I need my head volume to be 57cc instead of the now 63cc that I have with the valve relieved pistons and pocket added together. Along with a .040 total deck height this will put me at the desired 9:1 ration I need for my cam.
I always try to add pictures. This site rejects my posts about 80% of the time. I only try to add one or two pics, but it hardly ever accepts them. After trying 15 times I get pisses and just forget it…lol. |
| Chad911sc |
 Dec 18 2024, 01:32 PM Dec 18 2024, 01:32 PM
Post
#24
|
|
Newbie  Group: Members Posts: 21 Joined: 24-September 24 From: Florida Member No.: 28,374 Region Association: South East States |
I think I figured it out with my daughters help…
I am computer illiterate! Attached image(s) 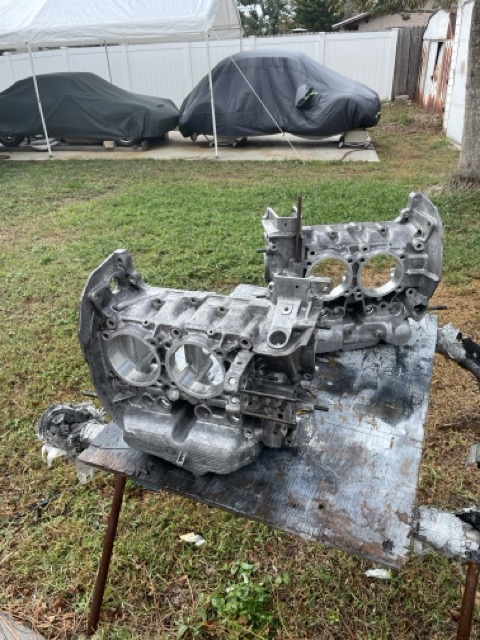
|
| Chad911sc |
 Dec 18 2024, 01:37 PM Dec 18 2024, 01:37 PM
Post
#25
|
|
Newbie  Group: Members Posts: 21 Joined: 24-September 24 From: Florida Member No.: 28,374 Region Association: South East States |
This is the 74 914 that it is going into…one of these days!
Attached thumbnail(s) 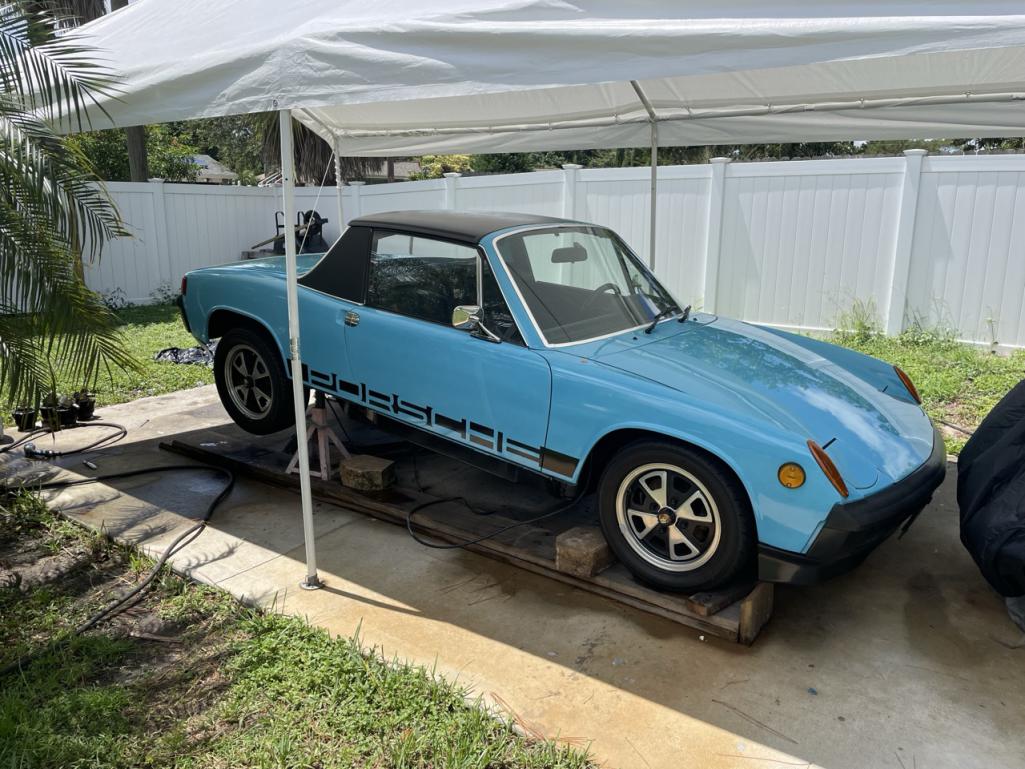
|
| Chad911sc |
 Dec 18 2024, 09:59 PM Dec 18 2024, 09:59 PM
Post
#26
|
|
Newbie  Group: Members Posts: 21 Joined: 24-September 24 From: Florida Member No.: 28,374 Region Association: South East States |
Question….
When I get my heads fly cut, it looks like I need to cut about .025 out to get to my target of 57cc’s total. Does this seem reasonable? 60cc heads with 3cc valve reliefs=63cc. Take away 6cc from the heads looks to be about .025-.030 cut needed. When I looked at the head surface there is a raised outer circle of aluminum that will need to be milled as well so that it will mate with the head surface. Am I on the right track?? Flying up to Indianapolis in a couple days, taking the heads and the case with me to a shop up there that I know well. Spend Christmas with the family and get my machine work done at the same time! Kill two birds with one stone (IMG:style_emoticons/default/beerchug.gif) Thanks again guys for the help….super appreciated! The black line is the amount that needs removed. The other red arrow is the raised aluminum area I was speaking of needing removed to let the cylinder mate with the surface of the head. Attached thumbnail(s) 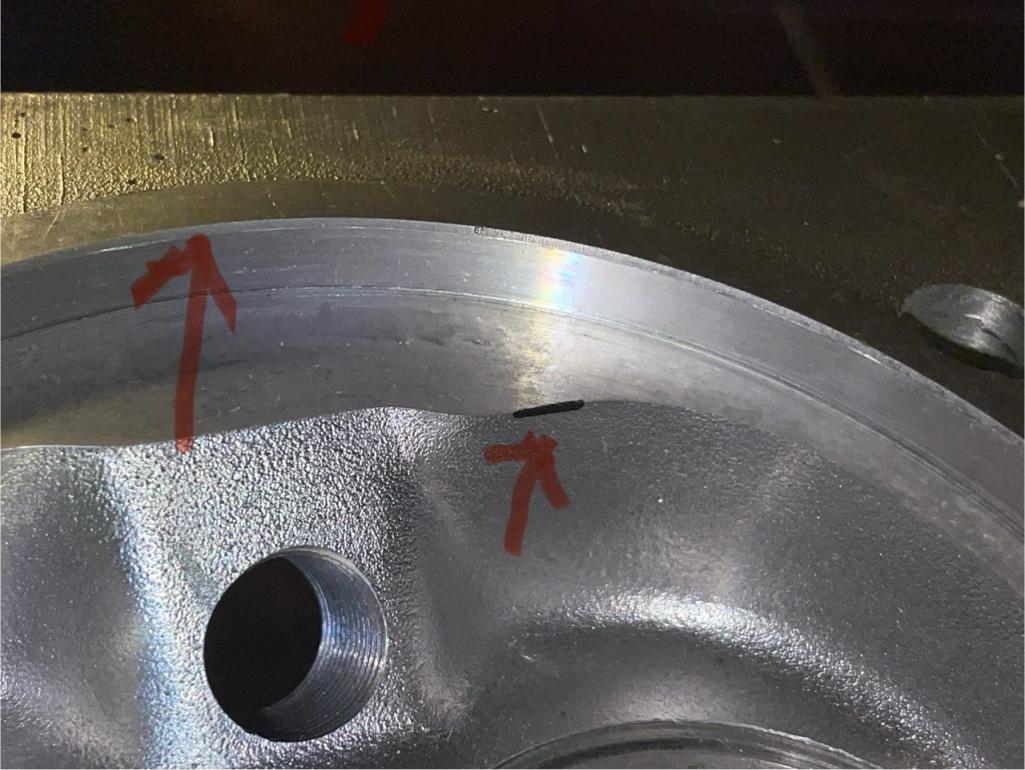
|
| technicalninja |
 Dec 18 2024, 10:50 PM Dec 18 2024, 10:50 PM
Post
#27
|
|
Advanced Member     Group: Members Posts: 2,074 Joined: 31-January 23 From: Granbury Texas Member No.: 27,135 Region Association: Southwest Region 
|
On a bone stock 73 2.0l the depression in the head is 6.5mm and the extension of the jug that fits in it is ALSO 6.5mm.
In stock configuration a fire ring or compression ring was included so there was plenty of clearance. Without that ring it looks like the upper casting wall (outer surface) should be machined down .010 to .020 anyway. BEFORE any fly cutting is done! If you fly cut the head, it will increase the upper surface cut exactly the same amount as the fly cut. This is on MY stuff... My stuff is OLD and German but doesn't appear to have been machined before. You should make measurements yourself! The ONLY place you want the head to contact is the sealing surface at the top of the cylinder. It touches anywhere else and you're going to have a cylinder to head blow out in your future. |
| Jack Standz |
 Dec 19 2024, 07:15 AM Dec 19 2024, 07:15 AM
Post
#28
|
|
Member   Group: Members Posts: 414 Joined: 15-November 19 From: Happy Place (& surrounding area) Member No.: 23,644 Region Association: None 
|
So I have the case halves back apart and now just need to decide where I’m going to ship it off to. Going to ask them to take .015 thousands off the deck. This should get me into the ballpark of where I need to be. I still need to address the head volume. With all the calculations for compression ratio, I need my head volume to be 57cc instead of the now 63cc that I have with the valve relieved pistons and pocket added together. Along with a .040 total deck height this will put me at the desired 9:1 ration I need for my cam. I always try to add pictures. This site rejects my posts about 80% of the time. I only try to add one or two pics, but it hardly ever accepts them. After trying 15 times I get pisses and just forget it…lol. Gonna try one more time on this. Raby says that generally it takes 30 thousandths to clean up the deck on most 1.7/1.8 liter cases, more for 2.0 liter cases. Over the years, most people have come to believe he knows what he's talking about. Not sure why you think your case is so special that you will get away with half that amount? Especially without measuring before and after the machine work. What makes you think your case needs only 15 thousandths removed? Maybe one side needs 30 thousandths and the other side needs 40? Or only 20? How far off parallel does your deck measurements show? Side 1, side2? Why not have a good and competent machinist cleanup the decks on your case (which, generally will take 30 thousandths or more according to Raby) by removing whatever amount of material necessary to achieve a flat and parallel deck? After this is done, you will probably need to add a spacer between the case and cylinders to achieve your optimal deck height. Then, after measuring and verifying the machine work, add the right size spacers. Then get the combustion chamber volume right for your desired static compression ratio. Or, get the case machined, get the heads machined to reduce combustion chamber volume. Then order the spacers based on careful measurement and verifying the machine work, unless somehow the machine work magically comes out to be the perfect combination to meet your CR desires. Not that I believe a particular CR is all that critical for a street motor (but too high a CR can be a problem). Does 8.8, 9.0, 9.1 mean it's all that problematic? But, good machining is very important, especially for long term performance? |
| Chad911sc |
 Dec 19 2024, 08:41 AM Dec 19 2024, 08:41 AM
Post
#29
|
|
Newbie  Group: Members Posts: 21 Joined: 24-September 24 From: Florida Member No.: 28,374 Region Association: South East States |
I understand what you are saying about the deck parallel to the crank is super important, this is why I disassembled it. And I am grateful that you have taken the time to help me see that it was necessary to do so. When I place a level across the deck it only has a .003 of a sag in the middle where Raby says it’s thinner. Some 2.0s need that much, but it doesn’t necessarily mean mine will need that much material to be removed. I also know I will need a shim under each cylinder when I’m done to set it back to .040 for final height. My question was more in the line of does .025 -.030 sound about right to get the head chambers down to the desired cc’s for the ratio I want? And also is that amount of removal typical for a fly cut? I have read through hours and hours of posts and some people say you shouldn’t even fly cut a type 4 head. But how else could you make the pocket smaller to get your required result and keep your deck height at the desired .040?
I don’t want to beat a dead horse, but I am a painter by trade and each and every step matters, which make me a bit OCD. |
| technicalninja |
 Dec 19 2024, 10:37 AM Dec 19 2024, 10:37 AM
Post
#30
|
|
Advanced Member     Group: Members Posts: 2,074 Joined: 31-January 23 From: Granbury Texas Member No.: 27,135 Region Association: Southwest Region 
|
I understand what you are saying about the deck parallel to the crank is super important, this is why I disassembled it. And I am grateful that you have taken the time to help me see that it was necessary to do so. When I place a level across the deck it only has a .003 of a sag in the middle where Raby says it’s thinner. Some 2.0s need that much, but it doesn’t necessarily mean mine will need that much material to be removed. I also know I will need a shim under each cylinder when I’m done to set it back to .040 for final height. My question was more in the line of does .025 -.030 sound about right to get the head chambers down to the desired cc’s for the ratio I want? And also is that amount of removal typical for a fly cut? I have read through hours and hours of posts and some people say you shouldn’t even fly cut a type 4 head. But how else could you make the pocket smaller to get your required result and keep your deck height at the desired .040? I don’t want to beat a dead horse, but I am a painter by trade and each and every step matters, which make me a bit OCD. Just saying "All will require XX amount of machine work" is short-sighted. Saying "Most require XX amount of machine work" is perfectly fine. I, personally, don't believe EVERYTHING Jake Raby says. I'd guess at times; he's kept some data "close to his chest" and allowed misinformation to flourish. There's a BUNCH of stuff that I figured he'd be doing that tuns out he was. In that engine video, at one point, he says "I'm using expensive Honda rods in everything now." He WASN"T the first... I believe The NASCAR guys did the "Will Honda rods work" jump well before him. The whole Raby "proprietary cam shaft profiles" is sort of BS as well. Adding 20+ degrees to both intake and exhaust and THEN spreading the LSA to 112-114 degrees was a GM trick first. This ALONE got rid of the EGR valve in the second gen small block (LS1) in the late 90s... I'd ALSO bet he's using asymmetric lobe profiles as well. I haven't seen "asymmetric lobes" mentioned in ANY camshaft discussions regarding the T4. Ninja rule (IMG:style_emoticons/default/ninja.gif) Rules are for fools; wise men use good judgement. Don't EVER believe everything you read, especially on the Internet. By the time I had it as individual cases I'd KNOW how much I needed machined. If you can get away with .015 you SHOULD as this solves the deck height issue. I believe that you should have a gasket/shim between the cylinders and the case if nothing more than a carrier for sealant. I'd measure how thick the thinnest paper gasket is and have the machining slightly increased to allow for it. To your question is .025-.030 enough to remove 6ccs. I'm NOT sure. I have access (through my son, Bryan) to high end 3D scanning and CAD engineering software. A simple scan and CAD computation is the way I'd go now but I did find YOUR suggestion of fill the chamber up with XX amount of fluid and just LOOK at where the level is as an EXCELENT suggestion. For this I'd want a fluid that had ZERO surface tension and Jack's suggestion of alcohol might be the very best fluid to measure this. I'd worry about TWO things doing the measurement this way. Is the head LEVEL and does the measuring fluid create a meniscus. I'd guess alcohol will have a tiny one. I'd also expect the alcohol to be an escape artist due to this feature. I'd wipe a tiny amount of simple candle wax on the valve seats before assembly. The way you will be going is the OLD SCHOOL way. Machine and then test, re-machine if required. This works FINE if you're the machine shop. And it's not a requirement to be dead ass on at 9.0-1. A CC difference will not alter the compression ratio that much. Now, when you get above 10.5-1 it starts to get critical and anything above 13.0-1 requires accuracy at the less than 0.5 cc range. Tenths of a CC has been HARD to hit for me. Just making multiple volume checks on a single cylinder is hard to re-create with fine accuracy. All important measurements I make at least three times and look at averages. It's easy to be a tiny little bit off. Hope this helps! EDIT: In your case I'd talk with the machine shop. I'd say "I think I'm pretty close to flat, I want you to deck the registers TO THE MAIN BEARNG BORE and take off at least .XXX. If that doesn't clean it up, go further until it does and measure how much you had to remove in total." That is the best way to skin that cat IMO. |
| Jack Standz |
 Dec 19 2024, 12:15 PM Dec 19 2024, 12:15 PM
Post
#31
|
|
Member   Group: Members Posts: 414 Joined: 15-November 19 From: Happy Place (& surrounding area) Member No.: 23,644 Region Association: None 
|
I, personally, don't believe EVERYTHING Jake Raby says. I'd guess at times; he's kept some data "close to his chest" and allowed misinformation to flourish. The whole Raby "proprietary cam shaft profiles" is sort of BS as well. Adding 20+ degrees to both intake and exhaust and THEN spreading the LSA to 112-114 degrees was a GM trick first. This ALONE got rid of the EGR valve in the second gen small block (LS1) in the late 90s... EDIT: In your case I'd talk with the machine shop. I'd say "I think I'm pretty close to flat, I want you to deck the registers TO THE MAIN BEARNG BORE and take off at least .XXX. If that doesn't clean it up, go further until it does and measure how much you had to remove in total." That is the best way to skin that cat IMO. Yes, don't believe everything Raby says either. But, when someone has built and machined so many type iv cases compared to other of us mortals, I think his comments and rules of thumb are not to be ignored. Yes, agreed on the proprietary camshafts. For example, one of his camshafts seems to be very close to Webcam 163/86b. Among other things, he added duration to the exhaust to crutch a weakness of the type iv exhaust ports. And to Chad911sc (BTW 911sc has been my favorite Porsche for a long time), no matter what they tell you, carefully measure everthing yourself. And my apologies if I came off a little gruff this morning. I'm still pulling for you to end up with the motor you wanted to build at the end of the project. And that it lasts for a very long time. |
| Chad911sc |
 Dec 19 2024, 01:12 PM Dec 19 2024, 01:12 PM
Post
#32
|
|
Newbie  Group: Members Posts: 21 Joined: 24-September 24 From: Florida Member No.: 28,374 Region Association: South East States |
Thanks guys!
Now worries, no offense taken. Like I said I wouldn’t have even taken this one on if it wasn’t for the help of this site. I did the same thing when I built my LS1 in my C5 a few years back. I ended up with 470 rwhp on a naturally asp small block. I take all advice with a grain of salt, but without all the input I wouldn’t have attempted that either. I do own a 1979 911sc imported from Germany by its only other owner. I’ve owned it for 23 years and just finished painting it last year. Haven’t put it back together yet because I always get distracted with a new project. Working on a 69 beetle right now as well that I adapted a 2.5l turbo forged STI engine into it. It has been a very challenging project getting the cooling and front end set up for a water motor. Attached thumbnail(s) 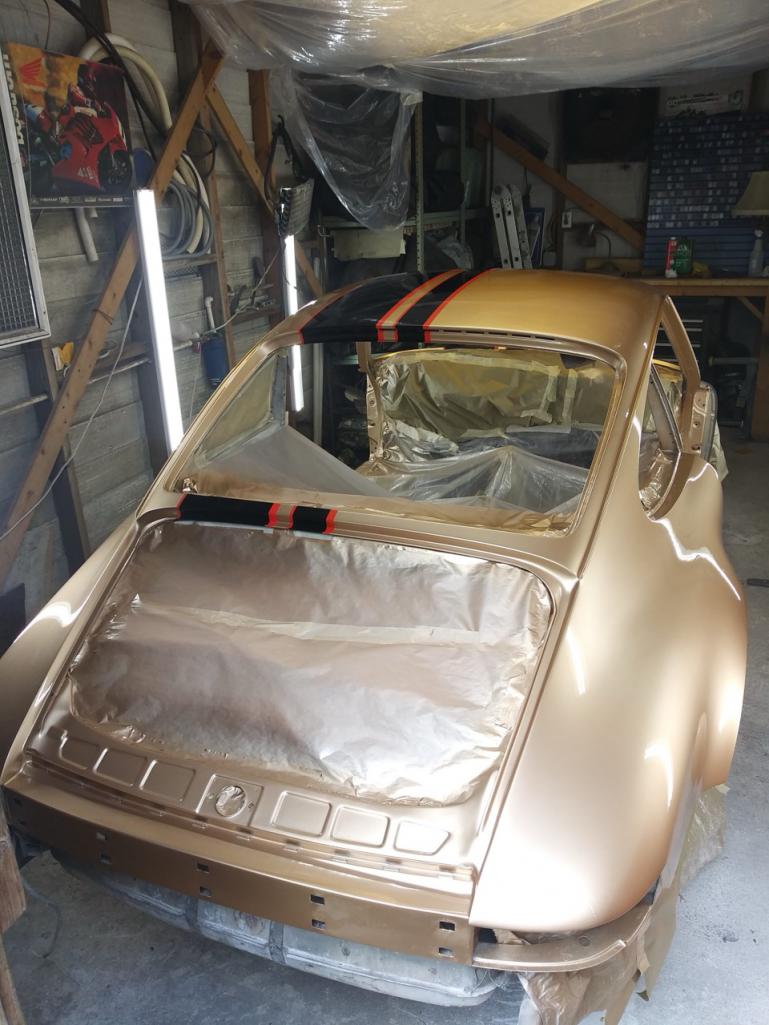 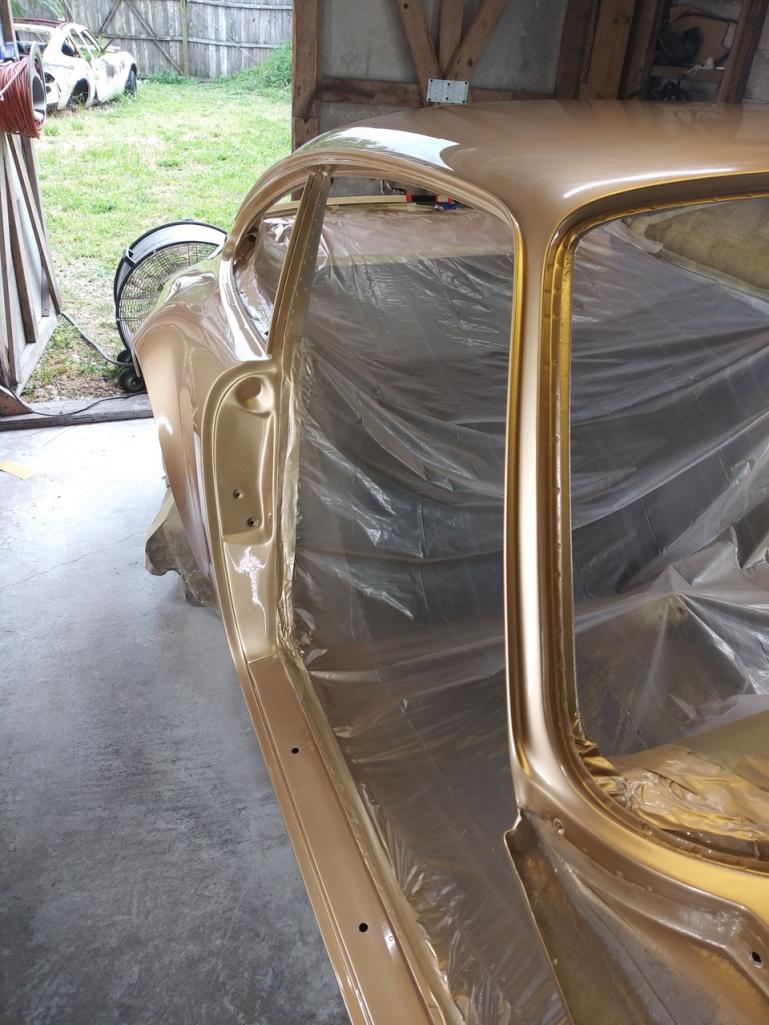
|
| rfinegan |
 Dec 19 2024, 02:27 PM Dec 19 2024, 02:27 PM
Post
#33
|
|
Senior Member    Group: Members Posts: 1,038 Joined: 8-February 13 From: NC Member No.: 15,499 Region Association: MidAtlantic Region 
|
duplicated
|
| rfinegan |
 Dec 19 2024, 02:33 PM Dec 19 2024, 02:33 PM
Post
#34
|
|
Senior Member    Group: Members Posts: 1,038 Joined: 8-February 13 From: NC Member No.: 15,499 Region Association: MidAtlantic Region 
|
Am I missing something...
Machine the case to the centerline of the crank. Doesn't the case split the center of the crank. This make setting up the case ez on the flat case half and clamping each case to the table. Machine both to clean up the spigots and match this setting to the other side. Please advise if I'm missing something, AS I will be performing this on my 2056 soon on my Bridgeport . Once parallel this can be adjusted to best deck height or shimmed as needed. |
| technicalninja |
 Dec 19 2024, 03:20 PM Dec 19 2024, 03:20 PM
Post
#35
|
|
Advanced Member     Group: Members Posts: 2,074 Joined: 31-January 23 From: Granbury Texas Member No.: 27,135 Region Association: Southwest Region 
|
The case line SHOULD be centered but...
Where it matters is a center axis of the crankshaft. This is how shit can go wrong... One of my other projects is a 91 MR2 Turbo. After tearing the stock gen 2 engine down (all OK, just never touched and OLD) a built Gen 3 engine showed up on Craigslist here in DFW. This engine was out of a wrecked car and it was cheap! Gen 3 engines are SHITLOADS better. They never made it to the USA and this one was seriously built ($10,000 receipt). H-beams, Wisecos, billet cams, adjustable cam gears, whole list of good shit. I went to look. Took a borescope and leak down stuff. Minor vertical scoring lines in the bore surface. It had been run an extended time without an airfilter! Leak downs sucked. All the valves had leakage and "bonking" them didn't improve it much. It HAD been sitting 9 months. I bought it for half what he was asking... The receipt was from a well known shop who specialized in these. I've purchased many things from them. So, I've got this bad-assed 2.0l that needs a ring job and cleaning up the valves. I rip it apart. Check deck height on all 4. I've learned to do this early instead of late. .006 difference in deck height!!!!!! (IMG:style_emoticons/default/headbang.gif) (IMG:style_emoticons/default/headbang.gif) (IMG:style_emoticons/default/headbang.gif) (IMG:style_emoticons/default/headbang.gif) (IMG:style_emoticons/default/headbang.gif) I'm used to seeing deck height difference BELOW .001. I'm expecting "tenths" and have results that are HUGE! I'm PISSED! What I found, after swapping rods/pistons and then installing the crank out of my gen2 in it was two things. #4 rod bearing journal was repaired via "off-set" grinding (this is a NORMAL thing for quicky machine shop repair) and the deck seemed to be ground at an angle to the crank. I told the machine shop what I thought, and Eric documented what they found. It took .0017" to clean it up. He did a final cut at 2 thousands. It WAS decked at an angle! The crank journal was off-set ground right at .005" I used the Gen 2 crank out of the car's original engine (never been machined and not damaged at all). Had it micro-polished/balanced and put it back together. Deck height differences are .0003 now! The shop in question is NOT a machine shop. They sub the work out They OBVIOUSLY didn't check anything when they got it back. The machine shop in question did a "quick production" job on the crank and they decked it from the oil pan registers instaead of the crank bore. This is the FASTER way to complete the machine work and everything would have worked absolutely fine on a bone stock build at 200hp. This build is targeted for 500hp (which as actually conservative) and that level of variation is unacceptable at that power level. So, on another active build at 2.0L I'm shooting for 500 hp. And parts for that puppy are CHEAPER than T4 stuff... |
| rfinegan |
 Dec 19 2024, 03:34 PM Dec 19 2024, 03:34 PM
Post
#36
|
|
Senior Member    Group: Members Posts: 1,038 Joined: 8-February 13 From: NC Member No.: 15,499 Region Association: MidAtlantic Region 
|
great follow up. Thanks for the information
|
| technicalninja |
 Dec 19 2024, 04:26 PM Dec 19 2024, 04:26 PM
Post
#37
|
|
Advanced Member     Group: Members Posts: 2,074 Joined: 31-January 23 From: Granbury Texas Member No.: 27,135 Region Association: Southwest Region 
|
The 911 is COOL!
What's that white car in the background? |
| Jack Standz |
 Dec 19 2024, 08:33 PM Dec 19 2024, 08:33 PM
Post
#38
|
|
Member   Group: Members Posts: 414 Joined: 15-November 19 From: Happy Place (& surrounding area) Member No.: 23,644 Region Association: None 
|
Chad,
Awesome looking 911SC. You should be working on getting that "real Porsche" back on the road! (IMG:style_emoticons/default/smile.gif) (IMG:style_emoticons/default/smile.gif) |
| Chad911sc |
 Dec 20 2024, 09:11 AM Dec 20 2024, 09:11 AM
Post
#39
|
|
Newbie  Group: Members Posts: 21 Joined: 24-September 24 From: Florida Member No.: 28,374 Region Association: South East States |
The 911sc is actually a Max Moritz built Porsche. It was bought in Germany by a space engineer that ended up moving to Florida and bringing it with him. She is my baby and as you said deserves to be back on the road. I just get distracted by a new project way too easily…lol.
The white car in the background is a 69 Opel GT that I ended up building a 347 ford stroker motor for and had a 4:10 posi shortened rear end into. That was one of the parts cars I used to steal panels from to fix the other one that’s not in the picture. |
| technicalninja |
 Dec 20 2024, 01:26 PM Dec 20 2024, 01:26 PM
Post
#40
|
|
Advanced Member     Group: Members Posts: 2,074 Joined: 31-January 23 From: Granbury Texas Member No.: 27,135 Region Association: Southwest Region 
|
Let's see here...
500 hp Vette Nice NICE NICE 911- power level unknown but due to the history of the OP NOT STOCK! 2.5L BLOWN Suby beetle. (I'd bet that is going to be a HANDFUL to drive). Stroked small block Ford swapped Opel GT with other serious mods. I'm going guess you will be "less than impressed" with the acceleration of the 914... I've got a tip for you. That STI engine will fit! (IMG:style_emoticons/default/devil.gif) And it would work better in a mid-engine installation IMO! (IMG:style_emoticons/default/ninja.gif) |
  |
3 User(s) are reading this topic (2 Guests and 0 Anonymous Users)
1 Members: brant

|
Lo-Fi Version | Time is now: 21st December 2024 - 08:40 AM |
Invision Power Board
v9.1.4 © 2024 IPS, Inc.


