|
|
|
Porsche, and the Porsche crest are registered trademarks of Dr. Ing. h.c. F. Porsche AG.
This site is not affiliated with Porsche in any way. Its only purpose is to provide an online forum for car enthusiasts. All other trademarks are property of their respective owners. |
|
|

  |

| DennisV |
 Dec 30 2024, 07:28 PM Dec 30 2024, 07:28 PM
Post
#1
|
|
Senior Member  Group: Members Posts: 910 Joined: 8-August 20 From: Santa Rosa, CA Member No.: 24,575 Region Association: Northern California |
I hate to belabor the rear shock topic, but I am stuck. I didn't have the original setup to reference, and I'm not finding much in terms of Boge details for 914-6.
Thanks for any assistance. 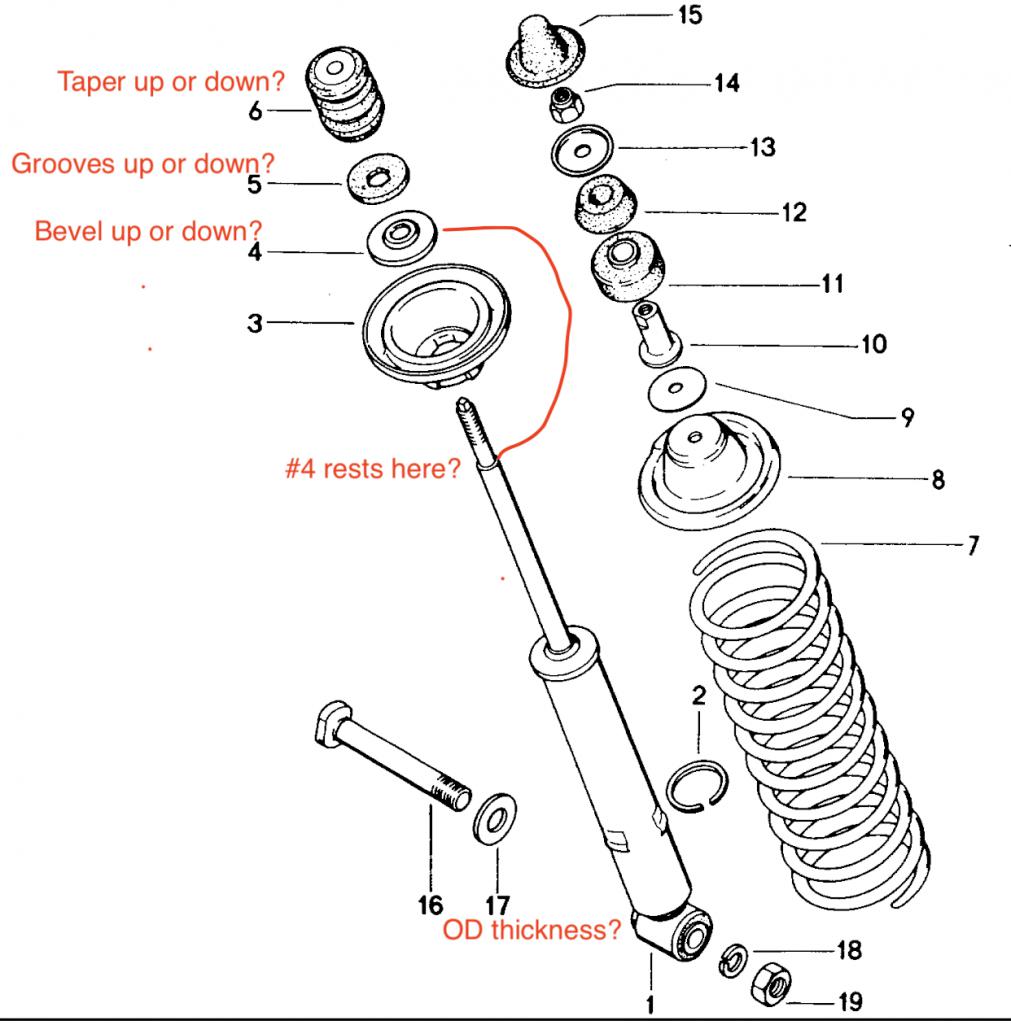 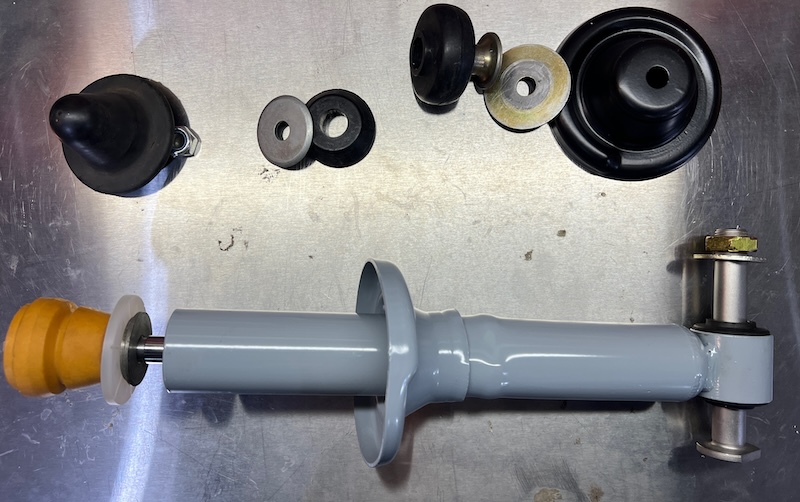 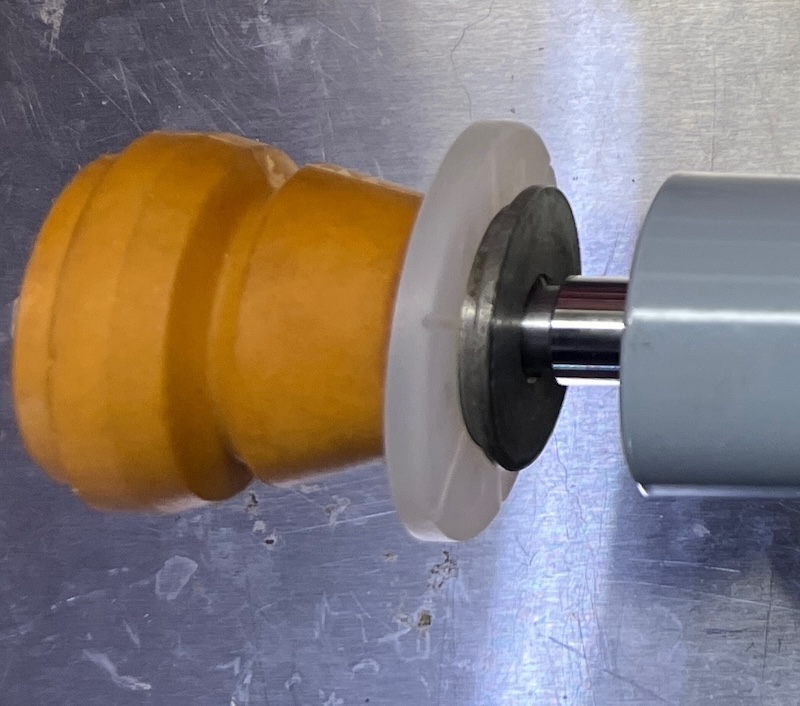 |
   |

 
|
| Superhawk996 |
Dec 30 2024, 09:26 PM
Post
#2
|
|
914 Guru Group: Members Posts: 7,821 Joined: 25-August 18 From: Woods of N. Idaho Member No.: 22,428 Region Association: Galt's Gulch |
That is totally wrong but the PET diagram is garbage as far as an exploded diagram goes so that no slam on you.
Washer #5 should have a hole large enough to allow it to slide to the bottom of the damper rod. It goes at the bottom and should basically be resting on the damper body. This is the first thing to go on the damper. The purpose of the slots is to prevent a vacuum from getting formed on the damper seal (inside damper body) when the jounce bumper gets squished under hard compression. The yellow bounce bumper #6 should have a hole large enough to slide all the way to the bottom of the damper rod. The washer #4 that you have at the top of the damper rod has a smaller hole - supposed to stay at the top of the damper rod. However it nests into the top spring retainer/perch #8 on PET. You’ll note it is stepped - this will allow it to “nest” into the spring retainer. Smaller stepped side to the top. |
|
|
|
| Superhawk996 |
Dec 30 2024, 09:34 PM
Post
#3
|
|
914 Guru Group: Members Posts: 7,821 Joined: 25-August 18 From: Woods of N. Idaho Member No.: 22,428 Region Association: Galt's Gulch |
The jounce bumper doesn’t contact anything until the spring / damper assembly is at full compression (jounce).
Its purpose is to slow down the damper at the limits of its travel before the internal damping rod / piston goes metal to metal which would be damaging to the damper. The jounce bumper also affects handling but I’m not going to try to go into that detail here. Watch some YouTube videos for more info on how jounce bumpers work and affect suspension tuning. |
|
|
|
| Superhawk996 |
Dec 30 2024, 10:26 PM
Post
#4
|
|
914 Guru Group: Members Posts: 7,821 Joined: 25-August 18 From: Woods of N. Idaho Member No.: 22,428 Region Association: Galt's Gulch |
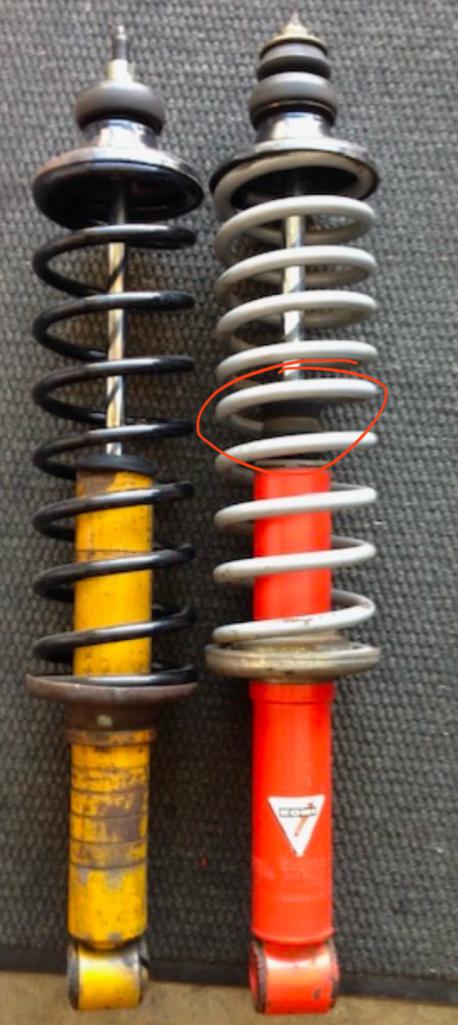
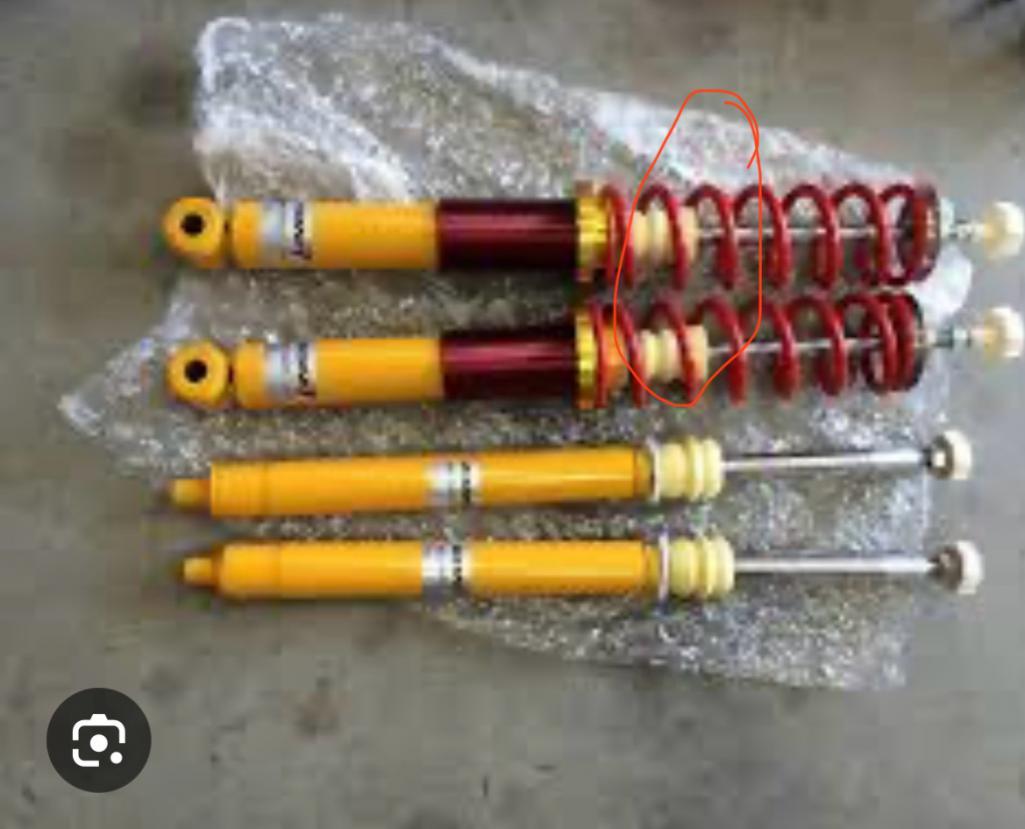
Here’s a couple other pictures of rear dampers and where the jounce bumper goes (circled in red)
  |
|
|
|
| DennisV |
Dec 31 2024, 08:16 PM
Post
#5
|
|
Senior Member Group: Members Posts: 910 Joined: 8-August 20 From: Santa Rosa, CA Member No.: 24,575 Region Association: Northern California |
QUOTE(Superhawk996 @ Dec 30 2024, 07:26 PM)  That is totally wrong but the PET diagram is garbage as far as an exploded diagram goes so that no slam on you. The yellow bounce bumper #6 should have a hole large enough to slide all the way to the bottom of the damper rod. The washer #4 that you have at the top of the damper rod has a smaller hole - supposed to stay at the top of the damper rod. However it nests into the top spring retainer/perch #8 on PET. You’ll note it is stepped - this will allow it to “nest” into the spring retainer. Smaller stepped side to the top. Thank you very much for taking time to post this. I think I have it sorted now. You are correct that I was using the parts catalog as an exploded diagram, which I guess I should not. It was definitely confusing in this case. The yellow bounce bumper #6 went on all the way down, but required some dish soap and persuasion. 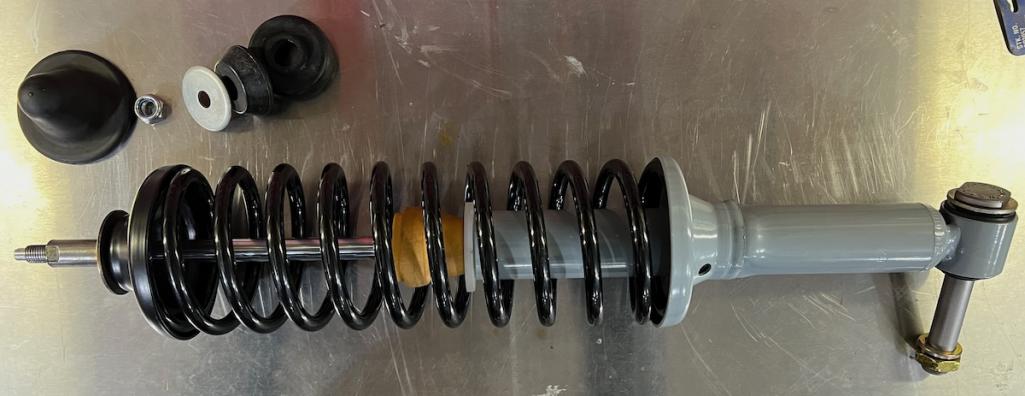 |
|
|
|
| Superhawk996 |
Dec 31 2024, 08:27 PM
Post
#6
|
|
914 Guru Group: Members Posts: 7,821 Joined: 25-August 18 From: Woods of N. Idaho Member No.: 22,428 Region Association: Galt's Gulch |
|
|
|
|
| davep |
Dec 31 2024, 09:49 PM
Post
#7
|
|
914 Historian Group: Benefactors Posts: 5,362 Joined: 13-October 03 From: Burford, ON, N0E 1A0 Member No.: 1,244 Region Association: Canada |
The PET diagram is not too bad if you look at the numbers.
1 the shock body 2 the lower perch retainer (not needed if the lower perch fts on the shock body) 3 lower spring perch 4 dust cap (stamped metal fits over the shock body like a bottle cap) I do not see #4 in the parts in your photos. 5 anti-siphon grooves down 6 bump stop rubber sits on the ledge at the top of the shaft 7 spring sits in bottom perch 8 spring cap 9 flat washer (large) 10 shaft nut (torque down to spec, applies preload to the spring which should not be loose 11 rubber bush fits over # 10 and centers the shock assembly into the bottom of shock tower The shock assembly is now semi complete and can now be fitted to the chassis 12 rubber bush centers the shock assembly onto the top of shock tower (11 & 12 isolate the shaft from the body) 13 cupped washer (cup faces up) 14 self locking nut (new or excellent used) 15 dust cap Your shock photos show a stepped washer on the step of the shaft. That is sort of where it goes, but it normally is bonded into the top of #6, and #'s 6, 5 & 4 are below it on the shaft. When the shaft begins to bottom out #6 bump stop comes into action to soften the blow. When #6 compresses it will seal on #5 and the air inside is forced out. Later the shaft will extend, and #6 decompresses it will suck air into itself; if the grooves in #5 are facing down, then the grooves allow a path for air to reenter #6. If # 5 is not there to provide an air path, then the suction could extract shock oil past the seal on the top of the shaft and eventually ruin the shock. When you install #10 you will have to compress the spring between perch 3 and cap 8. The flat washer 17 you have on the pin appears to be about the correct size; it should cover the rubber bushing in the bottom of the shock. |
 |
|
| davep |
Dec 31 2024, 09:58 PM
Post
#8
|
|
914 Historian Group: Benefactors Posts: 5,362 Joined: 13-October 03 From: Burford, ON, N0E 1A0 Member No.: 1,244 Region Association: Canada |
QUOTE(Superhawk996 @ Dec 30 2024, 11:26 PM) Here’s a couple other pictures of rear dampers and where the jounce bumper goes (circled in red) No, that is wrong! the bump stop (Jounce bumper) does not fit at the bottom of the shaft, but at the top and inside the spring cap. The original bump stop had the stepped washer bonded into the top of the foam rubber. The bump stop only comes into play when the shaft is fully pushed into the shock and the spring is fully compressed. Its purpose is to keep the bottom of the shaft from slamming into the bottom of the shock body. |
|
|
|
| davep |
Dec 31 2024, 10:09 PM
Post
#9
|
|
914 Historian Group: Benefactors Posts: 5,362 Joined: 13-October 03 From: Burford, ON, N0E 1A0 Member No.: 1,244 Region Association: Canada |
QUOTE(DennisV @ Dec 31 2024, 09:16 PM) You are correct that I was using the parts catalog as an exploded diagram, which I guess I should not. It was definitely confusing in this case. The yellow bounce bumper #6 went on all the way down, but required some dish soap and persuasion. The parts diagram is basically numbered in the order of assembly. As soon as you use the shock in the car, the #6 bumper will ride up the shaft as the spring gets compressed; it is supposed to be up in the cap! You do not need part #2 since the shock body is designed to support the perch. I do not see #4. I do not see a proper #13 The drain hole in the perch #3 should be in the lowest position when the shock is installed, so it will face forward. |
|
|
|
| Superhawk996 |
Jan 1 2025, 01:48 AM
Post
#10
|
|
914 Guru Group: Members Posts: 7,821 Joined: 25-August 18 From: Woods of N. Idaho Member No.: 22,428 Region Association: Galt's Gulch |
QUOTE(davep @ Dec 31 2024, 11:58 PM) The original bump stop had the stepped washer bonded into the top of the foam rubber. Fair enough - may have been that way on OEM part in 1970. Good luck finding a OEM jounce bumper with a bonded washer in 2024. What is going to happen is when the vehicle is driven, the jounce bumper will migrate up the damper rod. Due to tight fit to the damper rod it will end up staying at the top of the rod for a good while (maybe years). It will function exactly as intended. Eventually years down the road as the jounce bumper gets pounded out, it will become loose and slide back down to the bottom of the damper rod and will still continue to function for years until it finally splits and falls out. At that point you will be left with the stepped washer at the top of the damper rod - where they all have survived to this day. Buy new jounce bumper. Rinse, lather, repeat. Maybe someday Porsche will decide to offer the jounce bumper described. I give the OP a (IMG:style_emoticons/default/first.gif) for ordering the jounce bumper. Many rear dampers are running around out in the wild on new dampers with no jounce bumper at all. |
|
|
|
| DennisV |
Jan 1 2025, 07:15 AM
Post
#11
|
|
Senior Member Group: Members Posts: 910 Joined: 8-August 20 From: Santa Rosa, CA Member No.: 24,575 Region Association: Northern California |
QUOTE(davep @ Dec 31 2024, 07:49 PM) 4 dust cap (stamped metal fits over the shock body like a bottle cap) I do not see #4 in the parts in your photos. 6 bump stop rubber sits on the ledge at the top of the shaft Your shock photos show a stepped washer on the step of the shaft. That is sort of where it goes, but it normally is bonded into the top of #6, and #'s 6, 5 & 4 are below it on the shaft. When you install #10 you will have to compress the spring between perch 3 and cap 8. Hi Dave. Thanks for chiming in with additional insight. #4 When I was searching for parts, I got the impression the stepped washer was #4. So I guess I do not have it. I don't even know what it looks like, much less where to get it. Can you offer some additional details please? #6 The taper for the step washer goes up. The bump stop rubber below it with taper down. This would make the bump stop on the larger diameter part of the shaft. So if I slide my bump stop rubber up the shaft to meet the step washer, that would essentially be correct? To say I'm not looking forward to compressing these springs again is an understatement. (IMG:style_emoticons/default/headbang.gif) Best to get it right though. Happy New Year folks! |
|
|
|
| DennisV |
Jan 1 2025, 07:25 AM
Post
#12
|
|
Senior Member Group: Members Posts: 910 Joined: 8-August 20 From: Santa Rosa, CA Member No.: 24,575 Region Association: Northern California |
QUOTE(davep @ Dec 31 2024, 08:09 PM) #6 bumper will ride up the shaft as the spring gets compressed; it is supposed to be up in the cap! I do not see a proper #13 The drain hole in the perch #3 should be in the lowest position when the shock is installed, so it will face forward. 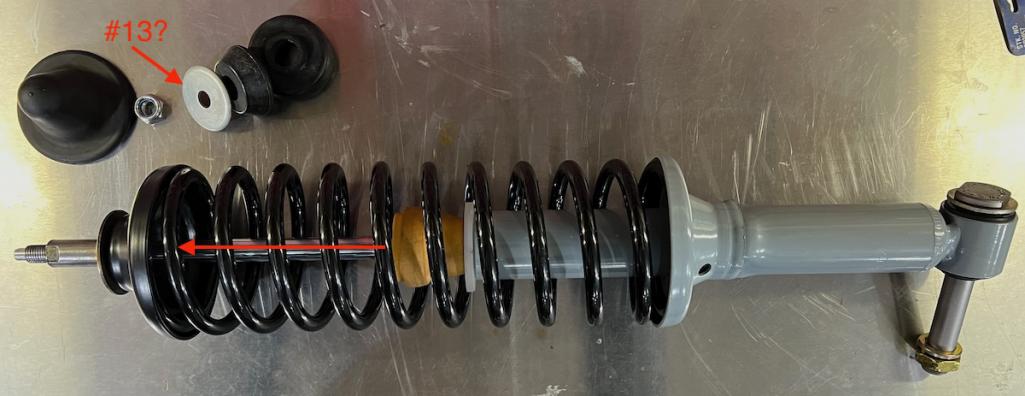 #6 will still be on the thicker part of the shaft though. So if I just slide it to meet the bevel washer, I am good? I thought the washer with the curved lip top left was #13? Is it not? The lip isn't easy to see in the photo. 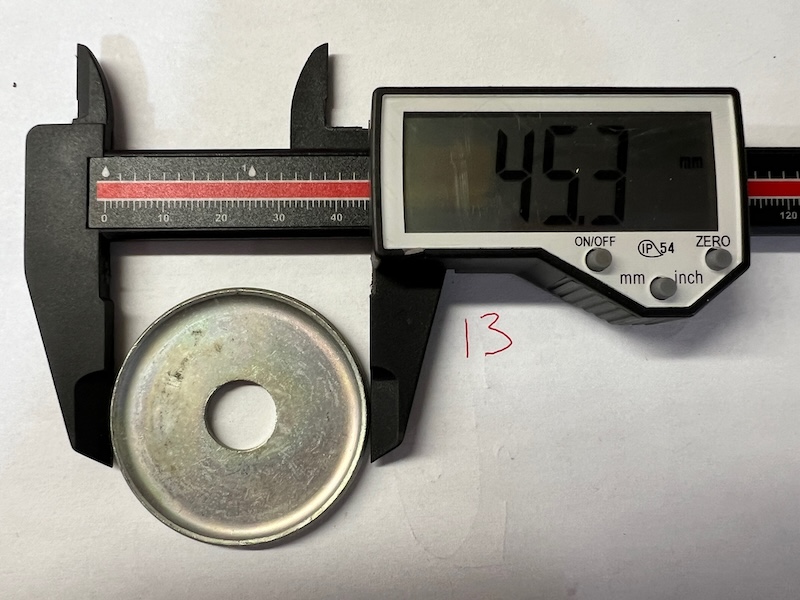 Thanks for the info on the drain hole position. |
|
|
|
| Cairo94507 |
Jan 1 2025, 08:06 AM
Post
#13
|
|
Michael Group: Members Posts: 10,617 Joined: 1-November 08 From: Auburn, CA Member No.: 9,712 Region Association: Northern California |
An excellent thread on rear shock assembly. Now I have to go look at mine and see what is what... (IMG:style_emoticons/default/beerchug.gif)
|
|
|
|
| Superhawk996 |
Jan 1 2025, 01:29 PM
Post
#14
|
|
914 Guru Group: Members Posts: 7,821 Joined: 25-August 18 From: Woods of N. Idaho Member No.: 22,428 Region Association: Galt's Gulch |
Was trying to find a NOS rear jounce bumper to see if I could find one with the bonded washer in it. Honestly, I’ve never seen one with a bonded washer going back to the 80s when I was working on a lot more 914s than I do today. All I’ve ever seen is loose jounce bumpers and stepped washers that never looked to have been bonded to anything.
Here’s a couple pictures of a NOS part on eBay in Porsche bag and with Porsche part number from Brad Mayeur. Unfortunately no top end view. Not saying Dave’s wrong, I was just trying to figure out what OEM really was since I’ve never seen a bonded jounce bumper in person. Edit: In fact, it would seem @Davep is absolutely right!! Thanks for teaching me about something I’ve never known about 914s!!! Brads listing states “No Longer Available. This is the correct, original bump stop that incorporates the “stepped” washer in the buffer. ” I guess there is exactly one available in 2024 (well now 2025 (IMG:style_emoticons/default/laugh.gif) ) 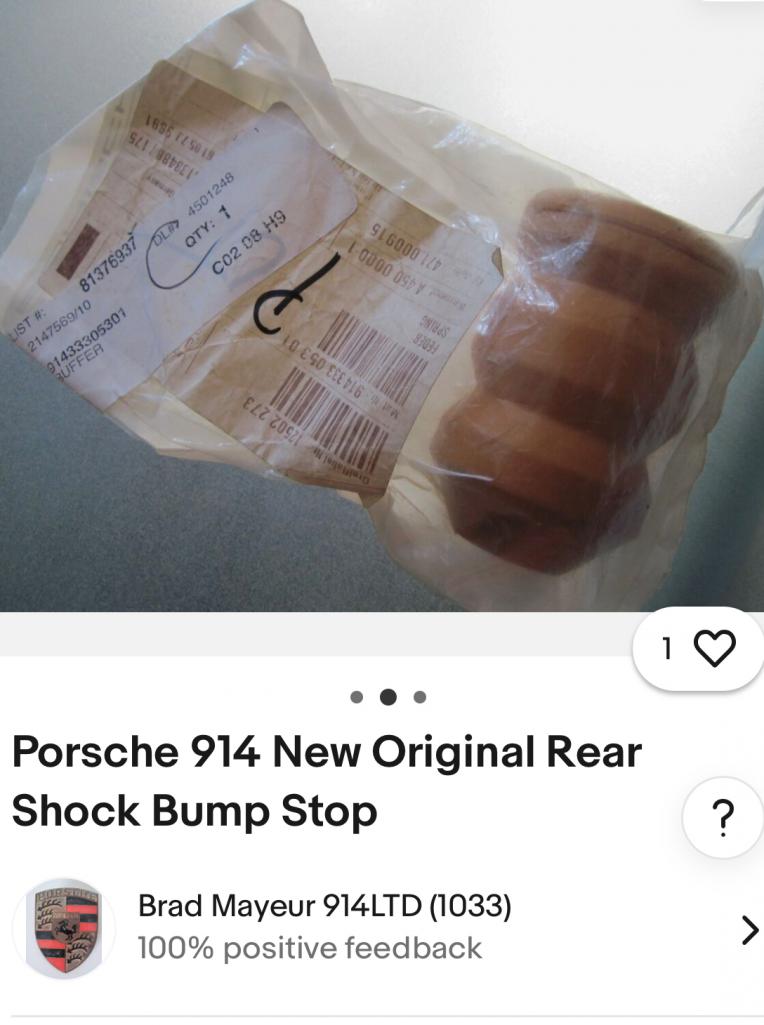 Anyone else have a NOS part picture of the end view with the washer incorporated? Would love to get what it looks like documented before these parts just disappear. Unfortunately Brad only has this one, otherwise I’d buy a pair of NOS just to see the end not shown in the photo. @ltd914. I’d love to have a set of NOS for my project but think any NOS parts ought to go to Dennis’ /6 restoration before I’d waste them on my /4 project. 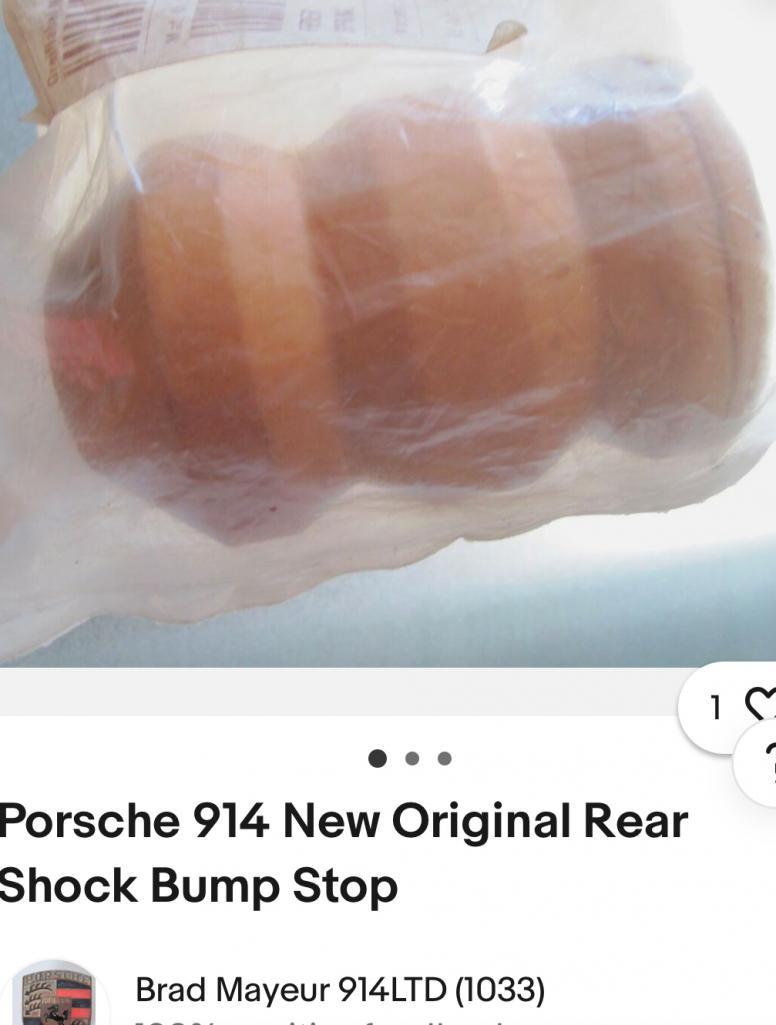 |
|
|
|
| Superhawk996 |
Jan 1 2025, 02:25 PM
Post
#15
|
|
914 Guru Group: Members Posts: 7,821 Joined: 25-August 18 From: Woods of N. Idaho Member No.: 22,428 Region Association: Galt's Gulch |
@DennisV
The jounce bumpers you already have will be functional and are 1000% better than no jounce bumper at all. |
|
|
|
| Superhawk996 |
Jan 1 2025, 02:33 PM
Post
#16
|
|
914 Guru Group: Members Posts: 7,821 Joined: 25-August 18 From: Woods of N. Idaho Member No.: 22,428 Region Association: Galt's Gulch |
I guess while I’m (IMG:style_emoticons/default/dead horse.gif)
I might as well put a photo of NOS front strut jounce bumper here for anyone stumbling on this thread in future. Attached image(s) 
|
|
|
|
| davep |
Jan 1 2025, 06:54 PM
Post
#17
|
|
914 Historian Group: Benefactors Posts: 5,362 Joined: 13-October 03 From: Burford, ON, N0E 1A0 Member No.: 1,244 Region Association: Canada |
QUOTE(DennisV @ Jan 1 2025, 08:25 AM) I thought the washer with the curved lip top left was #13? Is it not? The lip isn't easy to see in the photo. Thanks for the info on the drain hole position. That is indeed #13, but the cup faces up to the nut. |
|
|
|
| davep |
Jan 1 2025, 07:44 PM
Post
#18
|
|
914 Historian Group: Benefactors Posts: 5,362 Joined: 13-October 03 From: Burford, ON, N0E 1A0 Member No.: 1,244 Region Association: Canada |
I had a dozen of the orange bump stops, but the foam rubber just disintegrated into a powder. It appears that the lifespan is just 25 years unless in a sealed bag. I believe the stepped side faced up so that the larger diameter would not pull through. They were yellow zinc plated parts.
The black bump stop was probably a replacement part when they realized the foam rubber disintegrated. The bump stop you have will naturally move into the correct position over time so no need to force it. Most of my parts are buried at this time, but if I can find the parts, then I will add to the thread. In the meantime, just seek an original assembly to take apart. |
|
|
|
| DennisV |
Jan 2 2025, 02:20 PM
Post
#19
|
|
Senior Member Group: Members Posts: 910 Joined: 8-August 20 From: Santa Rosa, CA Member No.: 24,575 Region Association: Northern California |
QUOTE(davep @ Jan 1 2025, 05:44 PM) Most of my parts are buried at this time, but if I can find the parts, then I will add to the thread. In the meantime, just seek an original assembly to take apart. If you can share any additional details and or photos of #4 that would be appreciated. I think that is the only part unaccounted for now. I don't even know what it looks like, much less where to get it. I wish our car had the original Boge to reference. It was a semi complete Koni setup that I think they used for track or autocross. Thanks again everyone for your contributions in sorting this out. |
|
|
|
| rgalla9146 |
Jan 2 2025, 03:11 PM
Post
#20
|
|
Advanced Member Group: Members Posts: 4,957 Joined: 23-November 05 From: Paramus NJ Member No.: 5,176 Region Association: None |
Great thread. My reply is a bit off topic...bear with me. It's well known front struts on a 6 are grey. Rear Boges grey ? ...don't remember. I don't remember ever seeing grey lower spring perches. Always black. |
|
|
|
|
2 User(s) are reading this topic (2 Guests and 0 Anonymous Users)
0 Members:

|
Lo-Fi Version | Time is now: 27th April 2026 - 06:30 AM |
Invision Power Board
v9.1.4 © 2026 IPS, Inc.