|
|
|
Porsche, and the Porsche crest are registered trademarks of Dr. Ing. h.c. F. Porsche AG.
This site is not affiliated with Porsche in any way. Its only purpose is to provide an online forum for car enthusiasts. All other trademarks are property of their respective owners. |
|
|

  |

| friethmiller |
 Jan 1 2025, 02:08 PM Jan 1 2025, 02:08 PM
Post
#21
|
|
Senior Member  Group: Members Posts: 751 Joined: 10-February 19 From: Austin, TX Member No.: 22,863 Region Association: Southwest Region |
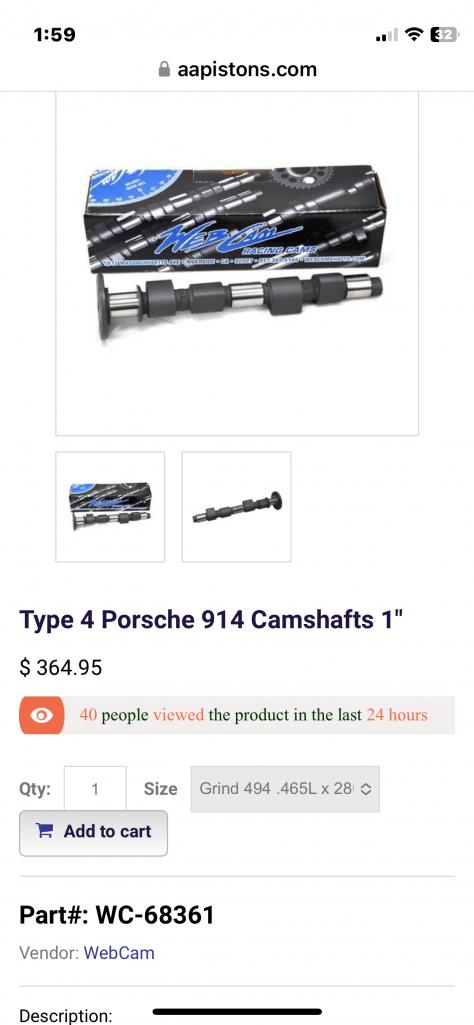
Web Cam has a 494 grind with a 1” base circle meant for 80mm+ cranks. BTW, I measured a 1.044 base circle with my digital caliper on my cam. So probably it’s 1” since I was just measuring 90 degrees from the lobe.
 |
   |

 
|
| technicalninja |
Jan 1 2025, 02:24 PM
Post
#22
|
|
Advanced Member Group: Members Posts: 2,377 Joined: 31-January 23 From: Granbury Texas Member No.: 27,135 Region Association: Southwest Region |
Those might not be JE pistons!
I have 2 new sets, Stroker 3.0l L28 Z-car and a 1MM over set for a Miata BP engine. My JEs look different than yours! All the pictures I've found on the internet show ZERO markings on the top. Mine are marked INSIDE the crown on the bottom. Wisecos ARE marked on the top... Everything "forged" I have Wiseco, JE, and Ross has much, much finer machining on the crown. More pics of piston please! Underside, both thrust and non-thrust sides of pistons (the skirts/both sides) and a side view on pin would help. You have a long stroke and short rods: I'm looking for excessive side loading on pistons. (Skirts will be worn) Your bores look OK, not bedded properly but not screwed up. LN does offer JEs flat tops with no valve relief. The pistons in this kit appear to be them. They don't look marked on the top either but it's HARD to see. https://lnengineering.com/type-4-store/engi...orsche-kit.html |
|
|
|
| technicalninja |
Jan 1 2025, 02:47 PM
Post
#23
|
|
Advanced Member Group: Members Posts: 2,377 Joined: 31-January 23 From: Granbury Texas Member No.: 27,135 Region Association: Southwest Region |
Looked at that cam. That wouldn't be my first choice.
I'd dither between 68362 86B/86C and 68444. 163/86B Compression ratio would be a factor. I'd need to check out the head, intake and exhaust. I'd be hunting 180hp+ and well over 200bs/ft. That engine would benefit from an intake I wanted to build... As I've pretty well decided to not travel the T4 route that will not happen. Modern EV14 Injectors pointed at valves in a short IDF base manifold, with proper taper, and modular. You could run IDF style throttle bodies OR add individual runners to a central plenum feed by a single electronic throttle body. Everything with proper taper and bell mouthed in the plenum... With sequential 1000 cc injectors the long design should improve low end torque to approx. 4500rpm by 10% or better... This will not add overall HP; it will add torque and improve responsiveness of the car. That would use the area you have the compressor in now. I believe I have a side mount baby Sanden solution. |
|
|
|
| friethmiller |
Jan 1 2025, 03:25 PM
Post
#24
|
|
Senior Member Group: Members Posts: 751 Joined: 10-February 19 From: Austin, TX Member No.: 22,863 Region Association: Southwest Region |
Interesting, I'll take a look here in a bit. I'm currently welding on the LE in the backyard.
Rick, in the interest of time and money, I'm going to stick with my dual 44 IDFs and my 1-5/8" Tangerine Exhaust. I'm thinking that should be sufficient to feed/exhaust this engine. Here's some pics of the pistons. Definitely JE Forged pistons with 22mm wrist pins. Here's some pics: Note: the weird spider look on some of the piston came from the ultrasonic cleaner. 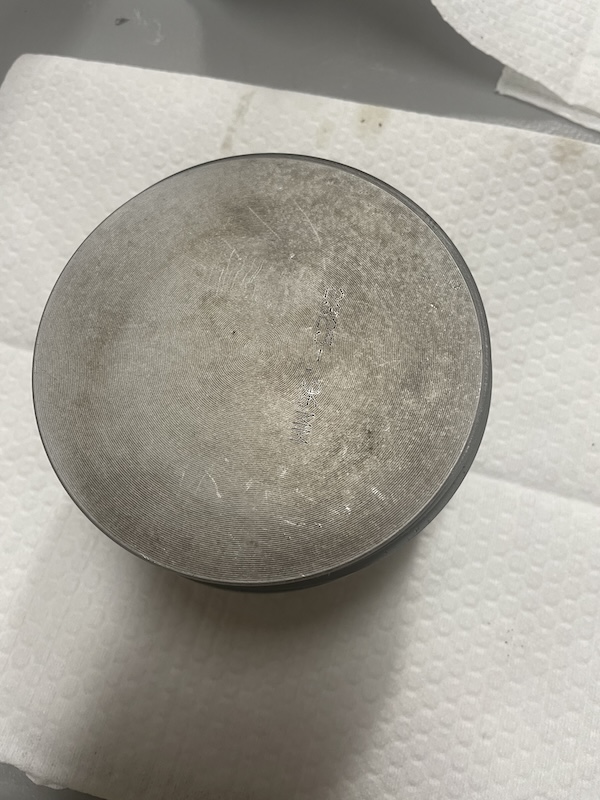 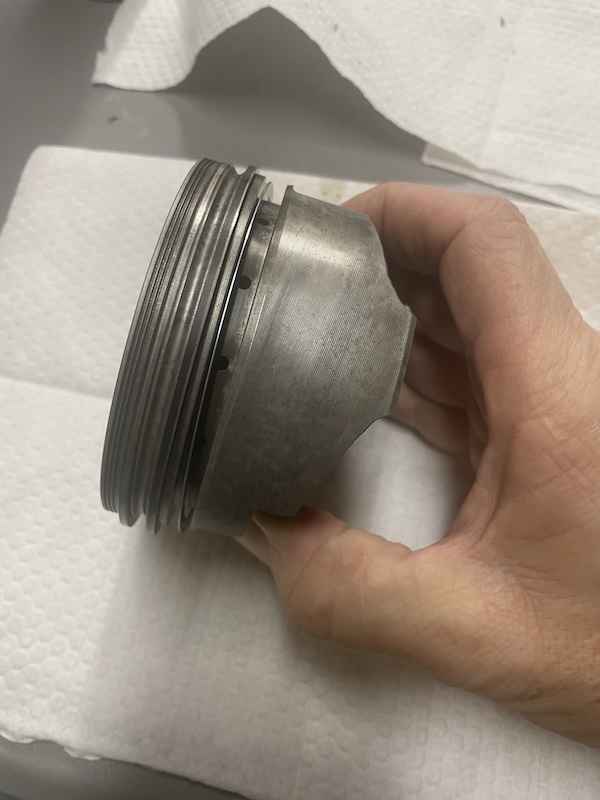 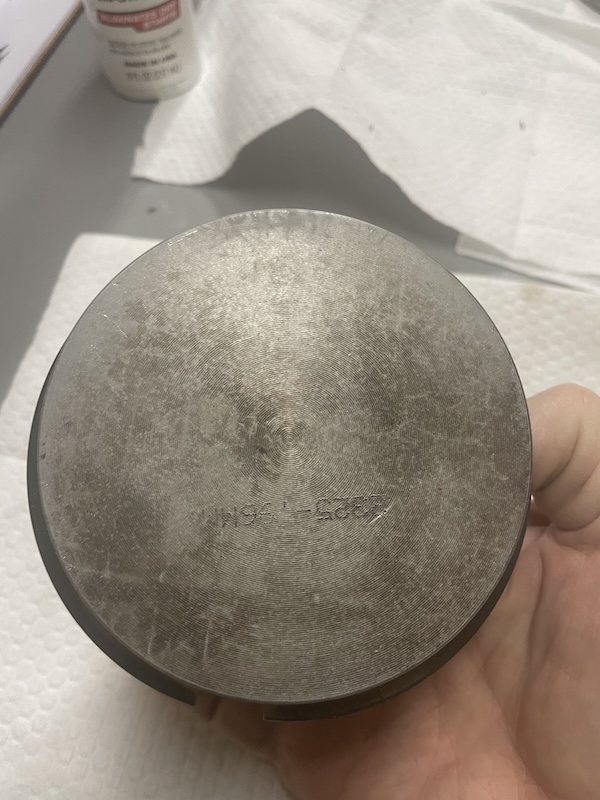 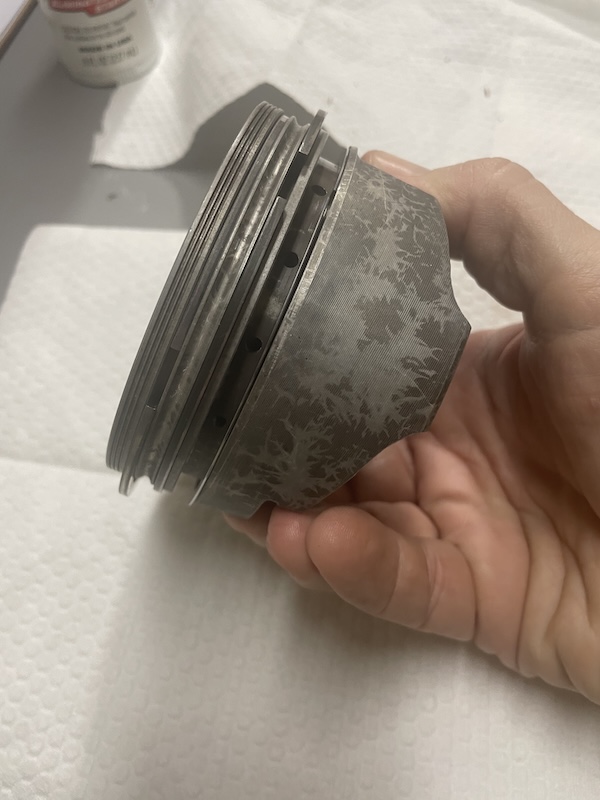 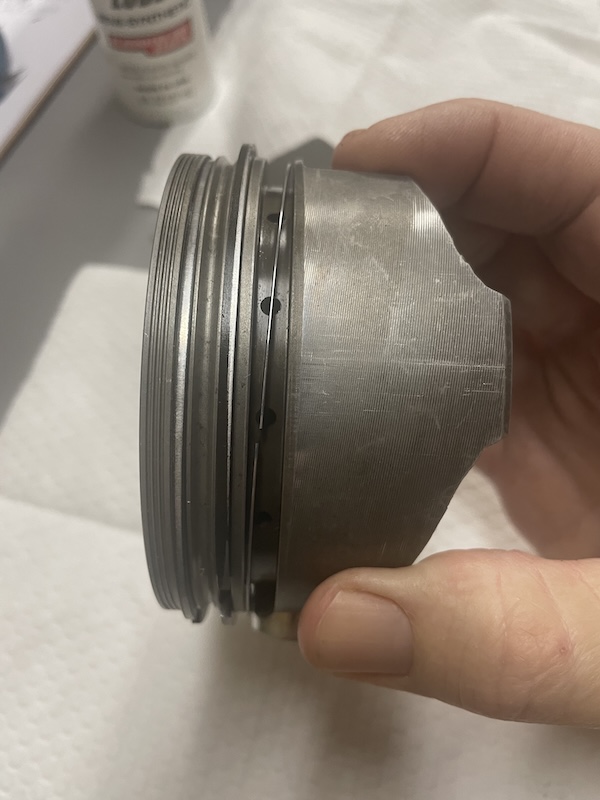 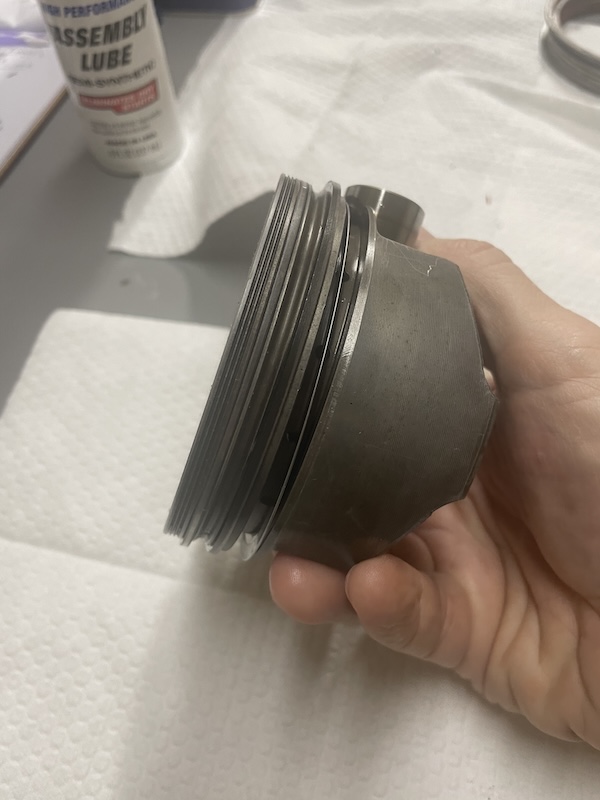 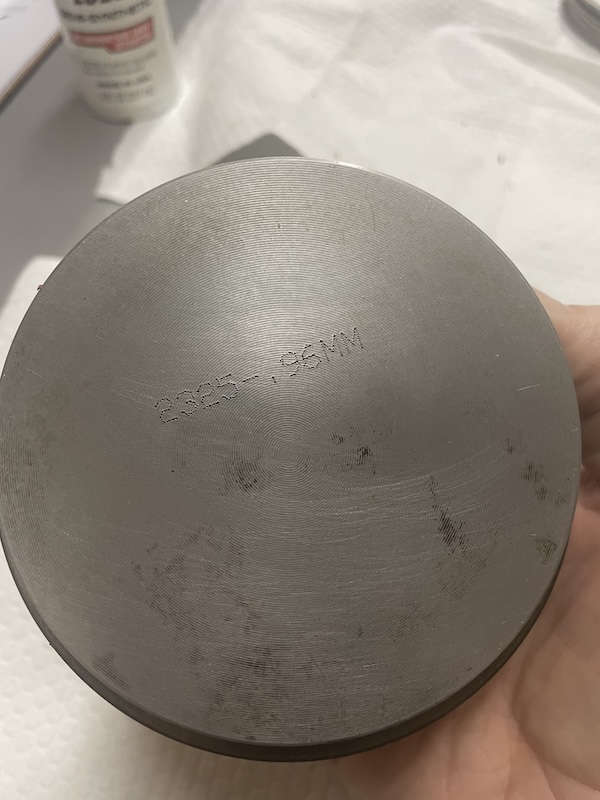 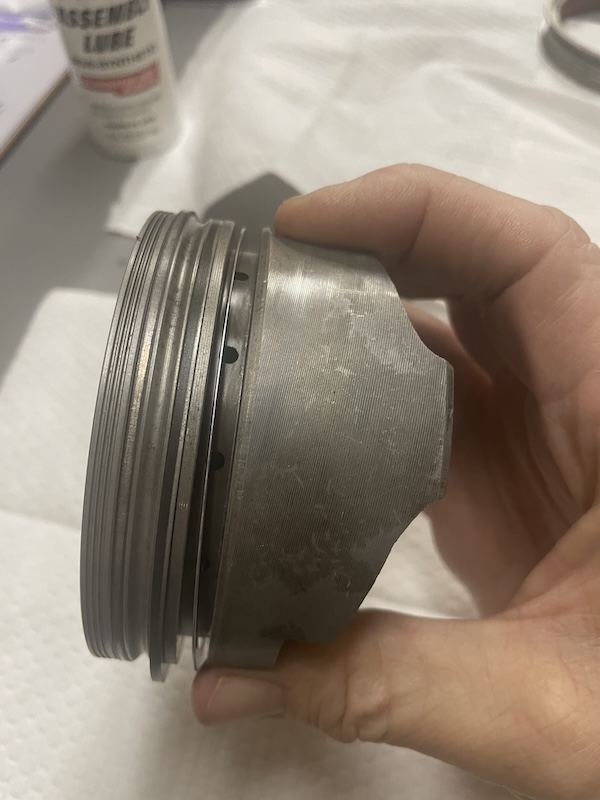 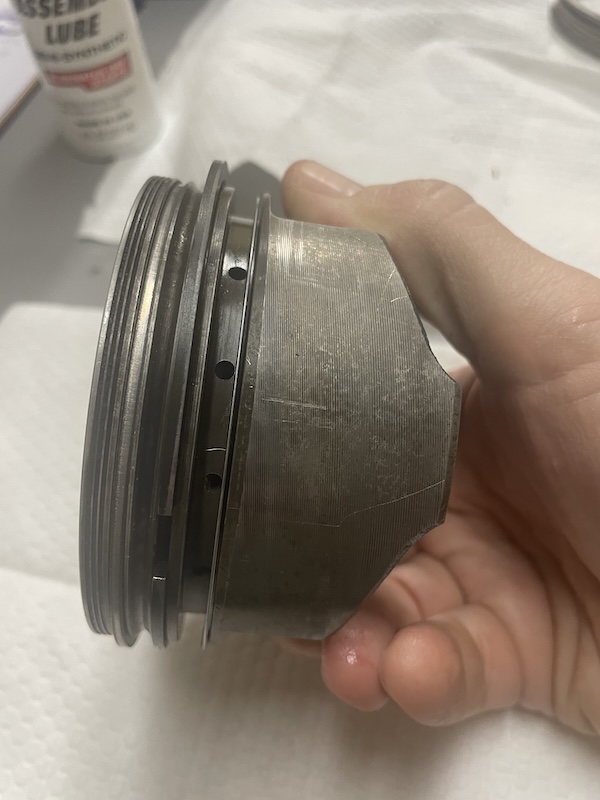 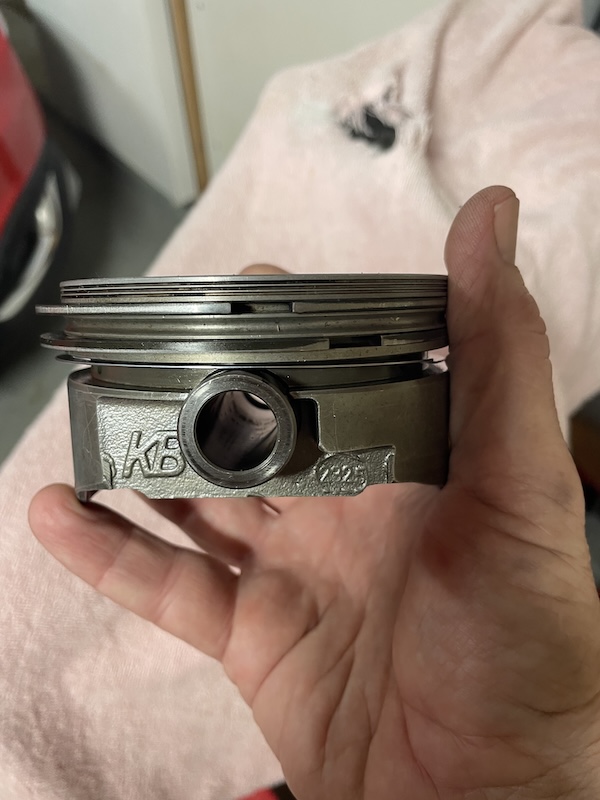 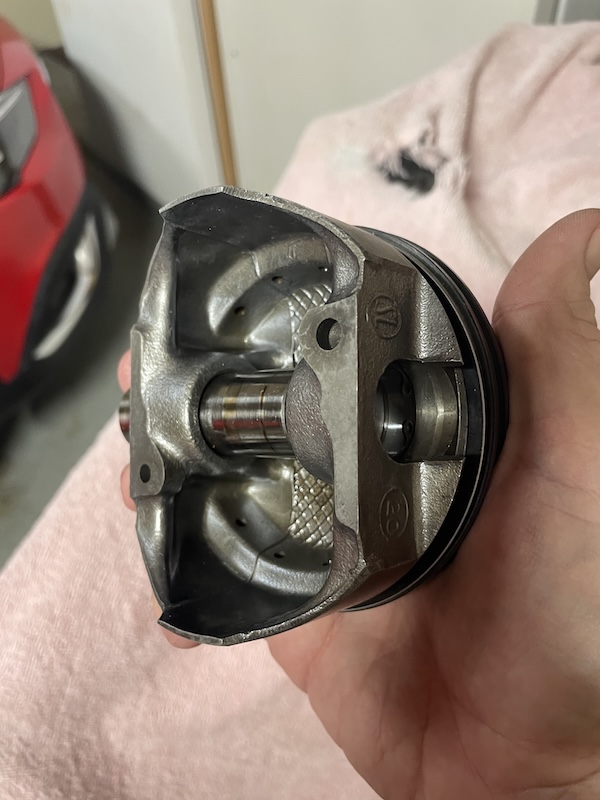 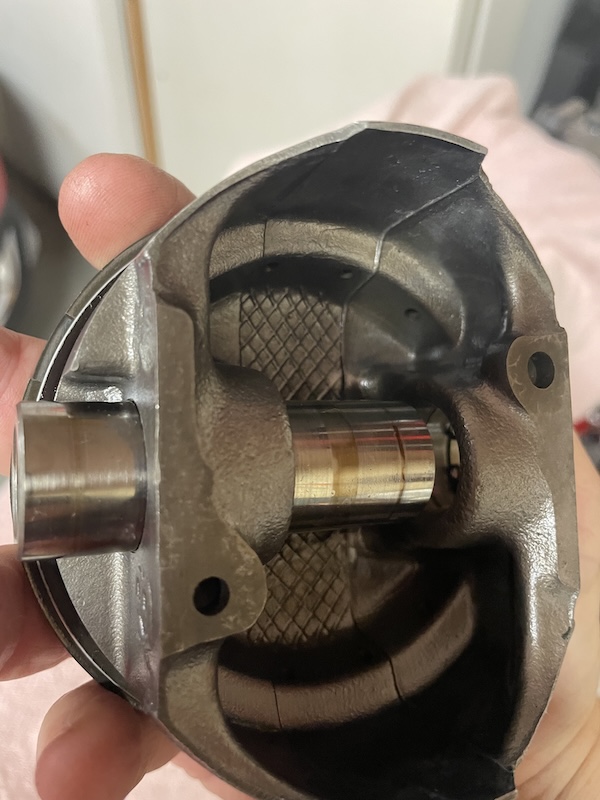 Attached image(s) 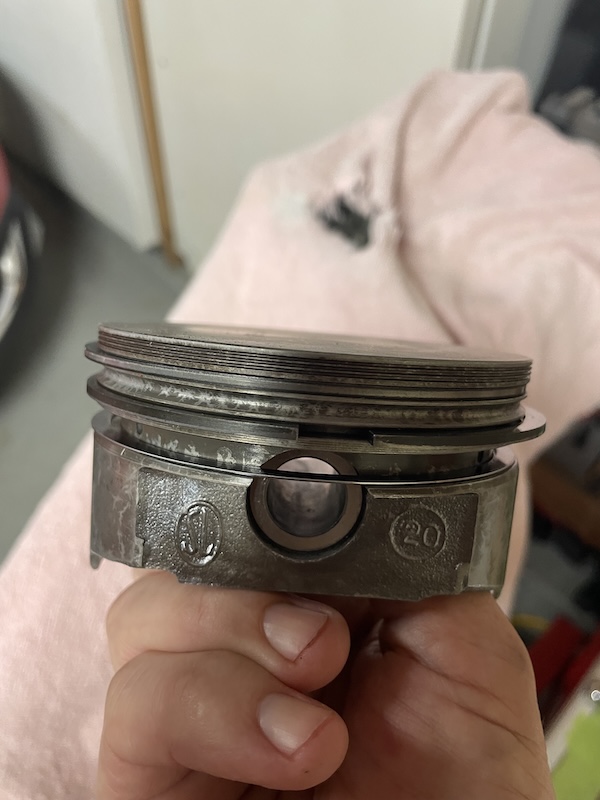
|
|
|
|
| technicalninja |
Jan 1 2025, 03:42 PM
Post
#25
|
|
Advanced Member Group: Members Posts: 2,377 Joined: 31-January 23 From: Granbury Texas Member No.: 27,135 Region Association: Southwest Region |
Flat top 96mm 82 stroke. 593.53 CC swept volume. This is a 2374 cc displacement.
With stock 2.0l 60cc chambers and 1mm (.040) deck at 7.2 ccs+1.0cc ring land =68.2 cc clearance volume. Swept/clearance +1 = comp ratio: 9.7/1 You're HOT! The chambers almost look like some welding may have been done... Have you CCd the chambers? That would one of the first things I did... And, I just "gave" you 17 ccs of displacement for free! Who came up with 2357? I don't think I'm screwing up the math! It's NOT rocket science... (IMG:style_emoticons/default/ninja.gif) |
|
|
|
| technicalninja |
Jan 1 2025, 04:03 PM
Post
#26
|
|
Advanced Member Group: Members Posts: 2,377 Joined: 31-January 23 From: Granbury Texas Member No.: 27,135 Region Association: Southwest Region |
Those ARE Keith Black "silverlines".
That is a hyper-eutectic cast piston. I was planning on using those on my build for various reasons, weight and cost being the big factors. Those pistons can be had here https://www.europeanmotorworks.com/pvw/034-...e+-+Keith+Black And I might know why those didn't work... That pin through control ring groove requires a roll pin, very small, installed through the skirt to block ONLY the lower scraper ring in the oil control ring "pack". If you don't have roll pins in the pistons it was doomed from the start. Those are CHEAP, LIGHT, and REMARKABLY strong for what they do. They were part of my recipe as hyper cast doesn't expand nearly as much as forged, you can run tighter bore clearances which limits how much the piston can rock allowing you to tighten up quench. I was going to ceramic coat those pistons. I even E-mailed him to get weights on the set up. They were stupid light compared to stock and one of the lightest pistons available anywhere. I WOULD NOT machine valve eyebrows in a cast piston!!!!!!! The use of those would limit the available travel I had for the valve. But they are NOT JEs... Edit: You can have different ways of supporting the control ring pack. 383 stroker long rod pistons have a gapless extra support ring below the standard control ring pack. You have to full support the lowest ring in some manner. Pinning it was new to me. Only time I've seen it pinned was VW stuff. The pin locked should work fine. |
|
|
|
| technicalninja |
Jan 1 2025, 04:14 PM
Post
#27
|
|
Advanced Member Group: Members Posts: 2,377 Joined: 31-January 23 From: Granbury Texas Member No.: 27,135 Region Association: Southwest Region |
I noticed it almost looks like those have a solid ring stuck on them in the control pack land.
That would be the VERY BEST way to support the control ring pack. |
|
|
|
| Jack Standz |
Jan 1 2025, 04:56 PM
Post
#28
|
|
Member Group: Members Posts: 445 Joined: 15-November 19 From: Happy Place (& surrounding area) Member No.: 23,644 Region Association: None |
Just some thoughts and first impressions.
Those are KB / Keith Black cast hypereutectic pistons. Good pistons, but they don't have the scraper ring pinned. Not good. In addition, it looks like you have poor ring sealing,, excessive blow by & an overly rich condition. Maybe part build issues and maybe part break-in procedures - but see above comment about the oil ring not being pinned.. In/Ex lift on type iv rockers is approximately 1.3:1 (some say IN slightly more and EX slightly less). Then + or - 5% when you cut the pushrods to the correct length and get geometry correct. But, you had other more concerning issues with this build. P toV clearance isn't usually an issue only @ TDC. For example on a 163/86b Webcam camshaft, the Pto V clearance gets closest around 8* ATDC (IIRC &YMMV). And, the valves might actually have clearance issues between the IN and EX valves (IIRC this cam can have this issue depending on how you set cam timing). So, be careful and mock-up and check everything. This cam may not be what you want for your application, but it does have longer duration on the EX, which is what has seemed to work better with the limitations of the type iv EX ports. Maybe take a look at the Webcam 86b/86c too. Cam thrust bearing problem seems like the cam was too tight (and possibly not aligned with each other) and should have been properly set-up during mock-up. You can take a glass plate and some valve grinding compound to clearance the thrust bearings. Seems to be a problem area too often, especially with double thrust bearings. Did not use Curil T or K on cylinder to case sealing. Not a fan of silicone here. Balance the entire rotating assembly, including clutch and PP. FI could bring better performance after properly designed and dialed-in. However, you'll be fine with the carbs and manifolds you have, if properly tuned. Good luck with getting your motor fixed! And Happy New Year too!! Attached thumbnail(s) 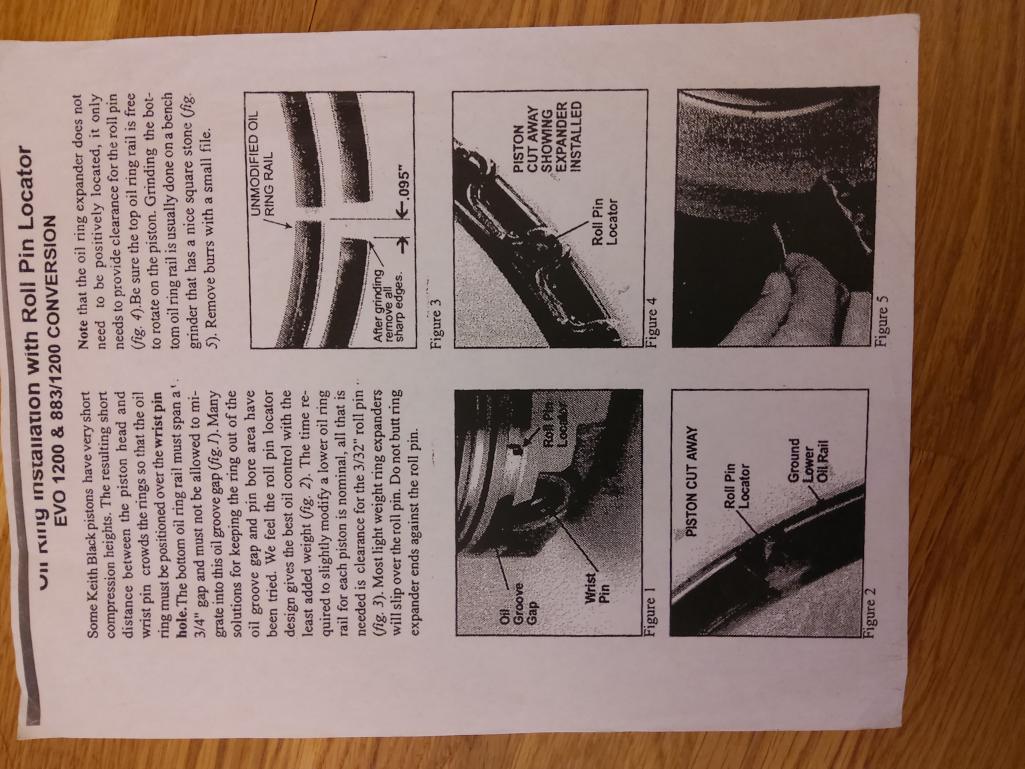
|
|
|
|
| Jack Standz |
Jan 1 2025, 05:20 PM
Post
#29
|
|
Member Group: Members Posts: 445 Joined: 15-November 19 From: Happy Place (& surrounding area) Member No.: 23,644 Region Association: None |
Since you're rebuilding the motor, let me support what technicalninja said about coatings. Yes, coat the piston crowns, head combustion chambers, valves, and ports. You can do it yourself.
Also, with an 82mm stroke and the connecting rod length, check clearances carefully during mock-up. And, if you get really ambitious, consider larger bore size nickies and JE pistons (IMG:style_emoticons/default/smile.gif) |
|
|
|
| friethmiller |
Jan 1 2025, 05:56 PM
Post
#30
|
|
Senior Member Group: Members Posts: 751 Joined: 10-February 19 From: Austin, TX Member No.: 22,863 Region Association: Southwest Region |
QUOTE(technicalninja @ Jan 1 2025, 04:03 PM)  Those ARE Keith Black "silverlines". That is a hyper-eutectic cast piston. I was planning on using those on my build for various reasons, weight and cost being the big factors. Those pistons can be had here https://www.europeanmotorworks.com/pvw/034-...e+-+Keith+Black And I might know why those didn't work... That pin through control ring groove requires a roll pin, very small, installed through the skirt to block ONLY the lower scraper ring in the oil control ring "pack". If you don't have roll pins in the pistons it was doomed from the start. Those are CHEAP, LIGHT, and REMARKABLY strong for what they do. They were part of my recipe as hyper cast doesn't expand nearly as much as forged, you can run tighter bore clearances which limits how much the piston can rock allowing you to tighten up quench. I was going to ceramic coat those pistons. I even E-mailed him to get weights on the set up. They were stupid light compared to stock and one of the lightest pistons available anywhere. I WOULD NOT machine valve eyebrows in a cast piston!!!!!!! The use of those would limit the available travel I had for the valve. But they are NOT JEs... Edit: You can have different ways of supporting the control ring pack. 383 stroker long rod pistons have a gapless extra support ring below the standard control ring pack. You have to full support the lowest ring in some manner. Pinning it was new to me. Only time I've seen it pinned was VW stuff. The pin locked should work fine. Ninja, I had it backwards. It was listed as a 2375cc. These are certainly KB pistons, not JEs. My dyslexia is in full force here today! Wow! I had no idea about pinning the oil ring pack. Both support rings top/bottom of the oil scrapper are the same. I certainly clocked them away from the wrist pin opening but nothing was pinned. Still not sure what pinning involves. Some of the pics are hard to tell. I assume this would need to be ordered special with the ring set or get the rings with the solid lower ring. |
|
|
|
| friethmiller |
Jan 1 2025, 06:08 PM
Post
#31
|
|
Senior Member Group: Members Posts: 751 Joined: 10-February 19 From: Austin, TX Member No.: 22,863 Region Association: Southwest Region |
QUOTE(Jack Standz @ Jan 1 2025, 04:56 PM) Just some thoughts and first impressions. Those are KB / Keith Black cast hypereutectic pistons. Good pistons, but they don't have the scraper ring pinned. Not good. In addition, it looks like you have poor ring sealing,, excessive blow by & an overly rich condition. Maybe part build issues and maybe part break-in procedures - but see above comment about the oil ring not being pinned.. In/Ex lift on type iv rockers is approximately 1.3:1 (some say IN slightly more and EX slightly less). Then + or - 5% when you cut the pushrods to the correct length and get geometry correct. But, you had other more concerning issues with this build. P toV clearance isn't usually an issue only @ TDC. For example on a 163/86b Webcam camshaft, the Pto V clearance gets closest around 8* ATDC (IIRC &YMMV). And, the valves might actually have clearance issues between the IN and EX valves (IIRC this cam can have this issue depending on how you set cam timing). So, be careful and mock-up and check everything. This cam may not be what you want for your application, but it does have longer duration on the EX, which is what has seemed to work better with the limitations of the type iv EX ports. Maybe take a look at the Webcam 86b/86c too. Cam thrust bearing problem seems like the cam was too tight (and possibly not aligned with each other) and should have been properly set-up during mock-up. You can take a glass plate and some valve grinding compound to clearance the thrust bearings. Seems to be a problem area too often, especially with double thrust bearings. Did not use Curil T or K on cylinder to case sealing. Not a fan of silicone here. Balance the entire rotating assembly, including clutch and PP. FI could bring better performance after properly designed and dialed-in. However, you'll be fine with the carbs and manifolds you have, if properly tuned. Good luck with getting your motor fixed! And Happy New Year too!! Excellent! Thanks for the info. I will look at these cam specs in a bit. I certainly remember lapping the cam's thrust bearings like you describe. And I had the cam moving freely without a ton of friction. I have Curil (forget which one) and will be using it this time around. I've been cleaning out silcone for days and I didn't really use that much. You should have seen how much the technician at Fat Performance used. Yes, I balanced the crank and rods but not with the flywheel & clutch. This time around, I will. |
|
|
|
| friethmiller |
Jan 1 2025, 06:20 PM
Post
#32
|
|
Senior Member Group: Members Posts: 751 Joined: 10-February 19 From: Austin, TX Member No.: 22,863 Region Association: Southwest Region |
9.7:1 Compression Ratio. Damn! That is hot!
Ok, I'm up for the need to get things coated. I'll research this. If I could do this myself that would be bad-ass! Sounds like it might be similar to powder-coating. Could certainly use the oven for both - win-win (IMG:style_emoticons/default/biggrin.gif) @technicalninja - I did buy a Burette-style 110cc kit from Summit. |
|
|
|
| technicalninja |
Jan 1 2025, 07:25 PM
Post
#33
|
|
Advanced Member Group: Members Posts: 2,377 Joined: 31-January 23 From: Granbury Texas Member No.: 27,135 Region Association: Southwest Region |
Intake and exhaust are fine, should support deep into the 150hp range.
Minimum of a 123 dist IMO. Next info needed is deck height, verify stroke. Assemble case with crank/rods only. main bolts only. OVER grease all of the bearings. We WANT the crank to be hydraulicly centered. Just past snug for tightness on rod bolts/mains. Say 10-15 lbs. Pistons with either no rings or top compression ring only (more important on forged pistons, helps center piston in bore). Clean registers, base of jugs and top. Install jugs. Come up with a way to bolt jugs down without the heads. Lightly snug jugs into case. Check deck height and total stroke. It is possible to intentionally place piston down the bore a bit by design. You can easily reduce compression ratio this way. You screw "power" however. I HOPE your pistons are close to the top! Make it easier to achieve 10/1. I LIKE between 9.5 to 10 for this application. This much displacement and compression ratio demand more duration and overlap than a 2055. You will NEED a bigger cam! I would mockup the engine and verify the above. CC the cylinder heads (got tips on this too as well as checking the valve job). Before I did ANYTHING else. I wouldn't even be looking at parts yet. You are welcome to come up and I'll help you go through it. I don't have the correct circle in plexi yet. I can probably help via keyboard as well. The DIY ceramic coating is EXACTLY like powder coating with one exception... No funky ass electronic charging sprayer! Coating does require the parts be clean. In many cases it's best to start with NEW parts as any oil seeped into the surface will degrade the coating. If you clean it up medically clean, then cook it in the oven multiple times you can clean stuff up. It makes an oven "not suitable for food" so sacrificial. An oven removed for a remodel will work fine. Most of the time you can find these cheap or free on Craigslist. |
|
|
|
| technicalninja |
Jan 1 2025, 07:33 PM
Post
#34
|
|
Advanced Member Group: Members Posts: 2,377 Joined: 31-January 23 From: Granbury Texas Member No.: 27,135 Region Association: Southwest Region |
The pinning is not a big deal.
Needs to be done on a drill press but drop dead simple. Maybe someone can link a picture. Once you see it you will understand. Merely keeps the lower oil control ring from rotating. Even Raby himself stated this caught him as well on his first use of this piston. I'd only seen the SBC version before and those have a "gapless coil" ring similar to a rotolock pin retention ring. PIA to install! Prone to slice your fingers! I sort of like the baby roll pin solution but have not built one yet. EDIT: only install ONE of the circlips in the piston pins. Set them up so you can pull the jug almost off the piston and remove it. If you put the top ring back in for stability-I normally do as it makes it less likely to drop the piston out of the jug. I use the ring to stabilize it and make it "an assembly". |
|
|
|
| friethmiller |
Jan 2 2025, 08:56 AM
Post
#35
|
|
Senior Member Group: Members Posts: 751 Joined: 10-February 19 From: Austin, TX Member No.: 22,863 Region Association: Southwest Region |
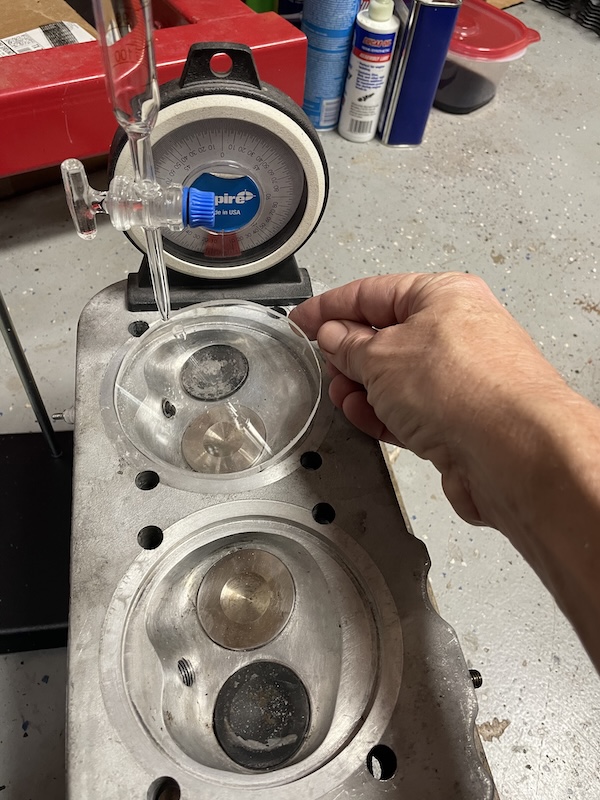
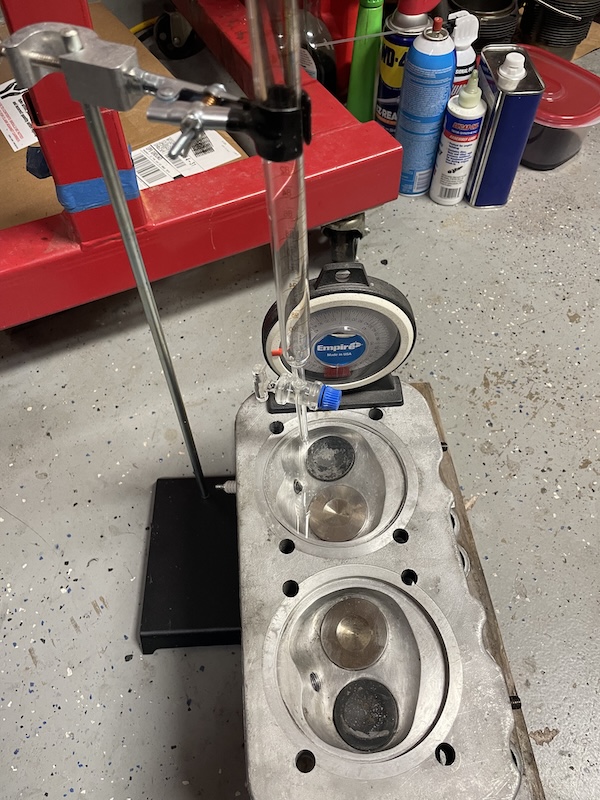
Going to cc the heads first. I measured the ID of the cylinder register in the head and drew a 105mm circle on the square plexiglass. Cut it out with a jigsaw and sanded down the edges to get it to fit. Hopefully this will work! Instructions say to lightly grease the plexi where it interfaces with the head to create a seal. Plan to attempt this this evening. Here's some pics of the setup on the garage floor. Going to move this to a work bench and level the head before testing.
  |
|
|
|
| technicalninja |
Jan 2 2025, 09:23 AM
Post
#36
|
|
Advanced Member Group: Members Posts: 2,377 Joined: 31-January 23 From: Granbury Texas Member No.: 27,135 Region Association: Southwest Region |
The above looks good.
Easier to see the bubbles if the water is colored and easier to get rid of bubbles is the surface tension is reduced. Us antifreeze as the fluid. Drill two holes, one to fit the burette end tightly and one across the open part of the chamber. This second hole can be SMALL. It's for releasing air. Tilt assembly so little hole is high and get with it. I use my Smurf grease on the plate to chamber contact. Any grease will work. |
|
|
|
| technicalninja |
Jan 2 2025, 09:26 AM
Post
#37
|
|
Advanced Member Group: Members Posts: 2,377 Joined: 31-January 23 From: Granbury Texas Member No.: 27,135 Region Association: Southwest Region |
|
|
|
|
| Jack Standz |
Jan 2 2025, 09:29 AM
Post
#38
|
|
Member Group: Members Posts: 445 Joined: 15-November 19 From: Happy Place (& surrounding area) Member No.: 23,644 Region Association: None |
If/when you get around to ceracoating things, as technicalninja says, things need to be clean. And even new parts need to get a good "grip" on the parts. For example, mask off the piston (except for the crown) and hit it with a media (like aluminum oxide in a smaller grit). Then use a small spray gun or maybe an airbrush (use what you have) to apply the coating before you bake it.
About that lower oil scraper ring that is in the piston pin area. My above post has a photo of how it's pinned to prevent it from rotating into the piston pin area. However, maybe someone else knows if a gapless/total seal type ring can be used instead of the pin? Maybe give Keith Black a call about what to use in that lower ring groove? |
|
|
|
| friethmiller |
Jan 2 2025, 09:44 AM
Post
#39
|
|
Senior Member Group: Members Posts: 751 Joined: 10-February 19 From: Austin, TX Member No.: 22,863 Region Association: Southwest Region |
QUOTE(technicalninja @ Jan 2 2025, 09:26 AM) What? You mean you don't like my two head bolts stacked on a washer technique. (IMG:style_emoticons/default/lol-2.gif) |
|
|
|
| friethmiller |
Jan 2 2025, 09:46 AM
Post
#40
|
|
Senior Member Group: Members Posts: 751 Joined: 10-February 19 From: Austin, TX Member No.: 22,863 Region Association: Southwest Region |
QUOTE(Jack Standz @ Jan 2 2025, 09:29 AM) If/when you get around to ceracoating things, as technicalninja says, things need to be clean. And even new parts need to get a good "grip" on the parts. For example, mask off the piston (except for the crown) and hit it with a media (like aluminum oxide in a smaller grit). Then use a small spray gun or maybe an airbrush (use what you have) to apply the coating before you bake it. About that lower oil scraper ring that is in the piston pin area. My above post has a photo of how it's pinned to prevent it from rotating into the piston pin area. However, maybe someone else knows if a gapless/total seal type ring can be used instead of the pin? Maybe give Keith Black a call about what to use in that lower ring groove? (IMG:style_emoticons/default/sunglasses.gif) Sounds like "a clean" like what's needed for electroplating. I've done that. I spent 95% of my time cleaning and 5% actually plating. |
|
|
|
|
3 User(s) are reading this topic (3 Guests and 0 Anonymous Users)
0 Members:

|
Lo-Fi Version | Time is now: 5th February 2025 - 05:53 AM |
Invision Power Board
v9.1.4 © 2025 IPS, Inc.