|
|
|
Porsche, and the Porsche crest are registered trademarks of Dr. Ing. h.c. F. Porsche AG.
This site is not affiliated with Porsche in any way. Its only purpose is to provide an online forum for car enthusiasts. All other trademarks are property of their respective owners. |
|
|

  |

| Spoke |
 Jan 10 2025, 07:43 PM Jan 10 2025, 07:43 PM
Post
#21
|
|
Jerry  Group: Members Posts: 7,137 Joined: 29-October 04 From: Allentown, PA Member No.: 3,031 Region Association: None |
I had the same thing happen to every one of my studs. Didn't know that much about the way the bolts were held in and snapped every bolt.
I drilled out every bolt with a small drill, then larger and larger until I could slide a bolt all the way through. Temporarily I put a bolt through with a nut and washers through all Then added my own nuts welding 2 in series then welding to the mount. Attached image(s)  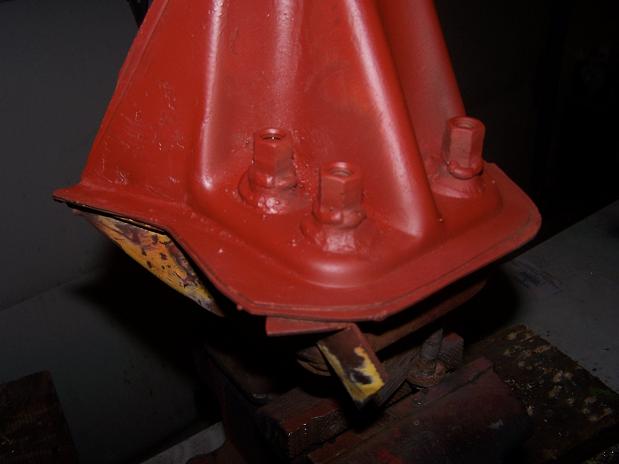
|
   |

 
|
| rhodyguy |
Jan 10 2025, 08:06 PM
Post
#22
|
|
Chimp Sanctuary NW. Check it out. Group: Members Posts: 22,235 Joined: 2-March 03 From: Orion's Bell. The BELL! Member No.: 378 Region Association: Galt's Gulch |
Aerokroil is a first rate penetrant. Spray generously and frequently. Be patient. Tapping the fasteners with a hammer can help break the rust bond. Be patient. Rather than reefing hard on stuff, use your torque wrench to break loose. Clicks? More penetrant. Be patient. I would consider finding a replacement trailing arm. Drill bits, taps and thread chasers get expensive for what might be a one time use.
|
|
|
|
| Superhawk996 |
Jan 10 2025, 08:08 PM
Post
#23
|
|
914 Guru Group: Members Posts: 6,814 Joined: 25-August 18 From: Woods of N. Idaho Member No.: 22,428 Region Association: Galt's Gulch |
QUOTE(rhodyguy @ Jan 10 2025, 10:06 PM)  Drill bits, taps and thread chasers get expensive for what might be a one time use. There is no such thing as one time use of left hand drill bits on a 914. (IMG:style_emoticons/default/laugh.gif) Tell the wife it’s an “investment”. (IMG:style_emoticons/default/av-943.gif) |
 |
|
| technicalninja |
Jan 10 2025, 08:14 PM
Post
#24
|
|
Advanced Member Group: Members Posts: 2,456 Joined: 31-January 23 From: Granbury Texas Member No.: 27,135 Region Association: Southwest Region |
My left-handed cobalt's are my most prized drill bits.
I've used them hundreds of times. I have yet to use them on a Porsche... Tools are seldom a "bad" purchase! Spoke's fix looks MEATY! I like! |
|
|
|
| PaIsa |
Mar 5 2025, 04:16 PM
Post
#25
|
|
Member Group: Members Posts: 104 Joined: 13-June 24 From: Quebec, Canada Member No.: 28,180 Region Association: Canada |
So following up on this.
Last week end, with the help of my son, we reinstalled most of what I took out of the car. When we installed the rear left trailing arm, the one with the 2 broken bolts on which we tapped 2 of the 3 bobbins for larger bolt, it became obvious that it would not give enough adjustment to properly align the wheel as pointed out by ChrisFoley. We had to try it! Our next move will be to drill through and use longer bolts. I will as well look at replacing the bobbins as a potential third option. I will make some measurement and prepare a drawing in order to get some bobbins machined. One question I would have is to know if someone can tell me how the bobbins are attached to the car frame (welding top and bottom, only top, only bottom??). Knowing how they are installed would help in knowing how to get them out. 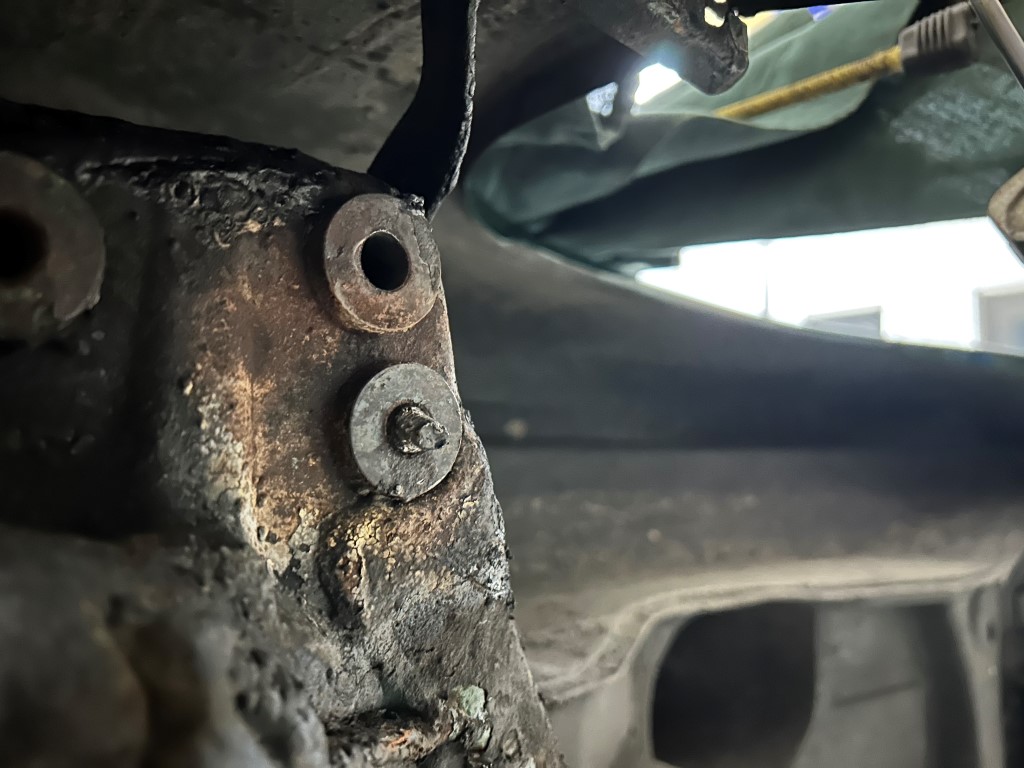 |
|
|
|
| Ishley |
Mar 5 2025, 08:34 PM
Post
#26
|
|
Member Group: Members Posts: 198 Joined: 4-October 21 From: Clarendon Hills Il Member No.: 25,957 Region Association: Upper MidWest |
|
|
|
|
| mgp4591 |
Mar 5 2025, 11:13 PM
Post
#27
|
|
914 Guru Group: Members Posts: 5,577 Joined: 1-August 12 From: Salt Lake City Ut Member No.: 14,748 Region Association: Intermountain Region |
QUOTE(JamesM @ Jan 7 2025, 07:29 PM) QUOTE(Superhawk996 @ Jan 7 2025, 06:46 PM) You are so (IMG:style_emoticons/default/sheeplove.gif) especially on those that broke off inside the bobbin. I don’t envy you. May God give you lots of courage and patience. Quit scaring him, its not that bad! (IMG:style_emoticons/default/tongue.gif) Annoying yes, end of the world, no. Im sure he has much bigger issues with his car, he just doesn't know about them yet. Pretty much what everyone else said though, soak the crap out of it, get a stud extraction kit and attempt to drill/extract. This can potentially be done from above or below. Worst case you totally destroy the threads the cylindrical threaded sleeve is just held in with a few welds and can be replaced. Tangerine used to sell these new, not sure if they still do. Even if you destroy just some of the threads its fully threaded longer than the bolt so you can get a slightly longer bolt to grab more threads. Once you get the bolts out though chase all the threads with a tap and get new bolts, those all look pretty hammered. James, is it possible to drill out the bolts slightly oversize, then re-tap the cylinders to accept a larger bolt? It would'nt be very big and the thickness of the inserts would'nt be compromised. Just a thought...could save a lot of work. Chris Foley, you're welcome to offer any information that would help. |
|
|
|
| Superhawk996 |
Mar 5 2025, 11:22 PM
Post
#28
|
|
914 Guru Group: Members Posts: 6,814 Joined: 25-August 18 From: Woods of N. Idaho Member No.: 22,428 Region Association: Galt's Gulch |
QUOTE(PaIsa @ Mar 5 2025, 06:16 PM) One question I would have is to know if someone can tell me how the bobbins are attached to the car frame (welding top and bottom, only top, only bottom??). Knowing how they are installed would help in knowing how to get them out. QUOTE(Superhawk996 @ Jan 7 2025, 09:46 PM) Details in my build thread if you want a view to the internals of what you’re dealing with. Page 3, post #46. Link to my build in my signature. |
|
|
|
| peteyd |
Mar 7 2025, 08:02 AM
Post
#29
|
|
Senior Member Group: Members Posts: 736 Joined: 27-March 08 From: Elora, Ontario, Canada Member No.: 8,858 Region Association: Canada |
We also have these available for left and right. I also turn the studs, so they could be special ordered from us as well.
https://www.restoration-design.com/store/product/PP318IR Pete |
|
|
|
| 930cabman |
Mar 7 2025, 04:11 PM
Post
#30
|
|
Advanced Member Group: Members Posts: 3,966 Joined: 12-November 20 From: Buffalo Member No.: 24,877 Region Association: North East States |
QUOTE(peteyd @ Mar 7 2025, 09:02 AM) We also have these available for left and right. I also turn the studs, so they could be special ordered from us as well. https://www.restoration-design.com/store/product/PP318IR Pete Once again, our valuable neighbors to the North come through, left and right Thanks guys (IMG:style_emoticons/default/beerchug.gif) |
|
|
|
| PaIsa |
Mar 10 2025, 10:37 AM
Post
#31
|
|
Member Group: Members Posts: 104 Joined: 13-June 24 From: Quebec, Canada Member No.: 28,180 Region Association: Canada |
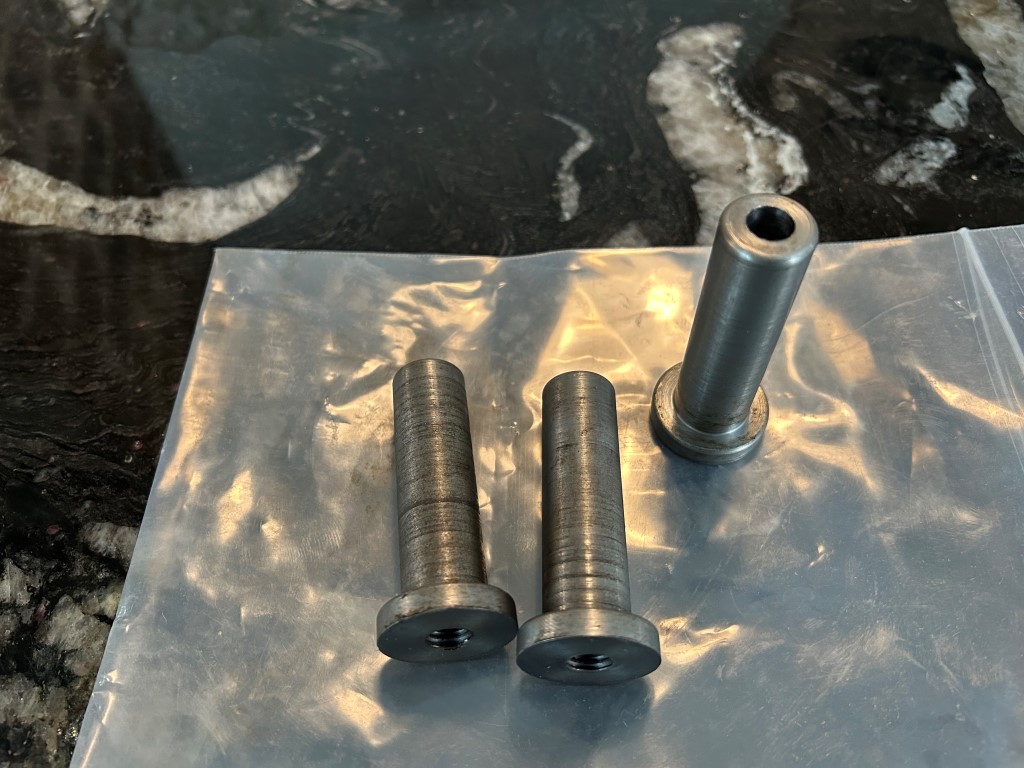
Replacement bobbins already delivered. Will work on getting the ones to replace out of the car this week end and then find a good welder to get the new ones welded in place.
 |
|
|
|
| Ishley |
Mar 11 2025, 09:15 PM
Post
#32
|
|
Member Group: Members Posts: 198 Joined: 4-October 21 From: Clarendon Hills Il Member No.: 25,957 Region Association: Upper MidWest |
You might consider making some sort of a jig to realign everything back to the original position before you cut the old ones out. Just a thought.
|
|
|
|
|
4 User(s) are reading this topic (4 Guests and 0 Anonymous Users)
0 Members:

|
Lo-Fi Version | Time is now: 12th March 2025 - 09:47 AM |
Invision Power Board
v9.1.4 © 2025 IPS, Inc.