|
|
|
Porsche, and the Porsche crest are registered trademarks of Dr. Ing. h.c. F. Porsche AG.
This site is not affiliated with Porsche in any way. Its only purpose is to provide an online forum for car enthusiasts. All other trademarks are property of their respective owners. |
|
|

  |

| zoomCat |
 Mar 7 2025, 12:32 PM Mar 7 2025, 12:32 PM
Post
#1
|
|
Member  Group: Members Posts: 199 Joined: 13-August 04 From: Cincinnati, OH Member No.: 2,526 Region Association: None |
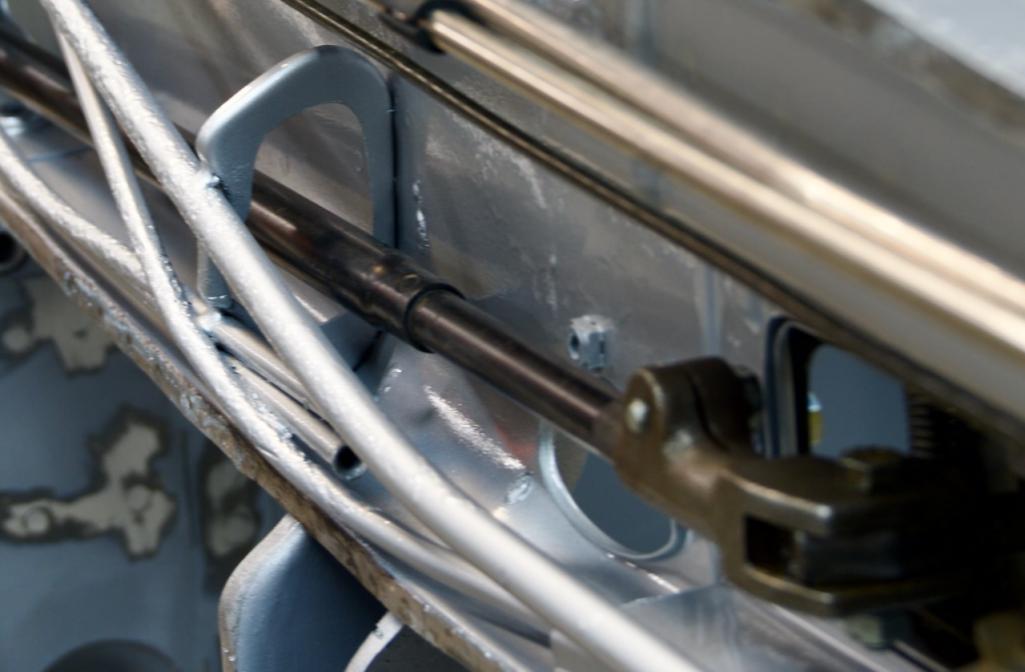
Here's a view of the tunnel from the bottom with no floor pans:
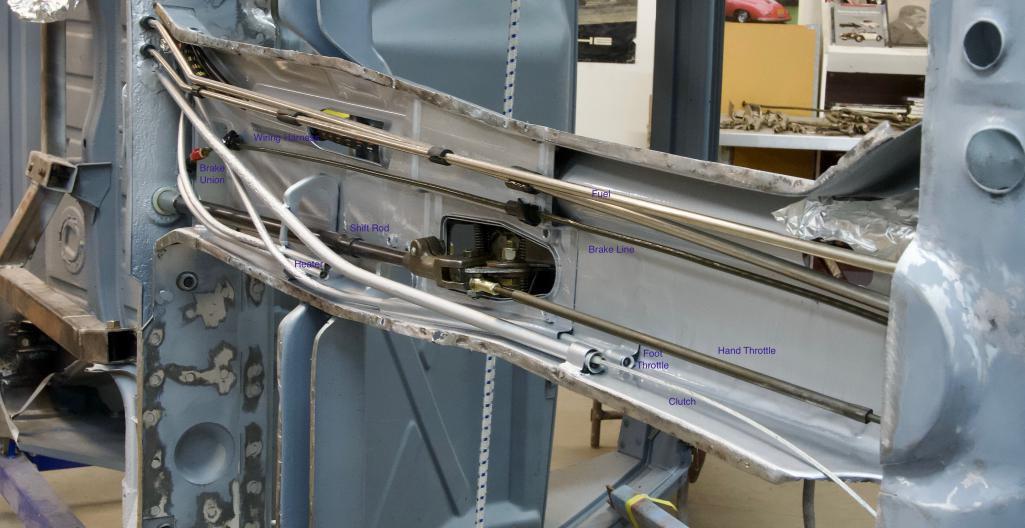 This is an early car with a side shift conversion, stainless fuel lines, and the 914/6 hand throttle. The speedometer, throttle, and heater cables have not been installed. I'll be adding a few more photos, but I'm putting these up with high resolution and only get one per post. |
   |

 
|
| zoomCat |
Mar 7 2025, 12:44 PM
Post
#2
|
|
Member Group: Members Posts: 199 Joined: 13-August 04 From: Cincinnati, OH Member No.: 2,526 Region Association: None |
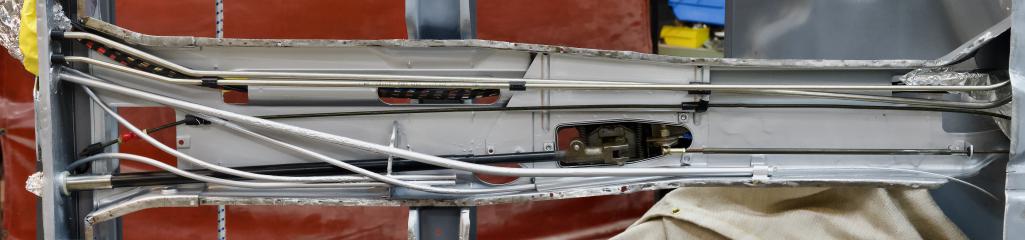
Another view:
 |
|
|
|
| NARP74 |
Mar 7 2025, 12:48 PM
Post
#3
|
|
Senior Member Group: Members Posts: 1,357 Joined: 29-July 20 From: Colorado, USA, Earth Member No.: 24,549 Region Association: Rocky Mountains |
If only all that was accessible so you didn't have to build a ship in a bottle to work on it.
Thank you. |
|
|
|
| zoomCat |
Mar 7 2025, 12:50 PM
Post
#4
|
|
Member Group: Members Posts: 199 Joined: 13-August 04 From: Cincinnati, OH Member No.: 2,526 Region Association: None |
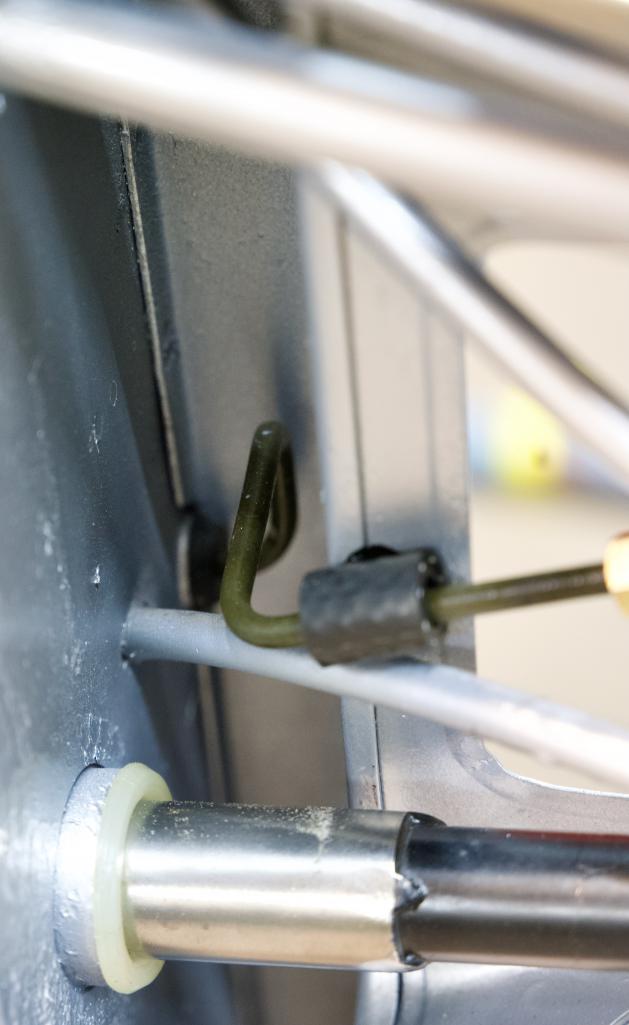
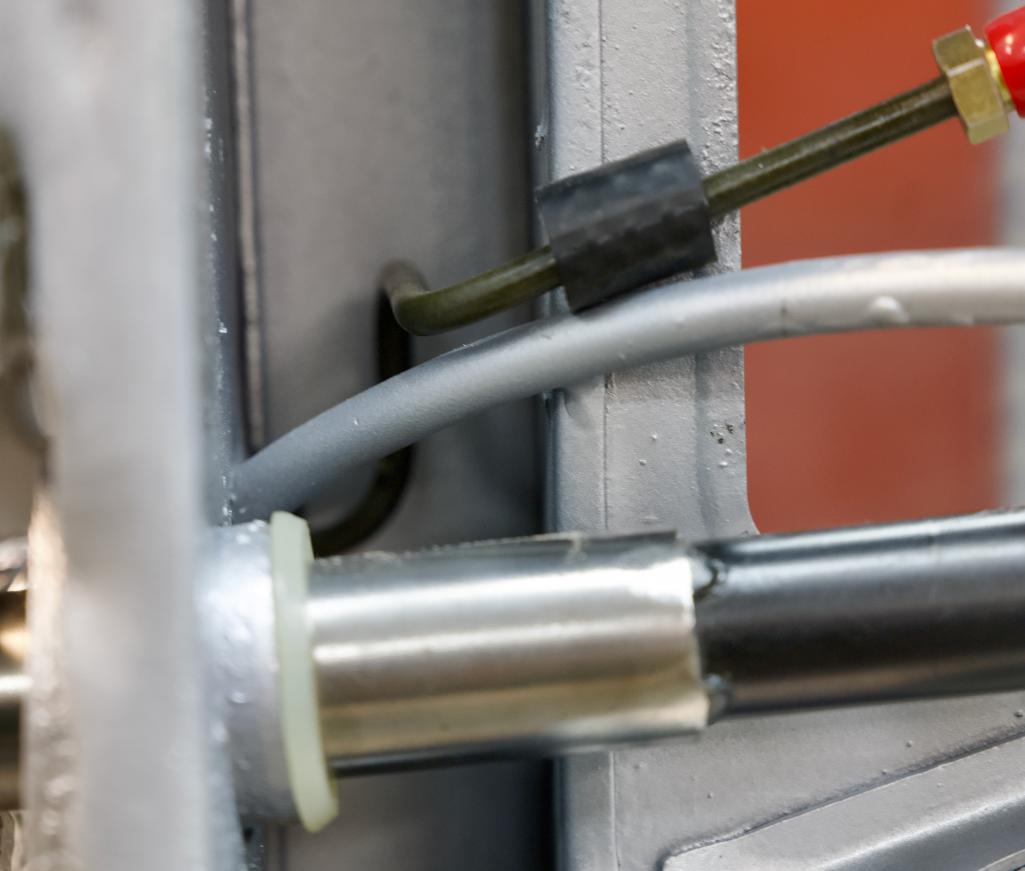
A better shot of the hand throttle:
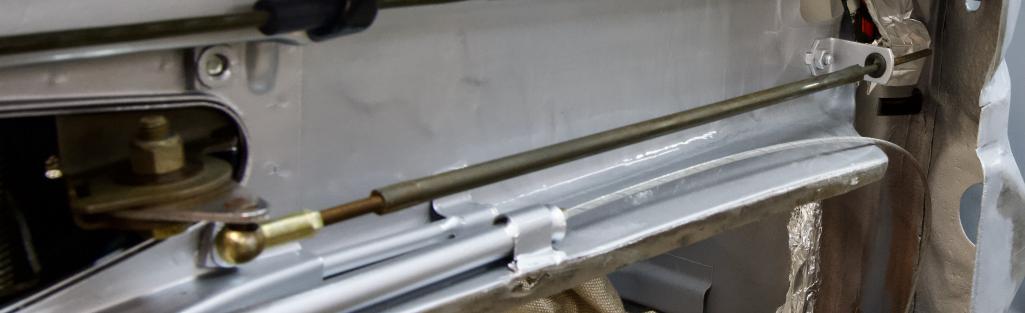 And the business end: 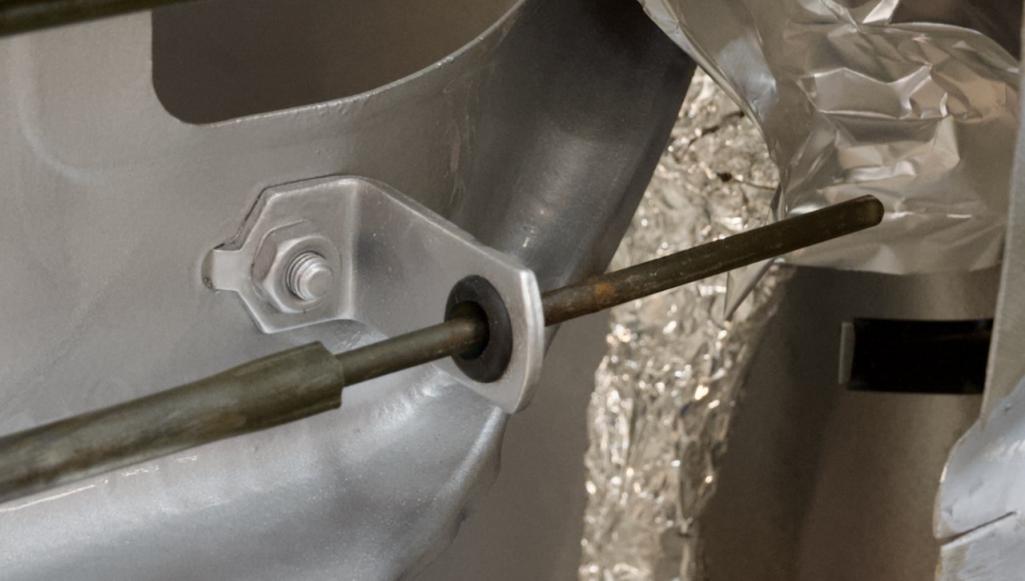 Note that the bushing and nubbin on the end are missing here. I have put in a simple grommet to keep it from rattling around, but I'm looking for the real thing or a suitable substitute. Aase has NOS nubbins, yay! |
|
|
|
| jc73-914 |
Mar 7 2025, 12:54 PM
Post
#5
|
|
Newbie Group: Members Posts: 37 Joined: 28-May 15 From: Richmond, B.C. Canada Member No.: 18,769 Region Association: Canada |
cool ... thx for posting
|
|
|
|
| zoomCat |
Mar 7 2025, 01:01 PM
Post
#6
|
|
Member Group: Members Posts: 199 Joined: 13-August 04 From: Cincinnati, OH Member No.: 2,526 Region Association: None |
This shows the clearance for the shift rod through the support. Early cars such as this had a circular hole, since the tail shifters had no lateral motion of the rod, only linear motion along the length and rotation. The hole was widened to accommodate the side shift conversion. This is roughly where neutral would be:
 And here is where it would be for 1st/Reverse. It may not be apparent from this angle, but the rod would definitely collide with the support if it hadn't been modified. 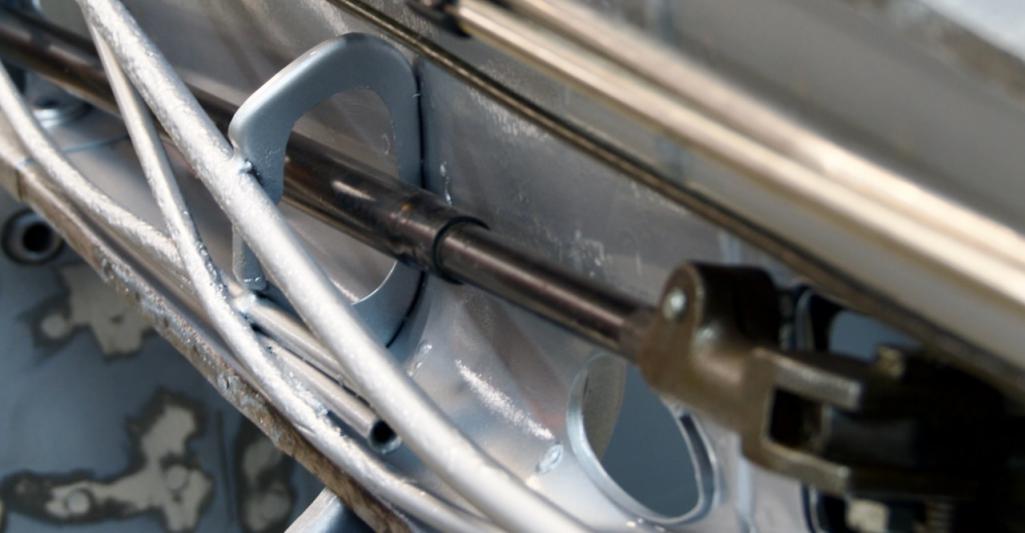 |
|
|
|
| Root_Werks |
Mar 7 2025, 01:16 PM
Post
#7
|
|
Village Idiot Group: Members Posts: 8,621 Joined: 25-May 04 From: About 5NM from Canada Member No.: 2,105 Region Association: Pacific Northwest |
So clean!
Looks great and yes, thank you for posting the pictures. Neat to see the inside of the tunnel like that. |
|
|
|
| zoomCat |
Mar 7 2025, 01:17 PM
Post
#8
|
|
Member Group: Members Posts: 199 Joined: 13-August 04 From: Cincinnati, OH Member No.: 2,526 Region Association: None |
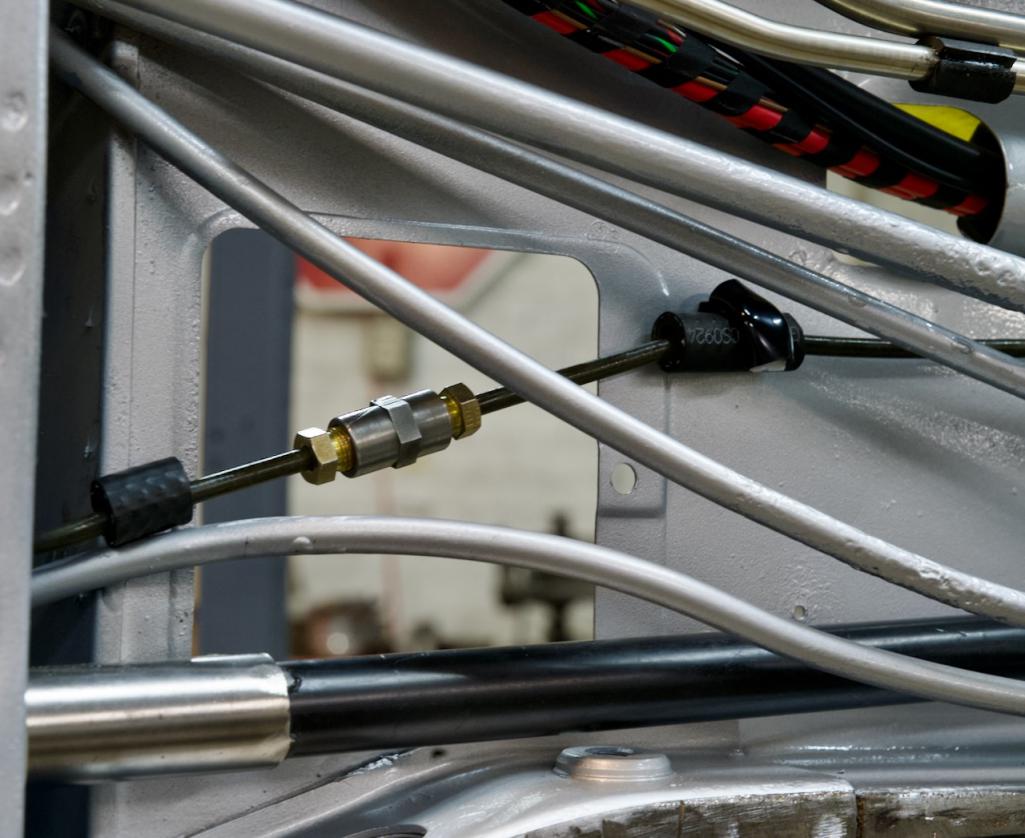
The small brake line at the back is a bit convoluted, it has runs from the firewall to the access port in the tunnel where is joined by a union with the long line that runs the rest of the length to the front:
 |
|
|
|
| zoomCat |
Mar 7 2025, 01:18 PM
Post
#9
|
|
Member Group: Members Posts: 199 Joined: 13-August 04 From: Cincinnati, OH Member No.: 2,526 Region Association: None |
Another angle on the brake line:
 |
|
|
|
| zoomCat |
Mar 7 2025, 01:27 PM
Post
#10
|
|
Member Group: Members Posts: 199 Joined: 13-August 04 From: Cincinnati, OH Member No.: 2,526 Region Association: None |
And the brake union, normally accessible from the access port above it (behind in this picture). This also shows why long seat belt bolts interfere with the shifter.
 |
|
|
|
| technicalninja |
Mar 7 2025, 01:33 PM
Post
#11
|
|
Advanced Member Group: Members Posts: 2,474 Joined: 31-January 23 From: Granbury Texas Member No.: 27,135 Region Association: Southwest Region |
Nicely done!
The "attention to detail" is excellent. And you've made us envious of your super sanitary tunnel... (IMG:style_emoticons/default/first.gif) |
|
|
|
| ctc911ctc |
Mar 7 2025, 01:33 PM
Post
#12
|
|
Senior Member Group: Members Posts: 1,079 Joined: 9-June 18 From: boston Member No.: 22,206 Region Association: North East States |
Really like the rubber bumpers on the stainless fuel lines. Great idea. Not sure if I can do the same with the fuel lines that I purchased as a replacement in my 70, hmmm
|
 |
|
| zoomCat |
Mar 7 2025, 01:37 PM
Post
#13
|
|
Member Group: Members Posts: 199 Joined: 13-August 04 From: Cincinnati, OH Member No.: 2,526 Region Association: None |
I took a bunch of pictures from different angles, at fairly high resolution. If anybody has any specific requests I can try to get it out there.
|
|
|
|
| mlindner |
Mar 7 2025, 02:14 PM
Post
#14
|
|
Senior Member Group: Members Posts: 1,648 Joined: 11-November 11 From: Merrimac, WI Member No.: 13,770 Region Association: Upper MidWest |
Very nice Guy, that tunnel is a busy place. Thanks for sharing.
|
|
|
|
| ClayPerrine |
Mar 7 2025, 03:50 PM
Post
#15
|
|
Life's been good to me so far..... Group: Admin Posts: 16,219 Joined: 11-September 03 From: Hurst, TX. Member No.: 1,143 Region Association: NineFourteenerVille |
QUOTE(zoomCat @ Mar 7 2025, 12:50 PM)  A better shot of the hand throttle: And the business end: Note that the bushing and nubbin on the end are missing here. I have put in a simple grommet to keep it from rattling around, but I'm looking for the real thing or a suitable substitute. Aase has NOS nubbins, yay! For the end of the hand throttle rod you can use a vacuum cap. It works well. |
|
|
|
| worn |
Mar 7 2025, 07:36 PM
Post
#16
|
|
Winner of the Utah Twisted Joint Award Group: Members Posts: 3,466 Joined: 3-June 11 From: Madison, WI Member No.: 13,152 Region Association: Upper MidWest |
QUOTE(technicalninja @ Mar 7 2025, 11:33 AM) Nicely done! The "attention to detail" is excellent. And you've made us envious of your super sanitary tunnel... (IMG:style_emoticons/default/first.gif) No kidding. Abject envy. |
|
|
|
| Montreal914 |
Mar 8 2025, 12:01 AM
Post
#17
|
|
Senior Member Group: Members Posts: 1,795 Joined: 8-August 10 From: Claremont, CA Member No.: 12,023 Region Association: Southern California |
Thank you for sharing this beautiful work!
Excellent documentation and very valuable pictures. Been studying the inside tunnel and capturing all the available web pictures (most of which come from here… obviously (IMG:style_emoticons/default/first.gif)). I will add those to my collection. Alway wondered how the side shift rod fitted in an early tunnel. Like the clearance for the lateral motion. Really nice work!!! (IMG:style_emoticons/default/pray.gif) |
|
|
|
| DennisV |
Mar 8 2025, 09:30 AM
Post
#18
|
|
Senior Member Group: Members Posts: 605 Joined: 8-August 20 From: Santa Rosa, CA Member No.: 24,575 Region Association: Northern California |
QUOTE(zoomCat @ Mar 7 2025, 10:50 AM) Note that the bushing and nubbin on the end are missing here. I have put in a simple grommet to keep it from rattling around, but I'm looking for the real thing or a suitable substitute. Aase has NOS nubbins, yay! Thanks for sharing these photos. They will be helpful to a lot of people. Regarding the "nub". I looked at NOS when putting ours back together. Given how our original disintegrated, I wasn't confident NOS would survive long. If you run into trouble with it, I created a 3D model. |
|
|
|
| brant |
Mar 8 2025, 09:53 AM
Post
#19
|
|
914 Wizard Group: Members Posts: 11,924 Joined: 30-December 02 From: Colorado Member No.: 47 Region Association: Rocky Mountains |
Put mechanics wire into the tunnel before you install the bottom cover to pull the cables through the routing ….
Much easier to install the cables (throttle/clutch/speedo) when the time comes) by attaching to the wire to pull them |
|
|
|
| 930cabman |
Mar 8 2025, 09:56 AM
Post
#20
|
|
Advanced Member Group: Members Posts: 4,000 Joined: 12-November 20 From: Buffalo Member No.: 24,877 Region Association: North East States |
QUOTE(ClayPerrine @ Mar 7 2025, 04:50 PM) QUOTE(zoomCat @ Mar 7 2025, 12:50 PM) A better shot of the hand throttle: And the business end: Note that the bushing and nubbin on the end are missing here. I have put in a simple grommet to keep it from rattling around, but I'm looking for the real thing or a suitable substitute. Aase has NOS nubbins, yay! For the end of the hand throttle rod you can use a vacuum cap. It works well. great tip, I have not been 100% pleased with the kit I installed, partially because it's a tough area to access. I will try a rubber cap on the end and also some sort of "bushing" to minimize the sloppiness at the bracket/rod |
|
|
|
|
1 User(s) are reading this topic (1 Guests and 0 Anonymous Users)
0 Members:

|
Lo-Fi Version | Time is now: 1st April 2025 - 05:17 PM |
Invision Power Board
v9.1.4 © 2025 IPS, Inc.