|
|
|
Tuesday, 1 April 2025 |
|
Porsche, and the Porsche crest are registered trademarks of Dr. Ing. h.c. F. Porsche AG.
This site is not affiliated with Porsche in any way. Its only purpose is to provide an online forum for car enthusiasts. All other trademarks are property of their respective owners. |
|
|

  |


| didenpx |
 Mar 17 2025, 05:39 PM Mar 17 2025, 05:39 PM
Post
#1
|
|
Newbie  Group: Members Posts: 36 Joined: 1-September 23 From: Usa Member No.: 27,556 Region Association: North East States |
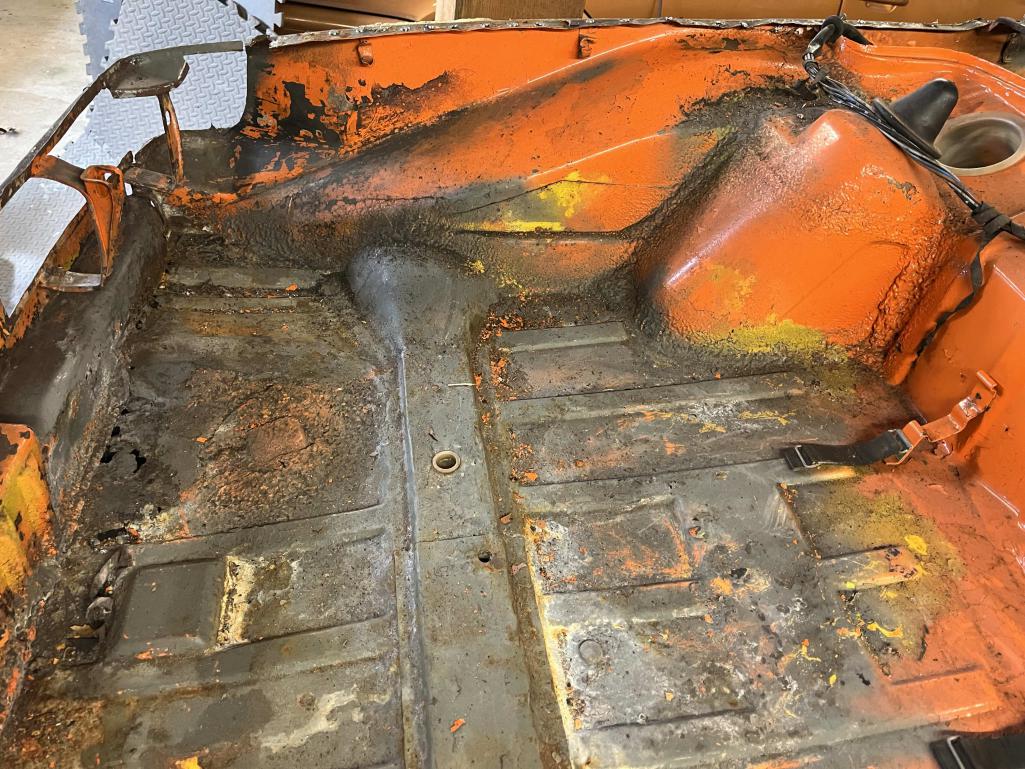
I'd appreciate advice on how to go about repairing some old collision damage from a rear LH impact that deformed the crumple zone. In the photo you may be able to make out a vertical crease that was previously straightened out just behind the rear strut and going from the bottom pinch seam up the top of the inner wheel well (maybe beyond that....still cleaning out the undercoating).
The evidence that I've found of the impact so far includes: -The rear quarter/rear of door gap was too tight (maybe 1-2mm throughout) -Area around the old crease is dented in several MM -There's a lot of subtle deformation (high and low spots) between between the old crease and continuing forward of the rear strut -There's some booger welding around the rear suspension console -There was some deformation of the top of the rear quarter above the creased area (subtle bumps that weren't visible but that you could feel) -The rear trunk lid was pushed forward, probably breaking the LH hinge pivot (was replaced by PO with a screw-in pivot point and fitted with gas struts to hold lid open) What I'm wondering: -How can I tell where the inner wheel well skin is/is not deformed? What's the proper profile in this area (straight, curved, etc)? -How should I deal with the deformation on the skin of the inner wheel well? Should I remove spot welds, cut it out, and replace it? Or could I get away with pulling out the low spots with a stud welder? -How can I tell if the impact messed up any of the structure between the inner wheel well skin and the interior of the trunk? What measurement points can I use to tell if that structure has shifted? -How can I measure to make sure the top of the inner wheel well panel where the rear quarter attaches is at the right height after repair? -How can I tell if the suspension console is properly located given the impact damage and evidence of booger welding there? -How the hell did I ever think I was going to get this car on the road by this Spring? |
   |

 
|
| didenpx |
Mar 17 2025, 05:56 PM
Post
#2
|
|
Newbie Group: Members Posts: 36 Joined: 1-September 23 From: Usa Member No.: 27,556 Region Association: North East States |
  |
|
|
|
| mate914 |
Mar 17 2025, 06:36 PM
Post
#3
|
|
Matt Group: Members Posts: 828 Joined: 27-February 09 From: Eagles mere, PA Member No.: 10,102 Region Association: North East States |
I see nothing stopping you from taking to alignment shop. Check alignments first. Change metal second. No 914 is perfect. Hand built baby.
Matt QUOTE(didenpx @ Mar 17 2025, 06:56 PM)  |
 |
|
| bkrantz |
Mar 17 2025, 06:55 PM
Post
#4
|
|
914 Guru Group: Members Posts: 8,311 Joined: 3-August 19 From: SW Colorado Member No.: 23,343 Region Association: Rocky Mountains |
Get the factory schematic that has all the spec measurements. Several copies have floated around on the forum. And then measure whatever is appropriate. You can also compare your left and right sides.
You can also get your car as level as possible on jack stands, and then use something like this to get first-order measurements of angles left and right. (Or get a tilt-meter app for your phone.) https://www.lowes.com/pd/Johnson-Level-Magn...9CO5g&gQT=1 |
|
|
|
| mate914 |
Mar 18 2025, 06:15 AM
Post
#5
|
|
Matt Group: Members Posts: 828 Joined: 27-February 09 From: Eagles mere, PA Member No.: 10,102 Region Association: North East States |
Can you please take a picture inside the area where shock tower mounts?
All spec measurements bkrantz referenced are here in 914world in the upper right corner under the "914 info" tab. Matt |
|
|
|
| Superhawk996 |
Mar 18 2025, 08:06 AM
Post
#6
|
|
914 Guru Group: Members Posts: 6,898 Joined: 25-August 18 From: Woods of N. Idaho Member No.: 22,428 Region Association: Galt's Gulch |
You’ve asked some good questions but honestly it is not easy to answer them all in a reasonable way in just one or two posts.
You have lots of homework to do. Start by reading Jeff Hails thread in its entirety. Within that thread you will find a diagram of the underbody mounting points and his nominal dimensions. http://www.914world.com/bbs2/index.php?showtopic=76791 The diagrams look like this - which I used extensively during my build to mount suspension locating points. My build link is in my signature if you want to look at that which has pictures of using a body trammel and a simple laser plumb bob to get measurements of the body. 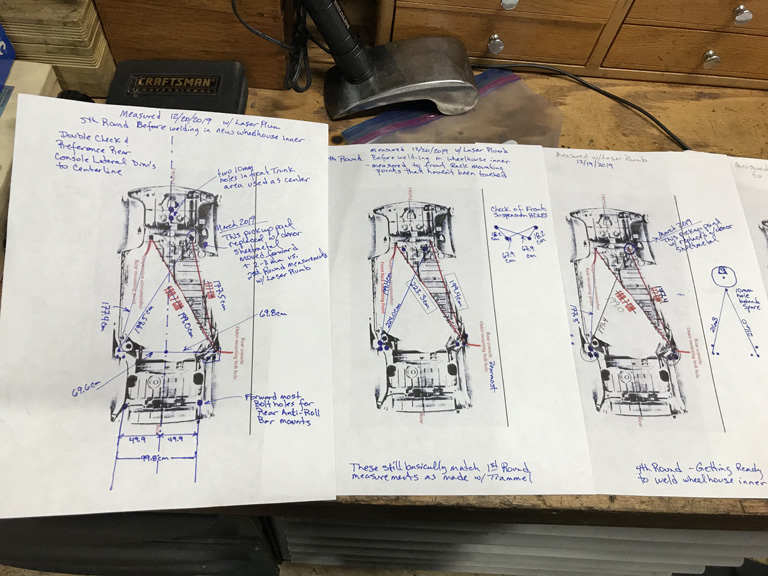 Likewise there are other restoration threads that will help answer your questions And reach out to @930cabman - he’s undertaken a project similar to yours. |
|
|
|
| 930cabman |
Mar 18 2025, 01:15 PM
Post
#7
|
|
Advanced Member Group: Members Posts: 3,996 Joined: 12-November 20 From: Buffalo Member No.: 24,877 Region Association: North East States |
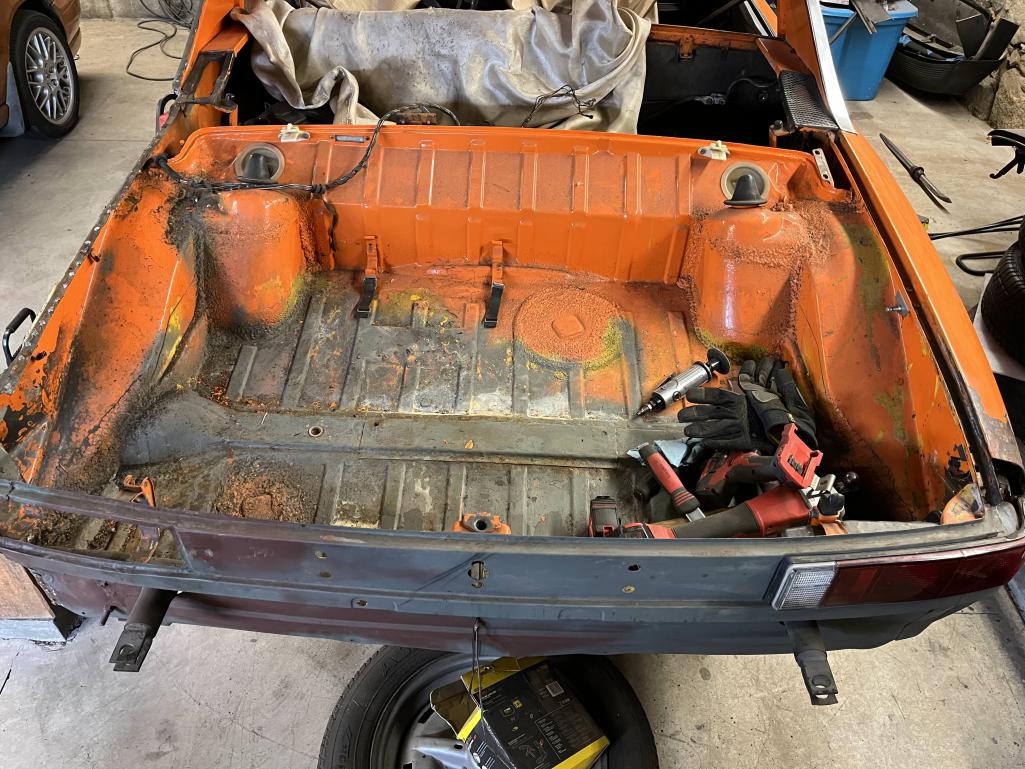
QUOTE(mate914 @ Mar 17 2025, 06:36 PM) I see nothing stopping you from taking to alignment shop. Check alignments first. Change metal second. No 914 is perfect. Hand built baby. Matt QUOTE(didenpx @ Mar 17 2025, 06:56 PM) 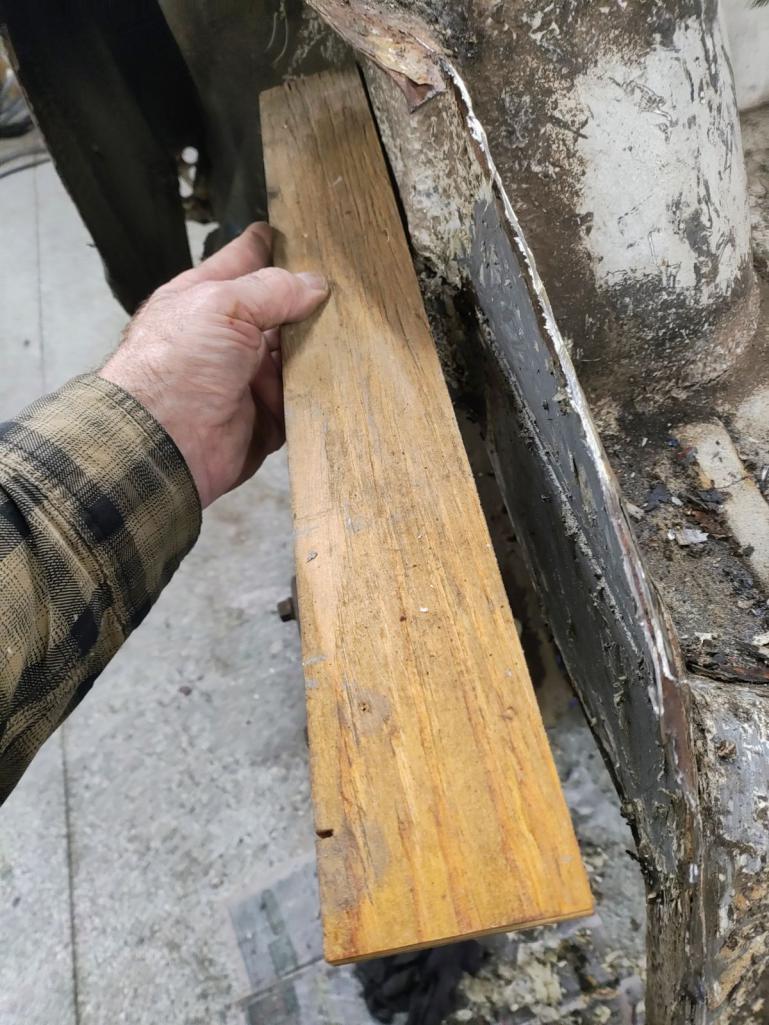 I started out with something like this, crumple area appears to have worked I started out with something like this, crumple area appears to have worked |
|
|
|
| 930cabman |
Mar 18 2025, 01:19 PM
Post
#8
|
|
Advanced Member Group: Members Posts: 3,996 Joined: 12-November 20 From: Buffalo Member No.: 24,877 Region Association: North East States |
QUOTE(930cabman @ Mar 18 2025, 01:15 PM) QUOTE(mate914 @ Mar 17 2025, 06:36 PM) I see nothing stopping you from taking to alignment shop. Check alignments first. Change metal second. No 914 is perfect. Hand built baby. Matt QUOTE(didenpx @ Mar 17 2025, 06:56 PM) I started out with something like this, crumple area appears to have workedPeeling back the onion 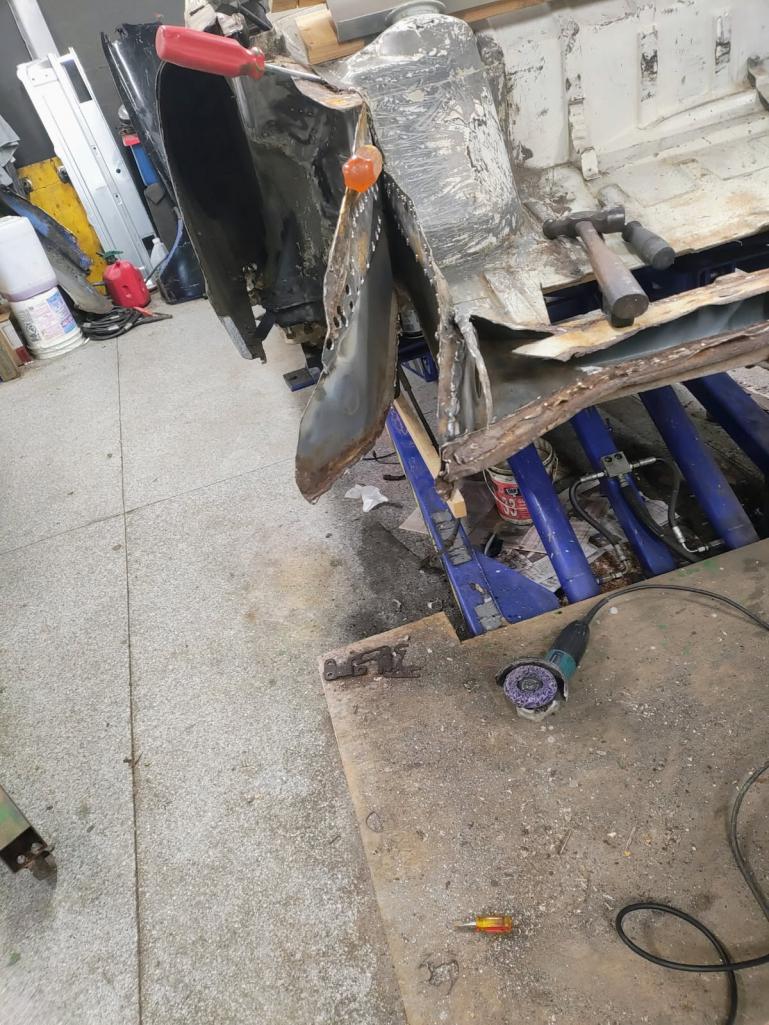 |
|
|
|
| 930cabman |
Mar 18 2025, 01:21 PM
Post
#9
|
|
Advanced Member Group: Members Posts: 3,996 Joined: 12-November 20 From: Buffalo Member No.: 24,877 Region Association: North East States |
QUOTE(930cabman @ Mar 18 2025, 01:19 PM) QUOTE(930cabman @ Mar 18 2025, 01:15 PM) QUOTE(mate914 @ Mar 17 2025, 06:36 PM) I see nothing stopping you from taking to alignment shop. Check alignments first. Change metal second. No 914 is perfect. Hand built baby. Matt QUOTE(didenpx @ Mar 17 2025, 06:56 PM) I started out with something like this, crumple area appears to have workedPeeling back the onion Today 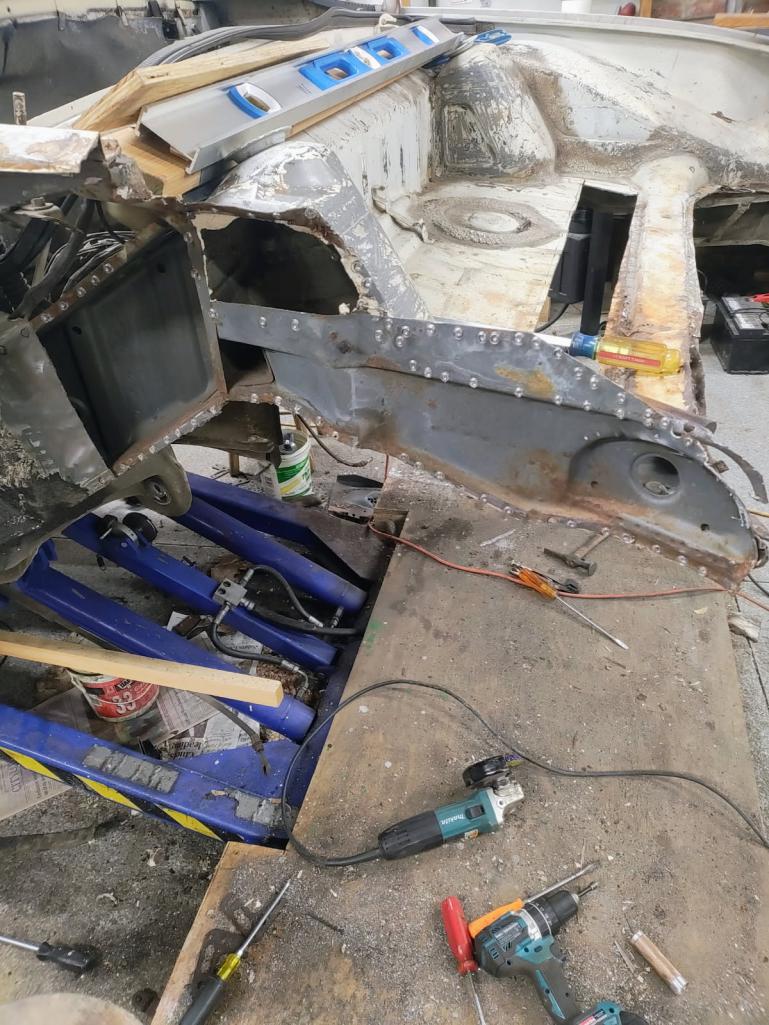 |
|
|
|
| didenpx |
Mar 18 2025, 05:04 PM
Post
#10
|
|
Newbie Group: Members Posts: 36 Joined: 1-September 23 From: Usa Member No.: 27,556 Region Association: North East States |
Thanks very much to everyone for the responses and suggestions. I do have a print out of the factory measurements and will spend some time using those to assess the area.
I also have started reading through Jeff's thread and will study it thoroughly in the coming days. Also thanks much to @930cabman for weighing in; I will be hitting him up via message. Below are the photos that @mate914 requested. They don't appear to show any deformation of the structure inwards....that I can tell at this point, anyway. Though I'm dubious about that because of that crease that was previously beaten out....how could it not have shifted things? 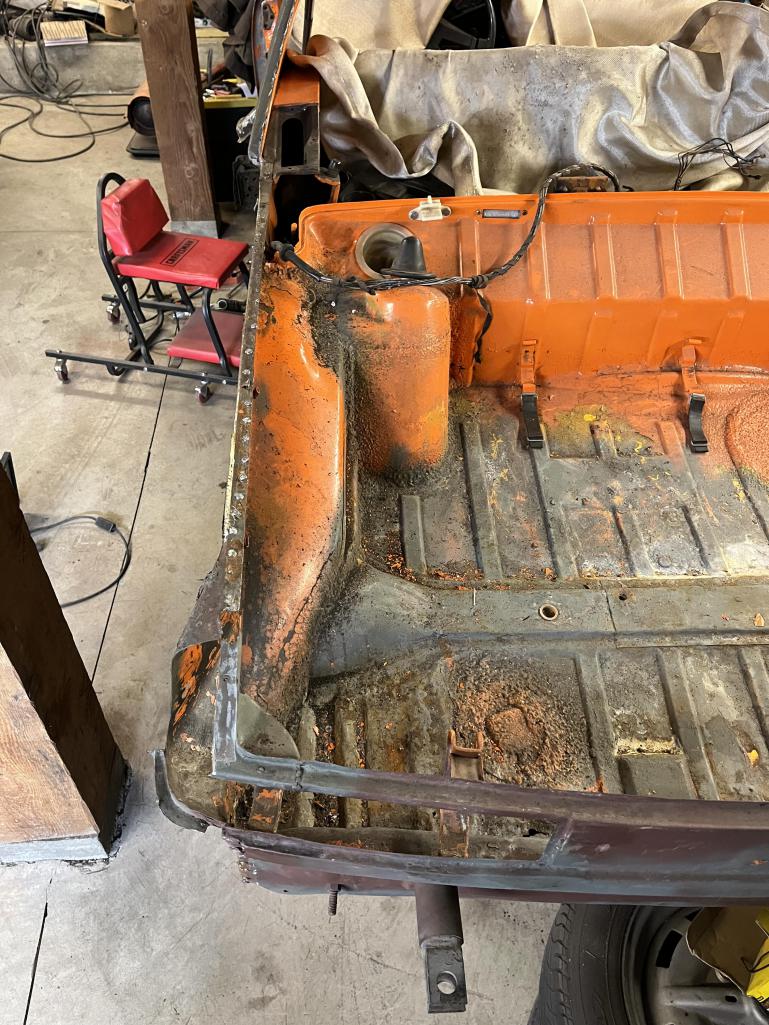 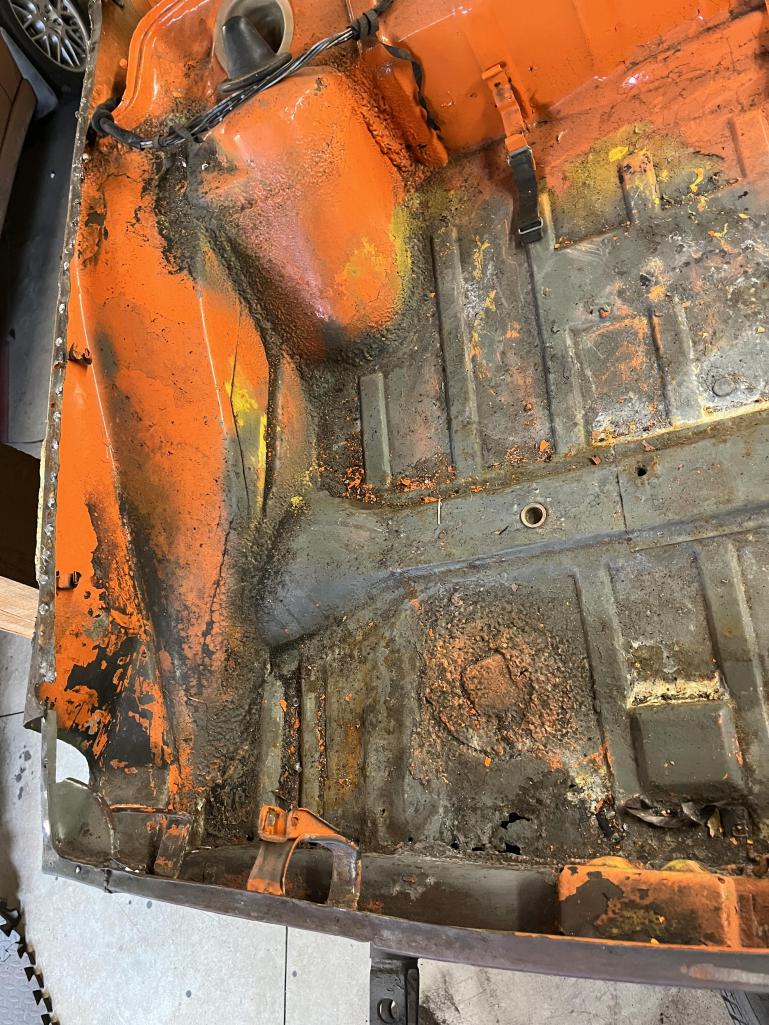 |
|
|
|
| didenpx |
Mar 18 2025, 05:05 PM
Post
#11
|
|
Newbie Group: Members Posts: 36 Joined: 1-September 23 From: Usa Member No.: 27,556 Region Association: North East States |
  |
|
|
|
| worn |
Mar 18 2025, 06:08 PM
Post
#12
|
|
Winner of the Utah Twisted Joint Award Group: Members Posts: 3,466 Joined: 3-June 11 From: Madison, WI Member No.: 13,152 Region Association: Upper MidWest |
How well do the rear light buckets fit to what remains? Do they look and measure the same from side to side. I would think that if you had unresolved rear shunt issues the lights would be affected. Perhaps more than anything else.
Btw, I am impressed. |
|
|
|
| didenpx |
Mar 18 2025, 06:18 PM
Post
#13
|
|
Newbie Group: Members Posts: 36 Joined: 1-September 23 From: Usa Member No.: 27,556 Region Association: North East States |
QUOTE(worn @ Mar 18 2025, 06:08 PM) How well do the rear light buckets fit to what remains? Do they look and measure the same from side to side. I would think that if you had unresolved rear shunt issues the lights would be affected. Perhaps more than anything else. Btw, I am impressed. The rear light on this side looked off kilter before I started tearing into things; it appeared high toward the outside. Though as you can probably make out the repairs that were done in that area previously were not top notch. When I started digging in here (and before I removed the undercoating and saw the extent of the wrinkles in the crumple zone I was thinking that in the course of welding in the new RD tail piece and rear trunk floor it could all be made to align properly. |
|
|
|
| mate914 |
Mar 19 2025, 04:30 AM
Post
#14
|
|
Matt Group: Members Posts: 828 Joined: 27-February 09 From: Eagles mere, PA Member No.: 10,102 Region Association: North East States |
From the inside. Where the shock set.
Matt QUOTE(didenpx @ Mar 18 2025, 06:04 PM) Thanks very much to everyone for the responses and suggestions. I do have a print out of the factory measurements and will spend some time using those to assess the area. I also have started reading through Jeff's thread and will study it thoroughly in the coming days. Also thanks much to @930cabman for weighing in; I will be hitting him up via message. Below are the photos that @mate914 requested. They don't appear to show any deformation of the structure inwards....that I can tell at this point, anyway. Though I'm dubious about that because of that crease that was previously beaten out....how could it not have shifted things? |
|
|
|
| didenpx |
Mar 23 2025, 03:13 PM
Post
#15
|
|
Newbie Group: Members Posts: 36 Joined: 1-September 23 From: Usa Member No.: 27,556 Region Association: North East States |
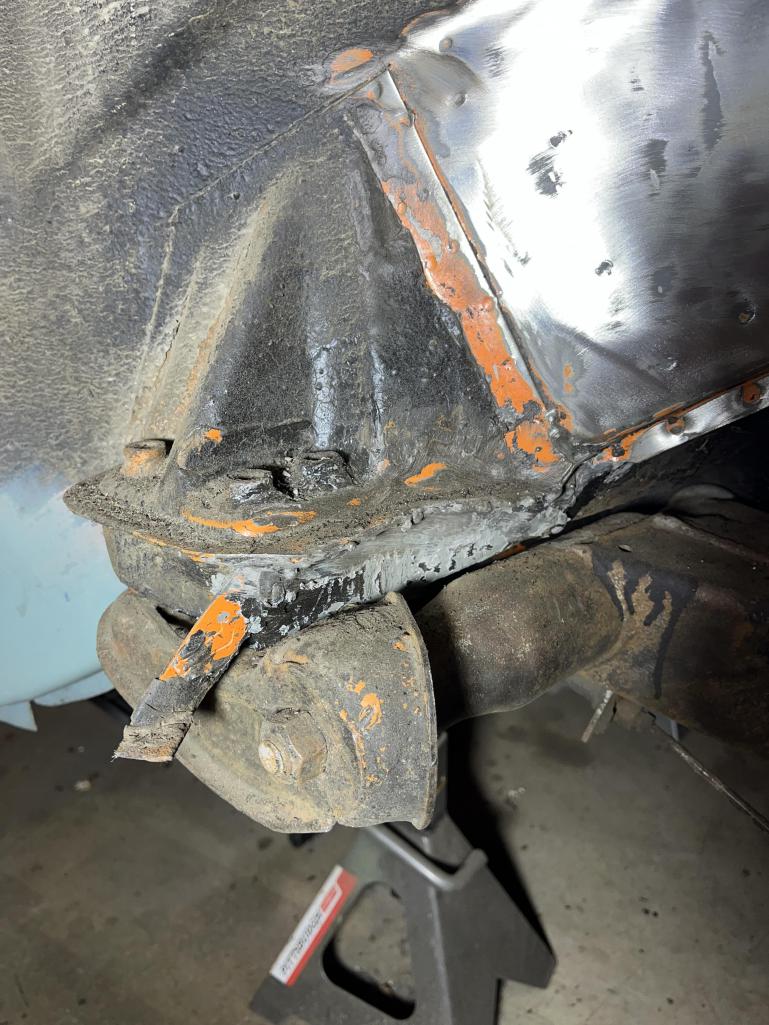
@mate914 Best photo I could get of the inside of the shock tower is below. Car still has suspension and engine mounted (been hoping to get away without pulling engine since the car ran and drove when I bought it).
You can see where the collision crease was partially pulled out on the outside of the inner wheel well in one photo and in the second you can see that the inner part of the shock tower was also creased (and apparently not repaired). 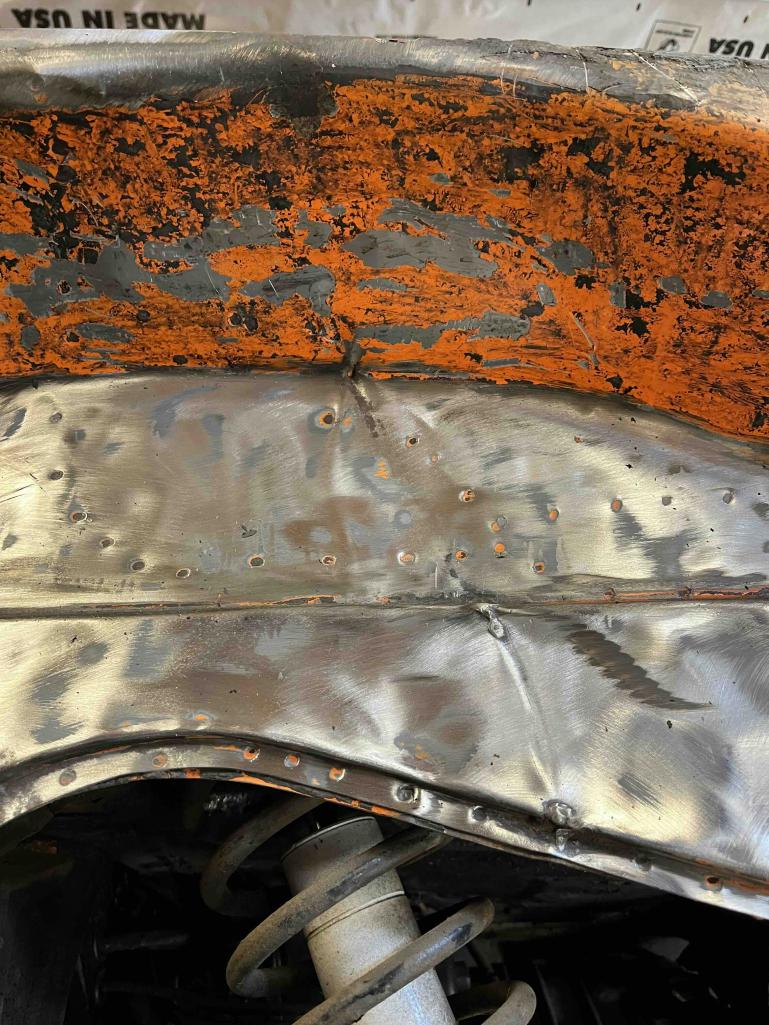 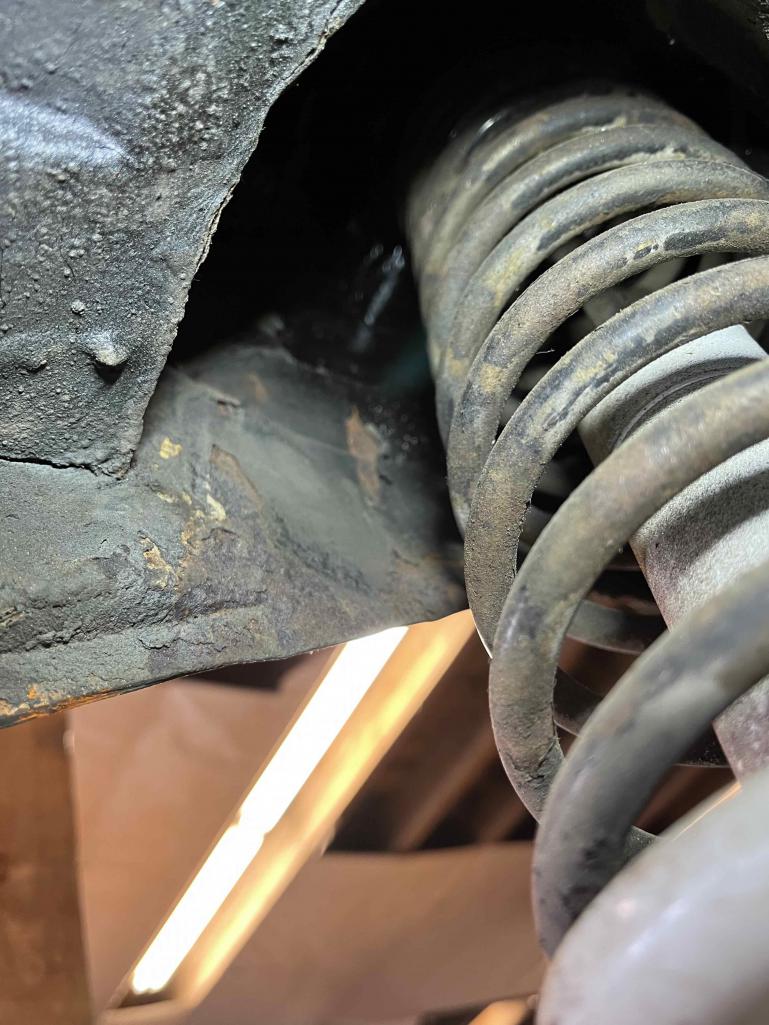 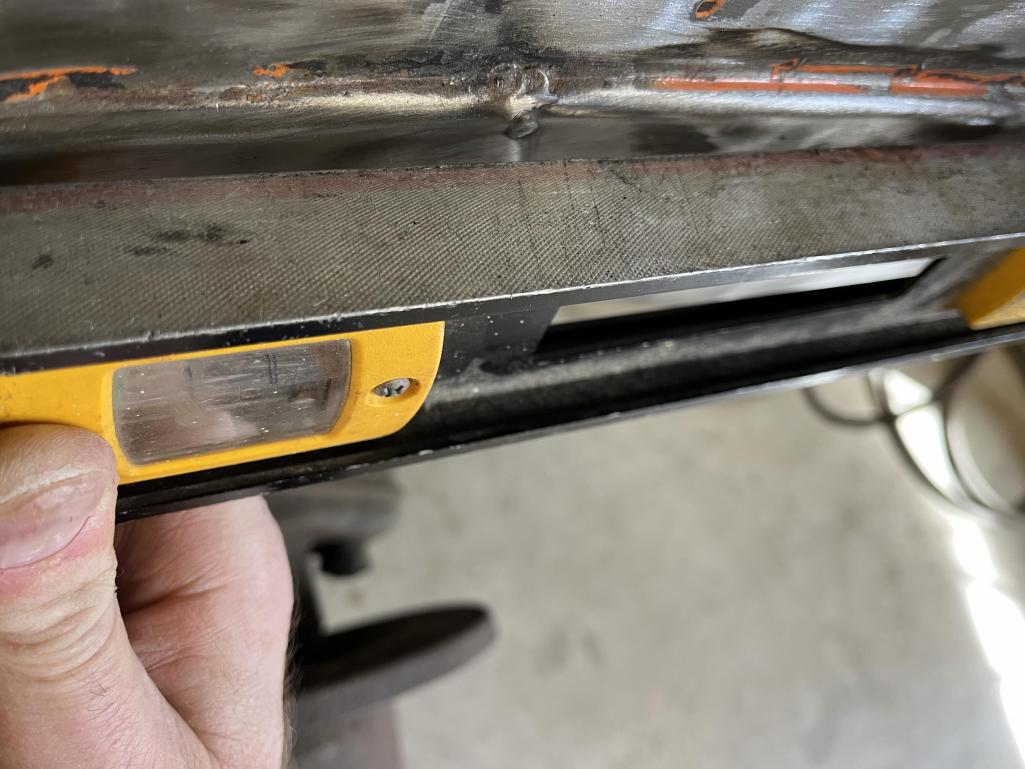 |
|
|
|
| didenpx |
Mar 23 2025, 03:32 PM
Post
#16
|
|
Newbie Group: Members Posts: 36 Joined: 1-September 23 From: Usa Member No.: 27,556 Region Association: North East States |
As best as I can tell doing measurements of the rear suspension mounting points (again, engine in) using a laser level, everything seems to be correctly located. I measured 139mm on center from the top of the head of the forward bolts in the console, and they are within 2mm of each other in level.
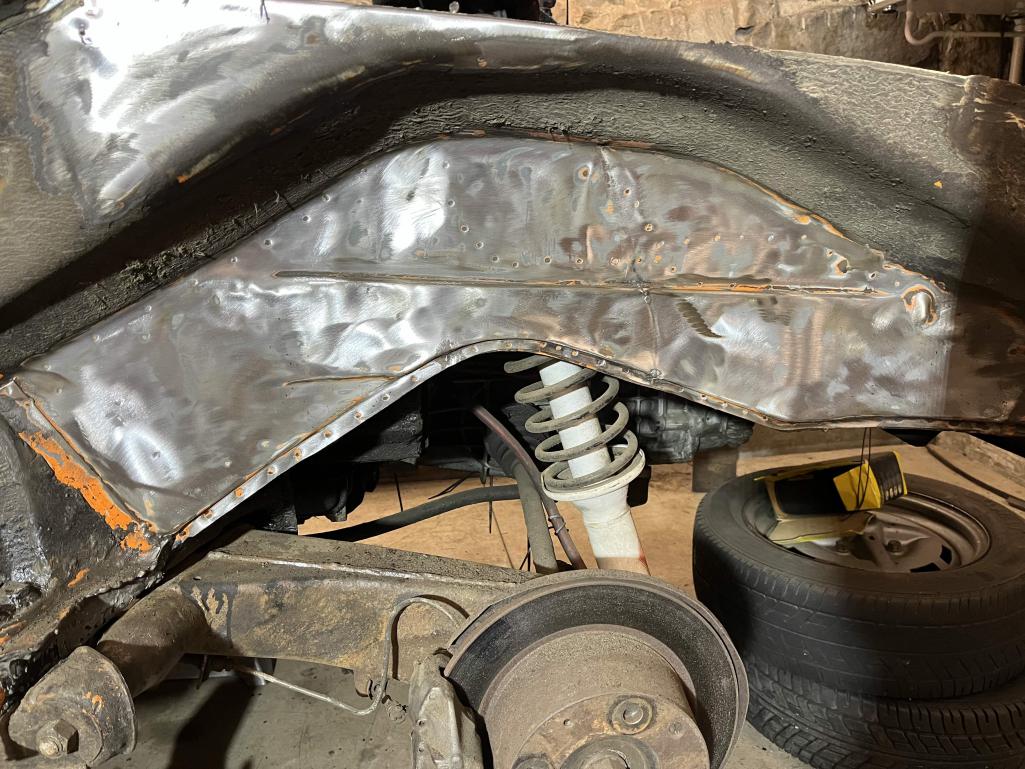
I did all of the rear measurements from here:http://www.914world.com/specs/bodydims.php Surprisingly they are close to good: -R: 135.5 measured vs factory 135.9 -Q: 78.6 measured vs factory 77.8 -S: this one stumped me. The description says to measure from the lip for the gasket, but the photo seems to show measuring to the bottom part of the trunk hinge when it is upright. Measuring vs the hinge I got 157.5 - 158.5 across range of hinge in/out motion vs 158.8 factory. However with the car perfectly leveled it's clear that the left hand inner structure is sitting about 1cm high. You can see from the photos below that the damage seems to be isolated to the wheel well back to the rear panel and rear of trunk floor (which I'll be replacing). Based on the above I'm currently thinking of cutting out just enough of the inner wheel well to access the crease on the inner shock tower and using a stud welder to pull that back into shape, then use the stud welder to pull out all of the inner wheel well structure, starting fro the front of the panel and working back towards the impact. Once that's done I will see if it has brought the top of the wheel well down the ~1cm. If not I'm thinking of bacing the car so the front can't lift upwards and using a frame jack to try to push the wheel well structure down (I've got a very low ceiling and could jack off of a 2 x 6 across some joists down onto the panel. Looking for feedback and reactions. Thanks! 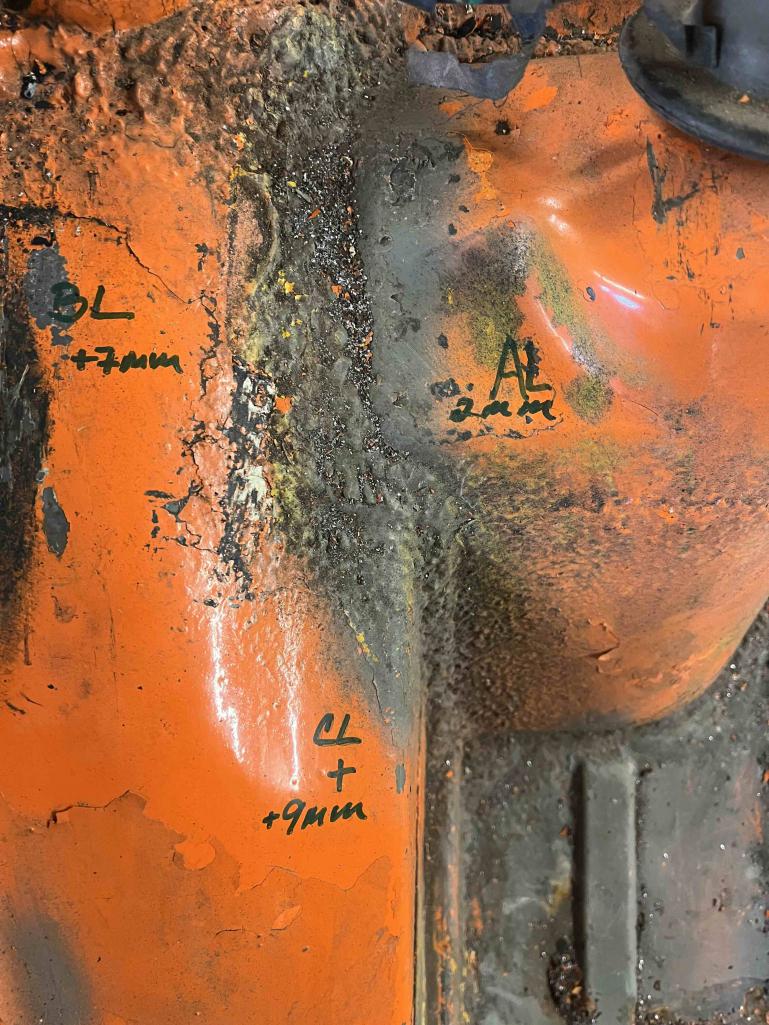 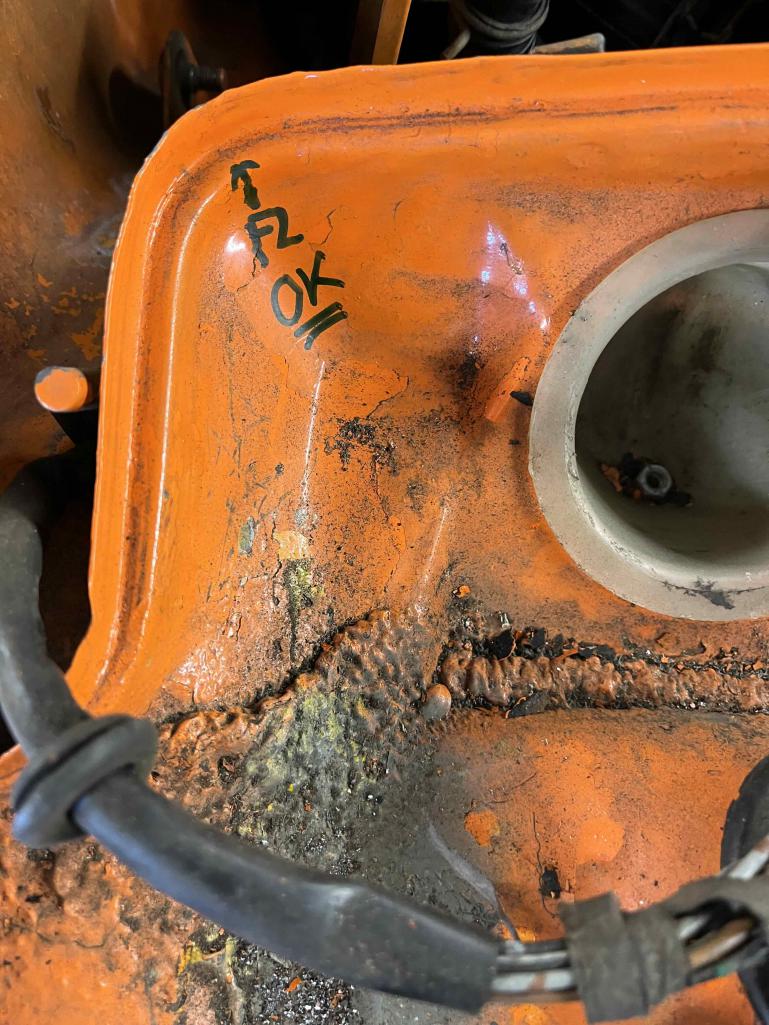 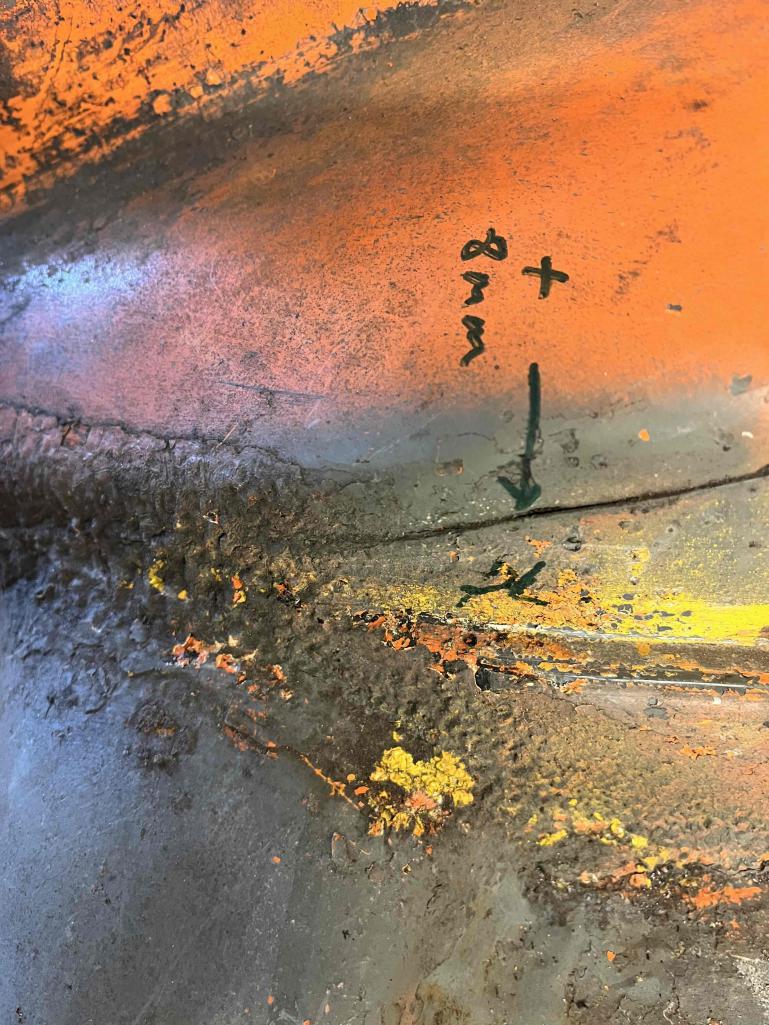 |
|
|
|
| didenpx |
Mar 27 2025, 05:32 PM
Post
#17
|
|
Newbie Group: Members Posts: 36 Joined: 1-September 23 From: Usa Member No.: 27,556 Region Association: North East States |
Making some decent progress straightening this out. I used a stud welder to pull out the deformation in the inner wheel well skin beginning behind the suspension console and working toward the old kink in the shock tower area.
At that point I cribbed underneath the transmission so that I could use a body jack to push the LH structure downwards (it was 5mm to 9mm higher than the RH side from the old collision). I kept jacking (pushing downwards from a ceiling joist in my barn), releasing the jack, measuring, and repeating. After several iterations I got the LH to within 3-4mm of the RH side at my measurement points (using a laser level). There was much celebration. There is still a slight (maybe 2-3mm) bulge in the bottom of the shock tower structure that I plan to push in using the body jack. Then it's on to straightening the inner wheel well skin backwards to the tail of the panel. I also need to work out the deformation in the top of the wheel arch and make sure that the mating surface for the quarter panel is level with the RH side. Hoping at that point that I'll find the replacement quarter panel-to-door gap will be correct so that I can start piecing together all of the sheet metal panels. 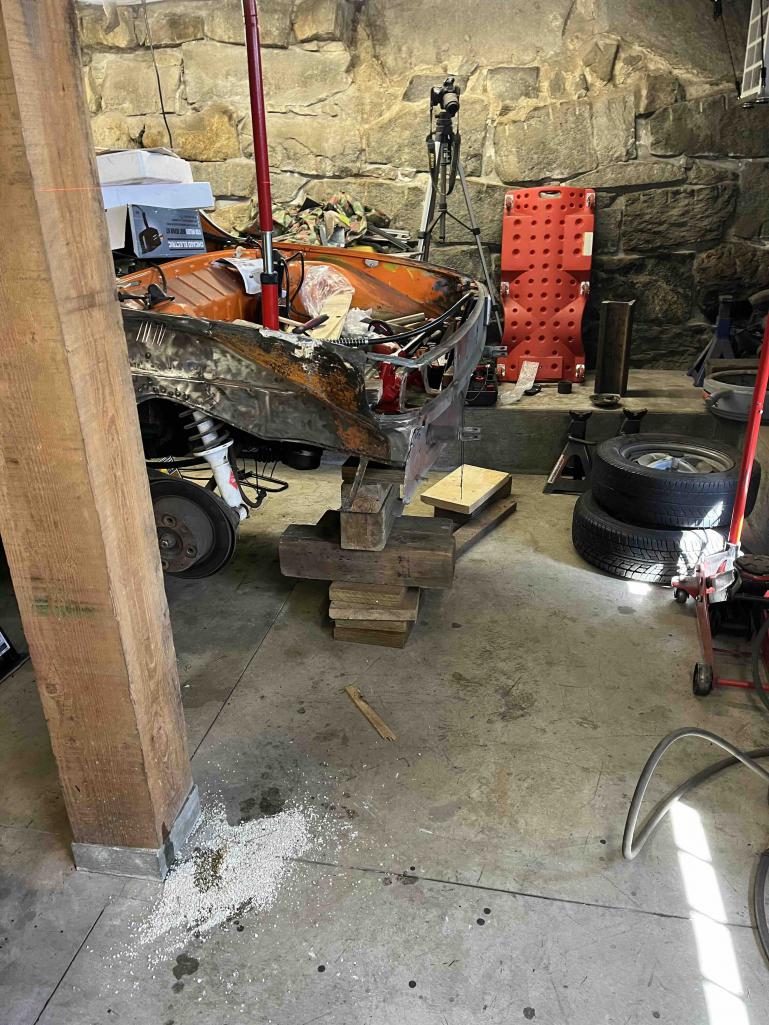 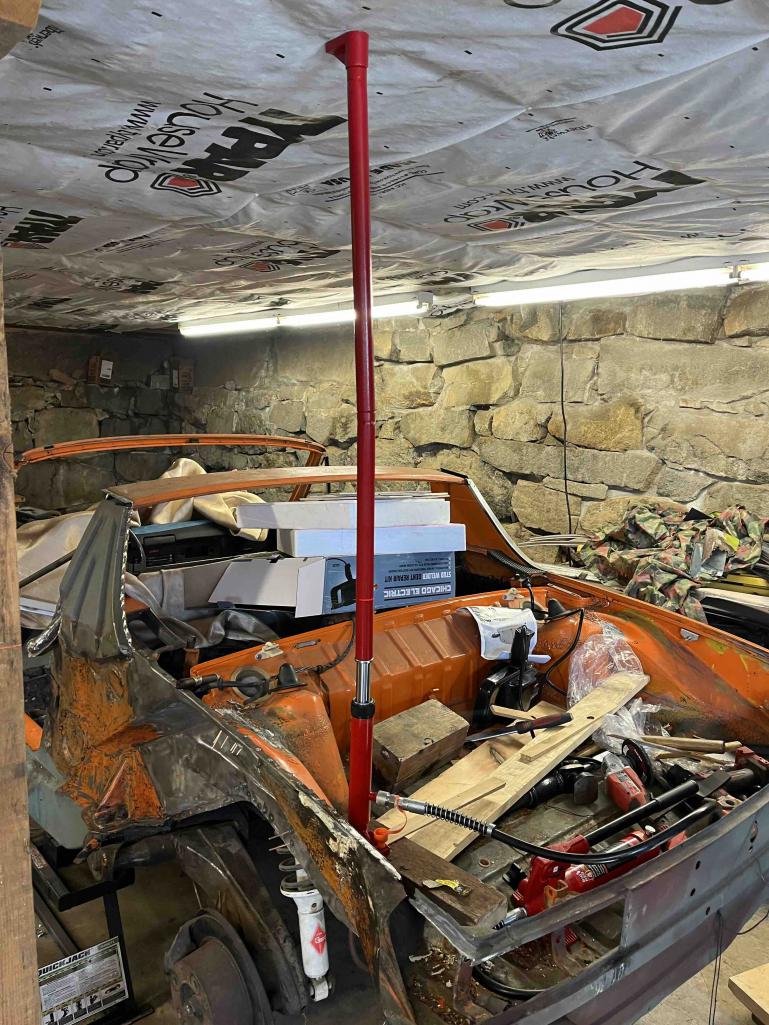 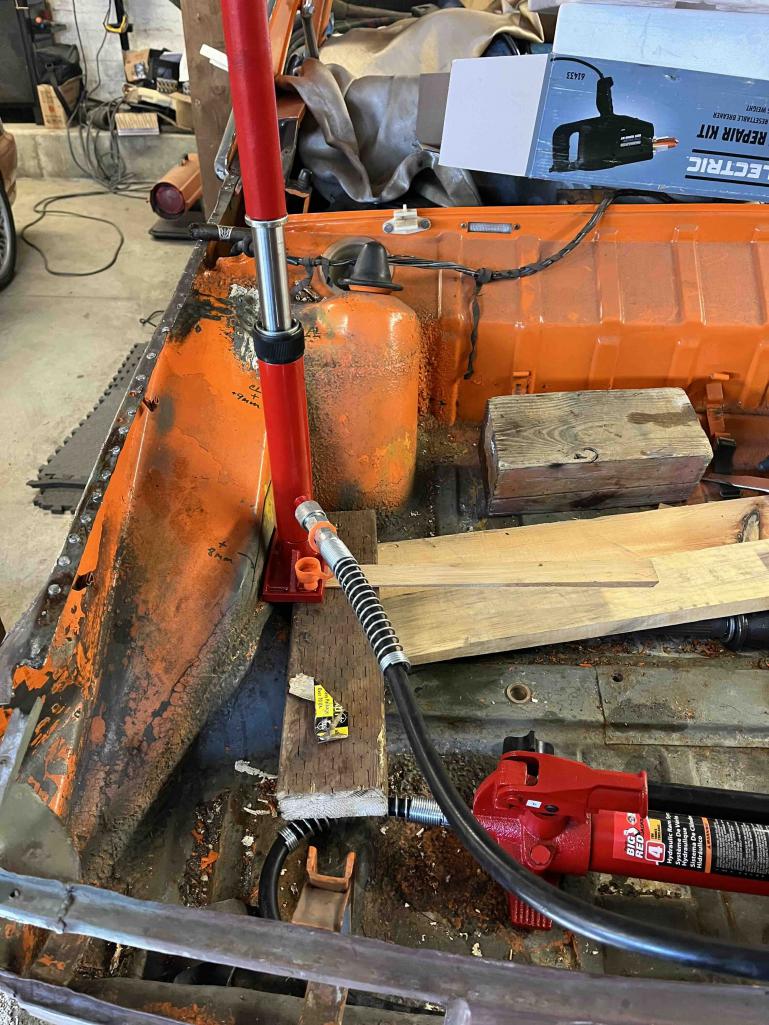 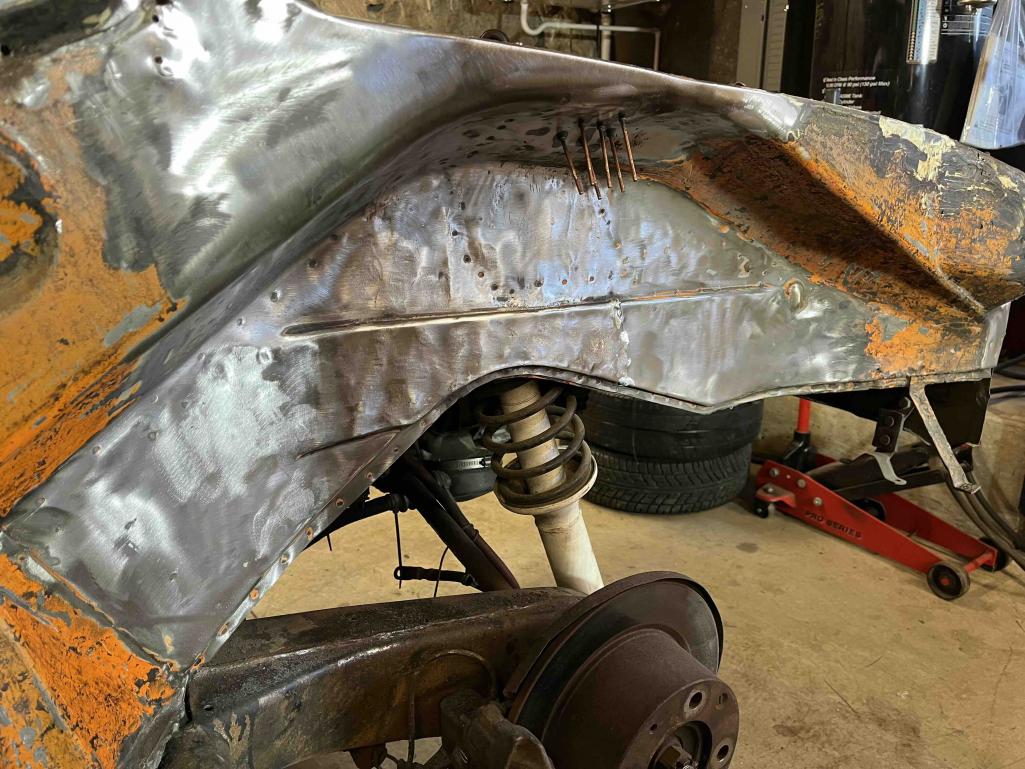 |
|
|
|
| Front yard mechanic |
Mar 27 2025, 06:01 PM
Post
#18
|
|
Senior Member Group: Members Posts: 1,295 Joined: 23-July 15 From: New Mexico Member No.: 18,984 Region Association: None |
Love the foundation do you wrench in a cave?
|
|
|
|
| didenpx |
Mar 27 2025, 06:09 PM
Post
#19
|
|
Newbie Group: Members Posts: 36 Joined: 1-September 23 From: Usa Member No.: 27,556 Region Association: North East States |
QUOTE(Front yard mechanic @ Mar 27 2025, 06:01 PM) Love the foundation do you wrench in a cave? Not far from it! Basement of an old barn. |
|
|
|
| Superhawk996 |
Mar 27 2025, 06:43 PM
Post
#20
|
|
914 Guru Group: Members Posts: 6,898 Joined: 25-August 18 From: Woods of N. Idaho Member No.: 22,428 Region Association: Galt's Gulch |
Some creative work going on - keep going
Always measure some diagonals to keep it square. Not easy working in 3 dimensions! |
|
|
|
|
1 User(s) are reading this topic (1 Guests and 0 Anonymous Users)
0 Members:

|
Lo-Fi Version | Time is now: 1st April 2025 - 07:10 AM |
Invision Power Board
v9.1.4 © 2025 IPS, Inc.