|
|
|
Porsche, and the Porsche crest are registered trademarks of Dr. Ing. h.c. F. Porsche AG.
This site is not affiliated with Porsche in any way. Its only purpose is to provide an online forum for car enthusiasts. All other trademarks are property of their respective owners. |
|
|

  |

| 914sgofast2 |
 Mar 25 2025, 03:52 PM Mar 25 2025, 03:52 PM
Post
#21
|
|
Senior Member  Group: Members Posts: 701 Joined: 10-May 13 From: El Dorado Hills, CA Member No.: 15,855 Region Association: None |
Those heads are very crusty. Looks like they have more than just 200 miles on them since they last received a valve job, unless the car was buried in the mud or something to cause all that external corrosion. I would get the heads cleaned up and then just hand lap the vales if you think it only has 200 miles since it last had a valve job and the heads were fly cut to fit the 96mm cylinders into them. When cleaning the heads, do not glass bead blast the internal surfaces of the heads where the valve train sits or the combustion chambers. Only bead blast the external areas. Glass beads will get stuck in the soft pores of the aluminum and then slowly released as the heads heat up and cool down during engine operation. You don't want stray glass beads being released into the engine's internal areas, as they will destroy the bearing surfaces and other moving parts. Only the cylinder heads' external areas can be glass bead blasted to clean them up. I also note that one of the heads has a big chunk of cooling fin missing from it. That will cause a loss of cooling ability on that head. You can probably still use it for a while, but don't expect a long life out that damaged head (which is already over 50 years old!)
|
   |

 
|
| Vicious |
Mar 25 2025, 04:00 PM
Post
#22
|
|
Newbie Group: Members Posts: 30 Joined: 31-October 22 From: South Dakota, USA Member No.: 26,958 Region Association: Upper MidWest |
QUOTE(914sgofast2 @ Mar 25 2025, 04:52 PM)  Those heads are very crusty. Looks like they have more than just 200 miles on them since they last received a valve job, unless the car was buried in the mud or something to cause all that external corrosion. I would get the heads cleaned up and then just hand lap the vales if you think it only has 200 miles since it last had a valve job and the heads were fly cut to fit the 96mm cylinders into them. When cleaning the heads, do not glass bead blast the internal surfaces of the heads where the valve train sits or the combustion chambers. Only bead blast the external areas. Glass beads will get stuck in the soft pores of the aluminum and then slowly released as the heads heat up and cool down during engine operation. You don't want stray glass beads being released into the engine's internal areas, as they will destroy the bearing surfaces and other moving parts. Only the cylinder heads' external areas can be glass bead blasted to clean them up. I also note that one of the heads has a big chunk of cooling fin missing from it. That will cause a loss of cooling ability on that head. You can probably still use it for a while, but don't expect a long life out that damaged head (which is already over 50 years old!) To be completely honest, I'm really not sure what I think at this point. Allegedly, it was driven less than 200 miles. PO is essentially family so trying to take him at his word. But I agree, and stated earlier in the thread the corrosion doesnt make sense to me. Body is in great shape. But the exhaust, tins, heads all have serious corrosion. And allegedly it was stored in that garage ever since it was put back together. not really sure what to think. Not that it matters I guess. It's in the condition its in now, and needs fixed regardless. But what you're saying got me thinking and Im just going to get the heads decked. better safe than sorry. Thanks for the tips on blasting. very good to know. |
|
|
|
| emerygt350 |
Mar 25 2025, 04:09 PM
Post
#23
|
|
Advanced Member Group: Members Posts: 2,781 Joined: 20-July 21 From: Upstate, NY Member No.: 25,740 Region Association: North East States |
Unless you are serious about keeping this cheap, those heads just look like disappointment to me. You might be able to snag a set of 1.8s for cheap out there.
That said, putting new ones on later is easy. There aren't even head gaskets to buy... |
|
|
|
| Vicious |
Mar 25 2025, 06:09 PM
Post
#24
|
|
Newbie Group: Members Posts: 30 Joined: 31-October 22 From: South Dakota, USA Member No.: 26,958 Region Association: Upper MidWest |
QUOTE(emerygt350 @ Mar 25 2025, 05:09 PM) Unless you are serious about keeping this cheap, those heads just look like disappointment to me. You might be able to snag a set of 1.8s for cheap out there. That said, putting new ones on later is easy. There aren't even head gaskets to buy... I'm keeping an eye out for 1.8 heads... see what pops up. Not in a huge rush. |
|
|
|
| rhcb914 |
Mar 25 2025, 07:54 PM
Post
#25
|
|
member Group: Members Posts: 360 Joined: 3-February 04 From: Boston, MA Member No.: 1,626 |
Those jugs and pistons look like the old 96MM NPR slip in big bore kit. You should measure the diameter of the heads, I bet they weren't flycut. That would also explain why the oily combustion.
You could rebuild the heads if you are on a tight budget have them opened to take the machine in 96MM kit. I am running 1.7 heads w/96 and really like that combo but there are tons of options. The 1.7 / 1.8 tins are the same. Only need to change the angle if you go the 2.0L head route. |
|
|
|
| Vicious |
Mar 25 2025, 09:56 PM
Post
#26
|
|
Newbie Group: Members Posts: 30 Joined: 31-October 22 From: South Dakota, USA Member No.: 26,958 Region Association: Upper MidWest |
QUOTE(rhcb914 @ Mar 25 2025, 08:54 PM) Those jugs and pistons look like the old 96MM NPR slip in big bore kit. You should measure the diameter of the heads, I bet they weren't flycut. That would also explain why the oily combustion. Got me curious, had to hop out of bed and run to the garage to check. I'm not really sure what the number should be but ive attached some photos. Based off everything im seeing it wouldn't surprise me if thats what they were. I really appreciate you saying something though. I had no idea that existed and would've been very disappointed to figure it out mid assembly. Attached thumbnail(s) 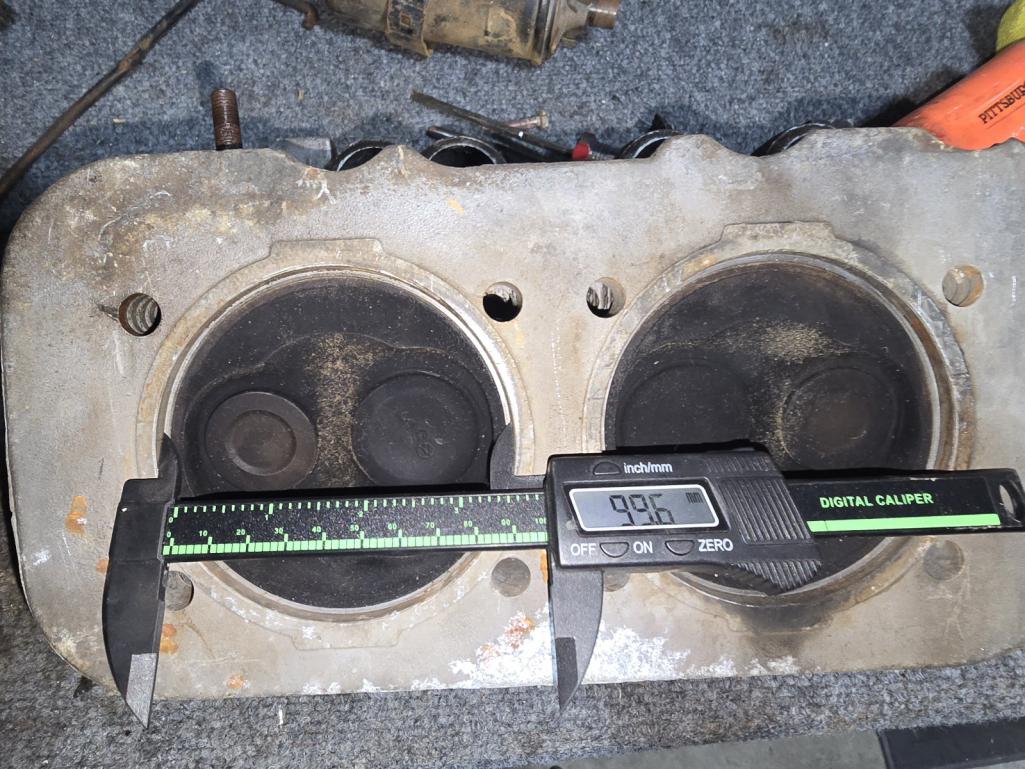 
|
|
|
|
| Artfrombama |
Mar 26 2025, 11:13 AM
Post
#27
|
|
Member Group: Members Posts: 265 Joined: 21-January 24 From: Alabama Member No.: 27,870 Region Association: South East States |
I don't see major corrosion. I see parts that need to be cleaned up, matter of fact the internal parts look pristine.
Forget modifying, put it back together, get it running and have fun! |
|
|
|
| 914sgofast2 |
Mar 26 2025, 12:48 PM
Post
#28
|
|
Senior Member Group: Members Posts: 701 Joined: 10-May 13 From: El Dorado Hills, CA Member No.: 15,855 Region Association: None |
Based on you photos, it looks like those heads won't fit onto those cylinder barrels. The barrels measure 99.9mm in diameter. The heads are measuring 99.6mm. Maybe your measurement of the heads are off, if those heads did come off of those cylinder barrels.
|
|
|
|
| Vicious |
Mar 26 2025, 02:34 PM
Post
#29
|
|
Newbie Group: Members Posts: 30 Joined: 31-October 22 From: South Dakota, USA Member No.: 26,958 Region Association: Upper MidWest |
QUOTE(914sgofast2 @ Mar 26 2025, 01:48 PM) Based on you photos, it looks like those heads won't fit onto those cylinder barrels. The barrels measure 99.9mm in diameter. The heads are measuring 99.6mm. Maybe your measurement of the heads are off, if those heads did come off of those cylinder barrels. Measurements are off. Didn't want to scrape my calipers against thee heads just wanted to get a rough idea to determine whether these heads were previously machined to take 96mm jugs or if these are slip in style jugs. These heads and jugs were previously installed together. |
|
|
|
| rhcb914 |
Mar 26 2025, 08:10 PM
Post
#30
|
|
member Group: Members Posts: 360 Joined: 3-February 04 From: Boston, MA Member No.: 1,626 |
I can tell by the thin wall of the cylinder sealing area those are 100% the slip-in kit.
The 1.7 heads registers are 100MM, so your measurement is close enough to say those heads aren't opened for the 1.8/2.0L cylinders which are 105MM. While cylinders look in OK shape, from my experience I would tell you to punt on those! (IMG:style_emoticons/default/smile.gif) Given the look of the combustion chamber, that engine was probably already a smoker! The NPR pistons are heavy. The thin sealing register will not seal properly, dig into the heads potentially ruining them. Likely to have ring break-in issues and oil control problems because the thin side walls don't have the strength to hold the shape. I built a 1911 with the NPR kit many years ago. It was just throwing away $$. I got less than 5K miles out of it and never got it to really run right. If the engine is disposable, sure clean it up and reassemble. But if you want anything to last, you would be better off getting a cheap 96MM AA set and having the heads opened up at the very minimum. Properly built 1911 is a pretty nice combo. |
|
|
|
| brant |
Mar 27 2025, 09:40 AM
Post
#31
|
|
914 Wizard Group: Members Posts: 11,921 Joined: 30-December 02 From: Colorado Member No.: 47 Region Association: Rocky Mountains |
you should seriously consider back dating to a set of SSI Heat exchangers.
you'll pick up HP over that late style that is inefficient. |
|
|
|
| technicalninja |
Mar 27 2025, 09:58 AM
Post
#32
|
|
Advanced Member Group: Members Posts: 2,473 Joined: 31-January 23 From: Granbury Texas Member No.: 27,135 Region Association: Southwest Region |
The single most important sealing surface on the T4 engine is the barrel to head contact point.
I "see" the normal 96mm kit for the 1.8/2.0 as too small. It will work but your surfaces need to be PERFECT! That 1.7 slipper kit is 1/2 the thickness of what I consider "too small". Look at a set of Nickies... The ones I've seen have very thick walls. @Superhawk996 has an excellent pic showing exactly this. The SSIs that Brant mentioned are a REQUIREMENT in my book for anything other than a concours restoration. |
|
|
|
| Vicious |
Mar 27 2025, 11:20 AM
Post
#33
|
|
Newbie Group: Members Posts: 30 Joined: 31-October 22 From: South Dakota, USA Member No.: 26,958 Region Association: Upper MidWest |
QUOTE(brant @ Mar 27 2025, 10:40 AM) you should seriously consider back dating to a set of SSI Heat exchangers. you'll pick up HP over that late style that is inefficient. The stock 75-76 headers and heat exchangers were pretty much shot so i planned to toss them anyways before i learned how power robbing they are. Rust had completely eaten through the muffler so i gotta replace the whole system anyways. I don't really care about having heat and was thinking of going with something like the bursch headers. From a strictly HP standpoint, is there much of a difference? |
|
|
|
| Vicious |
Mar 27 2025, 11:30 AM
Post
#34
|
|
Newbie Group: Members Posts: 30 Joined: 31-October 22 From: South Dakota, USA Member No.: 26,958 Region Association: Upper MidWest |
QUOTE(technicalninja @ Mar 27 2025, 10:58 AM) That 1.7 slipper kit is 1/2 the thickness of what I consider "too small". Yea I see what you're saying. That's okay I was originally planning to do cylinders so guess I'm back to that. |
|
|
|
| brant |
Mar 27 2025, 02:17 PM
Post
#35
|
|
914 Wizard Group: Members Posts: 11,921 Joined: 30-December 02 From: Colorado Member No.: 47 Region Association: Rocky Mountains |
QUOTE(Vicious @ Mar 27 2025, 11:20 AM) QUOTE(brant @ Mar 27 2025, 10:40 AM) you should seriously consider back dating to a set of SSI Heat exchangers. you'll pick up HP over that late style that is inefficient. The stock 75-76 headers and heat exchangers were pretty much shot so i planned to toss them anyways before i learned how power robbing they are. Rust had completely eaten through the muffler so i gotta replace the whole system anyways. I don't really care about having heat and was thinking of going with something like the bursch headers. From a strictly HP standpoint, is there much of a difference? doubt there is a lot of difference the SSI heat exchangers already have a slightly bigger ID than stock... I don't know the ID on the headers but often a used set of SSI's can be found might even be cheaper than dedicated headers which would likely be brand new. brant |
|
|
|
| Vicious |
Mar 29 2025, 03:01 PM
Post
#36
|
|
Newbie Group: Members Posts: 30 Joined: 31-October 22 From: South Dakota, USA Member No.: 26,958 Region Association: Upper MidWest |
Still waiting on my type 4 yoke to arrive so I can get started on some more engine stuff. In the meantime getting back to work on some tin restoration.
I'm sure I'm not doing it the most optimal way, if even the right way. I'm happy to receive any suggestions. My process so far: -scrub all grease and gunk with dawn dish soap -soak in evaporust -wire wheel rust off to expose metal -clean with prep all -hit with rust reformer to seal it -once they're all done I'll hit them with a gloss black engine enamel The piece pictured i decided not to take the whole piece to bare metal as it was just a nightmare with all the small areas. Scuffed the whole thing with a wire wheel and I think it should be fine. I was using the evaporust gel as I thought it would be cheaper than buying enough to submerge it but I just don't think it works as well. I'll be buying some evaporust to soak the remaining pieces. Attached image(s) 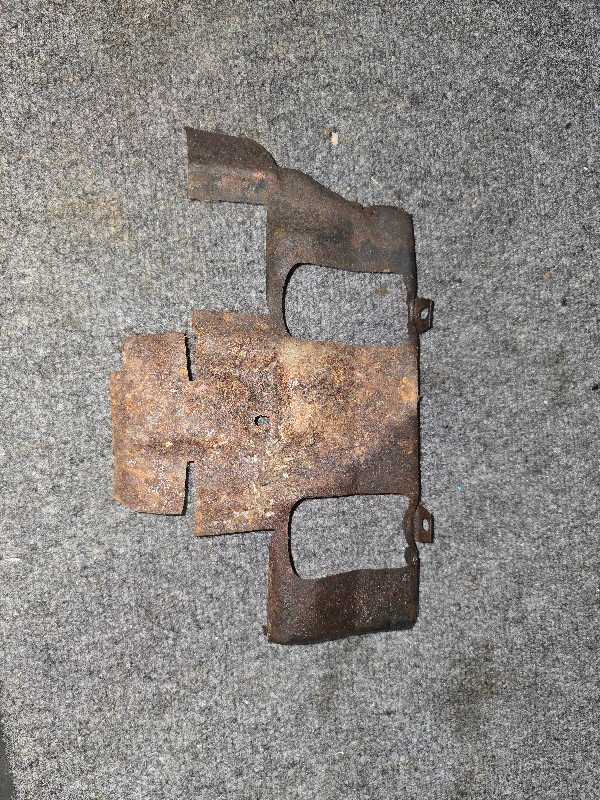 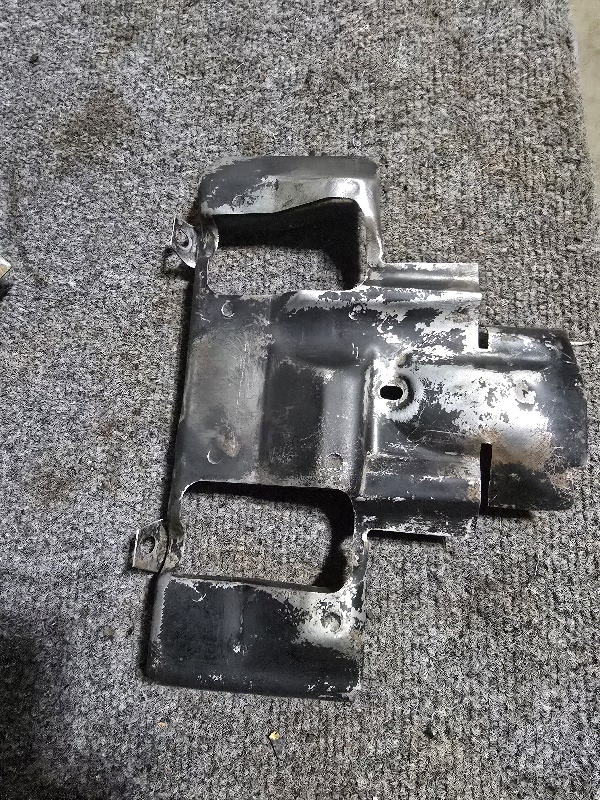 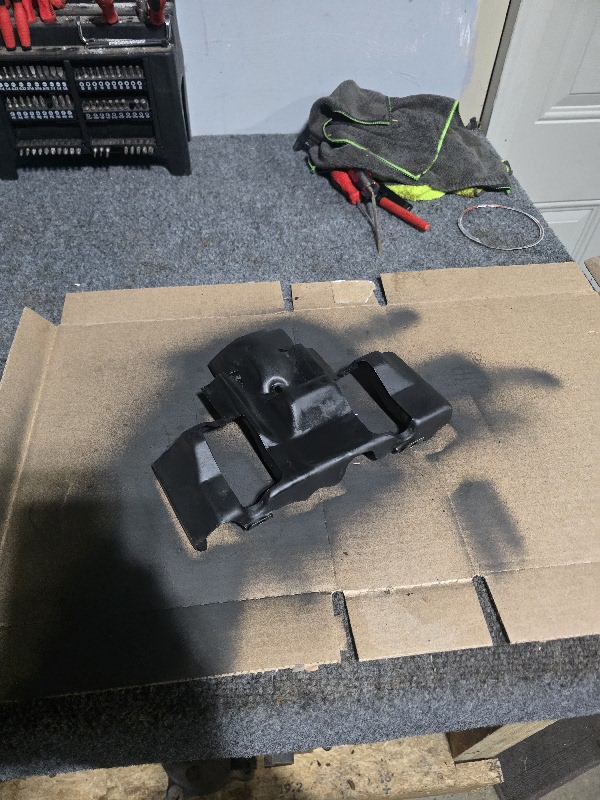 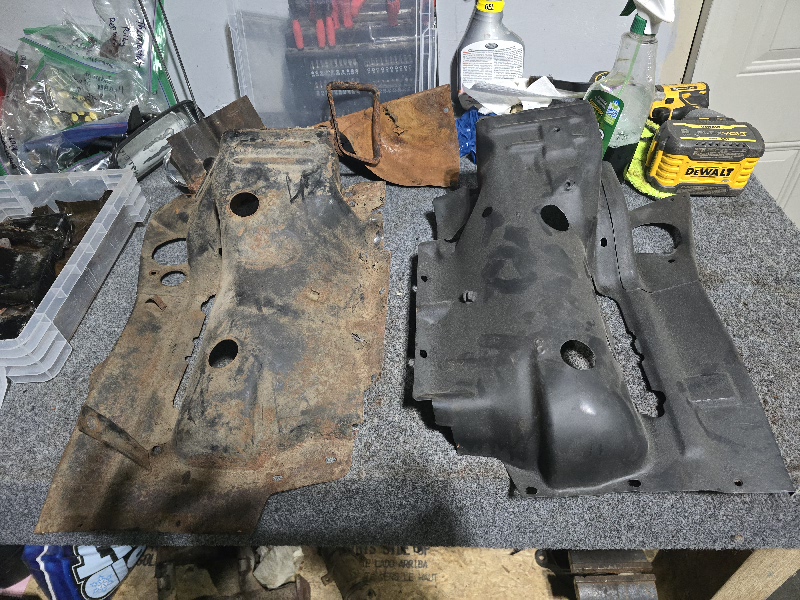
|
|
|
|
|
2 User(s) are reading this topic (2 Guests and 0 Anonymous Users)
0 Members:

|
Lo-Fi Version | Time is now: 31st March 2025 - 03:32 AM |
Invision Power Board
v9.1.4 © 2025 IPS, Inc.