|
|
|
Porsche, and the Porsche crest are registered trademarks of Dr. Ing. h.c. F. Porsche AG.
This site is not affiliated with Porsche in any way. Its only purpose is to provide an online forum for car enthusiasts. All other trademarks are property of their respective owners. |
|
|

  |

| Superhawk996 |
 Apr 5 2025, 11:30 AM Apr 5 2025, 11:30 AM
Post
#1
|
|
914 Guru  Group: Members Posts: 7,774 Joined: 25-August 18 From: Woods of N. Idaho Member No.: 22,428 Region Association: Galt's Gulch |
Ever wondered how the seat belt warning circuit works in early 72’ & 73’s?
Lets start with the description of operation in the owners manual: “An audio-visual warning system will remind the driver and the passenger to put on their safety belts. The buzzer will sound and the fasten seat belt sign on the dashboard will light up when the ignition is on and the parking brake is released. The warning system will also be activated if the passenger is not wearing the seat belt.” The entire “logic” to make all this happen is contained in the seat belt warning light. The whole thing is on a small PCB (see picture below). There really is no smarts or logic in the modern sense. It is just a very simple transistor based circuit that reads switch inputs. 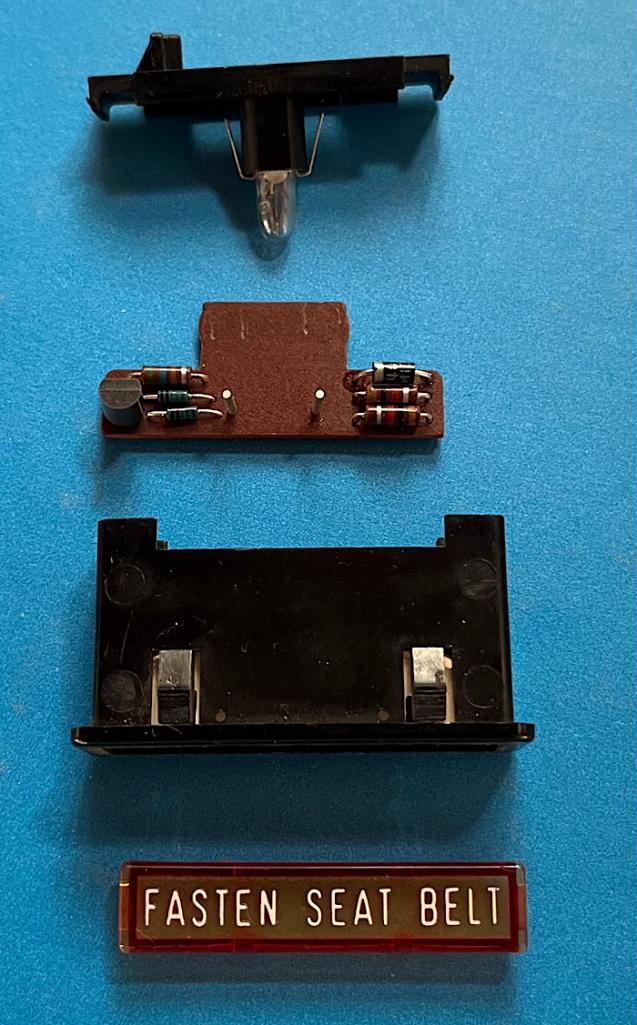 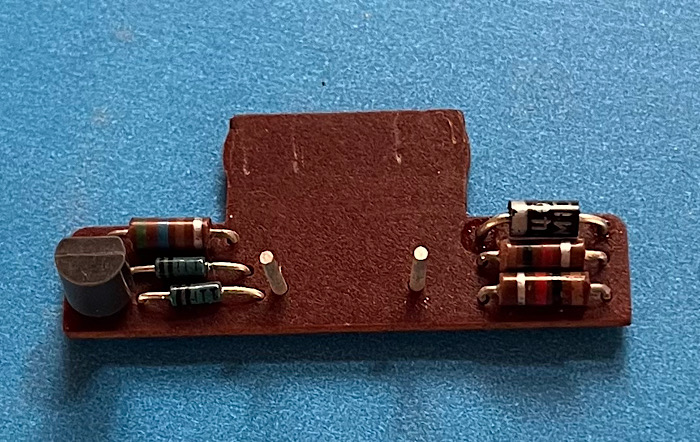 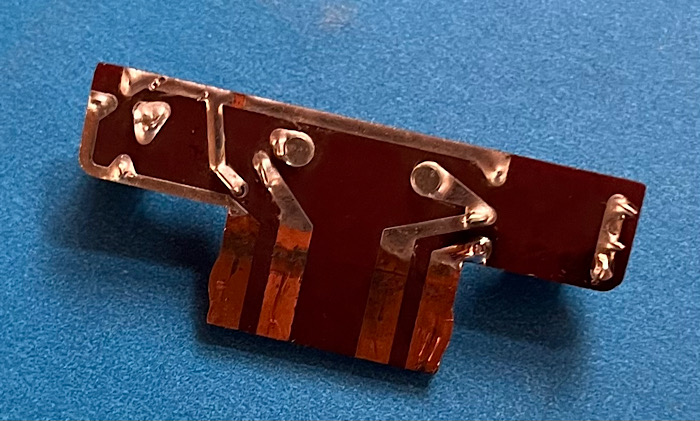 Note: one of the original diodes in this picture has been swapped for a 1N4001. The vehicle side electrical connector slides onto the four PCB traces to make the connection to the circuit board. The schematic is contained in the Haynes Manual for the 73’ model year. In my copy of Haynes the 72’ schematic is there but isn’t printed as clearly not sure if this is the case with all printings. Item 66 is the buzzer. The buzzer (which is really just a solenoid) is self actuated meaning that when 12v and ground is supplied to it, the solenoid repeatedly makes & breaks the connection that energizes the solenoid, causing it to "buzz". The buzzer has 12V to it at all times and the ground path is supplied though the transistor on the PCB. 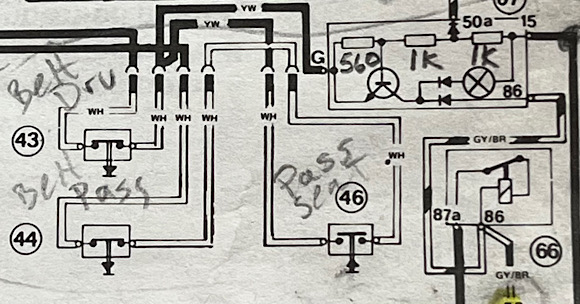 When the Fasten Seat Belt lamp is on, the seat belt buzzer will also be on. From here on out, I’m going to neglect to mention the buzzer. But remember, if the Fasten Seat Belt light is on, the buzzer would be on also and is sourcing current through the Fasten Seat Belt PCB circuit. NOTE: Special thanks to Montreal914 for donating this part for me to document and modify |
   |

 
|
| Superhawk996 |
Apr 5 2025, 11:36 AM
Post
#2
|
|
914 Guru Group: Members Posts: 7,774 Joined: 25-August 18 From: Woods of N. Idaho Member No.: 22,428 Region Association: Galt's Gulch |
Here's how it works (Big Picture Overview):
Power is supplied into the seat belt warning light via pin 15 coming from the ignition switch. When the ignition is ON, there is +12v supplied to the warning lamp circuit at all times. The seat belts buckles receivers (both driver and passenger side) and the passenger seat cushion switch are switched ground circuits that ultimately provide a ground to the seat belt warning lamp to turn the Fasten Seat Belt light on depending on the switch conditions. I will cover the details of how transistor circuit works later in this thread. Here are the basics of how the seat belt and switch cushion switches work before moving on: The driver and passenger seat belt switches are normally closed. i.e. when the seat belt isn’t fastened, the switch is closed and able to pass the ground signal. The passenger seat cushion switch is normally open. i.e. unless someone is sitting in the passenger seat the seat cushion switch is unable to pass the ground signal though it. |
|
|
|
| Superhawk996 |
Apr 5 2025, 11:44 AM
Post
#3
|
|
914 Guru Group: Members Posts: 7,774 Joined: 25-August 18 From: Woods of N. Idaho Member No.: 22,428 Region Association: Galt's Gulch |
Operation:
Driver Only – seat belt unbuckled. (Lets call this the default condition): Ground is passed though the driver side seat belt latch switch because its normally closed. That ground signal goes to pin “G” on the seat belt warning light and causes the transistor circuit to light the Fasten Seat Belt lamp. Once the driver buckles the seat belt, the normally closed switch is opened, the ground signal cannot pass, and the Fasten Seat Belt lamp is turned off. Passenger Only – seat belt unbuckled: Ground is passed though the passenger side seat belt latch switch because it’s normally closed. The signal then goes to the passenger side seat cushion switch. If no one is sitting in the passenger seat, the ground signal cannot pass to the warning lamp because the seat cushion switch is normally open. The Fasten Seat Belts lamp remains off. If someone is sitting in the passenger seat, the seat cushion switch is closed (by the passengers weight) and the ground signal from the unbuckled latch is able to pass on through to the warning lamp pin “G”, lighting the light regardless of whether the driver is buckled or unbuckled. When the passenger buckles the seat belt, the normally open switch at the buckle receiver is opened and the Fasten Seat Belt lamp is turned off. |
|
|
|
| Superhawk996 |
Apr 5 2025, 11:46 AM
Post
#4
|
|
914 Guru Group: Members Posts: 7,774 Joined: 25-August 18 From: Woods of N. Idaho Member No.: 22,428 Region Association: Galt's Gulch |
Parking Brake Lever Switch . . . . The Bonus Feature:
Porsche assumes that the parking brake will always be set when the vehicle is parked, and the driver will have to lower the parking brake lever before driving away. This would cause the Fasten Seat Belt lamp and buzzer to go on if the driver (or passenger if present) hasn’t buckled the seat belt and the ignition switch is turned to ON. Said differently, if the Fasten Seat Belt lamp is already on, lifting the parking brake lever will turn off the Fasten Seat Belt lamp by applying a ground signal (from the park brake switch) to pin 50 of the warning light. This behavior of the Fasten Seat Belt lamp is in parallel with the operation of the “Brake” light in the combo gauge. |
|
|
|
| Superhawk996 |
Apr 5 2025, 11:47 AM
Post
#5
|
|
914 Guru Group: Members Posts: 7,774 Joined: 25-August 18 From: Woods of N. Idaho Member No.: 22,428 Region Association: Galt's Gulch |
Circuit Overview:
There is a block diagram schematic of the Fasten Seat Belt warning circuit in the Haynes and factory manual. If you understand electronics & schematics, there is enough information present to see how the circuit operates as outlined above. The transistor is just acting as a electronic switch for the warning lamp bulb and the buzzer which are in parallel. The transistor allows current to flow though the Fasten Seat Belt lamp and the buzzer. The big picture is that when 12v is on pin 15 and ground is applied to pin “G”, the transistor switches “ON” and lets current flow of the Fasten Seat Belt light & buzzer (via pin 86) to pass through the transistor. If Ground is removed from pin “G” of the warning lamp by opening the seat belt switches or the passenger seat cushion switch, the transistor switches “OFF” and doesn’t allow current to flow through it. I don’t suspect anyone cares about the math or the details behind how the transistor is biased. The short version is that the 3 resistors on the PCB set up a simple voltage divider to bias the transistor such that its just sitting there waiting to see a ground on pin “G” and when it does, the transistor is switched on and can flow current to the lamp and the buzzer. |
|
|
|
| Superhawk996 |
Apr 5 2025, 11:48 AM
Post
#6
|
|
914 Guru Group: Members Posts: 7,774 Joined: 25-August 18 From: Woods of N. Idaho Member No.: 22,428 Region Association: Galt's Gulch |
What isn’t shown in the schematic - the component details:
1 BC338 transistor (NPN type) – obsolete but data sheet is on Mouser, Digikey, etc. Note: Currently working to identify a suitable substitute I can swap and test. 2N3705 looks like a good substitute. The catch here is that the transistor needs to be TO-92 size to fit inside the very small Fasten Seat Belt housing. It also needs to have a rather large collector current to support the incandescent lamp current (80-100 mA) + the buzzer solenoid current (TBD). The BC 338 data sheet lists Ic as 800mA, 625 mW power capacity. 2 resistors – 1K ohms (brown, black, red) 1 resistor – 560 ohms (green, blue, brown) 3 diodes – exact type unknown marked ITT. Blue glass case with 2 cathode bands but no numerical ID numbers. Measures as 0.6v forward current drop so its a silicon diode. Suitable replacement 1N4001 silicon diode tried and tested OK. Bulb incandescent Osram 12v, 1.2W. (grain of rice style bulb - actual current draw 90mA). Future project – replace with LED. |
|
|
|
| Superhawk996 |
Apr 5 2025, 11:53 AM
Post
#7
|
|
914 Guru Group: Members Posts: 7,774 Joined: 25-August 18 From: Woods of N. Idaho Member No.: 22,428 Region Association: Galt's Gulch |
More to come regarding mods:
Swap to LED lamp to free up current draw to enable other silly mods |
|
|
|
| technicalninja |
Apr 5 2025, 12:01 PM
Post
#8
|
|
Advanced Member Group: Members Posts: 2,531 Joined: 31-January 23 From: Granbury Texas Member No.: 27,135 Region Association: Southwest Region |
Nice write up! (IMG:style_emoticons/default/first.gif)
I'm not planning on fixing this circuit... On MY car I'd rip that crap out! But if I ever need to fix one, I know what I'm going to look at FIRST!!!! It's info like this that make this a special place! He's even listed modern available parts for repairs! KICK ASS! Hats off to you Sir! Edit: I thought YOU were asking for help initially. I thought WTF, why does he need help? So, I looked... Nope, full throw down dissection and repair instruction. |
 |
|
| Superhawk996 |
Apr 5 2025, 12:27 PM
Post
#9
|
|
914 Guru Group: Members Posts: 7,774 Joined: 25-August 18 From: Woods of N. Idaho Member No.: 22,428 Region Association: Galt's Gulch |
Note:
I'm still looking for cheap (i.e. shipping only) a late 74' - 76' interlock relay (working or not) to do the same write up on how that works and how they might be able to be repaired since they are NLA. Attached image(s) 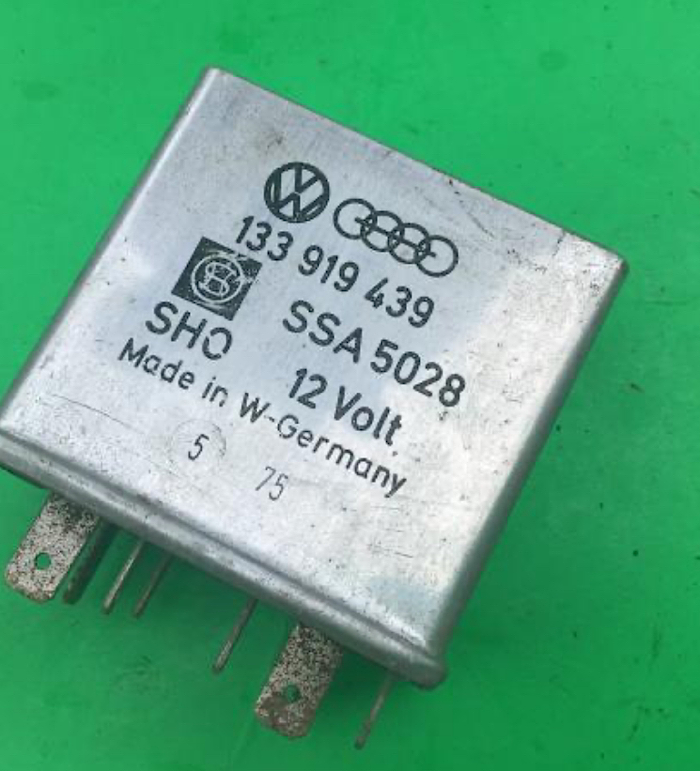
|
|
|
|
| jim_hoyland |
Apr 5 2025, 05:16 PM
Post
#10
|
|
Get that VIN ? Group: Members Posts: 10,043 Joined: 1-May 03 From: Sunset Beach, CA Member No.: 643 Region Association: Southern California |
Thank you for digging into this. I’d be interested in how to reconnect all those wires under the passenger seat. It’s a. ‘75 ; the relay is intact
Attached thumbnail(s) 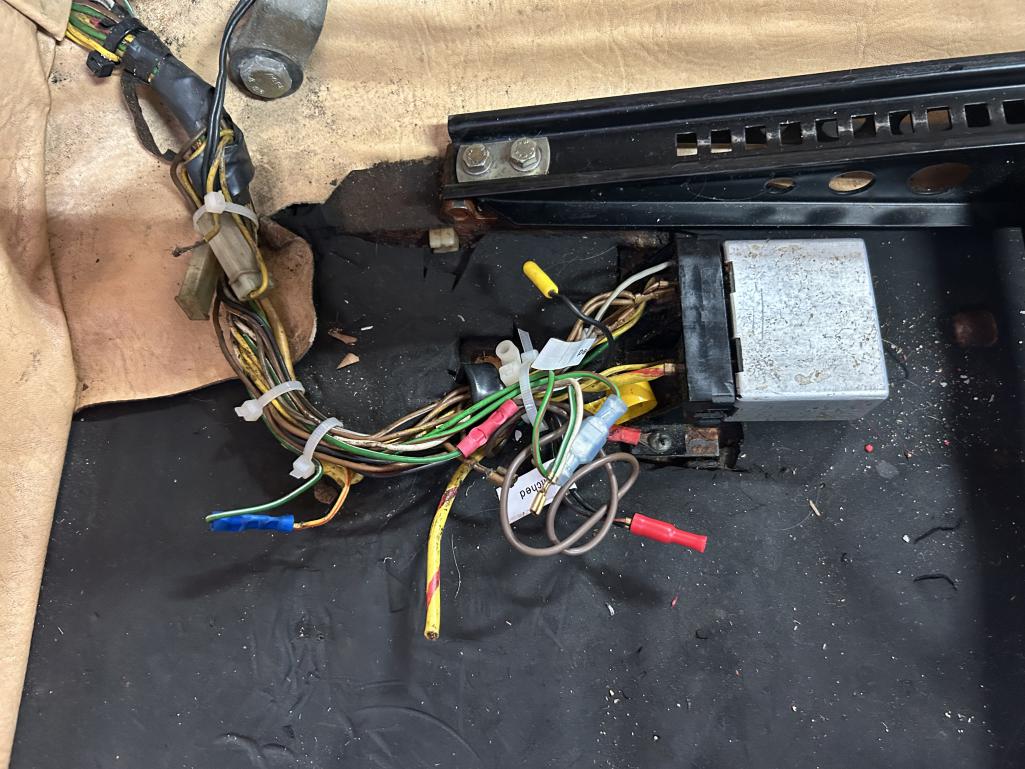
|
|
|
|
| jim_hoyland |
Apr 5 2025, 05:27 PM
Post
#11
|
|
Get that VIN ? Group: Members Posts: 10,043 Joined: 1-May 03 From: Sunset Beach, CA Member No.: 643 Region Association: Southern California |
And:
Attached thumbnail(s) 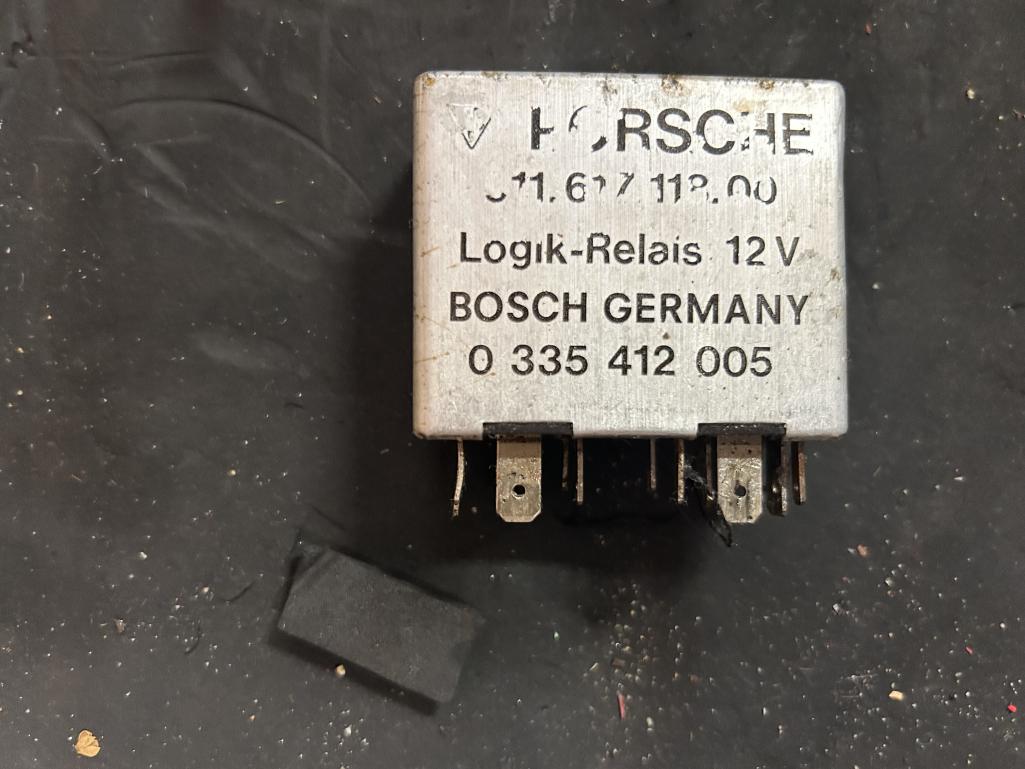
|
|
|
|
| Superhawk996 |
Apr 5 2025, 11:28 PM
Post
#12
|
|
914 Guru Group: Members Posts: 7,774 Joined: 25-August 18 From: Woods of N. Idaho Member No.: 22,428 Region Association: Galt's Gulch |
QUOTE(jim_hoyland @ Apr 5 2025, 07:27 PM)  And: Thanks for posting relay with p/n 911 617 118 00. (IMG:style_emoticons/default/beerchug.gif) Per PET looks like this is cross referenced to the relay part number I posted. So it looks like I’m looking for either part number. Need a non-functional part for tear down - opening the metal case will surely result in some damage & deformation. Likewise I’d like to be able to repair and modify without having someone’s car or working part compromised. |
|
|
|
| JeffBowlsby |
Apr 6 2025, 06:07 AM
Post
#13
|
|
914 Wiring Harnesses & Beekeeper Group: Members Posts: 9,230 Joined: 7-January 03 From: San Ramon CA Member No.: 104 Region Association: None |
QUOTE(Superhawk996 @ Apr 5 2025, 11:27 AM) Note: I'm still looking for cheap (i.e. shipping only) a late 74' - 76' interlock relay (working or not) to do the same write up on how that works and how they might be able to be repaired since they are NLA. Email sent @Superhawk996 |
|
|
|
| Superhawk996 |
Apr 9 2026, 10:04 PM
Post
#14
|
|
914 Guru Group: Members Posts: 7,774 Joined: 25-August 18 From: Woods of N. Idaho Member No.: 22,428 Region Association: Galt's Gulch |
Link to late 74’ - 76’ seat belt interlock info if you happen to have a late car.
www.914world.com/bbs2/index.php?act=ST&f=2&t=374489 Note: the late interlock project still is not complete (as of 4/26). Basic info in the operation is there. Hoping to get time to finish this project soon. Hit some snags on time and the ability to restore a non-functional unit. |
|
|
|
|
1 User(s) are reading this topic (1 Guests and 0 Anonymous Users)
0 Members:

|
Lo-Fi Version | Time is now: 10th April 2026 - 01:21 AM |
Invision Power Board
v9.1.4 © 2026 IPS, Inc.