|
|
|
Porsche, and the Porsche crest are registered trademarks of Dr. Ing. h.c. F. Porsche AG.
This site is not affiliated with Porsche in any way. Its only purpose is to provide an online forum for car enthusiasts. All other trademarks are property of their respective owners. |
|
|

  |

| nditiz1 |
 May 5 2025, 07:49 PM May 5 2025, 07:49 PM
Post
#1
|
|
Senior Member  Group: Members Posts: 1,263 Joined: 26-May 15 From: Mount Airy, Maryland Member No.: 18,763 Region Association: MidAtlantic Region |
*****Update**** No longer a 6 conversion project, maybe in the distant future, but lets get this off the lift and driving again.
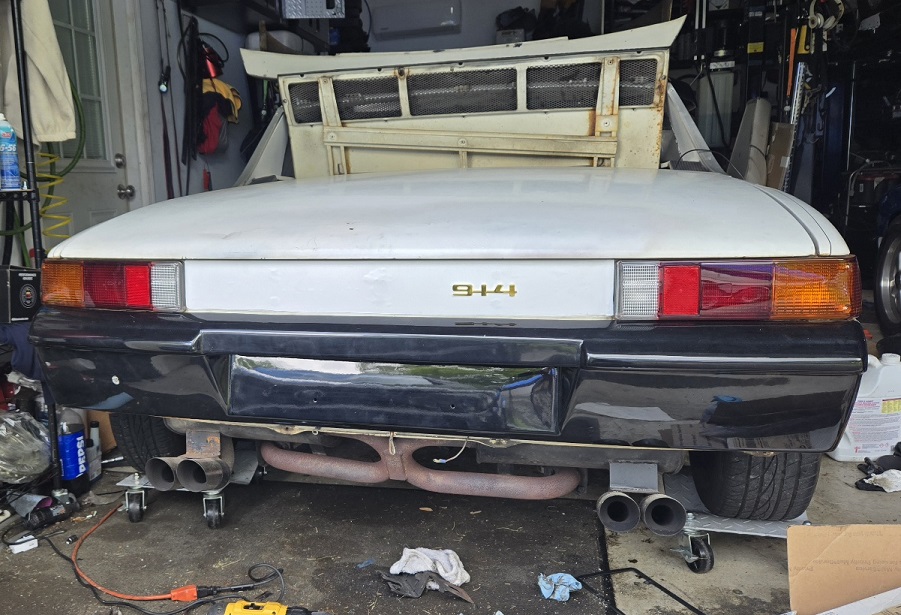
I figured since I finally started shelling out money I would begin a build thread. No set timeline in mind, maybe by the Sept ski roundtop swap meet??? I hate having a pcar down, BUT I have a Rallye and family trips coming up, plus boating season will be starting, just a lot of things going on. I may try to do some vids of the build as those are always helpful to me. Raw footage of me in boxers and flip-flops dropping an engine and trans is always a treat (IMG:style_emoticons/default/cheer.gif) ....Ok, enough blabbing on about life, down to the meat and potatoes. 1974 Ivory White 914. Going to assume it was a 1.8, by it not having fog lights. Idk, I just came up with that theory. "You know Nick, some of the 914s in 74 could have had the 2.0 without the appearance package" She's a basic B is what im trying to say. Too high of a vin in case you were wondering Jeff. Bought her off another world member, Don, down in Charlotte. It was sporting a 1.7 dual Carbs setup with 75/76 heat exchangers and a monza muffler. Black Forest racing did some rust repair years ago, back half of the floor pans. Anyway, I bought a one way ticket from Baltimore to Charlotte and drove her home. She made it eventually and I did not baby her. Once home I began to go over everything. Rocking 8 spoke empi wheels, rear reflector bar, primer spray in some areas, cracked targa. She was a driver, but she was mine. I immediately began formulating what my plans were. 5 lug conversion GT engine lid Restore rear trunk to factory look, sorry not a reflector bar guy Drop the 916 front and rear bumpers, not a 916 guy either Redo seats Add more gauges The list continued So I started to work on minor things, like a breather setup for the engine. During the trip 3/4 was blowing oil everywhere. Upon further inspection the 1/2 and oil fill were leading to atmosphere, soooooo the ground essentially. The hose on the 3/4 side didn't exist (IMG:style_emoticons/default/confused24.gif) I upgraded the gauge lights with leds and swapped in a working odometer. I replaced the rear lenses with euro 914rubber ones - which are mediocre fit at best, big gaps. Removed several useless switches and wiring under the dash. If there's one thing im decent at it's the wiring in these old cars. While playing with the shifter in the garage, I lost all the gears. Jack up the rear, shift console cover full of oil - add that fix to the list - the cone screw came out, easy fix, all gears back. Decided to do a minor tune-up with new plugs, and carb resetting. Don knew it wasn't right and I have tons of jets for webers. I began making adjustments. I did not however check the valves, I did the timing, not the valves, stupid me. (IMG:style_emoticons/default/headbang.gif) the last voyage I took her on, devastation hit a mile from my house. Kaboom down goes the valve and engine on cyl 3 (IMG:style_emoticons/default/hissyfit.gif) So i circle the wagons deciding what to do, top end rebuild the 1.7 OR drop in a 6. I have a 3.0 on the test stand currently. That made it less of a challenge, but a lot of work is involved to get everything so that engine can drop in. Money, time, patience. I did it once before and made some mistakes that I hope to not make this time around. So join me on this journey.... The old for sale ad http://www.914world.com/bbs2/index.php?showtopic=372901 Current state of things: 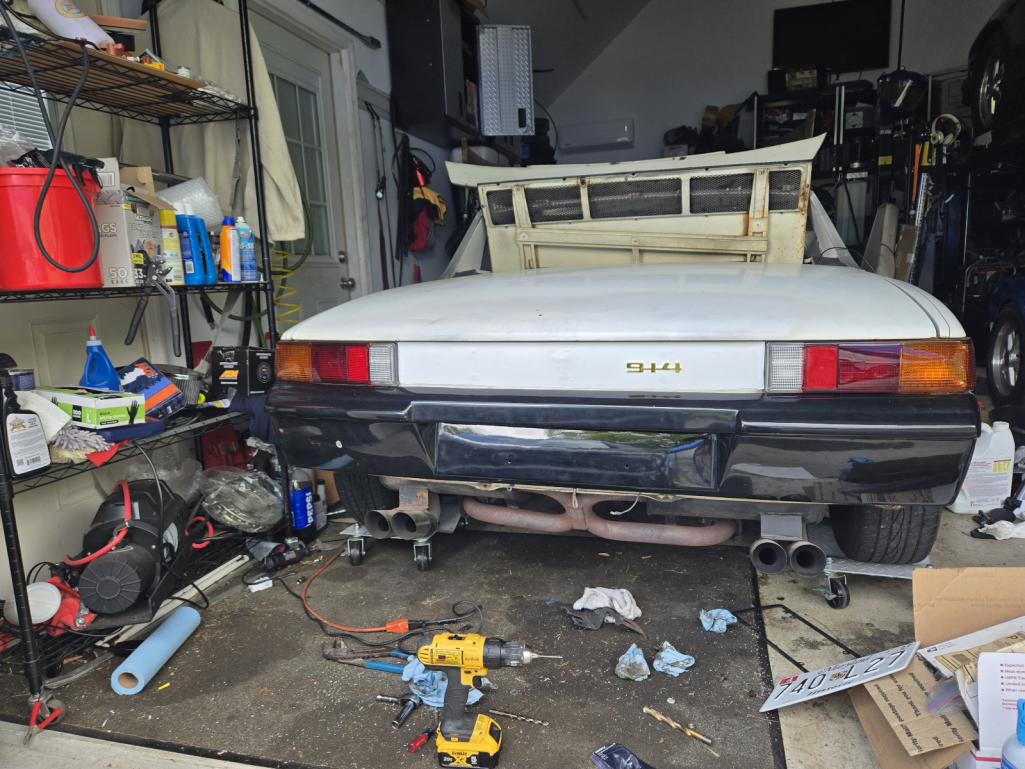 |
   |

 
|
| mb911 |
May 6 2025, 05:38 AM
Post
#2
|
|
914 Guru Group: Members Posts: 7,713 Joined: 2-January 09 From: Burlington wi Member No.: 9,892 Region Association: Upper MidWest |
Parts incoming. Might even have a GT bumper if you need one.
|
 |
|
| campbellcj |
May 6 2025, 06:28 AM
Post
#3
|
|
I can't Re Member Group: Members Posts: 4,687 Joined: 26-December 02 From: Agoura, CA Member No.: 21 Region Association: Southern California |
Sorry to hear about the engine mishap but looking forward to your build!
|
|
|
|
| Root_Werks |
May 6 2025, 10:14 AM
Post
#4
|
|
Village Idiot Group: Members Posts: 8,879 Joined: 25-May 04 From: About 5NM from Canada Member No.: 2,105 Region Association: Pacific Northwest |
This should be a good thread!
|
|
|
|
| OrangeBones |
May 6 2025, 10:35 AM
Post
#5
|
|
Member Group: Members Posts: 117 Joined: 20-November 20 From: 18914 Member No.: 24,914 Region Association: North East States |
How about getting it ready for the NEG???
|
|
|
|
| nditiz1 |
May 6 2025, 01:56 PM
Post
#6
|
|
Senior Member Group: Members Posts: 1,263 Joined: 26-May 15 From: Mount Airy, Maryland Member No.: 18,763 Region Association: MidAtlantic Region |
Rdy for NEG will be tough. I still need to pull the 1.7 out (IMG:style_emoticons/default/biggrin.gif)
I did just pull the trigger on the OEM weld in 6 mount from maddog. Ben's parts are in transit. I'm moving the 6 engine out of the way so I can get the car onto my maxjax. If I mainly stick to just the conversion and nothing else NEG could be a possibility. |
|
|
|
| mb911 |
May 6 2025, 03:39 PM
Post
#7
|
|
914 Guru Group: Members Posts: 7,713 Joined: 2-January 09 From: Burlington wi Member No.: 9,892 Region Association: Upper MidWest |
Shipped the first items today. Tank ,filler, console are next.
|
|
|
|
| racer914 |
May 6 2025, 04:55 PM
Post
#8
|
|
Member Group: Members Posts: 98 Joined: 1-October 19 From: Keystone Heights, FL Member No.: 23,513 Region Association: South East States |
I bought Peter's car and parts up in N Georgia, so I have some extra stuff. I sent you info on the front struts. I'm in the middle of my own conversion so I mainly bought it for the parts I needed. If you have other needs, let me know. I'll be interested in your build thread
Dave |
|
|
|
| nditiz1 |
May 7 2025, 06:28 AM
Post
#9
|
|
Senior Member Group: Members Posts: 1,263 Joined: 26-May 15 From: Mount Airy, Maryland Member No.: 18,763 Region Association: MidAtlantic Region |
Thanks Dave I did get the pics.
I guess starting this thread lit a fire under my a$$. Yesterday I found time to get crap out of the way to get the car up on the lift. I needed to drain the oil from my makeshift test stand and move a bunch of clutter around. Up on the lift gained me the first time seeing underneath the car. Blackforest did a decent job on the repair. With that said I saw a few trouble areas that were fixed with a crude application of things. I'll pretend I didn't see it until my foot goes through the floor (IMG:style_emoticons/default/beerchug.gif) (WTB: pedal pan section) Uggo pic 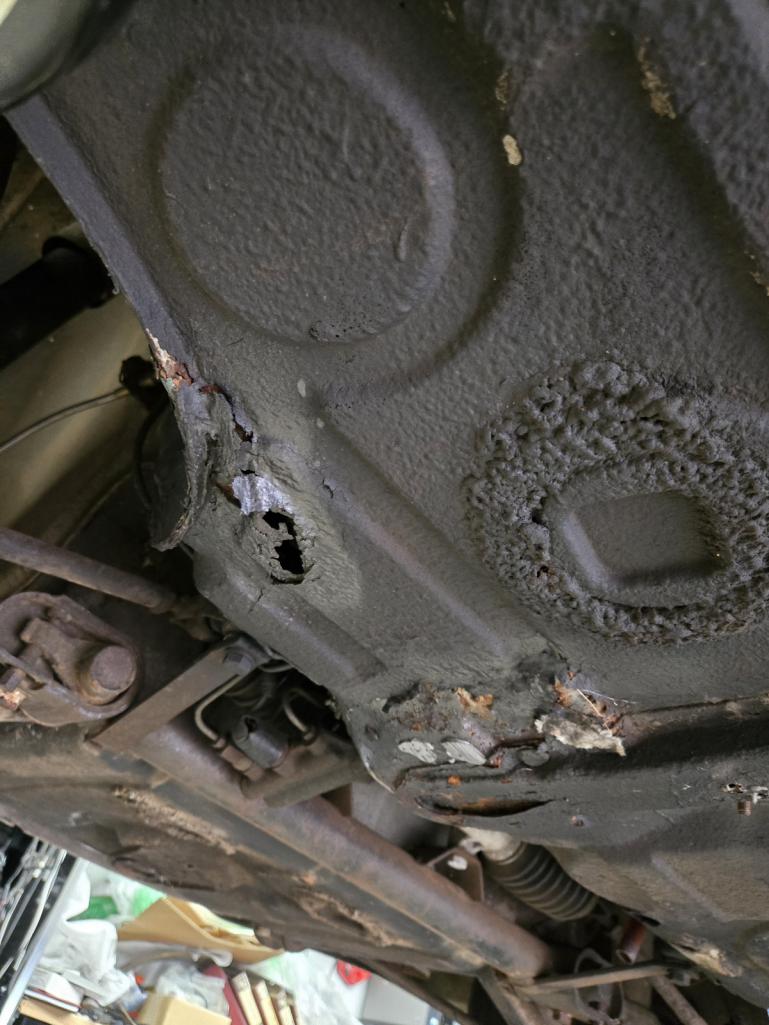 Not so uggo 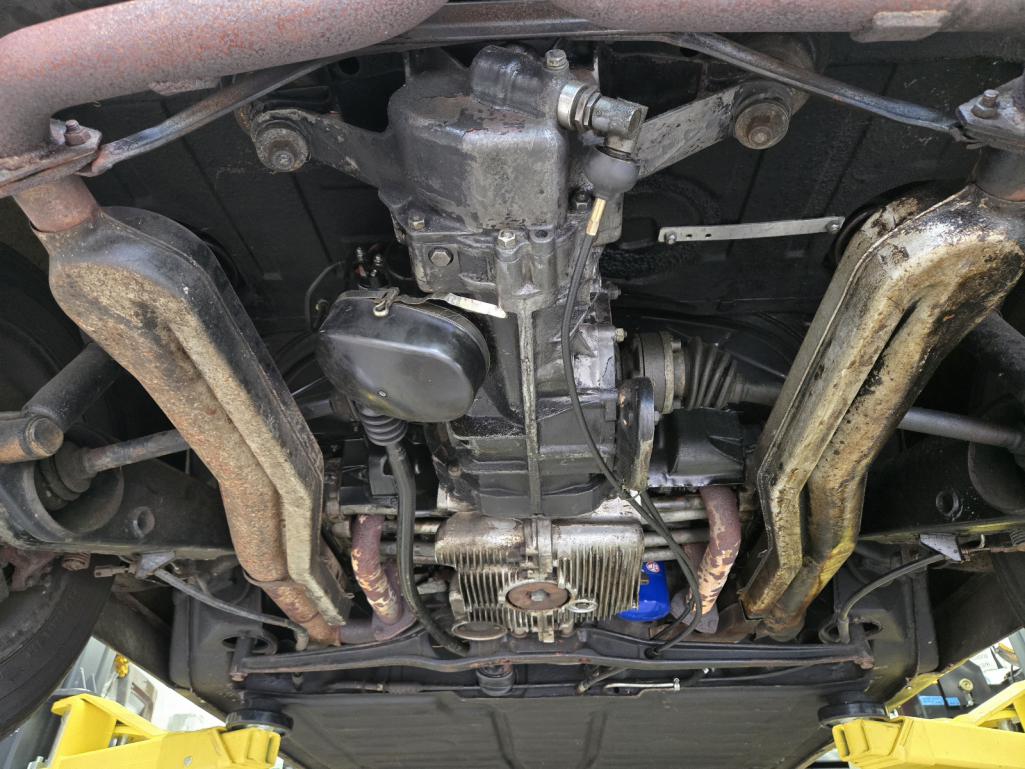 I might have gotten the drop ready in record time. At the same time I removed the shafts from the trans I also removed the shaft nut in preparation for the 5 lug hubs I purchased from Mark (914sixer). Let me put this out there for PMB. The 5 lug conversion they offer at $800 is a steal. Piecing all the parts together I will be at close to $1k and that is only because I already have new front 3.5 calipers, front and rear rotors. It would be more if I didn't have those. I really want the boxster setup like Tom (Olympic914), but that can come later. Breather disconnected, fuel line disconnected, speedo disconnected (might need to replace the cable), clutch cable disconnected, ground strap disco, shift rod disco, throttle cable disco, all 4 bolts loosened. Lowered the engine, unbolted the carrier bar, ran out of time for the trans bolts. Should be out later today (IMG:style_emoticons/default/cheer.gif) And just like that...it's out! 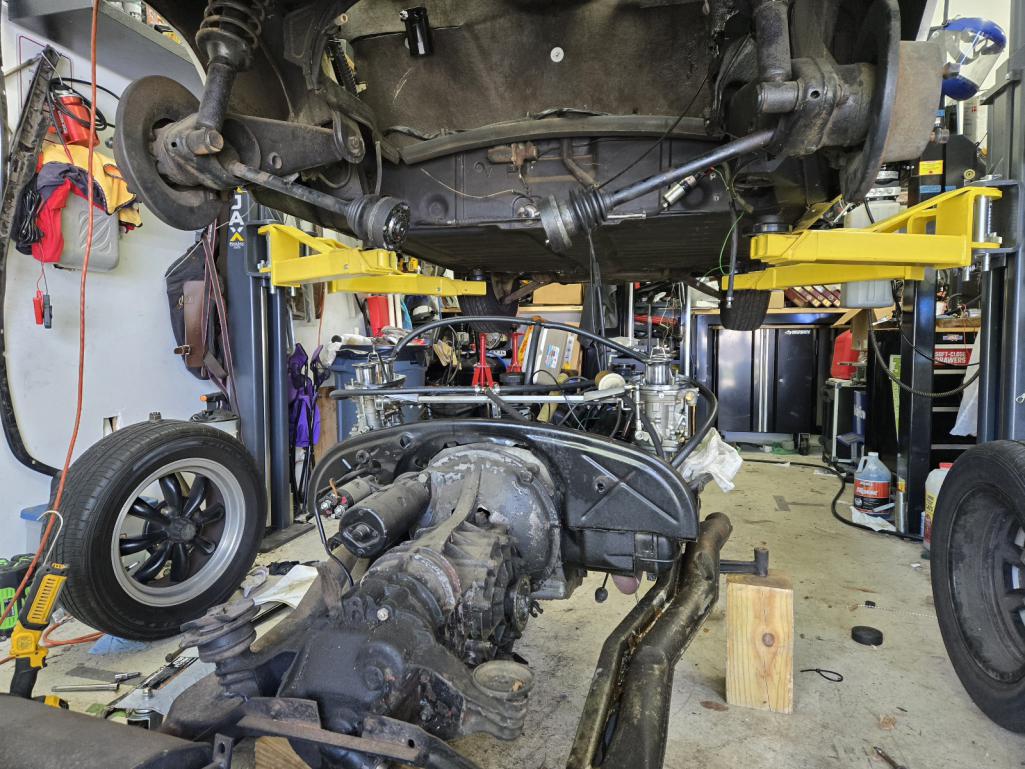 |
|
|
|
| scrz914 |
May 8 2025, 10:38 AM
Post
#10
|
|
Member Group: Members Posts: 452 Joined: 21-April 04 From: Santa Cruz, CA Member No.: 1,960 Region Association: Central California |
“I did it once before and made some mistakes that I hope to not make this time around. So join me on this journey....“
Looking forward to hearing any tips or tricks you’ve learned on your six conversion. I’m sure a lot of us starting our own conversion projects will learn a lot. |
|
|
|
| Shivers |
May 8 2025, 11:09 AM
Post
#11
|
|
Senior Member Group: Members Posts: 3,221 Joined: 19-October 20 From: La Quinta, CA Member No.: 24,781 Region Association: Southern California |
|
|
|
|
| Root_Werks |
May 8 2025, 11:54 AM
Post
#12
|
|
Village Idiot Group: Members Posts: 8,879 Joined: 25-May 04 From: About 5NM from Canada Member No.: 2,105 Region Association: Pacific Northwest |
Always like how quickly you can drop the entire drivetrain from a 914. My usual "forget" is the ground strap.
(IMG:style_emoticons/default/dry.gif) |
|
|
|
| nditiz1 |
May 8 2025, 12:37 PM
Post
#13
|
|
Senior Member Group: Members Posts: 1,263 Joined: 26-May 15 From: Mount Airy, Maryland Member No.: 18,763 Region Association: MidAtlantic Region |
@shivers - this is a one piece fiberglass bumper. Recently purchased the front and rear from a pelican member in FL. 916 bumpers will be in the classifieds soon.
@root_werks - I remembered that, but forgot the relay board. Luckily I noticed during the separation before it was stretched. Spent the rest of yesterday draining the tank, it was half full. Quick pro tip, hook the leads of your pump to a battery to drain the tank faster. This is in preparation of the return SS line from tangerine. Supply was previously done, but since it was carbs no return line needed. I also knocked both rear axles out for the new 5 lug rear hubs and bearings. |
|
|
|
| Shivers |
May 8 2025, 03:34 PM
Post
#14
|
|
Senior Member Group: Members Posts: 3,221 Joined: 19-October 20 From: La Quinta, CA Member No.: 24,781 Region Association: Southern California |
QUOTE(nditiz1 @ May 8 2025, 11:37 AM)  @shivers - this is a one piece fiberglass bumper. Recently purchased the front and rear from a pelican member in FL. 916 bumpers will be in the classifieds soon. @root_werks - I remembered that, but forgot the relay board. Luckily I noticed during the separation before it was stretched. Spent the rest of yesterday draining the tank, it was half full. Quick pro tip, hook the leads of your pump to a battery to drain the tank faster. This is in preparation of the return SS line from tangerine. Supply was previously done, but since it was carbs no return line needed. I also knocked both rear axles out for the new 5 lug rear hubs and bearings. Looks like it fits nicely. I do not see many of the old bumpers, a few on 6’s. I did a whole lot of work to keep mine. Very nice. |
|
|
|
| nditiz1 |
May 15 2025, 11:20 AM
Post
#15
|
|
Senior Member Group: Members Posts: 1,263 Joined: 26-May 15 From: Mount Airy, Maryland Member No.: 18,763 Region Association: MidAtlantic Region |
Making some steady progress on not only the 6 conversion but also the 5.
Pulled both rear hubs and bearings. New ones arrived from Mark. With the motor out I gained access to the bay. I already ordered the tangerine SS return line. Since the car was converted to carbs no need to replace both. Going to CIS it will be required. I removed the relay board and mount, the blower mount and the brake proportioning valve and mount. I will not be moving the valve like I did in my other conversion. I'm going to use a "T" and make it simple (flamers welcome). I removed the engine lid as I need to repair the passenger mount. Someone did a fix before and it was poor. A new one from restoration will do the trick. I did this on my other conversion as well. 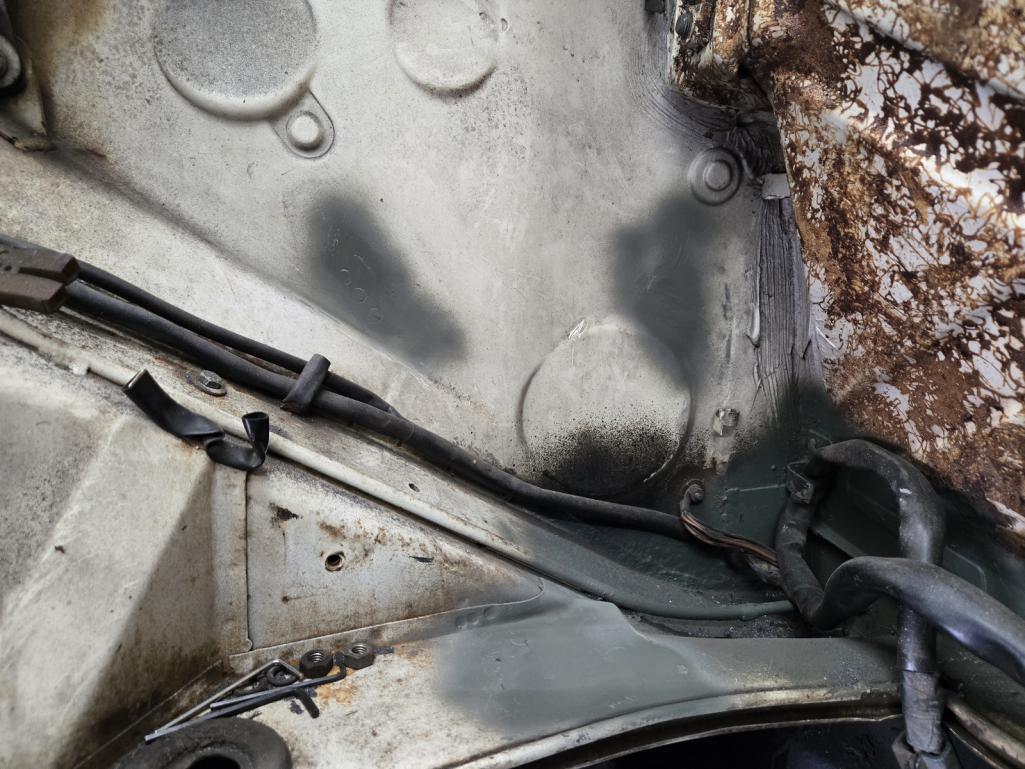 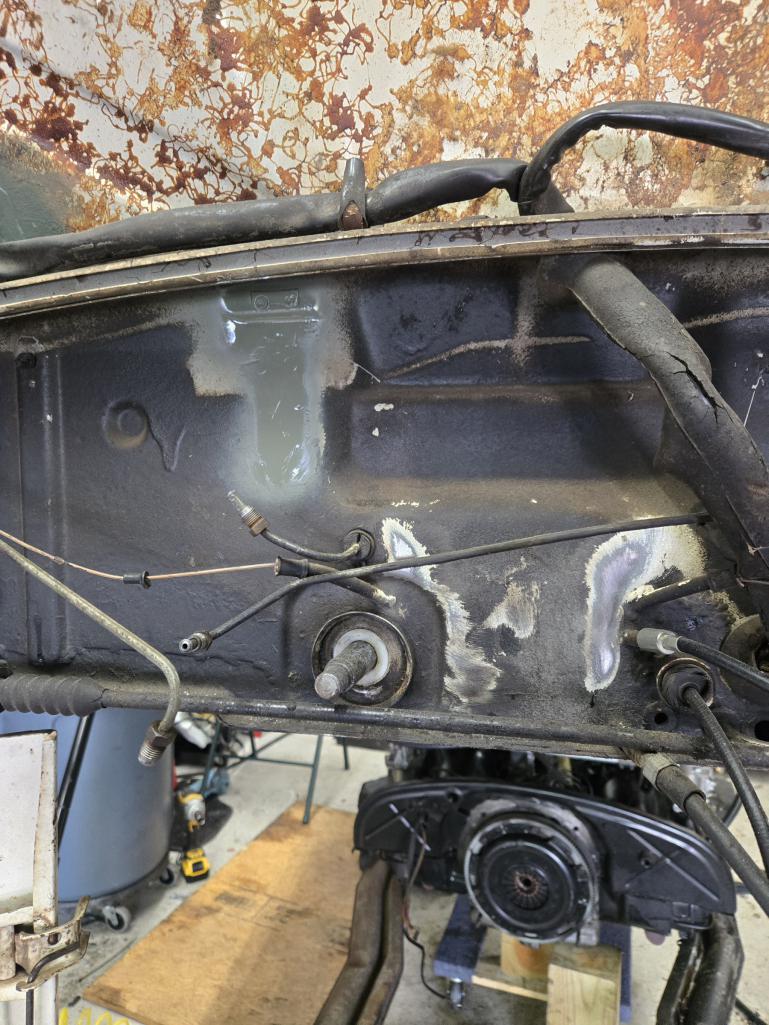 |
|
|
|
| Root_Werks |
May 15 2025, 11:28 AM
Post
#16
|
|
Village Idiot Group: Members Posts: 8,879 Joined: 25-May 04 From: About 5NM from Canada Member No.: 2,105 Region Association: Pacific Northwest |
Looks like you'll be installing the "Factory Style" mount. I did and really like it. I used the stock 914-6 rubber mount and it works great.
Fuzzy picture just after welding in place: Attached image(s) 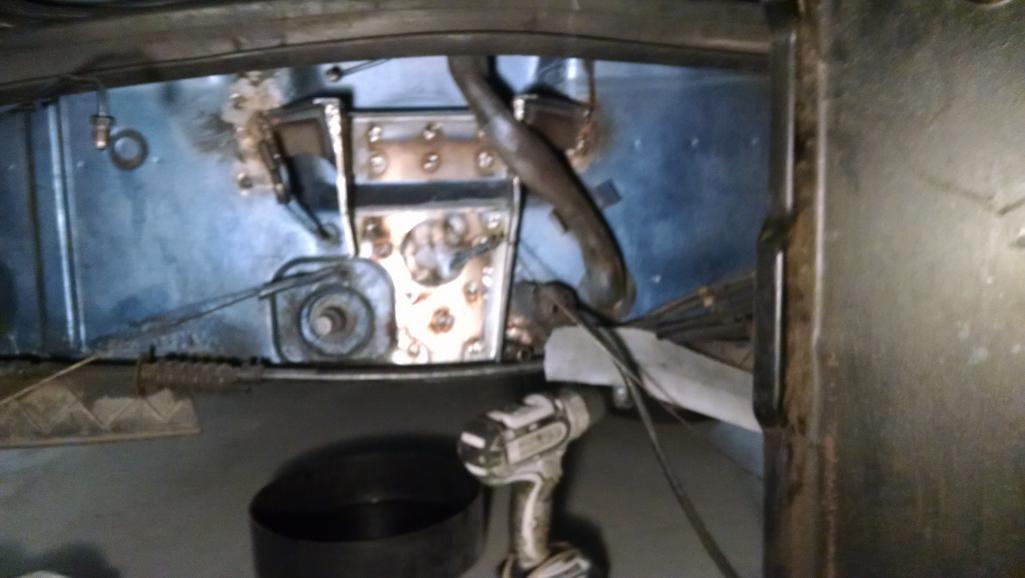
|
|
|
|
| Dion |
May 16 2025, 04:58 PM
Post
#17
|
|
RN Group: Members Posts: 2,922 Joined: 16-September 04 From: Audubon,PA Member No.: 2,766 Region Association: MidAtlantic Region |
Good luck with project! Will be following.
|
|
|
|
| nditiz1 |
May 20 2025, 06:26 PM
Post
#18
|
|
Senior Member Group: Members Posts: 1,263 Joined: 26-May 15 From: Mount Airy, Maryland Member No.: 18,763 Region Association: MidAtlantic Region |
@Root_Werks you are correct. I prefer the OEM mount, not because it's OEM, but because it just seems simple to install. I am going to run the stock square mount instead of the wevo like on my other conversion.
@Dion thanks! I plan to see you in 3 weeks at RR5. So I made a little more progress on the 5 lug conversion. Both bearings and hubs installed. Not a difficult swap. I ordered 1 912e/early 911 solid rotor. I installed it and bolted up the caliper. At first it wouldn't go on with the backing bracket in place. I needed to remove it so the caliper would fit. Maybe I dont have the hub fully pressed in. Once I removed the bracket it just barely fit with about .004" clearance between the caliper edge and the face of the rotor. I remember removing the backplate on my other conversion and having to use washers. Ian's vid says you can use the drive shaft torque to bring it all into spec. I will try this as ultimately that is what's needed. While looking at the condition of my rear calipers, they are functional but tired and I noticed a torn boot. Off to PMB I thought. Then I had an idea. The front SC calipers I will be running were already restored and I had a rear set of 911 ones (well had a rear set, 1 was used in my last 912e project). I thought for a sec I could have PMB restore just 1 911 one i have and id be set. I didn't have a working parking brake now, but would like to have one in the future. I researched what was needed to do the conversion and conceded the idea of using the 911 rears. While searching on fleabay for possible refurbished ones I came across PMBs ebay store. $200 for a set of early rears, no core needed, no wait time, I'm sold (IMG:style_emoticons/default/beerchug.gif) Even though my car is a 74 someone had already swapped to early calipers as I only have 1 bleeder on them. |
|
|
|
| mb911 |
May 21 2025, 06:20 AM
Post
#19
|
|
914 Guru Group: Members Posts: 7,713 Joined: 2-January 09 From: Burlington wi Member No.: 9,892 Region Association: Upper MidWest |
Your tank is done and waiting on filler necks to come back from the platers as I type.
|
|
|
|
| nditiz1 |
May 22 2025, 05:21 PM
Post
#20
|
|
Senior Member Group: Members Posts: 1,263 Joined: 26-May 15 From: Mount Airy, Maryland Member No.: 18,763 Region Association: MidAtlantic Region |
Woot! The tank.
Got 1 of the 2 major hurdles completed - welding in the mount. Only other thing I need to weld is the engine bracket and should go just as well as this did. The other hurdle is cutting holes for the tank. Seems simple enough, but making sure you get it lined up and try not to tear up your $30 hole saw bit. Last time I did this I chose the wrong size so I had a goof hole. It all worked out but it was still an oof. I almost screwed up welding the mount bracket. I had my wire speed set too low so when I went to fill the plugs it wasn't working correctly. Also I think I had the heat set too high. Anyway, I got it dialed in and things went as well as could be expected. I'm a "melti-glob" welder at best. The plug hole fill makes my novice skills seem somewhat passable, one reason why I like using this version of the mount. 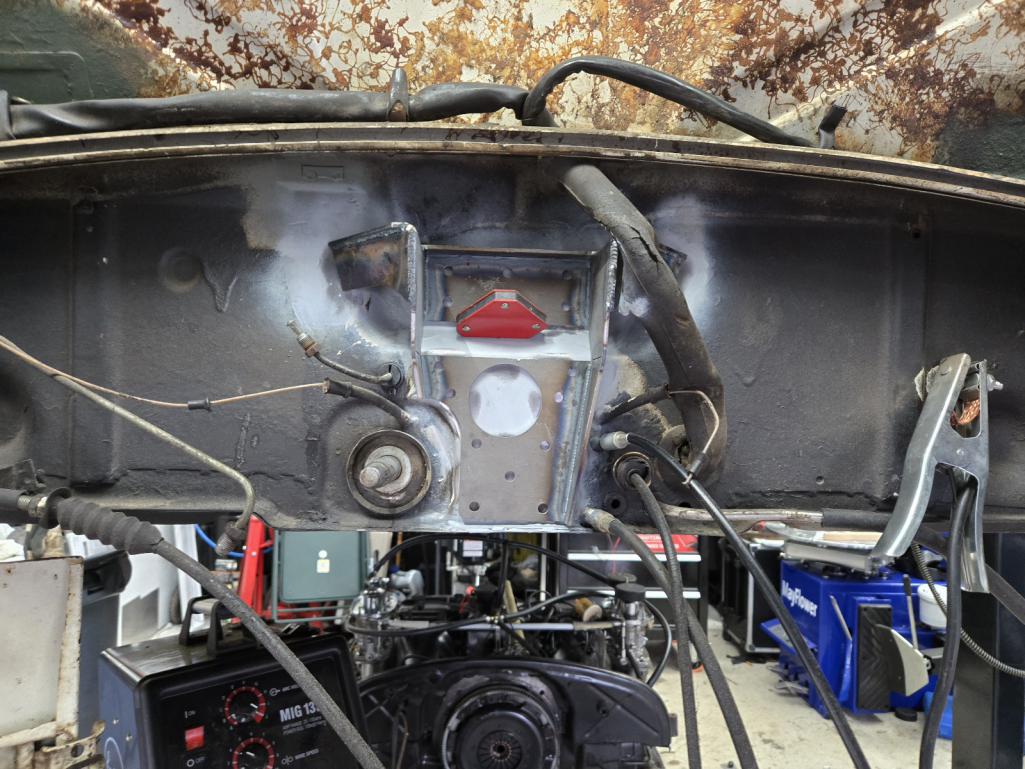 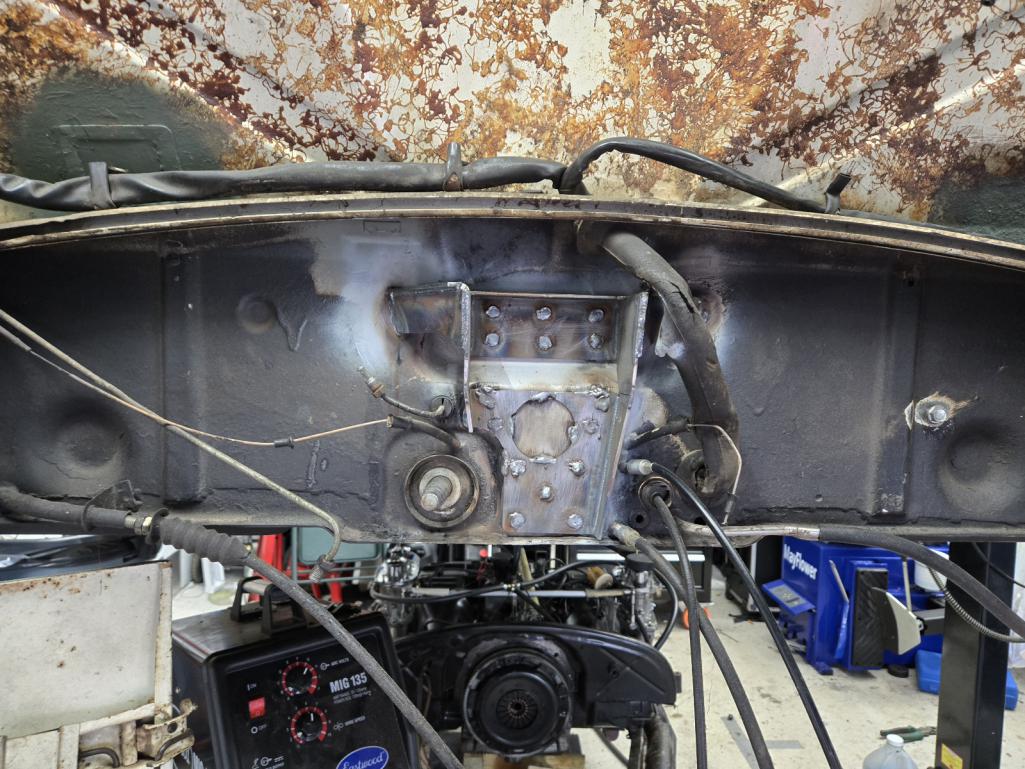 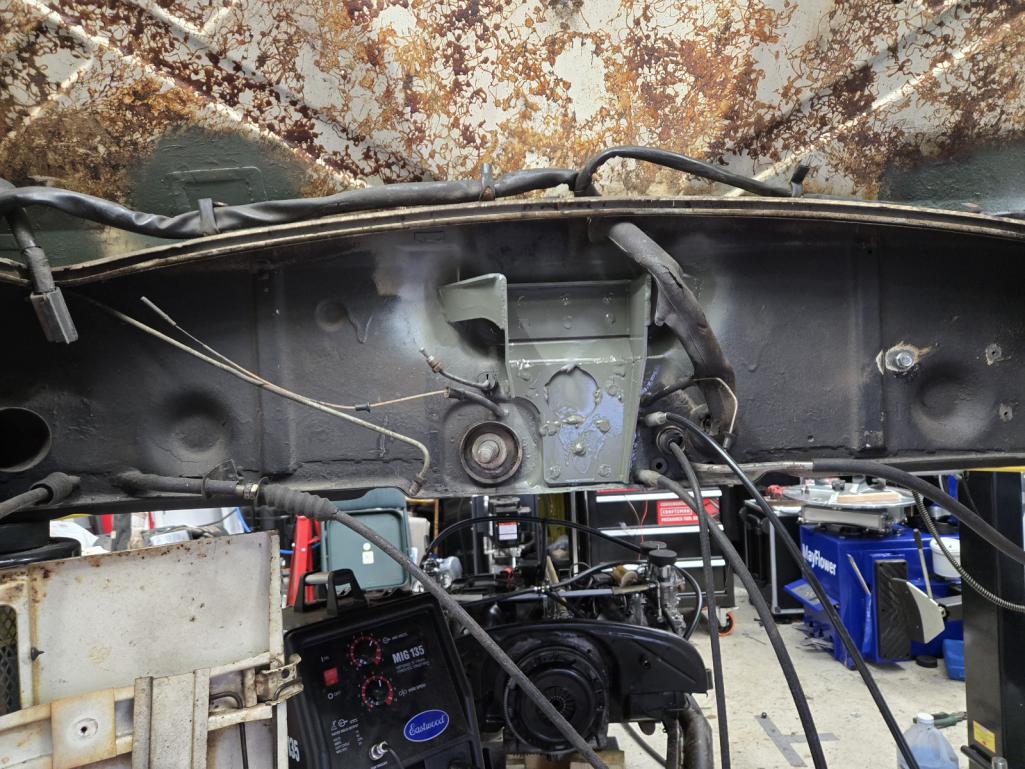 |
|
|
|
|
4 User(s) are reading this topic (3 Guests and 0 Anonymous Users)
1 Members: porschetub

|
Lo-Fi Version | Time is now: 19th January 2026 - 01:12 PM |
Invision Power Board
v9.1.4 © 2026 IPS, Inc.