|
|
|
Porsche, and the Porsche crest are registered trademarks of Dr. Ing. h.c. F. Porsche AG.
This site is not affiliated with Porsche in any way. Its only purpose is to provide an online forum for car enthusiasts. All other trademarks are property of their respective owners. |
|
|

  |

| John2kx |
 Sep 7 2003, 02:23 PM Sep 7 2003, 02:23 PM
Post
#1
|
|
Senior Member  Group: Members Posts: 502 Joined: 22-August 03 From: Augusta, Ga. Member No.: 1,066 |
Before breaking this plastic piece, thought I'd ask how to properly install.
Does the outside window rubber need to be removed to install this piece? It appears the same screw securing window channel holds this piece in place as well. What is the small hole in door right beneath where this piece goes for? John Attached image(s) 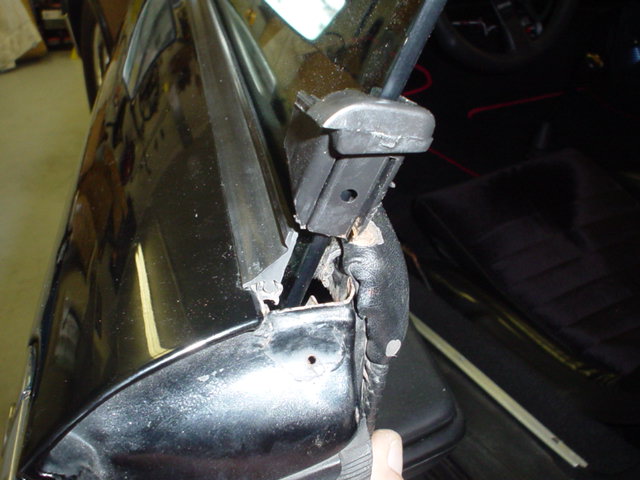
|
   |

 
|
| TheCabinetmaker |
Sep 7 2003, 02:28 PM
Post
#2
|
|
I drive my car everyday Group: Members Posts: 8,304 Joined: 8-May 03 From: Tulsa, Ok. Member No.: 666 |
If the scraper rubber hasn't shrunk, it may need to be removed for installation. The hole is for the screw that holds it in place. If you have to remove the scraper, use a light lube to slide it back in place.
|
|
|
|
| TheCabinetmaker |
Sep 7 2003, 02:30 PM
Post
#3
|
|
I drive my car everyday Group: Members Posts: 8,304 Joined: 8-May 03 From: Tulsa, Ok. Member No.: 666 |
One more thing. Pay close attention to which way the rubber comes out!
|
|
|
|
| MarkV |
Sep 7 2003, 02:30 PM
Post
#4
|
|
Fear the Jack Stands Group: Members Posts: 1,493 Joined: 15-January 03 From: Sunny Tucson, AZ Member No.: 154 Region Association: None |
I think you have the wrong part. The hole in the door is for a small screw that hold that end piece on.
|
|
|
|
| TheCabinetmaker |
Sep 7 2003, 02:33 PM
Post
#5
|
|
I drive my car everyday Group: Members Posts: 8,304 Joined: 8-May 03 From: Tulsa, Ok. Member No.: 666 |
Right part. The hole in the stop is where the screw goes once it's pushed into place
|
|
|
|
| John2kx |
Sep 7 2003, 02:53 PM
Post
#6
|
|
Senior Member Group: Members Posts: 502 Joined: 22-August 03 From: Augusta, Ga. Member No.: 1,066 |
It looks like the outer window rubber "track" fits where I have screw driver pointed.
I see how to pull window rubber out of track but if track needs to be removed, how is this done? This is starting to look like the door panel and just about every other piece needs to come apart to install this piece. |
|
|
|
| John2kx |
Sep 7 2003, 02:54 PM
Post
#7
|
|
Senior Member Group: Members Posts: 502 Joined: 22-August 03 From: Augusta, Ga. Member No.: 1,066 |
forgot to add pic
Attached image(s) 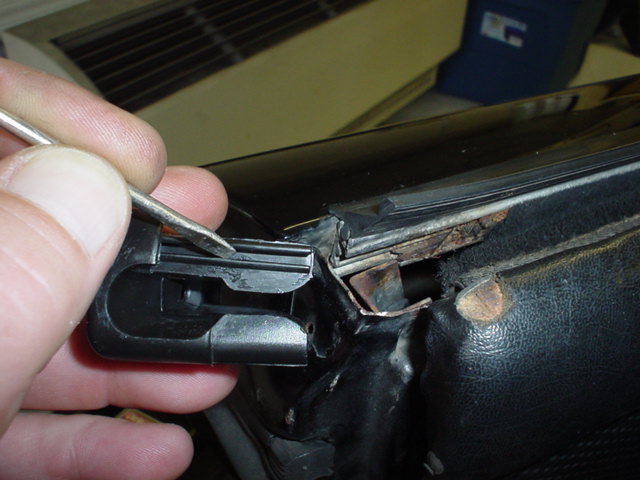
|
|
|
|
| TheCabinetmaker |
Sep 7 2003, 03:06 PM
Post
#8
|
|
I drive my car everyday Group: Members Posts: 8,304 Joined: 8-May 03 From: Tulsa, Ok. Member No.: 666 |
John, after a closer inspection of your pic and my car, Mark V is right. You have the wrong part. There should be a rubber lip that goes on the outside of the door that the screw goes into.
Sorry MarkV |
|
|
|
| John2kx |
Sep 7 2003, 03:16 PM
Post
#9
|
|
Senior Member Group: Members Posts: 502 Joined: 22-August 03 From: Augusta, Ga. Member No.: 1,066 |
Is what I have for a early car? Mine is a '73. It looks like the perfect part to fill the void.
Anyone have a pic of what this is supposed to look like put together correctly? John Attached image(s) 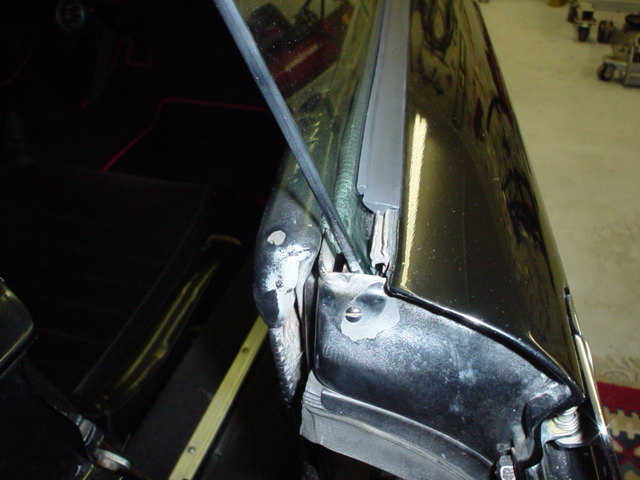
|
|
|
|
| TheCabinetmaker |
Sep 7 2003, 03:22 PM
Post
#10
|
|
I drive my car everyday Group: Members Posts: 8,304 Joined: 8-May 03 From: Tulsa, Ok. Member No.: 666 |
Here's two for sale on ebay from Partwerks. Notice the "flap" that goes on the outside with the screw hole.
http://cgi.ebay.com/ebaymotors/ws/eBayISAP...item=2430580261 http://cgi.ebay.com/ebaymotors/ws/eBayISAP...item=2430539844 |
|
|
|
| John2kx |
Sep 7 2003, 03:25 PM
Post
#11
|
|
Senior Member Group: Members Posts: 502 Joined: 22-August 03 From: Augusta, Ga. Member No.: 1,066 |
I found this pic on pelicans site. The holes appear to line up right but it looks a little short to fill the void I have.
If only I had a pic of piece installed. http://www.pelicanparts.com/catalog/shopca...weathr_main.htm |
|
|
|
| John2kx |
Sep 7 2003, 03:28 PM
Post
#12
|
|
Senior Member Group: Members Posts: 502 Joined: 22-August 03 From: Augusta, Ga. Member No.: 1,066 |
Sorry about that........bad link to pic I saw but the one you pointed out on ebay looked the same.
|
|
|
|
| TheCabinetmaker |
Sep 7 2003, 03:36 PM
Post
#13
|
|
I drive my car everyday Group: Members Posts: 8,304 Joined: 8-May 03 From: Tulsa, Ok. Member No.: 666 |
B-542-174-10 is the pelican part # for what you need. This is for a later model. What year car do you have? The scraper on your passenger door looks to have shrunk by about an inch of better. You won't fill that void with the end cap.
|
|
|
|
| boxstr |
Sep 7 2003, 03:44 PM
Post
#14
|
|
MEMBER:PACIFIC NORTHWEST REGION Group: Members Posts: 7,522 Joined: 25-December 02 From: OREGON Member No.: 12 Region Association: Pacific Northwest |
You have the rubber piece for the early car, the on eyou want comes out over the door and has a hole in it for a very small screw.
CCLINPARTSCITY |
|
|
|
| John2kx |
Sep 7 2003, 06:05 PM
Post
#15
|
|
Senior Member Group: Members Posts: 502 Joined: 22-August 03 From: Augusta, Ga. Member No.: 1,066 |
It looks like I've got the wrong shit this time around. Window "wipers" should be replaced as well if these are cut to shape as I think they are.
But the question still remains.............in which order does this stuff go in? alignment piece I'm referring to followed by window wiper or the other way around. A detailed pic sure would help here. John |
|
|
|
| TheCabinetmaker |
Sep 7 2003, 06:18 PM
Post
#16
|
|
I drive my car everyday Group: Members Posts: 8,304 Joined: 8-May 03 From: Tulsa, Ok. Member No.: 666 |
Unfortunately mine need to be replaced too,so I can't supply a good pic, but when i replaced the window scraper I had to remove the guide cap. Put the scraper in first. leave it a little long, and trim it to fit the cap.
|
|
|
|
| boxstr |
Sep 7 2003, 06:51 PM
Post
#17
|
|
MEMBER:PACIFIC NORTHWEST REGION Group: Members Posts: 7,522 Joined: 25-December 02 From: OREGON Member No.: 12 Region Association: Pacific Northwest |
The window "squeeges" are put in only after removing the end guide caps. There are right and left "squeeges". They come marked if you bought them from one of hte venders,PP,AA,PA,etc. You can look at the front edge and see which one goes forward and rearward.
The pic shows the right side(bottom) squeege, and left side (top) squeege. Then you install the rear guide. Don't lose the very small screw, hard to find at your FLAPS. Good luck. CCLINSQUEEGEVILLE Attached image(s) 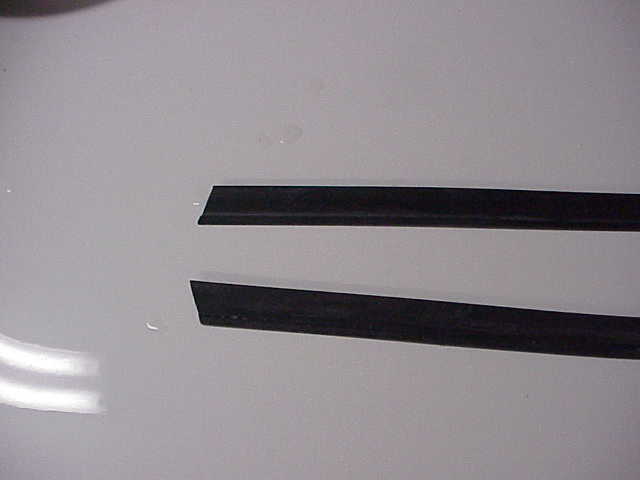
|
|
|
|
| MarkV |
Sep 7 2003, 07:33 PM
Post
#18
|
|
Fear the Jack Stands Group: Members Posts: 1,493 Joined: 15-January 03 From: Sunny Tucson, AZ Member No.: 154 Region Association: None |
Here is mine from a 73. I think there is also a srcew under the window channel.
Attached image(s) 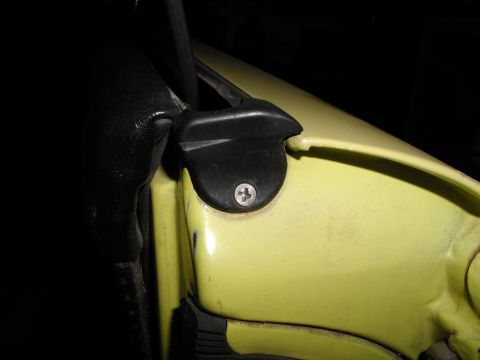
|
|
|
|
| SirAndy |
Sep 7 2003, 11:37 PM
Post
#19
|
|
Resident German Group: Admin Posts: 41,716 Joined: 21-January 03 From: Oakland, Kalifornia Member No.: 179 Region Association: Northern California |
John,
the part youy have is for a EARLY door. the early plastic piece is screwed from the inside, not from the back. early doors don't have that screw-hole. this part won't fit right, you need to get the plastic for a late model door ... Andy |
|
|
|
| John2kx |
Sep 8 2003, 02:04 AM
Post
#20
|
|
Senior Member Group: Members Posts: 502 Joined: 22-August 03 From: Augusta, Ga. Member No.: 1,066 |
Thanks for all the help on this one guys. Would have never figured out I had the wrong part without having another car to compare to.
John |
|
|
|
|
2 User(s) are reading this topic (2 Guests and 0 Anonymous Users)
0 Members:

|
Lo-Fi Version | Time is now: 4th July 2024 - 01:06 PM |
Invision Power Board
v9.1.4 © 2024 IPS, Inc.