|
|

|
Porsche, and the Porsche crest are registered trademarks of Dr. Ing. h.c. F. Porsche AG.
This site is not affiliated with Porsche in any way. Its only purpose is to provide an online forum for car enthusiasts. All other trademarks are property of their respective owners. |
|
|
  |
| nola914 |
 Nov 20 2008, 11:05 PM Nov 20 2008, 11:05 PM
Post
#141
|
|
Member   Group: Members Posts: 77 Joined: 19-January 06 From: New Orleans, LA Member No.: 5,440 |
David:
About your intercooler. I took a look around on the net, and a lot of Suby owners change out their stock units for the aftermarket TMIC's to get better efficiency and HP. But the aftermarket units are much thicker. I'm wondering about the fit and whether the thick units would have enough room to get proper flow through out of the bottom. Is your IC a stock model or one of the thicker upgrades? If its stock, do you think that a thicker aftermarket unit would fit and function properly in the same location? |
| ottox914 |
 Dec 1 2008, 09:56 PM Dec 1 2008, 09:56 PM
Post
#142
|
|
The glory that once was.    Group: Members Posts: 1,302 Joined: 15-December 03 From: Mahtomedi, MN Member No.: 1,438 Region Association: Upper MidWest  |
Updates: Dyno is a no-go. Winter just came up to fast. Its highs in the low teens around here lately, and a 2 1/2 hr drive each way in a car with no heat to spend $75 bucks for 3 pulls then turn around and drive back for some odd reason did not appeal to me at all. Plus I have better things to spend my $75 on these days... The butt dyno says around 150 hp at the wheels, but I have no real idea, no other teeners in the area with other HP to compare the ride to. Our auto cross club president has a 1.8 miata with 6psi of supercharged boost, making around 160 whp. His feels stronger down low, no suprize with his M62 blower, but once I get to 3500 or so, mine really takes off right up to redline.
WRX intercooler. Its a stock factory WRX unit, not from an STI, not a thicker aftermarket unit. I think the thicker ones would probably work, but my support braces were set up for the factory sized unit, and I got one cheep enough from a club member, so thats what I went with. I think the sucker fan, and more importantly, the sealed plenum below the IC make the real difference. I don't know if a bigger, thicker unit would have helped that much. As for clearance, check the following pics. |
| ottox914 |
 Dec 1 2008, 10:31 PM Dec 1 2008, 10:31 PM
Post
#143
|
|
The glory that once was.    Group: Members Posts: 1,302 Joined: 15-December 03 From: Mahtomedi, MN Member No.: 1,438 Region Association: Upper MidWest  |
Updates: I checked the thread to see what I had added and what not- and we are up to date on the turbo, with the swap to the 9B. I had some issues with oil blow by, ? if this was from the rings/valves/guides, or some of all of the above. My oil separator and catch can were home made from what I could find in the shop- a bike bottle and some 3M type scrubbing pads stuffed in it to slow down the air if there was a pressure difference from inside the bottle to outside. Seemed to work fine, but after a day at a longer track at a larger event site, I had lots of blow by out of the bottle and out of one head at the valve cover. So after a weekend of research, I ordered the CFR oil separator. Not cheep, but well worth what I paid. It works perfectly. I had Chris add some fuel cell foam to the interior of the can to further aid in oil separation. Here's a few pics: The first 2 are the goodies prior to install, the next 4 are the install. Note the 3rd install photo, shows a line from the oil fill to the CFR can. If I was using a thicker intercooler, I don't know if I'd have enough space for a decent curve in the line with out a kink, as a thicker IC would force a tighter bend in the hose.
Attached image(s) 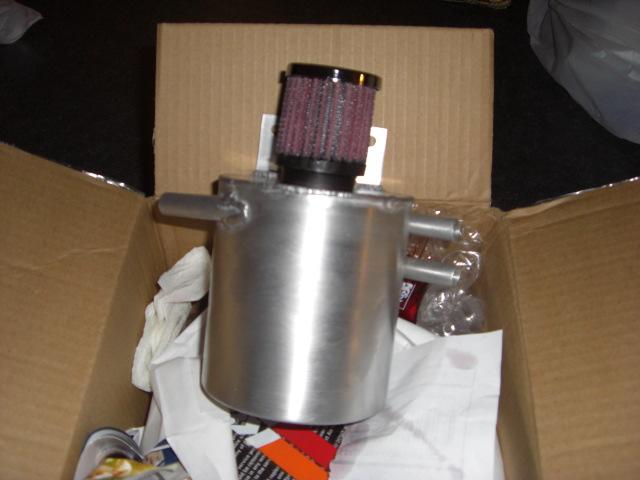 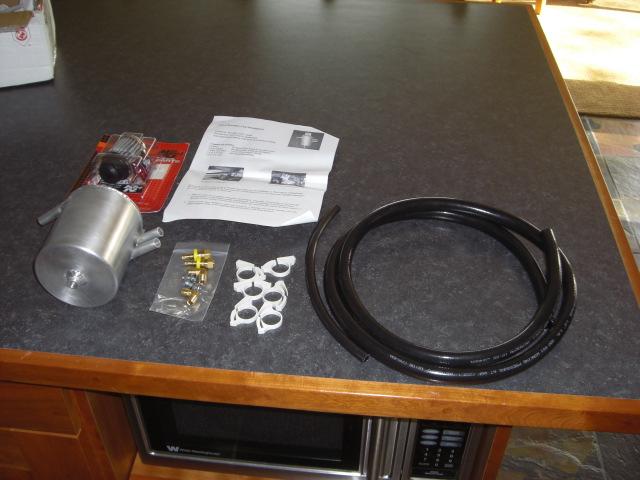 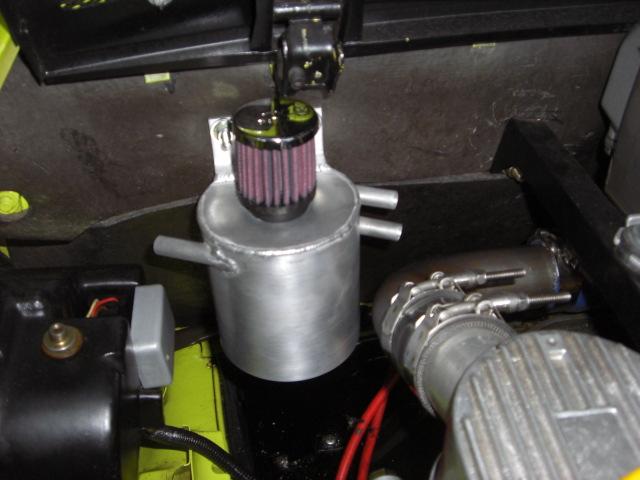 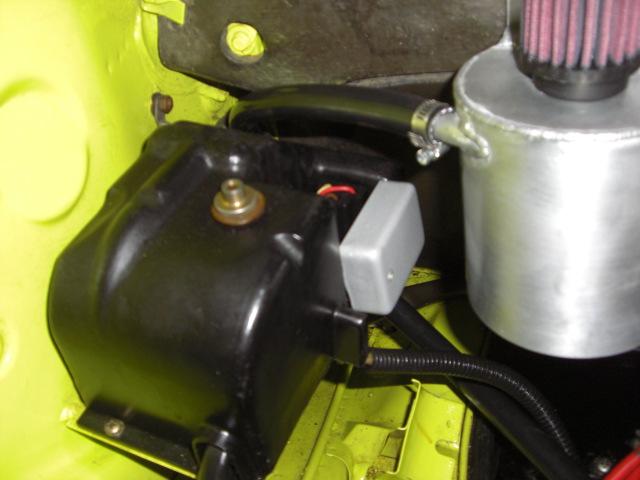 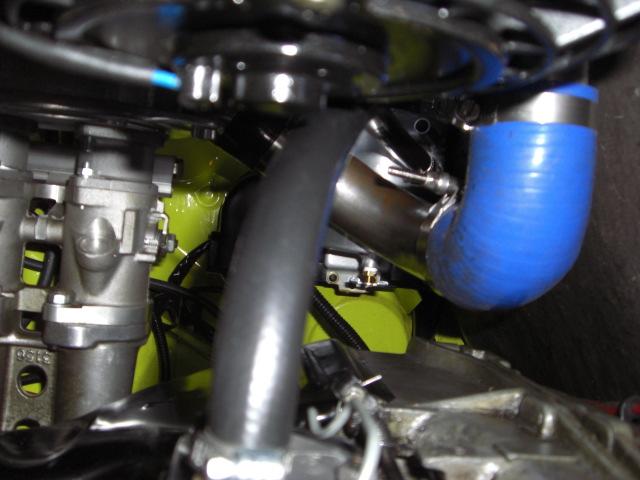 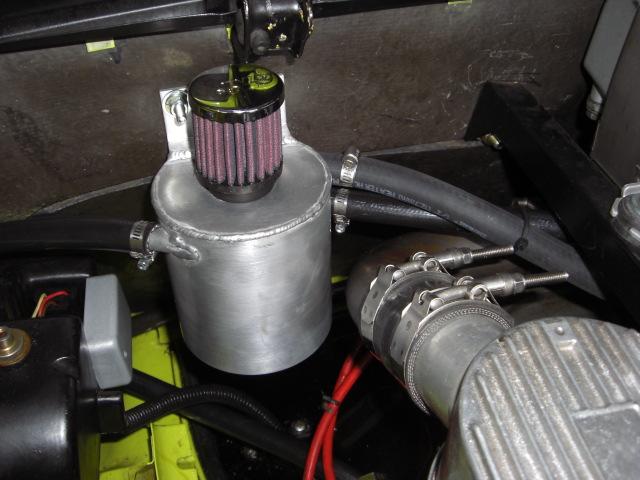
|
| Gint |
 Dec 2 2008, 07:52 AM Dec 2 2008, 07:52 AM
Post
#144
|
|
Mike Ginter                Group: Admin Posts: 16,094 Joined: 26-December 02 From: Denver CO. Member No.: 20 Region Association: Rocky Mountains  |
David, WHat did you use to attach the breather tank to the firewall? Does is go all the way through the firewall? I'm considering riv nuts...
|
| ottox914 |
 Dec 2 2008, 08:38 AM Dec 2 2008, 08:38 AM
Post
#145
|
|
The glory that once was.    Group: Members Posts: 1,302 Joined: 15-December 03 From: Mahtomedi, MN Member No.: 1,438 Region Association: Upper MidWest  |
David, WHat did you use to attach the breather tank to the firewall? Does is go all the way through the firewall? I'm considering riv nuts... I pulled the back panel out of the interior and drilled right thru- held the tank up where it would go, (pulled the filter off the top for better axcess to the mounting holes), marked, drilled pilot holes, drilled full size holes, dug around the workbench for some bolts, finding 2 that were maybe a bit long, but would work, and presto! One done project. The instructions for the kit have a drain line from the bottom of the tank back to the breather tower on the block. With the intercooler in place I didn't have that option, the oil would have had to flow uphill from the tank to the block. I went to the local hardware store and got a 1/8" valve that fit the threads perfectly in the bottom of the tank, and now I just check the valve, drain out what little is in there, and do this as part of my pre-race prep on the car when checking the engine oil level prior to an event. It was hard for me to spend the $$$ on the part- its not cheep, but to get one in your hands, the quality is superb, and it does exactly what it needs to, and does it much better than my home-made bike bottle/green pad shade tree solution. Some things are worth spending money on if they're the right solution to the problem, and this was the right solution. Looks cool too. Attached image(s) 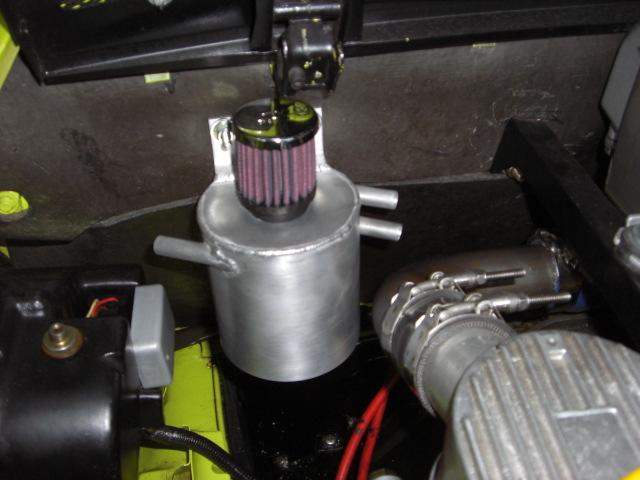 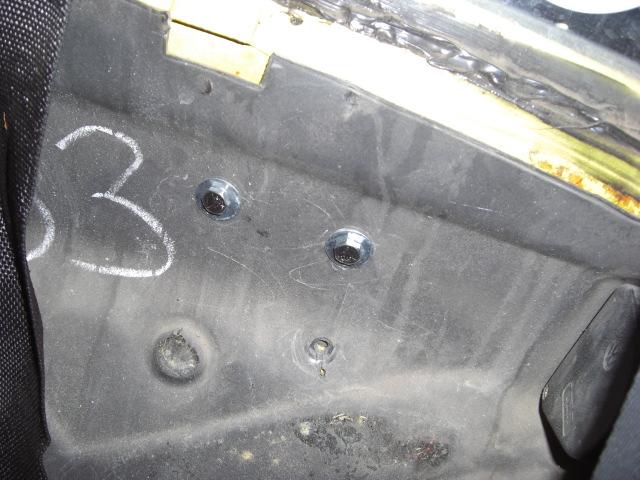
|
| maf914 |
 Dec 4 2008, 03:43 PM Dec 4 2008, 03:43 PM
Post
#146
|
|
Not a Guru!     Group: Members Posts: 3,049 Joined: 30-April 03 From: Central Florida Member No.: 632 Region Association: None 
|
The engine lid hinge appears to be very close to the breather can filter. Does it interfere when closing the lid?
Also, does much oil vapor pass exit the can through the filter? I am considering ordering one of Chris's breathers and am curious about that. Thanks. And thanks for all of the build photos and discriptions. |
| ottox914 |
 Dec 7 2008, 10:18 PM Dec 7 2008, 10:18 PM
Post
#147
|
|
The glory that once was.    Group: Members Posts: 1,302 Joined: 15-December 03 From: Mahtomedi, MN Member No.: 1,438 Region Association: Upper MidWest  |
The engine lid hinge appears to be very close to the breather can filter. Does it interfere when closing the lid? Also, does much oil vapor pass exit the can through the filter? I am considering ordering one of Chris's breathers and am curious about that. Thanks. And thanks for all of the build photos and discriptions. Hinge is not a problem, looks closer in the pics than in the real world. Lid opens and closes no problem, but it is close. I suppose I could have moved the tank 1/2 an inch this way or that, but with the space remaining with the intercooler and other turbo goodies back there, this was the only space left, so being interested in how well it all looks as well as how it works, I centered the can in the space that remained as best as I could. Vapor? hardly any, as in none. The instructions for the filter have you squirt some purple pre-oil stuff on it. The instructions have you saturate the filter with the pre-oil oil. The first time I used it there was a little run off of this onto the top of the can, easily wiped up. No mist or fog coming from the vent during normal, or not so normal (turbo charged auto cross runs) use. Much better than my old system of a bike water bottle with holes drilled in the top, and 3M scouring pad stuffed inside. That system worked OK for awhile, but on a longer track with extended boost, I had noticable blow by. |
| 904svo |
 Dec 7 2008, 10:38 PM Dec 7 2008, 10:38 PM
Post
#148
|
|
904SVO    Group: Members Posts: 1,124 Joined: 17-November 05 From: Woodstock,Georgia Member No.: 5,146 |
Dave, try this ,put a pressure gauge on the crankcase. I am willing to bet you
have over 10 lbs of pressure when you but your foot in it. You do not have a large enought hoses to relieve the crankcase pressure. You may have to add extra relief port on each valve cover and run it to a larger overflow catch can. Most drag cars have the same problem they solve the problem by using a vacuum pump to relieve the crankcase pressure |
| nein14 |
 Dec 8 2008, 06:42 AM Dec 8 2008, 06:42 AM
Post
#149
|
|
Senior Member    Group: Members Posts: 839 Joined: 6-February 03 From: USA Member No.: 262 |
Dave, try this ,put a pressure gauge on the crankcase. I am willing to bet you have over 10 lbs of pressure when you but your foot in it. You do not have a large enought hoses to relieve the crankcase pressure. You may have to add extra relief port on each valve cover and run it to a larger overflow catch can. Most drag cars have the same problem they solve the problem by using a vacuum pump to relieve the crankcase pressure 904sov is correct, the vent hose that comes out of the crank case cover on my motor is 1" in diameter and the tank is 1 liter in volume. Also both valve covers have return lines. |
| ottox914 |
 Dec 9 2008, 05:59 PM Dec 9 2008, 05:59 PM
Post
#150
|
|
The glory that once was.    Group: Members Posts: 1,302 Joined: 15-December 03 From: Mahtomedi, MN Member No.: 1,438 Region Association: Upper MidWest  |
904sov is correct, the vent hose that comes out of the crank case cover on my motor is 1" in diameter and the tank is 1 liter in volume. Also both valve covers have return lines. As noted, since the new breather package from CFR I have had no blow by issues, but I'd be interested to see your set up- got any pics to share? |
| nein14 |
 Dec 10 2008, 06:26 AM Dec 10 2008, 06:26 AM
Post
#151
|
|
Senior Member    Group: Members Posts: 839 Joined: 6-February 03 From: USA Member No.: 262 |
904sov is correct, the vent hose that comes out of the crank case cover on my motor is 1" in diameter and the tank is 1 liter in volume. Also both valve covers have return lines. As noted, since the new breather package from CFR I have had no blow by issues, but I'd be interested to see your set up- got any pics to share? how many miles and for how long time wise have you driven the car, also how much boost are you running for street use? these all have an effect on weither you will se it come back, base my experience your tank looks good but INHO your crankcase breather hose is too small. |
| ottox914 |
 Dec 12 2008, 02:22 PM Dec 12 2008, 02:22 PM
Post
#152
|
|
The glory that once was.    Group: Members Posts: 1,302 Joined: 15-December 03 From: Mahtomedi, MN Member No.: 1,438 Region Association: Upper MidWest  |
QUOTE how many miles and for how long time wise have you driven the car, also how much boost are you running for street use? these all have an effect on weither you will se it come back, base my experience your tank looks good but INHO your crankcase breather hose is too small. Since adding the new breather/catch can, have driven only 400 miles or so. No problems so far. Don't know if its just good luck, or haven't found right (or wrong) combination of twisting auto cross track and boost to really stress the new parts, or what. |
| ottox914 |
 Dec 13 2008, 07:33 AM Dec 13 2008, 07:33 AM
Post
#153
|
|
The glory that once was.    Group: Members Posts: 1,302 Joined: 15-December 03 From: Mahtomedi, MN Member No.: 1,438 Region Association: Upper MidWest  |
BREAKING NEWS!!! NEXT EVOLUTION OF PROJECT 914 TURBO!!!
I'd been having some smoke and blow by issues with project 914 turbo. I don't directly pin these problems to the turbo, as the motor was re-built by Brad Mayeur some 15 yrs ago or so, and has served me faithfully for that time, being beaten nearly to death auto crossing for the last 10 yrs. It doesn't owe me anything, I've more than gotten my moneys worth out of it. I do believe the addition of forced induction has served to magnify the condition time has placed on the little motor that could, and any worn parts were just made that much more obvious. Nothing is broken, but its time for a re-build. And so I have contacted Jake, and we have an interesting plan to make the most of my dollar, using a mix of 1.7 and 2.0 parts to build a turbo specific motor. Heads are already on their way to Len. I need next week to get the motor dropped so parts of the 2.0 can go to Jake for checking and re-building. http://forums.aircooledtechnology.com/showthread.php?t=2819 (link to the discussion and planning of the new motor) Needless to say, I'm looking foreword to next season, and hunting down that darn 350+ whp Comptech supercharged S2K that beat me 2x last year by a just tenths of a second. |
| ottox914 |
 Jan 11 2009, 03:25 PM Jan 11 2009, 03:25 PM
Post
#154
|
|
The glory that once was.    Group: Members Posts: 1,302 Joined: 15-December 03 From: Mahtomedi, MN Member No.: 1,438 Region Association: Upper MidWest  |
HEAD PORN!
hey, Hey, HEY, get your minds back on cars you guys! Len sent a pic of the head- not much done beyond a good clean up and inspection. Sharp eyes will note the plug location has been changed. Len thought the heads would be moving along in the next couple weeks, so I'll post more of the magic as I get updates. Gotta get going, the garage is calling, got the top side of the motor un-buttoned a couple weeks ago, still need to drop the motor and tear down the 2.0, getting some parts to Jake for inspection/machining. Attached thumbnail(s) 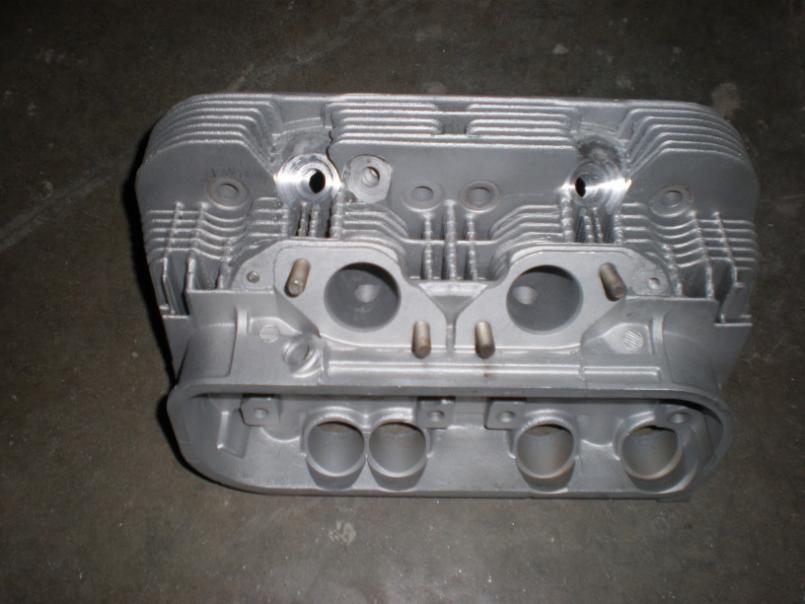
|
| RJMII |
 Jan 15 2009, 10:59 PM Jan 15 2009, 10:59 PM
Post
#155
|
|
Jim McIntosh     Group: Members Posts: 3,125 Joined: 11-September 07 From: Sandy, Utah Member No.: 8,112 Region Association: None |
Dave,
How did you plumb the turbo for cooling? what size of lines? what type of fittings to tap in where you did? Is it in the same loop of cooling line as the oil cooler? |
| ottox914 |
 Jan 16 2009, 09:31 PM Jan 16 2009, 09:31 PM
Post
#156
|
|
The glory that once was.    Group: Members Posts: 1,302 Joined: 15-December 03 From: Mahtomedi, MN Member No.: 1,438 Region Association: Upper MidWest  |
Dave, How did you plumb the turbo for cooling? what size of lines? what type of fittings to tap in where you did? Is it in the same loop of cooling line as the oil cooler? The 9B turbo I'm currently using came from a mitzu 3000 GT, its the front turbo off that twin turbo motor. In its native application, it has oil lube and water cooling. In my car, I plugged the water fittings, not like I needed to, but it looked a little better and kept road grime out of there, and am using just oil to lube/cool the turbo. The oil cooler is running off a sandwich plate adapter with a thermostat built into it. The lines from the adapter to the cooler and back to not share any function with the turbo oiling. As the turbo needs oil from start up, I couldn't tap into the supply to the cooler, as if the thermostat on the sandwich plate had not reached operating temperature, there'd be no oil for the turbo, and thats no good. The oil coming from the turbo leaves the turbo by gravity, so plumbing that into the return to the motor from the cooler would not work either, as there would be a back pressure from the cooler return line to the drain line of the turbo. Again, no good. Go to pg 4, comment 79, the photos attached there show the "T" fitting I added at the base of the oil sending unit. This got a braided stainless brake line attached to it to supply oil to the turbo. The brake line was, l think, under $10 bucks from the local dirt track supply store. Cheeper than anything summit or jegs had to offer. Pays to shop. The oil goes to the turbo, then drains out and into a tildon differential pump, now being used as a scavenge pump, to get the engine oil back to the motor. Seems I forgot to post the return trip pics for the oil. It goes from the turbo to the Tildon, and from there back thru the engine tin, where it attaches to a fitting I drilled and tapped into the lower area of the oil fill tower. Here are the pics of adding that fitting: First are the tools needed, 2nd is drilling pilot hole, 3 and 4 are tapping the hole. I used lots of oil on the tap. To catch shavings, I stuck several old socks in the oil fill, saturated them in oil, and took frequent stops to feel for any shavings coming off the back of the tap. Any I missed or couldn't feel were caught in the oil/socks. I'm pretty sure none got thru. Last photo shows the braided supply line from the oil sending unit, and the black return line from the tildon pump, attached to the oil tower. I chose to drain the oil back up there, rather than in a valve cover as others have done, because at an auto cross, with extended G loading of a long sweeper, I didn't want to risk filling a valve cover, and having the tildon try to fight to hard to evacuate the turbo oil into a full valve cover. Don't know if this answered your question, but there it is. Attached image(s) 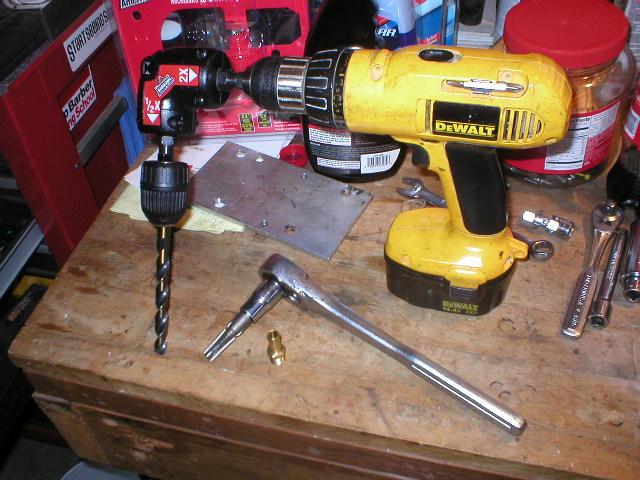 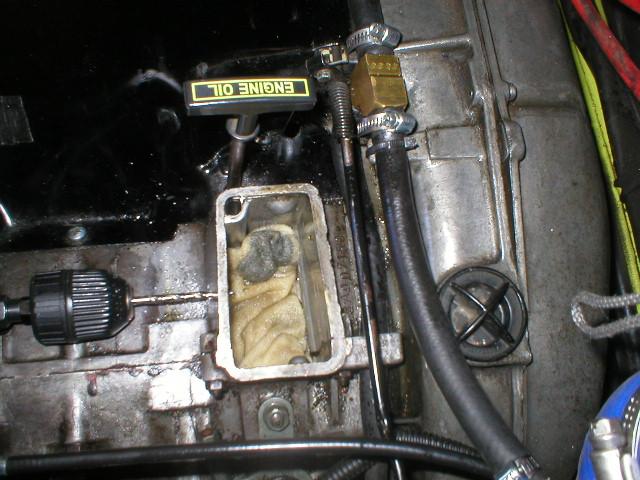 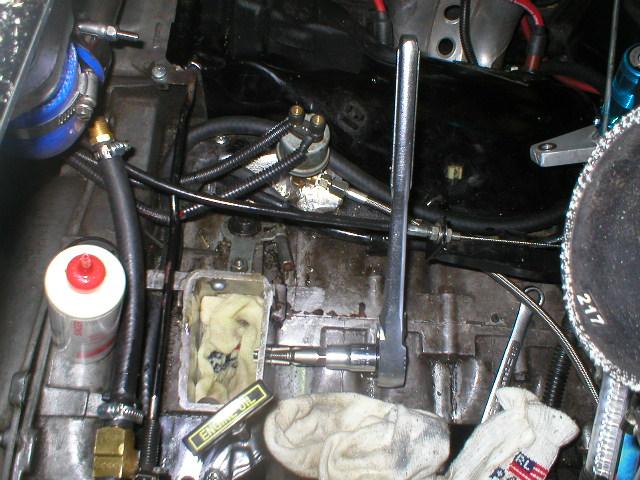 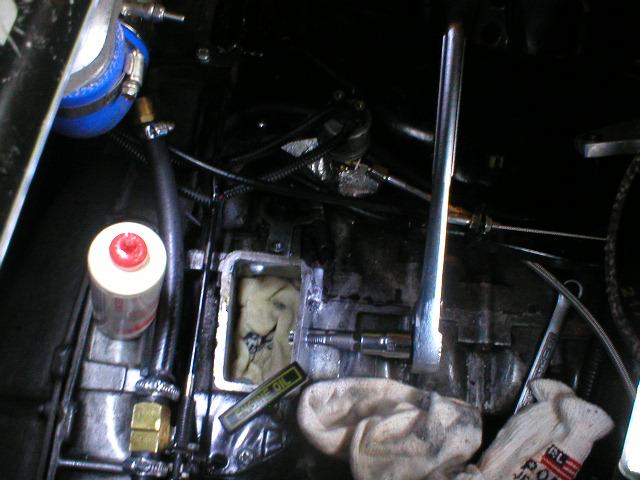 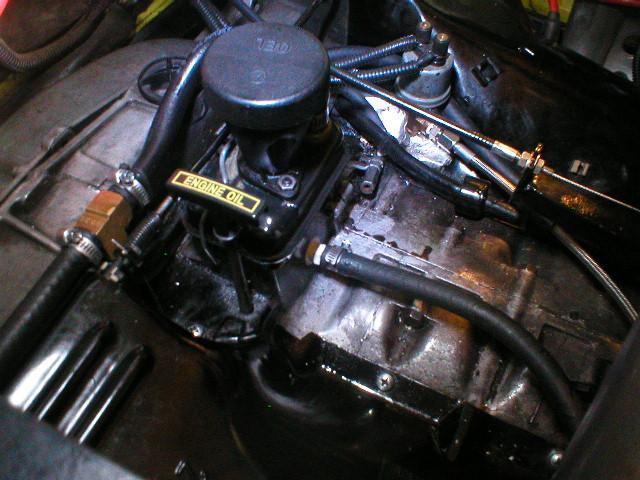
|
| ottox914 |
 Jan 16 2009, 09:45 PM Jan 16 2009, 09:45 PM
Post
#157
|
|
The glory that once was.    Group: Members Posts: 1,302 Joined: 15-December 03 From: Mahtomedi, MN Member No.: 1,438 Region Association: Upper MidWest  |
Below is a copy/paste from a comment I made on another turbo thread on our forums. I wanted to add it to this thread because I don't want people to think:
1- You need a ton of money to do this. I'm spending a lot of cash, over alot of years, but this is my hobby. I don't drink much, have no tatoos, no wacky collections, other than Porsche books. I enjoy this like someone else might love to golf or fish. The journey is for me often more satisfying than the destination. You can spend alot more, (ah, Chappy...) or alot less. If you steal some ideas from these pages, go for it. If you come up with better solutions, share them. 2- I didn't want anyone to think the new motor is because I blew up the old one. It was on its last rpm's awhile ago. If you're thinking of a turbo, either make sure your motor is healthy, or do like I did, work out the bugs of your turbo system on a sick motor, if it blows, it was gonna go anyway. Then build the motor you want the turbo to be on. "My intent in making this comment was not to imply that you needed a large wad of cash, or a bottomless pit of stuff to break, but to get the point across that if you build it, you'll gain a better understanding of how it works, and if/when it breaks, you'll be in a better situation to understand the failure mode and how to repair/avoid it again in the future. My SDS is a fine example. I am more interested in the overall engineering of the turbo system than the workings of the EFI. I could have built myself a mega-squirt system, but knew of others who had and ended up with problems getting the build right, then working thru the screens and screens of programing, and if one little thing is off, say the voltage range for the TPS on the system set up does not match the actual range of the TPS used, more trouble shooting to find and fix this, IF you don't pop a motor trying to tune around the problem. I elected to spend a little more and go with a proven system, and had great fun designing the layout of the wiring harness, fuel lines, linkages, and ecu location. Much more fun than I would have had tracking down a diode that I installed backwards one night at 9pm. If the SDS fails, I won't know where to start, but with the beyond excellent customer service they have shown me, I won't have to. I chose not to get more educated by the been there done that school for the efi part of the project, but I did a TON of research on what unit to buy. Whats that got to do w/a turbo on a 914? EvilEd did not make a kit for his system, he used an idea for CIS, that I think, but may not recall completely, was a retro-fit offered as a kit for for bus engines, and morphed that into a very good 914 system, but for the most part, its a one off build. Chappy has done amazing things with his turbo system, and in his quest for fire, or rather power, had moved up into bigger and better engines. He was more interested in building the perfect 914, so he applied his efforts in that direction, farming out the motor build. My system is loosely based on the kits from STS. Google STS turbo and you'll get to their site. My turbo car has been an evolution. I bought the ITB's from Jake several years before I used them, as I was thinking NA at that time. So step one was to mount the ITB's, get fuel and linkages figured out, install and tune the SDS. I strongly considered selling the ITB's and going CIS for the turbo, when the turbo bug bit, as I had been following Ed's build closely, but went SDS for several reasons: Its a great system that has all the features I need, and few I don't, service/support is excellent, and it controls spark and fuel. That was probably the big reason I didn't go CIS, I wanted to be able to fine tune the ignition curve for NA and boosted operation. I also liked the clean look of the engine compartment with the ITB's and the harness/fuel lines tucked up out of the way, and there was LOTS of room for an intercooler as well. As far as the system not being reliable, well, draw your own conclusions. The motor in the car currently is probably 12 or more yrs into its last re-build, and was using some oil prior to the turbo. I was figuring that with running a dozen auto crosses and schools a year, for the last 10 yrs, that I had maybe a yr or 2 left in the motor before it would be really needing a re-build, just on general principles and accumulated beatings/mileage. If I'm finishing top 10 in 100+ car grids I'm not being any to easy on the hardware to do this. So putting the turbo on it was not at all the cause of my doing a new motor, it was part of the plan. Using a tired motor for the test subject, if I really messed up and popped it, not much lost. I have proven to myself the system as it is installed all works as it should. The turbo and motor have stood up to 11.5psi on pump gas. My school of hard knocks intercooler plenum and fan set up will be improved upon for the new motor, and with better heads and cam, the whole system should breath much better, which should spool the turbo sooner, and its all good in the end. When will it be "done"? Never. And for me, thats part of the fun. Whose system is best? Blonde, brunette, or red head? Chappy has made the most amazing street 914 I could imagine. Trunk space has been lost, mega horse power and super-coolness found. Ed's/Nein's set up tucks into the factory location, not even loosing the raintray, and has been as reliable as gravity for 7 yrs of boost. Outstanding! And while the cost of the "used" parts is less than what I have into mine, I suspect if there was a 10 page build thread there was plenty of machine work and trial and error to get it right. Mine is a little different still, and works fine, and should be a hoot with a stronger engine as the project continues to evolve. Back to the project at hand: Draw thru would not need a RR FPR, but the carbon seal is a must. Consider your location also- while I do not have direct experience on this, I understand the draw thru systems can be prone to iceing and other issues in temps below 40-50 degrees or so. Read up on what Bell has to say on this. I considered a draw thru as well, but thought it to be a step backward from the CIS, and 2 steps back from the SDS, however depending on the budget, and intended use of the car, draw thru could be the way to go for this build. For me, driving to events in the early spring in 30 degree temps, draw thru was not an option, but the bug guys have been doing it for a while and making it work fine." |
| RJMII |
 Jan 16 2009, 09:57 PM Jan 16 2009, 09:57 PM
Post
#158
|
|
Jim McIntosh     Group: Members Posts: 3,125 Joined: 11-September 07 From: Sandy, Utah Member No.: 8,112 Region Association: None |
Dave,
You are awesome at answering questions! wow, and thank you! |
| ottox914 |
 Feb 2 2009, 09:55 AM Feb 2 2009, 09:55 AM
Post
#159
|
|
The glory that once was.    Group: Members Posts: 1,302 Joined: 15-December 03 From: Mahtomedi, MN Member No.: 1,438 Region Association: Upper MidWest  |
MORE HEAD PORN!
Progress has been slow at Hoffman automotive, but I'm in no hurry. Quality can take time, and I'm certainly aware that my heads aren't the only thing Len has on his plate. I can take a back seat to racers who need an emergency repair, or others who got their project in to him before mine. Still way to busy at work, and my motor is not dropped yet. Always looking on the bright side, work seems to have slowed a little recently, and Nancy is gone overnight for her work for a couple nights this wk, so maybe, just maybe I can get in the garage and get things moving on my end. I'm so close- just need to disconnect 1 CV, don't forget that ground strap, and the wire to the oil temp sending unit in the sump plate, and she should be ready to drop. Now a few pics: Attached image(s) 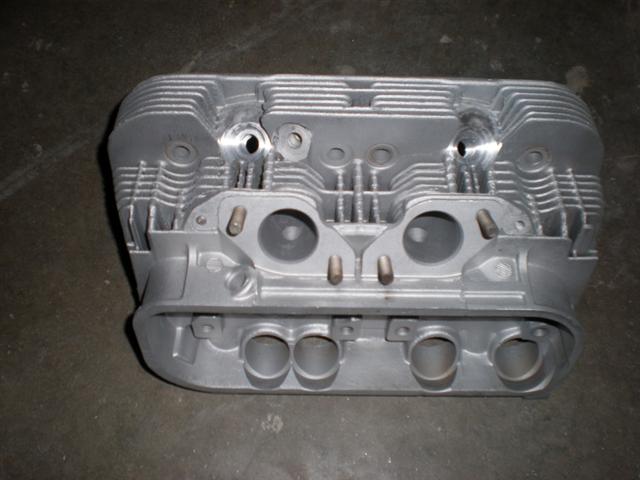 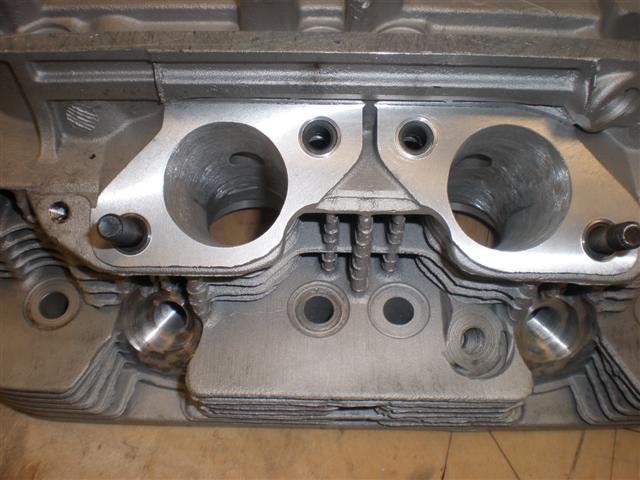 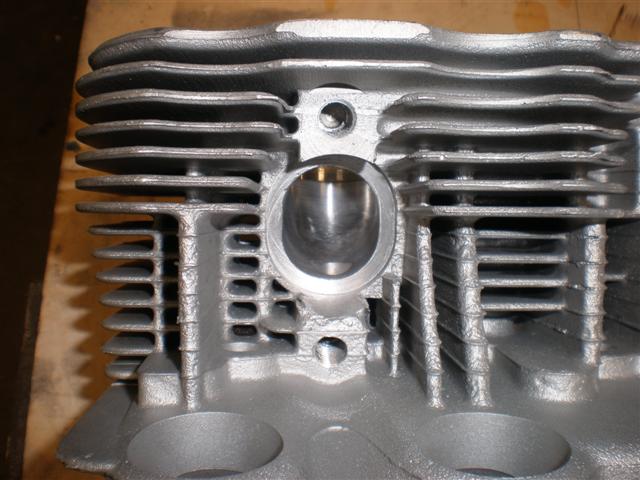
|
| Mark Henry |
 Feb 2 2009, 03:58 PM Feb 2 2009, 03:58 PM
Post
#160
|
|
that's what I do!                Group: Members Posts: 20,065 Joined: 27-December 02 From: Port Hope, Ontario Member No.: 26 Region Association: Canada |
So....what valve sizes are you and Len going with?
Looking good (IMG:style_emoticons/default/shades.gif) |
  |
1 User(s) are reading this topic (1 Guests and 0 Anonymous Users)
0 Members:

|
Lo-Fi Version | Time is now: 22nd November 2024 - 05:55 PM |
Invision Power Board
v9.1.4 © 2024 IPS, Inc.


