|
|

|
Porsche, and the Porsche crest are registered trademarks of Dr. Ing. h.c. F. Porsche AG.
This site is not affiliated with Porsche in any way. Its only purpose is to provide an online forum for car enthusiasts. All other trademarks are property of their respective owners. |
|
|
  |
| ottox914 |
 Apr 10 2007, 07:51 PM Apr 10 2007, 07:51 PM
Post
#41
|
|
The glory that once was.    Group: Members Posts: 1,302 Joined: 15-December 03 From: Mahtomedi, MN Member No.: 1,438 Region Association: Upper MidWest  |
More updates but still not done. Progress is moving at the speed of your average sundial these days- work is a B#@$*& lately. I obviously did not make my dead line to get the car dyno ready by last weekend. My current hope is to have it N/A ready this weekend, because next weekend is the first of 2 weeekends of novice school driver training, and the only thing better than riding with the newbies in their cars getting them to go faster is scaring the piss out of them in your own car...
On to the photos. Worked on more intercooler piping, have the section done from the intercooler back down thru the back engine tin. Came up with a couple good ideas for mounting the turbo and getting the exhaust to turbo section fab'd. Re-mounted the oil sending unit, adding a "T" for the supply line to the turbo. Used 2" of copper. Before you all jump on me for that, let me say Brad Mayeur built the motor, used the same thing, and had no fears of failure. Good enough for Brad, good enough for me. To be done: its still a long list. Ready for novice school: fix pulled exhaust stud, get wireing done to the hot start relay, extend some wires for the oil sender, swap out the turbo ITB hats for the air cleaners, put sway bars back togather, she should be good. Ready for dyno time: finish intercooler piping, get turbo mount and adaptor figured out/built, build some flange adaptors for the I/C pipes to the ITB hats, run the oil supply and return lines, mount boost gauge and run lines to that, and whatever else comes to mind. These photos are of the puke tank for the case and head venting, left and right ITB's and piping w/out the intercooler in the way, and the sending unit. I'll block off the air space around the oil sending unit with some silver aluminum tape, like is used in HVAC work, then cover that with black duct tape. Looking under the hood down in the depths of the engine you'll never know. Attached image(s) 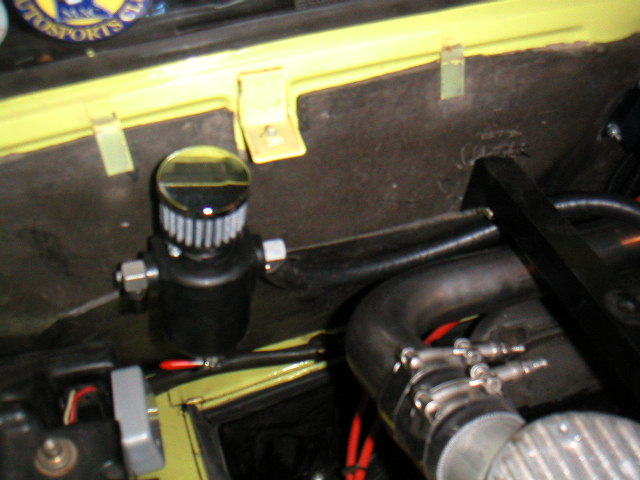 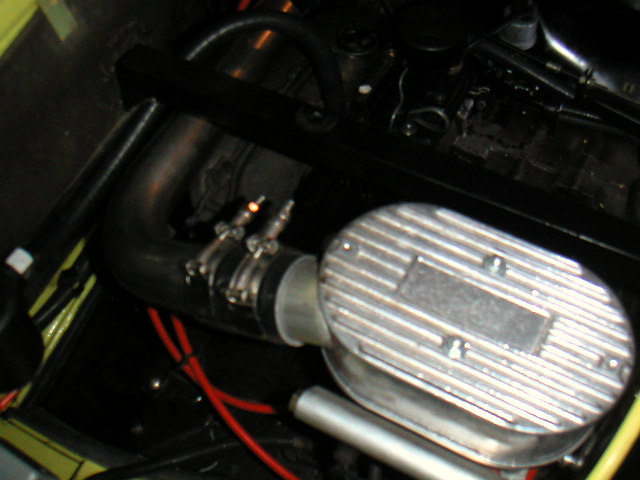 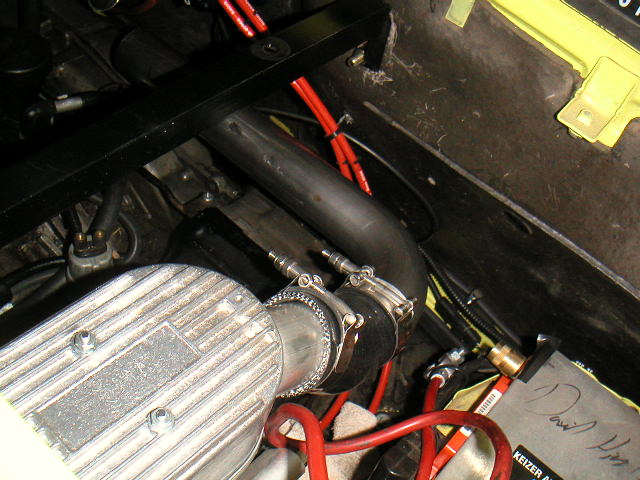 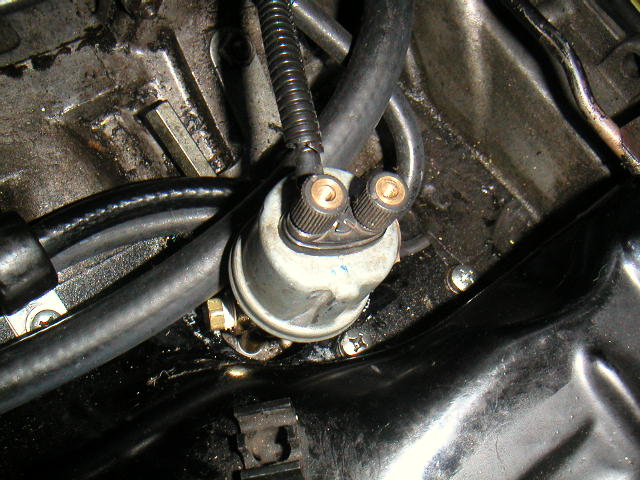
|
| ottox914 |
 Apr 10 2007, 07:54 PM Apr 10 2007, 07:54 PM
Post
#42
|
|
The glory that once was.    Group: Members Posts: 1,302 Joined: 15-December 03 From: Mahtomedi, MN Member No.: 1,438 Region Association: Upper MidWest  |
Next photos are of the pipeing from the intercooler to the back engine tin, the pipeing on the intercooler, and the hole in the back tin. This hole is big enough that I'll add some small hose split down the length to cover that sharp edge, and add a 2" section of silicone coupler around the charge pipe as it passes thru the hole to snug things up and allow some movement w/out rattling and squeeking me to death. The 2 smaller holes below the bigger one were for the hot start solinoid, which I'll be moving to the other side of the tin, and extending the wires to reach it.
The sad thing about all this is that I'm already thinking of NEXT winter, when I might try to take it all appart again and clean/detail/paint everything and cherry it out a little more... Attached image(s) 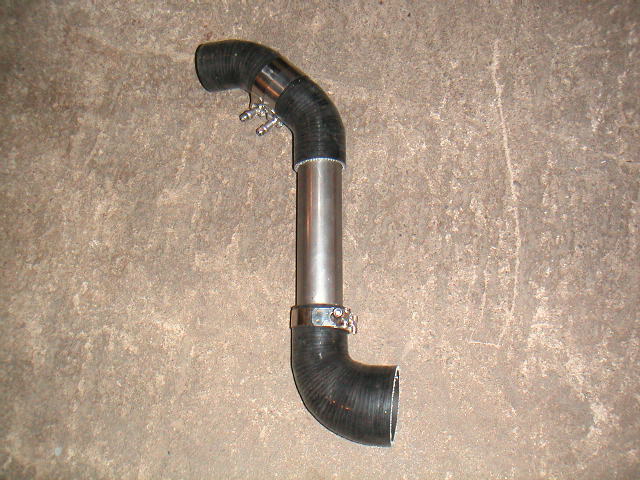 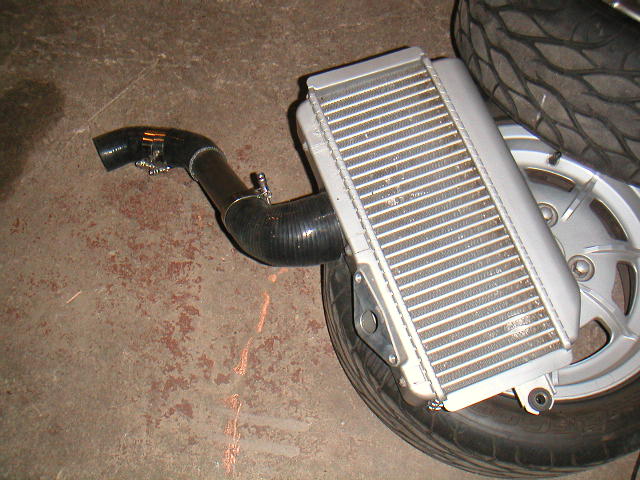 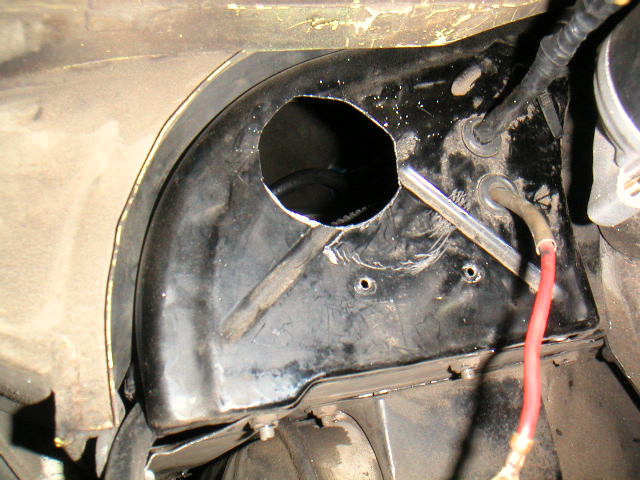
|
| Crazyhippy |
 Apr 10 2007, 08:30 PM Apr 10 2007, 08:30 PM
Post
#43
|
|
Insert witty comment here...    Group: Members Posts: 1,659 Joined: 28-July 05 From: Home of the Coyotes, AZ Member No.: 4,493 Region Association: None |
Keeping the intercooler fan on is a good idea. The only time the fan (w/ a temp/boost based switch and delay) will ever shut off is cruising on the highway, and possibly momentarily in stop and go traffic... Wire it to the ignition switch and know the intercooler is as taken care of as possible.
I'm going to be adding a fan(s) to my intercooler too, I see intake temps in the 120-130 range pretty often. They are lower on the freeway (below 75ish, no boost, and lotsa air) and short term stop and go traffic (before heatsoak gets it) A HUGE fan on the dyno was good for 13hp. BJH |
| Krieger |
 Apr 10 2007, 09:43 PM Apr 10 2007, 09:43 PM
Post
#44
|
|
Advanced Member     Group: Members Posts: 4,799 Joined: 24-May 04 From: Santa Rosa CA Member No.: 2,104 Region Association: None 
|
Get it to work really well, then paint/detail it. You never quite know about these odd unforseen gremlins that may cause you to take it apart a few more times and scratch/chip it in the process. Get-r-done!
|
| Tobra |
 Apr 17 2007, 12:54 AM Apr 17 2007, 12:54 AM
Post
#45
|
|
Senior Member    Group: Members Posts: 1,453 Joined: 22-August 05 From: Sacramento, CA Member No.: 4,634 |
You could put some misters over the IC and hook it to a windshield washer pump.
Water evaporating takes a lot of heat with it. |
| ottox914 |
 Apr 18 2007, 08:46 AM Apr 18 2007, 08:46 AM
Post
#46
|
|
The glory that once was.    Group: Members Posts: 1,302 Joined: 15-December 03 From: Mahtomedi, MN Member No.: 1,438 Region Association: Upper MidWest  |
Good things come to those who wait... well, I've been working on this project way to long to sit back and wait for it to finish itself. If I'm lucky, I get a couple hours a week, one night a week, so its been slow going...
As our novice driving school is this weekend, I have focused the last couple weeks on getting it n/a ready, and doing it RIGHT the first time, rather than slapping it togather and haveing to re-do a bunch of stuff. So, not alot of turbo ready photos this time around, but getting some of the bits and pieces in place. A friend of mine, (not dave h, the fearless fabricator) who is a welding genius (how many of you have welded stainless left handed up inside a 2' round tube about as far as you can reach while looking into a mirror to see what you're doing?) is retiring end of this month, and welcomed the small projects I had, such as the turbo to exhaust adaptor, I/C adaptors, and a few other odds and ends. Much cheeper rates that the shop the car was going to, plus I get to have a hand in the project, which will stay much closer to home. The car WILL go to LSE performance for the dyno tune once all systems are up and operating. Current status pics- one is wireing to the starter, had to extend some lines and of course shrink tube and shield the lines, next is another view of the starter install. The next is the hot start kit. I know, lots of you say you don't need this, and with the mini gear reduction starter I probably don't need it, but with the added heat of the turbo down there, I thought it couldn't hurt, and besides, I have used one for years with no problems. Last is the power to the oil cooler fan, adding a fused connector, and taking power from the jumper to the hot start solinoid. I've got a few vacuume lines to buttton up, need to attach the rear sway bar again, get it on the ground and give it a bath, and I should be ready to go for the weekend. Not bringing the sticky rubber, why waste it on the newbies, they'll have a thrill ride enough on a short, twisty course in a 30+ yr old car that keeps up with the new stuff, and beats up on a fair number of those newfangled water cooled cars. I'm expecting, with my work, house projects, welding time, dyno time for this project to extend to mid summer. Bummer. Attached image(s) 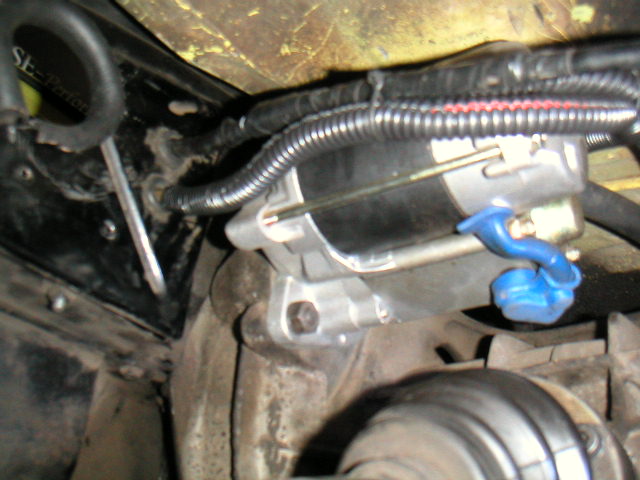 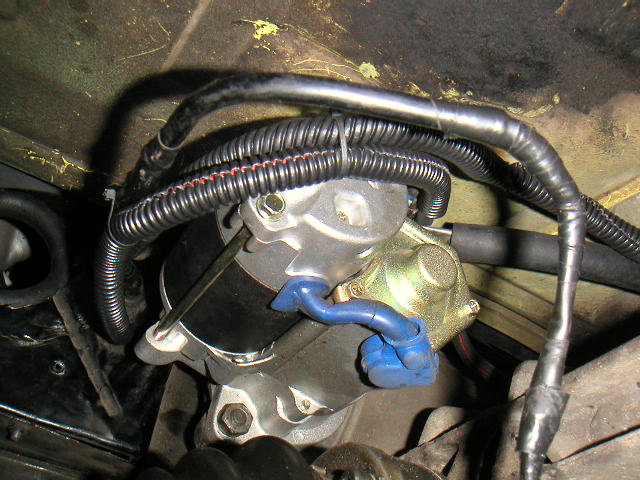 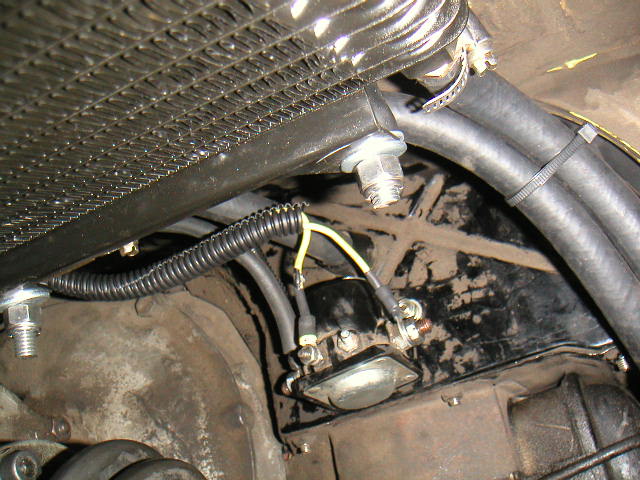 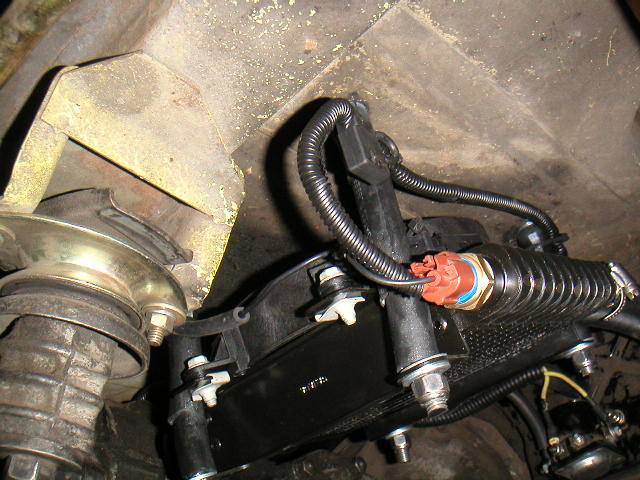
|
| Scott-thundercat |
 May 8 2007, 11:39 PM May 8 2007, 11:39 PM
Post
#47
|
|
Member   Group: Members Posts: 159 Joined: 16-October 06 From: Reno, NV Member No.: 7,049 |
any updates?
|
| Nor.Cal.914 |
 Jun 10 2007, 04:02 AM Jun 10 2007, 04:02 AM
Post
#48
|
|
1975 914 3.0SC    Group: Members Posts: 1,062 Joined: 28-January 05 From: Weatherford, TX Member No.: 3,523 Region Association: None |
How's your progress coming along with this? I'd like to see how you're doing on it! Thanks
-Chris |
| Scott-thundercat |
 Jul 8 2007, 09:01 PM Jul 8 2007, 09:01 PM
Post
#49
|
|
Member   Group: Members Posts: 159 Joined: 16-October 06 From: Reno, NV Member No.: 7,049 |
any new info?
|
| ottox914 |
 Jul 8 2007, 10:40 PM Jul 8 2007, 10:40 PM
Post
#50
|
|
The glory that once was.    Group: Members Posts: 1,302 Joined: 15-December 03 From: Mahtomedi, MN Member No.: 1,438 Region Association: Upper MidWest  |
Really nothing much new to report. My local mega-fabricator is out of town for the month, so it may be into August before we get the header-collector to turbo adaptor made, the oval intercooler to round I/C piping done, and the shorty tail pipe from the turbo out the back done.
Around the house, we've been working on a bathroom re-model, up to about 10K in materials and counting. This has soaked up much of my time, as the plumbing, electrical, HVAC in this area have all been changed. This is ending up to be not your average slap some paint on it, "flip this house" sort of deal. Lots of natural stone and tile work, cherry wood work, Kohler everything. We do all the labor ourselves. Back to the car, I've ordered a turbo-tach from one of our members, bigmark. I'll see if I can attach the photo. It should be on the way, and installed next weekend. I've got a couple pulled exhaust studs to be dealing with then too, to tighten up the exhaust to get ready for they turbo. I'll be puttering around with small projects on the car waiting for my fabricator to return home. I almost find myself second guessing this turbo thing- at our last auto cross, I finished 9th out of 100 cars. How much more power do I really need? AS MUCH AS IT TAKES!!! Here's the tach pics. Attached image(s) 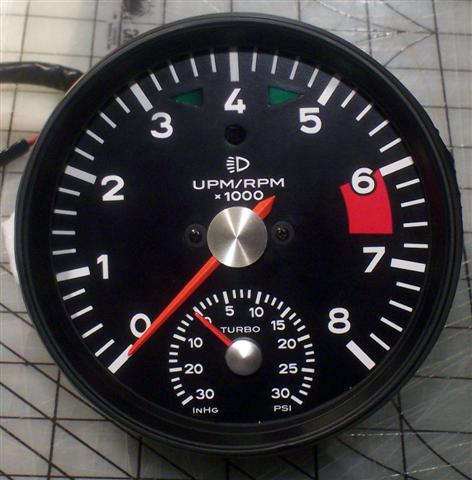 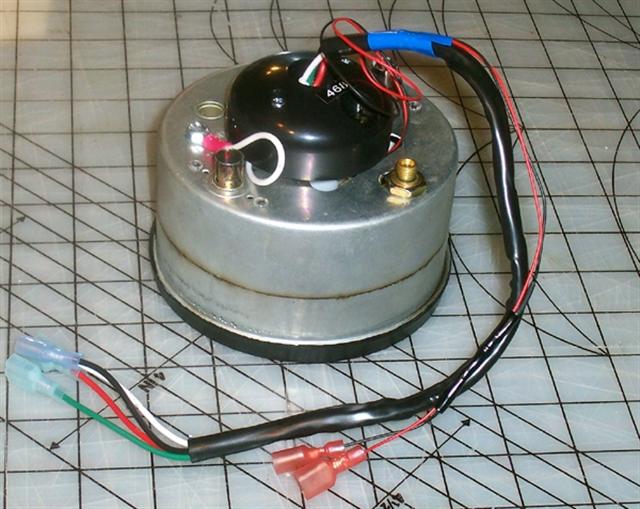
|
| ottox914 |
 Sep 1 2007, 10:48 PM Sep 1 2007, 10:48 PM
Post
#51
|
|
The glory that once was.    Group: Members Posts: 1,302 Joined: 15-December 03 From: Mahtomedi, MN Member No.: 1,438 Region Association: Upper MidWest  |
Finally some more progress!!! Got bigmark's turbo tach installed, had some problems with the tach working right. He stepped right up to the plate and sent another one out asap. Will be getting that installed this coming week. I'll start another thread with step by step photos.
The tach is all well and good, but how about the turbo? Spent the day today with my friend Ron the metal master. He spent the day working on the flanges for the exhaust side of the turbo. The day. On 2 parts. Never ask a machinest to make a part for you, unless you have the patience of a saint. I must say, the pieces he made aren't fancy, but they will do the job, and are perfectly sized and cut. While he was working on that, I was working on intercooler piping. I re-installed the hats on the ITB's, and did alot of measure 2x cut 1x to get the round to oval down pipes Ron made cut to length, and the ITB to intercooler down pipes cut and set up. Here are a couple pics of the initial test fitting from the ITB's, and the intercooler round to oval pipes Ron made. Attached image(s) 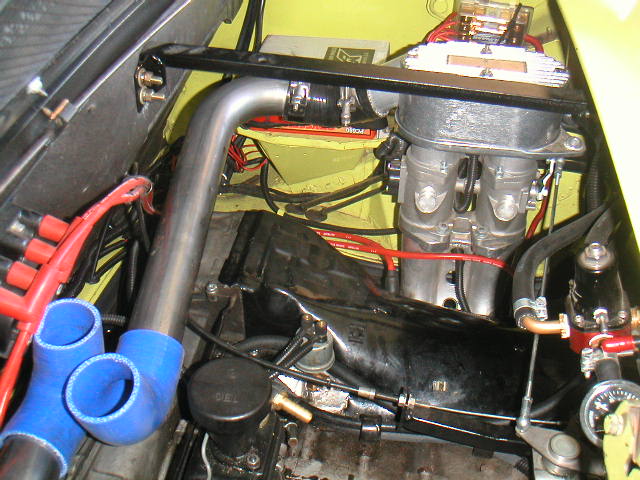 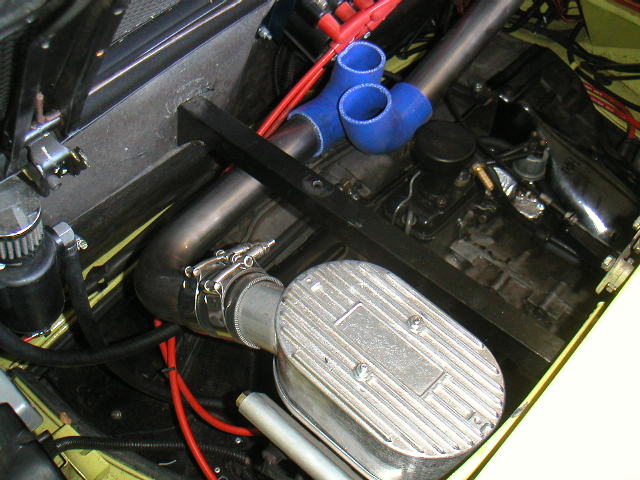 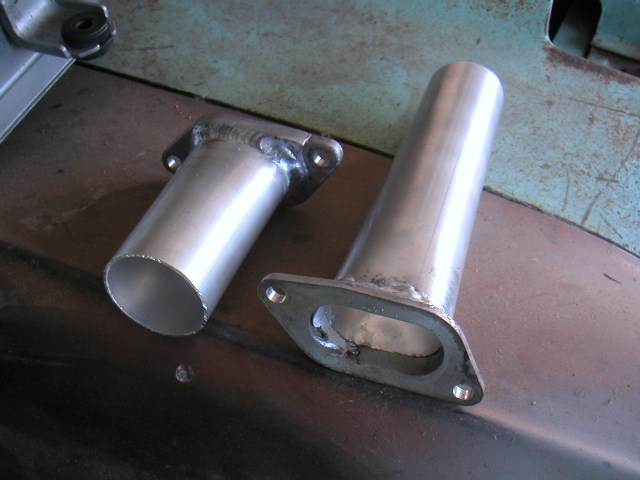
|
| ottox914 |
 Sep 1 2007, 10:54 PM Sep 1 2007, 10:54 PM
Post
#52
|
|
The glory that once was.    Group: Members Posts: 1,302 Joined: 15-December 03 From: Mahtomedi, MN Member No.: 1,438 Region Association: Upper MidWest  |
I also revised the lines to the puke tank, running 1 line from each head to the tank.
The next photo shows the oiling system for the turbo. To the left is the oil sending unit, and when I installed it, I added a "T" and a plug. I'll just need a 1/4" male fitting on the line to have oil to the turbo. From the Turbo, it will go to a scavenge pump, them back up and into the engine at the oil fill, where there is a fitting installed to receive the return oil line. We also made an aluminum plate to mount on the intercooler for the blow of valve. With a VNT turbo, I'll probably not need it, but I decided to add one anyway. The subie BOV mounts up at an angle, making it impossible to close the engine lid. This plate with an angled hole drilled, will allow the BOV to mount horizontal, and the lid to close. Attached image(s) 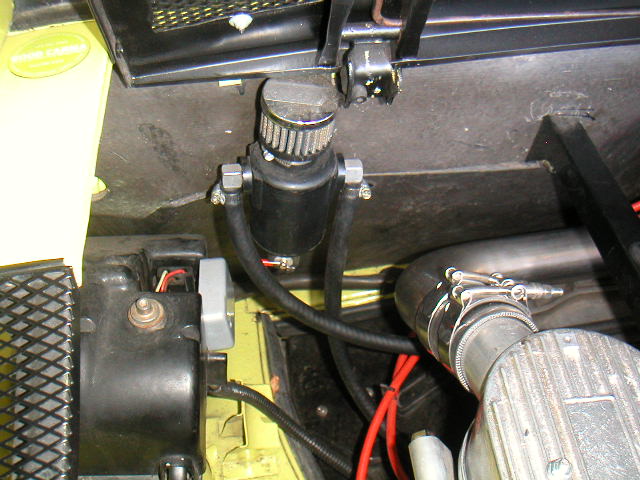 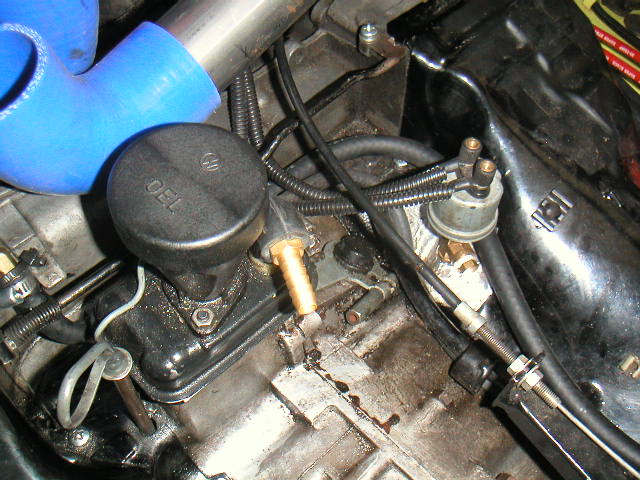 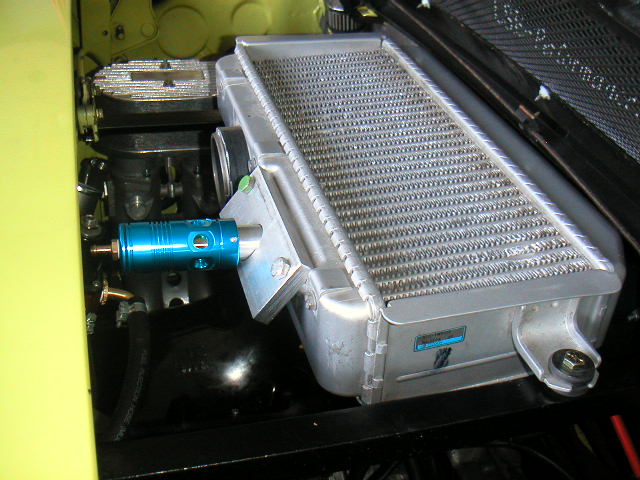
|
| ottox914 |
 Sep 1 2007, 11:04 PM Sep 1 2007, 11:04 PM
Post
#53
|
|
The glory that once was.    Group: Members Posts: 1,302 Joined: 15-December 03 From: Mahtomedi, MN Member No.: 1,438 Region Association: Upper MidWest  |
Now for some good stuff. Got all the piping roughed in for the left ITB. It just needs some beads added to the ends to keep the hose on, and its done. The rt side needs an extention welded onto the "J" shapped piece, as the piece is about an inch to short on the short end of the "J". Ron will be heli-arcing that tomorrow with stainless, so the joint should be pretty invisible. This winter it all comes appart for powder coating anyway.
The last pic is the intercooler and piping. Keep in mind we need to add a little length to the pipe on the left as it turns back to the ITB, add beads, and bolt it all togather for good. I also spent some time checking the turbo and actuator, to make sure the vanes were working as expected. All checked out good, and I got it adjusted to work for this application. To be done: finish the turbo exhaust flanges, make the header collector adaptor, mount the scavenge pump, wire it, add oil in/out, make a short exhaust pipe, lengthen the wide band wired to get the sensor further back, add a bung for the Os sensor in the exhaust pipe, add piping from the turbo to the intercooler, install the turbo tach. Attached image(s) 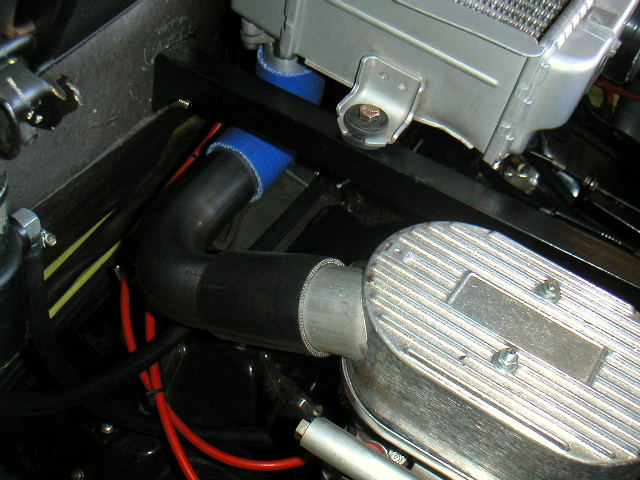 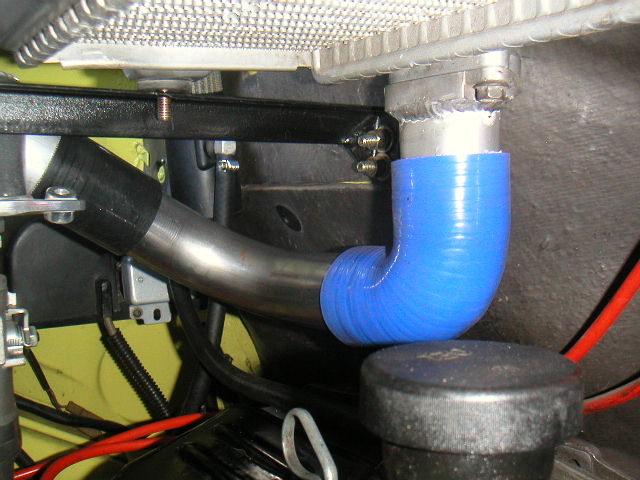 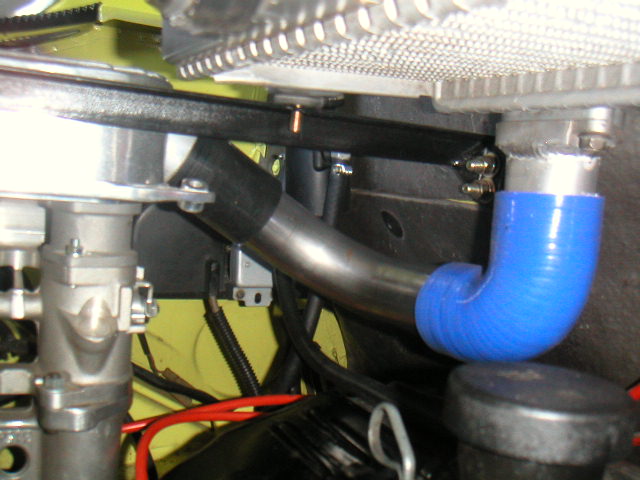 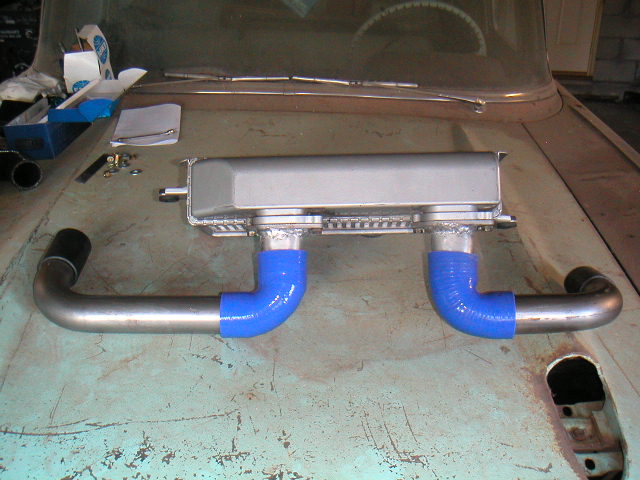
|
| ottox914 |
 Sep 1 2007, 11:10 PM Sep 1 2007, 11:10 PM
Post
#54
|
|
The glory that once was.    Group: Members Posts: 1,302 Joined: 15-December 03 From: Mahtomedi, MN Member No.: 1,438 Region Association: Upper MidWest  |
Thats pretty much for the updates for now. Last week I ballasted the car and corner balanced it, got to within 4 lbs of matching cross weights. It was interesting to re-connect the sway bars, and see the difference in how you needed to set the drop links side to side when setting them with weight in the drivers seat. I made some adjustable double heim jointed links for the front and back of the car so I can set the bars for ZERO weight bearing when the car is static and ballasted.
The rest of this weekend is devoted to Mrs me, so probably not much more to add till tue/wed of next wk. My goal is to have the turbo up and running by the weekend, as there is a car show saturday and family reunion sunday I'd like to take it to. Blown, but not blown up. |
| marks914 |
 Sep 2 2007, 10:11 AM Sep 2 2007, 10:11 AM
Post
#55
|
|
Senior Member    Group: Members Posts: 845 Joined: 9-October 04 From: the motor city Member No.: 2,912 Region Association: None |
Hey David,
Did you get a chance to try out that 2nd tach? Mark |
| JPB |
 Sep 2 2007, 07:19 PM Sep 2 2007, 07:19 PM
Post
#56
|
|
The Crimson Rocket smiles in your general direction.     Group: Members Posts: 2,927 Joined: 12-November 05 From: Tapmahamock, Va. Member No.: 5,107 |
Everyone knows you can't turbo a T4, should of went with a T1. (IMG:style_emoticons/default/hide.gif)
|
| ottox914 |
 Sep 3 2007, 09:34 PM Sep 3 2007, 09:34 PM
Post
#57
|
|
The glory that once was.    Group: Members Posts: 1,302 Joined: 15-December 03 From: Mahtomedi, MN Member No.: 1,438 Region Association: Upper MidWest  |
Mark, only had saturday to get to the car, family ruled for sunday/monday. Hope to get it installed tomorrow night and see how it goes. It looks great, and your customer service has been beyond great.
JPB- you best stay hidden behind that couch lest the mighty 914T smack you down! (although I really DID think of T1 power, lets see, lighter, alot more been there/done that to fall back on, re-build it monthly when you hit it with the boost... hmmm.. nope) This brings up an interesting thought- patience or money, which do you have more of? When I turbo'd my ford focus, I bought a kit, it was all there, to the last nut and bolt. Got it done and on the road in one long evening after work. No kidding. This project has taken FOREVER, although I will admit to being sidetracked with auto cross, gutting to the studs and re-doing our master bathroom, (10K in materials and still counting the labor...) golf, family, summer, but still, when it takes a day just to machine up 2 flanges for the exhaust in/out, and all the thinking, ordering, fabricating, re-fitting, re-doing when a better solution presents itself, well, I can really appreciate the one box solutions offered for other cars when it comes to turbos, and actually am quite amazed that the kits offered are as cheep as they are, in the 3-5k range, when I think of all that has gone into this project. Time for bed. Gotta get an early start to the day to make an early appearance in the garage, for more progress and pics. |
| 914-gt |
 Sep 3 2007, 11:46 PM Sep 3 2007, 11:46 PM
Post
#58
|
|
Member   Group: Members Posts: 51 Joined: 2-September 07 From: Houston TX Member No.: 8,066 |
Hi David, thats a nice set up!
Does anyone know what happened to the 76 914-6 with the turbo? I was told that car was a mule car but have never found any actual info on the car. That sure would be a neat car to document. |
| ottox914 |
 Sep 13 2007, 09:45 PM Sep 13 2007, 09:45 PM
Post
#59
|
|
The glory that once was.    Group: Members Posts: 1,302 Joined: 15-December 03 From: Mahtomedi, MN Member No.: 1,438 Region Association: Upper MidWest  |
All kinds of updates: her is a link to the "bigmark" turbo tach install-
http://www.914world.com/bbs2/index.php?showtopic=76184 and a pic of the finished product. Attached image(s) 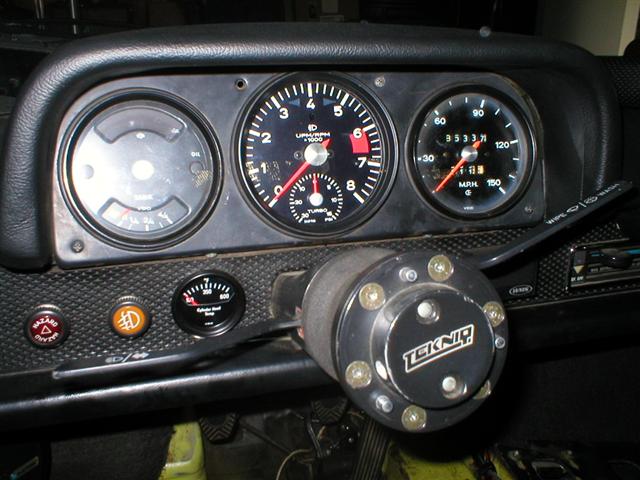
|
| ottox914 |
 Sep 13 2007, 09:55 PM Sep 13 2007, 09:55 PM
Post
#60
|
|
The glory that once was.    Group: Members Posts: 1,302 Joined: 15-December 03 From: Mahtomedi, MN Member No.: 1,438 Region Association: Upper MidWest  |
... now on to the good stuff. All this took place last week, thursday and friday, but I have had no time to update since then. We'll start out with the intercooler. Here are some pics of the final fitting of the pipes for the intercooler to ITB section of the system.
pic 1- test fitting right side pic 2- test fitting right side pic 3- test fitting left side pic 4- test fitting left side Attached image(s) 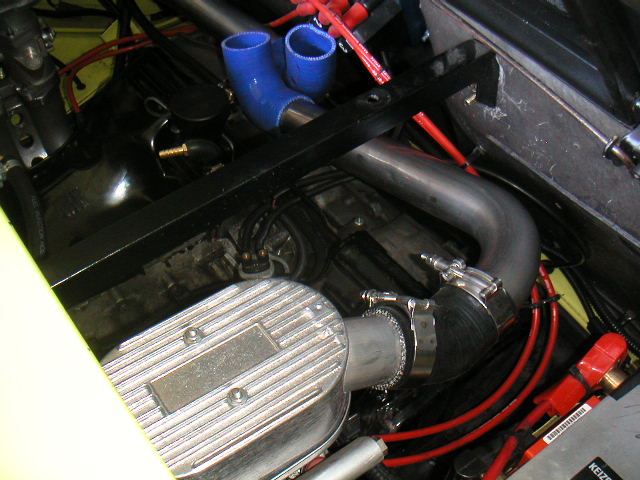 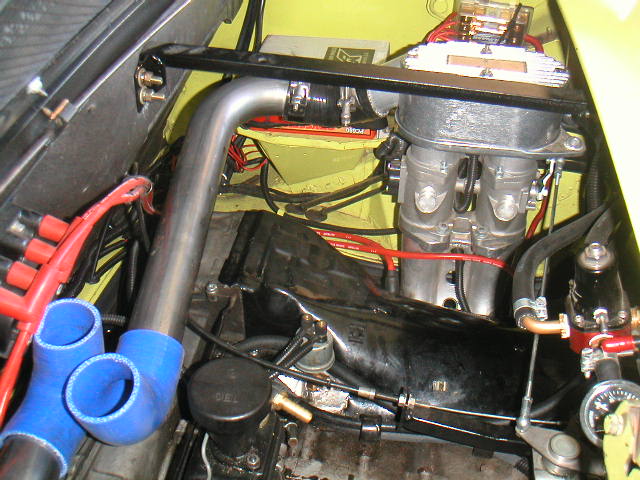 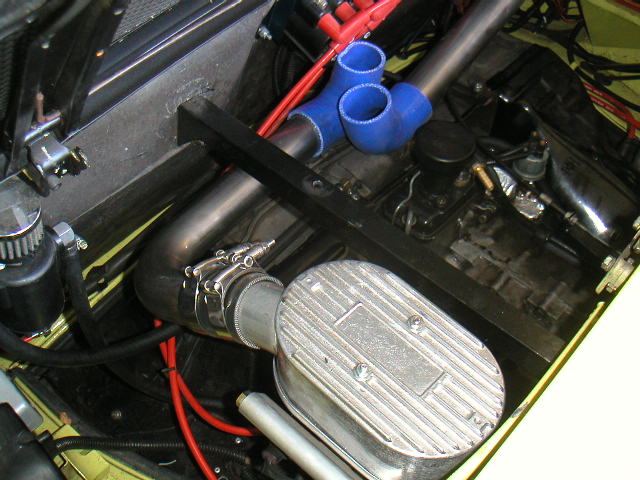 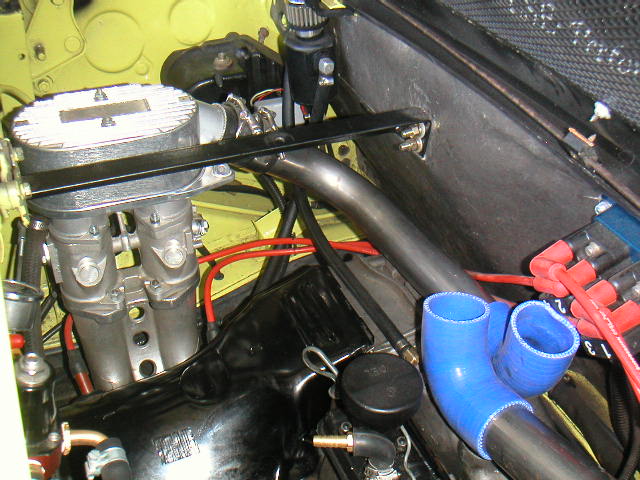
|
  |
1 User(s) are reading this topic (1 Guests and 0 Anonymous Users)
0 Members:

|
Lo-Fi Version | Time is now: 2nd April 2025 - 02:06 AM |
Invision Power Board
v9.1.4 © 2025 IPS, Inc.


