|
|
|
Porsche, and the Porsche crest are registered trademarks of Dr. Ing. h.c. F. Porsche AG.
This site is not affiliated with Porsche in any way. Its only purpose is to provide an online forum for car enthusiasts. All other trademarks are property of their respective owners. |
|
|

  |

| Phoenix-MN |
 Aug 5 2007, 10:50 AM Aug 5 2007, 10:50 AM
Post
#1
|
|
Senior Member  Group: Members Posts: 927 Joined: 23-January 04 From: ST. Bonifacius,MN Member No.: 1,590 |
I have finally mated the engine and transmission together and went through the put together - take apart, put together - take apart process about 5 times to get the throwout bearing free play where I wanted it, I started out with 1 washer under the pivot ball that was about .059" thick and this only had about 1/16" free play at the end of the clutch arm. I ground the washer down to .030" and this resulted in almost 1/2" free play (too much). After several variations I ended up with a washer that was .050" thick and gave me a little less than 1/4" free play. As you can surmise, it doesn't take much to make a large change in the free play movement.
Here's a picture of the assembled engine/transmission, I have a small issue to iron out with the drivers side header before it goes into the car. It's getting closer (but no light at the end of the tunnel yet) 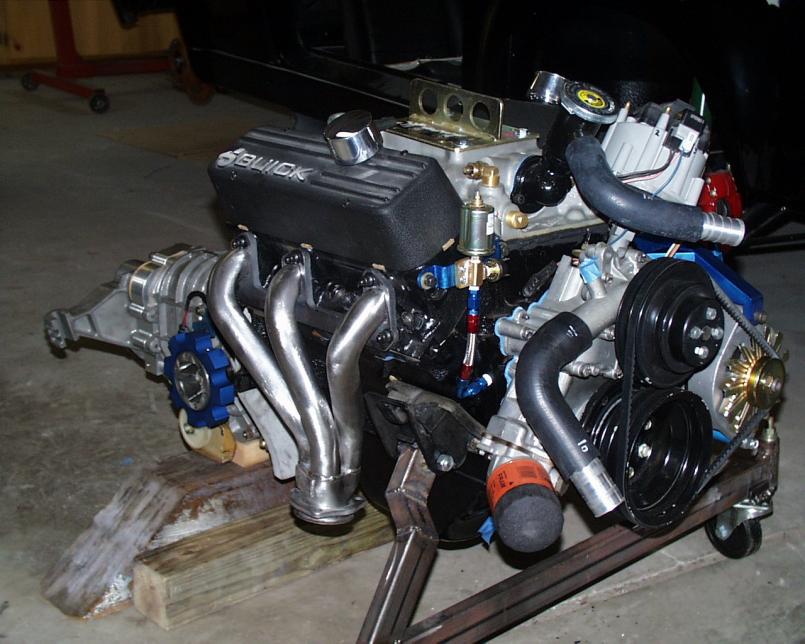 |
   |

 
|
| pjhaun |
Aug 5 2007, 09:35 PM
Post
#2
|
|
Member Group: Members Posts: 370 Joined: 21-August 03 Member No.: 1,055 Region Association: None |
Paul,
Here is a couple picture of the dry fitting of my engine installation. This is to check for all the re- routing of the wiring hydrualic lines, brake lines and water pipes for the radiator and heaters. Attached image(s) 
|
|
|
|
| pjhaun |
Aug 5 2007, 09:37 PM
Post
#3
|
|
Member Group: Members Posts: 370 Joined: 21-August 03 Member No.: 1,055 Region Association: None |
QUOTE(pjhaun @ Aug 5 2007, 08:35 PM)  Paul, Here is a couple picture of the dry fitting of my engine installation. This is to check for all the re- routing of the wiring hydrualic lines, brake lines and water pipes for the radiator and heaters. Attached image(s) 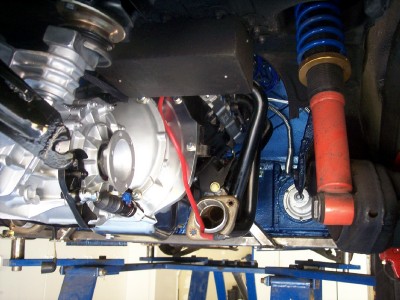
|
|
|
|
| pjhaun |
Aug 5 2007, 09:38 PM
Post
#4
|
|
Member Group: Members Posts: 370 Joined: 21-August 03 Member No.: 1,055 Region Association: None |
QUOTE(pjhaun @ Aug 5 2007, 08:37 PM) QUOTE(pjhaun @ Aug 5 2007, 08:35 PM) Paul, Here is a couple picture of the dry fitting of my engine installation. This is to check for all the re- routing of the wiring hydrualic lines, brake lines and water pipes for the radiator and heaters. Attached image(s) 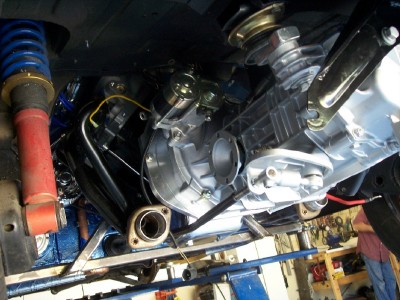
|
|
|
|
| pjhaun |
Aug 5 2007, 09:39 PM
Post
#5
|
|
Member Group: Members Posts: 370 Joined: 21-August 03 Member No.: 1,055 Region Association: None |
QUOTE(pjhaun @ Aug 5 2007, 08:38 PM) QUOTE(pjhaun @ Aug 5 2007, 08:37 PM) QUOTE(pjhaun @ Aug 5 2007, 08:35 PM) Paul, Here is a couple picture of the dry fitting of my engine installation. This is to check for all the re- routing of the wiring hydrualic lines, brake lines and water pipes for the radiator and heaters. Attached image(s) 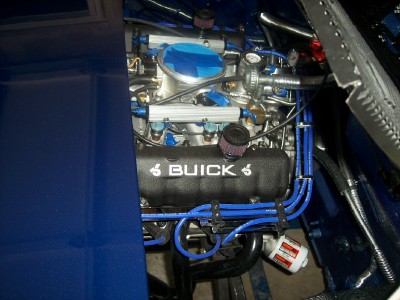
|
|
|
|
| pjhaun |
Aug 5 2007, 09:40 PM
Post
#6
|
|
Member Group: Members Posts: 370 Joined: 21-August 03 Member No.: 1,055 Region Association: None |
QUOTE(pjhaun @ Aug 5 2007, 08:39 PM) QUOTE(pjhaun @ Aug 5 2007, 08:38 PM) QUOTE(pjhaun @ Aug 5 2007, 08:37 PM) QUOTE(pjhaun @ Aug 5 2007, 08:35 PM) Paul, Here is a couple picture of the dry fitting of my engine installation. This is to check for all the re- routing of the wiring hydrualic lines, brake lines and water pipes for the radiator and heaters. Attached image(s) 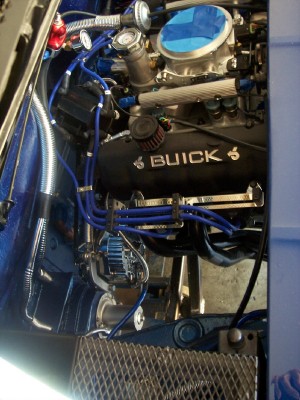
|
|
|
|
| pjhaun |
Aug 5 2007, 09:41 PM
Post
#7
|
|
Member Group: Members Posts: 370 Joined: 21-August 03 Member No.: 1,055 Region Association: None |
QUOTE(pjhaun @ Aug 5 2007, 08:40 PM) QUOTE(pjhaun @ Aug 5 2007, 08:39 PM) QUOTE(pjhaun @ Aug 5 2007, 08:38 PM) QUOTE(pjhaun @ Aug 5 2007, 08:37 PM) QUOTE(pjhaun @ Aug 5 2007, 08:35 PM) Paul, Here is a couple picture of the dry fitting of my engine installation. This is to check for all the re- routing of the wiring hydrualic lines, brake lines and water pipes for the radiator and heaters. Attached image(s) 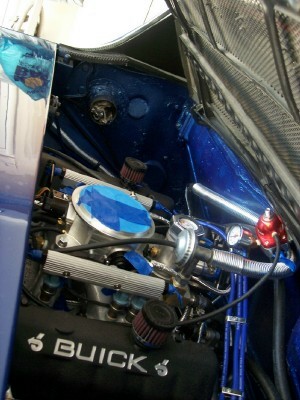
|
|
|
|
| GS Guy |
Aug 6 2007, 06:28 AM
Post
#8
|
|
Member Group: Members Posts: 243 Joined: 8-July 04 From: Columbia, MD Member No.: 2,325 Region Association: North East States |
PJ,
Got any close up pics of your clutch slave cylinder mount? That looks pretty slick. Jeff |
|
|
|
| Phoenix-MN |
Aug 6 2007, 06:48 AM
Post
#9
|
|
Senior Member Group: Members Posts: 927 Joined: 23-January 04 From: ST. Bonifacius,MN Member No.: 1,590 |
Phillip,
It looks like you have your eng/trans mounted an inch or so back (blocks on the transmission mounts). Did you need to do this for clearance of the pulley combination you used on the front of the engine? Your install looks real nice, can't wait for a report when it fires up. Paul |
|
|
|
| So.Cal.914 |
Aug 6 2007, 07:06 AM
Post
#10
|
|
"...And it has a front trunk too." Group: Members Posts: 6,588 Joined: 15-February 04 From: Low Desert, CA./ Hills of N.J. Member No.: 1,658 Region Association: None |
Couldn't you get the tape and plug wires to match your paint any closer?
Looks good... |
|
|
|
| iamchappy |
Aug 6 2007, 07:50 AM
Post
#11
|
|
It all happens so fast! Group: Members Posts: 4,893 Joined: 5-November 03 From: minnetonka, mn Member No.: 1,315 Region Association: Upper MidWest |
The race is on, lets see if we can get ours done before they have to be put away for the Winter. It will kill me if I have to wait till Spring to finish up, I already feel like I missed out this summer on getting it done. I would never of imagined 3 months ago I would still be working on mine.
Keep going Paul, maybe we will celebrate wrapping these cars up before Winter. |
|
|
|
| Phoenix-MN |
Aug 6 2007, 09:11 AM
Post
#12
|
|
Senior Member Group: Members Posts: 927 Joined: 23-January 04 From: ST. Bonifacius,MN Member No.: 1,590 |
Chappy,
Is it orange yet? Will I be done before it get cold? Ya right (IMG:style_emoticons/default/av-943.gif) One can only hope. |
|
|
|
| pjhaun |
Aug 6 2007, 09:25 AM
Post
#13
|
|
Member Group: Members Posts: 370 Joined: 21-August 03 Member No.: 1,055 Region Association: None |
QUOTE(GS Guy @ Aug 6 2007, 05:28 AM) PJ, Got any close up pics of your clutch slave cylinder mount? That looks pretty slick. Jeff Jeff, I used the original clutch cable bracket. I drilled a hole in it and welded it in. Attached image(s) 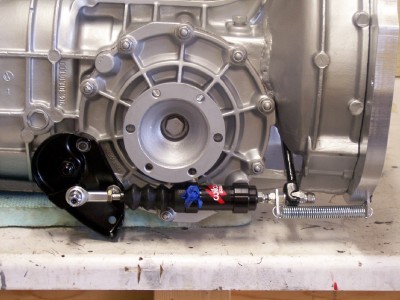
|
|
|
|
| iamchappy |
Aug 6 2007, 09:27 AM
Post
#14
|
|
It all happens so fast! Group: Members Posts: 4,893 Joined: 5-November 03 From: minnetonka, mn Member No.: 1,315 Region Association: Upper MidWest |
Not Orange yet, but everything on the car is in primer, but one door skin and under the engine lid and hinges, should be in primer by the end of the day. I hope to see Orange this week....."HOPE"!
|
|
|
|
| pjhaun |
Aug 6 2007, 09:29 AM
Post
#15
|
|
Member Group: Members Posts: 370 Joined: 21-August 03 Member No.: 1,055 Region Association: None |
QUOTE(Phoenix-MN @ Aug 6 2007, 05:48 AM) Phillip, It looks like you have your eng/trans mounted an inch or so back (blocks on the transmission mounts). Did you need to do this for clearance of the pulley combination you used on the front of the engine? Your install looks real nice, can't wait for a report when it fires up. Paul Paul, The engine sets back an 1 inch and quarter. This is for the front pulleys to clear the fire wall. |
|
|
|
| dbledsoe |
Aug 6 2007, 05:30 PM
Post
#16
|
|
Mutineer Group: Members Posts: 300 Joined: 13-May 03 From: Boise, ID. Member No.: 687 |
QUOTE(pjhaun @ Aug 6 2007, 09:29 AM) QUOTE(Phoenix-MN @ Aug 6 2007, 05:48 AM) Phillip, It looks like you have your eng/trans mounted an inch or so back (blocks on the transmission mounts). Did you need to do this for clearance of the pulley combination you used on the front of the engine? Your install looks real nice, can't wait for a report when it fires up. Paul Paul, The engine sets back an 1 inch and quarter. This is for the front pulleys to clear the fire wall. Phillip, Did you use serpentine type belt and pulleys or V belt? I used V belt (just like Paul's set up in his photo above) on my Buick V6 conversion and didn't have to set the engine back, and I left the sound deadening insulation in place. Makes for a pain to change the belt but I can do it with a bit of grunting, cussing, and questioning of my sanity. (IMG:style_emoticons/default/sad.gif) Don |
|
|
|
| pjhaun |
Aug 6 2007, 06:10 PM
Post
#17
|
|
Member Group: Members Posts: 370 Joined: 21-August 03 Member No.: 1,055 Region Association: None |
QUOTE(Phoenix-MN @ Aug 5 2007, 09:50 AM) I have finally mated the engine and transmission together and went through the put together - take apart, put together - take apart process about 5 times to get the throwout bearing free play where I wanted it, I started out with 1 washer under the pivot ball that was about .059" thick and this only had about 1/16" free play at the end of the clutch arm. I ground the washer down to .030" and this resulted in almost 1/2" free play (too much). After several variations I ended up with a washer that was .050" thick and gave me a little less than 1/4" free play. As you can surmise, it doesn't take much to make a large change in the free play movement. Here's a picture of the assembled engine/transmission, I have a small issue to iron out with the drivers side header before it goes into the car. It's getting closer (but no light at the end of the tunnel yet) Paul, I have these short headers that I am not going to use. They need to be sand blasted and recoated. Phillip J. Haun Oak Harbor, WA. Attached thumbnail(s) 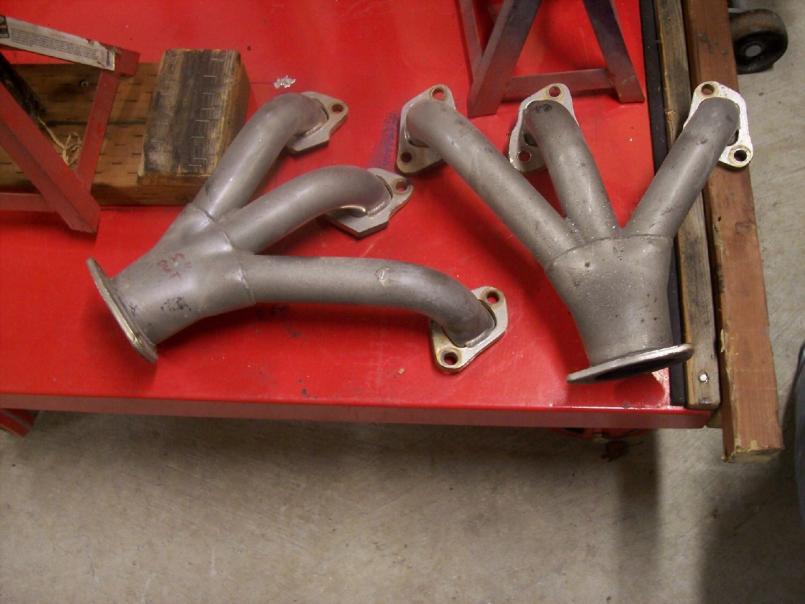
|
|
|
|
| pjhaun |
Aug 6 2007, 06:21 PM
Post
#18
|
|
Member Group: Members Posts: 370 Joined: 21-August 03 Member No.: 1,055 Region Association: None |
QUOTE(dbledsoe @ Aug 6 2007, 04:30 PM) QUOTE(pjhaun @ Aug 6 2007, 09:29 AM) QUOTE(Phoenix-MN @ Aug 6 2007, 05:48 AM) Phillip, It looks like you have your eng/trans mounted an inch or so back (blocks on the transmission mounts). Did you need to do this for clearance of the pulley combination you used on the front of the engine? Your install looks real nice, can't wait for a report when it fires up. Paul Paul, The engine sets back an 1 inch and quarter. This is for the front pulleys to clear the fire wall. Phillip, Did you use serpentine type belt and pulleys or V belt? I used V belt (just like Paul's set up in his photo above) on my Buick V6 conversion and didn't have to set the engine back, and I left the sound deadening insulation in place. Makes for a pain to change the belt but I can do it with a bit of grunting, cussing, and questioning of my sanity. (IMG:style_emoticons/default/sad.gif) Don Don, I am using a "V" Belt. I am using the Orginal Renegade Hybrid Kit from 1990. That was when they where in Califorina and they did kits for the Buick V6 and Chevy V6. In this Kit they moved the engine back an 1 inch an quarter back. I believe they did that due to where they placed the Alternator. Phillip J. Haun Oak Harbor, WA. |
|
|
|
| Phoenix-MN |
Aug 6 2007, 06:33 PM
Post
#19
|
|
Senior Member Group: Members Posts: 927 Joined: 23-January 04 From: ST. Bonifacius,MN Member No.: 1,590 |
Phillip,
I got the header issue resolved today with Sanderson Headers, thanks for the offer though. Paul |
|
|
|
| GS Guy |
Aug 6 2007, 07:13 PM
Post
#20
|
|
Member Group: Members Posts: 243 Joined: 8-July 04 From: Columbia, MD Member No.: 2,325 Region Association: North East States |
QUOTE(pjhaun @ Aug 6 2007, 11:25 AM) QUOTE(GS Guy @ Aug 6 2007, 05:28 AM) PJ, Got any close up pics of your clutch slave cylinder mount? That looks pretty slick. Jeff Jeff, I used the original clutch cable bracket. I drilled a hole in it and welded it in. Good thinking! I like the return spring attachment too. Jeff |
|
|
|
|
1 User(s) are reading this topic (1 Guests and 0 Anonymous Users)
0 Members:

|
Lo-Fi Version | Time is now: 26th September 2024 - 12:08 PM |
Invision Power Board
v9.1.4 © 2024 IPS, Inc.