|
|

|
Porsche, and the Porsche crest are registered trademarks of Dr. Ing. h.c. F. Porsche AG.
This site is not affiliated with Porsche in any way. Its only purpose is to provide an online forum for car enthusiasts. All other trademarks are property of their respective owners. |
|
|
  |
| Jeff Hail |
 Feb 10 2008, 09:54 PM Feb 10 2008, 09:54 PM
Post
#166
|
|
Senior Member    Group: Members Posts: 1,141 Joined: 3-May 07 From: LA/ CA Member No.: 7,712 |
No rust left here. All new steel.
Made another fixture to keep the longs in check. Threaded rod with plates on each end. Tack welded to the inner longs. Keeps the dimensions in check and the longs won't splay in process. Remember to take measurements before you begin cutting off stuff. Especially the suspension consoles Attached image(s) 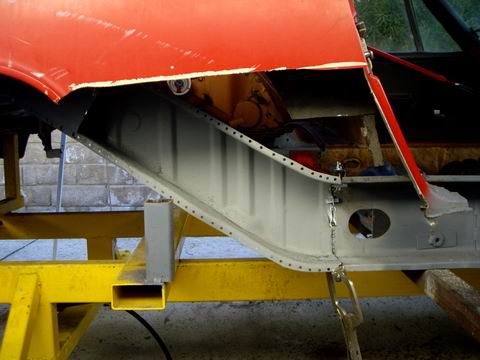 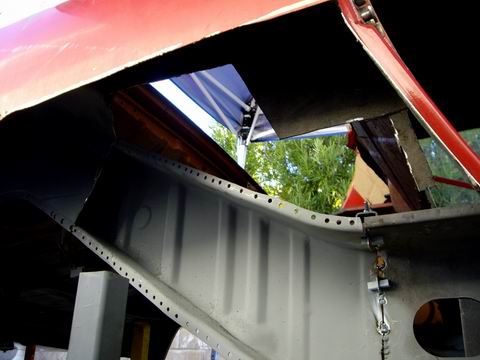 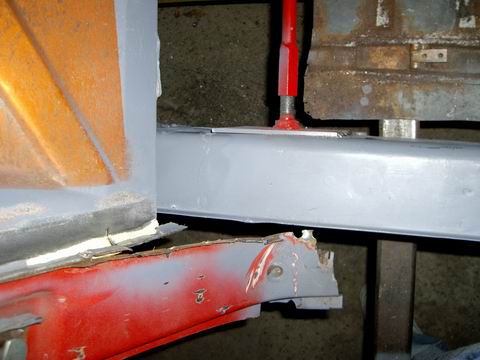 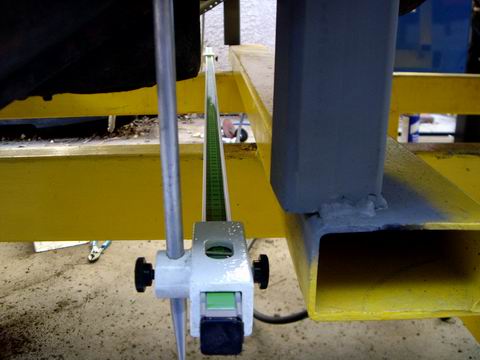
|
| Jeff Hail |
 Feb 10 2008, 10:00 PM Feb 10 2008, 10:00 PM
Post
#167
|
|
Senior Member    Group: Members Posts: 1,141 Joined: 3-May 07 From: LA/ CA Member No.: 7,712 |
More on measuring.
Do not proceed without measuring before you cut. This is vital to returning a chassis to dimensional tolerance. You do not have to high tech equipment. A tape measure will get by if on a budget. Pre- measure both sides before you cut any suspension consoles off. Attached image(s) 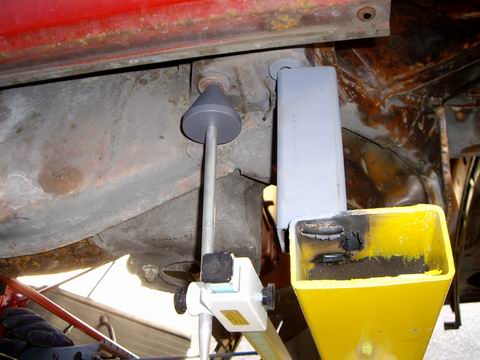 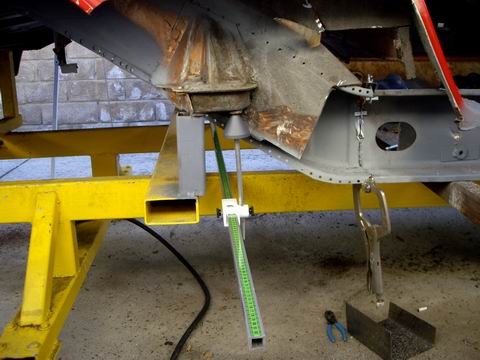 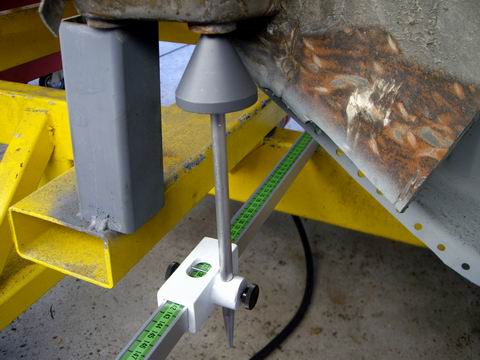 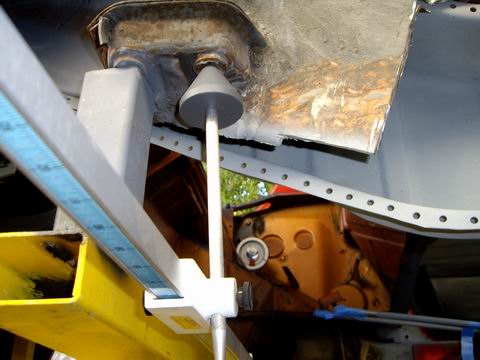
|
| Jeff Hail |
 Feb 10 2008, 10:05 PM Feb 10 2008, 10:05 PM
Post
#168
|
|
Senior Member    Group: Members Posts: 1,141 Joined: 3-May 07 From: LA/ CA Member No.: 7,712 |
Finished the long connection at the rear rail. Added a sleeve at the joint. This will strengthen the connection and eliminate the flex at this area that 914's at notorious for.
Notice I punched holes in the sleeve. Since this is a area known for corrosion I did the work from inside the long. No leaks from pin holes in any welds will happen here. Also less finish work required since it is all inside once the long is closed up. Work smart -not hard! Attached image(s) 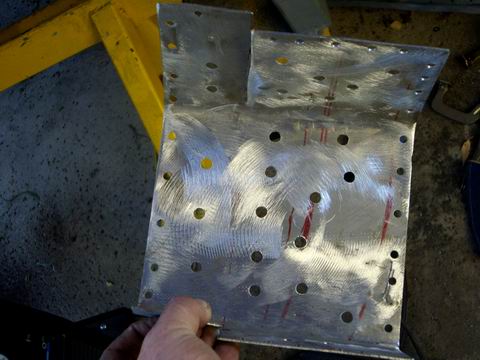 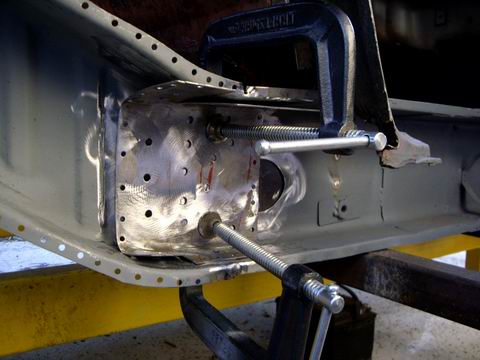 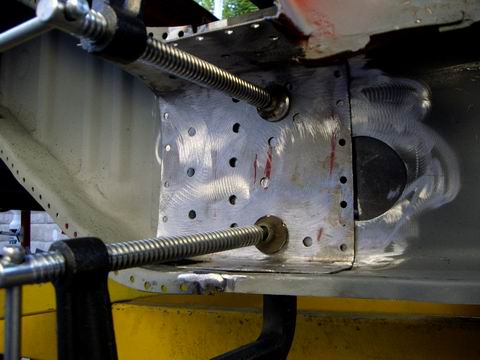 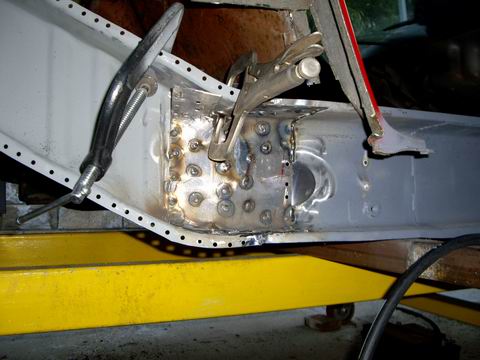
|
| Jeff Hail |
 Feb 10 2008, 10:15 PM Feb 10 2008, 10:15 PM
Post
#169
|
|
Senior Member    Group: Members Posts: 1,141 Joined: 3-May 07 From: LA/ CA Member No.: 7,712 |
Twice as strong as the factory design in this area. No welds from the outside except the outside butt joint equals no water leaks in this area.
I rough fit the new outer wheelhouse ( oops didn't take a pic) I little more trimming needed but should be installed next weekend. I am actually considering modifying a shelf where the rear diagonal long meets the inner long at the firewall. An angled addition of sheetmetal to make water run off and down away from the long. Easy to do and hardly noticeable. More on that later. Attached image(s) 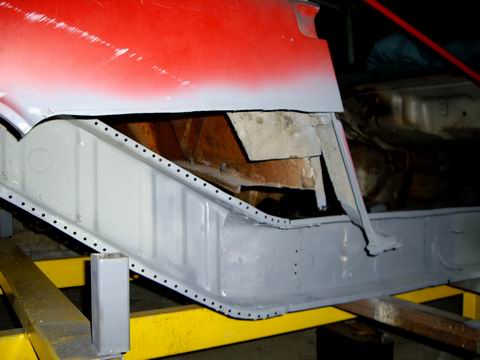
|
| Jeff Hail |
 Feb 10 2008, 10:31 PM Feb 10 2008, 10:31 PM
Post
#170
|
|
Senior Member    Group: Members Posts: 1,141 Joined: 3-May 07 From: LA/ CA Member No.: 7,712 |
Value in scribbled notes:
I am sure this will help someone one day! Measurements........... Seat hinge mounting Attached image(s) 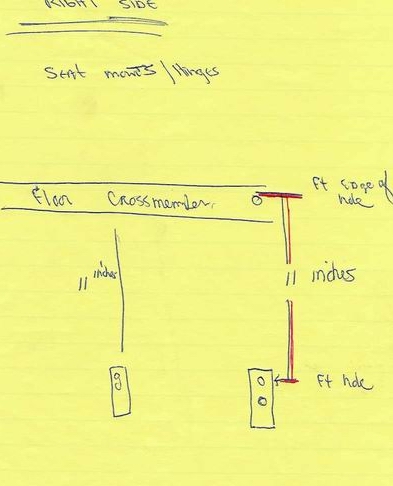
|
| Jeff Hail |
 Feb 10 2008, 10:33 PM Feb 10 2008, 10:33 PM
Post
#171
|
|
Senior Member    Group: Members Posts: 1,141 Joined: 3-May 07 From: LA/ CA Member No.: 7,712 |
More value in scribbled notes:
I am sure this will help someone one day! Measurements........... Outer suspension console specs............... Attached image(s) 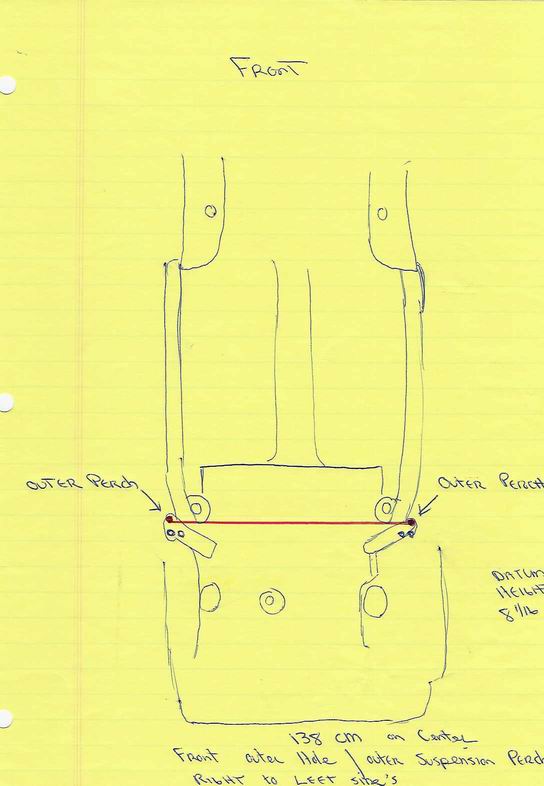
|
| Jeff Hail |
 Feb 10 2008, 10:35 PM Feb 10 2008, 10:35 PM
Post
#172
|
|
Senior Member    Group: Members Posts: 1,141 Joined: 3-May 07 From: LA/ CA Member No.: 7,712 |
More value in scribbled notes:
Measurements........... Inner suspension console specs............... Attached image(s) 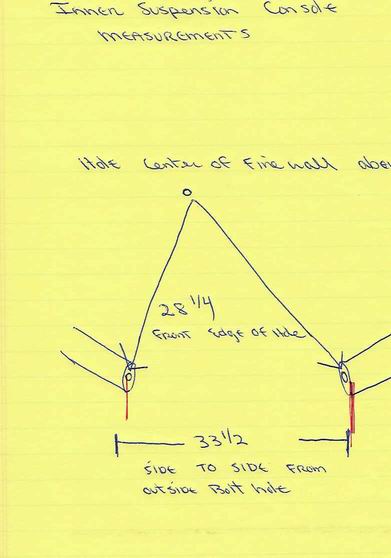
|
| Jeff Hail |
 Feb 10 2008, 10:39 PM Feb 10 2008, 10:39 PM
Post
#173
|
|
Senior Member    Group: Members Posts: 1,141 Joined: 3-May 07 From: LA/ CA Member No.: 7,712 |
More scribbled notes:
Measurements........... Jack post tube............... if you want your rocker moldings to fit correctly (tube centered in the rocker molding cutout hole) Attached image(s) 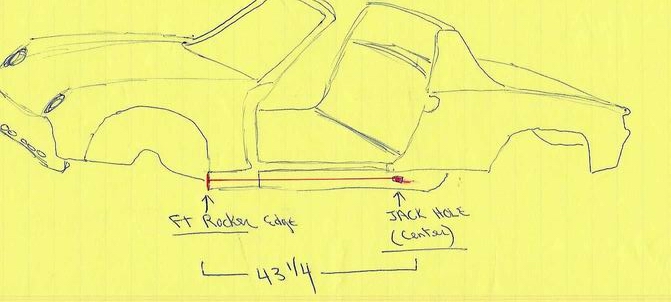
|
| type11969 |
 Feb 11 2008, 06:41 AM Feb 11 2008, 06:41 AM
Post
#174
|
|
Senior Member    Group: Members Posts: 1,231 Joined: 2-December 03 From: Collingswood, NJ Member No.: 1,410 Region Association: North East States |
Looks familiar . . . just much nicer!
-Chris |
| Eric_Shea |
 Feb 11 2008, 04:45 PM Feb 11 2008, 04:45 PM
Post
#175
|
|
PMB Performance                Group: Admin Posts: 19,289 Joined: 3-September 03 From: Salt Lake City, UT Member No.: 1,110 Region Association: Rocky Mountains  |
How long before my "Rock Crusher" is done... (IMG:style_emoticons/default/confused24.gif)
http://www.914world.com/bbs2/index.php?showtopic=80797 |
| Jeff Hail |
 Feb 11 2008, 08:44 PM Feb 11 2008, 08:44 PM
Post
#176
|
|
Senior Member    Group: Members Posts: 1,141 Joined: 3-May 07 From: LA/ CA Member No.: 7,712 |
Two weeks! Isn't that what all shops say?
|
| Twystd1 |
 Feb 12 2008, 12:08 AM Feb 12 2008, 12:08 AM
Post
#177
|
|
You don't want to know... really.....     Group: Members Posts: 2,515 Joined: 12-September 04 From: Newport Beach, California Member No.: 2,743 |
Eric, I have seen Jeff's work first hand.
Your rock crusher should be done in 9 days if I read it right. C |
| Jeff Hail |
 Feb 13 2008, 12:26 AM Feb 13 2008, 12:26 AM
Post
#178
|
|
Senior Member    Group: Members Posts: 1,141 Joined: 3-May 07 From: LA/ CA Member No.: 7,712 |
Might as well add this to the thread (IMG:style_emoticons/default/welder.gif) too:
The design make's everything a one man operation. The width of the upper bed is 32 inches wide which fits between the rear inner console ears that are the lowest part of the car. The height from the ground up was based on the maximum height of the common floor jack +2 inches (adding 2x2x 6 foot) cross bars that sat on jackstands and the bench rolled right underneath with a hair to spare? Of course easy access to gain access and roll around underneath on a creeper was taken into account. Attached image(s) 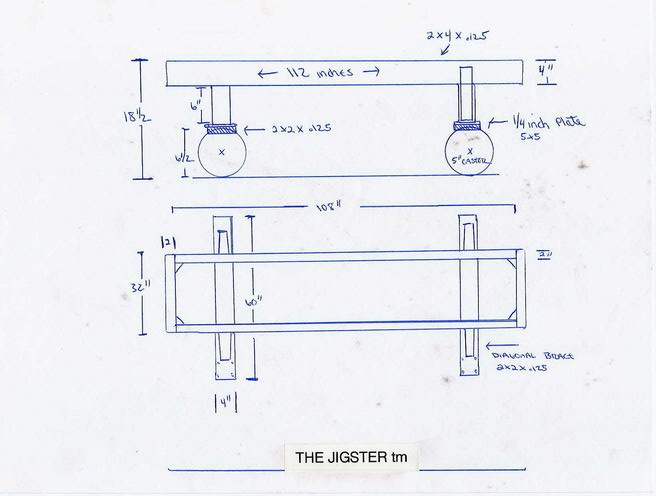
|
| Twystd1 |
 Feb 13 2008, 02:52 AM Feb 13 2008, 02:52 AM
Post
#179
|
|
You don't want to know... really.....     Group: Members Posts: 2,515 Joined: 12-September 04 From: Newport Beach, California Member No.: 2,743 |
This is my favorite thread on this site so far. I LOVE THIS STUFF.
Clayton |
| Zimms |
 Feb 14 2008, 04:57 AM Feb 14 2008, 04:57 AM
Post
#180
|
|
Senior Member    Group: Members Posts: 1,414 Joined: 11-February 06 From: Michigan Member No.: 5,565 Region Association: Upper MidWest 
|
(IMG:style_emoticons/default/agree.gif) Thanks for posting all of the sketches. I am going to be starting something similar this summer.
|
| Jeff Hail |
 Feb 17 2008, 06:44 PM Feb 17 2008, 06:44 PM
Post
#181
|
|
Senior Member    Group: Members Posts: 1,141 Joined: 3-May 07 From: LA/ CA Member No.: 7,712 |
Lets make some Sill Triangles
Made 2 templates. The first one is actual size after the bends (silhouette) of the mounted original. The second is 3/8 larger all the way around. Cut out the sheetmetal using the larger template and then trace the smaller (silhouette) template onto the cutouts. Then drill the holes. I am making right and left sides. Make some relief cuts so the bends don't buckle the flat area's. I tacked some really small welds where the sill plate doglegs over the bracket for strength. These were the tools used in the process and a metal scroll saw to make the cutouts . Finished triangle next to the original. Attached image(s) 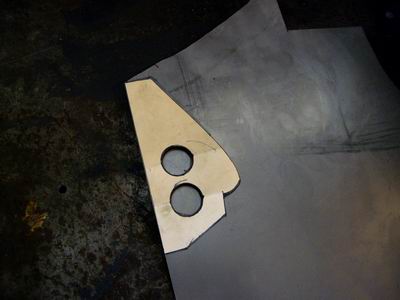 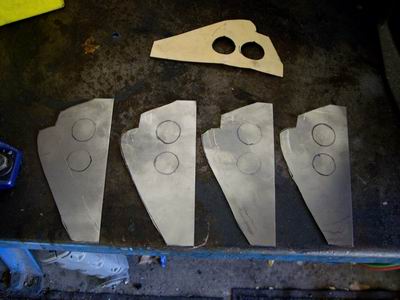 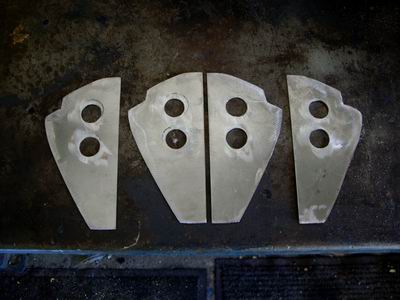 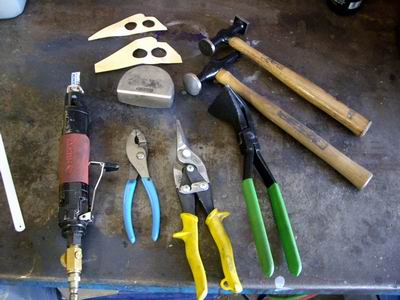 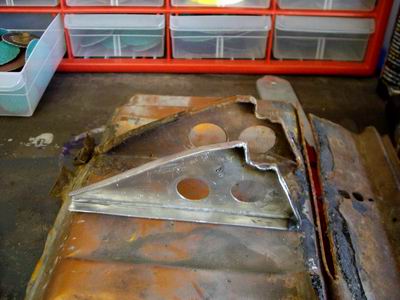
|
| Jeff Hail |
 Feb 17 2008, 06:46 PM Feb 17 2008, 06:46 PM
Post
#182
|
|
Senior Member    Group: Members Posts: 1,141 Joined: 3-May 07 From: LA/ CA Member No.: 7,712 |
Primed set of 4 right and left side triangles.......
Attached image(s) 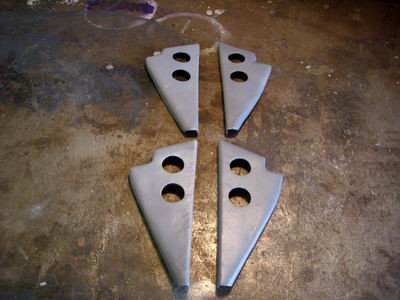
|
| watsonrx13 |
 Feb 18 2008, 05:58 AM Feb 18 2008, 05:58 AM
Post
#183
|
|
Advanced Member     Group: Members Posts: 2,735 Joined: 18-February 03 From: Plant City, FL Member No.: 312 Region Association: South East States |
Jeff, very nice job on the triangles. BTW, what gauge metal did you use?
-- Rob |
| Jeff Hail |
 Feb 18 2008, 09:55 AM Feb 18 2008, 09:55 AM
Post
#184
|
|
Senior Member    Group: Members Posts: 1,141 Joined: 3-May 07 From: LA/ CA Member No.: 7,712 |
|
| Wes V |
 Feb 18 2008, 07:35 PM Feb 18 2008, 07:35 PM
Post
#185
|
|
Member   Group: Members Posts: 482 Joined: 11-October 07 From: Los angeles Member No.: 8,211 |
Jeff;
I just wanted to say thanks again for the sketch of your working platform. I just had 60 feet of steel delivered so I can build my own. Wes |
  |
1 User(s) are reading this topic (1 Guests and 0 Anonymous Users)
0 Members:

|
Lo-Fi Version | Time is now: 20th January 2025 - 08:03 AM |
Invision Power Board
v9.1.4 © 2025 IPS, Inc.


