|
|

|
Porsche, and the Porsche crest are registered trademarks of Dr. Ing. h.c. F. Porsche AG.
This site is not affiliated with Porsche in any way. Its only purpose is to provide an online forum for car enthusiasts. All other trademarks are property of their respective owners. |
|
|
  |
| Twystd1 |
 Sep 30 2008, 10:39 PM Sep 30 2008, 10:39 PM
Post
#366
|
|
You don't want to know... really.....     Group: Members Posts: 2,515 Joined: 12-September 04 From: Newport Beach, California Member No.: 2,743 |
Hi Jeff.
I was just looking at the ground control shocks setup that BradHolio said he could hook me up with. It cost about 2K for that particular setup for all four corners.. Do you have a sense of waht are you going to run for bars, springs and shocks? (Brands, etc) AND... Since I'm tearing into the body work and minor suspension mods. What would you do if you were going to throw some bucks at the chassis? The Engman long kit is a must as well as the sway bar braces. What else would suggest for a flared car with 7s and 8s stickys for the street and occasional A/X? What bracing can I do while the car is apart that creates enough rigidity and still be streetable and affordable? I am thinking a 4 point cage with a down bar that attatches right below the door hinges and goes back to the sill/long area next to the trunk release. 6 points actually. My fear is transferring to much flex to the wheel house and front end. As they are basically stock. I dunno... I just want to hear what you might do for a street and occasional AX car? Note. At the proper time and the proper place........ I drive the streets like it's a track. I have all my life. Thus it is necessary to make this car work without snapping suspension pieces because I am a middle aged nut case. I believe I can build dam near anything given the time and money.. It just doesn't look ANYTHING like your work. I wish I had your mad skilzzzz. By the way. I have 3 new in box intercoolers. Ya know anyone that need any ICs? Cheers, Clayton |
| Jeff Hail |
 Oct 1 2008, 12:34 AM Oct 1 2008, 12:34 AM
Post
#367
|
|
Senior Member    Group: Members Posts: 1,141 Joined: 3-May 07 From: LA/ CA Member No.: 7,712 |
Hi Jeff. I was just looking at the ground control shocks setup that BradHolio said he could hook me up with. It cost about 2K for that particular setup for all four corners.. Do you have a sense of waht are you going to run for bars, springs and shocks? (Brands, etc) AND... Since I'm tearing into the body work and minor suspension mods. What would you do if you were going to throw some bucks at the chassis? The Engman long kit is a must as well as the sway bar braces. What else would suggest for a flared car with 7s and 8s stickys for the street and occasional A/X? What bracing can I do while the car is apart that creates enough rigidity and still be streetable and affordable? I am thinking a 4 point cage with a down bar that attatches right below the door hinges and goes back to the sill/long area next to the trunk release. 6 points actually. My fear is transferring to much flex to the wheel house and front end. As they are basically stock. I dunno... I just want to hear what you might do for a street and occasional AX car? Note. At the proper time and the proper place........ I drive the streets like it's a track. I have all my life. Thus it is necessary to make this car work without snapping suspension pieces because I am a middle aged nut case. I believe I can build dam near anything given the time and money.. It just doesn't look ANYTHING like your work. I wish I had your mad skilzzzz. By the way. I have 3 new in box intercoolers. Ya know anyone that need any ICs? Cheers, Clayton I will be running Bil's front and rear. Sway Away 22mm torsion bars up front and Eibach 250's out back. Tarret bar up front. I am not worried about the suspension pieces taking a beating. Its the chassis that needs help. Engman reinforcements a must. I am going to install reinforcements where the Engman kit stops and continue it all the way back to the rear strut towers as I am raising the suspension pickups. Weight is not that much. Plus the cage ties into the rear rails. Easy as I have not welded the lower firewall in yet. The front is another issue. The cowl flex's considerably which with heavy t-bars may result in cowl shake. To me the best way even with an inexpensive cage would be to tie the cage into the hinge pillars (down low) and high through the bulkhead into the strut towers. If you are thinking 6 pts might as well just add two more tubes (cheap) If you are going front coil overs the strut towers will need to be modified with camber box's or heavily reinforced. Attached image(s) 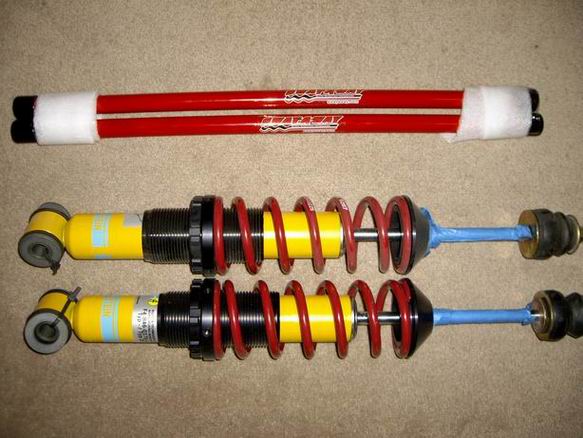
|
| tronporsche |
 Oct 1 2008, 12:40 AM Oct 1 2008, 12:40 AM
Post
#368
|
|
Member   Group: Members Posts: 281 Joined: 21-August 08 From: California Member No.: 9,447 Region Association: Central California |
Jeff, what size Or weight springs are those please ? Do only that size or weight come in red like that ? What use is those size springs for (racing, daily driving , to be comfortable, etc,) The reason I ask is I have the same set and shocks on my car that came from another car. Thank you.
|
| gs11x |
 Oct 11 2008, 06:17 PM Oct 11 2008, 06:17 PM
Post
#369
|
|
Newbie  Group: Members Posts: 8 Joined: 24-February 08 From: Olympia, Wa Member No.: 8,745 Region Association: Pacific Northwest |
Hi Jeff,
Can you share how you are doing your media blasting in your rust repairs? I agree with you comment about trying to grind the rust out because it removes to much metal. I want to buy some media blast equipment but I am not sure what equipment to get. Thanks |
| Jeff Hail |
 Oct 11 2008, 07:17 PM Oct 11 2008, 07:17 PM
Post
#370
|
|
Senior Member    Group: Members Posts: 1,141 Joined: 3-May 07 From: LA/ CA Member No.: 7,712 |
Edited. Non auto stuff removed.
|
| Jeff Hail |
 Oct 11 2008, 07:19 PM Oct 11 2008, 07:19 PM
Post
#371
|
|
Senior Member    Group: Members Posts: 1,141 Joined: 3-May 07 From: LA/ CA Member No.: 7,712 |
Edited. Non auto stuff removed.
|
| Jeff Hail |
 Oct 11 2008, 07:20 PM Oct 11 2008, 07:20 PM
Post
#372
|
|
Senior Member    Group: Members Posts: 1,141 Joined: 3-May 07 From: LA/ CA Member No.: 7,712 |
Edited. Non auto stuff removed.
|
| Jeff Hail |
 Oct 11 2008, 07:21 PM Oct 11 2008, 07:21 PM
Post
#373
|
|
Senior Member    Group: Members Posts: 1,141 Joined: 3-May 07 From: LA/ CA Member No.: 7,712 |
Edited. Non auto stuff removed.
|
| Jeff Hail |
 Oct 11 2008, 07:25 PM Oct 11 2008, 07:25 PM
Post
#374
|
|
Senior Member    Group: Members Posts: 1,141 Joined: 3-May 07 From: LA/ CA Member No.: 7,712 |
edited. Non auto stuff removed.
|
| Jeff Hail |
 Oct 11 2008, 09:10 PM Oct 11 2008, 09:10 PM
Post
#375
|
|
Senior Member    Group: Members Posts: 1,141 Joined: 3-May 07 From: LA/ CA Member No.: 7,712 |
Hi Jeff, Can you share how you are doing your media blasting in your rust repairs? I agree with you comment about trying to grind the rust out because it removes to much metal. I want to buy some media blast equipment but I am not sure what equipment to get. Thanks I use both a professional forced pressure gun (hopper type) and a cheap hand held suction gun with a huge nozzle (Home Depot bucket is the hopper). Forced for larger areas and the hand held for smaller spot areas. I do not use sand. I use Dupont Starblast ( I think I posted somewhere way back about the Starblast). Process is straight forward. Blast until the rust is gone. Wear gloves, a windowed hood and proper respirator. I lay out a big blue poly tarp under the work area to catch the spent media and then recycle it by sifting it thru a ultra fine strainer to remove the contaminants. (pain but it works) Since I am doing this project in stages I try to work smaller areas that can be started and completed without leaving exposed metal for periods of time. |
| Wilhelm |
 Oct 12 2008, 09:19 AM Oct 12 2008, 09:19 AM
Post
#376
|
|
Member   Group: Members Posts: 408 Joined: 7-September 07 From: Hooterville, OR Member No.: 8,088 Region Association: None |
Hi Jeff, Can you share how you are doing your media blasting in your rust repairs? I agree with you comment about trying to grind the rust out because it removes to much metal. I want to buy some media blast equipment but I am not sure what equipment to get. Thanks Heres my sandblasting effort............ http://www.914world.com/bbs2/index.php?showtopic=87896 |
| Jeff Hail |
 Nov 30 2008, 07:10 PM Nov 30 2008, 07:10 PM
Post
#377
|
|
Senior Member    Group: Members Posts: 1,141 Joined: 3-May 07 From: LA/ CA Member No.: 7,712 |
We appologize for the interuption. We will return to our regular programming in a moment.
No time to work on the tub until now. I feel like the Duracell bunny sometimes. Go,go, go...... Finished the pedal box and pedal board support. A few modifications to the original design but I am happy with the result. Primed, seam sealed and primed again - done Anyone who has worked/ repaired this area knows its tight confines. Attached thumbnail(s) 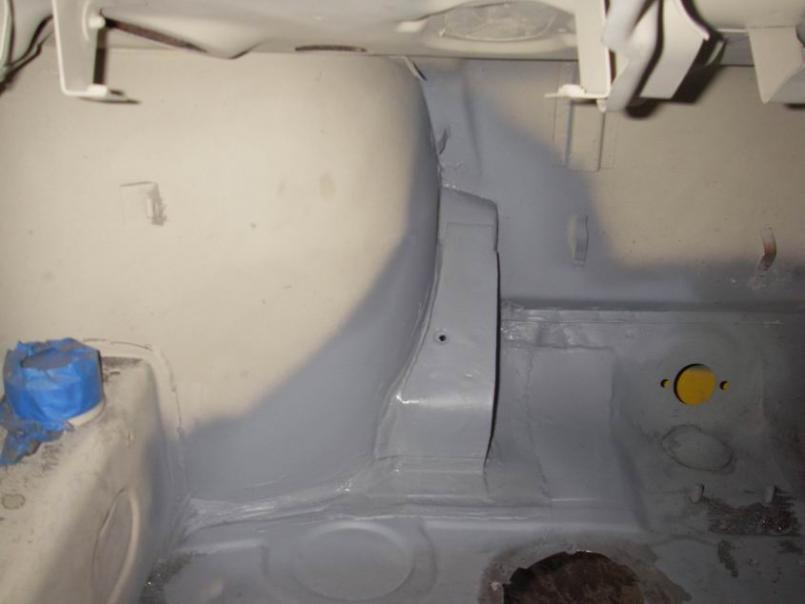 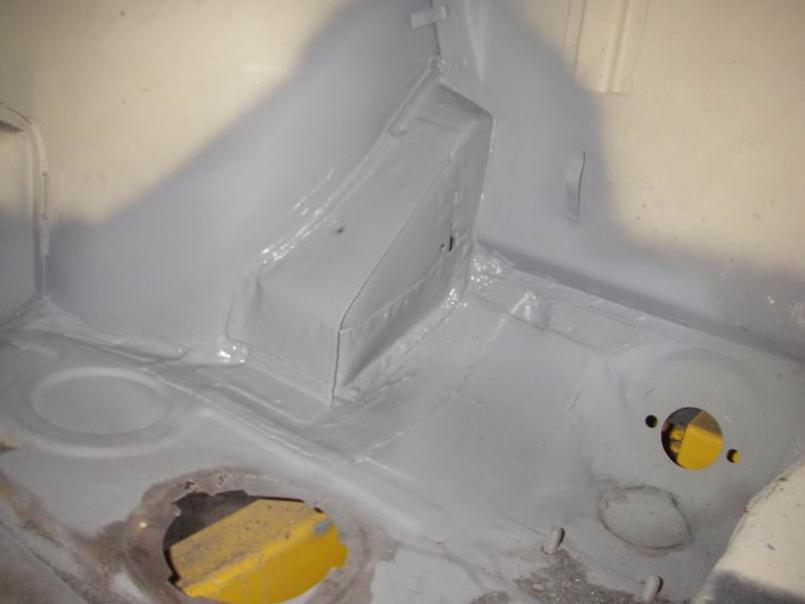
|
| Jeff Hail |
 Dec 20 2008, 01:51 AM Dec 20 2008, 01:51 AM
Post
#378
|
|
Senior Member    Group: Members Posts: 1,141 Joined: 3-May 07 From: LA/ CA Member No.: 7,712 |
Chris,
Really I have been working on the car. Ho Ho Ho Attached image(s) 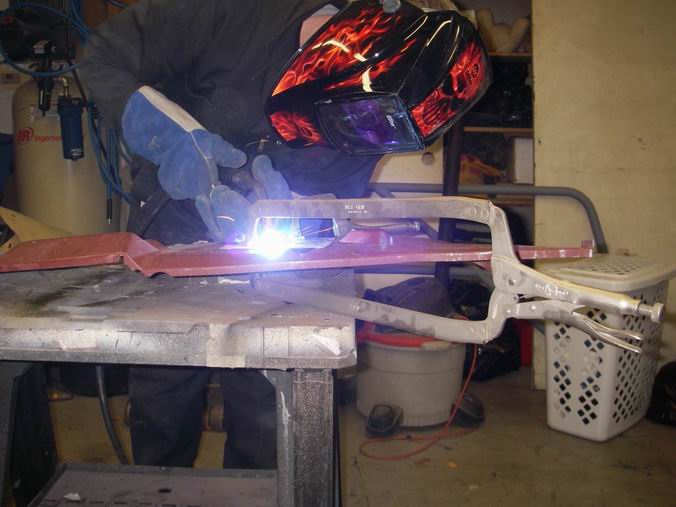
|
| Jeff Hail |
 Dec 20 2008, 02:06 AM Dec 20 2008, 02:06 AM
Post
#379
|
|
Senior Member    Group: Members Posts: 1,141 Joined: 3-May 07 From: LA/ CA Member No.: 7,712 |
Its been 28 degree's at night and raining/ snowing for a week. What is the best way to stay warm? Fire - of course.. Crazy thing is i'm in L.A County...snow? well a little mostly just frig'in cold.
Welded some backers/ reinforcing plates on the inside of the firewall. The thought of the PMS mount supporting a fat six with only 18 guage sheet made me think. While I'm in there add some metal. This is an area most cannot do while in there because its inaccessible. Do it once and never have to worry. No fatigue in the firewall sheet metal at a later date. Two reasons..I can really turn up the heat when I weld the mount in and I can also tie the plates into the cage from inside the passenger compartment. Best thing is its all concealed by the inner firewall. Sano. You get the idea. Better overkill than not enough. Attached image(s) 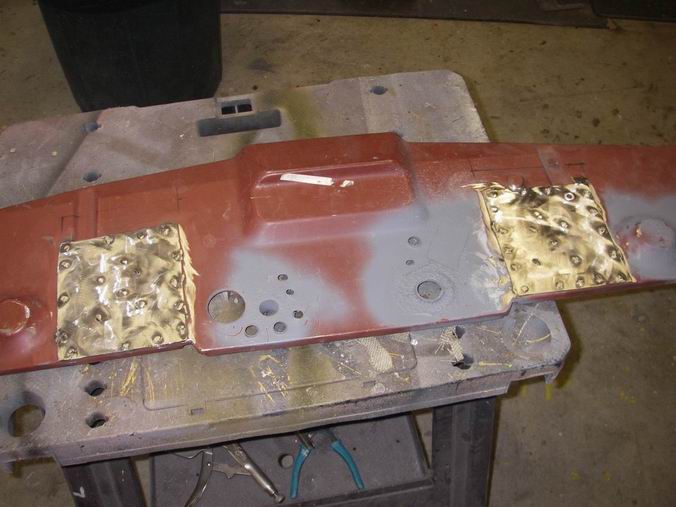 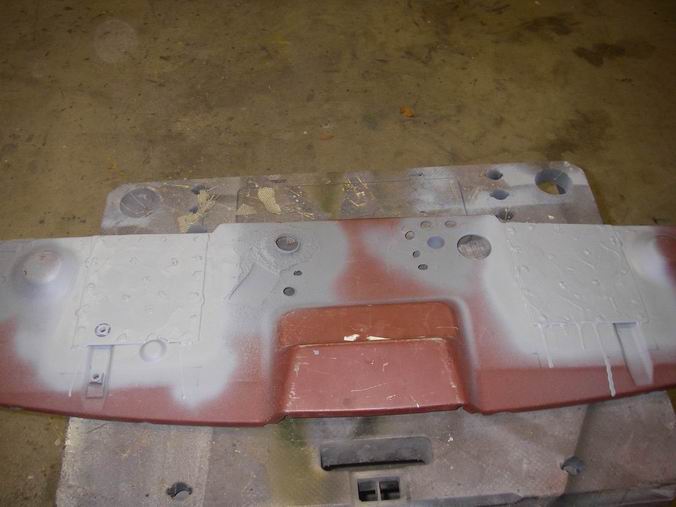 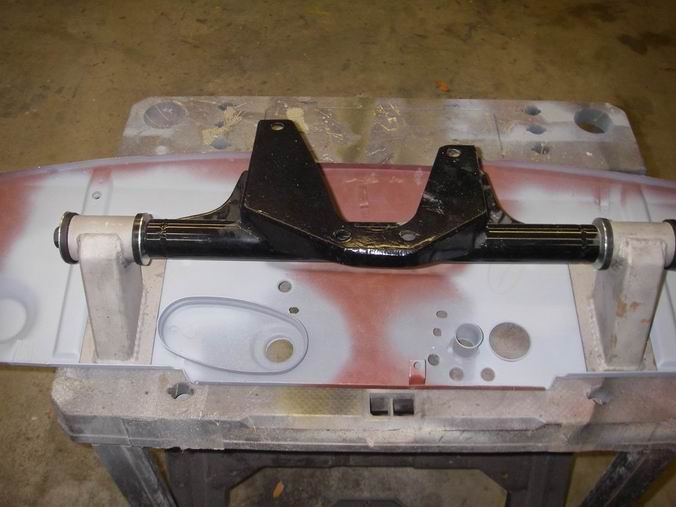
|
| ChrisFoley |
 Dec 20 2008, 06:22 PM Dec 20 2008, 06:22 PM
Post
#380
|
|
I am Tangerine Racing      Group: Members Posts: 7,976 Joined: 29-January 03 From: Bolton, CT Member No.: 209 Region Association: None 
|
|
| Jeff Hail |
 Jan 1 2009, 02:59 AM Jan 1 2009, 02:59 AM
Post
#381
|
|
Senior Member    Group: Members Posts: 1,141 Joined: 3-May 07 From: LA/ CA Member No.: 7,712 |
A few posts ago (many- somewhere on the site). I provided a glimpse on a center pull/ tunnel mounted E Brake using a 993 E brake assembly. A few reasons......get rid of the rinky dink left side E Brake and improve the system in the process. Using two right side 914 cables of equal length and relocating it to the tunnel. Full adjustment at the lever and cables from inside the car. Here you go completed product. No modifications to the cables needed. Yup Shea....freak of nature. Dr. FP would be proud! Quote:Sarah Conner from the movie Terminator. "Men like you thought it up. You think you're so creative. You don't know what it's like to really create something". Quote: Jeff Hail "Sarah be quiet- you are annoying me. Go to your room " Happy freak'in New Year!!!!!!!!!!!!!!!!!!!!!!!!!!!!!!!!!!!![size=3] Attached image(s) 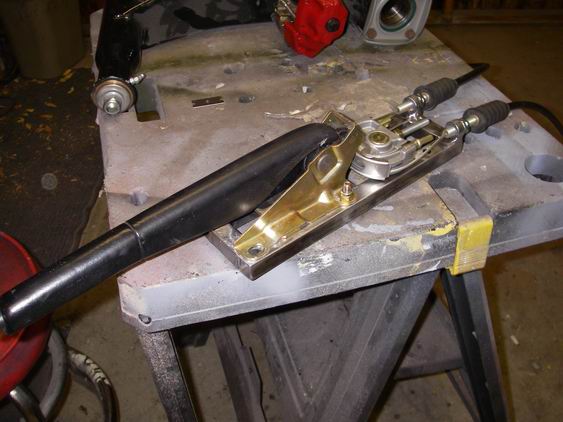 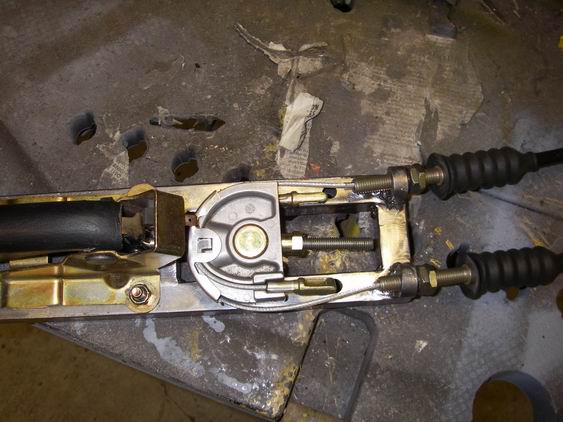 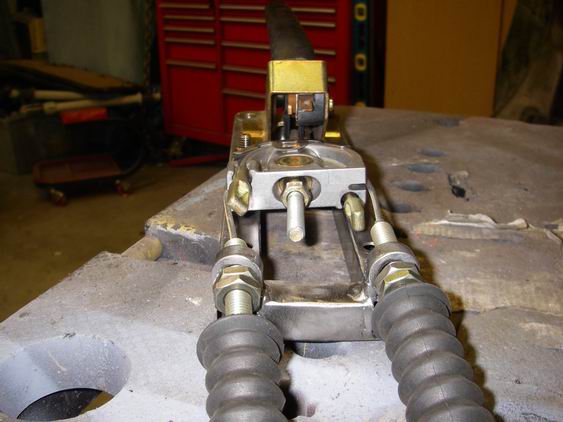
|
| Jeff Hail |
 Jan 2 2009, 12:36 PM Jan 2 2009, 12:36 PM
Post
#382
|
|
Senior Member    Group: Members Posts: 1,141 Joined: 3-May 07 From: LA/ CA Member No.: 7,712 |
Front floor officially done
Cut out the area that had some rust for the access cover and fabbed a square piece to insert. Attached image(s) 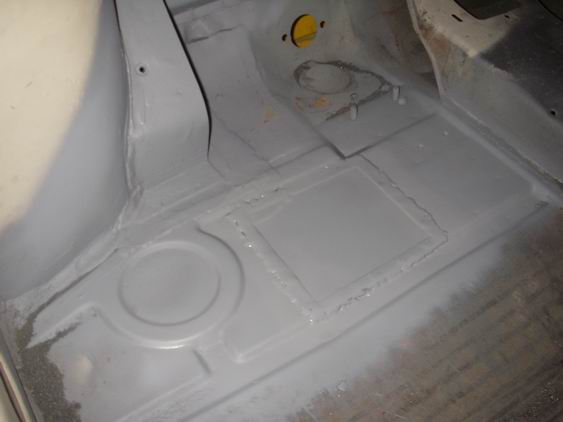
|
| Eric_Shea |
 Jan 2 2009, 02:47 PM Jan 2 2009, 02:47 PM
Post
#383
|
|
PMB Performance                Group: Admin Posts: 19,289 Joined: 3-September 03 From: Salt Lake City, UT Member No.: 1,110 Region Association: Rocky Mountains  |
|
| Jeff Hail |
 Jan 11 2009, 07:21 PM Jan 11 2009, 07:21 PM
Post
#384
|
|
Senior Member    Group: Members Posts: 1,141 Joined: 3-May 07 From: LA/ CA Member No.: 7,712 |
Final coat of epoxy primer on the front floor/ pedal box. Nice and pretty.
........and yes that is a dent in the floor just to the left of the cut in the trans tunnel. Didnt notice it until after I primed it. It will easily be corrected with a piece of 4x4 and a floor jack. Few hits with a rubber mallet to raise the low area. Attached image(s) 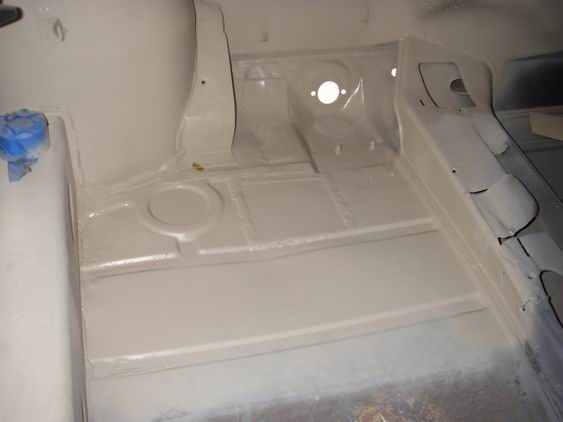
|
| Jeff Hail |
 Jan 11 2009, 07:24 PM Jan 11 2009, 07:24 PM
Post
#385
|
|
Senior Member    Group: Members Posts: 1,141 Joined: 3-May 07 From: LA/ CA Member No.: 7,712 |
The left side cowl is as expected. Evaluate and start cutting out the bad metal.
Attached image(s) 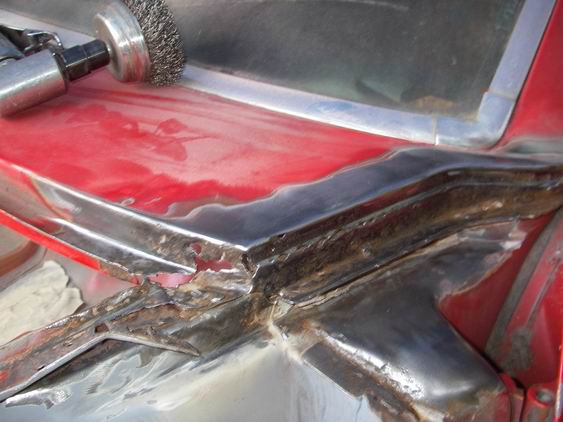 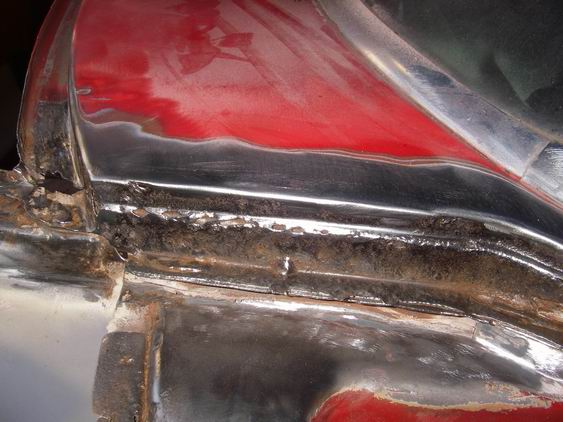 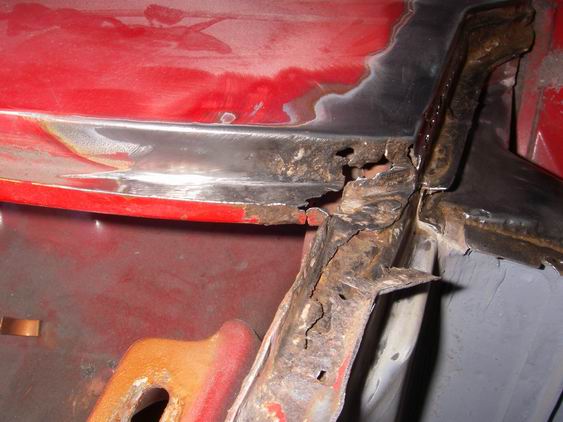 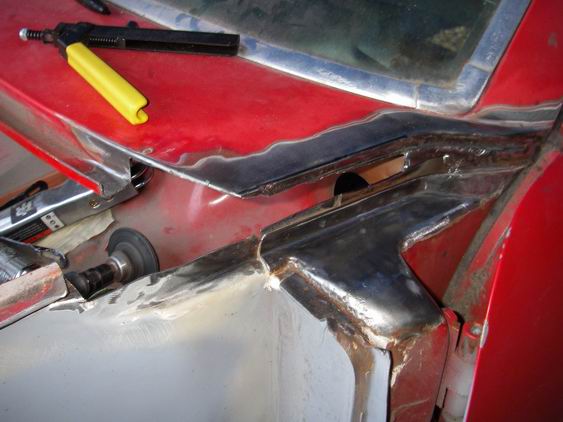 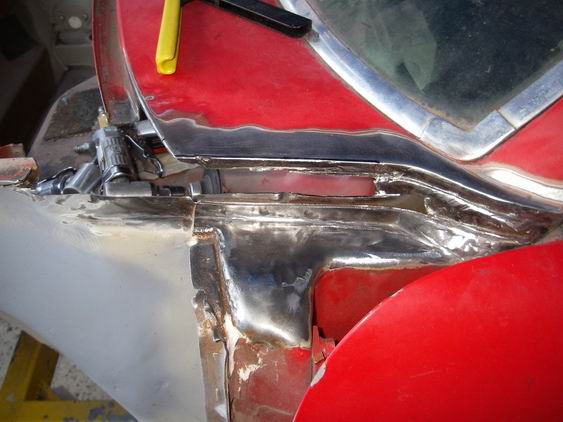
|
  |
1 User(s) are reading this topic (1 Guests and 0 Anonymous Users)
0 Members:

|
Lo-Fi Version | Time is now: 19th January 2025 - 12:19 AM |
Invision Power Board
v9.1.4 © 2025 IPS, Inc.


