|
|

|
Porsche, and the Porsche crest are registered trademarks of Dr. Ing. h.c. F. Porsche AG.
This site is not affiliated with Porsche in any way. Its only purpose is to provide an online forum for car enthusiasts. All other trademarks are property of their respective owners. |
|
|
  |
| Superhawk996 |
 Aug 25 2018, 05:19 PM Aug 25 2018, 05:19 PM
Post
#706
|
|
914 Guru      Group: Members Posts: 6,670 Joined: 25-August 18 From: Woods of N. Idaho Member No.: 22,428 Region Association: Galt's Gulch 
|
I'm about to begin a similar endeavor on a 73' 2.0L widebody.
This thread has been a tremendous source of information and inspiration. Keep going!! CAN is the only option. |
| Curbandgutter |
 Aug 26 2018, 10:48 AM Aug 26 2018, 10:48 AM
Post
#707
|
|
Senior Member    Group: Members Posts: 565 Joined: 8-March 13 From: Murrieta CA Member No.: 15,637 Region Association: Southern California 
|
Interesting rear wing location. I understand it's critical to get the wing up high. This one's mounted farther forward than most I've seen. I'm not smart enough to know anything but I wonder how that might impact aero. Farther back = more leverage? Either way, I like the aesthetic. Great looking car (it's giving me some ideas for mine!) @tygaboy the reason for the location of the wing is so that the wind load going down will go right over the rear suspension and transfer straight down to the wheels without any additional torque on the car that will try to lift the front wheels. For example, if you imagine putting the wing out behind the car 10' yes 10' and then you hypothetically attach it to the car, and then you put a force vertically down, do you see how it would force the back end down but it would also use the rear wheels as a fulcrum point and would try to lift the front of the car. Do you see it? Well now if you start to move that wing closer and closer to the point where it sits right over the rear wheel, can you see that it will get to a point where it sits right on top of the fulcrum and will have the same downforce but it will not lift the front of the car up?? That is why he did it that way. If I ever put a wing on my car, that will be the location! Hope that helps. Sorry for getting off post. |
| doug_b_928 |
 Dec 30 2018, 07:35 PM Dec 30 2018, 07:35 PM
Post
#708
|
|
Senior Member    Group: Members Posts: 713 Joined: 17-January 13 From: Winnipeg Member No.: 15,382 Region Association: Canada |
Happy New Year Jeff. In post #245 on p. 13 of your thread, you document applying Wurth Seal/Fix to the underside of the door sill and around the sill triangles. Would the Wurth sprayable seam sealer work as well as the Seal/Fix in that location? Also, do you apply a thin amount of seam sealer on the top side seam where the sill meets the inner rocker/longitudinal (to prevent water from getting under the sill and being trapped underneath by the sealer that has been applied from the bottom side)?
|
| Jeff Hail |
 Dec 30 2018, 08:32 PM Dec 30 2018, 08:32 PM
Post
#709
|
|
Senior Member    Group: Members Posts: 1,141 Joined: 3-May 07 From: LA/ CA Member No.: 7,712 |
Happy New Year Jeff. In post #245 on p. 13 of your thread, you document applying Wurth Seal/Fix to the underside of the door sill and around the sill triangles. Would the Wurth sprayable seam sealer work as well as the Seal/Fix in that location? Also, do you apply a thin amount of seam sealer on the top side seam where the sill meets the inner rocker/longitudinal (to prevent water from getting under the sill and being trapped underneath by the sealer that has been applied from the bottom side)? Hey Doug! Happy New Year. Sitting here watching the Jeff Beck story:"Still on the Run". Sprayable will work as well although not much volume comes out of the gun at low pressure.. After primer: Mine was a thin bead and then sprayed over with the Wurth (spit gun). As far as between the sill top I just used a copious amount of weld through primer on both surfaces since its sacrificial and has a low melt temperature. I sprayed a thin coat second time after welding to hit the edge of the sill and let it creep in. |
| doug_b_928 |
 Dec 30 2018, 09:35 PM Dec 30 2018, 09:35 PM
Post
#710
|
|
Senior Member    Group: Members Posts: 713 Joined: 17-January 13 From: Winnipeg Member No.: 15,382 Region Association: Canada |
Thanks very much Jeff!
|
| preach |
 Dec 31 2018, 01:51 PM Dec 31 2018, 01:51 PM
Post
#711
|
|
Ridge Runner    Group: Members Posts: 1,039 Joined: 27-March 10 From: Live Free or Die Member No.: 11,513 Region Association: North East States 
|
Amazing thread Jeff.
|
| ssuperflyoldguy |
 Sep 18 2019, 01:03 PM Sep 18 2019, 01:03 PM
Post
#712
|
|
Member   Group: Members Posts: 173 Joined: 15-November 15 From: NorCal - East Bay Baby! Member No.: 19,364 Region Association: None |
|
| stevegm |
 May 7 2020, 06:53 PM May 7 2020, 06:53 PM
Post
#713
|
|
Advanced Member     Group: Members Posts: 2,111 Joined: 14-July 14 From: North Carolina Member No.: 17,633 Region Association: South East States 
|
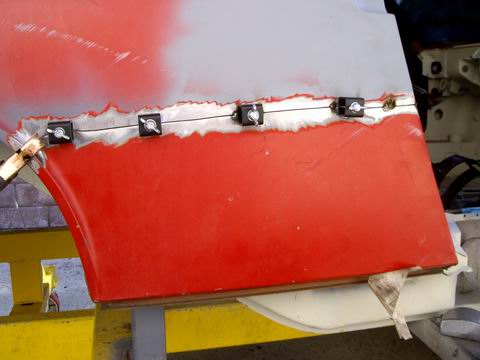
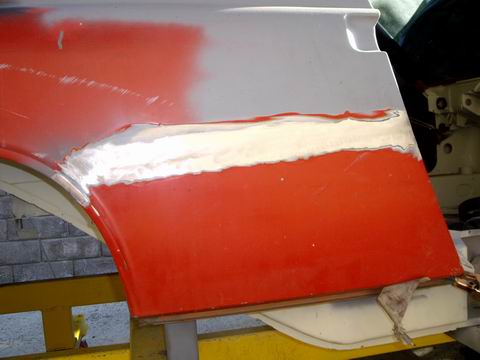
When butt-welding along with good weld penetration the key is the grinding and finishing process. I begin with a spot weld grinding disc to take the crown of the weld down to just above panel height. Move slow and let the panel cool. A grinder will warp thin sheetmetal just like overheating while welding. Then I use a 3 inch 36 grit disc on a angle die grinder to take the crown down a little more. Then I switch to a 6 inch flat flap disc and follow the crown back and forth eliminating any high spots. Question - How do you finish the seam on the inside of the quarter panel? I would imagine that getting in there to grind it smooth would be difficult. Do most people just knock it down a little bit, and leave it rough since it’s on the inside of the fender? Attached image(s)  
|
| Jeff Hail |
 May 7 2020, 09:35 PM May 7 2020, 09:35 PM
Post
#714
|
|
Senior Member    Group: Members Posts: 1,141 Joined: 3-May 07 From: LA/ CA Member No.: 7,712 |
When butt-welding along with good weld penetration the key is the grinding and finishing process. I begin with a spot weld grinding disc to take the crown of the weld down to just above panel height. Move slow and let the panel cool. A grinder will warp thin sheetmetal just like overheating while welding. Then I use a 3 inch 36 grit disc on a angle die grinder to take the crown down a little more. Then I switch to a 6 inch flat flap disc and follow the crown back and forth eliminating any high spots. Question - How do you finish the seam on the inside of the quarter panel? I would imagine that getting in there to grind it smooth would be difficult. Do most people just knock it down a little bit, and leave it rough since it’s on the inside of the fender? Angled die grinder with a 2 or 3 inch disc. A 3 inch flap (water wheel type) will take the back side down. Just need to hit the high spots. The butt weld done right does not leave much of a proud weld on the back. |
  |
3 User(s) are reading this topic (3 Guests and 0 Anonymous Users)
0 Members:

|
Lo-Fi Version | Time is now: 17th January 2025 - 04:53 PM |
Invision Power Board
v9.1.4 © 2025 IPS, Inc.


