|
|

|
Porsche, and the Porsche crest are registered trademarks of Dr. Ing. h.c. F. Porsche AG.
This site is not affiliated with Porsche in any way. Its only purpose is to provide an online forum for car enthusiasts. All other trademarks are property of their respective owners. |
|
|
  |
| Jeff Hail |
 Oct 1 2007, 11:35 PM Oct 1 2007, 11:35 PM
Post
#1
|
|
Senior Member    Group: Members Posts: 1,141 Joined: 3-May 07 From: LA/ CA Member No.: 7,712 |
Bringing Out The Dead.....or how to restore a rusty 914 and convert it to a street/track car when I have time after dealing with everyone elses stuff.
My background is collision and restoration (day job) of high end automobiles for 28 years in addition to race fabrication. I jumped the fence and left that industry to pursue pretty much the same thing except on the paperwork end which is really boring and thankless. (another day job) I look at rust like a diamond in the rough. Rust is afraid of me because it know's it cannot live in my world. Metal becomes submissive because I have confidence in my metal working talents. I will add to this post as work progress's. I hope my years of experience can help others as I add. I believe there is a right way to repair a car and wrong way. I metal finish because in the end its cleaner, lighter and stronger. I was taught old school techniques with new school technology. A great combination. I also believe in doing a job once correctly using the highest quality materials and proper tools. Many ways to skin a cat I say. If you hold it by the tail it can still bite! Good advice to follow: Take measurements of the door openings and targa bar to windshield header. Cross measure then do it again to confirm. Recheck your measurements against the factory figures. Make a couple of adjustable braces for each side that attach from the upper seat belt anchors to the door hinges. I recommend cross braces also right to left. These can be made from rod or tube and turnbuckles for cheap. Racer Chris has some really nice ones with rod ends. Support the car from below equally on both sides of the undercarriage and front and rear. I do not believe jack stands can hold the proper tolerances at 4 points. It takes a minimum of 6 and preferably 8. These are all easy to do and are essential to a square and level chassis. Not everyone can afford a Cellete bench or hourly frame time at a shop for these type of do it yourself repairs. Impovisation can be done correctly and for a lot less money. Make sure your floor or platform is level. Keep in mind that tolerances for the 914 were 7-9mm from the factory so anything you can do to make it better is worth it. 7mm by today’s standards is huge. 9mm is a Grand Canyon. Anything you can do to tighten the tolerances will provide a better end product. Exterior panels were fit with the adjust and weld method and are only a skin. My 914 had measurements all over the place on the front end and the rust issues were all in the rear that needed correction. Car was never in any collisions. 90% of the measurements were factory assembly tolerances. Porsche's aint perfect. I made my own dedicated bench for 911's and 914's. By some stroke of luck I ended up with a 1 mm variance in height (datum) and 2mm in length and width is zero with my own fixtures. This has been substantiated with endless anal cross measuring and factory manuals. I used a steel front suspension cross member as a front body holding fixture. I went through 4 before I found an acceptable one. The first 3 were so far off factory tolerances (4-6 mm out of square) I rejected them before I found a good one. My bench is not for pulling. It was designed for assembly and replacement of structural parts. It will support 3,000 pounds. $350 worth of steel and another $175 in industrial castors was worth it considering its use. A stripped 914 shell is a feather and easy to roll around. When you cut and replace structural parts recheck your measurements. Control points change when you remove, replace and weld in new parts. They are easily controlled with patience. If it does not come out perfect do not lose sleep. Remember tolerance and variance was not perfect from the factory. If you have a control point locating hole that is 14 mm a dowel or pin of 9-10mm was used during birth. That is why suspension systems are adjustable for variance and wear. You will also find center indexing points on the front and rear of the body. Easy tools to use are plumb lines, tape measures and levels if you do not have access to high end measuring equipment. You can locate and make symmetrical measurements throughout repairs. If you have one side that is undamaged or not rusted use that side as a starting point for measurements. Use panel gaps as a visual indicator during repairs and welding. 3 important factors- height, length and width. If you are me then there are 4 (Z axis) and that one will make you lose sleep! Some pics of the beggining: A back east 914 comes to California. Attached image(s) 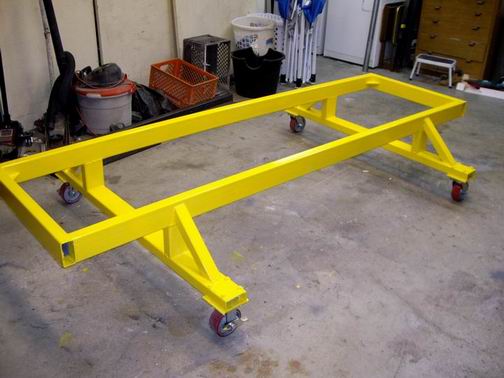 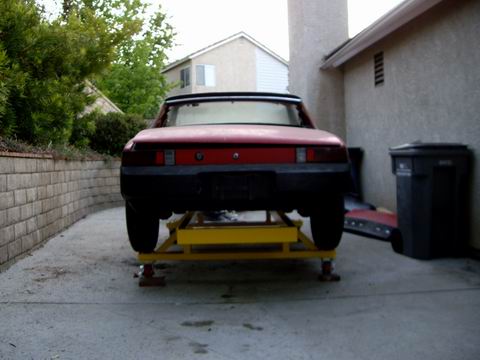 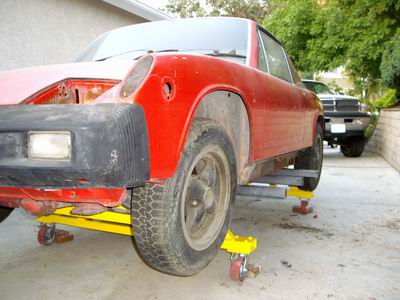 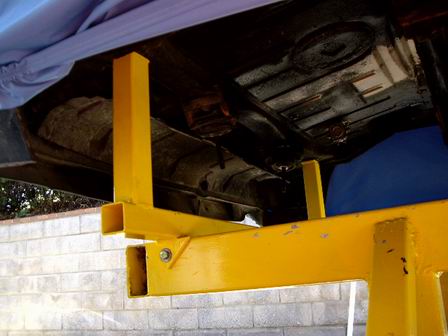
|
| Jeff Hail |
 Oct 1 2007, 11:37 PM Oct 1 2007, 11:37 PM
Post
#2
|
|
Senior Member    Group: Members Posts: 1,141 Joined: 3-May 07 From: LA/ CA Member No.: 7,712 |
Contd
Attached image(s) 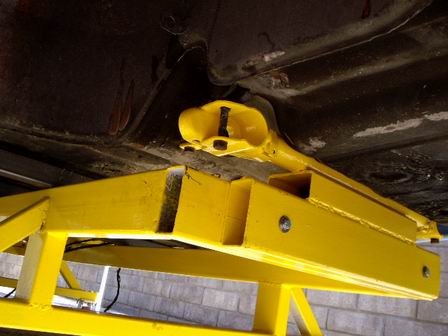 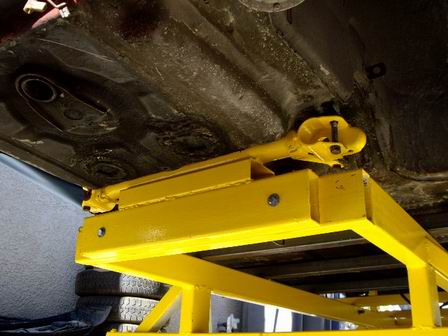 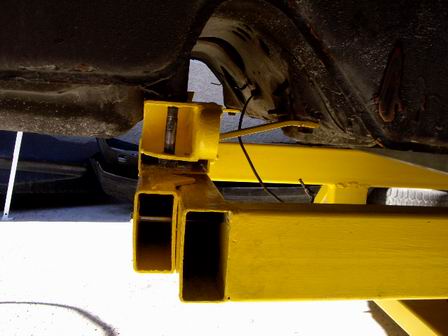 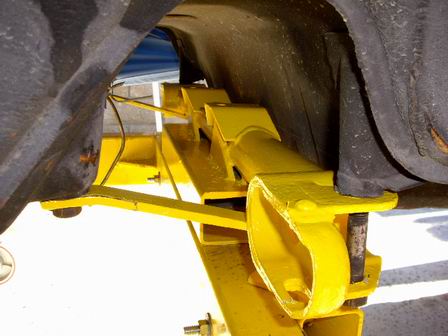
|
| Jeff Hail |
 Oct 1 2007, 11:41 PM Oct 1 2007, 11:41 PM
Post
#3
|
|
Senior Member    Group: Members Posts: 1,141 Joined: 3-May 07 From: LA/ CA Member No.: 7,712 |
Contd Rear floor replacement. An yes the RD floors will work in a 1975 914. A little metal work in the rear corners will lay right down flat on the bumper absorber reinforcements allowing full panel replacment without clipping the rear pockets. Attached image(s) 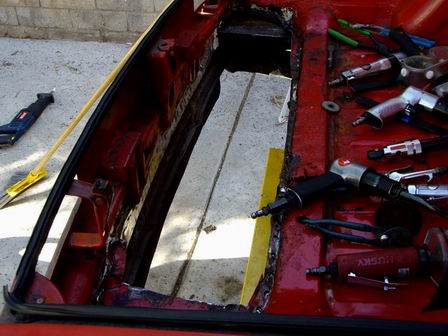 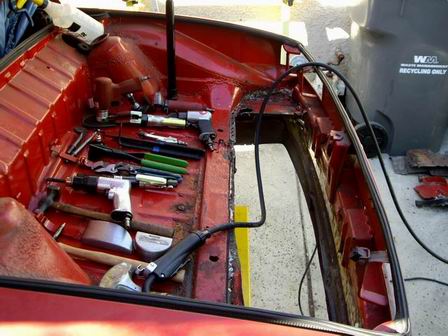 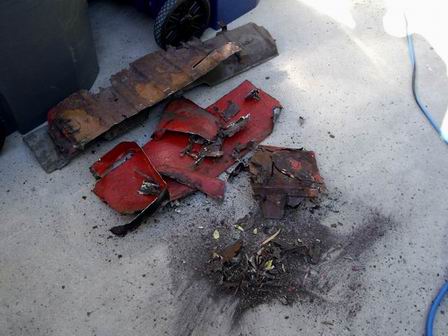 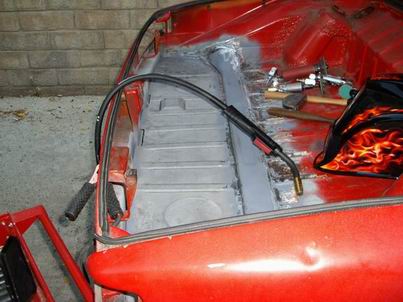
|
| Eric_Shea |
 Oct 1 2007, 11:43 PM Oct 1 2007, 11:43 PM
Post
#4
|
|
PMB Performance                Group: Admin Posts: 19,299 Joined: 3-September 03 From: Salt Lake City, UT Member No.: 1,110 Region Association: Rocky Mountains  |
Wow (IMG:style_emoticons/default/ohmy.gif)
(IMG:style_emoticons/default/welcome.png) This'll be a fun one to watch. |
| Jeff Hail |
 Oct 1 2007, 11:47 PM Oct 1 2007, 11:47 PM
Post
#5
|
|
Senior Member    Group: Members Posts: 1,141 Joined: 3-May 07 From: LA/ CA Member No.: 7,712 |
Wow (IMG:style_emoticons/default/ohmy.gif) (IMG:style_emoticons/default/welcome.png) This'll be a fun one to watch. And Eric I will be calling you. Floor contd. Damn cool welding helmet if you ask me! Attached image(s) 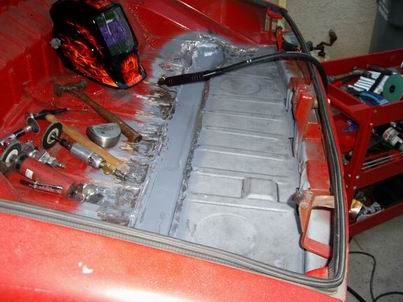 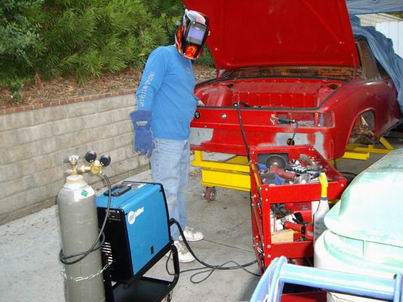
|
| jd74914 |
 Oct 1 2007, 11:52 PM Oct 1 2007, 11:52 PM
Post
#6
|
|
Its alive     Group: Members Posts: 4,841 Joined: 16-February 04 From: CT Member No.: 1,659 Region Association: North East States |
Nice work, I can't wait to see more . . . and
:welcome: |
| Jeff Hail |
 Oct 1 2007, 11:57 PM Oct 1 2007, 11:57 PM
Post
#7
|
|
Senior Member    Group: Members Posts: 1,141 Joined: 3-May 07 From: LA/ CA Member No.: 7,712 |
Interior stripped.
Odometer? DMV say its for real and so do the prior owners receipts. (least of my concerns) Its about the fun! Attached image(s) 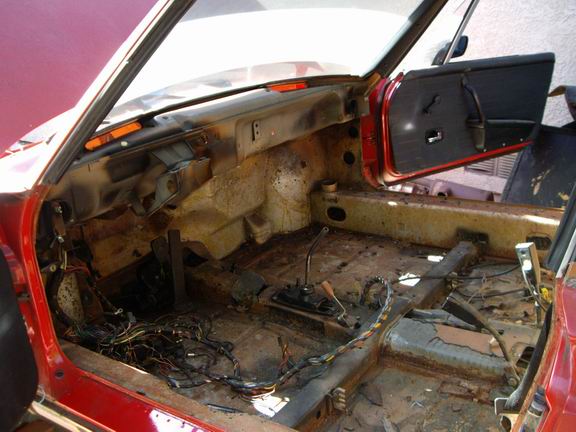 
|
| Jeff Hail |
 Oct 2 2007, 12:08 AM Oct 2 2007, 12:08 AM
Post
#8
|
|
Senior Member    Group: Members Posts: 1,141 Joined: 3-May 07 From: LA/ CA Member No.: 7,712 |
Moving along into the rocker and longs. This was how car was received.
The good. Right upper wheelhouse is sound and so is the outer suspension perch. Left rocker/ outer long. Pretty normal for an east coaster. Right side is another story. Ugly. Outer is shot. Corner of the floor is gone. Inner long lower gone. Inner console has been seem welded prior due to rust and it is going to metal heaven. Attached image(s) 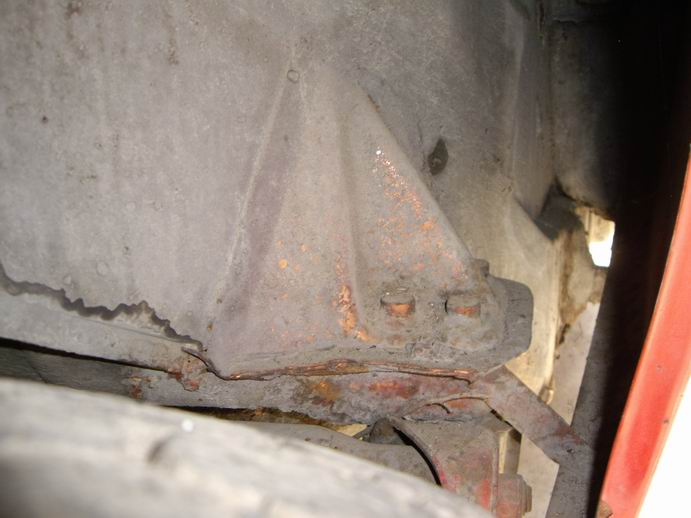 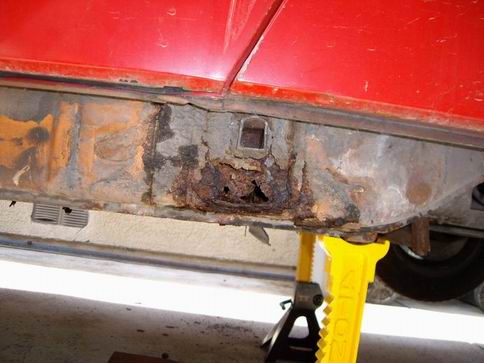 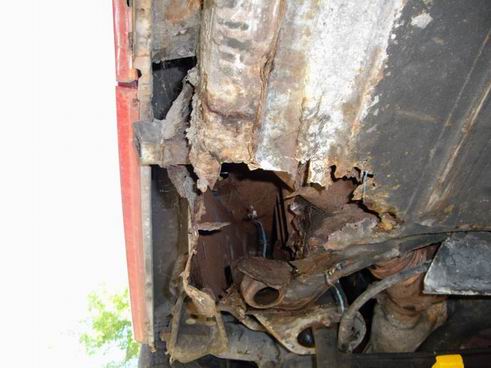
|
| Jeff Hail |
 Oct 2 2007, 12:17 AM Oct 2 2007, 12:17 AM
Post
#9
|
|
Senior Member    Group: Members Posts: 1,141 Joined: 3-May 07 From: LA/ CA Member No.: 7,712 |
Cut out the rusted outer. Actually only the rear 1/4 was bad. Since I have a replacement and need access to the inner long whole piece is getting replaced
Media blasted the inner long and only the area around 4 inches in front of the jackpost/ seatbelt anchor is bad. I will fabricate, section and sleeve that in back to behind the firewall. I have a new outer wheelhouse which provides half the box on the outside which will make that area and rearward easier to repair. Attached image(s) 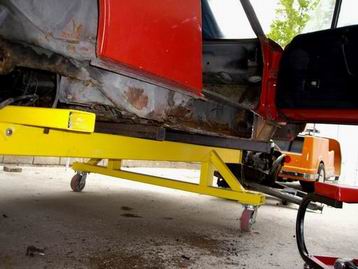 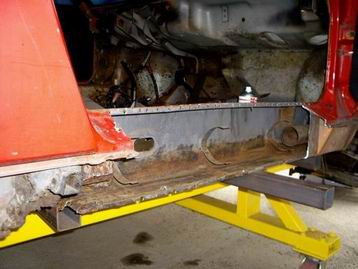 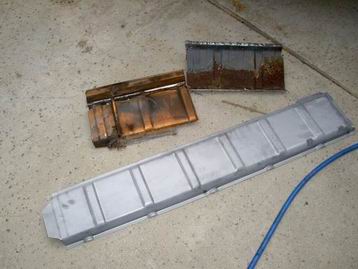 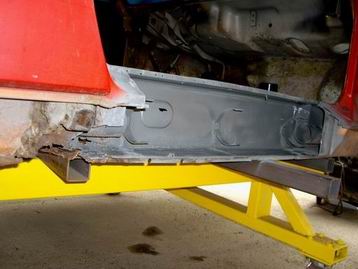
|
| KELTY360 |
 Oct 2 2007, 12:42 AM Oct 2 2007, 12:42 AM
Post
#10
|
|
914 Neferati      Group: Members Posts: 5,119 Joined: 31-December 05 From: Pt. Townsend, WA Member No.: 5,344 Region Association: Pacific Northwest 
|
(IMG:style_emoticons/default/welcome.png)
Are you the Jeff Hail of the Mulholland thread on Pelican? I've read the whole thing and follow it constantly. Best thread ever. Nice work on your teener. |
| Twystd1 |
 Oct 2 2007, 12:48 AM Oct 2 2007, 12:48 AM
Post
#11
|
|
You don't want to know... really.....     Group: Members Posts: 2,515 Joined: 12-September 04 From: Newport Beach, California Member No.: 2,743 |
Were you part of the Mulholland crew back in the day?
Clayton |
| Jeff Hail |
 Oct 2 2007, 12:54 AM Oct 2 2007, 12:54 AM
Post
#12
|
|
Senior Member    Group: Members Posts: 1,141 Joined: 3-May 07 From: LA/ CA Member No.: 7,712 |
Floor metal finished and primed. No filler.
I did end up installing the entire floor as it comes from Bill at RD. The old floor had some minor rust at the weld tracks near the rear of the structural crossmember underneath. That 4 extra inches of sheetmetal is easier to lap weld in then butt weld to dirty steel. It makes my finish work less time consuming also. I treated the inside of the crossmember and sealed that up prior to welding in the new panel. The entire trunk will be media stripped. I just threw some primer on for now until this weekend. I will hit it will some Starblast media (DuPont), epoxy prime and then seal all the seams with Wurth Sprayable Seam Sealer for that oem look and texture. Attached image(s) 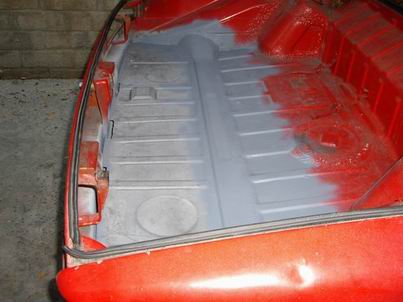 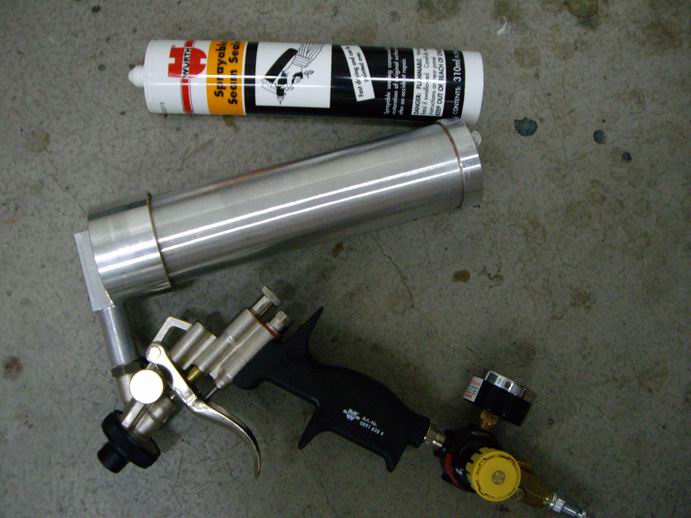
|
| Jeff Hail |
 Oct 2 2007, 01:00 AM Oct 2 2007, 01:00 AM
Post
#13
|
|
Senior Member    Group: Members Posts: 1,141 Joined: 3-May 07 From: LA/ CA Member No.: 7,712 |
(IMG:style_emoticons/default/welcome.png) Are you the Jeff Hail of the Mulholland thread on Pelican? I've read the whole thing and follow it constantly. Best thread ever. Nice work on your teener. Yours truly one and the same.... |
| Jeff Hail |
 Oct 2 2007, 01:19 AM Oct 2 2007, 01:19 AM
Post
#14
|
|
Senior Member    Group: Members Posts: 1,141 Joined: 3-May 07 From: LA/ CA Member No.: 7,712 |
|
| Lou W |
 Oct 2 2007, 03:07 AM Oct 2 2007, 03:07 AM
Post
#15
|
|
"Here Kitty Kitty" my ass......     Group: Members Posts: 4,109 Joined: 9-May 04 From: Roseburg, OR. Member No.: 2,039 Region Association: Spain |
(IMG:style_emoticons/default/welcome.png) Keep the pctures coming. (IMG:style_emoticons/default/smile.gif)
|
| jtf914 |
 Oct 2 2007, 08:18 AM Oct 2 2007, 08:18 AM
Post
#16
|
|
Member   Group: Members Posts: 428 Joined: 31-December 02 From: Burlington, CT Member No.: 58 Region Association: North East States |
(IMG:style_emoticons/default/welcome.png) Wow, that was some introduction. Keep the pics coming, great project!!
|
| SGB |
 Oct 2 2007, 08:27 AM Oct 2 2007, 08:27 AM
Post
#17
|
|
just visiting     Group: Members Posts: 4,086 Joined: 8-March 03 From: Huntsville, AL Member No.: 404 Region Association: South East States |
shhhh.
Artist at work. Thats really impressive. |
| pin31 |
 Oct 2 2007, 10:11 AM Oct 2 2007, 10:11 AM
Post
#18
|
|
Member   Group: Members Posts: 398 Joined: 30-January 07 From: Newport, Rhode Island Member No.: 7,492 Region Association: North East States |
Very cool !!!
Someone should write a book. (IMG:style_emoticons/default/welder.gif) (IMG:style_emoticons/default/welcome.png) |
| Jeff Hail |
 Oct 6 2007, 09:22 PM Oct 6 2007, 09:22 PM
Post
#19
|
|
Senior Member    Group: Members Posts: 1,141 Joined: 3-May 07 From: LA/ CA Member No.: 7,712 |
This weeks installment of Bringing out the dead
Attacking the firewall. This car had rust at the bottom of the lower firewall. Prior repairs included welding in plumbers tape with what looks like an arc welder of all things. Seems the floor rusted along with the firewall at the bottom seem and it was held together with "L" shaped pumbers tape or and angle iron/ shelf bracket. I assessed the firewall at the long junction which is also prone to rust from leaks at the window and hell pit. Cut the corners out to access the inner longs which require some work anyways. It's only metal..... Attached image(s) 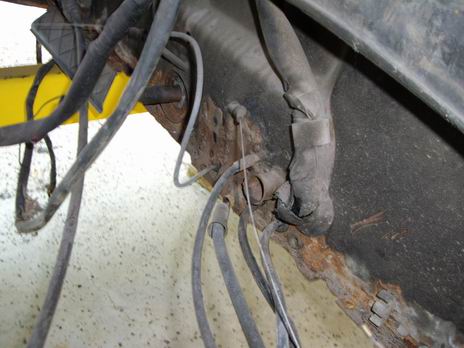 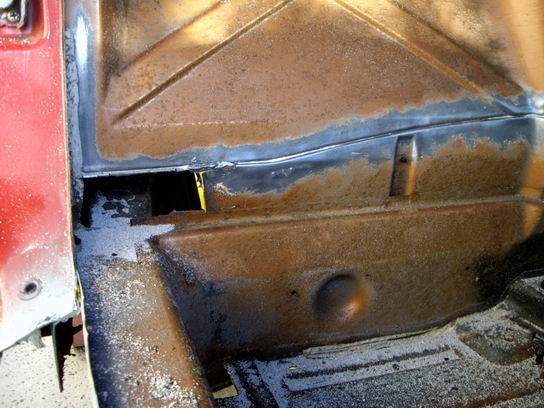 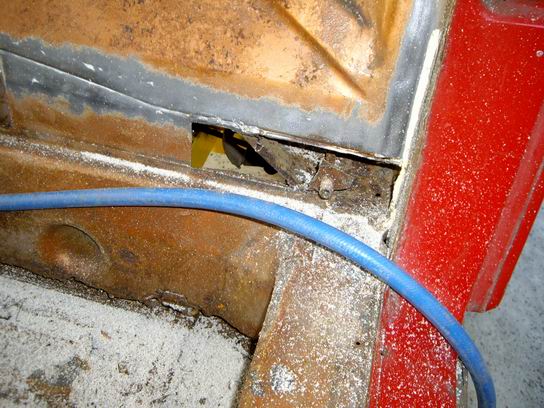
|
| Jeff Hail |
 Oct 6 2007, 09:32 PM Oct 6 2007, 09:32 PM
Post
#20
|
|
Senior Member    Group: Members Posts: 1,141 Joined: 3-May 07 From: LA/ CA Member No.: 7,712 |
Some great tools to have are the Astro Scraper. Its like a minature air chisel except has super high speed short strokes and does not damage the surface underneath. Comes with an assortment of blades and scrapers included. They run $40. I stripped the entire floor tar pads in about 7 minutes flat.
The other tool I have and is worth it weight in gold is the Wurth Master. It is pretty much a flail with the needle brush mounted. Different wheels are for stripe and double sided tape removal but the flail wheel removes the factory seam sealer with zero effort. Everyone knows the oem seam sealers can be like concrete. These are expensive so it pays if you know someone who has one for limited use versus purchasing one. Attached image(s) 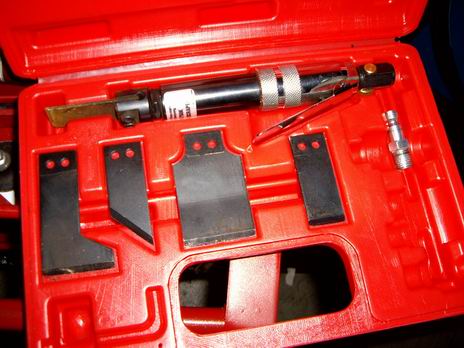 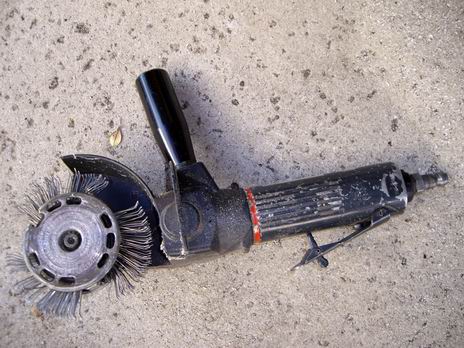
|
  |
2 User(s) are reading this topic (2 Guests and 0 Anonymous Users)
0 Members:

|
Lo-Fi Version | Time is now: 3rd April 2025 - 07:24 PM |
Invision Power Board
v9.1.4 © 2025 IPS, Inc.


