|
|
|
Porsche, and the Porsche crest are registered trademarks of Dr. Ing. h.c. F. Porsche AG.
This site is not affiliated with Porsche in any way. Its only purpose is to provide an online forum for car enthusiasts. All other trademarks are property of their respective owners. |
|
|

  |

| MrKona |
 May 23 2008, 06:34 PM May 23 2008, 06:34 PM
Post
#41
|
|
Senior Member  Group: Members Posts: 597 Joined: 25-July 05 From: Santa Rosa, CA Member No.: 4,469 Region Association: None |
More...
Attached thumbnail(s) 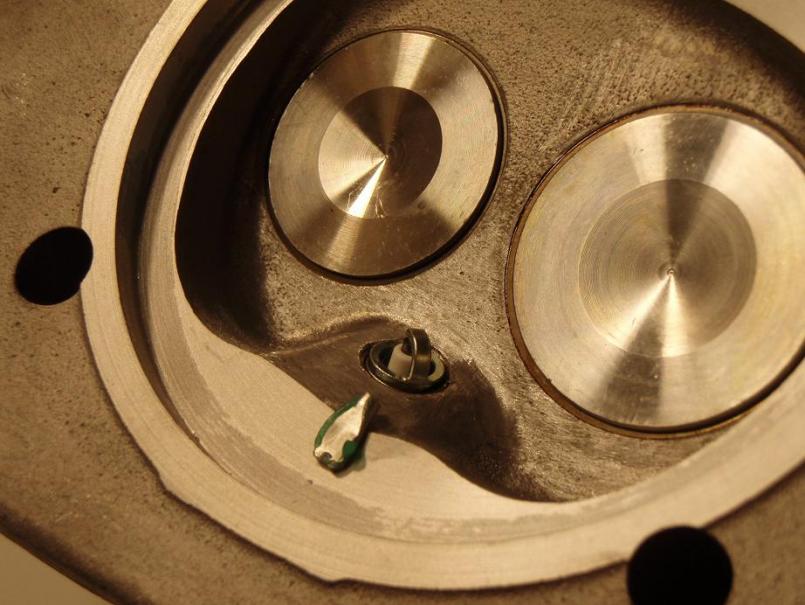 Attached image(s) 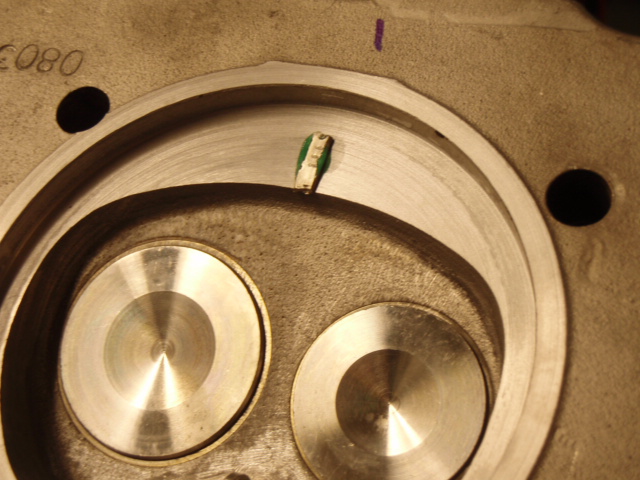
|
   |

 
|
| MrKona |
May 23 2008, 06:34 PM
Post
#42
|
|
Senior Member Group: Members Posts: 597 Joined: 25-July 05 From: Santa Rosa, CA Member No.: 4,469 Region Association: None |
More...
Attached thumbnail(s) 
|
|
|
|
| rhodyguy |
May 23 2008, 10:22 PM
Post
#43
|
|
Chimp Sanctuary NW. Check it out. Group: Members Posts: 22,117 Joined: 2-March 03 From: Orion's Bell. The BELL! Member No.: 378 Region Association: Galt's Gulch |
bryan, powdercoating for the duct pieces, warm air elbows, and j-tubes works swell, seals real tight. i coated the 2 lower wrm air guide that connect the hes to the case too. due to the pivots and the valve shaft, paint is the way to go on the valves. your hes look swell. is that the new tin on the case? you're pretty close.
k |
|
|
|
| MrKona |
May 23 2008, 11:11 PM
Post
#44
|
|
Senior Member Group: Members Posts: 597 Joined: 25-July 05 From: Santa Rosa, CA Member No.: 4,469 Region Association: None |
QUOTE(rhodyguy @ May 23 2008, 09:22 PM)  bryan, powdercoating for the duct pieces, warm air elbows, and j-tubes works swell, seals real tight. i coated the 2 lower wrm air guide that connect the hes to the case too. due to the pivots and the valve shaft, paint is the way to go on the valves. your hes look swell. is that the new tin on the case? you're pretty close. k Hi Kevin, Thanks for the tip regarding paint on the valves. Both of mine are pretty rusty right now, so I'll have to see if they can be blasted clean, but inside and out. The tin in the picture is actually my current tin for the 1.8, just cleaned up for that picture after my last engine drop. I worked pretty hard on those heat exchangers. I wish one of them wasn't dented. At least you can't see it when they're mounted on the car, but it still gets to me when I look at that picture. (IMG:style_emoticons/default/mad.gif) I haven't even touched the tin I got from you yet. Once I get a little further on this engine, I'll be bringing the tin, runners, fan, and exhaust pieces to the local powder coater. It's going to look so nice. (IMG:style_emoticons/default/drooley.gif) I may even have him coat the fan shroud if there is a "natural" looking color availabe in powder coat that looks appropriate. - Bryan |
|
|
|
| Jake Raby |
May 24 2008, 06:19 AM
Post
#45
|
|
Engine Surgeon Group: Members Posts: 9,396 Joined: 31-August 03 From: Lost Member No.: 1,095 Region Association: South East States |
Even I am impressed with how sterile the engine is, thats the key to a successful build and it shows a lot of pride in your work. This one will run really well!
|
|
|
|
| MrKona |
May 24 2008, 12:11 PM
Post
#46
|
|
Senior Member Group: Members Posts: 597 Joined: 25-July 05 From: Santa Rosa, CA Member No.: 4,469 Region Association: None |
QUOTE(Jake Raby @ May 24 2008, 05:19 AM) Even I am impressed with how sterile the engine is, thats the key to a successful build and it shows a lot of pride in your work. This one will run really well! Jake, Thank you. I take that as a huge compliment. |
|
|
|
| MrKona |
May 26 2008, 01:06 AM
Post
#47
|
|
Senior Member Group: Members Posts: 597 Joined: 25-July 05 From: Santa Rosa, CA Member No.: 4,469 Region Association: None |
A little setback tonight, due to what looks design flaw with my engine stand mount. Although before I can say for sure, please take a look at these pictures and tell me if I'm missing something here...
I installed p/c #4 first so that I could drive the piston pin toward the fan side of the engine, due to the oil cooler mount. Next is #3. However, as I slide the p/c assembly on, the piston pin hits my engine stand. (IMG:style_emoticons/default/WTF.gif) I looked at pictures of other stands, and I notice that they have an indentation cut out at that spot, for what I assume is the #3 piston pin. They are thicker, from the looks of it to maintain strength despite the cut-out indentation. I picked this stand up on Ebay from a local USA made company with really good feedback. I have a hard time believing that I'm the first person to notice this "flaw". Am I just not seeing the obvious, or do I really need to remove this engine from the stand just to install the #3 piston pin? (IMG:style_emoticons/default/blink.gif) Attached thumbnail(s) 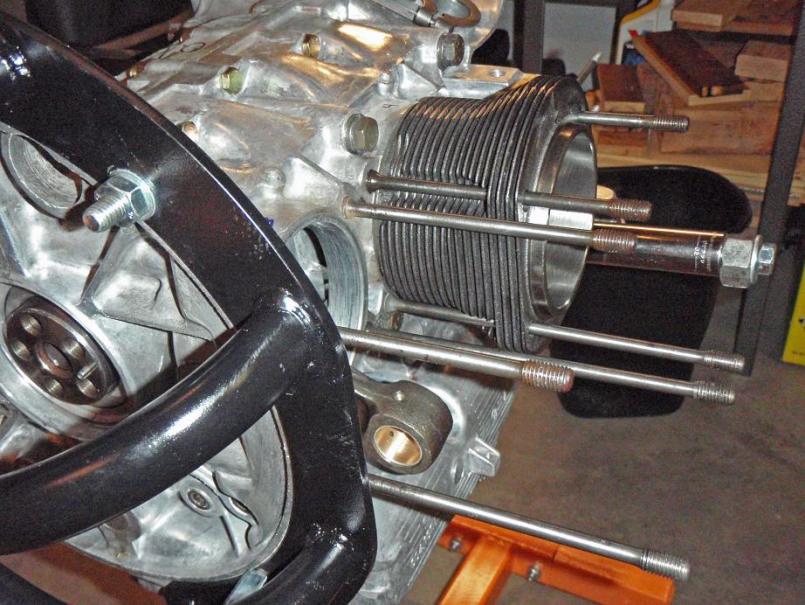 Attached image(s) 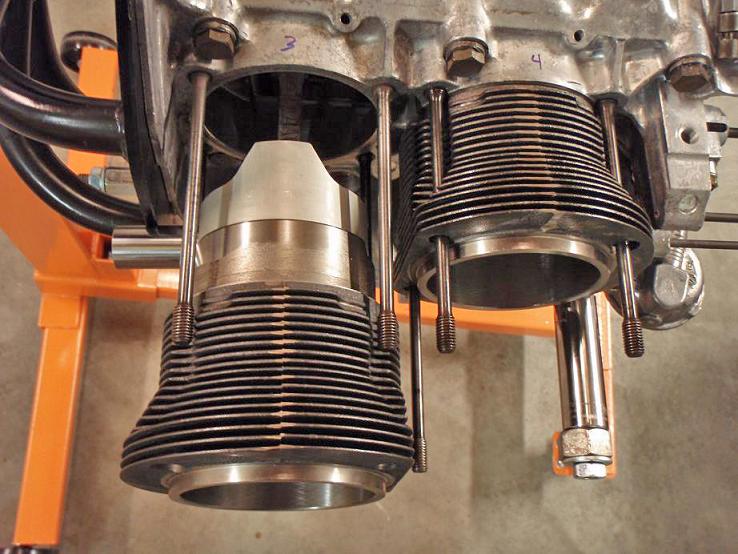
|
|
|
|
| MrKona |
May 27 2008, 12:20 AM
Post
#48
|
|
Senior Member Group: Members Posts: 597 Joined: 25-July 05 From: Santa Rosa, CA Member No.: 4,469 Region Association: None |
Problem solved... I had to remove the engine from the stand and cut away that section. After cutting, it was easy to install the piston pin. I also noticed after the cylinder was installed, that one of the cylinder fins would not have cleared the stand without cutting it.
Attached image(s) 
|
|
|
|
| MrKona |
May 27 2008, 12:27 AM
Post
#49
|
|
Senior Member Group: Members Posts: 597 Joined: 25-July 05 From: Santa Rosa, CA Member No.: 4,469 Region Association: None |
Tonight I experienced the thrill of victory, which turned to the agony of defeat in about 3 seconds after I realized a mistake I made. Today I installed the pistons/cylinders, heads, cylinder head sheet metal pieces, and push rod tubes. I was looking forward to posting pictures of my progress. Figured the icing on the cake tonight would be to install the cylinder head temp sensor.
This is when the shock hit me. I installed the heads on the wrong side. The cylinder head temp threaded hole is on the driver side instead of the passenger side! This was a first-timer mistake that I will never make again. Unfortunately, I'm traveling Tuesday - Friday this week for work, so won't get a chance to right this wrong until the weekend. If I didn't have to get up early tomorrow morning, I'd be working on this late into the night. I'll be frustrated with this until I can make it right... (IMG:style_emoticons/default/headbang.gif) I'll post more pictures after I fix this. |
|
|
|
| jmill |
May 27 2008, 02:04 PM
Post
#50
|
|
Green Hornet Group: Members Posts: 2,449 Joined: 9-May 08 From: Racine, Wisconsin Member No.: 9,038 Region Association: Upper MidWest |
Great thread. Thanks for sharing. I'm planning my own rebuild and your pics and experiences will really help me out. I have to say that is one clean engine. Fantastic work.
Could you have slid the #3 piston pin in from the other side before installing #4? |
|
|
|
| MrKona |
May 28 2008, 12:07 AM
Post
#51
|
|
Senior Member Group: Members Posts: 597 Joined: 25-July 05 From: Santa Rosa, CA Member No.: 4,469 Region Association: None |
QUOTE(jmill @ May 27 2008, 01:04 PM) Great thread. Thanks for sharing. I'm planning my own rebuild and your pics and experiences will really help me out. I have to say that is one clean engine. Fantastic work. Could you have slid the #3 piston pin in from the other side before installing #4? Thanks very much. I'm keeping this whole assembly as clean as possible. A lot of carb cleaner, alcohol, lint-free wipes, and compressed air to keep pieces clean and dust free. I also cover the engine when I'm not working on it to keep dust off. I wrote about my mistake with the cylinder heads especially so that someone else could avoid the same mistake. Regarding the pistons, you have to install the piston pin of cylinder #4 from the inside of the piston, as the oil cooler mount portion of the case prevents you from accessing it from the outside (fan side) of the case. If you install piston/cylinder #3 first, there is no way to install the #4 pin from the inside (as #3 cylinder will be in the way). |
|
|
|
| Jake Raby |
May 28 2008, 06:23 AM
Post
#52
|
|
Engine Surgeon Group: Members Posts: 9,396 Joined: 31-August 03 From: Lost Member No.: 1,095 Region Association: South East States |
QUOTE Regarding the pistons, you have to install the piston pin of cylinder #4 from the inside of the piston, as the oil cooler mount portion of the case prevents you from accessing it from the outside (fan side) of the case. If you install piston/cylinder #3 first, there is no way to install the #4 pin from the inside (as #3 cylinder will be in the way). And I do go over that in detail, in my TIV engine rebuild video. |
|
|
|
| purple |
May 28 2008, 10:21 AM
Post
#53
|
|
Pigeon feeders attract me Group: Members Posts: 938 Joined: 24-July 07 From: Houston, TX Member No.: 7,942 Region Association: None |
Nice thread....has me really wanting to build my own engine. I know jake will help me with that once I've got the money saved (IMG:style_emoticons/default/smile.gif)
|
|
|
|
| 6freak |
May 29 2008, 01:27 PM
Post
#54
|
|
MR.C Group: Members Posts: 4,740 Joined: 19-March 08 From: Tacoma WA Member No.: 8,829 Region Association: Pacific Northwest |
QUOTE(Vacca Rabite @ Mar 19 2008, 09:14 AM) That crank bracket is brilliant. I wish that I had thought of it when I was playing with my crank last month. Zach I LOVE PLAY`N WITH MY CRANK TOO (IMG:style_emoticons/default/av-943.gif) (IMG:style_emoticons/default/av-943.gif) (IMG:style_emoticons/default/bye1.gif) |
|
|
|
| MrKona |
May 30 2008, 12:07 AM
Post
#55
|
|
Senior Member Group: Members Posts: 597 Joined: 25-July 05 From: Santa Rosa, CA Member No.: 4,469 Region Association: None |
QUOTE(purple @ May 28 2008, 09:21 AM) Nice thread....has me really wanting to build my own engine. I know jake will help me with that once I've got the money saved (IMG:style_emoticons/default/smile.gif) I've been wanting to build an engine for probably about 10 years now... and I must say, now that the time has come, this has been one of the most satisfying things I have done in a long time... |
|
|
|
| MrKona |
May 30 2008, 12:12 AM
Post
#56
|
|
Senior Member Group: Members Posts: 597 Joined: 25-July 05 From: Santa Rosa, CA Member No.: 4,469 Region Association: None |
QUOTE(Jake Raby @ May 28 2008, 05:23 AM) QUOTE Regarding the pistons, you have to install the piston pin of cylinder #4 from the inside of the piston, as the oil cooler mount portion of the case prevents you from accessing it from the outside (fan side) of the case. If you install piston/cylinder #3 first, there is no way to install the #4 pin from the inside (as #3 cylinder will be in the way). And I do go over that in detail, in my TIV engine rebuild video. and that's exactly where I learned it. (IMG:style_emoticons/default/biggrin.gif) |
|
|
|
| Phoenix914 |
May 30 2008, 06:24 AM
Post
#57
|
|
Member Group: Members Posts: 389 Joined: 6-December 06 From: Oviedo, FL Member No.: 7,322 Region Association: South East States |
Your engine looks fantastic. Please keep us updated with commentary and pictures. I'm planning to rebuild my 2056 this summer and need all the inspiration I can get!
|
|
|
|
| MrKona |
Jun 1 2008, 01:47 AM
Post
#58
|
|
Senior Member Group: Members Posts: 597 Joined: 25-July 05 From: Santa Rosa, CA Member No.: 4,469 Region Association: None |
I have got to spend a few hours on the engine today, and was able to "right" my "wrong" from last week, when I installed the cylinder heads on the wrong sides. I feel much better now... So here are some pictures from last week and today.
I had removed the piston rings before I mocked up the pistons, cylinders and cylinder heads for deck height. Prior to reinstalling them, I cleaned up the pistons and cylinders with a combo of carb cleaner, alcohol, lint free wipes, and compressed air. As everyone says, don't assume that the parts are clean from the factory. I got a lot of black residue off the cylinder walls. After I had reinstalled the rings, I installed the pistons in the cylinders. Sorry, no picture of the pistons going into the cylinders, but I did it as Jake describes in his video. Make sure not to push the piston in too hard when installing it in the cylinders. It took me the first piston to get the technique down for the ring compressor. Once I figured that out, the pistons went in with just a light tap on the top of the piston with the end of a plastic hammer handle. Although the pictures show the cylinder with the beveled edge up, I installed the piston into the other end of the cylinder. I used two spacers at the base of each cylinder and put a thin coating of Curil K2 between each spacer and at the base of each cylinder. Attached image(s) 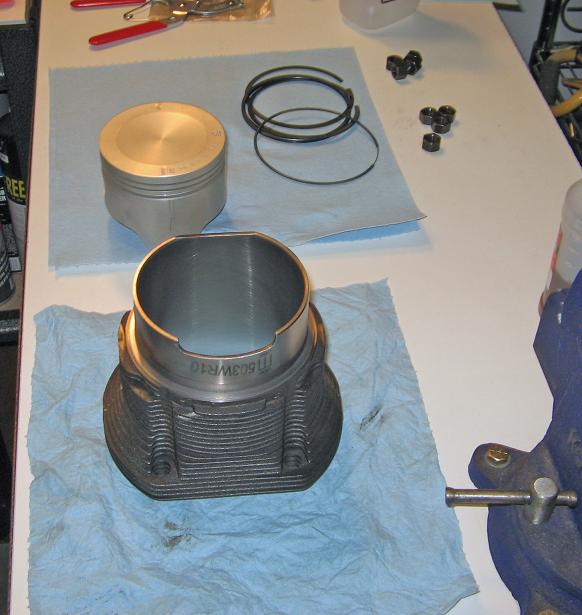 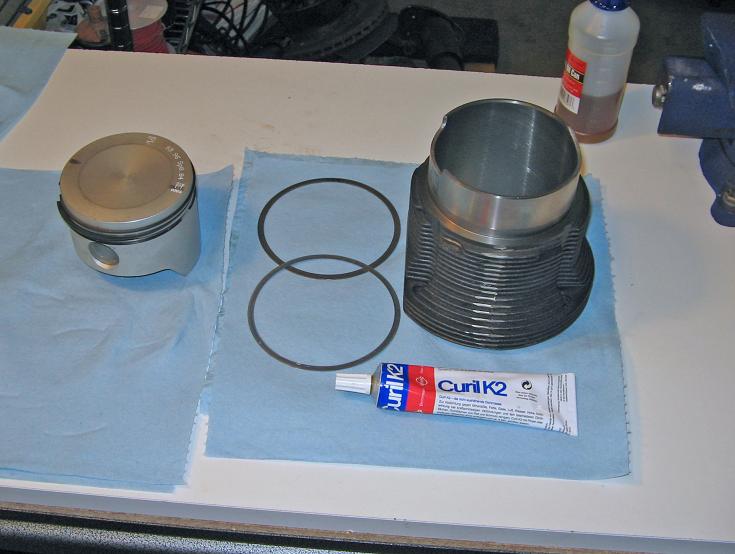
|
|
|
|
| MrKona |
Jun 1 2008, 01:54 AM
Post
#59
|
|
Senior Member Group: Members Posts: 597 Joined: 25-July 05 From: Santa Rosa, CA Member No.: 4,469 Region Association: None |
And on went the cylinders. It was easy to install the #3 piston pin since I had cut part of my engine stand mount away. Just make sure as you install the pistons that you don't pull back on the cylinders and expose the rings. That would mean back to the bench to reinstall the pistons with the ring compressor.
Attached thumbnail(s) 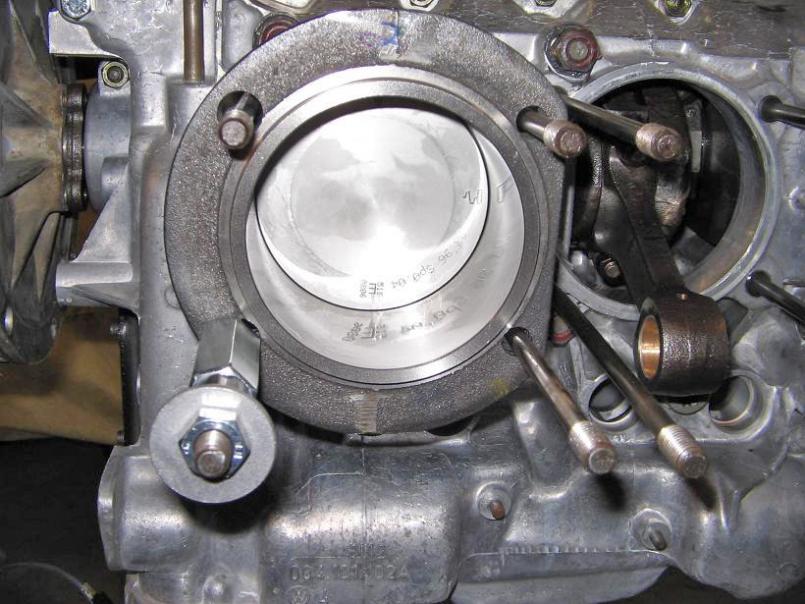 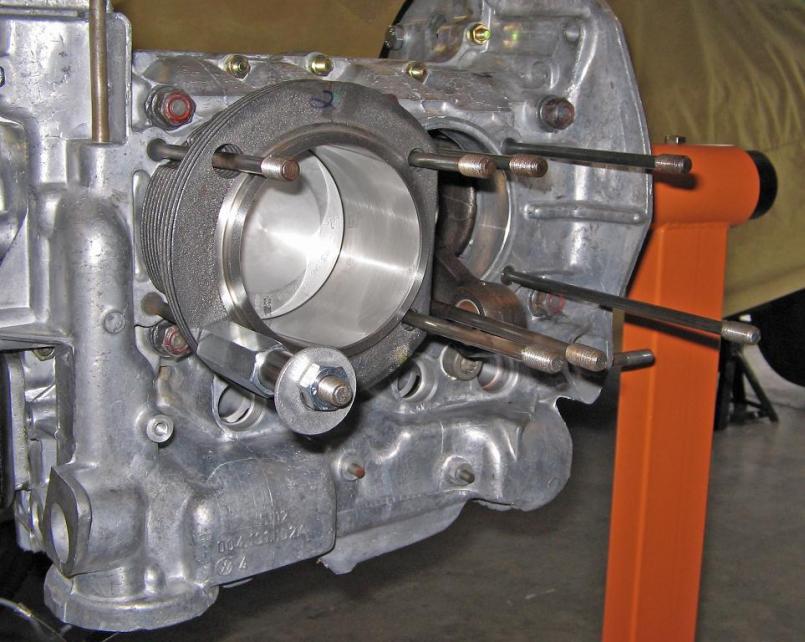
|
|
|
|
| MrKona |
Jun 1 2008, 01:55 AM
Post
#60
|
|
Senior Member Group: Members Posts: 597 Joined: 25-July 05 From: Santa Rosa, CA Member No.: 4,469 Region Association: None |
Pistons/Cylinders...
Attached thumbnail(s) 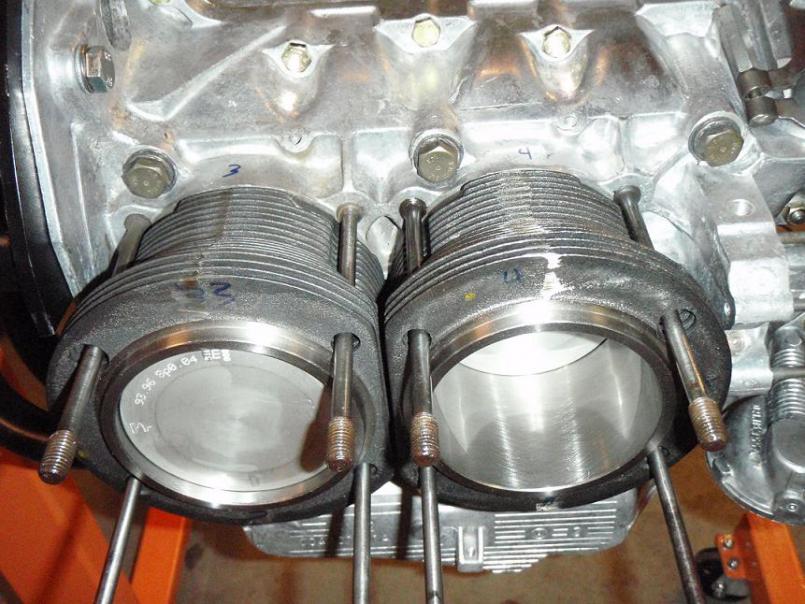 Attached image(s) 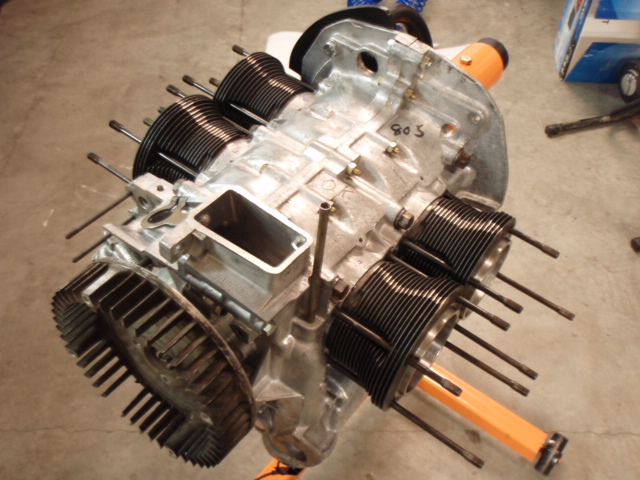
|
|
|
|
|
2 User(s) are reading this topic (2 Guests and 0 Anonymous Users)
0 Members:

|
Lo-Fi Version | Time is now: 1st July 2024 - 06:09 AM |
Invision Power Board
v9.1.4 © 2024 IPS, Inc.