|
|

|
Porsche, and the Porsche crest are registered trademarks of Dr. Ing. h.c. F. Porsche AG.
This site is not affiliated with Porsche in any way. Its only purpose is to provide an online forum for car enthusiasts. All other trademarks are property of their respective owners. |
|
|
  |
| FourBlades |
 Sep 28 2008, 07:38 PM Sep 28 2008, 07:38 PM
Post
#121
|
|
From Wreck to Rockin     Group: Members Posts: 2,056 Joined: 3-December 07 From: Brevard, FL Member No.: 8,414 Region Association: South East States 
|
Steve, I think you could salvage the two main "L" sections and adapt them to your project, no problem. I'm trying to finish up the underside so I can get my car back on its own feet again. Lets get together soon. John |
| FourBlades |
 Sep 28 2008, 09:23 PM Sep 28 2008, 09:23 PM
Post
#122
|
|
From Wreck to Rockin     Group: Members Posts: 2,056 Joined: 3-December 07 From: Brevard, FL Member No.: 8,414 Region Association: South East States 
|
Welded in and painted the rear trunk.
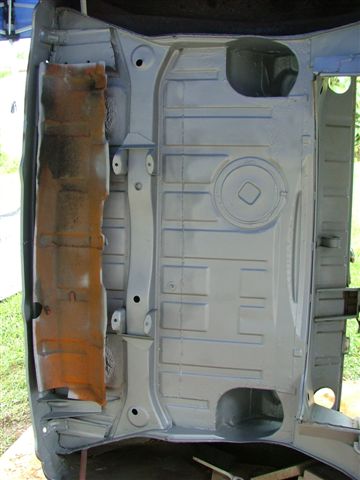 Started seam sealing the trunks and bottom of the car. 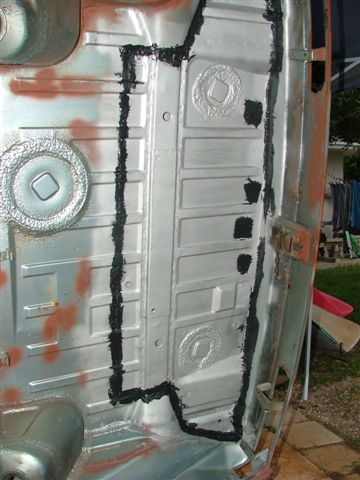 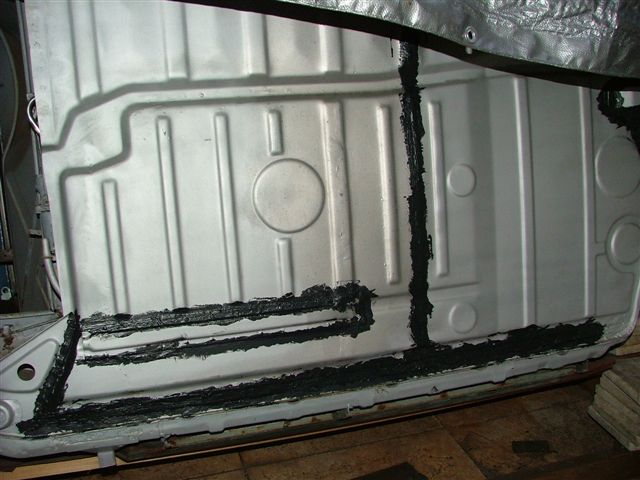 Once it is all seam sealed, I am going to paint it with two more layers of eastwood rust encapsulator and then undercoat it. I hope this will keep it from rusting for a long time. John |
| FourBlades |
 Oct 3 2008, 06:31 PM Oct 3 2008, 06:31 PM
Post
#123
|
|
From Wreck to Rockin     Group: Members Posts: 2,056 Joined: 3-December 07 From: Brevard, FL Member No.: 8,414 Region Association: South East States 
|
Rust encapsulator, seam sealer, 2 more coats of rust encapsulator, 2 coats of
rubberized undercoating. 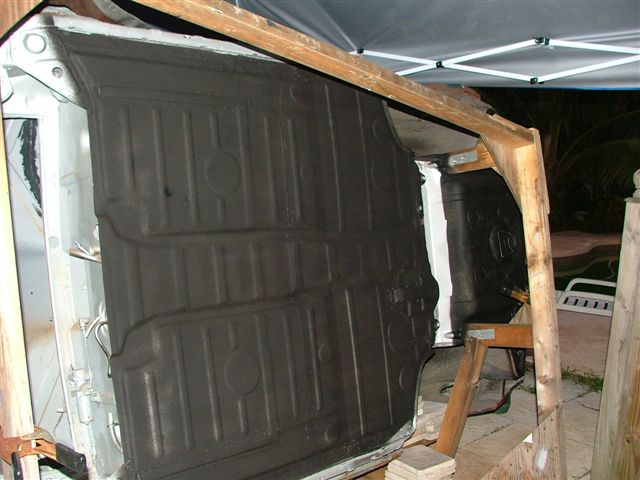 Going to install brake master cylinder, some brake lines, steering rack, front jacking donuts, then its time to flip it back to normal mode. John |
| southernmost914 |
 Oct 3 2008, 07:41 PM Oct 3 2008, 07:41 PM
Post
#124
|
|
KEY WEST/HAVANA Tunnel Authority   Group: Members Posts: 338 Joined: 16-October 07 From: Key West/ St. Augie, Fl USA Member No.: 8,234 Region Association: South East States 
|
Awsome! Funny how in Florida you do most of your work in the summer(afternoon rain, storms). I grew up in M.I. , Hampton homes just North of 520. I know every road in Brevard county. You got skills, ROCK ON!
Steve |
| jc914 |
 Oct 4 2008, 08:29 AM Oct 4 2008, 08:29 AM
Post
#125
|
|
Member   Group: Members Posts: 289 Joined: 15-September 08 From: Miami, Florida Member No.: 9,548 Region Association: South East States |
You are doing a great job. Very impressive restoration (IMG:style_emoticons/default/beerchug.gif)
|
| FourBlades |
 Oct 16 2008, 08:10 PM Oct 16 2008, 08:10 PM
Post
#126
|
|
From Wreck to Rockin     Group: Members Posts: 2,056 Joined: 3-December 07 From: Brevard, FL Member No.: 8,414 Region Association: South East States 
|
Thanks for the feedback guys. (IMG:style_emoticons/default/smile.gif)
Big news today. I welded on the front jacking donuts and flipped the car back to normal side down!!! 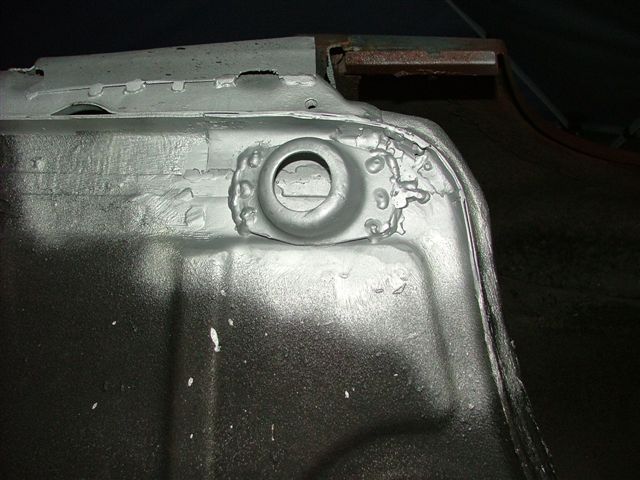 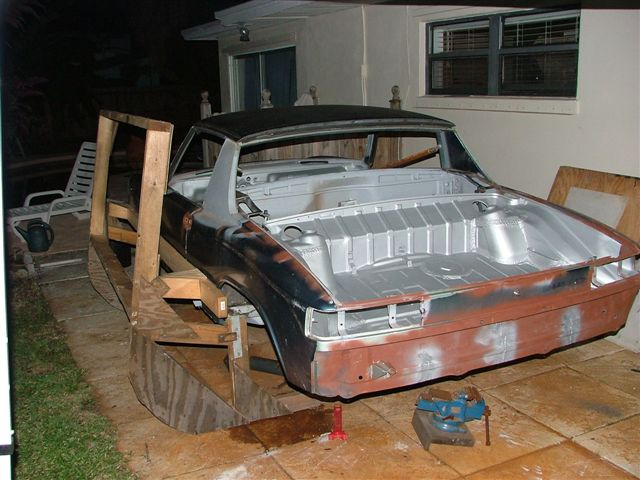 Wow, it looks weird this way after so long on its side. Flipping it back was a little hairy because it gets really heavy past the balancing point. I screwed a long 2x4 on to provide leverage and carefully eased it down. I you are [A] building a wood rotisserie in your backyard [B] planning to use it for more than a few months, and [C] pretty much considered insane by your friends, then you really should paint the rotisserie because the plywood reinforcements will rot and weaken in 3 or 4 months, and plan ahead when tipping the car back because if it gets away from you it will crash down big time. You need to use leverage and caution because without 4 or 5 friends you can't muscle a 350 pound car body. Now I in the home stretch, only 77 items on my to do list and $3500 more parts on my buy list. I am so glad I saved money on my car insurance because restoring a $500 car is not a big money maker. (IMG:style_emoticons/default/rolleyes.gif) It is amazing how much a 914 costs when you buy every single part except the (rusty) tub one by one. Find a car with the vast majority of the parts in useable condition if you want to be a CSOB. Seriously, I am getting really excited about getting this thing on the road. John |
| jc914 |
 Oct 16 2008, 09:43 PM Oct 16 2008, 09:43 PM
Post
#127
|
|
Member   Group: Members Posts: 289 Joined: 15-September 08 From: Miami, Florida Member No.: 9,548 Region Association: South East States |
Once again Great job John. I am glad you were able to get it back down without any damage. It is looking good. (IMG:style_emoticons/default/smilie_pokal.gif) (IMG:style_emoticons/default/clap56.gif) (IMG:style_emoticons/default/driving.gif)
|
| sean_v8_914 |
 Oct 16 2008, 11:16 PM Oct 16 2008, 11:16 PM
Post
#128
|
|
Chingon 601     Group: Members Posts: 4,011 Joined: 1-February 05 From: San Diego Member No.: 3,541 |
wow!
my hell hole repairs suddenly seem so trivial |
| dlee6204 |
 Oct 16 2008, 11:28 PM Oct 16 2008, 11:28 PM
Post
#129
|
|
Howdy     Group: Members Posts: 2,162 Joined: 30-April 06 From: Burnsville, NC Member No.: 5,956 |
I've watched this build from the beginning and I'm even starting to get excited! (IMG:style_emoticons/default/w00t.gif) Keep up the good work!
|
| FourBlades |
 Oct 17 2008, 07:11 AM Oct 17 2008, 07:11 AM
Post
#130
|
|
From Wreck to Rockin     Group: Members Posts: 2,056 Joined: 3-December 07 From: Brevard, FL Member No.: 8,414 Region Association: South East States 
|
Thanks for the good words, it keeps me motivated. (IMG:style_emoticons/default/piratenanner.gif) I REALLY wanted to make the Rocket City Ramble this year but it was not to be. I'm gonna make next year's east coast event if I have haul my 914 there in a dump truck... John |
| FourBlades |
 Oct 19 2008, 06:34 PM Oct 19 2008, 06:34 PM
Post
#131
|
|
From Wreck to Rockin     Group: Members Posts: 2,056 Joined: 3-December 07 From: Brevard, FL Member No.: 8,414 Region Association: South East States 
|
Finishing the passenger door sills. Welded on the support triangles. Used the
sill plate to line up the triangles properly. 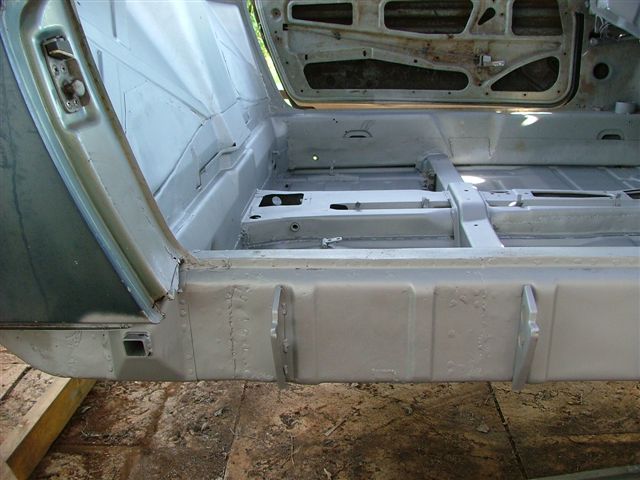 Added the sill plate. Now I have to close the hole between the sill plate the door jamb. Trim off the rusty edges. 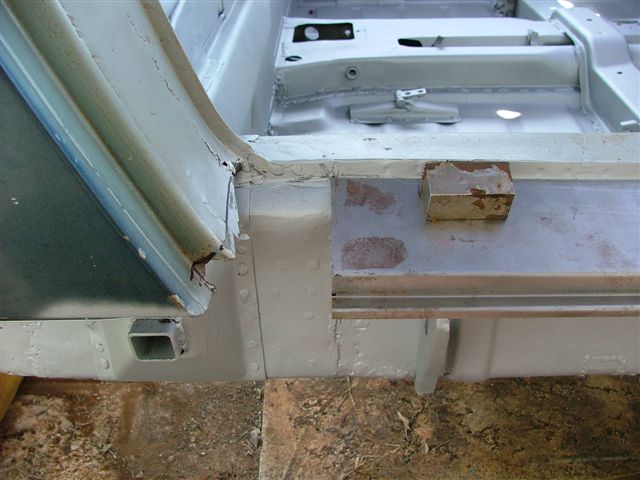 Patched it using two separate pieces of metal to avoid having to make such a complex shape in one piece. 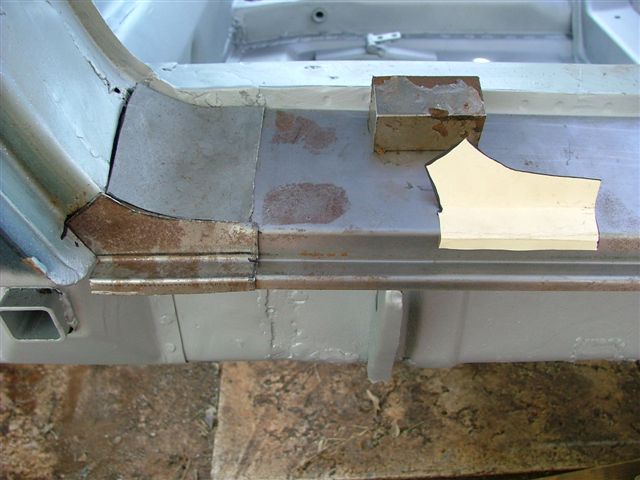 Weld it up and grind it. It ain't purty but it is solid. 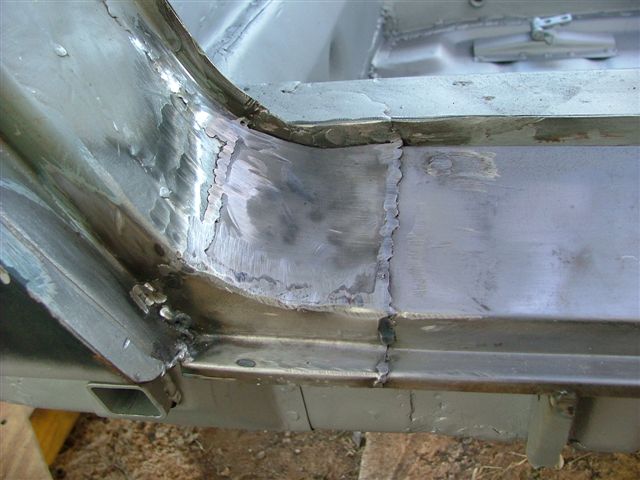 Passenger side is done. 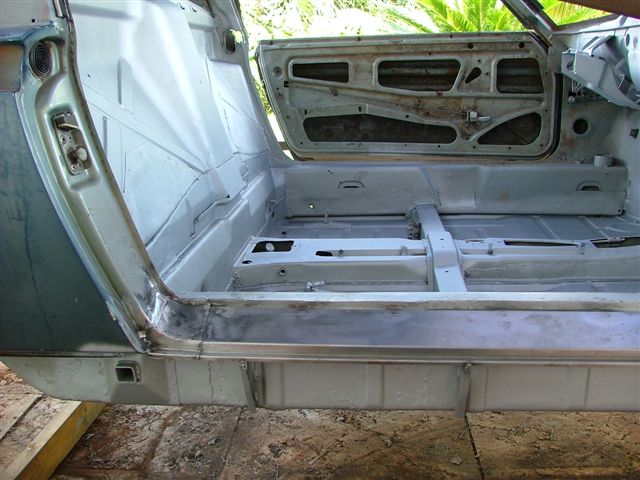 John |
| FourBlades |
 Oct 19 2008, 06:58 PM Oct 19 2008, 06:58 PM
Post
#132
|
|
From Wreck to Rockin     Group: Members Posts: 2,056 Joined: 3-December 07 From: Brevard, FL Member No.: 8,414 Region Association: South East States 
|
Now I have this to look forward to fixing. (IMG:style_emoticons/default/wacko.gif)
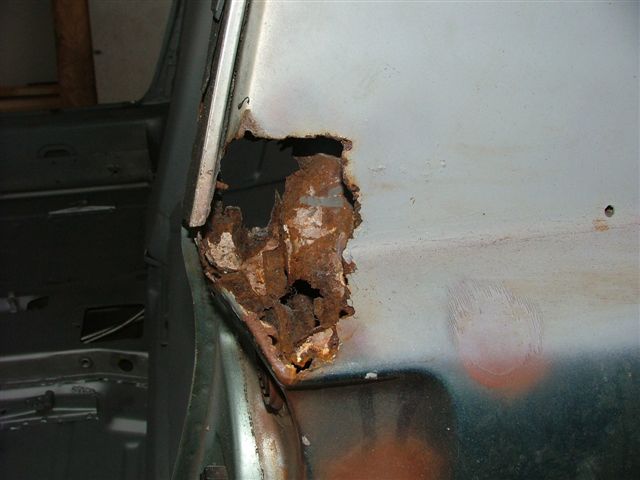 The inside where the door vent comes out is almost as pretty. Anyone got any ideas about the easy way to fix this??? (IMG:style_emoticons/default/confused24.gif) (IMG:style_emoticons/default/confused24.gif) (IMG:style_emoticons/default/confused24.gif) For now, it is (IMG:style_emoticons/default/beer3.gif) time... John |
| FourBlades |
 Oct 20 2008, 07:55 PM Oct 20 2008, 07:55 PM
Post
#133
|
|
From Wreck to Rockin     Group: Members Posts: 2,056 Joined: 3-December 07 From: Brevard, FL Member No.: 8,414 Region Association: South East States 
|
I broke down and ordered the Auto Atlanta sail panel to fix the outside of
that nasty rust hole in the previous post. Fixing the driver's side door sill. Still have some major rust areas to fix. 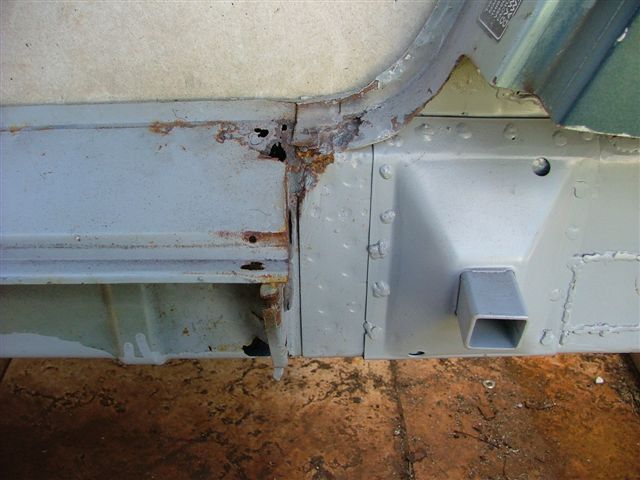 Cut out the rusty parts and clean it up. I don't know about you but I hate drilling out spot welds, so I am using a new trick I read about in a book. First, cut away the majority of the panel being removed. This leaves a strip of metal that is spot welded to the other panel. Use a wire wheel to clean the strip and reveal where the spot welds are. Then use a grinder to cut through just the panel being removed in between each spot weld. Then the situation looks like this: 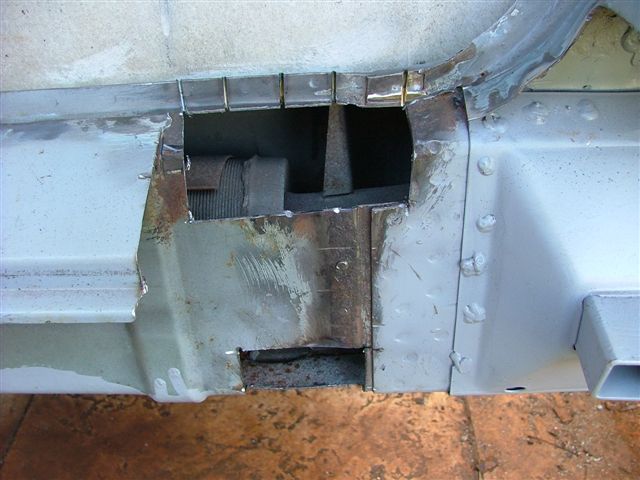 Now take some major end nippers and grab hold of each piece of the strip. By squeezing down and then twisting it is easy to break off each piece of the strip one by one. 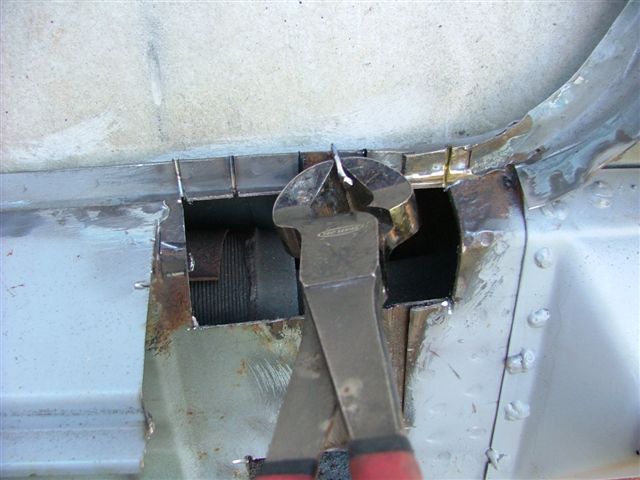 The end nippers are great because they get under the ends of the strip easily. Only the very small spot weld area is actually attached to the other panel making it easy to remove the pieces. 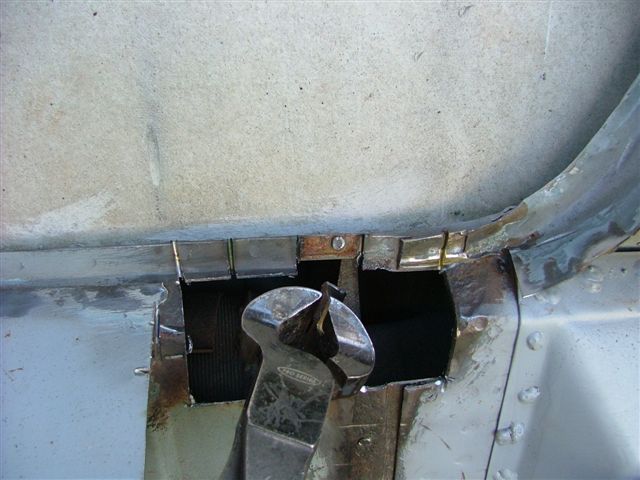 I find this method is faster and less annoying than drilling out each weld. It also really helps to cut out the majority of the panel first whether you are drilling or twisting the rest off. Then use a grinder to remove the spot weld stubs. 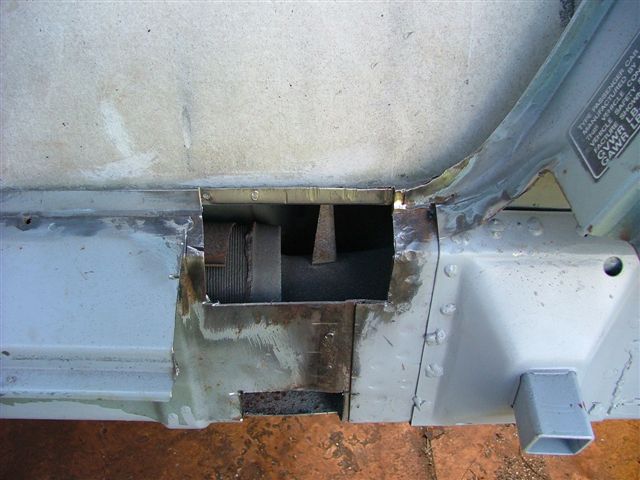 Saves me lots of time and iritation. |
| FourBlades |
 Oct 20 2008, 08:13 PM Oct 20 2008, 08:13 PM
Post
#134
|
|
From Wreck to Rockin     Group: Members Posts: 2,056 Joined: 3-December 07 From: Brevard, FL Member No.: 8,414 Region Association: South East States 
|
Continue fixing the drivers door sill area. Made some patches for the holes using
left over long replacement panel. This makes fitting the patches very easy. 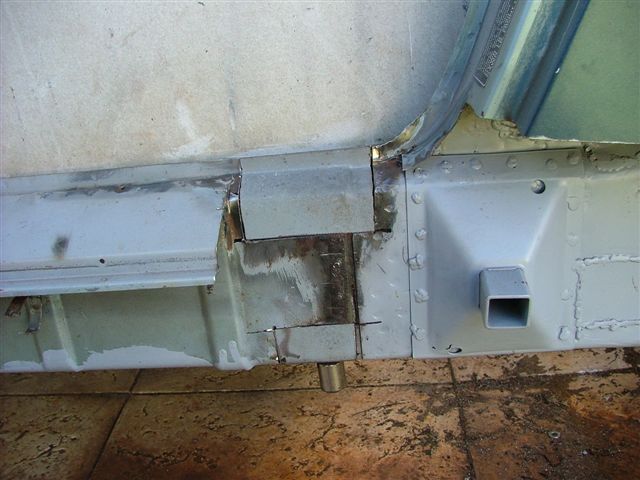 (IMG:style_emoticons/default/welder.gif) (IMG:style_emoticons/default/welder.gif) (IMG:style_emoticons/default/welder.gif) 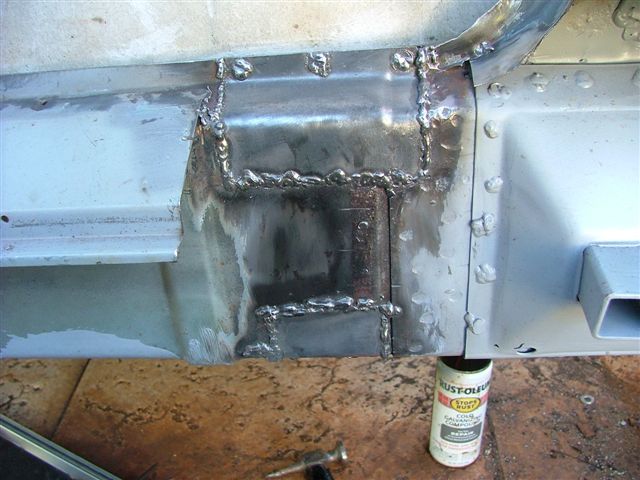 Took some time grinding down all the welds in this area. Made a patch for the sill. Put back the chunk of fender I cut away months ago while fixing the heck hole. 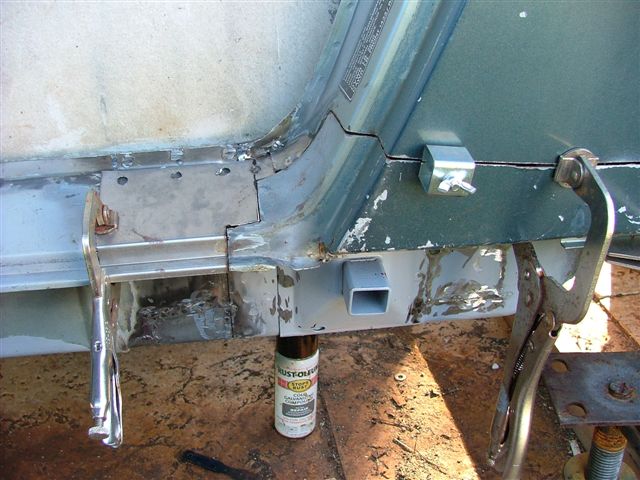 Carefully welded it all up. Tried to go slow and not warp the fender. It looks pretty good, maybe bowed out a tiny bit. I'll need to grind it down carefully too so as not to over heat it. 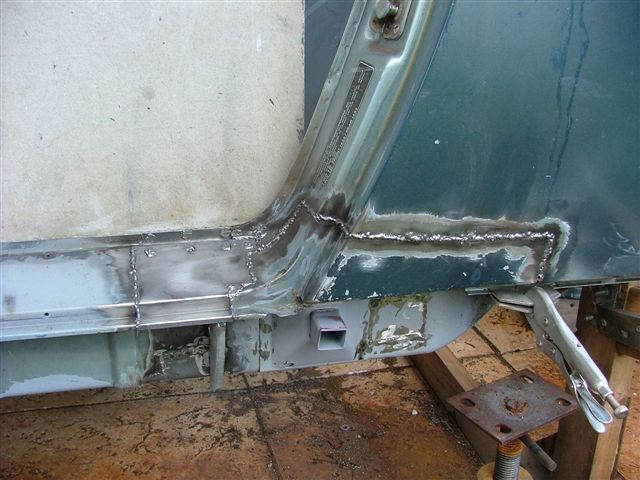 I think this leaves six rusty areas to fix. (IMG:style_emoticons/default/piratenanner.gif) Driver side sail panel. (IMG:style_emoticons/default/bootyshake.gif) Driver side lower door jamb. (IMG:style_emoticons/default/blink.gif) Driver side cowl to fender joint. (IMG:style_emoticons/default/sheeplove.gif) Passenger side cowl to fender joint. (IMG:style_emoticons/default/bs.gif) Front trunk rain gutters. (IMG:style_emoticons/default/icon8.gif) Rear trunk tail light openings. (IMG:style_emoticons/default/welder.gif) Each one will probably take 3-5 hours to fix. One more month and it will have been a year. (IMG:style_emoticons/default/bye1.gif) John |
| jd74914 |
 Oct 20 2008, 08:38 PM Oct 20 2008, 08:38 PM
Post
#135
|
|
Its alive     Group: Members Posts: 4,818 Joined: 16-February 04 From: CT Member No.: 1,659 Region Association: North East States |
I broke down and ordered the Auto Atlanta sail panel to fix the outside of that nasty rust hole in the previous post. . . . Saves me lots of time and iritation. Pansy. (IMG:style_emoticons/default/laugh.gif) (IMG:style_emoticons/default/happy11.gif) 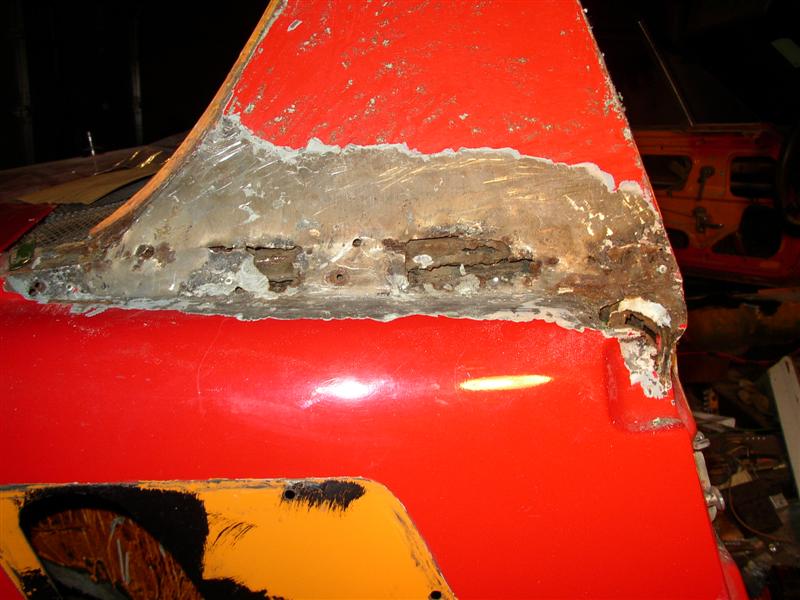 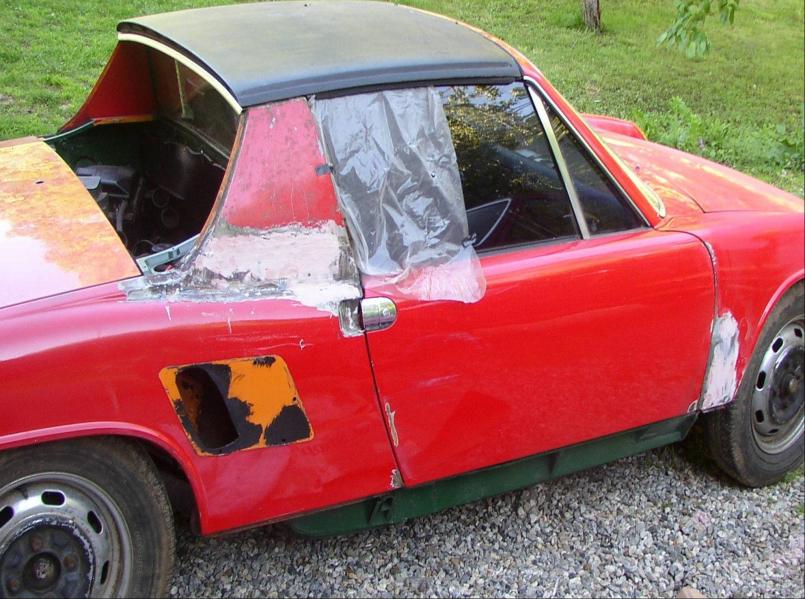 Just kidding! The car looks great. (IMG:style_emoticons/default/biggrin.gif) |
| FourBlades |
 Oct 20 2008, 08:46 PM Oct 20 2008, 08:46 PM
Post
#136
|
|
From Wreck to Rockin     Group: Members Posts: 2,056 Joined: 3-December 07 From: Brevard, FL Member No.: 8,414 Region Association: South East States 
|
Jim, That is some nasty sail panel rust! Did you make your own patch for that??? Those are some interesting looking side vents... John |
| jd74914 |
 Oct 20 2008, 09:13 PM Oct 20 2008, 09:13 PM
Post
#137
|
|
Its alive     Group: Members Posts: 4,818 Joined: 16-February 04 From: CT Member No.: 1,659 Region Association: North East States |
Yep, I made all of my own patches (the other side looked like that too, except its entire door handle recess was gone). I'm only 20, and at that time (well, currently too) had much more time than money, and not buying replacement stamping was a great way for me to save. It was also a great experience in metal working.
The side vents were added by someone in the 80s; probably well before I was born. (IMG:style_emoticons/default/laugh.gif) I'm not their biggest fan, but I do like their uniqueness. What you see is just a cutout. They have a "cover thingie" that bolts on over it and gives them definition. Jim |
| FourBlades |
 Oct 21 2008, 07:30 AM Oct 21 2008, 07:30 AM
Post
#138
|
|
From Wreck to Rockin     Group: Members Posts: 2,056 Joined: 3-December 07 From: Brevard, FL Member No.: 8,414 Region Association: South East States 
|
Jim, Looks like you did a nice job fixing those holes. I like to make my own patches but I guess I am getting impatient to be done with the body work. My new engine is collecting dust in my bedroom right now, I want to see it in the car... John |
| Root_Werks |
 Oct 21 2008, 08:21 AM Oct 21 2008, 08:21 AM
Post
#139
|
|
Village Idiot      Group: Members Posts: 8,510 Joined: 25-May 04 From: About 5NM from Canada Member No.: 2,105 Region Association: Pacific Northwest 
|
(IMG:style_emoticons/default/huh.gif) I will not wine about the rust on my 914 ever again, I will not wine about the rust in my 914 again.... (IMG:style_emoticons/default/blink.gif)
Seriuosly, great work! I love keeping up on this thread. (IMG:style_emoticons/default/welder.gif) |
| jd74914 |
 Oct 21 2008, 02:52 PM Oct 21 2008, 02:52 PM
Post
#140
|
|
Its alive     Group: Members Posts: 4,818 Joined: 16-February 04 From: CT Member No.: 1,659 Region Association: North East States |
Jim, Looks like you did a nice job fixing those holes. I like to make my own patches but I guess I am getting impatient to be done with the body work. My new engine is collecting dust in my bedroom right now, I want to see it in the car... John That sentiment is easy to sympathize with. (IMG:style_emoticons/default/smile.gif) |
  |
20 User(s) are reading this topic (20 Guests and 0 Anonymous Users)
0 Members:

|
Lo-Fi Version | Time is now: 27th December 2024 - 04:05 AM |
Invision Power Board
v9.1.4 © 2024 IPS, Inc.


