|
|

|
Porsche, and the Porsche crest are registered trademarks of Dr. Ing. h.c. F. Porsche AG.
This site is not affiliated with Porsche in any way. Its only purpose is to provide an online forum for car enthusiasts. All other trademarks are property of their respective owners. |
|
|
  |
| Wilhelm |
 Jun 11 2009, 07:55 PM Jun 11 2009, 07:55 PM
Post
#237
|
|
Member   Group: Members Posts: 408 Joined: 7-September 07 From: Hooterville, OR Member No.: 8,088 Region Association: None |
Great Job! Where do you get the time? I've done nothing substantial for a month!
|
| FourBlades |
 Jul 26 2009, 07:05 PM Jul 26 2009, 07:05 PM
Post
#238
|
|
From Wreck to Rockin     Group: Members Posts: 2,056 Joined: 3-December 07 From: Brevard, FL Member No.: 8,414 Region Association: South East States 
|
Show us your tit!
 At least it has a nice, flaky fog light cover. 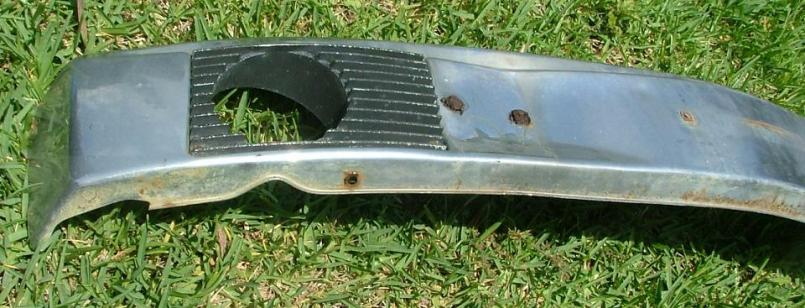 A pretty rusty back. 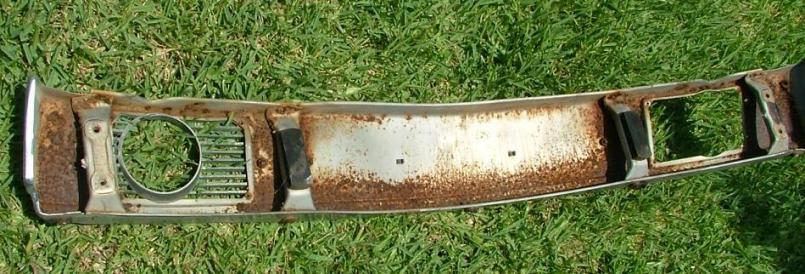 Some serious BFH work was required. Cut off all the old bolts. Derusted and painted the inside. 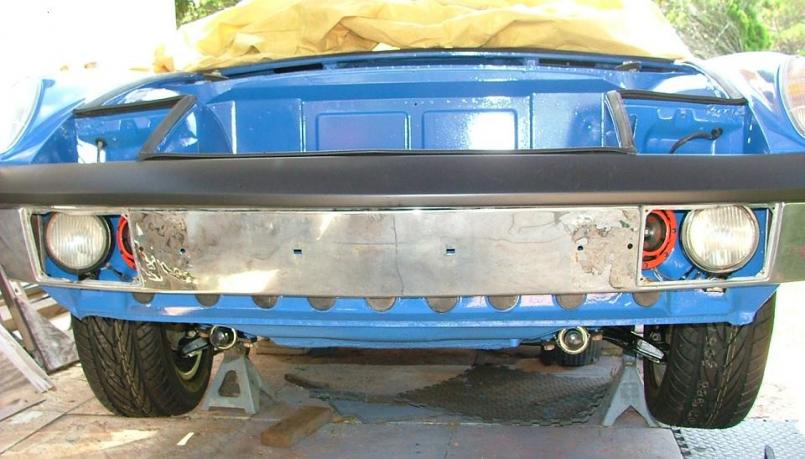 It looks pretty scruffy but is passable for a hot rod. I am too over budget at this point to rechrome it. I just want to get it running, and then I can tweak it more. John |
| jonferns |
 Jul 26 2009, 07:17 PM Jul 26 2009, 07:17 PM
Post
#239
|
|
Advanced Member     Group: Members Posts: 2,081 Joined: 29-March 07 From: New Jersey Member No.: 7,631 Region Association: North East States 
|
Looking good John. Maybe repaint the bumper with that chrome paint that someone else on here used for their bumper. I forget the manufacturer, but its a cheap alternative to getting it rechromed and it looks nice.
|
| FourBlades |
 Jul 26 2009, 07:35 PM Jul 26 2009, 07:35 PM
Post
#240
|
|
From Wreck to Rockin     Group: Members Posts: 2,056 Joined: 3-December 07 From: Brevard, FL Member No.: 8,414 Region Association: South East States 
|
Putting in the Engman fuse panel. This is a really nicely made piece and it is pretty
easy to put in. It took less than an hour altogether. All the wiring issue threads convinced me this was a must have upgrade. First push the relays off the board. Then label the first row of wires with the provided stickers. 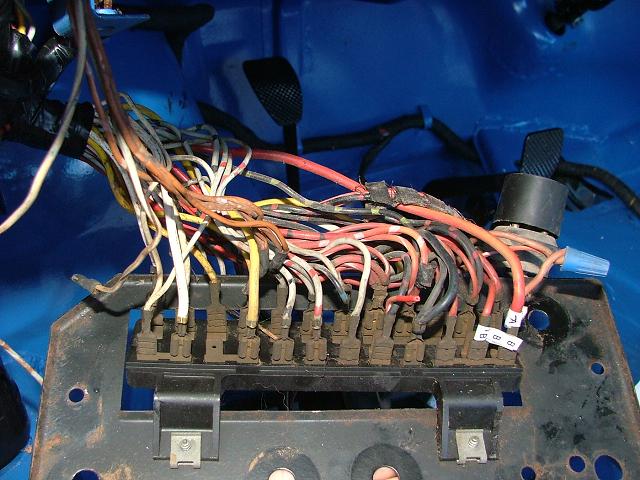 Pulled off the first row of wires and labeled the second row. The key is to work carefully and systematically, but it really is not hard. You can tell which way the boards go from looking at which terminals are double and which are single. Notice the first two on the right have two sets of terminals. None of my second set of terminals had anything plugged in to it, I wonder if these are for options? 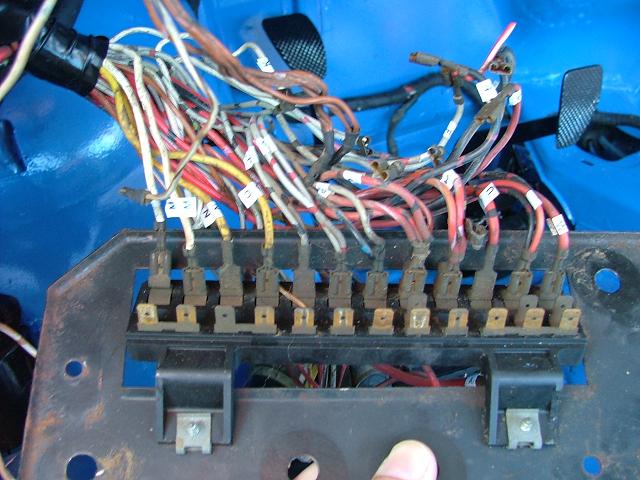 Pull off the second row of wires. 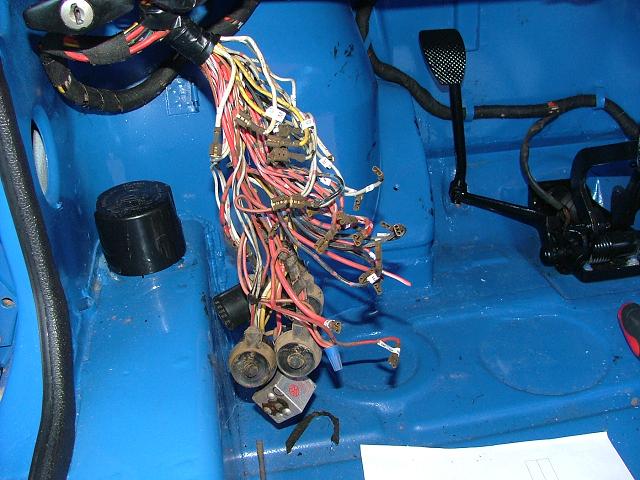 Tested each relay while I had them handy. Touching the terminals with a 9v battery you should here a clicking sound. The two terminals in question are those closest to the pin that is by itself. This does not guarantee the relay will work, but if it does not click, then the relay is bad. 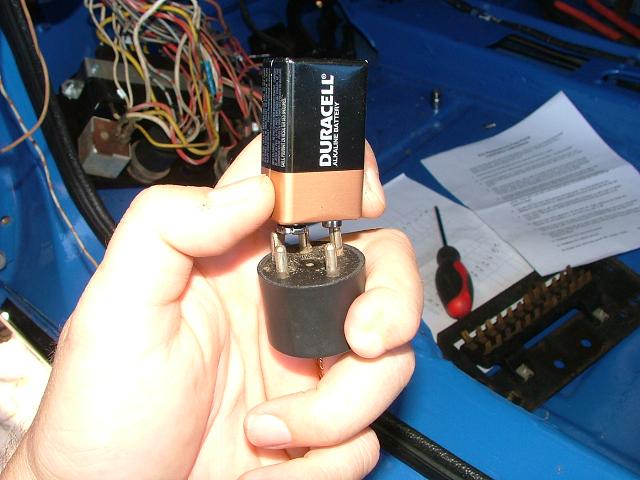 Start putting on the second row of wires first. 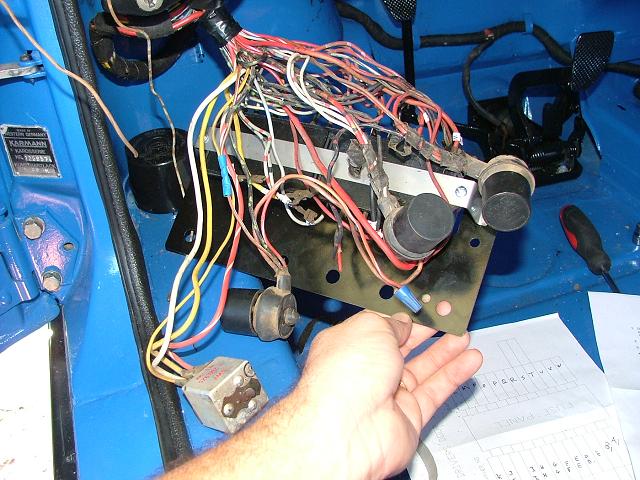 To get the first row of wires on I had to untangle and reroute some of the wires. I had to untangle the relay wires as well. At first it looked like they would not all reach but with a little fiddling around you see there is more than enough wire length. Just one relay left to put in. 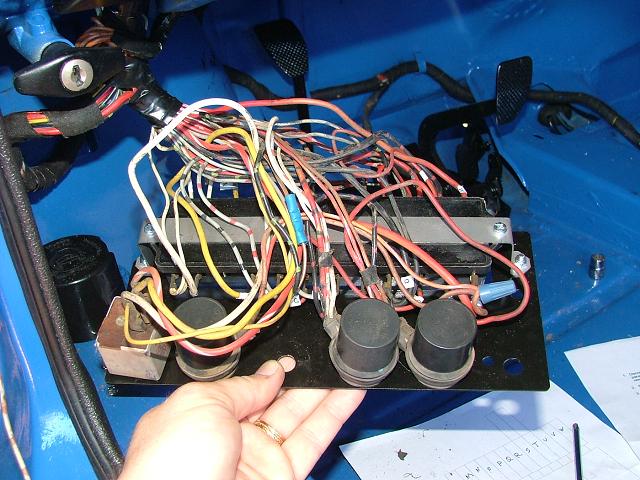 Put the panel in place. It looks backwards and maybe it is, but it fits better this way with how I installed my wiring harness. (IMG:style_emoticons/default/biggrin.gif) 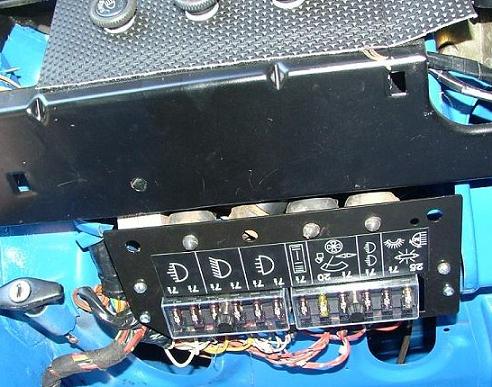 I hope to finish up the last few wiring connections around the car and put in a battery soon. John |
| sixnotfour |
 Jul 26 2009, 08:14 PM Jul 26 2009, 08:14 PM
Post
#241
|
|
914 Wizard           Group: Members Posts: 10,698 Joined: 12-September 04 From: Life Elevated..planet UT. Member No.: 2,744 Region Association: Rocky Mountains 

|
Great Job !!
IMSAIMSAIMSA |
| FourBlades |
 Jul 27 2009, 07:00 PM Jul 27 2009, 07:00 PM
Post
#242
|
|
From Wreck to Rockin     Group: Members Posts: 2,056 Joined: 3-December 07 From: Brevard, FL Member No.: 8,414 Region Association: South East States 
|
I here ya man, I am anxious to get back to the IMSA car... John |
| netbanshee |
 Jul 27 2009, 10:56 PM Jul 27 2009, 10:56 PM
Post
#243
|
|
Newbie  Group: Members Posts: 26 Joined: 18-May 08 From: Philadelphia Member No.: 9,071 Region Association: North East States |
John,
Excellent job so far! I only happened upon this thread now, but have definitely given it a good once over. Many a man would have gotten frustrated with the amount of work you had ahead of you. And that said, you're so close. I'm looking forward to the next few weeks / months. I did a decent restore job with my pops that ended somewhat tragically, but in the end, I found myself with a fine 70 914. Good work, no matter what the circumstances, pays off in the end. Flickr reference: http://www.flickr.com/photos/netbanshee/sets/1076179/ Cheers, Sean |
| FourBlades |
 Jul 28 2009, 07:22 AM Jul 28 2009, 07:22 AM
Post
#244
|
|
From Wreck to Rockin     Group: Members Posts: 2,056 Joined: 3-December 07 From: Brevard, FL Member No.: 8,414 Region Association: South East States 
|
Hey thanks Sean. I really enjoyed the welding and metal work. I am not so fond of all the fiddling around with reassembling everything. The fire you suffered totally sucks. You were making great progress. That looks like a sweet 1970 914 though. John (IMG:style_emoticons/default/welcome.png) |
| FourBlades |
 Aug 1 2009, 07:58 PM Aug 1 2009, 07:58 PM
Post
#245
|
|
From Wreck to Rockin     Group: Members Posts: 2,056 Joined: 3-December 07 From: Brevard, FL Member No.: 8,414 Region Association: South East States 
|
I spent all day fixing my rear trunk hinges and installing a camp 914 shock
kit. The shock kit is excellent and a piece of cake to install. The trunk hinges were a pain because one was broken off and the other had the shoulder bolt broken off in it. I only had one replacement shoulder bolt so I found a 10.9 bolt from my stash that had the right amount of shoulder and threads. 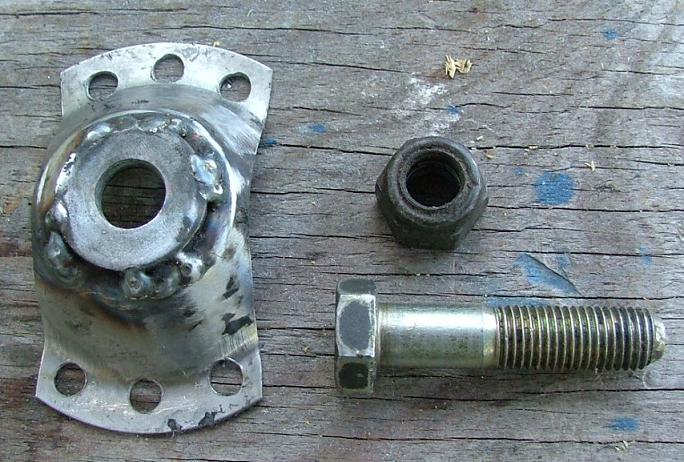 Welded a thick washer to the replacement trunk hinge mounting thingee. The bolt will get trimmed to length later. Here is how this is going to work. 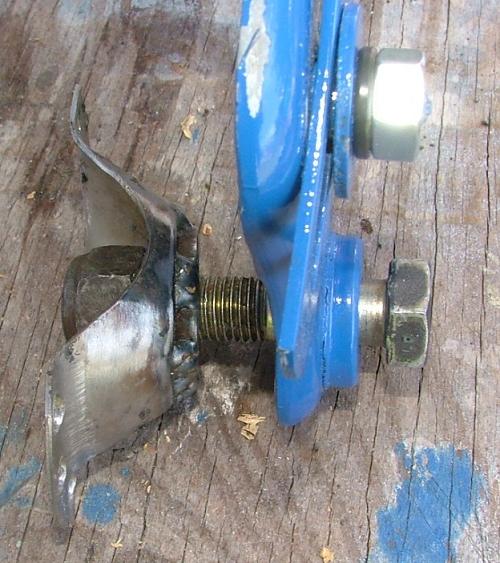 Welded the lock nut to the back of the thingee so that I did not have to get a wrench back there to hold it. Melted the nylon insert unfortunately. (IMG:style_emoticons/default/dry.gif) 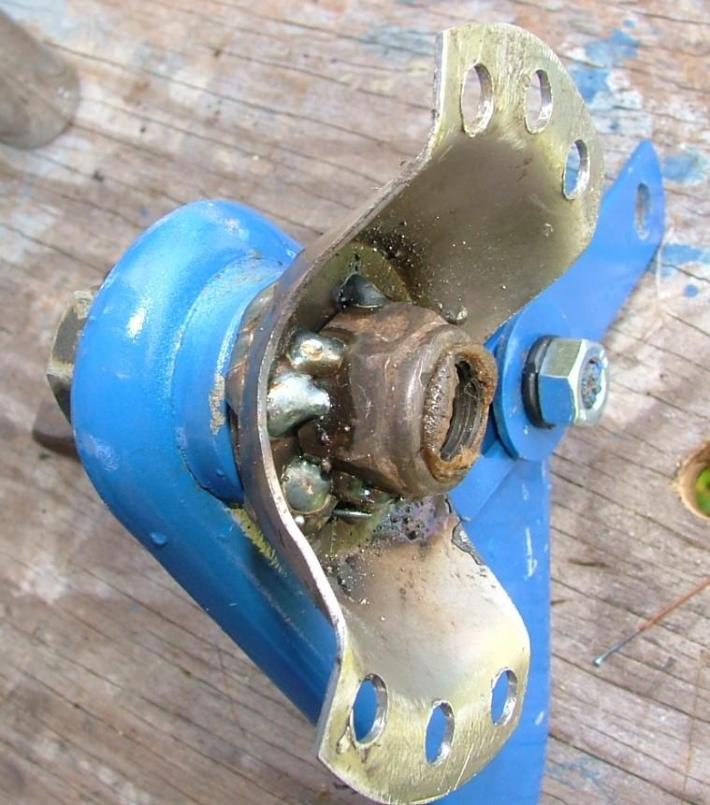 Sanded off the paint in the weld area using a detail sander. This is slow but easy to control and not as messy as a wire wheel. 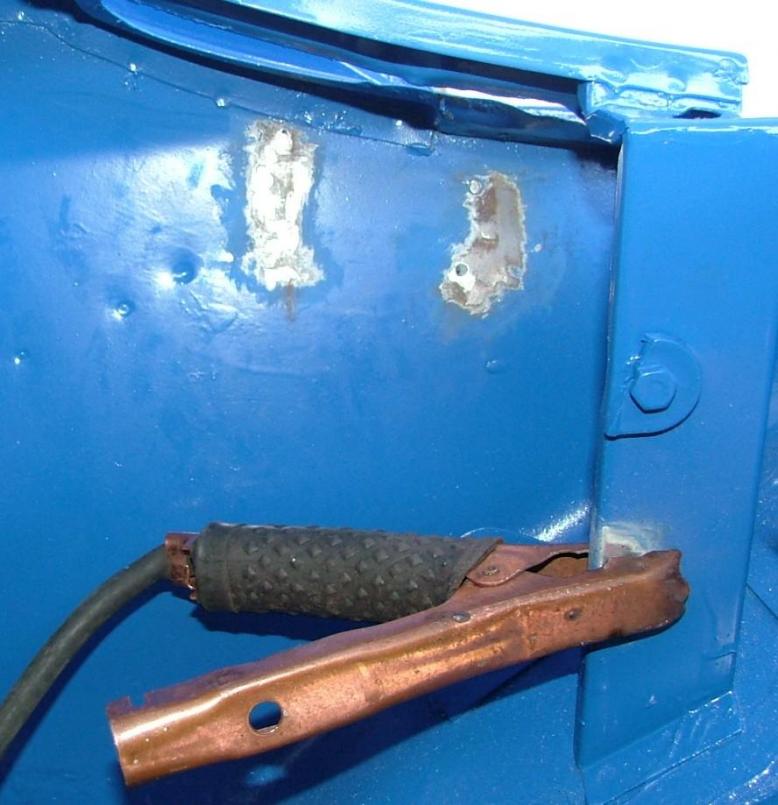 I located the position for the new thingee by finding the old spot welds. I also compared it by eye to the other side. This is not that hard and my trunk lid fit and closes well. |
| FourBlades |
 Aug 1 2009, 08:21 PM Aug 1 2009, 08:21 PM
Post
#246
|
|
From Wreck to Rockin     Group: Members Posts: 2,056 Joined: 3-December 07 From: Brevard, FL Member No.: 8,414 Region Association: South East States 
|
Welded the replacement thingee on. I think my approach will be stronger than
the stock shoulder bolt, which necks down to an m8 or so, whereas I am using an m12 through its whole length. Greased all the moving parts of both hinges with white lithium grease. 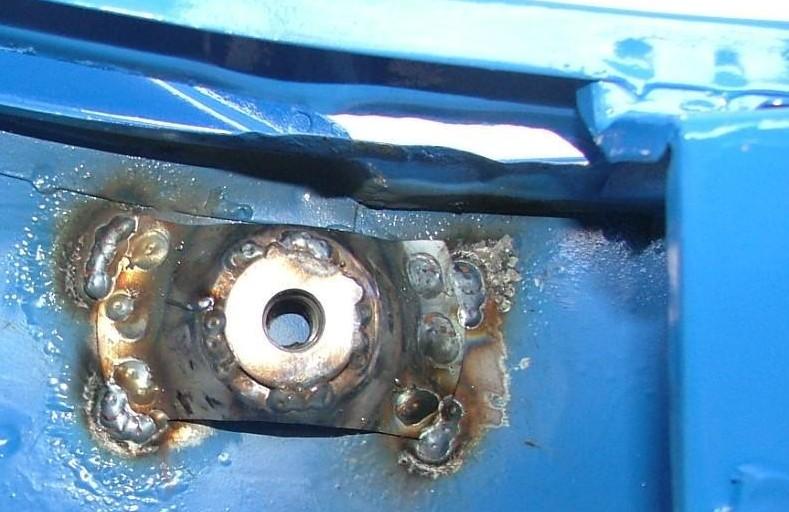 Drilled out and retapped the other side hinge. I also sanded the paint off and welded the edges of the hinge mount to prevent it from breaking off down the road. Down the road, get it? (IMG:style_emoticons/default/lol-2.gif) 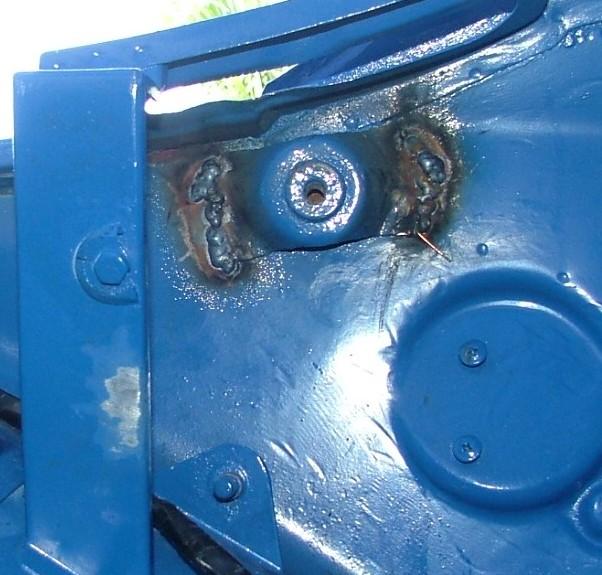 More pictures and incredibly bad humor tomorrow. Must be the effects of too much welding smoke, phosgene gas, and zinc fumes. John |
| my928s4 |
 Aug 1 2009, 08:55 PM Aug 1 2009, 08:55 PM
Post
#247
|
|
Member   Group: Members Posts: 349 Joined: 18-August 07 From: Spokane, WA Member No.: 8,018 Region Association: Pacific Northwest |
John
As always great progress, yours is much nearer being on the road than mine! Like you my trunk hinge mounts were toast, any reason why you did not go with the JWest Pivots? Cheers |
| FourBlades |
 Aug 2 2009, 10:10 AM Aug 2 2009, 10:10 AM
Post
#248
|
|
From Wreck to Rockin     Group: Members Posts: 2,056 Joined: 3-December 07 From: Brevard, FL Member No.: 8,414 Region Association: South East States 
|
Hey John, I did not know Jwest had pivots for the rear trunk. I bought the replacement stock parts a long time ago. When I realized yesterday I was short one shoulder bolt I just decided to improvise rather than stop working and wait to order more parts. I am kind of in get it on the road ASAP mode now... (IMG:style_emoticons/default/beer.gif) John |
| FourBlades |
 Aug 19 2009, 08:06 PM Aug 19 2009, 08:06 PM
Post
#249
|
|
From Wreck to Rockin     Group: Members Posts: 2,056 Joined: 3-December 07 From: Brevard, FL Member No.: 8,414 Region Association: South East States 
|
Opened up the transmission that came with the car so Dr. Evil can see if it looks
ok to rebuild at the Atlanta clinic. The box was covered in thick, nasty oil that had to be chipped off, but inside it looks really good to me. Of course, I have only the faintest idea what to look for. 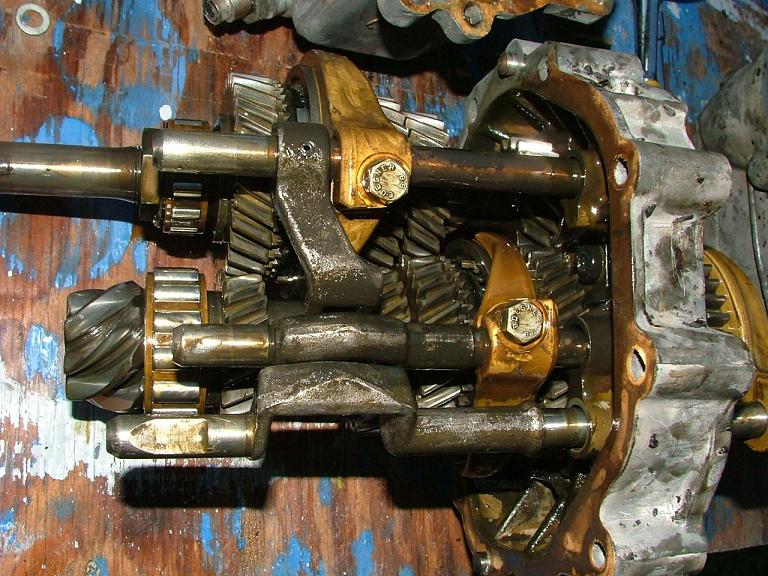 Getting it apart and putting it back together was pretty simple following the instructions on the doctor's web pages. 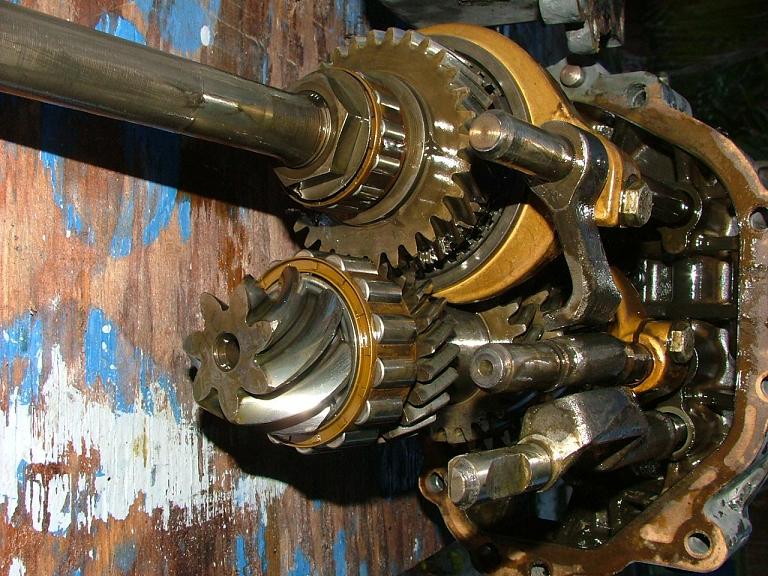 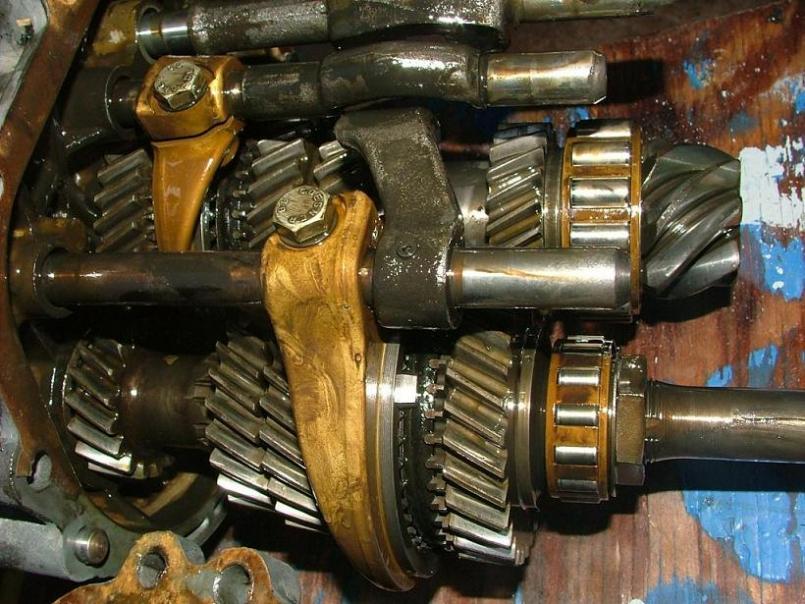 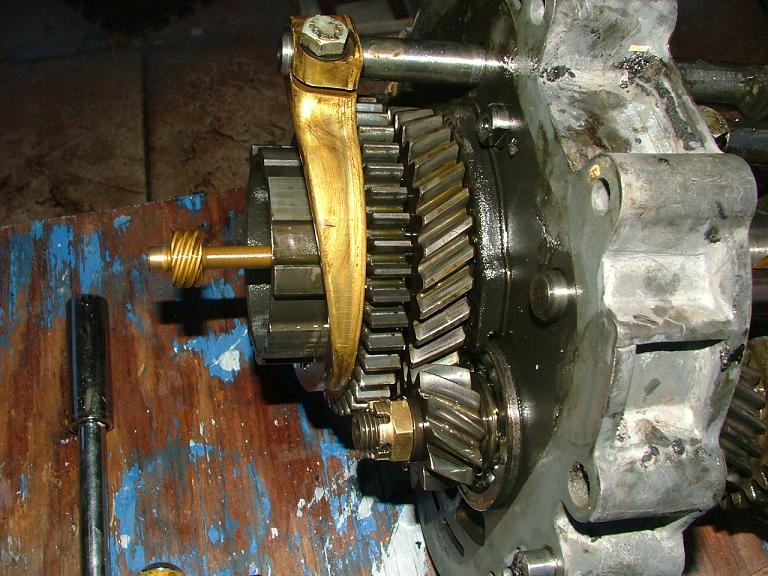 When you think of all the precisely machined and hardened parts and all the little bearings and polished shafts in there it is a pretty amazing piece of engineering. The tail cone looks like it will weigh 10 pounds but it is only 2 pounds or so, I guess it is magnesium. Not bad for a 40 year old design. You can't help but be impressed with the quality of the parts. John |
| FourBlades |
 Aug 19 2009, 08:10 PM Aug 19 2009, 08:10 PM
Post
#250
|
|
From Wreck to Rockin     Group: Members Posts: 2,056 Joined: 3-December 07 From: Brevard, FL Member No.: 8,414 Region Association: South East States 
|
More pictures of the transmission.
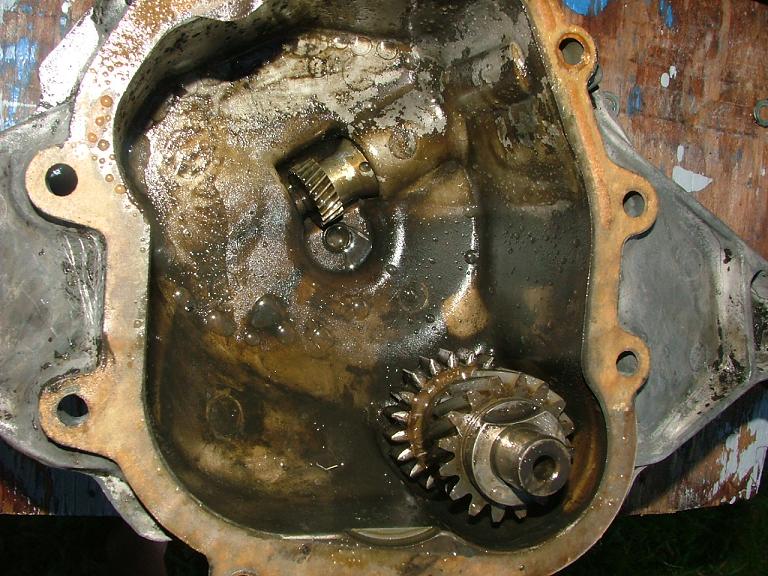 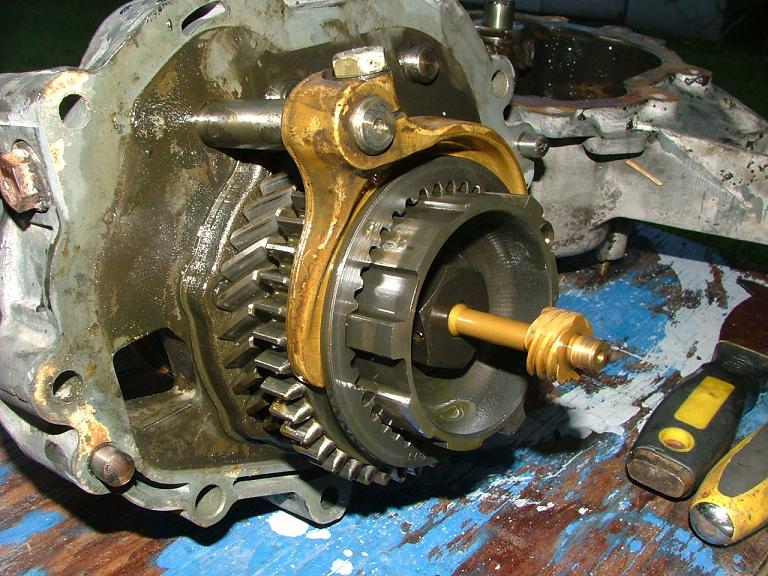 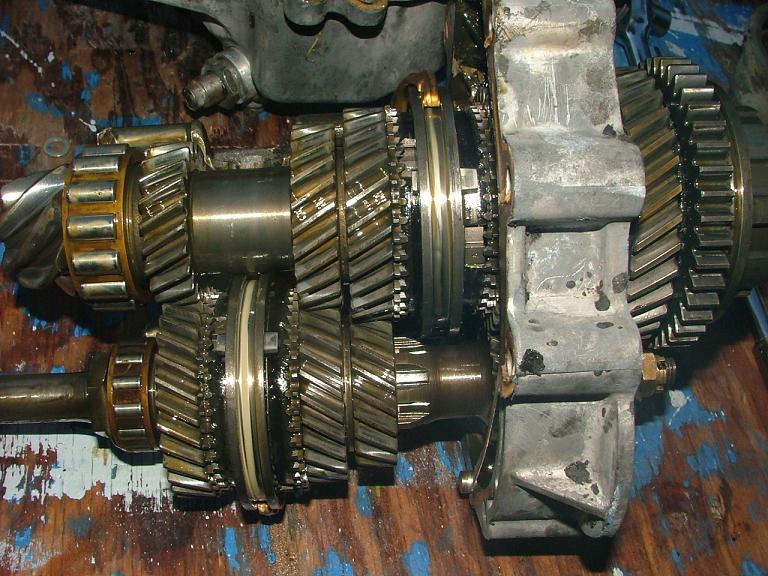 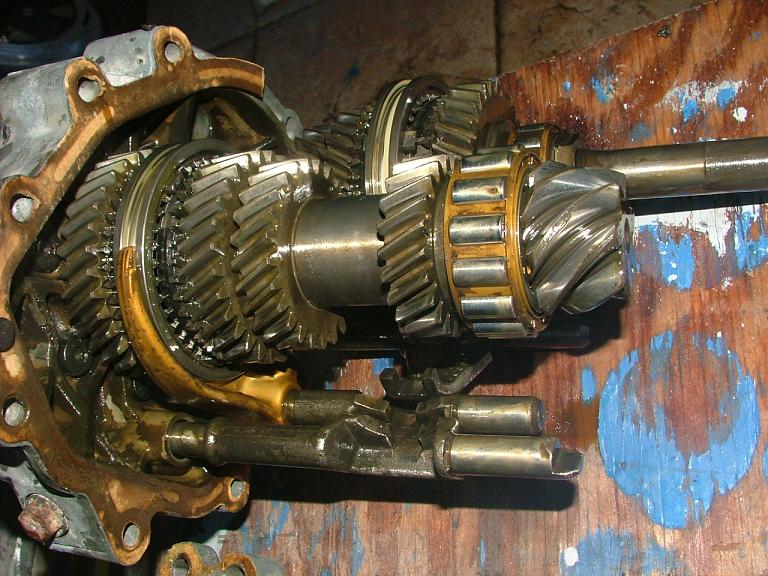 That is it for now. John |
| bcheney |
 Aug 19 2009, 09:05 PM Aug 19 2009, 09:05 PM
Post
#251
|
|
Senior Member    Group: Members Posts: 1,341 Joined: 16-November 03 From: Orlando, FL Member No.: 1,348 Region Association: South East States |
John,
You are doing a great job on that teener!!...I would love to stop by and see you. I hope to be in Melbourne soon. I"ll give you a call. |
| FourBlades |
 Aug 21 2009, 02:46 PM Aug 21 2009, 02:46 PM
Post
#252
|
|
From Wreck to Rockin     Group: Members Posts: 2,056 Joined: 3-December 07 From: Brevard, FL Member No.: 8,414 Region Association: South East States 
|
Brian, Sounds good, pick a date and time and PM me. I should be home this weekend. Bring your teener if it is drivable... John |
| 993inNC |
 Aug 21 2009, 06:14 PM Aug 21 2009, 06:14 PM
Post
#253
|
|
Member   Group: Members Posts: 194 Joined: 14-August 09 From: at the beach Member No.: 10,676 Region Association: South East States |
Got to say, being new both here and back into the 914 thing after 20 years of not having one...........and being new to the welding/resto thing, I do believe you may be my newest hero. Amazing undertaking no less in the oppressive heat of florida! I'm going to feel like a complete puss now for doing hopefully what turns out to be a fraction of what you had to do, but on a lift in a climate controlled garage.
So to you sir (IMG:style_emoticons/default/pray.gif) (IMG:style_emoticons/default/pray.gif) (IMG:style_emoticons/default/pray.gif) (IMG:style_emoticons/default/pray.gif) (IMG:style_emoticons/default/pray.gif) |
| FourBlades |
 Aug 21 2009, 10:15 PM Aug 21 2009, 10:15 PM
Post
#254
|
|
From Wreck to Rockin     Group: Members Posts: 2,056 Joined: 3-December 07 From: Brevard, FL Member No.: 8,414 Region Association: South East States 
|
Thanks man, I have learned from the masters on this board, nothing else like it anywhere. I've wanted to do this for so long I decided not to let any practical considerations get in the way, and usually things have worked out. That and I jump in the pool every 30 minutes or so when it is hot. I dream of working in AC and considered converting my dining room into a workshop. I have had my Raby/McMark 2270 engine sitting in my bedroom for 6 months but taking over the dining room was the limit for my wife so I've had to embrace the sweat... John |
| carr914 |
 Aug 22 2009, 04:09 AM Aug 22 2009, 04:09 AM
Post
#255
|
|
Racer from Birth                                                                                                     Group: Members Posts: 122,808 Joined: 2-February 04 From: Tampa,FL Member No.: 1,623 Region Association: South East States  |
Brian, Bring your teener if it is drivable... (IMG:style_emoticons/default/lol-2.gif) John, Looking good, hopefully it will road worthy soon, so your attention can go to the IMSA car T.C. |
| 993inNC |
 Aug 22 2009, 07:02 AM Aug 22 2009, 07:02 AM
Post
#256
|
|
Member   Group: Members Posts: 194 Joined: 14-August 09 From: at the beach Member No.: 10,676 Region Association: South East States |
Thanks man, I have learned from the masters on this board, nothing else like it anywhere. I've wanted to do this for so long I decided not to let any practical considerations get in the way, and usually things have worked out. That and I jump in the pool every 30 minutes or so when it is hot. I dream of working in AC and considered converting my dining room into a workshop. I have had my Raby/McMark 2270 engine sitting in my bedroom for 6 months but taking over the dining room was the limit for my wife so I've had to embrace the sweat... John You've got nerve brother I'll give you that! My wife is pretty forgiving, but never would I get away with storing parts in the house, wow (IMG:style_emoticons/default/blink.gif) I'm looking forward to jumping into mine. I don't think I'll get to my newly found rust until next year's summer season. I want to get mine back into a driveable condition first with everything working so I know everything works before I completely strip it down to bare bones. |
  |
1 User(s) are reading this topic (1 Guests and 0 Anonymous Users)
0 Members:

|
Lo-Fi Version | Time is now: 7th January 2025 - 06:19 AM |
Invision Power Board
v9.1.4 © 2025 IPS, Inc.


