|
|
|
Porsche, and the Porsche crest are registered trademarks of Dr. Ing. h.c. F. Porsche AG.
This site is not affiliated with Porsche in any way. Its only purpose is to provide an online forum for car enthusiasts. All other trademarks are property of their respective owners. |
|
|

  |

| jasons |
 Jul 28 2008, 07:24 PM Jul 28 2008, 07:24 PM
Post
#81
|
|
Jackstand Extraordinaire  Group: Members Posts: 2,011 Joined: 19-August 04 From: Scottsdale, AZ Member No.: 2,573 Region Association: None |
You know, I hate to meddle with your paint choices after you've already started but....
That intake looks bitchin in raw Al. Reminds me of something you would see on a vintage aircraft. And, I would do the valve cover in red wrinkle coat. Like the Maserati Spyder... 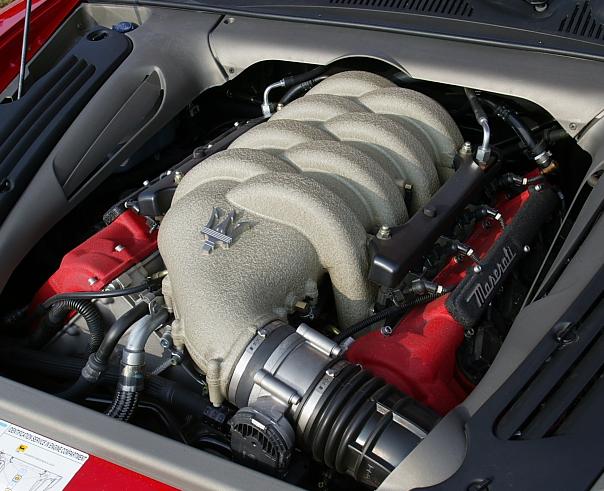 |
   |

 
|
| 3d914 |
Aug 1 2008, 05:07 PM
Post
#82
|
|
Senior Member Group: Members Posts: 1,275 Joined: 24-September 03 From: Benson, AZ Member No.: 1,191 Region Association: Southwest Region |
Jason,
I agree - that wrinkle affect looks cool. I'll have to save that idea for next time though - too far along to backup now. |
|
|
|
| 3d914 |
Aug 2 2008, 01:53 PM
Post
#83
|
|
Senior Member Group: Members Posts: 1,275 Joined: 24-September 03 From: Benson, AZ Member No.: 1,191 Region Association: Southwest Region |
Still workin on the intake manifold. I removed the intake runners and noticed that they would look much better with the casting seams removed. So I dug out the Dremel with the course sanding disk and went to work. Once I got the seam flat I used a file to feather and contour.
Went from this . . . 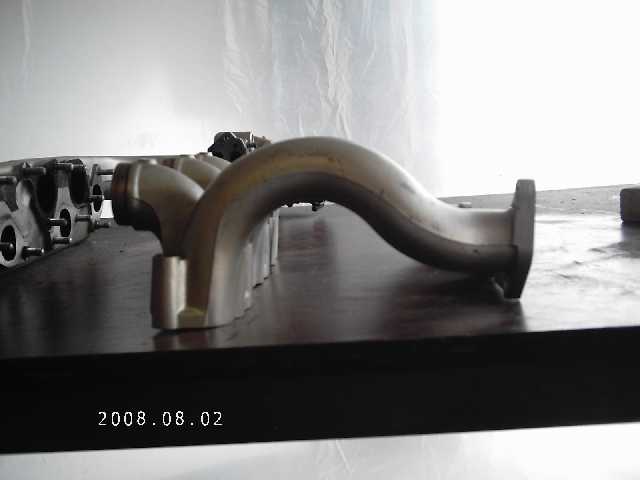 To this . . . 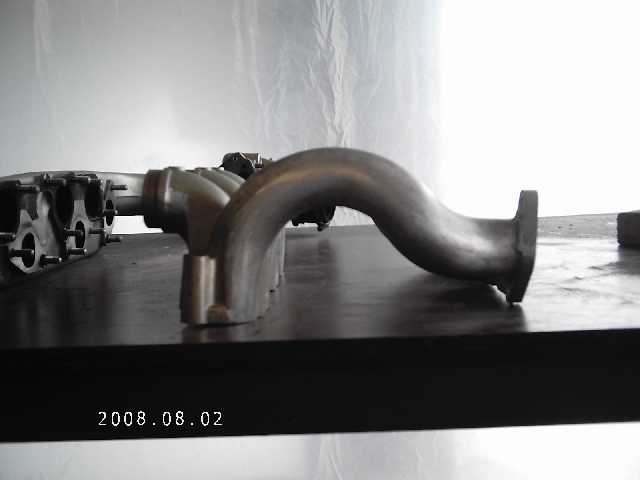 I still have to have these media blasted to remove the paint, but I have done a little sanding on them. The paint on these is thicker than the paint on the valve covers - for whatever reason. |
|
|
|
| Eric_Shea |
Aug 2 2008, 10:56 PM
Post
#84
|
|
PMB Performance Group: Admin Posts: 19,300 Joined: 3-September 03 From: Salt Lake City, UT Member No.: 1,110 Region Association: Rocky Mountains |
When I was in the SHO club there were some guys who had theirs polished... talk about a dramatic effect.
|
|
|
|
| 3d914 |
Aug 4 2008, 10:15 PM
Post
#85
|
|
Senior Member Group: Members Posts: 1,275 Joined: 24-September 03 From: Benson, AZ Member No.: 1,191 Region Association: Southwest Region |
Definitely. Here are some examples . . .
SHO Bling . . . 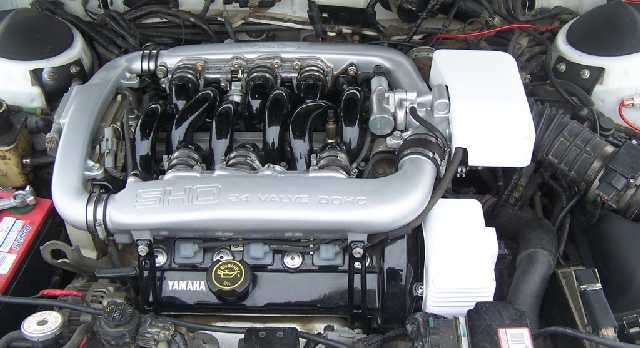 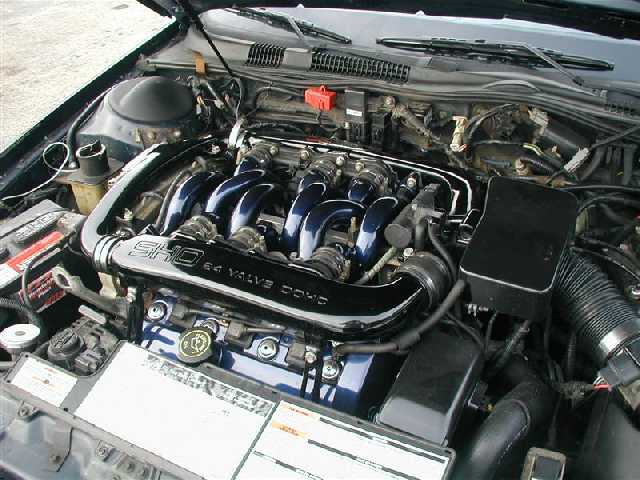 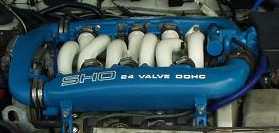  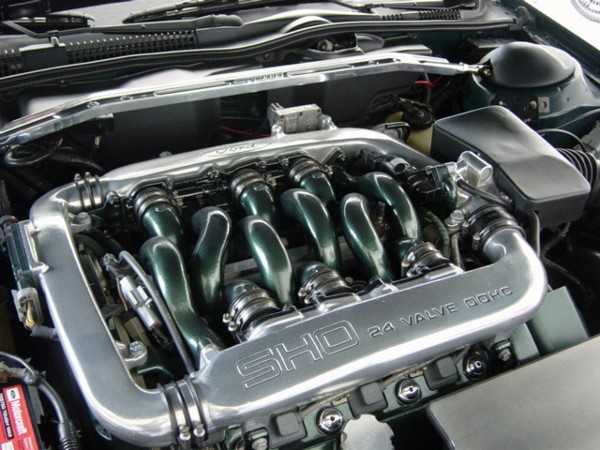 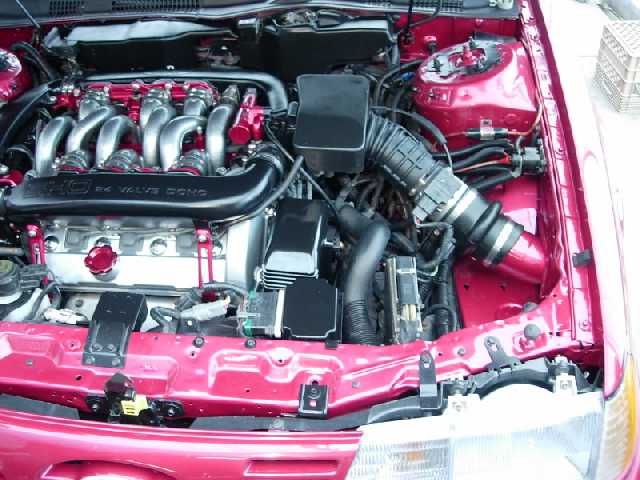 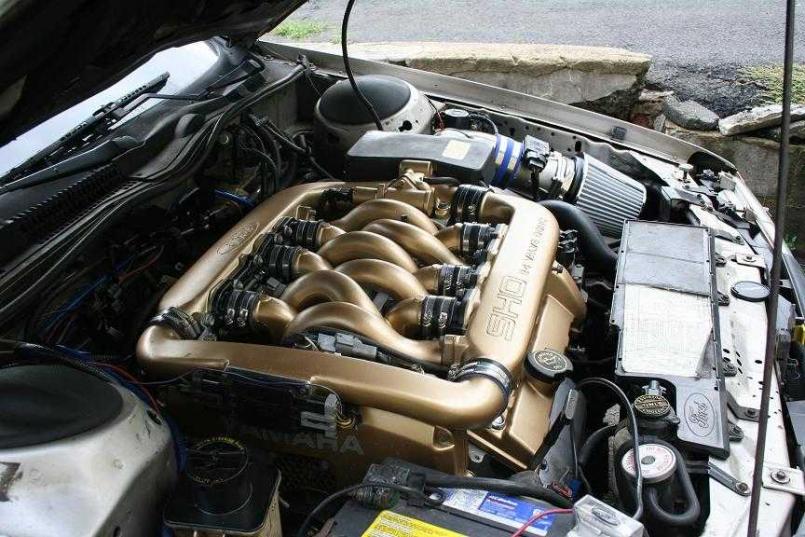 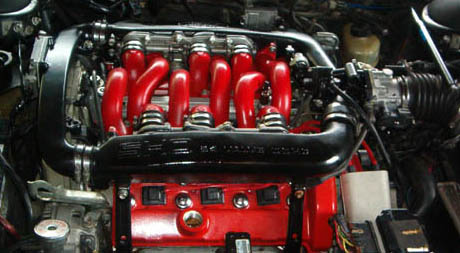 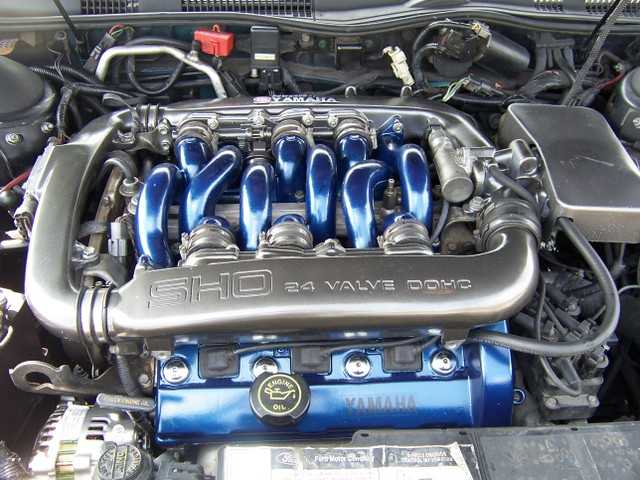 Purty (IMG:style_emoticons/default/aktion035.gif) |
|
|
|
| 3d914 |
Aug 30 2008, 12:03 AM
Post
#86
|
|
Senior Member Group: Members Posts: 1,275 Joined: 24-September 03 From: Benson, AZ Member No.: 1,191 Region Association: Southwest Region |
OK, I know there hasn't been much action here lately . . .
because its tooo dannggg HOTTTTT. I am getting a few things done on the weekends. Pics to come when I have something together. Stay cool! |
|
|
|
| charliew |
Aug 30 2008, 10:18 PM
Post
#87
|
|
Advanced Member Group: Members Posts: 2,363 Joined: 31-July 07 From: Crawford, TX. Member No.: 7,958 |
Good thread, lots of hard work, I don't know how you can work in the heat. I am retired and last summer I would work early in the morning till about 12 noon then clean up and eat and take a siesta and go back out at 7pm and work till 12 or 1 am. It worked pretty well except that you gotta have good lights and the painting must be in the early morning or it will get bugs in it. I also use a few big fans. Of course the fans gotta be off to weld.
Practise a lot with the scrap body metal before you try to put the repair panel in. You said the body metal is 16 ga. but I'm pretty sure it's thinner than that. It's probably 18 ga. Spot weld about 1 inch apart and keep going around the panel if it gets too hot to touch do something else and let it cool. You can buy the little butt weld gadgets at HF. I use a thick piece of copper to back the weld up if I can get it in position. Eastwood has a magnetic copper strip but it's not cheap. My experience with pop rivets are they will show up later as little circles no matter what you put over them. After you get the fiberglass bonded to your satisfaction, drill them out and fill the area over with fiberglass strand. I haven't tried it but the product Kitty Hair, made by Evercoat, is a bondo type putty with fiber strands in it. There is also one by the same company that has short strands it probably will be easier to use, the long strands are harder to work with. They are both waterproof. I use them both but I haven't had to deal with pop rivets lately. On the rotisserie I thought the practice was to brace the door gap to keep the tub from sagging as now the support is on the very ends not at the suspension where the tub was designed to be supported. I guess if the door gaps haven't changed it's ok, although it would be something if the fenders are stressed at the front and rear and you do all the body work and they relax when you take it off the rotisserie. My experience with painting aluminium motor parts is that unless they are bead or sand blasted and painted with a epoxy paint it doesn't stick very well. Good luck you are really working hard, I'm sure you will be proud of the finished product. Isn't car life full of lessons? |
|
|
|
| 3d914 |
Sep 5 2008, 08:24 PM
Post
#88
|
|
Senior Member Group: Members Posts: 1,275 Joined: 24-September 03 From: Benson, AZ Member No.: 1,191 Region Association: Southwest Region |
Charlie,
Thanks for the insights. Things have been progressing very slowly the last few weeks. On top of the heat, I now spend 4 hours at school a couple of nights, and reading/homework a couple more nights. But at least its time spent indoors - cool! You're correct on the sheet metal - mostly 18 & 20ga in a few spots. I've been trying to finalize my trunk and get it at least primered. The shop doing the final paint work suggested a self-etching primer to protect the bare metal. So now that I have most the paint off, I'm just cleaning up some areas of surface rust in the trunk, prepping down to bare metal, cleaning & treating with Metal Ready, then shooting with a couple lite coats of primer. Took eleven hours over two days last weekend just to get 1/3 of the trunk done. Once I get the entire trunk to that point, then I'll move on to the sheet metal. I bought some other replacement/add-on panels, so I've got to start focusing on welding again. And then there's the hell-hole that I have to investigate. Regarding the rotisserie; I still have my doors installed in order to maintain integrity. I also left the suspension in tact so that I can lower it as needed to do a couple of body cuts that shouldn't be done in the air. I managed to get the aluminum manifold welded, so now I just need to finish up the metal work, blast it and get it ready to paint. No work on the teener this weekend though - my son is in for the weekend from college - so I get to spend some time with him & working on his car. PS: You're right about the lessons. I keep looking for them. |
|
|
|
| Eric_Shea |
Sep 5 2008, 08:51 PM
Post
#89
|
|
PMB Performance Group: Admin Posts: 19,300 Joined: 3-September 03 From: Salt Lake City, UT Member No.: 1,110 Region Association: Rocky Mountains |
School Schmool... get ta work on that car. I want a ride! (IMG:style_emoticons/default/w00t.gif)
|
|
|
|
| 3d914 |
Nov 2 2008, 09:33 PM
Post
#90
|
|
Senior Member Group: Members Posts: 1,275 Joined: 24-September 03 From: Benson, AZ Member No.: 1,191 Region Association: Southwest Region |
OK, finally the engine is going together. He's where my list is at compared to a couple months back.
Engine rebuild . . .
To say I'm glad to have reached this point is an understatement. I'm glad I'm not on a schedule. Here's a picture of the current status. Once I find the head bolts I can continue . . . 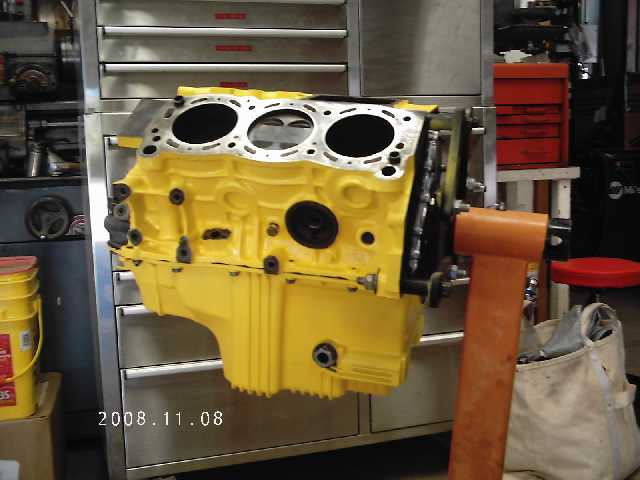 |
|
|
|
| 3d914 |
Nov 16 2008, 09:34 PM
Post
#91
|
|
Senior Member Group: Members Posts: 1,275 Joined: 24-September 03 From: Benson, AZ Member No.: 1,191 Region Association: Southwest Region |
OK, got some more done on the engine this weekend - thanks Tom!
Heads are on & valve covers are just sitting there waiting to put the seal/gasket on. The crank position sensor is mounted and gapped. A remanufactured waterpump Tom had available is also installed, along with the main tubing and housings for the head cooling. Here are the pics so far: 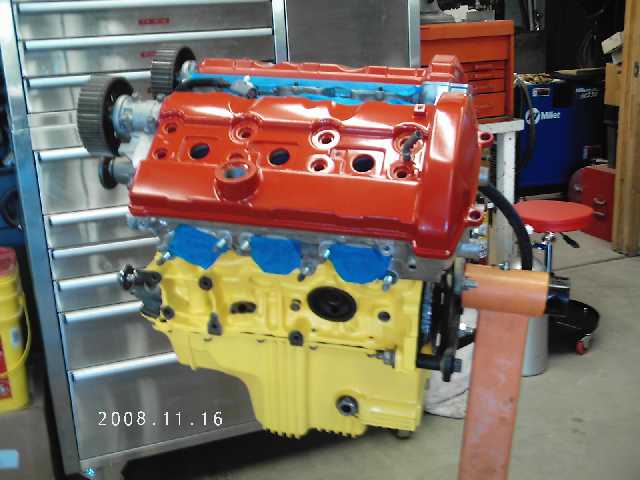 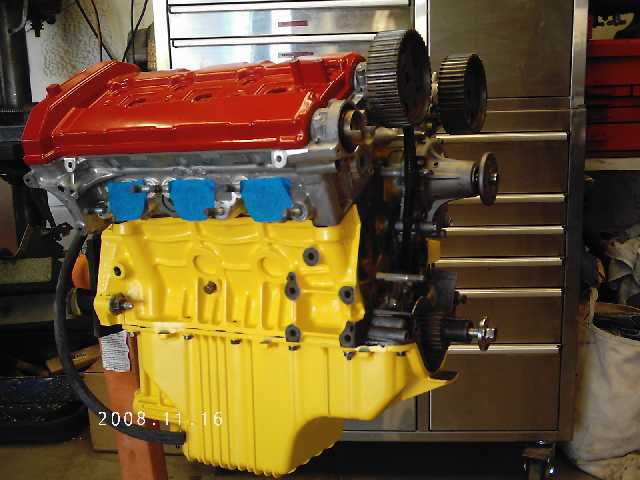 Purtty, |
|
|
|
| So.Cal.914 |
Nov 16 2008, 09:51 PM
Post
#92
|
|
"...And it has a front trunk too." Group: Members Posts: 6,588 Joined: 15-February 04 From: Low Desert, CA./ Hills of N.J. Member No.: 1,658 Region Association: None |
Did you swap in 3.0 cams?
|
|
|
|
| rick 918-S |
Nov 17 2008, 08:39 AM
Post
#93
|
|
Hey nice rack! -Celette Group: Members Posts: 20,925 Joined: 30-December 02 From: Now in Superior WI Member No.: 43 Region Association: Northstar Region |
Wow, that's a tall oil pan. You may need to shorten it. Have you test fit this in the car? Nice looking engine! (IMG:style_emoticons/default/drooley.gif) (IMG:style_emoticons/default/popcorn[1].gif)
|
|
|
|
| 3d914 |
Nov 17 2008, 12:07 PM
Post
#94
|
|
Senior Member Group: Members Posts: 1,275 Joined: 24-September 03 From: Benson, AZ Member No.: 1,191 Region Association: Southwest Region |
No 3.0 cams. I think the stock 3.2 is going to be more than enough to start with. And I can always upgrade - right?
I've done a test fit via CAD. The oil pan is low, but it won't sit more than 1/2" below the bottom of the rear firewall. You can see my layout on a previous page. Once I get the intake on it will look even bigger. Once engine is running, I'll have to pull the intake off again to get the engine in from underneath, then install the intake from the top. It'll be interesting . . . |
|
|
|
| 3d914 |
Jan 10 2009, 01:41 PM
Post
#95
|
|
Senior Member Group: Members Posts: 1,275 Joined: 24-September 03 From: Benson, AZ Member No.: 1,191 Region Association: Southwest Region |
OK - latest progress.
The engine build continues. Did a valve-adjustment on new years eve, and have numerous plastic covers cleaned, painted, and ready to install. New engine pics coming when I get it all buttoned up. Next issue I've been playing with is the intake. The huge, but cool, intake manifold on the SHO requires an equally large throttle body that is preceded by a MAF sensor. So the dilemma for me has been how to route the intake air from the engine lid to the throttle body without giving up my entire trunk. Here's a couple of things to keep in mind:
Over the Top This method routes the intake from each side of the engine lid, through filters, then back up and over to the center, where they meet at the MAF sensor, then curves down to the throttle body.  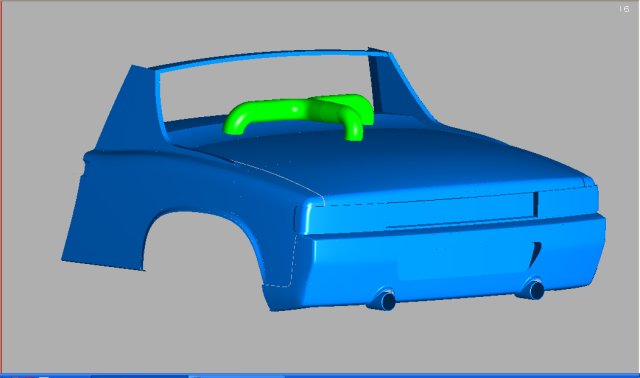 Side Run This method routes the intake from each side of the engine lid, through filters, then directly rear through the trunk wall, over to the center and to the MAF sensor, then slightly up and into the throttle body. 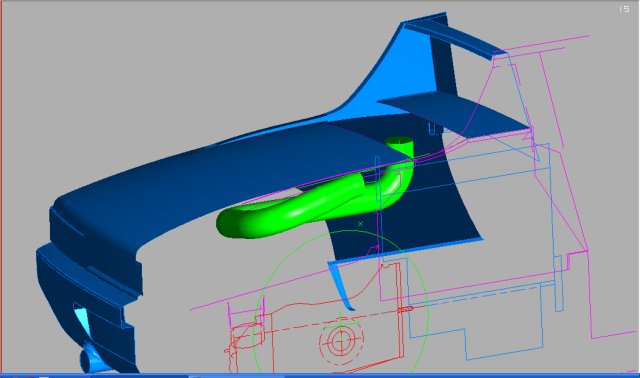 Down the Middle This method requires a custom pedestal in the center to mount a wing. The pedestal will house the air filter and box to blend to the 3.5 inch outlet needed on the input side of the MAF sensor. The intake and MAF will route directly down the center into the throttle body. Most of this should stay hidden under the trunk lid, although a custom cover will still be needed for the throttle body itself. 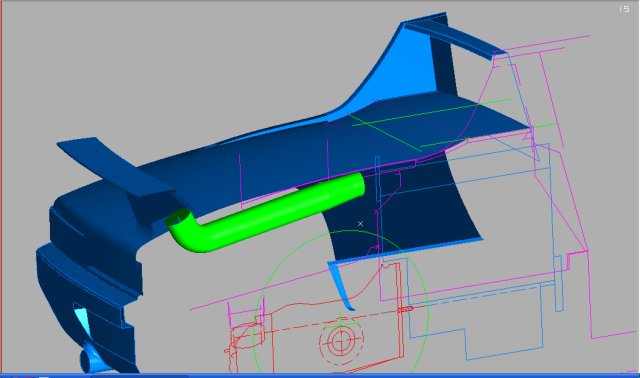 Thoughts? Comments? |
|
|
|
| Eric_Shea |
Jan 11 2009, 12:56 PM
Post
#96
|
|
PMB Performance Group: Admin Posts: 19,300 Joined: 3-September 03 From: Salt Lake City, UT Member No.: 1,110 Region Association: Rocky Mountains |
Side = Clean
|
|
|
|
| Todd Enlund |
Jan 11 2009, 01:00 PM
Post
#97
|
|
Resident Photoshop Guru Group: Members Posts: 3,251 Joined: 24-August 07 From: Laurelhurst (Portland), Oregon Member No.: 8,032 Region Association: Pacific Northwest |
|
|
|
|

| 3d914 |
Jan 18 2009, 04:01 PM
Post
#98
|
|
Senior Member Group: Members Posts: 1,275 Joined: 24-September 03 From: Benson, AZ Member No.: 1,191 Region Association: Southwest Region |
A lot of time has gone by, but progress continues slowly. Here is the pre-assembly of the famous SHO Intake Manifold. I've been taking my time making sure everything is fitting together properly.
(Here are two pics. For some reason the yellow gets washed out in the sun) 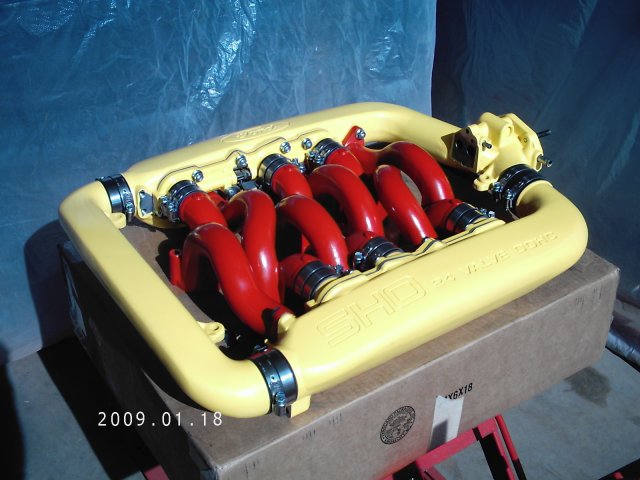 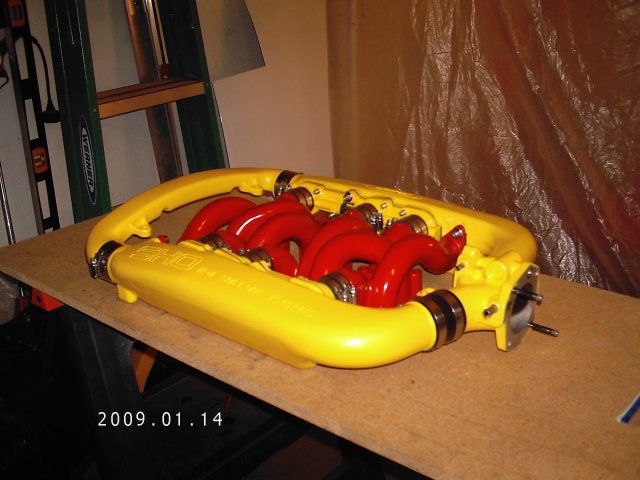 Since the wiring harness sits under the intake between the fuel injector rails, I have a lot of work to do on the harness. I got it cleaned up & removed all the old dried out tape and insulator. Some lines will need to be extended for my application so all that will get done before the test run. 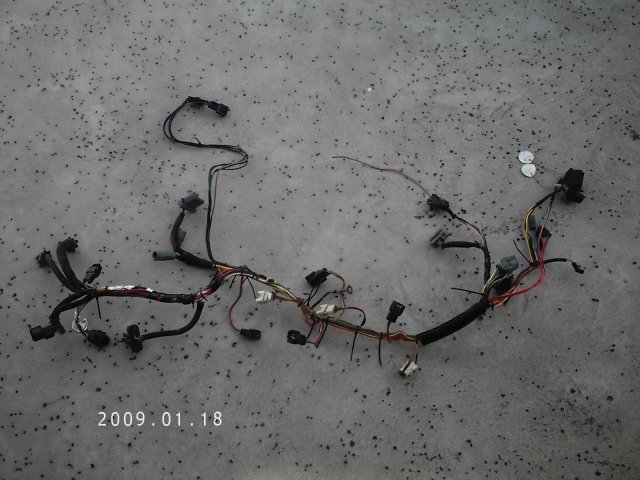 More to follow . . . |
|
|
|
| gopack |
Jan 18 2009, 04:19 PM
Post
#99
|
|
CHEESEHEAD in CA, MARK Group: Members Posts: 744 Joined: 7-August 04 From: Folsom, CA Member No.: 2,472 Region Association: Northern California |
I think the down the middle is the most direct, and elegant approach. with a minimum of bends you dont have to worry about any pesky flow dynamics, and you know it will be a more laminar charge. also if the pedistal faces fron, it will be RAM AIR!
|
|
|
|
| 3d914 |
Jan 26 2009, 05:04 PM
Post
#100
|
|
Senior Member Group: Members Posts: 1,275 Joined: 24-September 03 From: Benson, AZ Member No.: 1,191 Region Association: Southwest Region |
Mark,
Sorry to see you're selling your project. I'll be relying on your current project thread for some insight into the typical body mods (hell-hole, flare fit with rockers & valances, etc). Don't stray far from the group - gotta keep that 914 fever! Best of luck, |
|
|
|
|
1 User(s) are reading this topic (1 Guests and 0 Anonymous Users)
0 Members:

|
Lo-Fi Version | Time is now: 20th April 2025 - 02:35 AM |
Invision Power Board
v9.1.4 © 2025 IPS, Inc.