|
|

|
Porsche, and the Porsche crest are registered trademarks of Dr. Ing. h.c. F. Porsche AG.
This site is not affiliated with Porsche in any way. Its only purpose is to provide an online forum for car enthusiasts. All other trademarks are property of their respective owners. |
|
|
  |
| jeeperjohn56 |
 May 27 2010, 12:38 PM May 27 2010, 12:38 PM
Post
#141
|
|
Member   Group: Members Posts: 479 Joined: 9-July 06 From: Antioch,Ca. Member No.: 6,407 Region Association: None |
.Geoff, Your doing a great job,you'll have a nice built car when done keep up the great job and good luck. John (IMG:style_emoticons/default/driving.gif)
|
| strawman |
 Jun 15 2010, 02:25 PM Jun 15 2010, 02:25 PM
Post
#142
|
|
Senior Member    Group: Members Posts: 891 Joined: 25-January 08 From: Los Osos, CA Member No.: 8,624 Region Association: Central California 
|
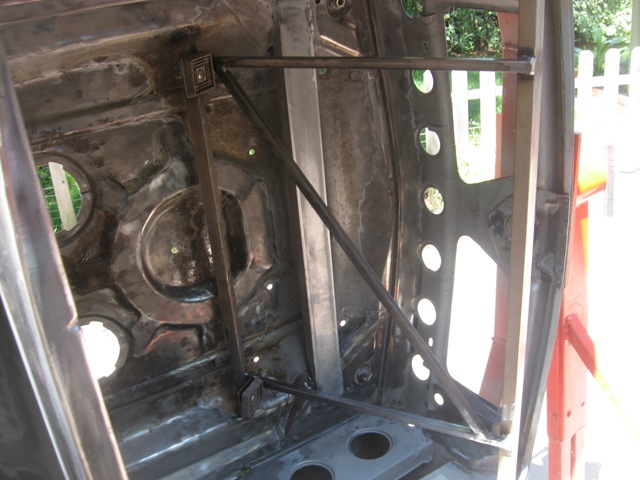
Been a while since I last posted, but I have been working hard on my car. I finished welding up the radiator support system supports. I used a thin-wall 3/4" square vertical tubes that will be the basis of the radiator top supports, and I tied them together diagonally using the same tubing. Here is a picture from the backside:
 I also seam welded the strut towers / wheel-well area. Here are some pictures before grinding them smooth (to the extent possible). Note that I welded in short ~1" bursts and cooled them with compressed air prior to proceeding to avoid too much warpage. 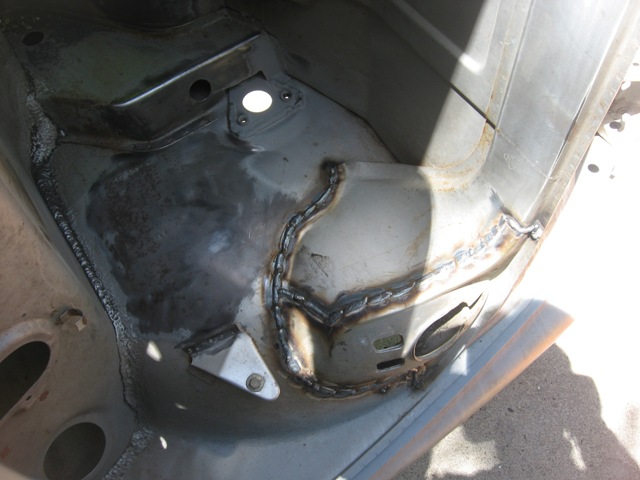 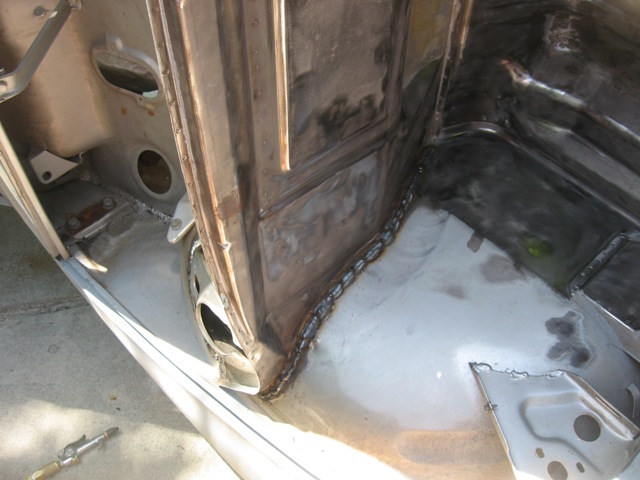 Here is a picture of the area ground down smooth. 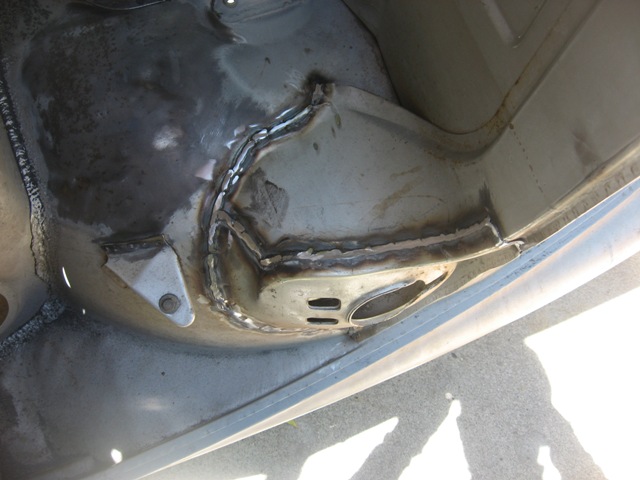 Has anyone bothered to seam weld the horizontal firewall seam that connects the two strut towers? It seems like that wouldn't be too critical an area, since the metal is already corrugated from the factory for strength. I'm contemplating two diagonal supports from the firewall (near the strut tops) to an area near the front A-arm mounts to triangulate that area. Or is the car too floppy from the area behind the strut towers to the long that I'd be wasting my time? If I end up cutting out the wheelwells to exhaust the radiator air (if the hood exhaust idea doesn't work), I'd imagine diagonal braces would be helpful... any opinions on that? |
| strawman |
 Jun 15 2010, 07:32 PM Jun 15 2010, 07:32 PM
Post
#143
|
|
Senior Member    Group: Members Posts: 891 Joined: 25-January 08 From: Los Osos, CA Member No.: 8,624 Region Association: Central California 
|
More pics from today's efforts. First up is the front fender tacked on. I neglected to snap a pic of the cut-out and preparation...
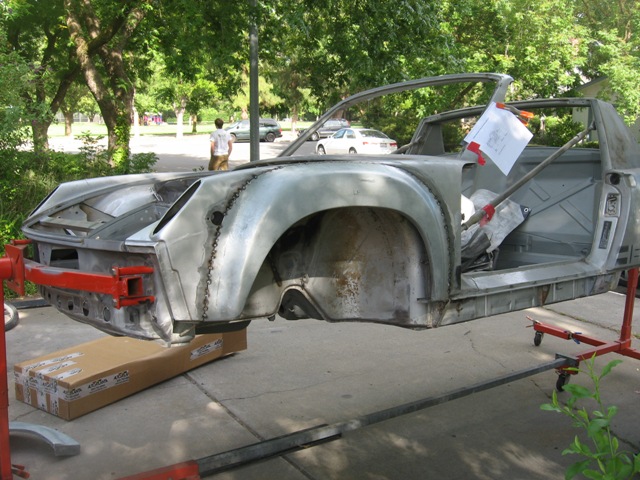 Next up is the rear fender cut out and ready to accept the AA flare. 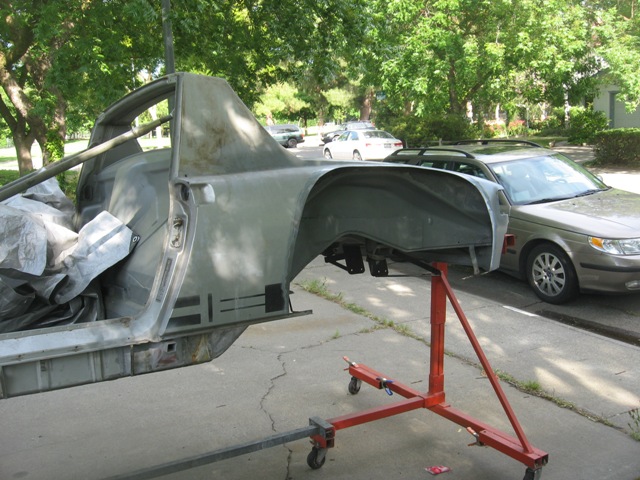 Finally, here is a pic of the driver's side fenders tacked on. I hope to tackle the passenger side in the coming days, and to spend some quality time this weekend finishing it up (my wife and daughter are heading to the in-laws for a week on Thursday!). (IMG:style_emoticons/default/beer3.gif) 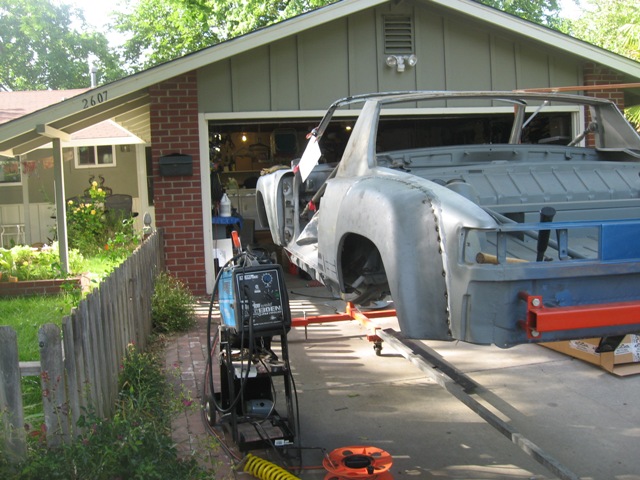 |
| Spoke |
 Jun 15 2010, 08:20 PM Jun 15 2010, 08:20 PM
Post
#144
|
|
Jerry      Group: Members Posts: 7,284 Joined: 29-October 04 From: Allentown, PA Member No.: 3,031 Region Association: None 
|
Nice job.
You have inspired me to move away from the computer and watch some TV. Keep up the good work. |
| Zaney |
 Jun 15 2010, 08:53 PM Jun 15 2010, 08:53 PM
Post
#145
|
|
Deuchland en der Haus   Group: Members Posts: 461 Joined: 1-March 04 From: Engine 11 Redmond, WA Member No.: 1,738 Region Association: Pacific Northwest |
(IMG:style_emoticons/default/aktion035.gif) (IMG:style_emoticons/default/welder.gif)
Awesome work, as usual Geoff!!! Hope that you keep up the momentum! It is always fun and educational to read your updated posts, especially for Suby Noobies like me! (IMG:style_emoticons/default/driving.gif) Cheers! (IMG:style_emoticons/default/beer.gif) Nate |
| Spoke |
 Jun 16 2010, 04:48 AM Jun 16 2010, 04:48 AM
Post
#146
|
|
Jerry      Group: Members Posts: 7,284 Joined: 29-October 04 From: Allentown, PA Member No.: 3,031 Region Association: None 
|
Nice job. You have inspired me to move away from the computer and watch some TV. Keep up the good work. I looked back at what I wrote and hope it wasn't taken offensively. I was joking about the TV while I was bumming out that my own 914 project wasn't getting worked on because of other priorities. My 71 914 was going to be a Ru powered beast too until it was crunched from behind. |
| strawman |
 Jul 10 2010, 05:17 PM Jul 10 2010, 05:17 PM
Post
#147
|
|
Senior Member    Group: Members Posts: 891 Joined: 25-January 08 From: Los Osos, CA Member No.: 8,624 Region Association: Central California 
|
I have been busy helping get our "Team Tinyvette" Opel GT ready for our 24 Hours of Lemons race at Thunderhill next month, so my teener project has been put on the back burner a bit.
Also, after realizing that the driver side rear flare was a dud (after welding it on!), I finally received a replacement one yesterday from AA -- that is a whole 'nother story not worth sharing here. 'Cause my mother taught me that if you don't have something good to say about someone, then... Here are some pics of the all four flares welded on. Notice the bad shape of the driver side rear in post #143 above compared to the replacement one below; pay particular attention to the lower rear section. See how the dud above is "boxier?" It is also about 3/4" wider than the correct flare. Well, that was about four hours of my time I'll never get back... not to mention all the hair I pulled out. I think my neighbors want to have me committed after all the curse words uttered. 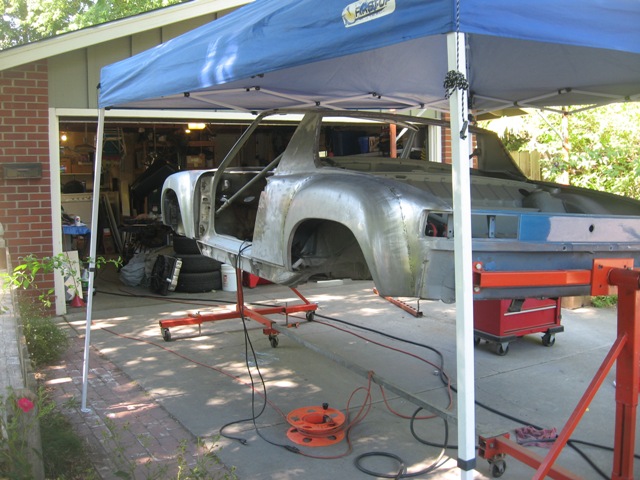 Below is a pic of the passenger side flares welded on. I still have to finish the lower flanges, since they don't match up exactly with the factory "double bend" area. 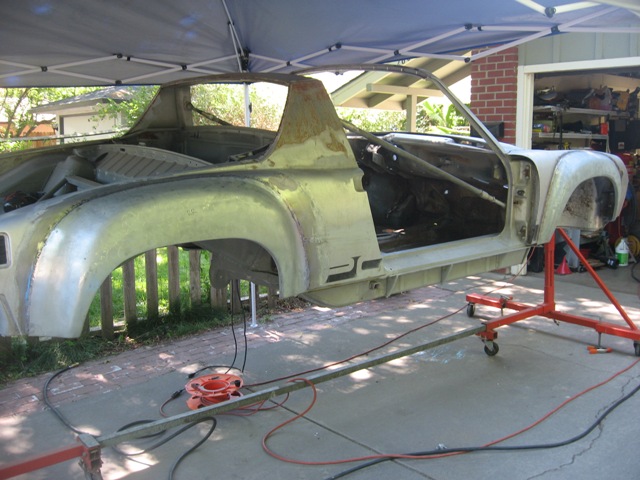 I finished up seam welding the front trunk area of the car, and will epoxy paint all bare metal tomorrow morning when it is cooler (it is 95 degrees outside right now). I'll take some pictures of that seam welding later this evening and add them to this build blog after my camera batteries recharge for a couple of hours. |
| strawman |
 Jul 10 2010, 11:51 PM Jul 10 2010, 11:51 PM
Post
#148
|
|
Senior Member    Group: Members Posts: 891 Joined: 25-January 08 From: Los Osos, CA Member No.: 8,624 Region Association: Central California 
|
Okay, the camera batteries were charged, so here are some pics of the front trunk ("frunk"), gas tank area, driver side inner fenderwell, and underside (with fresh burns on my epoxy paint!). I'm not sure if I actually stiffened anything to a measurable degree -- but it was one of those "while I'm in there" kinda things. I also spent some time doing some final front trunk rubber seal channel repairs. In total, I've probably got 30 hours into these tasks...
First pic is of the frunk as stripped and modified for front-mount radiator and welded in forward A-arm support. I've stripped out all of the factory sealant, and will re-seal once I epoxy prime the area. My plan is to Marine-Clean and POR-15 Metal ready this area tomorrow morning so's I can paint it before it gets too hot (supposed to get up to high 90's!). 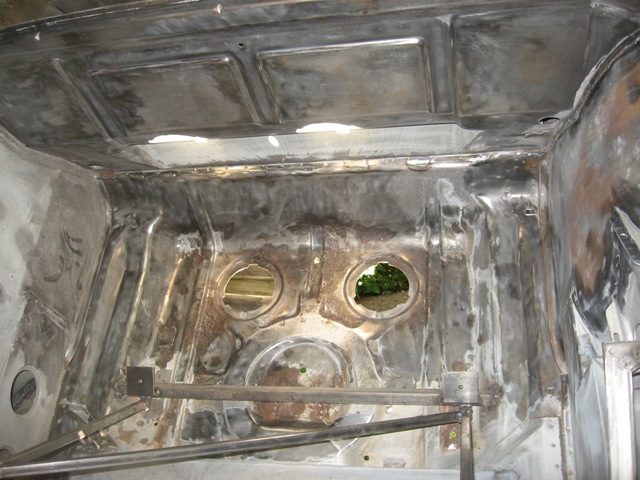 Next pic is of the driver's side inner fenderwell. Here you can see the where the seam welding in the gas tank and upper front strut mount areas burned through (nicely, I might add). I'll strip this in the coming days and get it ready for epoxy primer painting. BTW, I've decided not to to weld in an outer sway bar support, since the jury is still out on whether that is necessary -- especially since I've seam welded the area around it. You can also see the flare weld-through, too, in the upper portion of the photo. 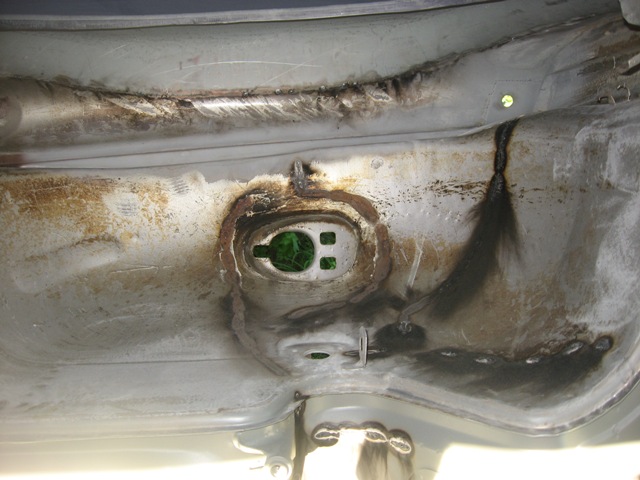 The next pic is of the gas tank area. Again, I've stripped out all of the factory sealant, sanded down to metal whenever I found any evidence of rust underneath the factory paint (in some places I had to spot sandblast), scuffed the paint in all other areas, and will prep/epoxy prime tomorrow. Bottom line is that this is worst PITA so far -- and no one will likely see this area ever again! 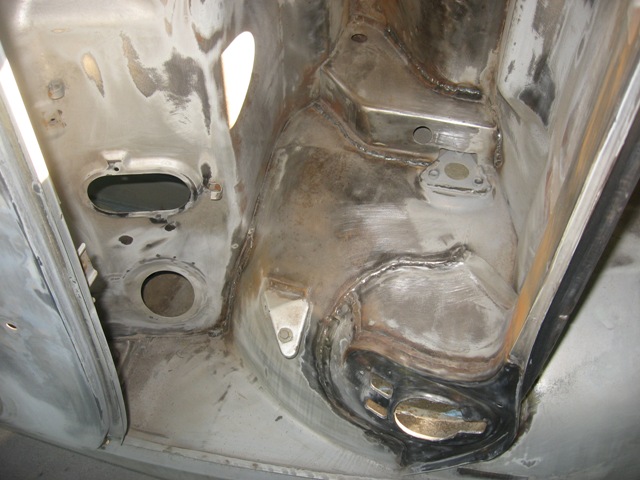 Finally, here is evidence of proper weld burn-through on my recently epoxy-primed bottom. Oh well, epoxy primer isn't THAT expensive... 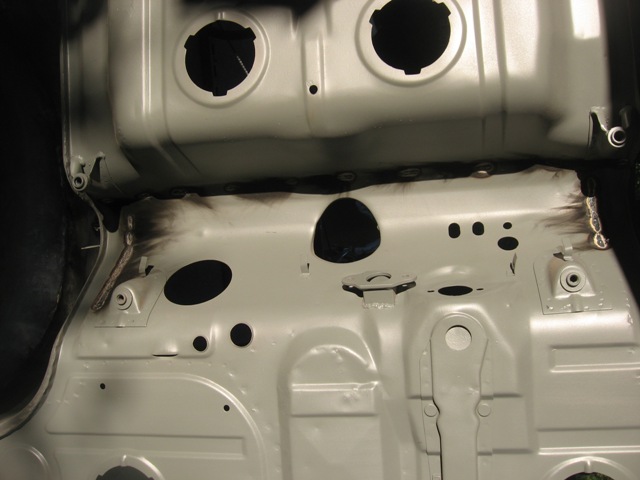 |
| J P Stein |
 Jul 11 2010, 07:54 AM Jul 11 2010, 07:54 AM
Post
#149
|
|
Irrelevant old fart      Group: Members Posts: 8,797 Joined: 30-December 02 From: Vancouver, WA Member No.: 45 Region Association: None |
I went with the "if there's a seam, weld it" philosophy.....since I was there. (IMG:style_emoticons/default/confused24.gif) This included those on the spreader bar.
If nuthin' else, it keeps the water out. (IMG:style_emoticons/default/biggrin.gif) Attached thumbnail(s) 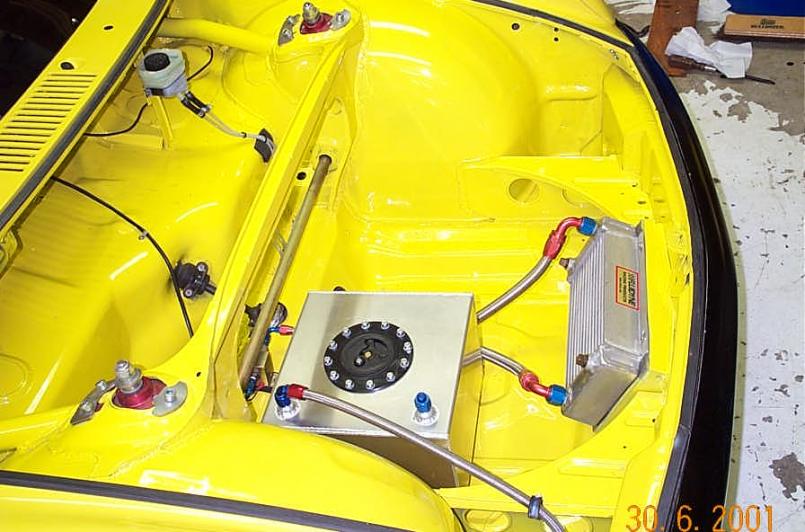
|
| J P Stein |
 Jul 11 2010, 08:11 AM Jul 11 2010, 08:11 AM
Post
#150
|
|
Irrelevant old fart      Group: Members Posts: 8,797 Joined: 30-December 02 From: Vancouver, WA Member No.: 45 Region Association: None |
BTW, my first look at your thread.....damn nice work.
The shitbox needs a major HP infusion......300-350 at the wheels seems like a good plan. A turbo Subie may be the ticket. All's fair in love, war & XP. (IMG:style_emoticons/default/biggrin.gif) I'll pay more attention to your thread in the future. |
| strawman |
 Jul 11 2010, 02:21 PM Jul 11 2010, 02:21 PM
Post
#151
|
|
Senior Member    Group: Members Posts: 891 Joined: 25-January 08 From: Los Osos, CA Member No.: 8,624 Region Association: Central California 
|
Thanks for the compliment, JP. I've read a whole bunch of your posts, and I consider your word on building a car to be almost gospel. I neglected to seam weld the spreader, but I didn't cut any portion of it out like you did for your fuel cell. So I hope that it'll suffice...
Below are a coupla photos of the frunk, with two coats of epoxy primer. Glad THAT is done! 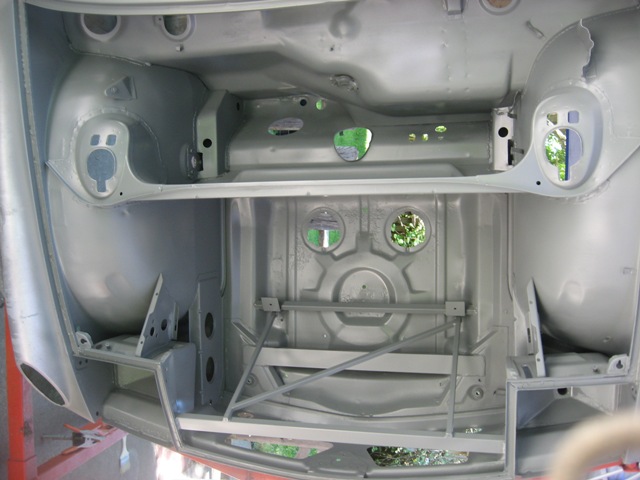 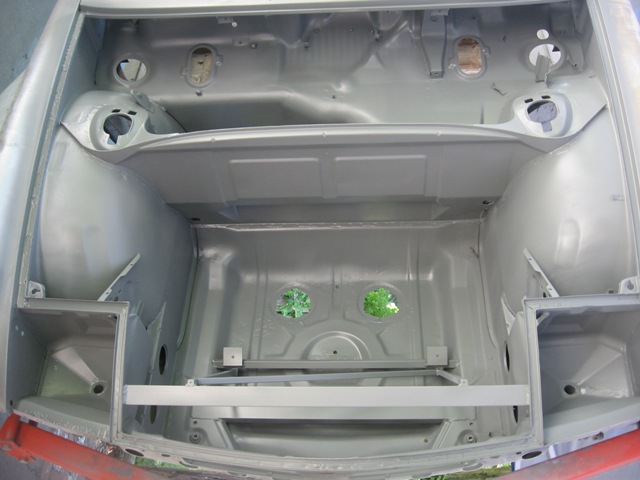 Next comes flare smoothing and epoxy primering, followed by wrapping up the interior metal prep/primer. Once that is done, I plan to pull the tub off the rotisserie so that I can assemble everything for final fitting of all components and testing. But for the rest of today, I'll sit in front of the boob-tube and relax in comfort (with the AC on!). |
| arkitect |
 Jul 13 2010, 05:11 AM Jul 13 2010, 05:11 AM
Post
#152
|
|
Senior Member    Group: Members Posts: 617 Joined: 3-March 10 From: Stockton, CA Member No.: 11,426 Region Association: None |
Geoff,
Great build thread!!!! (IMG:style_emoticons/default/piratenanner.gif) (IMG:style_emoticons/default/piratenanner.gif) (IMG:style_emoticons/default/piratenanner.gif) Alot of fabrication and attention to details, very impresive. Very interested in the work on the gas tank for cleaning and sealing...a little nervous about using a liner inside the tank that has the potential of coming off in the future but I've seen posts that they last for quite awhile. Might just try to neutralize the rust and do a good cleaning on mine. Your car will be very clean when it's done from top to bottom, can't wait to see it. Dave |
| charliew |
 Jul 13 2010, 12:09 PM Jul 13 2010, 12:09 PM
Post
#153
|
|
Advanced Member     Group: Members Posts: 2,363 Joined: 31-July 07 From: Crawford, TX. Member No.: 7,958 |
I have been using por 15 brand of tank sealer kits for more than ten years. If it's done right by the instructions it will last longer than the car. It is a inside shell of urethane. If you ever do one and inspect the amount that drains out and see what is is you will understand. Cleaning a tank will not stop future rust.
|
| Ductech |
 Aug 24 2010, 06:51 PM Aug 24 2010, 06:51 PM
Post
#154
|
|
Member   Group: Members Posts: 356 Joined: 16-July 10 From: AridZona Member No.: 11,949 Region Association: Southwest Region |
Hey now where is a good place to get that awesome chassis stand? That would make rustoration ten time easier!
|
| charliew |
 Aug 24 2010, 09:22 PM Aug 24 2010, 09:22 PM
Post
#155
|
|
Advanced Member     Group: Members Posts: 2,363 Joined: 31-July 07 From: Crawford, TX. Member No.: 7,958 |
Most 914 guys use modified engine stands as a starting point.
|
| strawman |
 Aug 24 2010, 09:43 PM Aug 24 2010, 09:43 PM
Post
#156
|
|
Senior Member    Group: Members Posts: 891 Joined: 25-January 08 From: Los Osos, CA Member No.: 8,624 Region Association: Central California 
|
Most 914 guys use modified engine stands as a starting point. Yupper, see post #27 of this thread for details on the rotisserie. I hope to have the tub off the rotisserie in the next two weeks... been working hard on the project, I just haven't taken time to update this blog. |
| strawman |
 Aug 25 2010, 11:06 PM Aug 25 2010, 11:06 PM
Post
#157
|
|
Senior Member    Group: Members Posts: 891 Joined: 25-January 08 From: Los Osos, CA Member No.: 8,624 Region Association: Central California 
|
I haven't updated in a while, but I have been making process. The AA flares are finally on, and the welds are cleaned up. After finally getting a replacement driver side rear flare (still waiting for reimbursement (IMG:style_emoticons/default/mad.gif) ), I mated up the lower corners to match up with the factory "angular" sections. I also stripped the paint on the outer surfaces (chemical stripper, D/A sander and 80-grit sandpaper), cleaned the entire body using POR-15 Marine Clean, etched with POR-15 Metal Ready, and finished off with PPG two-part epoxy primer. These pics were taken tonight, so sorry for the crappy pictures.
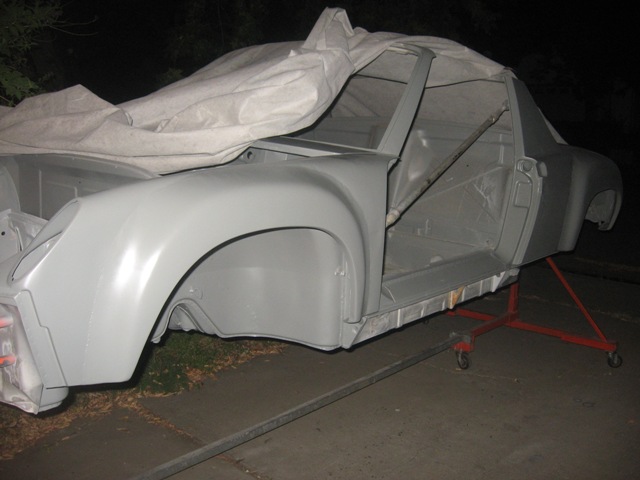 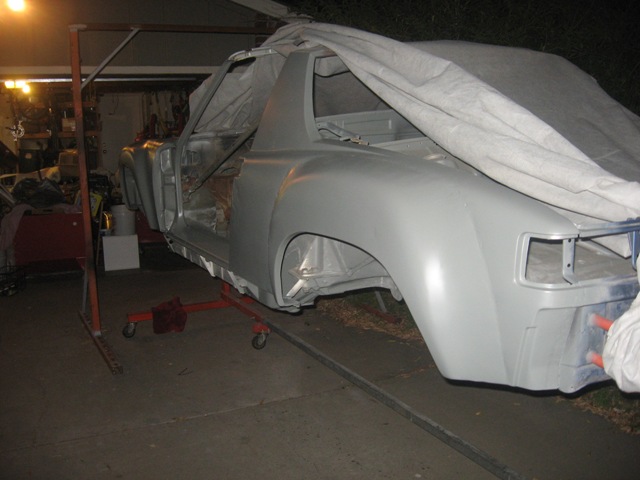 I need to finish up the area beneath sill plates and the outer rockers, and then I'll tackle the cab interior, the top portion of the windshield frame, and the inner portion of the targa bar. I'll address the front and rear areas when I take the tub off the rotisserie -- hopefully this weekend. I also dug out the seam sealer in the inner fenderwells, addressed any rust issues (!) and cleaned/etched/epoxy primered those areas. You can see where the seam welding completed in the gas tank area and front trunk burned through nicely. 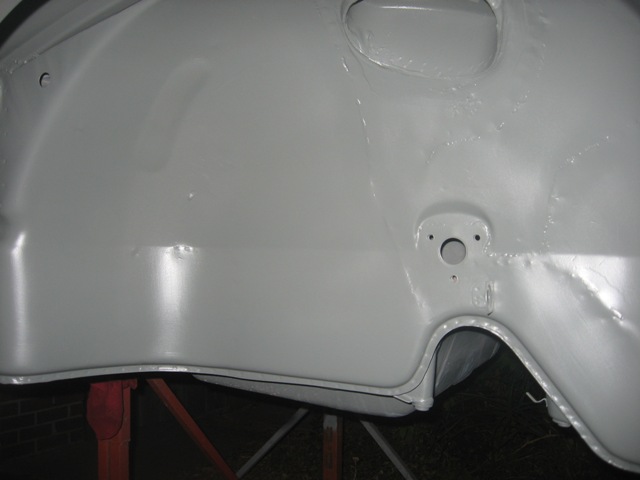 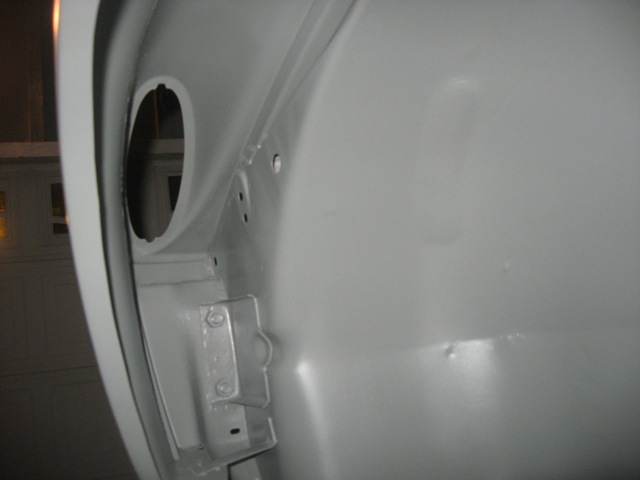 |
| strawman |
 Aug 25 2010, 11:24 PM Aug 25 2010, 11:24 PM
Post
#158
|
|
Senior Member    Group: Members Posts: 891 Joined: 25-January 08 From: Los Osos, CA Member No.: 8,624 Region Association: Central California 
|
I also finished up the "erector set" of the radiator inlet shroud. In total, this shroud required six pieces of 16 gauge aluminum. I bought some aluminum prep solution that will allow me to powder coat it; I'll post pics when that process is completed. I'll also assemble it on my bench so that you can see how intricate it is (I'm kinda proud, see). (IMG:style_emoticons/default/beerchug.gif)
By the way, I LOVE Clecos! They're kinda cumbersome, but they work really well for mock up. 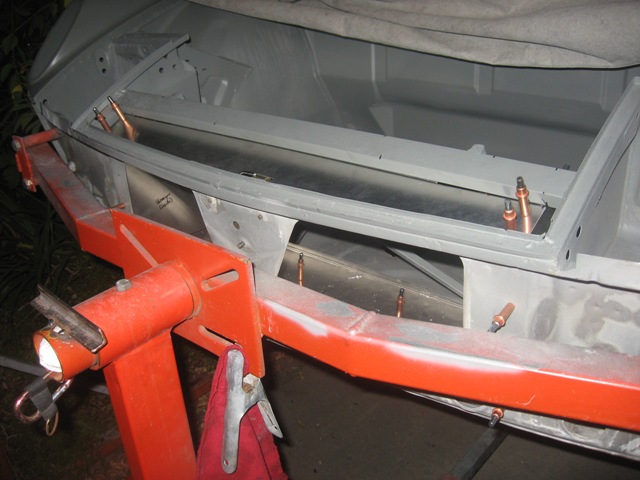 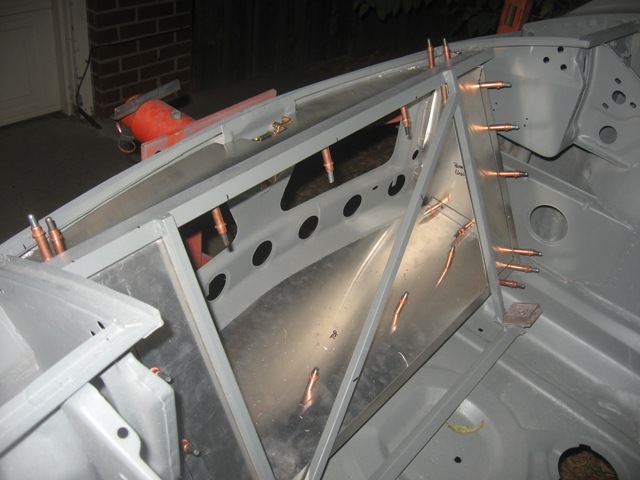 Here is a pic of the water-air intercooler heat exchanger that I'll be using. It is off a Ford Crown Vic, and I spent a LOT of time cleaning it... 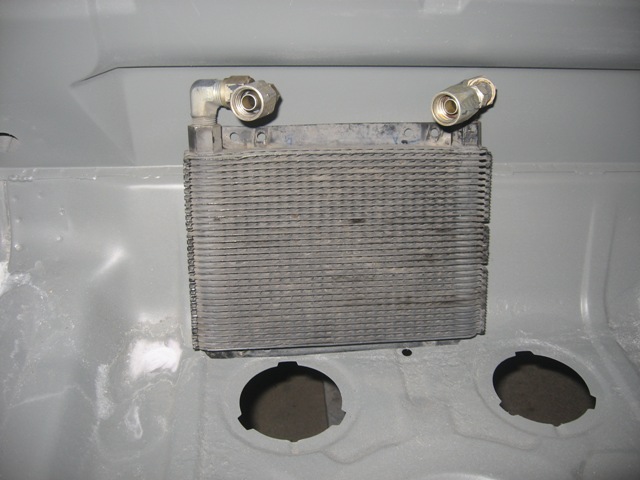 I also bought a Ground Control coilover setup for my Bilstein rear dampers, with 250 lb/in springs. Jay from Ground Control recommended these to match my 18.8mm front torsion bars, Elephant polybronze bushings, Tarrett front sway bar and camber plates. They're works of art; I'll post pics when I set these up. Geoff |
| charliew |
 Aug 26 2010, 10:36 AM Aug 26 2010, 10:36 AM
Post
#159
|
|
Advanced Member     Group: Members Posts: 2,363 Joined: 31-July 07 From: Crawford, TX. Member No.: 7,958 |
Geoff great work. The fabbing is nice and the epoxy primer is good. I use it always, even as a thinned sealer coat. I do have a concern though about adhesion on it if it sets over 24 hours. The spec sheet I think I remember says it's a non-sanding primer which means I think it needs to be scuffed for the next coat if it goes past the 24 hr period. There may be a answer in just shooting a second coat of epoxy primer over it when the next stage of paint whether it's a sanding primer, seam sealer, filler or top coat is going to be applied. I think of it as a way to put the next coat on without needing to sand or scuff in all the little nooks and crannys so the next coat sticks real good. I've never had the desire to see if the top coats adhear well after it's cured a long time though, the later coats cost too much for me tp worry about whether they are going to peel or not, not counting the work to remove them. When I plan on putting filler over it I apply the filler before 12hours to try to get the best adhearance of the filler. I know you are trying to stop flashrust so this may be your only way to go but you might want to plan ahead on the interior areas where the next coat will only be a top coat and the nooks and crannys are hard to scuff.
You make like powdercoat but another approach on the aluminum panels is to bead blast them and shoot the ppg epoxy on them and then a top coat will stick really good. Also I'm not sure how the thin aluminum will be after it gets 400 degree powdercoat heat. You are making great strides, keep it up. |
| strawman |
 Aug 26 2010, 01:32 PM Aug 26 2010, 01:32 PM
Post
#160
|
|
Senior Member    Group: Members Posts: 891 Joined: 25-January 08 From: Los Osos, CA Member No.: 8,624 Region Association: Central California 
|
... The spec sheet I think I remember says it's a non-sanding primer which means I think it needs to be scuffed for the next coat if it goes past the 24 hr period... Yup, I planned on scuffing the epoxy primer before the final topcoat. But I'm trying to stop rust from its relentless march onward while the tub sits outside. I'll check to see if another coat of epoxy primer right before topcoat or buildup primer will suffice; I just bought 1.5 gallons of the stuff, so I should have enough for a quick/thin spray of buildup primer after final body work. I've got more smoothing than I anticipated prior to stripping off the paint and bondo... (IMG:style_emoticons/default/mad.gif) From what I've read, aluminum needs to be treated for flash "white rust" much sooner than steel -- like 10-15 minutes after scuffing/blasting. So I bought some Liquiguard PC AL Powder Coating Primer from Caswell to treat it after scuffing or bead blasting it. I'll do a sample powder coat on a leftover scrap piece to see if the aluminum warps. Thanks for the input... Geoff |
  |
2 User(s) are reading this topic (2 Guests and 0 Anonymous Users)
0 Members:

|
Lo-Fi Version | Time is now: 14th December 2025 - 05:06 AM |
Invision Power Board
v9.1.4 © 2025 IPS, Inc.


