|
|
|
Porsche, and the Porsche crest are registered trademarks of Dr. Ing. h.c. F. Porsche AG.
This site is not affiliated with Porsche in any way. Its only purpose is to provide an online forum for car enthusiasts. All other trademarks are property of their respective owners. |
|
|

  |

| rfuerst911sc |
 May 24 2008, 07:50 PM May 24 2008, 07:50 PM
Post
#1
|
|
Advanced Member  Group: Members Posts: 2,158 Joined: 4-May 06 From: Dahlonega , Georgia Member No.: 5,980 Region Association: South East States |
The update/conversion moved along today with the installation of a 19mm master cylinder and the replacement of the hard lines. Man am I sore (IMG:style_emoticons/default/sad.gif) Crawling around under the car and getting up and down about a thousand times wore me out, plus it was about 93 degrees out today (IMG:style_emoticons/default/mad.gif) Anyway the install of the master cylinder went as planned with no issues. Even the install of the reservoir lines was easy but I did lossen the clamp and lowered the reservoir to make it easier. I purchased a complete hard line kit off Ebay from a guy that imports nickel/copper lines from England. They're a little easier to bend than steel lines and supposedly won't rust. The install of the tunnel lines was easier than I thought and removing the shifter gained access to the clamp tabs that need to first be unbent and then bent back once the new lines are in. So the front lines are done and the tunnel lines are done so now on to the rear lines. Just thought I would share my days work (IMG:style_emoticons/default/beerchug.gif)
|
   |

 
|
| Allan |
May 24 2008, 07:55 PM
Post
#2
|
|
Teenerless Weenie Group: Members Posts: 8,373 Joined: 5-July 04 From: Western Mesopotamia Member No.: 2,304 Region Association: Southern California |
Nice way to spend the day.
Sounds better than I thought as far as the tunnel lines go. Pics? |
|
|
|
| watsonrx13 |
May 24 2008, 08:44 PM
Post
#3
|
|
Advanced Member Group: Members Posts: 2,735 Joined: 18-February 03 From: Plant City, FL Member No.: 312 Region Association: South East States |
Man, central FL is getting F*&*^ hot.... Glad you're able to continue to work on the car in this weather....
BTW (IMG:style_emoticons/default/thisthreadisworthlesswithoutpics.gif), ya gotta show progress... (IMG:style_emoticons/default/biggrin.gif) -- Rob |
|
|
|
| rfuerst911sc |
May 26 2008, 06:39 AM
Post
#4
|
|
Advanced Member Group: Members Posts: 2,158 Joined: 4-May 06 From: Dahlonega , Georgia Member No.: 5,980 Region Association: South East States |
QUOTE(watsonrx13 @ May 24 2008, 06:44 PM)  Man, central FL is getting F*&*^ hot.... Glad you're able to continue to work on the car in this weather.... BTW (IMG:style_emoticons/default/thisthreadisworthlesswithoutpics.gif), ya gotta show progress... (IMG:style_emoticons/default/biggrin.gif) -- Rob I'll try to get some pics today. I'm used to working in the heat but as I get older ( 50 now ) it is getting harder to deal with it. Plus I generally work in a one piece mechanics suit to stay cleaner but man I sweat like a pig (IMG:style_emoticons/default/blink.gif) I generally work until my vision blurs and I feel dizzy, that's my sign I've had enough (IMG:style_emoticons/default/biggrin.gif) Believe it or not the tunnel lines onlt took about 10 minutes to install once the shifter was pulled. (IMG:style_emoticons/default/bye1.gif) |
|
|
|
| FourBlades |
May 26 2008, 07:24 AM
Post
#5
|
|
From Wreck to Rockin Group: Members Posts: 2,056 Joined: 3-December 07 From: Brevard, FL Member No.: 8,414 Region Association: South East States |
I'd love to see some pictures because I need to do the same install soon. It is not much cooler over here in Melbourne either. I'd park my car in my living room for the summer if my wife wouldn't freak out about it. (IMG:style_emoticons/default/biggrin.gif) (IMG:style_emoticons/default/biggrin.gif) John |
|
|
|
| rfuerst911sc |
May 26 2008, 09:10 AM
Post
#6
|
|
Advanced Member Group: Members Posts: 2,158 Joined: 4-May 06 From: Dahlonega , Georgia Member No.: 5,980 Region Association: South East States |
I had a chance to take two pics of the drivers side front. You can see the master cylinder in the one pic and the other you can see the new line coming up to the rubber flex line. Also the 911 Boge strut with M caliper and 20mm vented rotor. And that's a 19mm front H&H sway bar. Also turbo tie rod ends and Elephant racing polybronze bushings. I really can't get a picture of the tunnel lines as all you can see is thru the access panels. Hope this helps. (IMG:style_emoticons/default/beerchug.gif)
Attached image(s) 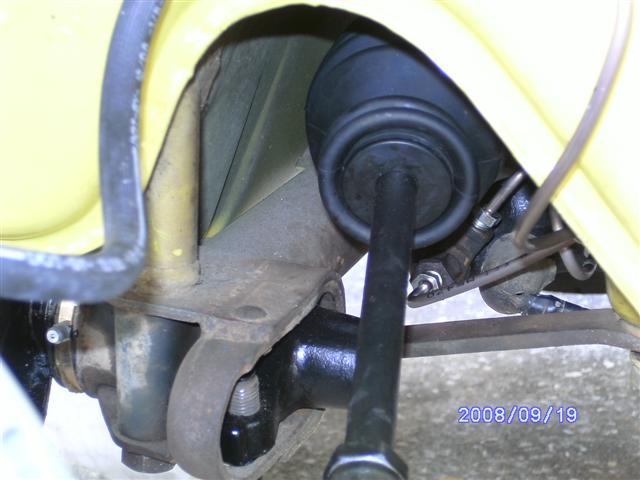 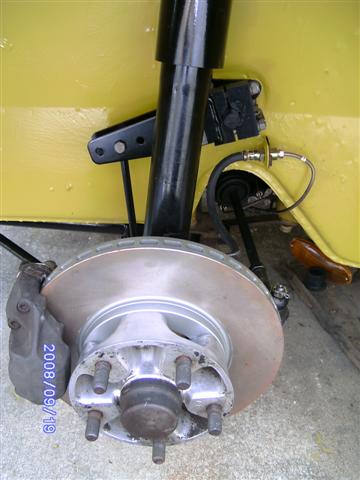
|
|
|
|
| So.Cal.914 |
May 26 2008, 09:22 AM
Post
#7
|
|
"...And it has a front trunk too." Group: Members Posts: 6,588 Joined: 15-February 04 From: Low Desert, CA./ Hills of N.J. Member No.: 1,658 Region Association: None |
QUOTE(rfuerst911sc @ May 24 2008, 06:50 PM) Even the install of the reservoir lines was easy but I did lossen the clamp and lowered the reservoir to make it easier. a very good idea, it would have made it easier come to think of it. The guys that come after you will appreciate the tip. (IMG:style_emoticons/default/smile.gif) |
|
|
|
| rfuerst911sc |
May 26 2008, 10:52 AM
Post
#8
|
|
Advanced Member Group: Members Posts: 2,158 Joined: 4-May 06 From: Dahlonega , Georgia Member No.: 5,980 Region Association: South East States |
QUOTE(So.Cal.914 @ May 26 2008, 07:22 AM) QUOTE(rfuerst911sc @ May 24 2008, 06:50 PM) Even the install of the reservoir lines was easy but I did lossen the clamp and lowered the reservoir to make it easier. a very good idea, it would have made it easier come to think of it. The guys that come after you will appreciate the tip. (IMG:style_emoticons/default/smile.gif) I probably would have struggled with that had I not seen that suggestion on this forum or one of the other forums ( can't remember ). By lowering the reservoir / lines you're able to really get some pushing torque on them to insert them into the rubber grommets. It took about 30 seconds to have both lines snapped in. I just hope when it's all buttoned up she doesn't leak anywhere (IMG:style_emoticons/default/blink.gif) |
|
|
|
|
1 User(s) are reading this topic (1 Guests and 0 Anonymous Users)
0 Members:

|
Lo-Fi Version | Time is now: 2nd April 2026 - 10:21 PM |
Invision Power Board
v9.1.4 © 2026 IPS, Inc.