|
|

|
Porsche, and the Porsche crest are registered trademarks of Dr. Ing. h.c. F. Porsche AG.
This site is not affiliated with Porsche in any way. Its only purpose is to provide an online forum for car enthusiasts. All other trademarks are property of their respective owners. |
|
|
  |
| fat73 |
 Oct 28 2008, 07:45 PM Oct 28 2008, 07:45 PM
Post
#241
|
|
W9R1   Group: Members Posts: 244 Joined: 7-May 05 From: tampa,fl Member No.: 4,043 Region Association: South East States |
That looks like it Ed, they make great stuff. Good to hear from you buddy! Dana, I'm honored to be one of the few that have actually had an opportunity to take a ride in your car. That was the inspiration for building mine right from the moment you scared the hell out of me in Las Vegas rush hour traffic nearly 3 years ago. Thank you for all the work and engineering you put in at Renegade that made the Subaru WRX conversion feasible and practical, inspiring those of us who want to modernize and improve on the performance of our 914s without having to think too hard, do a bunch of trial and error, or have the engineering skills of you and some of the other superstars on this forum (you know who you are...tony, scott, et al). By the way...I have my car garaged in Tennessee at the moment in my shop. I have a few things to do, like Carrera front suspension/brakes, new windshield, and yes....paint. I've got to decide what paint scheme to use to replace the old Martini style scheme ( ideas are welcome), but it's getting tired (30 years old) and has gotta be done. I just sold a really solid 72 roller (from Arizone) that I was gonna build, but have decided just to work on what I have. Maybe some day... I continue to be amazed how many incredibly talented people there are on this forum. I can't wait to see how this unique hot rod turns out. By the way all you die hard Porsche purists....Don't ever take a ride in one of these....You may find you will have some crow to eat. You'll want one too. Ed aka W9R1 |
| smdubovsky |
 Oct 28 2008, 09:19 PM Oct 28 2008, 09:19 PM
Post
#242
|
|
Member   Group: Members Posts: 331 Joined: 27-September 04 From: Silver Spring, MD Member No.: 2,837 Region Association: MidAtlantic Region |
... There is no reason to build that structure in the rear of the car. All the metal after the shock towers is pretty much hanging on for the ride. Its not about the shock towers. Its about having to support the tranny ear loads (calculate the downward vertical force when you drop the clutch on a ???lbft motor in 1st gear). It sees more force than the motor mounts and people have torn those loose. Most people run the rear tubes to the shock towers because thay ALSO run the cage tubes to the rear shock towers, thus tying the tranny into the cage. Its simply a convenient place to bring the tubes. |
| plymouth37 |
 Oct 28 2008, 09:50 PM Oct 28 2008, 09:50 PM
Post
#243
|
|
Senior Member    Group: Members Posts: 1,825 Joined: 24-May 05 From: Snoqualmie, WA Member No.: 4,138 Region Association: Pacific Northwest 
|
Well put, I used to have bars running from the cage to the towers when I was running a type IV but I had to remove them to get the WRX engine to fit. I just started prepping the rest of my cage this afternoon to weld in some new tubes that will clear the taller engine.
|
| Brett W |
 Oct 29 2008, 10:45 AM Oct 29 2008, 10:45 AM
Post
#244
|
|
Advanced Member     Group: Members Posts: 2,858 Joined: 17-September 03 From: huntsville, al Member No.: 1,169 Region Association: None 
|
I was under the impression he was just doing the tubes and not connecting it to a cage structure.
|
| plymouth37 |
 Oct 29 2008, 11:04 AM Oct 29 2008, 11:04 AM
Post
#245
|
|
Senior Member    Group: Members Posts: 1,825 Joined: 24-May 05 From: Snoqualmie, WA Member No.: 4,138 Region Association: Pacific Northwest 
|
I was under the impression he was just doing the tubes and not connecting it to a cage structure. Yeah I kind of mentioned that earlier but it was hidden between the pictures (I had a hard time finding it and I wrote the damn thing). Anyway I am wondering how I should do this, I have seen some people go straight forward to the cage from the towers which would work well for fore and aft stress but not very good for twisting forces. On the other hand I could put another X across the engine bay which would help to counteract twisting forces but only do ok with the fore and aft forces (and look cooler (IMG:style_emoticons/default/biggrin.gif) ). Any opinions? |
| r_towle |
 Oct 29 2008, 12:12 PM Oct 29 2008, 12:12 PM
Post
#246
|
|
Custom Member                Group: Members Posts: 24,705 Joined: 9-January 03 From: Taxachusetts Member No.: 124 Region Association: North East States 
|
there is little twisting force there that you need to deal with.
the passenger compartment firewall and the rear tubes you put in provide the shear strength for that area...the firewall doing most of the work... The twist is forward of that firewall...put the car on jack stands under each donut only...then rock the rear of the fenders and watch the door gaps and door alignment as you do this... the rear of the car...firewall back moves as a unit...the twist occurs forward of that...basically right where the longitudinal cracks.... drop a line down from the top of the windshield to the long...that is the stress point.. You will see what I mean if you wiggle the chassis while its on jack stands under the donuts. Rich |
| J P Stein |
 Oct 29 2008, 12:38 PM Oct 29 2008, 12:38 PM
Post
#247
|
|
Irrelevant old fart      Group: Members Posts: 8,797 Joined: 30-December 02 From: Vancouver, WA Member No.: 45 Region Association: None |
A couple things.
First, I am surprised at the weight savings. My eyeball job on the area told me that it would be minimal or a push. I've been wrong before. (IMG:style_emoticons/default/confused24.gif) Taking weight out of the rear of a 914 is a bitch....7 lbs is significant. Second. IMO you're doing it right....after you tie it into the roll hoop/cage. The hoop alone won't cut it for overall stiffness. A lot of opinions ventured on the necessity of bracing various parts of the 914 chassis. Those are about as good as mine....except my chassis is stiff....for a 914. Could it be better, sure, I've seen better...or what appears to be better. Nobody has supplied numbers, just speculation. I don't have numbers either but my butt dyno revealed a huge improvement when I tied the front & rear towers into the cage.....shoulda done it sooner. |
| byndbad914 |
 Oct 29 2008, 03:26 PM Oct 29 2008, 03:26 PM
Post
#248
|
|
shoehorn and some butter - it fits    Group: Members Posts: 1,547 Joined: 23-January 06 From: Broomfield, CO Member No.: 5,463 Region Association: None |
If I were me Dana I would hack that rinky-dink stock shock mount tower completely out and run a tube from the cage back near that area*, make a bend and head down to the trans mount and create a rear structure exactly like Paul (URY) did. Then I would weld a couple tabs on to mount a new, better shock with rod ends at each end. Get rid of that rubber crap in the stock shock (which puts a shock on your shock (IMG:style_emoticons/default/blink.gif) and I would rather have a hard interface so the shock can do its job).
* I say near the area because you would need to have the bar in that region to create the upper mount. Here is a shot of my shock assy and upper mount and what I am essentially describing. 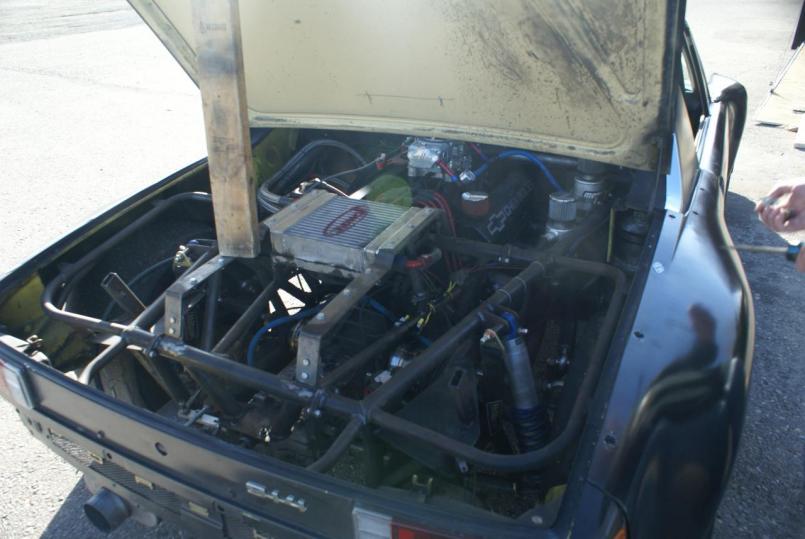 |
| jd74914 |
 Oct 29 2008, 03:36 PM Oct 29 2008, 03:36 PM
Post
#249
|
|
Its alive     Group: Members Posts: 4,841 Joined: 16-February 04 From: CT Member No.: 1,659 Region Association: North East States |
Dana, I agree with Tim. A friend and I were looking at pictures of the rear cutout this morning, and we were both thinking a mount like above would be the way to go. Its not too much more work, and really opens up a whole new world in relation to shock selection and mounting precision.
|
| J P Stein |
 Oct 29 2008, 03:51 PM Oct 29 2008, 03:51 PM
Post
#250
|
|
Irrelevant old fart      Group: Members Posts: 8,797 Joined: 30-December 02 From: Vancouver, WA Member No.: 45 Region Association: None |
Due to some computer problems, I can't load the pic of a car which I think was done better and got rid of the "rinky dink" shock tower mounting of the shocks.
I think "Bads" frame is stiffer than most all racing 914......by God, it should be. And, by God, he shoulda gotten rid of the rinky dink McPherson strut suspenders up front tho. (IMG:style_emoticons/default/biggrin.gif) |
| byndbad914 |
 Oct 29 2008, 04:15 PM Oct 29 2008, 04:15 PM
Post
#251
|
|
shoehorn and some butter - it fits    Group: Members Posts: 1,547 Joined: 23-January 06 From: Broomfield, CO Member No.: 5,463 Region Association: None |
I think "Bads" frame is stiffer than most all racing 914......by God, it should be. And, by God, he shoulda gotten rid of the rinky dink McPherson strut suspenders up front tho. (IMG:style_emoticons/default/biggrin.gif) hahaha - working on coming up with a dual A setup up front (and rear for that matter) but not this winter. Time and money... I had more time (future) than money when I did the front section, as well as already had the RSR struts and stuff in the "tub" car before. Converting a tube chassis car from strut mount to SLA is pretty easy once the money comes around again - just reroute a couple tubes. But after the latest transaxle purchase won't be for at least a year (IMG:style_emoticons/default/laugh.gif) I sorta wanted to do a power steering rack up front which I would want to build the SLA around (to remove bumpsteer i.e. set the front geom to specifically work with an aftermarket rack width). All that was adding up a bit quick at the time. There is limited room in the front to mount the rack, so since that is the limiter I want to have that piece first. |
| Brett W |
 Oct 30 2008, 10:42 AM Oct 30 2008, 10:42 AM
Post
#252
|
|
Advanced Member     Group: Members Posts: 2,858 Joined: 17-September 03 From: huntsville, al Member No.: 1,169 Region Association: None 
|
Yeah, since you are removing the rear trunk may as well go ahead and cut out everything including the fenderwells and just hang the back of the body off the tube chassis stuff. It would be lighter and you could make custom wheel wells in the trunk.
Plus you can use regular double eye shocks. I would come straight back from the fire wall to the shock towers with tubes, Cross the firewall underneath the the engine lid, right up against the fire wall. Weld it to the chassis in several places. Then build an Xbrace out of 1in or 1.25 in tubing for the engine compartment. Make it removable so you can get into the engine bay. |
| BKLA |
 Nov 18 2008, 11:19 AM Nov 18 2008, 11:19 AM
Post
#253
|
|
Really old member    Group: Members Posts: 1,253 Joined: 14-August 05 From: OR Member No.: 4,590 Region Association: Pacific Northwest 
|
(IMG:style_emoticons/default/popcorn[1].gif)
Update(s)????? Half a month is too long to wait! (IMG:style_emoticons/default/wink.gif) |
| plymouth37 |
 Nov 18 2008, 06:29 PM Nov 18 2008, 06:29 PM
Post
#254
|
|
Senior Member    Group: Members Posts: 1,825 Joined: 24-May 05 From: Snoqualmie, WA Member No.: 4,138 Region Association: Pacific Northwest 
|
(IMG:style_emoticons/default/popcorn[1].gif) Update(s)????? Half a month is too long to wait! (IMG:style_emoticons/default/wink.gif) (IMG:style_emoticons/default/biggrin.gif) Just flew in from out o' town, I have some friends coming into town tomorrow but should be able to make some progress on Monday. |
| plymouth37 |
 Nov 20 2008, 01:13 AM Nov 20 2008, 01:13 AM
Post
#255
|
|
Senior Member    Group: Members Posts: 1,825 Joined: 24-May 05 From: Snoqualmie, WA Member No.: 4,138 Region Association: Pacific Northwest 
|
Since I have removed my trunk floor I no longer need the turbo relocation kit, I figured it would be better to bring the turbo back up to its original position. Here is the turbo in its relocated position, notice the mangled oil lines, custom bracket, and intake extension.
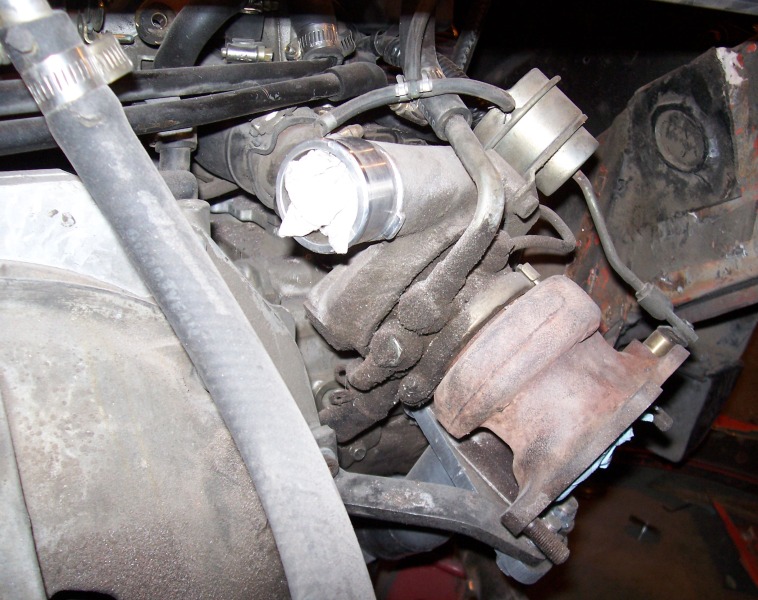 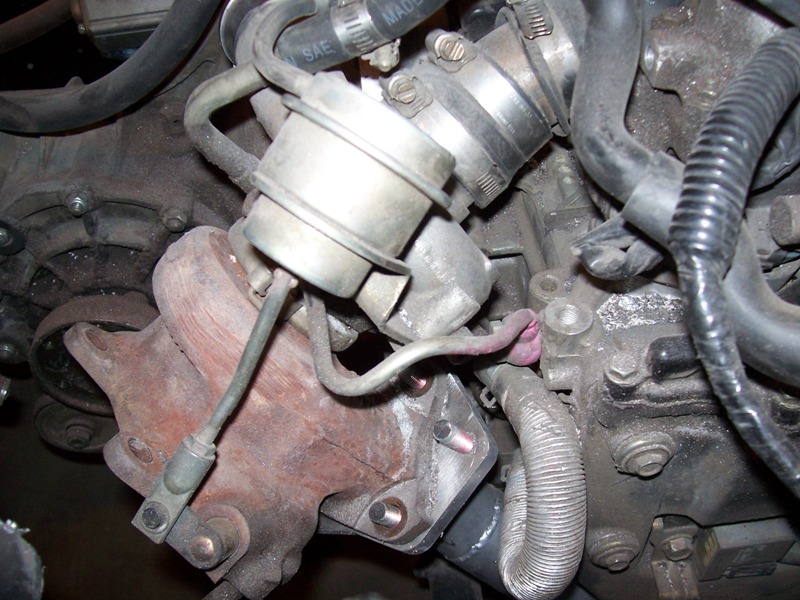 |
| plymouth37 |
 Nov 20 2008, 01:13 AM Nov 20 2008, 01:13 AM
Post
#256
|
|
Senior Member    Group: Members Posts: 1,825 Joined: 24-May 05 From: Snoqualmie, WA Member No.: 4,138 Region Association: Pacific Northwest 
|
I removed the turbo and found that my intake was cracked and that the oil and coolant lines running to the turbo were also damaged. I ordered new lines, mounts, and a high performance silicone intake. According to it's maker this intake will increase performance by 10HP but I have my doubts, it looks good though! Here it is compared to the restrictive stock unit.
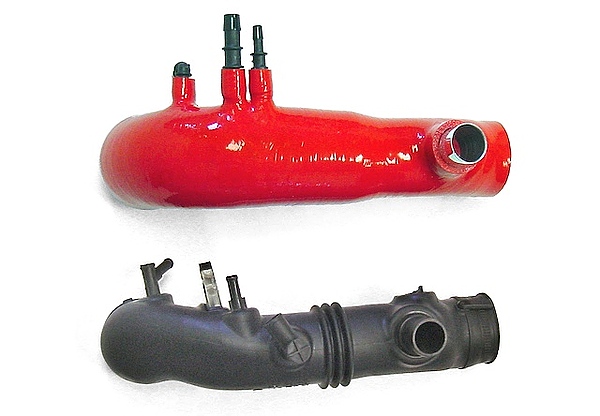 I installed everything and now my turbo is back where it belongs. And don't worry that missing nut is on order! 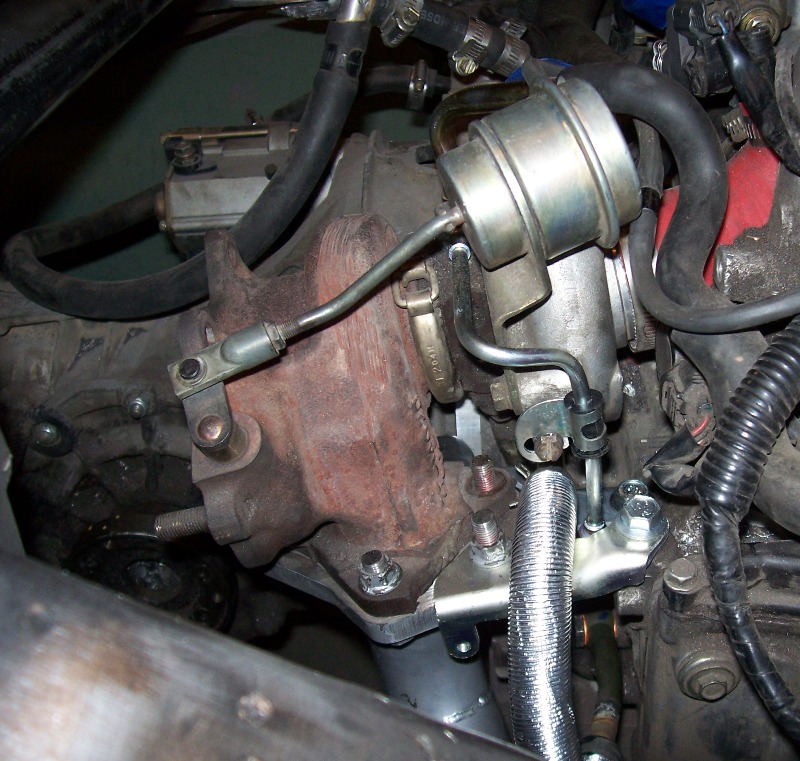 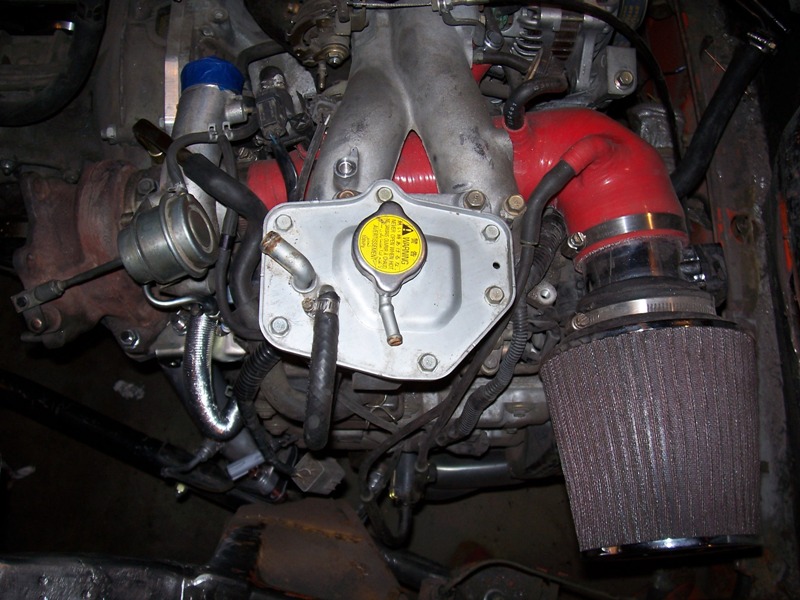 |
| PeeGreen 914 |
 Nov 20 2008, 01:24 AM Nov 20 2008, 01:24 AM
Post
#257
|
|
Just when you think you're done...wait, there is more..lol           Group: Members Posts: 10,219 Joined: 21-September 06 From: Seattle, WA... actually Everett Member No.: 6,884 Region Association: Pacific Northwest 
|
(IMG:style_emoticons/default/drooley.gif) I love this thread (IMG:style_emoticons/default/piratenanner.gif)
|
| plymouth37 |
 Nov 20 2008, 01:26 AM Nov 20 2008, 01:26 AM
Post
#258
|
|
Senior Member    Group: Members Posts: 1,825 Joined: 24-May 05 From: Snoqualmie, WA Member No.: 4,138 Region Association: Pacific Northwest 
|
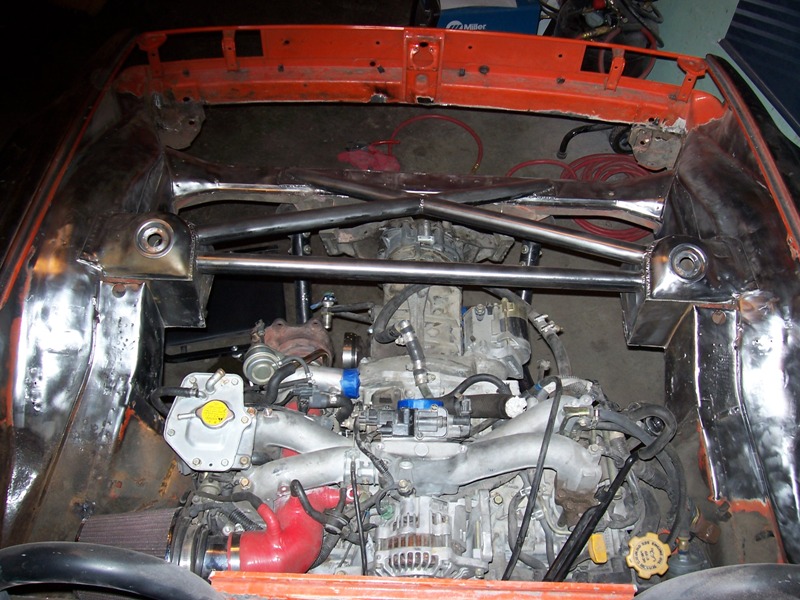
I also removed the remaining excess sheetmetal and cleaned up the frame rails. Next I am going to rebuild the area where the rails meet the towers and weld in the tubes that will tie the rear structure into the main cage.
 |
| wobbletop |
 Nov 20 2008, 11:48 AM Nov 20 2008, 11:48 AM
Post
#259
|
|
Member   Group: Members Posts: 382 Joined: 8-December 06 From: Ontario, Canada Member No.: 7,335 Region Association: Canada |
FYI... The newer Subies have a plastic coolant tank instead of the metal one. The top of the metal tank tends to corrode. I just replaced mine. I also did the silicon inlet hose. My race shop says they are beneficial. While I was there I also added the Hondata intake manifold gaskets. They reduce the temperature from the block going into the intake. Also, there is a coolant line going into the throttle body. You could remove that as well. I think it's only to prevent the throttle from sticking in (really) cold weather. People also remove the tumble generator valves (TGVs) between the intake manifold and the block to free up some airflow. These are some simple things to improve on the stock design. Just trying to be useful (IMG:style_emoticons/default/biggrin.gif). -Walter |
| plymouth37 |
 Nov 20 2008, 12:30 PM Nov 20 2008, 12:30 PM
Post
#260
|
|
Senior Member    Group: Members Posts: 1,825 Joined: 24-May 05 From: Snoqualmie, WA Member No.: 4,138 Region Association: Pacific Northwest 
|
FYI... The newer Subies have a plastic coolant tank instead of the metal one. The top of the metal tank tends to corrode. I just replaced mine. I also did the silicon inlet hose. My race shop says they are beneficial. While I was there I also added the Hondata intake manifold gaskets. They reduce the temperature from the block going into the intake. Also, there is a coolant line going into the throttle body. You could remove that as well. I think it's only to prevent the throttle from sticking in (really) cold weather. People also remove the tumble generator valves (TGVs) between the intake manifold and the block to free up some airflow. These are some simple things to improve on the stock design. Just trying to be useful (IMG:style_emoticons/default/biggrin.gif). -Walter Thanks for the advice (IMG:style_emoticons/default/beerchug.gif) I will have to take a look at the coolant tank in my '07 Legacy, it sounds like the plastic one may be a good replacement, I hadn't heard about the corrosion problem but after looking inside mine it does look pretty rough. I will also check out those gaskets, they sound like a good upgrade. Since this is a fair weather car I have already removed the throttle body heater and plan on removing the TGVs once I pull the engine from the car. After I pull the engine I am going to re-route alot of things like the coolant lines to make the engine look cleaner. |
  |
2 User(s) are reading this topic (2 Guests and 0 Anonymous Users)
0 Members:

|
Lo-Fi Version | Time is now: 12th April 2025 - 03:01 AM |
Invision Power Board
v9.1.4 © 2025 IPS, Inc.


