|
|
|
Porsche, and the Porsche crest are registered trademarks of Dr. Ing. h.c. F. Porsche AG.
This site is not affiliated with Porsche in any way. Its only purpose is to provide an online forum for car enthusiasts. All other trademarks are property of their respective owners. |
|
|

  |

| charliew |
 Feb 27 2011, 09:45 AM Feb 27 2011, 09:45 AM
Post
#121
|
|
Advanced Member  Group: Members Posts: 2,363 Joined: 31-July 07 From: Crawford, TX. Member No.: 7,958 |
I haven't tried this yet, not sure if I will need to but I do have a bubble on the edge of the seal strip on each fender. Wouldn't it be easier to just remove just the top of the fender and not distrub the lower part where the fender attaches. It really looks like the fender will be hard to put back on and seal up the way you have removed it. You probably have thought about it a lot and have it figgured out but it still looks like a hard spot to get to from under the fender and getting sealer in at the door jamb side looks even harder. I'm still thinking the only reason for the strip was to allow for a fender replacement without body work at the windshield post area. Maybe they learned from the karmen ghia. But it could be for flex also. I'm thinking I will just blast the seam out, clean it up, ospho it, seal it up with weld through primer then close it up with weld, especially the trunk channel and see if it cracks. The bottom of the welded area won't be sealed though. The only thing is if it does crack it will be way harder to fix it back stock.
You are doing so good so far I'm sure you have it under control. This thread is a really good reference thread. |
   |

 
|
| JRust |
Feb 27 2011, 12:44 PM
Post
#122
|
|
914 Guru Group: Members Posts: 6,316 Joined: 10-January 03 From: Albany Oregon Member No.: 129 Region Association: Pacific Northwest |
Looking good Dean! Now just get those flares on (IMG:style_emoticons/default/drooley.gif)
|
 |
|
| sawtooth |
Feb 28 2011, 10:06 AM
Post
#123
|
|
Member Group: Members Posts: 297 Joined: 25-June 08 From: Boise, ID Member No.: 9,211 Region Association: Intermountain Region |
QUOTE(charliew @ Feb 27 2011, 08:45 AM)  I haven't tried this yet, not sure if I will need to but I do have a bubble on the edge of the seal strip on each fender. Wouldn't it be easier to just remove just the top of the fender and not distrub the lower part where the fender attaches. It really looks like the fender will be hard to put back on and seal up the way you have removed it. You probably have thought about it a lot and have it figgured out but it still looks like a hard spot to get to from under the fender and getting sealer in at the door jamb side looks even harder. I'm still thinking the only reason for the strip was to allow for a fender replacement without body work at the windshield post area. Maybe they learned from the karmen ghia. But it could be for flex also. I'm thinking I will just blast the seam out, clean it up, ospho it, seal it up with weld through primer then close it up with weld, especially the trunk channel and see if it cracks. The bottom of the welded area won't be sealed though. The only thing is if it does crack it will be way harder to fix it back stock. You are doing so good so far I'm sure you have it under control. This thread is a really good reference thread. Hey Charlie, I decided to make one smaller visible cut and take the 1/2 section of fender for a few reasons: - The problem with just removing the top of the fender is the double layer in the top corner of the fender. If you come down the fender about 10" you'll clear the double layer. It'd be near impossible to weld the back side of the double layer when re-installing. - Steel flare will cover all but about 5" of the visible cut at the top - Cutting the jamb attachment stretch will be pretty straight forward to re-attach. There is good access from both sides to weld it back in. On the passenger side, it isn't nearly as bad, so I'm going to... - use a heat gun and saw blade to scrape out as much of the factory seam sealer as possible from the under side of the cowl/fender seam. There's no welds, just seam sealer for 99% of that seam. - ospho from the top of the seam letting it soak through the seam to the under side. - prime and 3m seam seal the bottom and top side - and finally paint. The cowl/fender seam will be left open with no rubber seal to match the trunk and door gap. This will allow it to dry out whenever it gets wet, with not much chance to trap any water. |
|
|
|
| charliew |
Feb 28 2011, 10:56 AM
Post
#124
|
|
Advanced Member Group: Members Posts: 2,363 Joined: 31-July 07 From: Crawford, TX. Member No.: 7,958 |
That sounds like a good plan to me. Except for the groove going into the trunk seal channel. I guess you will put a dam on the end of the groove up against the seal to stop water from getting under the seal. I read where someone actually takes the trunk seals out after washing the car to dry the channel out. He doesn't glue them in.
|
|
|
|
| sawtooth |
Feb 28 2011, 11:21 AM
Post
#125
|
|
Member Group: Members Posts: 297 Joined: 25-June 08 From: Boise, ID Member No.: 9,211 Region Association: Intermountain Region |
QUOTE(charliew @ Feb 28 2011, 09:56 AM) That sounds like a good plan to me. Except for the groove going into the trunk seal channel. I guess you will put a dam on the end of the groove up against the seal to stop water from getting under the seal. I read where someone actually takes the trunk seals out after washing the car to dry the channel out. He doesn't glue them in. Good point. I like the idea of not gluing in the trunk seal, may not even use one at all. It may keep water out of the trunk, but it's destroyed my channel in places. |
|
|
|
| sawtooth |
Mar 3 2011, 12:55 AM
Post
#126
|
|
Member Group: Members Posts: 297 Joined: 25-June 08 From: Boise, ID Member No.: 9,211 Region Association: Intermountain Region |
Got one flare on tonight. Since I'm a rookie at fab work, this was pretty fun to see a flare go on smoothly and fit nice.
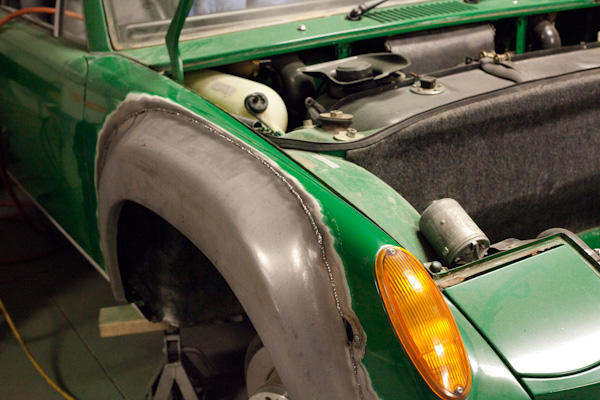 When lining up the bottom of the flare with the bottom of the fender, I was a little concerned about the top of the flare hitting the fender too high. But it turned out perfect, using Root_Werks method. Thanks Dan! 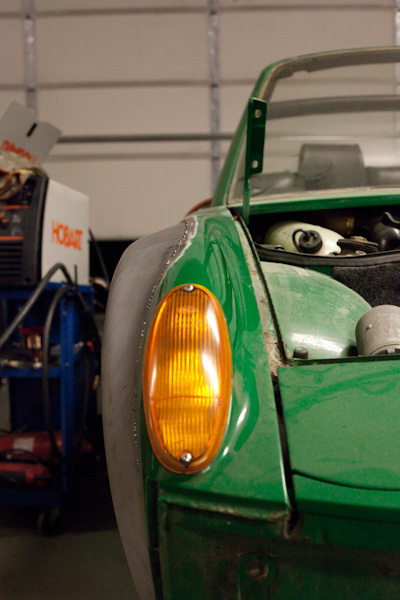 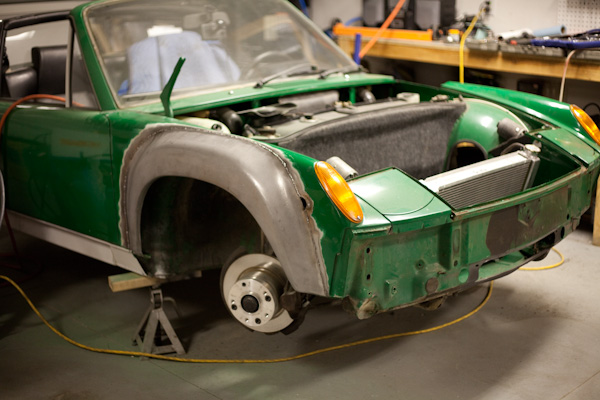 |
|
|
|
| pktzygt |
Mar 3 2011, 04:33 AM
Post
#127
|
|
Member Group: Members Posts: 328 Joined: 20-March 07 From: Chesapeake, VA Member No.: 7,611 Region Association: MidAtlantic Region |
Looks great, you're giving me the "if he can do it, I can do it" ideas yet again. My suby 914 isn't even running yet.
It really does look good though! |
|
|
|
| charliew |
Mar 3 2011, 08:16 AM
Post
#128
|
|
Advanced Member Group: Members Posts: 2,363 Joined: 31-July 07 From: Crawford, TX. Member No.: 7,958 |
I don't remember if you said whether you are using fg rockers. Did you check the front to rear positioning to the rocker or are you going to mod steel rockers to fit? And have you heard about easygrind filler wire? It's not cheap but really easy to grind and hammers a lot easier and doesn't seem to crack as easily when you hammer it.
|
|
|
|
| sawtooth |
Mar 3 2011, 10:50 AM
Post
#129
|
|
Member Group: Members Posts: 297 Joined: 25-June 08 From: Boise, ID Member No.: 9,211 Region Association: Intermountain Region |
QUOTE(charliew @ Mar 3 2011, 07:16 AM) I don't remember if you said whether you are using fg rockers. Did you check the front to rear positioning to the rocker or are you going to mod steel rockers to fit? And have you heard about easygrind filler wire? It's not cheap but really easy to grind and hammers a lot easier and doesn't seem to crack as easily when you hammer it. Yes, AA flared fg rockers. I did mount the rocker up first to get forward/rear position for the flare. Looks like it'll line up well. I've read some on the easygrind wire but haven't tried it. I'm using a high quality .023 and really like it so I'll probably stick with that. It grinds down pretty easy using a die grinder with cut-off wheel to knock down the high spots and then finish up with a flap disk. Easygrind does sound good, although I did see quite a few mixed reviews. I'll need to get some and compare for myself. |
|
|
|
| sawtooth |
Mar 3 2011, 11:01 AM
Post
#130
|
|
Member Group: Members Posts: 297 Joined: 25-June 08 From: Boise, ID Member No.: 9,211 Region Association: Intermountain Region |
QUOTE(pktzygt @ Mar 3 2011, 03:33 AM) Looks great, you're giving me the "if he can do it, I can do it" ideas yet again. My suby 914 isn't even running yet. It really does look good though! Thanks Sean. (IMG:style_emoticons/default/biggrin.gif) Yep, if I can do it I'm betting you can too, get'er done. |
|
|
|
| sawtooth |
Mar 30 2011, 12:07 AM
Post
#131
|
|
Member Group: Members Posts: 297 Joined: 25-June 08 From: Boise, ID Member No.: 9,211 Region Association: Intermountain Region |
Since I now live in an area where I'd get lynched if I blasted my car outside, I decided to go stealth and turn one side of my garage into a 914 sized blasting cabinet. Not sure I'll do that again (IMG:style_emoticons/default/blink.gif) but I sure love the results.
 I did have a few neighbors giving me the look as I backed my brother-in-law's diesel powered compressor into my driveway. (IMG:style_emoticons/default/happy11.gif) before... 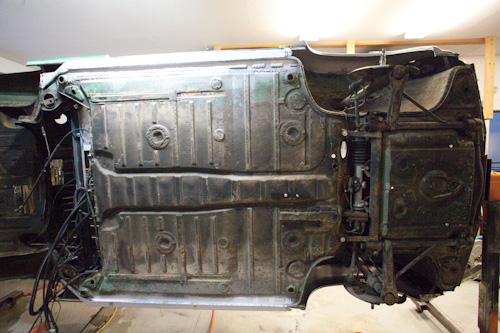 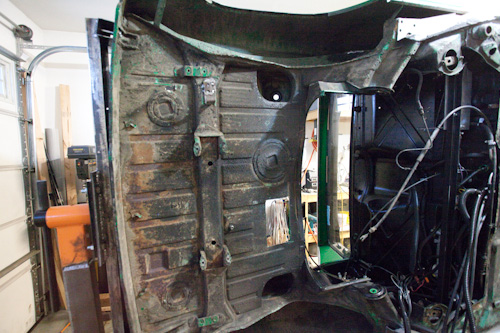 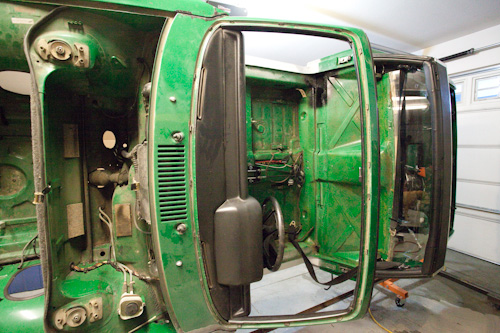 |
|
|
|
| sawtooth |
Mar 30 2011, 12:12 AM
Post
#132
|
|
Member Group: Members Posts: 297 Joined: 25-June 08 From: Boise, ID Member No.: 9,211 Region Association: Intermountain Region |
After finishing up with disassembly, and 1000lbs+ of sand later...
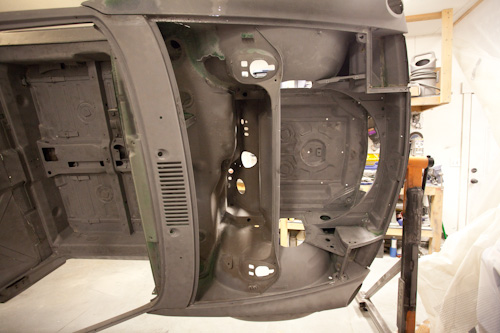 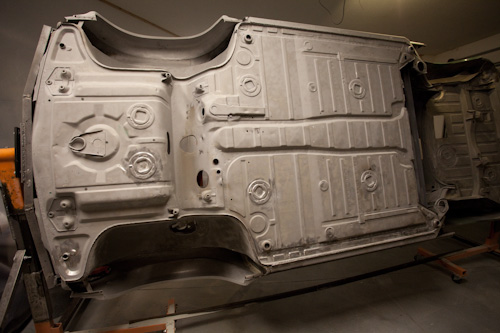 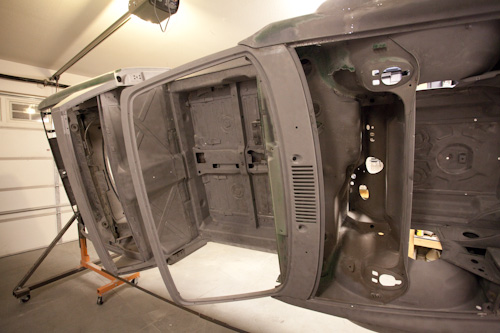 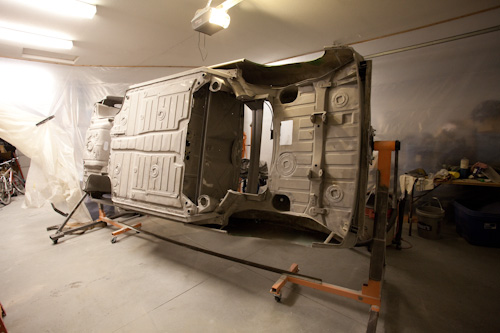 All of the seam sealer and foam in the wheel wells is gone, and most of the rest of the body too. There was enough surface rust under some of the seam sealer that I decided I wanted it all out of there. Heat gun and chisel worked best, then hit it again with sand. Glad that's over. Time to finish up the rust repair and rear flares. |
|
|
|
| sawtooth |
Mar 30 2011, 12:27 AM
Post
#133
|
|
Member Group: Members Posts: 297 Joined: 25-June 08 From: Boise, ID Member No.: 9,211 Region Association: Intermountain Region |
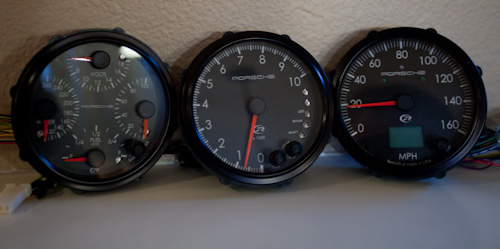
New gauges arrived today, can't wait until it's time to install these. My goal was to get updated gauges with as close to original look as possible. I'm really happy with the way they turned out. Electric programmable speedo which is driven by the stock suby vss.
 |
|
|
|
| JRust |
Mar 30 2011, 02:39 AM
Post
#134
|
|
914 Guru Group: Members Posts: 6,316 Joined: 10-January 03 From: Albany Oregon Member No.: 129 Region Association: Pacific Northwest |
Absolutely looking great! I'm amazed you took it down as far as you have. Going to be an absolute beauty once you get the new paint on there. I can't wait to see it (IMG:style_emoticons/default/drooley.gif)
|
|
|
|
| Quebecer |
Mar 30 2011, 03:39 AM
Post
#135
|
|
SuperDan Group: Members Posts: 100 Joined: 13-May 04 From: Lachenaie, Qc, CANADA Member No.: 2,063 |
I've been contemplating doing exactly the same thing (blasting booth in garage) for the longest time. I live in the suburbs, neither my neighbours, nor my wife would let me do it outside.
Did you leave the plastic loose on the bottom, did you cover the ceiling and the floor? Can you tell us (or show us) more about your booth? Keep up the good work! |
|
|
|
| pktzygt |
Mar 30 2011, 06:52 AM
Post
#136
|
|
Member Group: Members Posts: 328 Joined: 20-March 07 From: Chesapeake, VA Member No.: 7,611 Region Association: MidAtlantic Region |
What gauges are those? I'm going to end up using vdo vision series electronic gauges to stay with the stock'ish look and still have better functionality and low cost. I just haven't pulled the trigger on ordering them yet.
I want to switch over to red lighting which is easy with the vdo, but the speedometer is really expensive for anything over 120mph. |
|
|
|
| sawtooth |
Mar 30 2011, 10:17 AM
Post
#137
|
|
Member Group: Members Posts: 297 Joined: 25-June 08 From: Boise, ID Member No.: 9,211 Region Association: Intermountain Region |
QUOTE(Quebecer @ Mar 30 2011, 03:39 AM) I've been contemplating doing exactly the same thing (blasting booth in garage) for the longest time. I live in the suburbs, neither my neighbours, nor my wife would let me do it outside. Did you leave the plastic loose on the bottom, did you cover the ceiling and the floor? Can you tell us (or show us) more about your booth? Keep up the good work! I used a good quality duct tape to seal the barrier wall to the floor. I didn't cover the ceiling or the floor. The biggest obvious problem with this whole setup is the silica dust. It's toxic to breath so you need a good mask. And if your garage is attached to your house like mine is, you'd want to be really careful to keep the dust isolated to the booth. Honestly if I do another car again I'll be looking for an outdoor location to do it. I could go on about what I learned as far as equipment goes etc. happy to share. Just let me know if you want any more info. - Dean |
|
|
|
| dlee6204 |
Mar 30 2011, 10:23 AM
Post
#138
|
|
Howdy Group: Members Posts: 2,162 Joined: 30-April 06 From: Burnsville, NC Member No.: 5,956 |
Wow. Talk about progress... Keep up the good work! (IMG:style_emoticons/default/thumb3d.gif)
|
|
|
|
| sawtooth |
Mar 30 2011, 10:28 AM
Post
#139
|
|
Member Group: Members Posts: 297 Joined: 25-June 08 From: Boise, ID Member No.: 9,211 Region Association: Intermountain Region |
QUOTE(pktzygt @ Mar 30 2011, 06:52 AM) What gauges are those? I'm going to end up using vdo vision series electronic gauges to stay with the stock'ish look and still have better functionality and low cost. I just haven't pulled the trigger on ordering them yet. I want to switch over to red lighting which is easy with the vdo, but the speedometer is really expensive for anything over 120mph. The gauges are from speedhut.com, revolution series. I was going to go the vdo route, but decided to go with speedhut instead. I really like their options. You can configure the gauge to have exactly the look and features you want on their site. I like the porch logo, and the turn signals and hi-beam in the speedo, not exactly like oem in the tach, but still has the same feel and functionality. |
|
|
|
| charliew |
Mar 30 2011, 07:54 PM
Post
#140
|
|
Advanced Member Group: Members Posts: 2,363 Joined: 31-July 07 From: Crawford, TX. Member No.: 7,958 |
I would never attempt to try to do that in a confined space. I'm really surprised you're still breathing. How could you see? The only good thing is you could reuse the sand but I guess you survived and got it done.
|
|
|
|
|
1 User(s) are reading this topic (1 Guests and 0 Anonymous Users)
0 Members:

|
Lo-Fi Version | Time is now: 19th April 2025 - 05:45 PM |
Invision Power Board
v9.1.4 © 2025 IPS, Inc.